manuals.online logo
Brands
  1. Home
  2. •
  3. Brands
  4. •
  5. Helvex
  6. •
  7. Toilet
  8. •
  9. Helvex MG Ferry User manual

Helvex MG Ferry User manual

Requerimientos de
Instalación
Para el correcto funcionamiento de este
producto, la presión mínima es de (1,0
Kg/cm²) 14,22 PSI y la máxima es de
(6,0 kg/cm²) 85,3 PSI.
Relación
Altura Tinaco-Presión
2,5 m
3 m
60 m
PSI
Altura (h)
3,55
4,2
85,3
kg/cm²
0,25
0,3
6,0
Hola soy Fluxy, te
ayudaré a instalar
tu producto.
Installation Requirements
For the correct operation of this product,
the minimum pressure is (1,0 Kg/cm²)
14,22 PSI and the maximum is (6,0 kg/
cm²) 85,3 PSI.
Relation
Tub Height-Pressure
Hi I'm Fluxy, I'll
help you to install
your product.
Height (h)
INSTALLATION GUIDE
GUÍA DE INSTALACIÓN
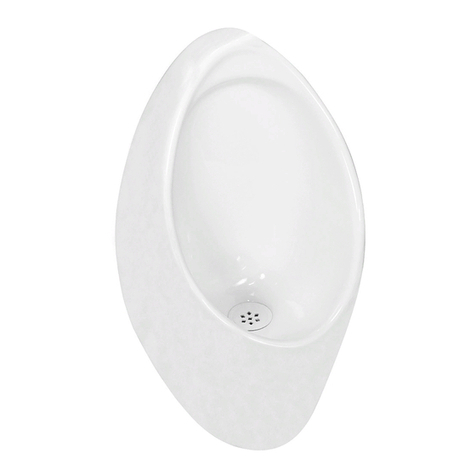
Mingitorio tipo Cascada
para Fluxómetro, 0.5l o 1l /
Waterfall Urinal Flushometer
type, 1l 0.5 l
Herramienta Requerida / Required Tools
adjustable
wrench
perico
level
nivel screwdriver
destornillador
drill bit
Ø 1/4 “
taladro con broca
de Ø 1/4” pencil
lápiz
6
MG Ferry (MG-1)
Para disminuir el riesgo de lesiones o daños a la propiedad, lea todas las instrucciones antes de instalar el
producto. Utilice gafas de seguridad. En obras de construcción, instalación, modificación, ampliación y
reparación deben cumplir con el reglamento de construcción y obras de su localidad. El producto ilustrado
puede sufrir cambios de aspecto como resultado de la mejora continua a la que está sujeto.
Agradecemos su elección por los productos HELVEX.
Estamos seguros de que su confiabilidad por el producto excederá sus más altas expectativas, cuya
funcionalidad, estética, durabilidad, respaldo integral y alta calidad le otorgarán plena satisfacción por años,
reflejando el compromiso con la calidad, innovación y el medio ambiente que forman parte de Helvex.
Thank you for choosing HELVEX products.
We are confident that the product reliability will exceed your maximum expectations. The functionality,
aesthetics, durability are at its highest quality! The comprehensive support will grant full satisfaction for years,
reflecting the commitment to quality, innovation and the environment as part Helvex.
To reduce the risk of injury or property damage, read all instructions before installing the product. Please
remember to use safety glasses. In construction, installation, alteration, extension and repair, the rules of
constructions must be applied. As result of continuous improvement, the illustration product may change in
appearance.
Cada metro de altura de
su producto a la base
del tinaco equivalen a
(0,1 kg/cm²) [1,42 PSI].
Every meter of height of
your product to the base
of the tube is equivalent
to (0,1 kg/cm²) [1,42
PSI].
Este instructivo aplica al producto en cualquier acabado. / This instructive applies
to the product in any finish.
cold
Fría
angle stops
válvula angular
Instalación General / General Installation
1Cierre el suministro de agua. / Close the water supply.
Ubique y cierre las válvulas de suministro de agua.
Locate and close the water supply valve.
[email protected]
Original Spare Parts:
Consultancy and Technical
01(55)53339431
01800 909 2020 01 (55) 53 33 94 00
Refacciones Originales:
Asesoría y Servicio Técnico:
Ext. 5068, 5815 y 5913
Service:
53 33 94 21
01 800 890 0594
[email protected]
2
Instalación General / General Installation
3
Instalación General / General Installation
5
Ubique los centros de las ranuras y
marque con un punto de golpe. / Locate
the centers of the slots and mark with one hit
point.
El tubo debe estar
rígido y fijo a la
pared. /The tube
should be rigid and
fixed to the wall.
*48 cm
*81,5 cm
*1 cm
*48 cm
*27 cm
*tubería del
desagüe ø2” - 11 - ½ NPT
* tubing
drain ø 2 "- 11 - ½ NPT
NPT
Nivel de piso terminado
Finished floor level
*Medidas Recomendadas
* Recommended Measures
ancla
anchor
marca de ranura del ancla
Anchor brand slot
alimentación para fluxómetro
supply for flowmeter
*13,5 cm
90°
Marque los centros de las ranuras, colocando las anclas, a las distancias recomendadas.
/ Mark the centers of the slots, placing the anchors, to the recommended distances.
Barrene las marcas con broca de ø¼”
para concreto (no incluida). / Drill with drill
marks ø ¼ "concrete (not included).
punto de golpe
about to blow
desagüe
drain
desagüe
4
Inserte los taquetes en los barrenos. /
Insert the anchors into the holes.
desagüe
drain
taquetes
anchors
6Coloque las anclas y enrosque las pijas. /
Place the anchors and screw the lags.
ancla
anchors
ancla
anchors
pija
pija
desagüe
drain
Rosque la brida (incluida) al tubo de
desagüe a tope del acabado final de
la pared. / Thread the flange
(included) to the drainage pipe to
finish top of the wall.
7
1 cm MAX
brida (incluida)
flange (included)
desagüe
drain
2
3
8 9
Nivele la brida (incluida). / Level the
bracket (included). Presente el mingitorio en las anclas. / Present the urinal in the anchors.
/ Drain Installation
Instalación General / General Installation
10 Desmonte el mingitorio de las anclas. / Remove the urinal
anchors.
11
Instalación General / General Installation
Retiren las anclas. / Withdraw the anchors. Barrene las marcas con broca de ø¼”
para concreto (no incluida). / Drill with
drill marks ø ¼ "concrete (not included).
1312
Las ranuras de fijación del mingitorio
coincidir con los barrenos de la brida. / The
urinal attachment slots must
match the holes in the flange.
nivel
level
brida (incluida)
flange (included)
ancla
anchors
mingitorio
urinal
ancla
anchors
Si las ranuras de fijación SÍ coincidieron con los barrenos de la brida,
continúe con el siguiente paso. Si NO coincidieron proceda con el ajuste
de instalación (ver pag. 8). / If the securing slots YES coincided with the
holes in the flange,continue to the next step. If NOT agreed to proceed with
the adjustmentinstallation (see p. 8).
mingitorio
urinal
ancla
anchors
ancla
anchors
Marque los barrenos. / Mark the holes.
desagüe
drain
ancla
anchors
ancla
anchors
desagüe
drain
ancla
anchors
pija
prick
ancla
anchors
Ubique los centros de los barrenos y
marque con un punto de golpe. / Locate
the hole centers and mark with one hit
point.
punto de
golpe
point
blow
desagüe
drain
14
desagüe
drain
4
No apriete con demasiada
fuerza para evitar daños a la
cerámica. / Do not press too
hard to prevent damage to the
ceramic.
17
15 Inserte los taquetes en los barrenos. /
Insert the anchors into the holes.
/ Drain Installation
Instalación General / General Installation
18 Fije el mingitorio con los tornillos (incluidos)y rondanas
(incluidas) a tope. / Set the urinal with screws (included) and
washers (included) to stop.
ancla
anchors
desagüe
drain
desagüe
drain
taquetes
anchors
16 Coloque las anclas y rosque las pijas. /
Roque Place anchors and the lags.
desagüe
drain
pijas
prick
ancla
anchors
Monte el mingitorio en las anclas. /
Mount the urinal in the anchors.
mingitorio
urinal
ancla
anchors
ancla
anchors
Ajuste de Instalación / Installation Adjustment
Distancia aproximada de desplazamiento.
Displacement distance of approximately.
1. Mida la distancia aproximada entre los centros de las ranuras y el
centro del barreno de la brida. / 1. Measure the approximate distance
between the centers of the slots and center hole of the flange.
Si las ranuras de fijación NO coincidieron con los barrenos de la brida, haga
lo siguiente:
If the securing slots NO coincided with the holes in the flange, thenfollowing:
Ajuste de Instalación / Installation Adjustment
ancla
anchors
mingitorio
urinal
2. Desmonte el mingitorio. / Remove the urinal 3. Afloje las pijas. / Loosen the lags.
ancla
anchors
ancla
anchors
3. Recorra las anclas a la distancia
previamente medida, ya sea arriba o abajo. /
Walk the anchors to the previously measured
distance, either up or down.
ancla
anchors
ancla
anchors
desagüe
drain
Las ranuras de fijación del mingitorio
coincidir con los barrenos de la brida. / The
urinal attachment slots must
ancla
anchors
mingitorio
urinal
ancla
anchors
/ Drain Installation
Instalación del Fluxómetro (no incluido) / Installation of the Flushvalve (Not Included)
5
4. Fije nuevamente las anclas. / Reattach
anchors.
desagüe
drain
ancla
anchors
ancla
anchors
5. Monte el mingitorio en las anclas, confirmando que los barrenos de la brida coincidan con las
ranuras del mingitorio y continúe con los pasos 8 al 16 de Instalación General. / Mount the urinal in
the anchors, confirming that the holes in the flange slots match urinal and continue with steps 8 to 16 General
Installation.
Instale su fluxómetro de descarga de 0,5 l marca Helvex (no incluido), de acuerdo al siguiente diagrama. / Install the flush valve discharge Helvex
0.5L (not included), according to the following diagram.
Puede instalar cualquier tipo
de Fluxómetro de descarga
de 0.5l marca Helvex.
You can install any type
discharge Flushometer
Helvex 0.5l.
*24 cm
(9,4”)
*129,5 cm
(509,8”)
*13 cm
(5,1”)
N.P.T.
Nivel de Piso Terminado
Finished Floor Level
fluxómetro (no incluido)
flushvalve (not included)
6,5 cm
(2,3”)
*Medidas Recomendadas
* Recommended Measures
Ajuste de Instalación / Installation Adjustment
HELVEX, S. A. DE C.V. Calzada Coltongo 293, Col. Industrial Vallejo 02300 Del. Azcapotzalco, México, D.F. Tel. (55) 53-33-94-00.
Es muy importante seguir las siguientes instrucciones para conservar los
acabados de los productos HELVEX, con brillo y en perfecto estado:
1. Utilice únicamente agua y un paño limpio.
2. No utilice fibras, polvos, abrasivos, ni productos químicos.
3. No utilice objetos punzo-cortantes para limpiar los acabados.
4. Se recomienda realizar la limpieza de su producto diariamente.
Nota: Vea nuestros tips en la pag. www.helvex.com.mx
It is very important to follow the instructions below to preserve HELVEX products
finishes, shiny and in perfect condition:
1. Use only water and a clean cloth.
2. Do not use fibers, powders, abrasives, or chemicals.
3. Do not use sharp objects to clean the finish.
4. It is recommended to clean your product daily.
Note: See our tips on: www.helvex.com.mx
Recomendaciones de Limpieza / Cleaning Recommendations
Posibles Causas y Soluciones / Possible Causes and Solutions
1
Problema / Problem Causa / Cause Solución / Solution
La tubería de alimentación está obstruída. / The supply
line is obstructed.
Retire el émbolo de su fluxómetro , y abra la llave de retención
dejando correr el agua. / Remove the plunger from the flush
valve and open the stop letting the water run
Presión por debajo de la recomendada. / Pressure below
the recommended.
Verifique los requerimientos de operación, (ver Página 1). /
Check operating requirements, (see Page 1).
Utilice una bomba sanitaria para destapar. / Use a sanitary
pump to unclog.
Utilice una sonda sanitaria para destapar. /Use a water probe
to uncover.
Hay fuga de agua en las
conexiones. / Water
leaks at connections.
Las conexiones están flojas. / Loose connections. Verifique que las conexiones estén apretadas firmemente. /
Verify that the connections are firmly tightened.
El volúmen de la descarga
es insuficiente para la
limpieza del mingitorio.
/ The discharge volume
is insufficient to clean the
urinal.
No se va el volúmen de
agua por el desagüe. / No
volume of water goes
down the drain.
La tubería del desagüe está obstruída. / The drain pipe
is obstructed.
In Guadalajara:
Contact:
Enter our free
training courses.
In Monterrey:
En la Ciudad de México:
In Mexico City:
En Monterrey:
En Guadalajara:
01 55 53 33 94 00
Ext. 5804, 5805 y 5806 (0133) 36 19 01 13
Comunícate:
Participa en nuestros
cursos gratuitos
de capacitación.
(0181) 83 33 57 67
(0181) 83 33 61 78

This manual suits for next models

1

Other Helvex Toilet manuals

Helvex WC 2.5 User manual

Helvex

Helvex WC 2.5 User manual

Helvex WC AUSTRAL 2P W User manual

Helvex

Helvex WC AUSTRAL 2P W User manual

Helvex MG-MOJAVE User manual

Helvex

Helvex MG-MOJAVE User manual

Helvex MG GOBI TDS User manual

Helvex

Helvex MG GOBI TDS User manual

Helvex WC MURANO User manual

Helvex

Helvex WC MURANO User manual

Helvex WC DRAKAR2 User manual

Helvex

Helvex WC DRAKAR2 User manual

Helvex WLU GOBI TDS User manual

Helvex

Helvex WLU GOBI TDS User manual

Helvex WC MIURA 16 TCC User manual

Helvex

Helvex WC MIURA 16 TCC User manual

Helvex WC MIURA User manual

Helvex

Helvex WC MIURA User manual

Helvex WC BOLMEN User manual

Helvex

Helvex WC BOLMEN User manual

Helvex WC AUSTRAL P User manual

Helvex

Helvex WC AUSTRAL P User manual

Helvex AT-4 User manual

Helvex

Helvex AT-4 User manual

Helvex UMG GOBI TDS User manual

Helvex

Helvex UMG GOBI TDS User manual

Helvex WC OPTION User manual

Helvex

Helvex WC OPTION User manual

Helvex ATM User manual

Helvex

Helvex ATM User manual

Helvex OP RIVOLI PLUS User manual

Helvex

Helvex OP RIVOLI PLUS User manual

Helvex WC MIURA16 User manual

Helvex

Helvex WC MIURA16 User manual

Helvex AT-5 User manual

Helvex

Helvex AT-5 User manual

Helvex WC AUSTRAL User manual

Helvex

Helvex WC AUSTRAL User manual

Helvex WC MURANO 2P User manual

Helvex

Helvex WC MURANO 2P User manual

Helvex AF-1 User manual

Helvex

Helvex AF-1 User manual

Helvex WC Bolmen User manual

Helvex

Helvex WC Bolmen User manual

Helvex WC AUSTRAL L 2P User manual

Helvex

Helvex WC AUSTRAL L 2P User manual

Helvex WC-OPTION-AT2 User manual

Helvex

Helvex WC-OPTION-AT2 User manual

Popular Toilet manuals by other brands

Delta Lilah C43902-WH-RSL Installation

Delta

Delta Lilah C43902-WH-RSL Installation

bioBidet BB-400 Installation manual and operating instructions

bioBidet

bioBidet BB-400 Installation manual and operating instructions

Toto UT105U installation manual

Toto

Toto UT105U installation manual

Speakman T-5001 installation instructions

Speakman

Speakman T-5001 installation instructions

Roca IN-WASH INSIGNIA A803104001 manual

Roca

Roca IN-WASH INSIGNIA A803104001 manual

Roca IN-WASH INSPIRA manual

Roca

Roca IN-WASH INSPIRA manual

SmartBidet SB-2000 user manual

SmartBidet

SmartBidet SB-2000 user manual

PolyJohn PJP4 Series Product instructions

PolyJohn

PolyJohn PJP4 Series Product instructions

Toto CWT426CMFG installation guide

Toto

Toto CWT426CMFG installation guide

BEMIS CLICK & CLEAN CLASSIC ABNBCDBL Installation instruction

BEMIS

BEMIS CLICK & CLEAN CLASSIC ABNBCDBL Installation instruction

Geberit IDO PORSGRUND GLOW 91570 Operating and maintenance instruction

Geberit

Geberit IDO PORSGRUND GLOW 91570 Operating and maintenance instruction

Gordon Ellis WALTON COMMODE 6288 manual

Gordon Ellis

Gordon Ellis WALTON COMMODE 6288 manual

Raritan 2500RFK manual

Raritan

Raritan 2500RFK manual

Kohler K-77780KR-0 Homeowner's guide

Kohler

Kohler K-77780KR-0 Homeowner's guide

Toto washlet installation guide

Toto

Toto washlet installation guide

Toto NEOREST 750H instruction manual

Toto

Toto NEOREST 750H instruction manual

Kohler C3 K-4107KR installation guide

Kohler

Kohler C3 K-4107KR installation guide

ELLAI MT-807 Quick reference guide

ELLAI

ELLAI MT-807 Quick reference guide

manuals.online logo
manuals.online logoBrands
  • About & Mission
  • Contact us
  • Privacy Policy
  • Terms and Conditions

Copyright 2025 Manuals.Online. All Rights Reserved.