manuals.online logo
Brands
  1. Home
  2. •
  3. Brands
  4. •
  5. Hess
  6. •
  7. Lantern
  8. •
  9. Hess NOVARA ML User manual

Hess NOVARA ML User manual

Other Hess Lantern manuals

Hess BURGOS User manual

Hess

Hess BURGOS User manual

Hess CENTO A User manual

Hess

Hess CENTO A User manual

Hess Novara OV User manual

Hess

Hess Novara OV User manual

Hess AVILA User manual

Hess

Hess AVILA User manual

Hess CAMPO User manual

Hess

Hess CAMPO User manual

Hess LEDIA GL A Series User manual

Hess

Hess LEDIA GL A Series User manual

Hess PALERMO G220 1,5T User manual

Hess

Hess PALERMO G220 1,5T User manual

Hess NOVARA L User manual

Hess

Hess NOVARA L User manual

Hess REVARA L600 User manual

Hess

Hess REVARA L600 User manual

Hess Varese User manual

Hess

Hess Varese User manual

Popular Lantern manuals by other brands

DS Produkte TRF18P0752-1 instructions

DS Produkte

DS Produkte TRF18P0752-1 instructions

Stahl ECOLUX 6610 Series operating instructions

Stahl

Stahl ECOLUX 6610 Series operating instructions

SNOWJOE SUNJOE 24V-LGT500-CT Operator's manual

SNOWJOE

SNOWJOE SUNJOE 24V-LGT500-CT Operator's manual

PRG VARI LITE VL5 Service manual

PRG

PRG VARI LITE VL5 Service manual

Raytec VARIO2 series installation guide

Raytec

Raytec VARIO2 series installation guide

ENSA LEDBT18WS2 installation instructions

ENSA

ENSA LEDBT18WS2 installation instructions

LUG OFFICE LB LED N/T Installation instruction

LUG

LUG OFFICE LB LED N/T Installation instruction

Draper RLEDL19/B instructions

Draper

Draper RLEDL19/B instructions

Green Lighting TRI-SENSOR GL4612LU Assembly & fitting instructions

Green Lighting

Green Lighting TRI-SENSOR GL4612LU Assembly & fitting instructions

Panasonic EY3741B57 operating instructions

Panasonic

Panasonic EY3741B57 operating instructions

Clas Ohlson LCC8T instruction manual

Clas Ohlson

Clas Ohlson LCC8T instruction manual

Coolon WDN-140 manual

Coolon

Coolon WDN-140 manual

shada 1000436 instruction manual

shada

shada 1000436 instruction manual

BEGA 84 036 Instructions for use

BEGA

BEGA 84 036 Instructions for use

BEGA 33 596 Instructions for use

BEGA

BEGA 33 596 Instructions for use

Dale Tiffany GT701162 Assembly instructions

Dale Tiffany

Dale Tiffany GT701162 Assembly instructions

Wagan Brite Nite Pop-Up USB Lantern user manual

Wagan

Wagan Brite Nite Pop-Up USB Lantern user manual

Eaton Crouse-Hinds Pauluhn DLLA M2 Series Installation & maintenance information

Eaton

Eaton Crouse-Hinds Pauluhn DLLA M2 Series Installation & maintenance information

manuals.online logo
manuals.online logoBrands
  • About & Mission
  • Contact us
  • Privacy Policy
  • Terms and Conditions

Copyright 2025 Manuals.Online. All Rights Reserved.

1
Gebrauchsanleitung
Installation and Operating Instructions
Notice de montage et d´installation
Manual de instrucciones
Istruzioni d’uso
2017/03/A
N O V A R A M L
10
2
Hess Licht + Form non risponde in alcun modo
di danni causati da un impiego non corretto.
Il montaggio va effettuato solo da personale
esperto. FI pali di altri costruttori devono esse-
re omologati secondo DIN EN 40.
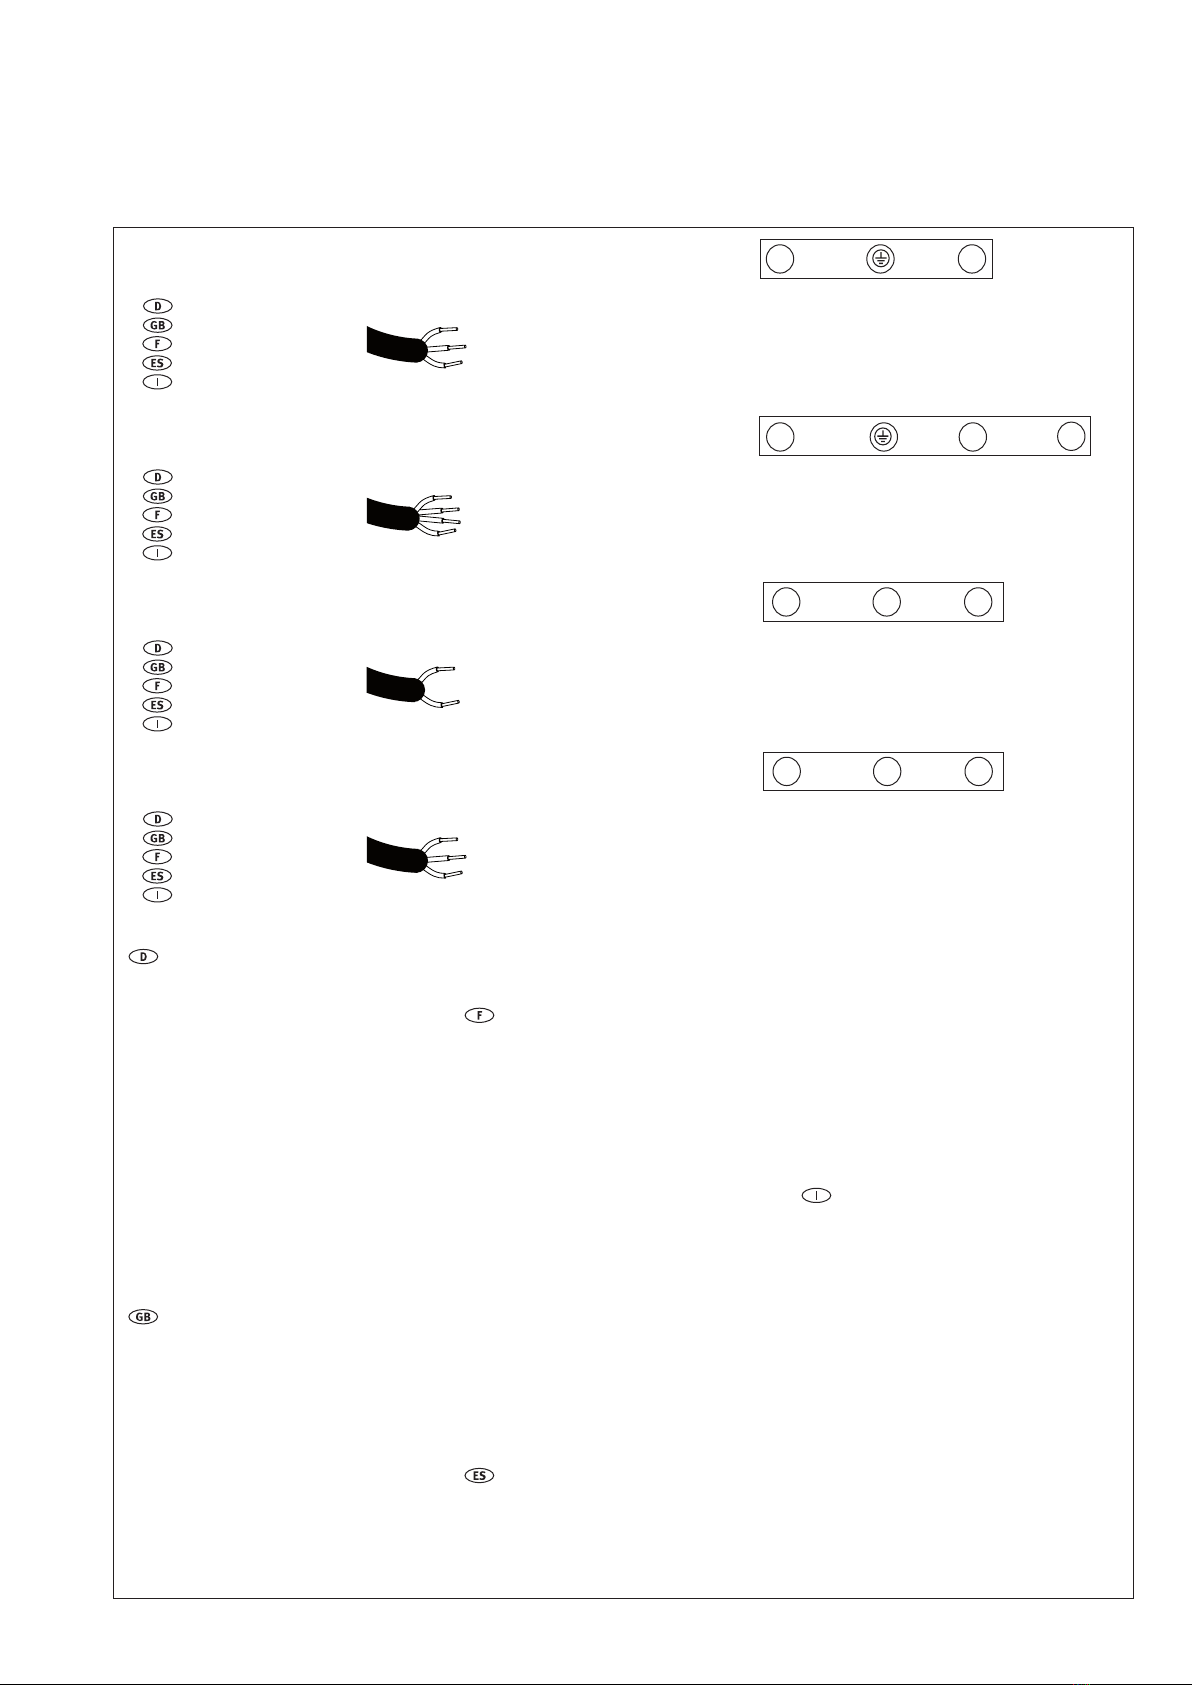
Leuchten mit diesem Zeichen sind
für den Betrieb mit Lampen mit externem
Zündgerät eingerichtet (HSE-E 50W und HSE-
E 70 W). Diese dürfen nicht mit Lampen mit
internem Zündgerät betrieben werden.
Luminaires with this marking are only
for operation with external ignitors (HSE-E
50 W and HSE-E 70 W). Operation of these
luminaires with internal ingitors is prohib-
ited.
Les luminaires portant ce symbole
sont conçus pour le fonctionnement avec
des lampes munies d’un amorceur externe
(HSE-E 50 W et HSE-E 70 W). Attention : Ces
luminaires ne sont pas conçus pour le fonc-
tionnement avec des lampes munies d’un
amorceur interne.
Las luminarias con este indicativo
están preparadas para ser usadas con un
cebador externo (HSE-E 50W y HSE-E 70 W).
Dichas luminarias no deben utilizarse con
lámparas con cebador interno.
Gli apparecchi provvisti di questo
simbolo sono equipaggiati per l’impie-
go con lampade provviste di accenditore
esterno(HSE-E 50W e HSE-E 70 W). Questi
apparecchi non vanno utilizzati con lampade
provviste di accenditore interno.
Leuchten, geeignet zur Montage auf
normal entflammbaren Flächen.
Luminaires suitable for mounting on
normally combustible surfaces.
Luminaires pouvant être montés sur des
surfaces à inflammabilité normale.
Luminarias con el símbolo F, son adecua-
das para el montaje sobre superficies inflama-
bles.
Apparecchi idonei al montaggio superfi-
ci normalmente infiammabili.
Montage- und Wartungsarbeiten sind
nur mit Originalteilen durchzuführen. Für die
Installation und den Betrieb sind die nati-
onalen und internationalen Vorschriften zu
beachten. Werden nachträglich Änderungen
an Leuchten, Ausleger oder Masten vorge-
nommen, so gilt derjenige als Hersteller,
der diese Änderungen vornimmt. Hess
Licht + Form übernimmt keine Haftung für
Schäden, die durch unsachgemäßen Einsatz
entstehen. Montage nur durch Fachpersonal.
Fremdmasten müssen gemäß DIN EN 40 zerti-
fiziert sein.
Only use original parts for maintenance
or in the installation of this luminaire. National
and international regulations and laws apply
to the installation and operation of this light-
ing fixture. If modifications are made to the
luminaire, bracket arm or pole, the person
who made the modifications shall be consid-
ered the manufacturer thereafter. Hess Licht +
Form does not accept the liability for damages
occurring through improper actions. Only
qualified persons are permitted to install and
assemble products obtained from Hess Licht
+ Form. All poles provided by others must be
certified in compliance with DIN EN 40.
Tous travaux de montage et d‘entretien
ne doivent être effectués qu‘avec des pièces
d’origine. Observez les consignes de sécurité
électriques nationales et internationales lors
de l’installation et lors du fonctionnement. En
cas de modifications ultérieurement apportées
aux luminaires, aux consoles ou aux mâts, la
personne responsable de ces modifications
est considérée comme le fabricant. Hess Licht
+ Form n’assume aucune responsabilité pour
les dommages résultant d’une utilisation non
conforme. Le montage ne doit être effectué
que par des spécialistes. Les mâts provenant
de tiers doivent être certifiés selon DIN EN 40.
Utilizar exclusivamente piezas origi-
nales para trabajos de montaje y manteni-
miento. Durante la instalación y el funcio-
namiento deben observarse las normativas
nacionales e internacionales aplicables. En
caso de modificaciones ulteriores en lumina-
rias/postes, se considerará como fabricante
quienquiera que haya efectuado dichas modi-
ficaciones. Hess Licht + Form declina cualquier
responsabilidad sobre daños por uso indebi-
do. Montaje únicamente por personal técnico
cualificado. Los postes ajenos a Hess deben
estar homologados según DIN EN 40.
Per gli interventi di montaggio e di
manutenzione vanno utilizzati esclusiva-
mente pezzi originali. Per l’installazione e il
funzionamento attenersi alle norme nazionali
e internazionali. Se in un secondo tempo ven-
gono apportate modifiche agli apparecchi, agli
sbracci o ai pali, viene considerato costruttore
chi ha effettuato le modifiche.
!
Wichtige Hinweise
Important Information
Consignes importantes
Observaciones importantes
Indicazioni importanti
m
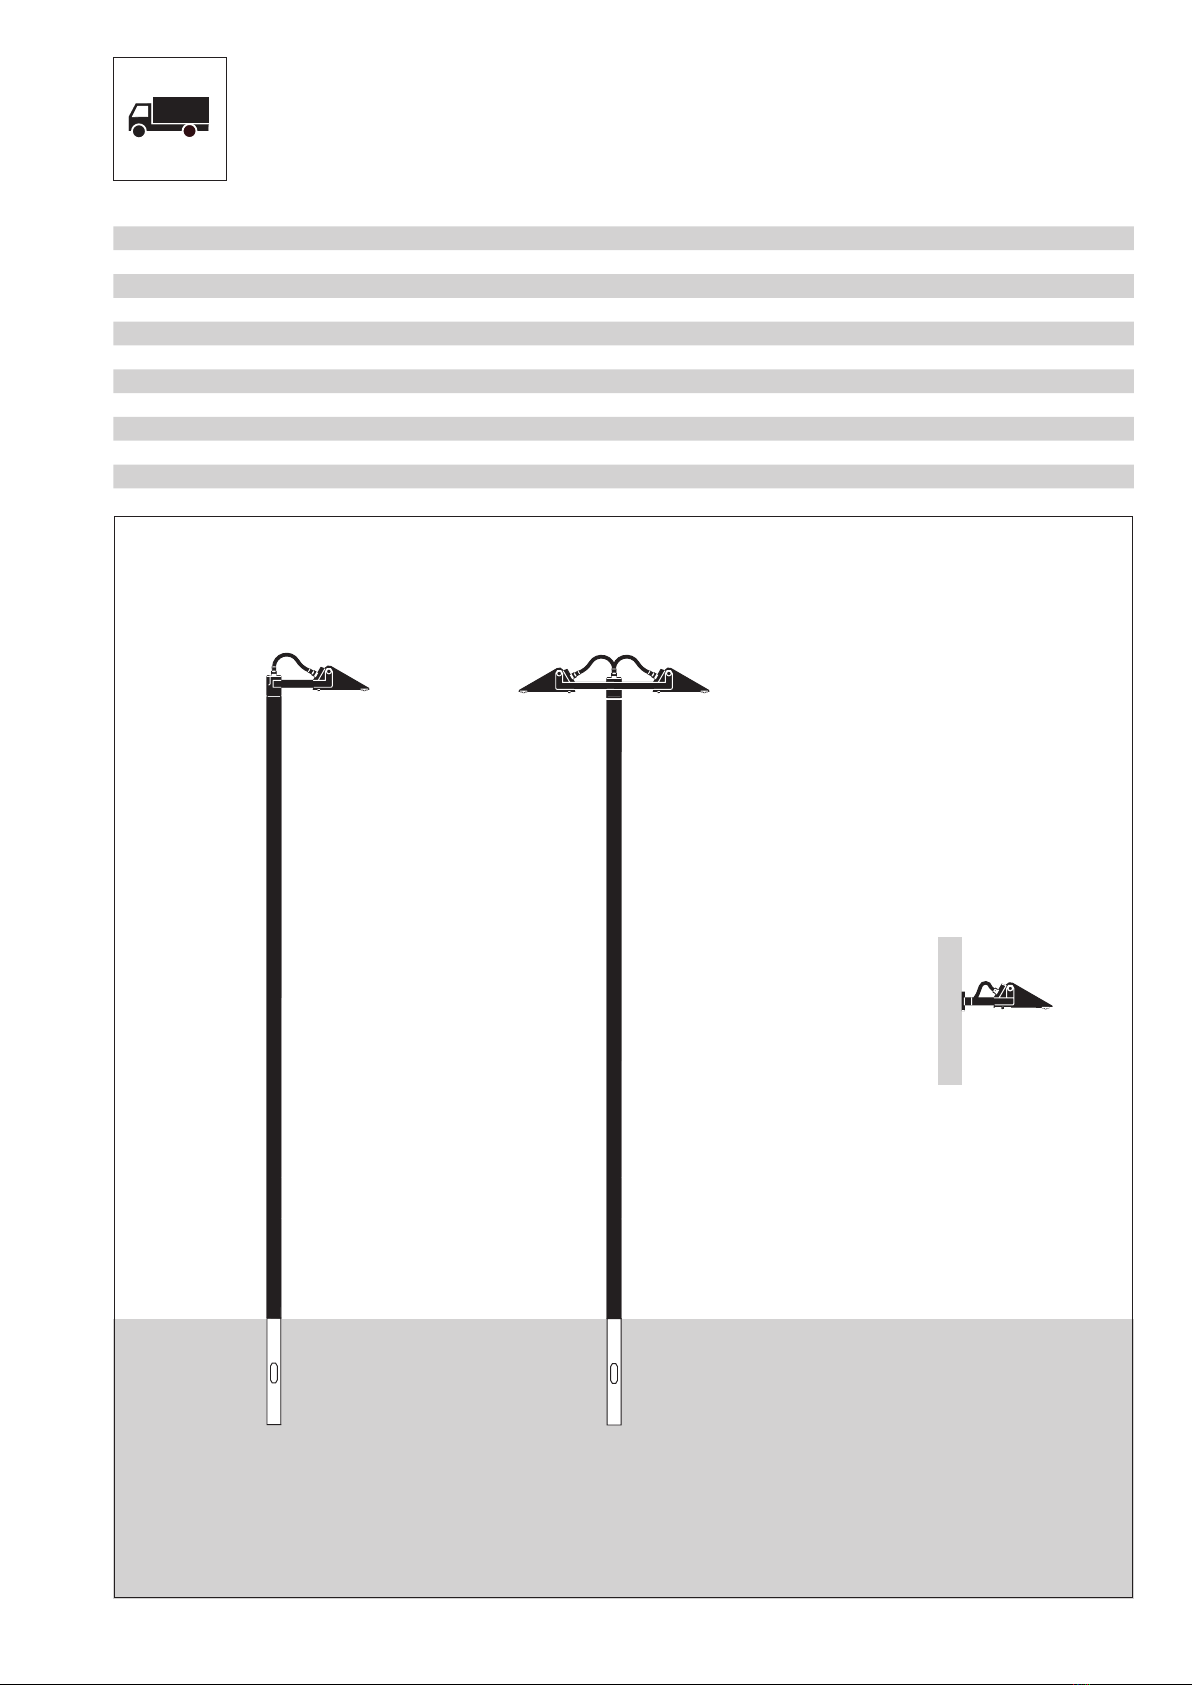
Kleinster Abstand zu brennbaren
Flächen
Do not exceed the minimum allowed
distance to illuminated surfaces.
Il faut respecter la distance minimale
aux surfaces illuminées suivant les notices
explicatives.
Observar la distancia mínima respecto
a las superficies iluminadas según las instruc-
ciones.
Va mantenuta la distanza minima dalle
superfici illuminate secondo le indicazioni for-
nite.
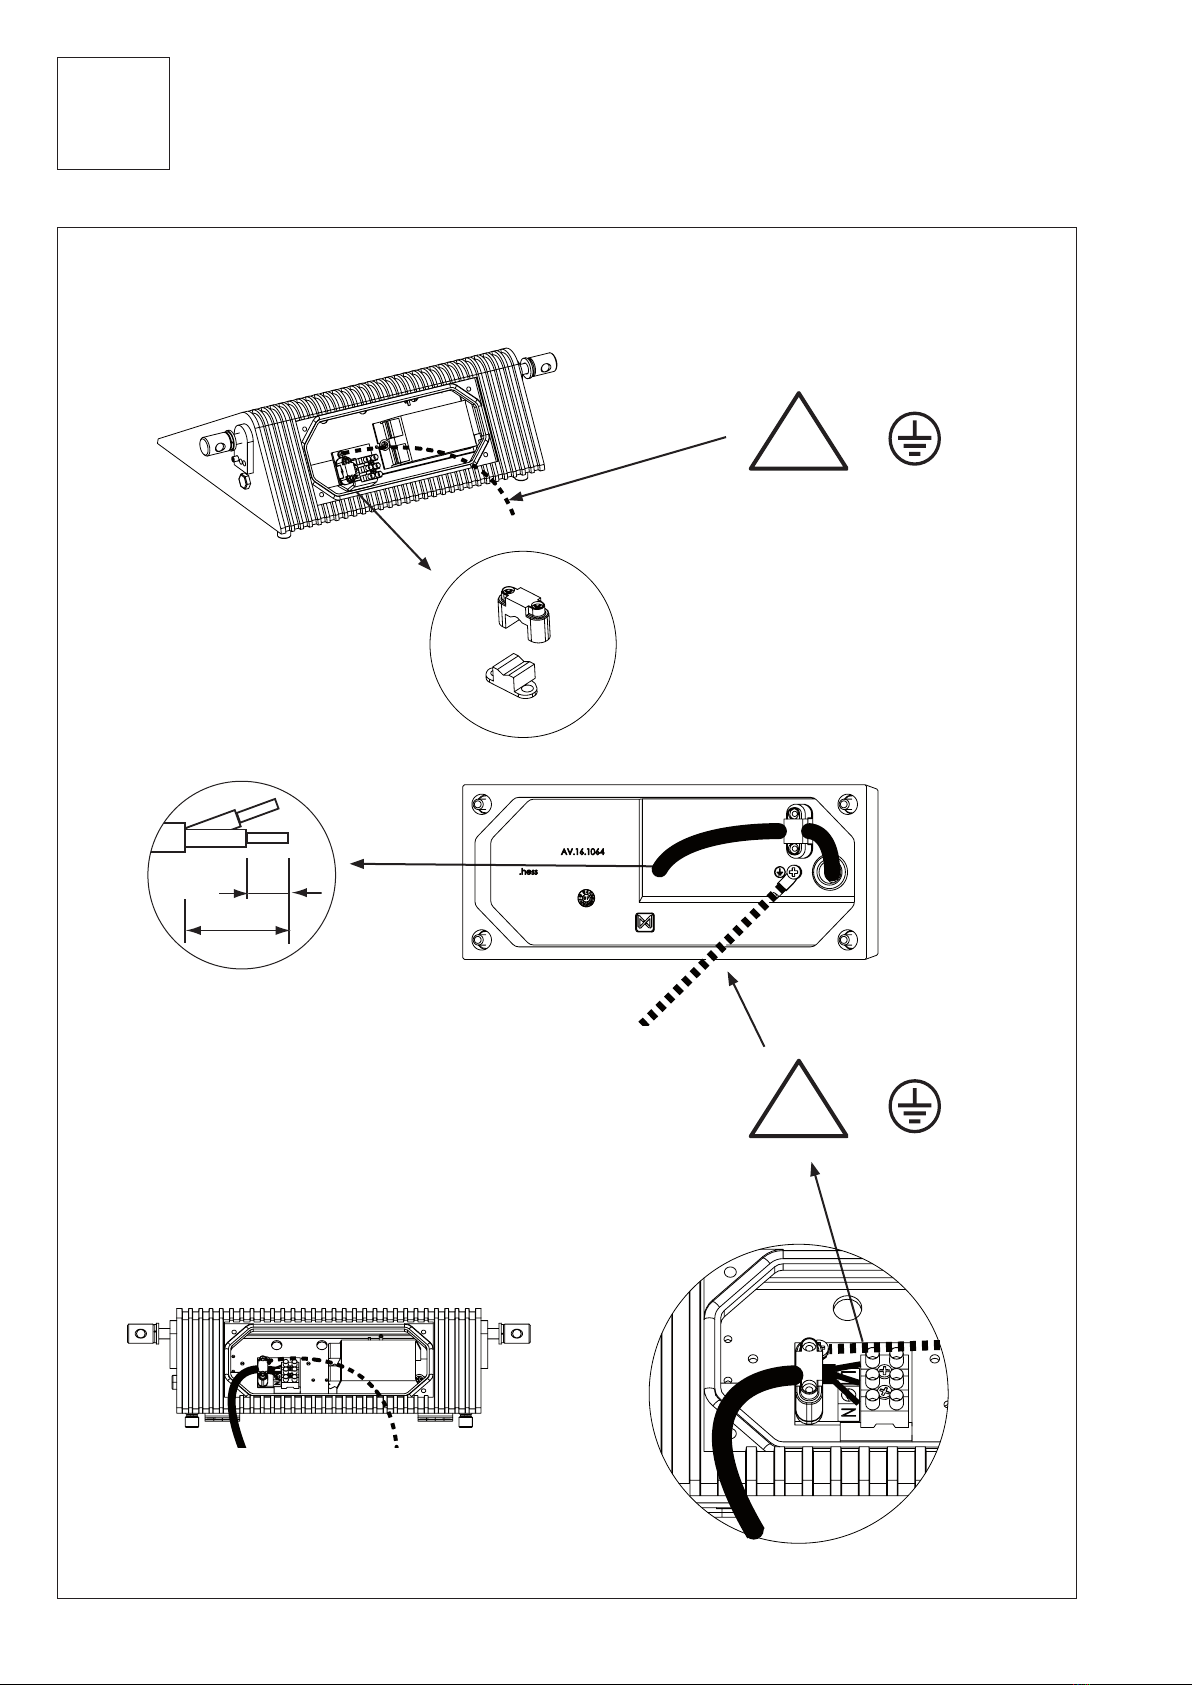
Bei fehlender Lampe Fassungskontakte
nicht berühren. Es können gefährliche, elek-
trische Spannungen anstehen.
DANGER! Danger of electrical shock! Do
not touch the socket or lampholder contacts at
any time.
AVERTISSEMENT ! Danger de mort ! Ne
pas toucher les dispositifs de contact des
douilles lors de l’absence de la lampe. Risque
de tensions électriques dangereuses.
ADVERTENCIA! ¡Peligro de muerte! No
tocar nunca los contactos del portalámparas
en ausencia de la lámpara. Puede existir una
tensión eléctrica peligrosa.
ATTENZIONE! Pericolo di morte! In caso
di lampada mancante, non toccare i contatti
del portalampada. Possono essere presenti
pericolose tensioni elettriche.
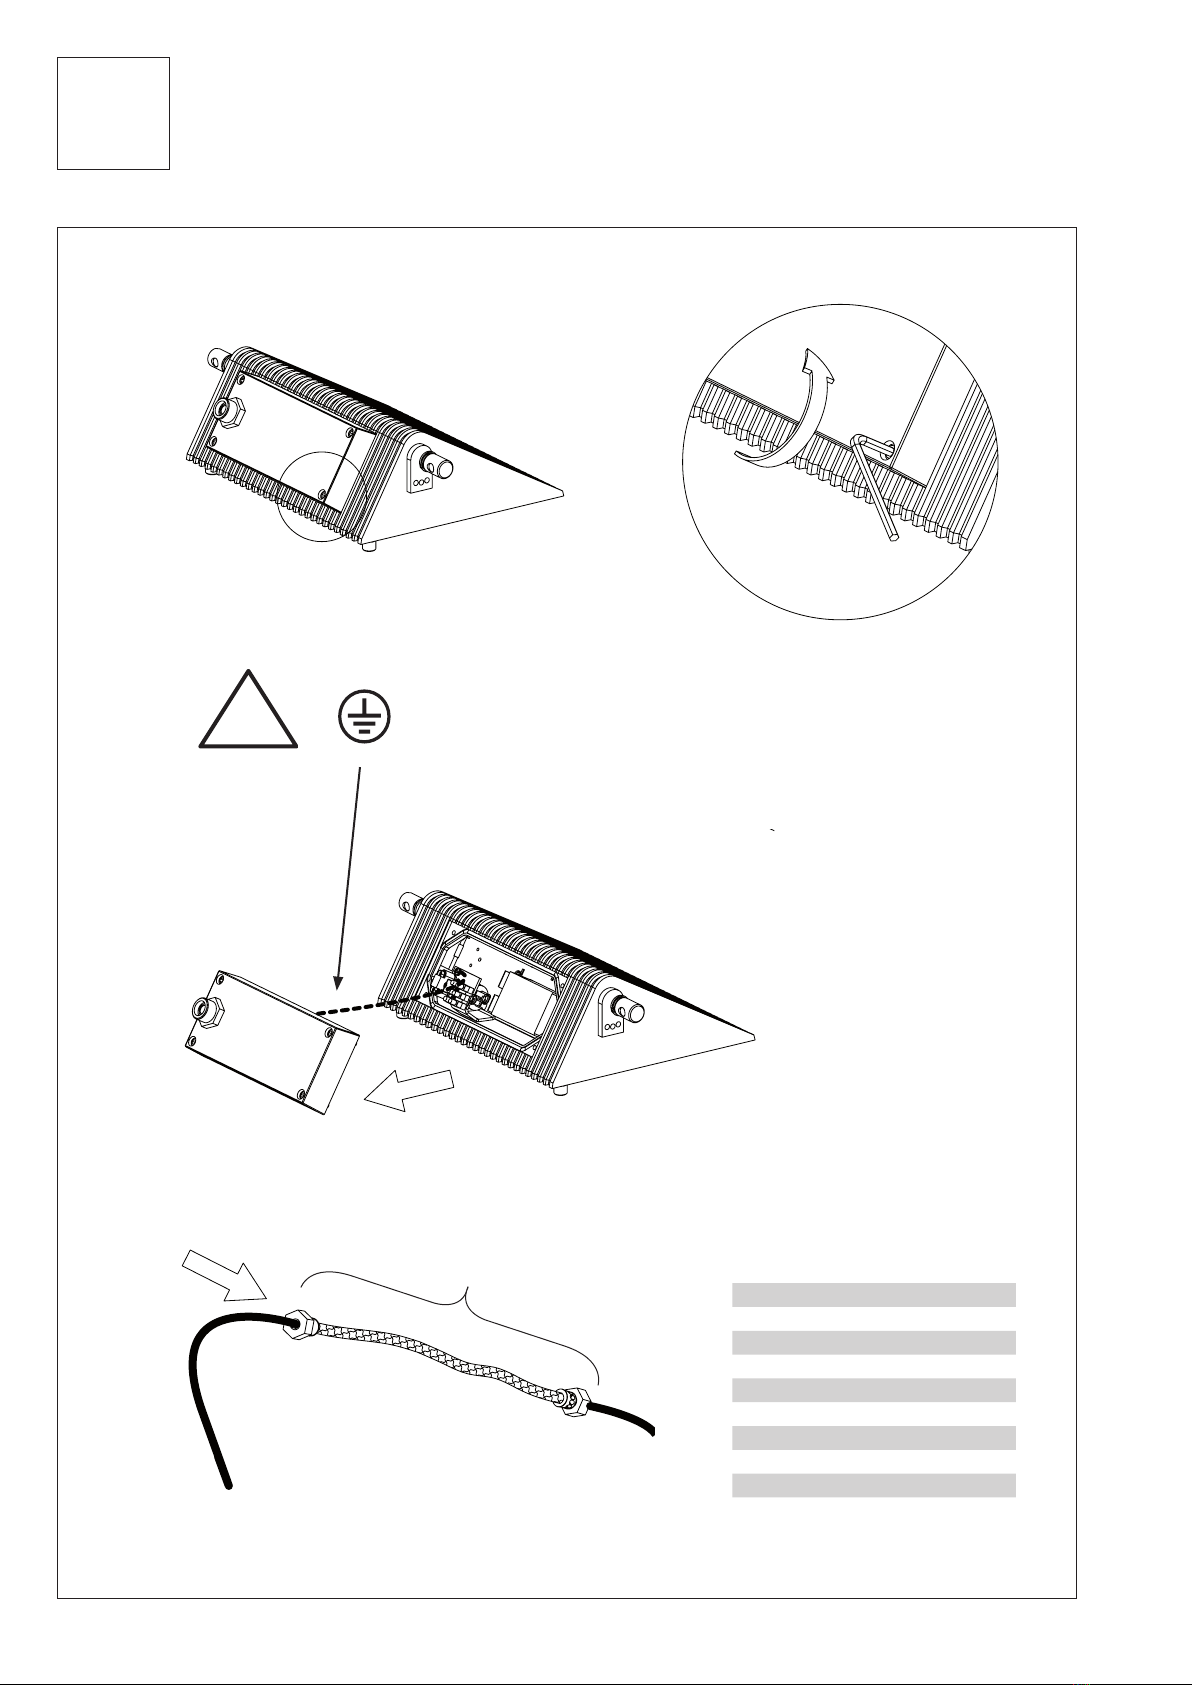
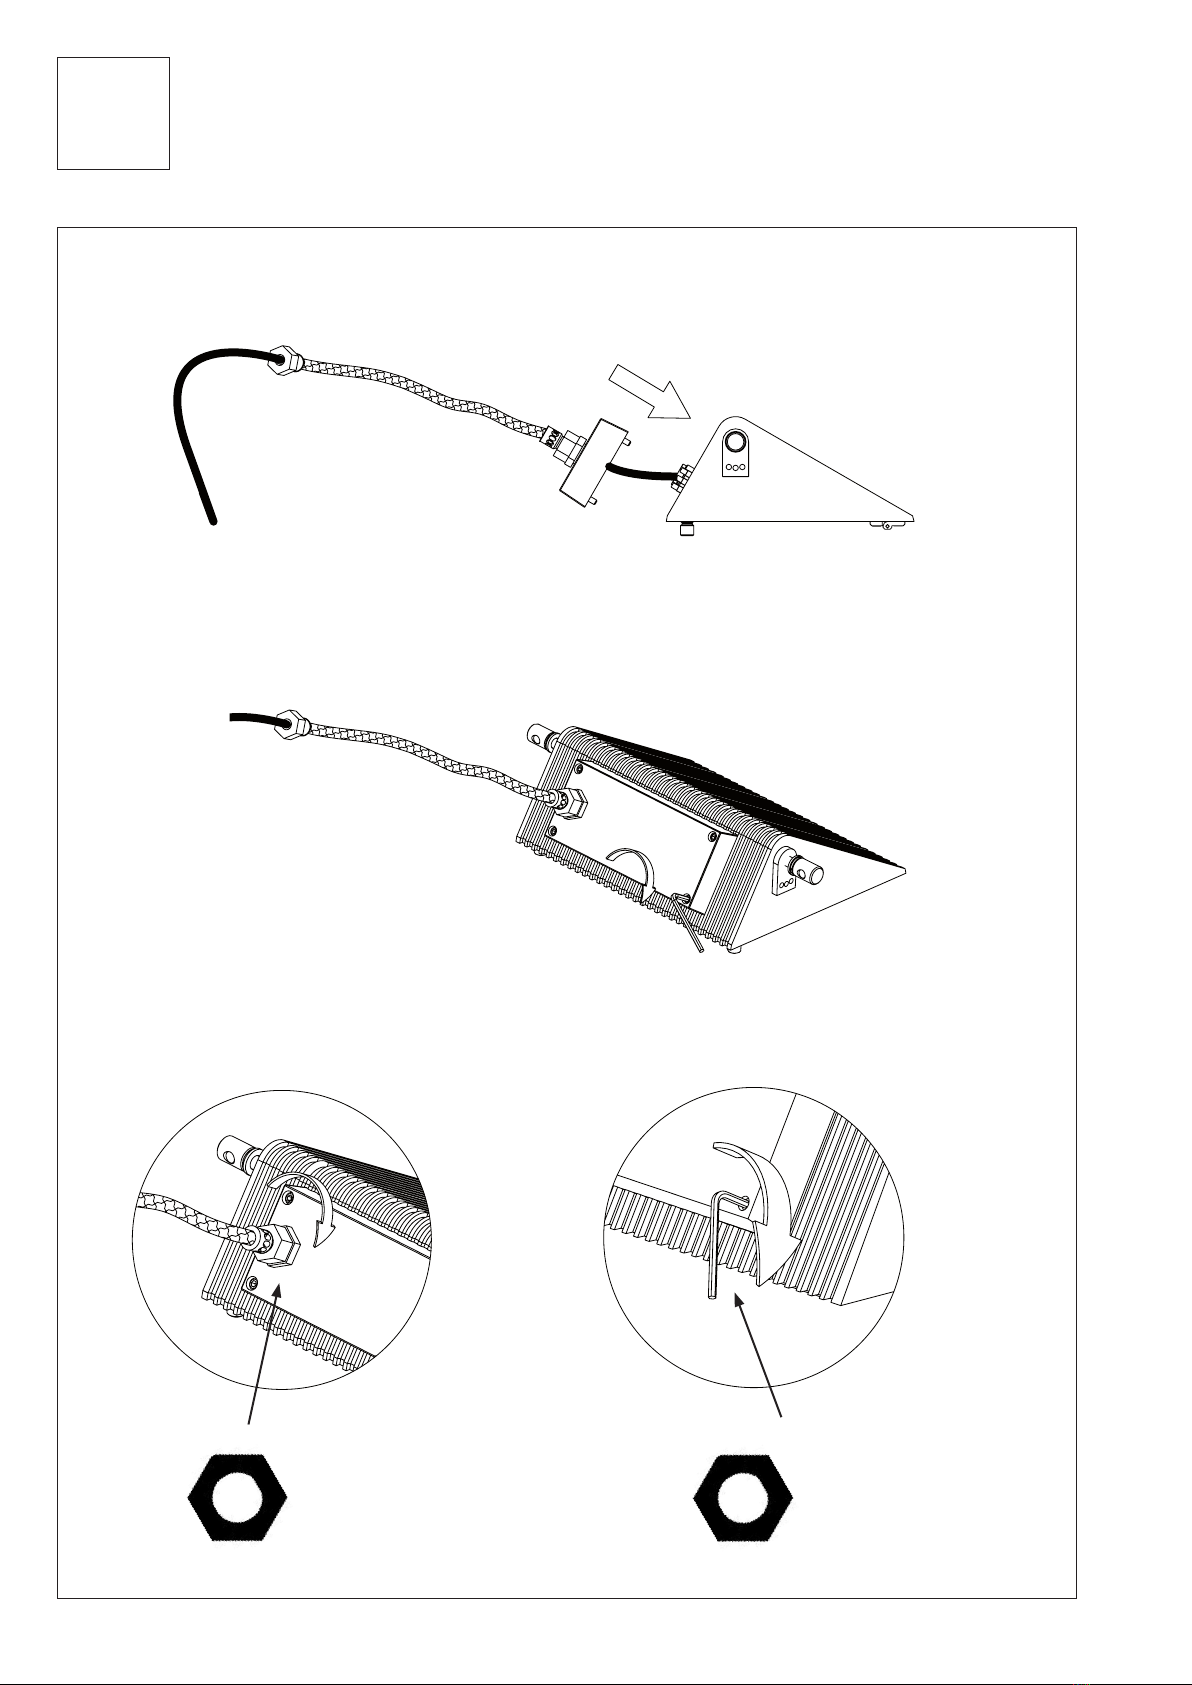
Die Leuchte darf nur mit kompletter
Schutzabdeckung betrieben werden.
Only operate this luminaire when it is
in a closed state, i.e. with closed cover.
Ne faire fonctionner le luminaire
qu´avec le couvercle de protection fermé.
La luminaria debe funcionar única-
mente con las cubiertas de protección al
completo.
L’apparecchio di illuminazione può
essere utilizzato solo con le coperture di
sicurezza complete.
3
Lieferumfang
Included in Luminaire Purchase
Matériel fourni
Programa de entrega
Volume di consegna
• • E
12.02624.3500
• F •
12.02643.0
• C •
• F •
• D •
• B • A • D •
• C •
• • E
• C •
12.02626.3500
• F •
• B • A • D •
N O V A R A M L A B C D EF
mm mm mm mm mm mm
10.02624.3500 3500 600 280 120 82,5 485
10.02626.4500 3500 600 560 120 82,5 970
12.02643.0 — — 235 120 — 440
4
1.b1.c
1.a
3.
Empfohlene Montagefolge
Recommended Installation Procedure
Déroulement de montage recommandé
Secuencia de montaje recomendada
Sequenza di montaggio consigliata
2.
4.
5
1. Mast aufstellen / Wandarm montieren
Putting Up the Pole / Mounting the Bracket
Ériger le mât / Monter la console
Montaje del poste/ Montaje del brazo mural
Montaggio del palo / Montaggio dello sbraccio
1.a
• A >> •
•
• B
• 425 mm
1.c
1.b
• A >> •
•• 425 mm
• 70 •
• 100 •
• 120 •
• 150 •
••
ø 10,5
• 235 •
12.02624.3500
12.02626.3500
Typ Q 300/15
200
Flanschplatte
flange plate
platines de fixation
placas base
piastre di fissaggio
Gewichte / Windangriffsflächen
Weight / Wind Catching Surface
Poids / Surface de résistance au vent
Pesos / Superficie expuesta al viento
Pesi / Superficie di resistenza al vento
N O V A R A M L ∑
kg kg kg kg kg m²
12.02624.3500 9 3 – 31 43 0,04
12.02626.3500 9 – 4 31 44 0,04
12.02613.0 9 2,5 – – 11,5 0,04
N O V A R A M L A B
mm mm
12.02624.3500 3500 600 Q 300/15
12.02626.3500 3500 600 Q 300/15
300
22
42
6
2.
2.1
A
B
C
L
!
ca. 150mm
N O V A R A M L L
mm
12.02624.3500 400
12.02626.3500 400
Elektrische Verdrahtung
Wiring
Câblage électrique
Cableado eléctrico
Cablaggio elettrico
7
2.2
B
!
ca. 150mm
C
!
ca. 150mm
!
ca. 150mm
A
Kabel Ø7,0 – Ø10,5 - Einsatz grün
Cable Ø7.0 – Ø10.5 - Green plug
Câble Ø7,0 – Ø10,5 - passe-câble vert
Cable Ø7,0 – Ø10,5 - Inserto verde
Cavo Ø7,0 – Ø10,5 - inserto verde
8
2. Elektrische Verdrahtung
Wiring
Câblage électrique
Cableado eléctrico
Cablaggio elettrico
A
!
ca. 150mm
B
!
ca. 150mm
C
8 mm
20 mm
2.3
9
Schutzklasse I 1x Lampe braun grün/gelb blau
Protection rating I 1x Lamp brown green/yellow blue
Classe électrique I 1x lampe brun vert/jaune bleu
Clase de protección I 1x Lámpara marrón amar./verde azul
Classe di Isolamento I 1x Lampada marrone verde/giallo blu
Schutzklasse I 1x Lampe Nachtabsenkung braun grün/gelb blau schwarz
Protection rating I 1x Lamp Night economy feature brown green/yellow blue black
Classe électrique I 1x lampe Réduction de puissance la nuit brun vert/jaune bleu noir
Clase de protección I 1x Lámpara Reducción nocturna marrón amar./verde azul negro
Classe di Isolamento I 1x Lampada Riduzione notturna marrone verde/giallo blu nero
Schutzklasse II 1x Lampe braun blau
Protection rating II 1x Lamp brown blue
Classe électrique II 1x lampe brun bleu
Clase de protección II 1x Lámpara marrón azul
Classe di Isolamento II 1x Lampada marrone blu
Schutzklasse II 1x Lampe Nachtabsenkung braun schwarz blau
Protection rating II 1x Lamp Night economy feature brown black blue
Classe électrique II 1x lampe Réduction de puissance la nuit brun noir bleu
Clase de protección II 1x Lámpara Reducción nocturna marrón negro azul
Classe di Isolamento II 1x Lampada Riduzione notturna marrone nero blu
L1 N
H05SS-F 3G0,75²
H05SS-F 4G0,75²
H05SS-F 2X0,75²
H05SS-F 3X0,75²
L1 N PST
Nachtabsenkung (bei Leuchten mit
einer Lampe): Die Nachtabsenkung ist bei
Anlieferung der Leuchten so geschaltet,
dass bei Anliegen der Spannung an den
Klemmen L, N und PST die Lampe mit
der höheren Leistung leuchtet (Positiv
Logik). Nach Abschaltung des Relais an
der Klemme PST wird die Lampe auf die
niedrigere Leistung abgesenkt. Wird die
Nachtabsenkung in der umgekehrten
Reihenfolge gewünscht (Negativ Logik),
so sind die Leitungen am Relais an den
Klemmen 1 und 2 umzuklemmen.
Nachtabsenkung (bei Leuchten mit zwei
Lampen): Während der Nachtabsenkung hat
die Klemme L2 für die zweite Lampe keine
Spannung.
Night reduction function (for lumi-
naires with one lamp): The night reduction
is factory wired so that when voltage is
applied to the L1, N and PST terminals the
lamp will illuminate at full capacity (posi-
tive logic). When the night reduction relay
switches off the voltage to the PST terminal,
the light output from the lamp is reduced. If
it is desired that the night reduction occur
in the opposite sequence, the terminal con-
nections 1 and 2 must be reversed on the
relay.
Night reduction function (for luminaires
with two lamps): While the luminaire is in
the night reduction modus, there is no volt-
age on the L2 terminal of the second lamp.
Réduction électronique de puissance
nocturne (pour les luminaires avec une
source lumineuse): Lors de la livraison des
luminaires, la réduction électronique de
puissance nocturne est couplée comme
suit : Si les bornes L, N et PST sont sous
tension, la source lumineuse de puissance
plus élevée éclaire (logique positive). Après
la mise hors service du relais électronique
sur la borne PST, la puissance de la source
lumineuse est réduite à la puissance plus
faible. Si une réduction électronique de
puissance nocturne inverse est souhaitée
(logique négative), il faut modifier le raccor-
dement des câbles du relais électronique
des bornes 1 + 2.
Réduction électronique de puissance noc-
turne (pour les luminaires avec deux sour-
ces lumineuses): Pendant la réduction élec-
tronique de puissance nocturne, la borne L2
n’a pas de tension pour la deuxième source
lumineuse.
Reducción de potencia por la noche
(para luminarias con una lámpara): La red-
ucción de potencia por la noche en las lumi-
narias entregadas está cableada de manera
que la lámpara brilla con mayor potencia
cuando hay tensión aplicada en los bornes
L, N y PST (lógica positiva). Tras la desco-
nexión del relé en el borne PST, la lámpara
adopta la potencia reducida. Si se desea
una reducción de potencia en la secuencia
inversa (lógica negativa) se deben reconec-
tar los cables del relé en los bornes 1 y 2.
Reducción de potencia por la noche (para
luminarias con dos lámparas): Durante
la reducción de potencia por la noche el
borne L2 no tiene tensión para la segunda
lámpara.
Commutatore per la riduzione nottur-
na (con apparecchi dotati di una lampada):
Al momento della consegna degli apparec-
chi, il commutatore per la riduzione nottur-
na è cablato in modo che all’applicazione
della tensione ai morsetti L, N e PST la lam-
pada assicuri un illuminamento maggiore
(logica positiva). Una volta disattivato il relè
sul morsetto PST la lampada viene ridot-
ta alla potenza più bassa. Se si desidera
impostare il commutatore per la riduzione
notturna nella sequenza inversa (logica
negativa) i cavetti sul relè (morsetti 1 e 2)
vanno invertiti.
Commutatore per la riduzione notturna (con
apparecchi dotati di due lampade): Quando
il commutatore per la riduzione notturna è
attivo, il morsetto L2 per la seconda lampa-
da non è sottoposto a tensione.
L1 N
L1 PST N
2.4
10
2.5
2. Elektrische Verdrahtung
Wiring
Câblage électrique
Cableado eléctrico
Cablaggio elettrico
min. 5 Nm 4x DIN 912 M6
SW 29
SW 5