Hiboy N1 User manual

N1 ELECTRIC SCOOTER FOR CHILD
NOTE:
The unit must be traveling at least 3 mph (5 km/h) before motor will engage.
Kick to start to at least 3 mph (5 km/h) while applying the throttle to engage motor.

1
CONTENTS
SAFETY WARNINGS

2
BEFORE YOU BEGIN
Throttle
Collar Clamp
LED Lighted Front Wheel
Kickstand
Power Cut-off
Rear-Fender Brake
Charger Port
5 mm Allen Wrench
WARNING: DO NOT USE NON-Hiboy
PRODUCTS WITH YOUR SCOOTER.
Hiboy scooters have been built to certain Hiboy
design specifications.The original equipment
supplied at the time of sale was selected on
the basis of its compatibility with the frame,
fork and all other parts. Certain aftermarket
products may not be compatible and will void
the warranty.
Note: Electric scooter must be moving at least
3 mph (5 km/h) while pressing the push-button
throttle to engage motor.
Box Contents:
•N1
•Charger
•Owner’s Manual
•Allen Wrench
Charger
(Note: Charger design
may vary from one shown

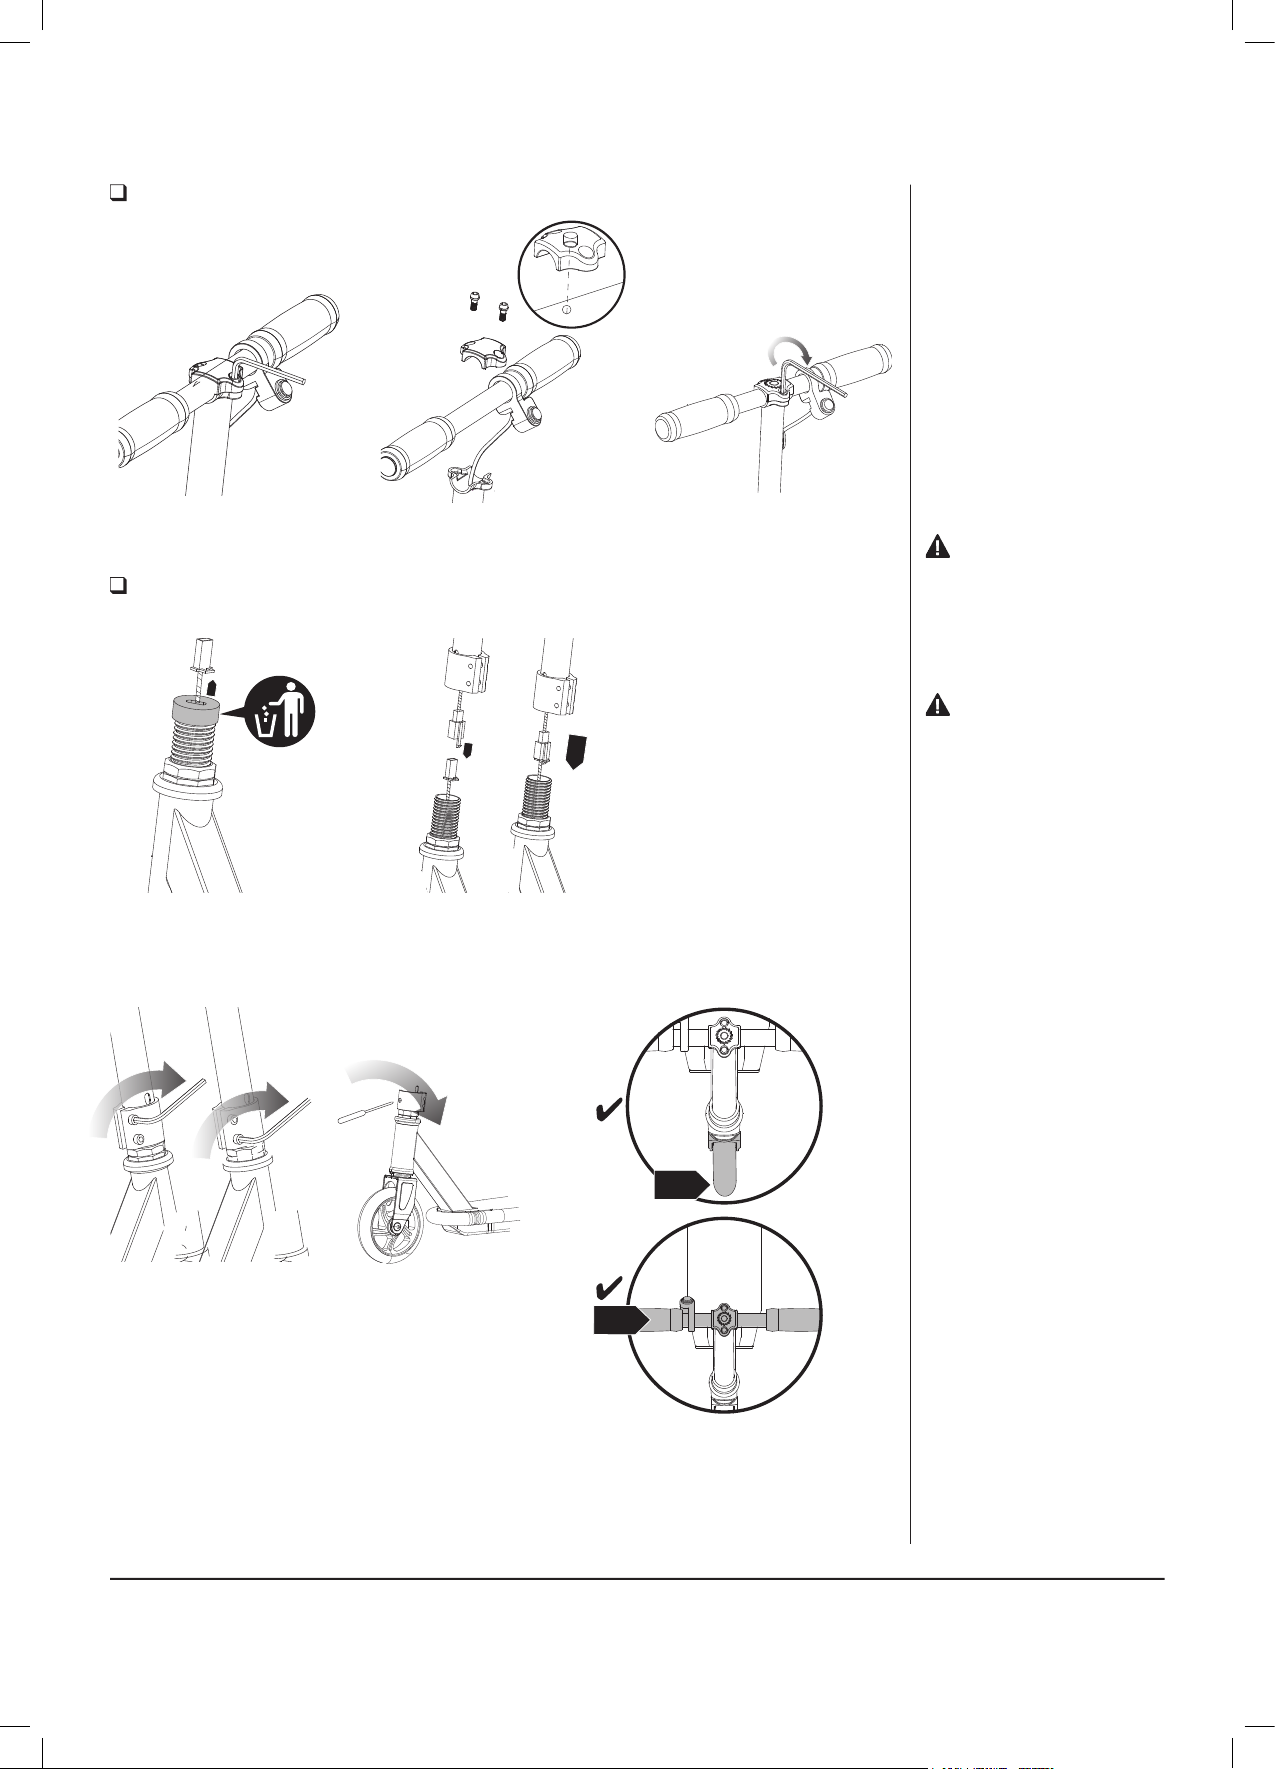
WARNING: Failure to properly tighten
the collar clamp may allow the handlebars to
dislodge while riding and may cause you to
lose control and fall. When correctly tightened,
the handlebars will not rotate out of alignment
with the front wheel under normal
circumstances.
3
ASSEMBLY AND SET-UP
Attaching the Handlebars
Tool Required:
1 Using the 5 mm Allen wrench
loosen the handlebar clamp.
1 Before inserting the T-bar onto the
fork, pull the connector through and
remove the rubber protector.
3 With the front wheel pointed straight
ahead and the handlebars square to
the front wheel and the Hiboy logo
facing the front, tighten the clamp as
shown. Tighten securely.
Need Help? Visit our website for replacement parts, product support, a list of authorized service centers in the US and customer service contact information
at www.Hiboy.com. Please have the product I.D. code (located on the white label of your product) available for better assistance. Additional Customer Service
contact information is listed at the back of this manual.
2 Connect the connector on the T-bar to the
connection on the down tube and insert the
T-bar onto the fork.
2 Insert the handlebar with the
throttle facing the rider.
3 Using the 5 mm Allen wrench
tighten the handlebar clamp.
5 mm Allen Wrench
Attaching the T-bar
Tool Required: 5 mm Allen Wrench
WARNING: Do not attempt to thread
the handle barinto the front fork thread.
Tighten clamp securely.
Note: The cable and wire assembly must be
tucked inside the fork before inserting the t-bar.
Sharp bends or twisting of the cables can
cause malfunction.

4
CHARGING THE BATTERY
PRE-RIDE CHECKLIST
Charger
LED Light
(Note: Charger design may vary
from one shown)
Hardware/Loose Parts
Before every ride, check all parts, such as nuts, bolts, fasteners,
etc., to ensure they are secure and assembled correctly. There
should not be any unusual rattles or sounds from loose parts or broken
components. If the product is damaged, do not ride.
Safety Gear
Always wear proper protective equipment, such as an approved
safety helmet (with chin strap securely buckled), elbow pads,
and kneepads. A helmet may be legally required by local law
or regulation in your area. A long-sleeved shirt and long pants are
recommended. Always wear shoes and keep shoelaces tied and
out of the way of the wheels and motor.
NEVER RIDE BAREFOOTED OR IN SANDALS.
Laws and Regulations
Always check and obey any local laws or regulations.
Insurance
Do not assume that your existing insurance policies necessarily provide
coverage for product use. Check with your insurance company for
information regarding insurance.
Storage
Prolonged exposure to UV rays, rain and the elements may
damage the enclosed materials, store indoors when not in use.
Wheels
Periodically inspect the wheels for excessive wear.
Frame, Fork and Handlebars
Check for cracks or broken connections. Although broken frames are rare,
it is possible for an aggressive rider to run into a curb or object and wreck,
bend or break a frame. Get in the habit of inspecting your scooter on a
regular basis.
1 Plug the charger plug into wall
outlet. The light on the charger
should be green.
(Note: If green light (LED) does not
turn on, try a different outlet.
(Note: Make sure power button is in the
OFF position. Plug the charger into the
charger port.
The light on the charger should turn red
during charging. The light will turn green
again when charging is complete.
Your N1 may not have a fully charged battery; therefore you must charge the battery prior to
use. Be sure to charge the battery in a clean, dry location away from direct sunlight, flames or sparks.
•Initial charge time: 5 hours.
•Recharge time: up to 5 hours, even if the light turns green.
Recommended maximum charging time is 5 hours.
•Always charge the battery immediately after riding.
•Fully charge battery before storing for extended periods of time.
•Unplug charger from the wall outlet when not in use.
•Failure to recharge battery periodically may result in a battery
that will not accept a charge.
•Make sure the power button is turned OFF when
product is not in use. If the power button is left on
for an extended period of time, the battery may reach
a stage at which it will no longer hold a charge.
•Run time: Up to 20 minutes of continuous ride time.
Run time may vary depending on riding conditions,
rider weight, climate, and/or proper maintenance.
•Constant starting and stopping may shorten ride time.
•Battery life can vary depending on proper maintenance
and usage of the product.
•Do not charge at or below 32°F (0°C).
24 2

How to Ride
5
Place one foot on the deck plate and with the other foot, push (kick to start) scooter while pressing the
push- button throttle. Place other foot on deck plate once motor has engaged.
Note: Lighted front wheel will light up when wheel is in motion.
Note: Electric scooter must be moving at least 3 mph (5 km/h) while pressing the push-button throttle
to engage motor.
How to Stop
For controlled stops, release the throttle and apply the brake by putting pressure on the rear-fender brake.
Hiboy recommends that you practice applying the brake at various speeds and in an open area free from
obstructions before riding your scooter around others
Note: Electric scooter must be moving at least
3 mph (5 km/h) while pressing the push-button
throttle to engage motor.
Note: As an additional safety feature, the
scooter is designed to cut power to the motor
when brake is applied.
Note: Motor will re-engage, (without having to
kick to start), if brake is released and push-
button throttle is pressed beforescooter has
slowed down to under 3 mph (5 km/h).
Note: Practice riding only in wide open areas
clear from curbs, parking blocks and other
obstacles.Impacting the wheels against any
hard surface can damage the wheels.
Wheels are not covered under the limited
warranty.
Need Help? Visit our website for replacement parts, product support, a list of authorized service centers in the US and customer service contact information
at www.Hiboy.com. Please have the product I.D. code (located on the white label of your product) available for better assistance. Additional Customer
Service contact information is listed at the back of this manual.
USAGE

6
WARNING: Wheelies and other
stunt-type riding reduces your ability
to maneuver and control your scooter.
Take the necessary precautions, such
as wearing appropriate protective gear
and practice in an area safe for stunt
riding and free from obstructio
WARNING: Risk of fire–no user serviceable parts.
Cleaning Your Scooter
Wipe with a damp cloth to remove dirt and dust. Do not use industrial cleaners or solvents as they may
damage the surfaces. Do not use alcohol, alcohol-based or ammonia-based cleaners as they may
damage or dissolve the plastic components or soften the decals or decal adhesive.
Charger
The charger supplied with the N1 should be regularly examined for damage to the cord, plug, enclosure and other
parts and in the event of such damage, the product must not be charged until it has been repaired or replaced.
Use ONLY with the recommended charger.
Wheels and Bearings
Under normal circumstances and conditions, Hiboy wheels and wheel bearings are maintenance free. Nonetheless,
it is the responsibility of the owner or guardian to periodically inspect the wheels for wear and tear, the axle for proper
tightness, and bearings for side-to-side play, and loose parts. When a wheel or wheel bearing develops play, this is an
indication of excess wear and replacement is necessary. Replace immediately with only genuine Hiboy wheels.
Worn wheels/bearings are considered normal wear-and-tear and are not covered by the Hiboy Warranty. Wheels other
than genuine HIboy wheels may not be compatible with your Hiboy scooter. The use of anything other than genuine
Hiboy replacement parts may affect your safety and will void your warranty.
Replacement Parts
The most frequently requested replacement parts are available for purchase at some Hiboy retail partners. For the
complete selection of replacement parts visit www.Hiboy.com.
Repair Centers
For a list of authorized Hiboy repair centers:
•Check online at www.Hiboy.com.
•Additional Customer Service contact information is listed on the back of this manual.
Recycling Lithium-ion
Batteries: Lithium-ion batteries are
recyclable. You can help preserve
our environment by returning your
used rechargeable batteries to the
collection and recycling location
nearest you.
Cleaning Your Scooter
•Do not store in freezing or below freezing temperatures. To properly maintain your battery and ensure
maximum battery life, carefully read the “Charging the Battery” section on page 5 of this owner’s manual.
•Battery pack should not be disassembled, crushed, punctured, opened or otherwise mutilated.
Disposal: Your N1 uses a lithium-ion battery pack which must be recycled or disposed of in an environmentally
safe manner. Do not dispose of a battery pack in a fire. The battery pack may explode.
Do not dispose of a battery pack in your regular household trash. The incineration, land filling or mixing of batteries
with household trash is prohibited by law in most areas. Return exhausted batteries to a federal or state approved
lithium-ion battery recycler.
REP AIR AND MAINTENANCE
Li-Ion

7
2-1
1
2
4
3
5
9
6
10
7
8
14
13
12
11
Keep your N1 running for years with genuine Hiboy parts. Visit our website or e-mail us for more information on spare part availability. (Specifications
subject to change without notice.)
1.Push-Button Throttle
2.Handlebar Clamp 2-1. Clamp Bolts
3.Handlebar Grips
Handleb
5. Steering Tube
6. Collar Clamp
7. Headset (Upper/Lower)
8. Front Fork
9. Lighted Front Wheel
10. Rear-Fender Brake
11. Rear Wheel w/Hub Motor
12. Kickstand
13. Lithium-ion Battery Pack
14. Control Module
HIBOY N1 PARTS

Battery capacity
Maximum distance
Expanded size
Material
Motor
Wheel size
Maximum speed
Front light
With kick stand
Speed mode
Brake system
Charging time
Maximum climbing angle
Maximum scale time
Maximum load
Product weight
Vehicle IP rating
Accessories
25.2V/2AH, lithium battery
6 km
816*330*160mm
aluminum alloy
5.5'' 120W, with plastic wheels
5.5'' with plastic wheels
12km/h
Yes, there are LED lights on the front wheel and under the pedal
Yes
1 gear
foot brake
about 5 hours
10 degrees
28 minutes
60 KG
7.2 kg
IP X4
1*user manual, 1*charger
PARAMETER
8
Hiboy Limited Warranty
The manufacturer warranties this product to be free of manufacturing defects for a period of 90 days from date of purchase. This Limited Warranty
does not cover normal wear and tear, wheel, or any damage, failure or loss caused by improper assembly, maintenance, storage or use of the N1.
This Limited Warranty will be void if the product is ever:
•used in a manner other than for recreation or transportation;
•modified in any way;
•rented.
•The manufacturer is not liable for incidental or consequential loss or damage due directly or indirectly to the use of this product.
30-day unconditional return and refund, one-year warranty
HIboy does not offer an extended warranty. If you have purchased an extended warranty, it must be honored by the store at which it was purchased.
For your records, save your original sales receipt with this manual and write the serial number below.
Need Help? Visit our website for replacement parts, product support, a list of authorized service centers in the US and customer service contact information
at www.Hiboy.com. Please have the product I.D. code (located on the white label of your product) available for better assistance. Additional Customer
Service contact information is listed at the back of this manual.
WARRANTY

CONTACT US
@Hiboyscooter
HiboyUS
www.hiboy.com
hiboyus
Contact us if you experience issues relating to riding, maintenance and safety, or errors/faults with your Hiboy SK3.
HIBOY INTELLIGENT INC
1822 E ROU TE66 STE A339
GLENDORA, CA 91740
E-mail Service: us.support@hiboy.com
Table of contents
Other Hiboy Scooter manuals