Hiboy P7 User manual

The manufacturer reserves the right to make changes to the product,
and update this manual at any time.
www.hiboy.com
USER MANUAL
Electric Bike
P7

Contents
1
Important! Before Riding, You Should
1. Package Contents
2. Product Overview
3. Installing The Handlebars
4. Installing The Front Wheel
5. Installing The Pedals
6. Installing The Headlight
7. Installing The Saddle
8. Display Introduction
9. How To Use The Display, Headlight & Horn
10. How To Take Off The Battery
11. How To Charge The Battery
12. Notes Of Charging
01
02
03
05
06
07
08
09
10
11
12
13
14
IMPORTANT! BEFORE RIDING, YOU SHOULD
• Make sure your electric bike is fully charged before the first ride
• Make sure the pedals are tight
• Make sure the front wheel is installed properly and tightly
• Check to be sure the tires are inflated properly
• Learn how to use the display
• Wear a helmet when riding is highly advised
When riding, please
• Always respect pedestrians
• Obey local traffic rules
• Pay attention to other running vehicles around you
After riding
• If there is any abnormality or loosen parts, please check and repair as soon as possible
• After riding on a rainy day, please clean up the rainwater and sediment immediately
If you have any trouble with the installation, please contact Hiboy customer service
13. Daily Care And Maintenance
14. Specifications
15. Limited Warranty Statement
16. Q&A and Trouble shooting
15
16
17
19
17. Contact Us 22

1. Package Contents
Please check package contents carefully, if anything is missing or damaged, please
contact Hiboy customer service for support:support@hiboy.com
32
Charger x 1
Battery Key x 2
Hexagon wrench x 4
Pedals (R and L) x 2 User manual x 1
Headlight screw x 1
Electric bike x 1
Installing tool x 1
Spring x 2
Skewer x 1
End nut x 1
2. Product Overview
Brake lever
Headlight
Fork
Seat
Freewheel
Rear Derailleur
Crank Set Pedal
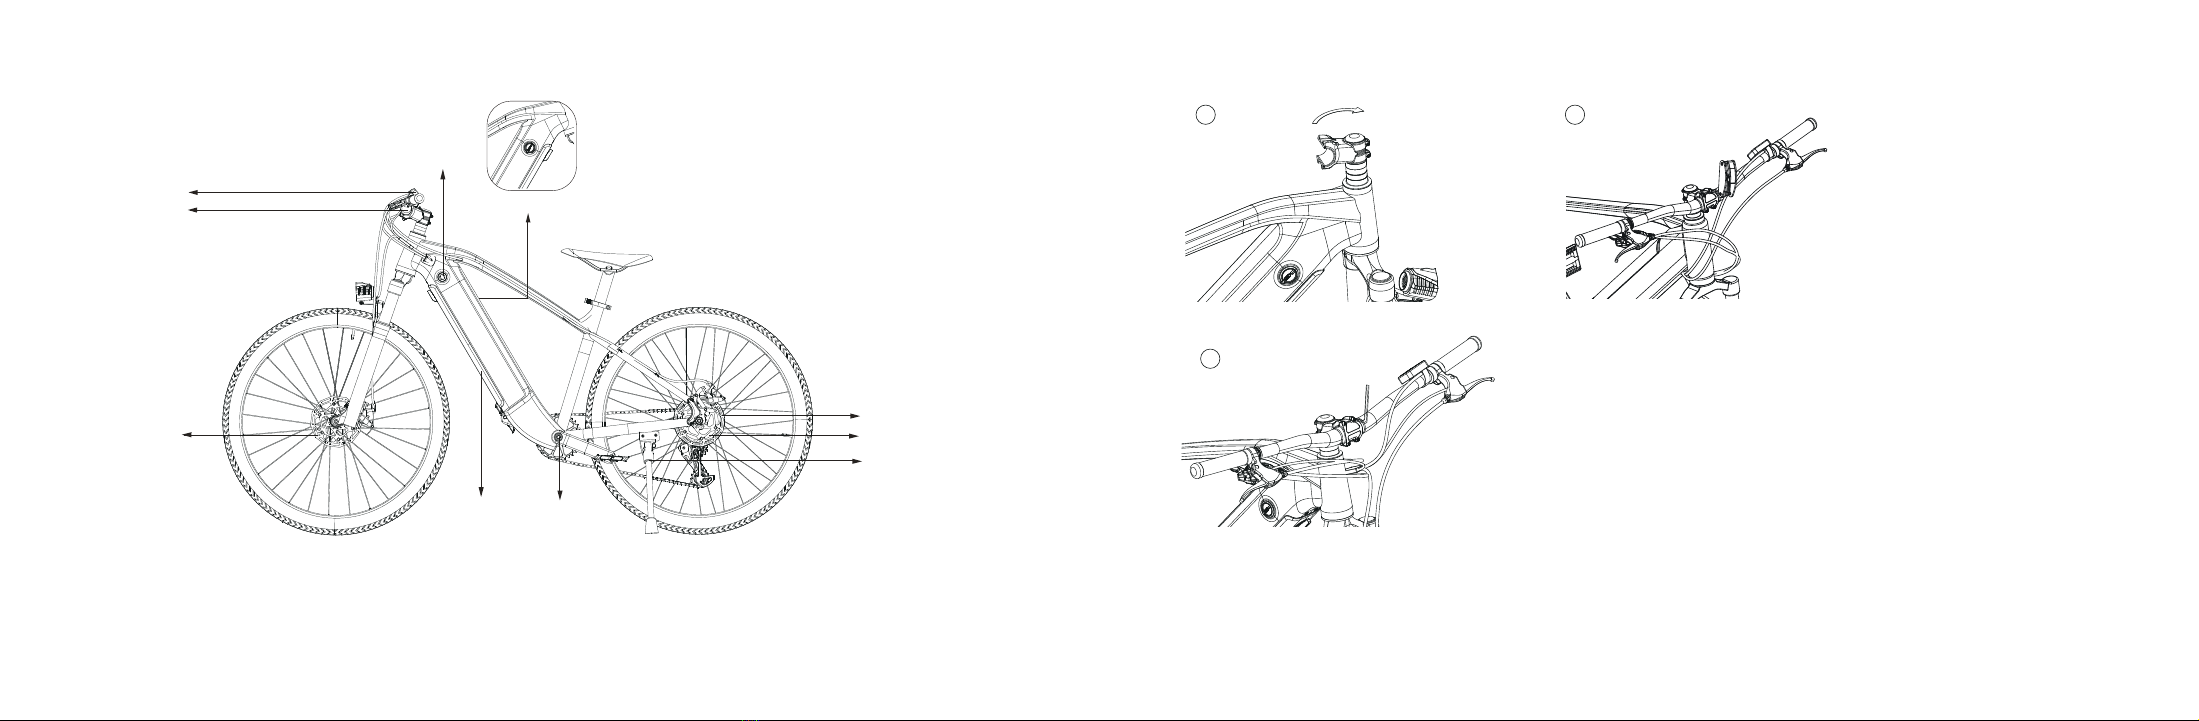
54
Display
Thumb Throttle
Disc Brake
Battery
Disc Brake
Motor
Kickstand
Charge Port
Battery Lock
Sensor
3.Installing The Handlebars
1. Shown in figure 1, according to the direction of the arrow, rotate the handle stem towards the front of the bike.
2. Put the handlebar in the handlebar mount and be careful with the wires.
3. Insert the screws and tighten alternating sides with installing tool.
4. Verify and check all items are tight.
1
3
2
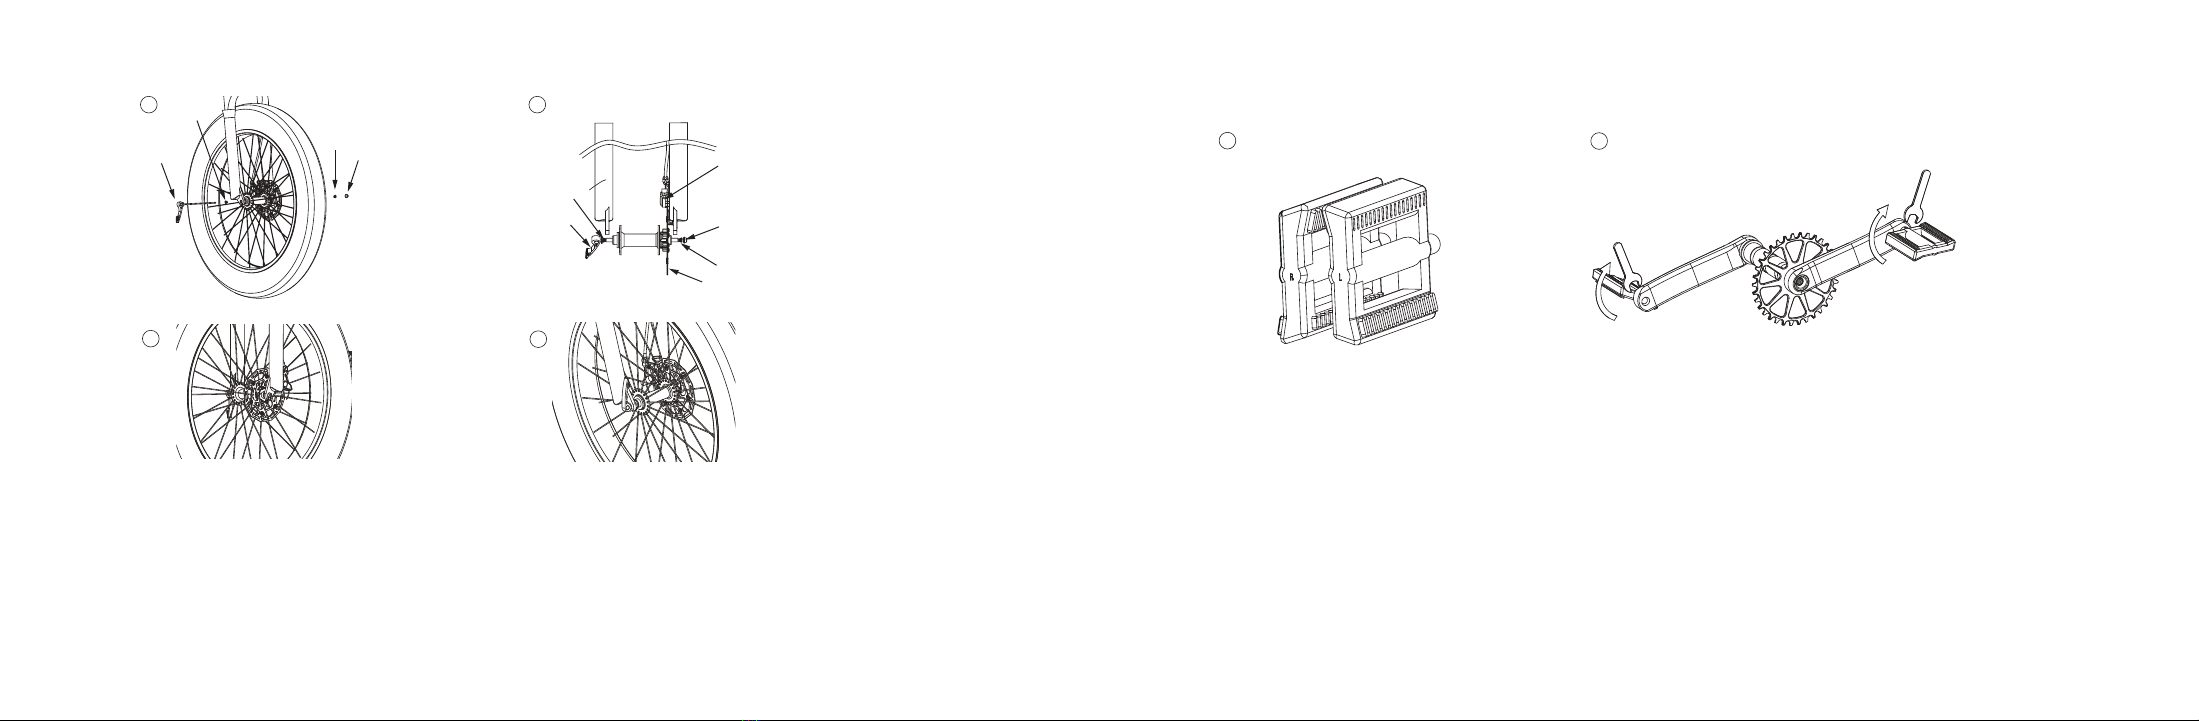
4. Installing The Front Wheel
76
Spring
Brake disc
5. Installing The Pedals
1. Insert the front wheel in between the front fork on the bike. Be sure the fork is resting on the outside of the axle.
2. Shown in figure 2, align the wheel axle with the disc brake slot, put the brake disc into the disc brake slot. Keep
the skewer and spring on the RIGHT side of electric bike's riding direction, and the other spring and the end nut on the LEFT
side of electric bike’s riding direction. Then insert the skewer into the wheel axle, shown in figure 1. BE AWARE TO DISTINGUISH
THE LEFT SIDE AND THE RIGHT SIDE.
3. Screw the skewer with the end nut and tighten.
4. Lock up the lever. Lift the lever up until parallel with the front fork. The front wheel is now installed.
1. Identify the Left and Right labels on the pedals. They can only be installed in their own side. INCORRECT INSTALLATION WILL
CAUSE DAMAGE. PLEASE BE AWARE TO DISTINGUISH LEFT & RIGHT BEFORE INSTALLATION.
2. L is for the Left pedal of the riding direction; R is for the Right pedal of the riding direction, Screw on the pedal in the direction
of the arrow.
3. Take out the 15 # open-end wrench in the tool kit and tighten it in the direction of the arrow.
12
34
Skewer
Spring
End nut
Spring
Spring
Skewer End nut
Disc brake slot
12
Left - Riding direction
Right - Riding direction

6. Installing The Headlight
9
7. Installing The Saddle
8
2. Tighten the screw with nut by using the installing tool.
3. Take out the hexagonal wrench and open-end wrench in the tool kit, adjust the headlight to the proper position, and then lock the screws.
1. Shown in Figure 1, insert the screw of the headlight into the headlight hole.
2.Push the saddle down, pull up or push down to adjust the height.
3.Check to make sure the saddle is fully inserted and adjust it accordingly.
1. Install the saddle according to the picture.
4. Lock the handle.
12
43
21
3
Nut Headlight hole
Headlight Hexagon wrench
Nut
Installing tool

1. Press and hold for 3 seconds to turn on the display. Your bike will be turned on. Press and hold for 3 seconds again to turn
off. The display will turn off automatically when there is no operation or riding for 5 minutes.
2. Short press the "+" or "-" button to change the boost level between 0-5 levels. 0 is the output power, 1 is the minimum boost, 5
is the maximum boost level.
3. Short press to switch the display data of multi-function area when the display is on.
4. When the power is on, press and hold "-" to enter 3.7MPH/H towing mode; release "-" to cancel towing mode.
1110
8. Display Introduction 9. How To Use The Display, Headlight & Horn
1. Press the light button to turn on/off the headlight
2. Press the horn button for horn control
Speed display
Controller failure
Brake
Motor failure
Voltage protection
Battery indicator
Cruise mark
Multi-function display area
Assist level
VOL:voltage ODO:total mileage
TRIP:single meleage
TIME:working time
1312
11. How To Charge The Battery
3
12
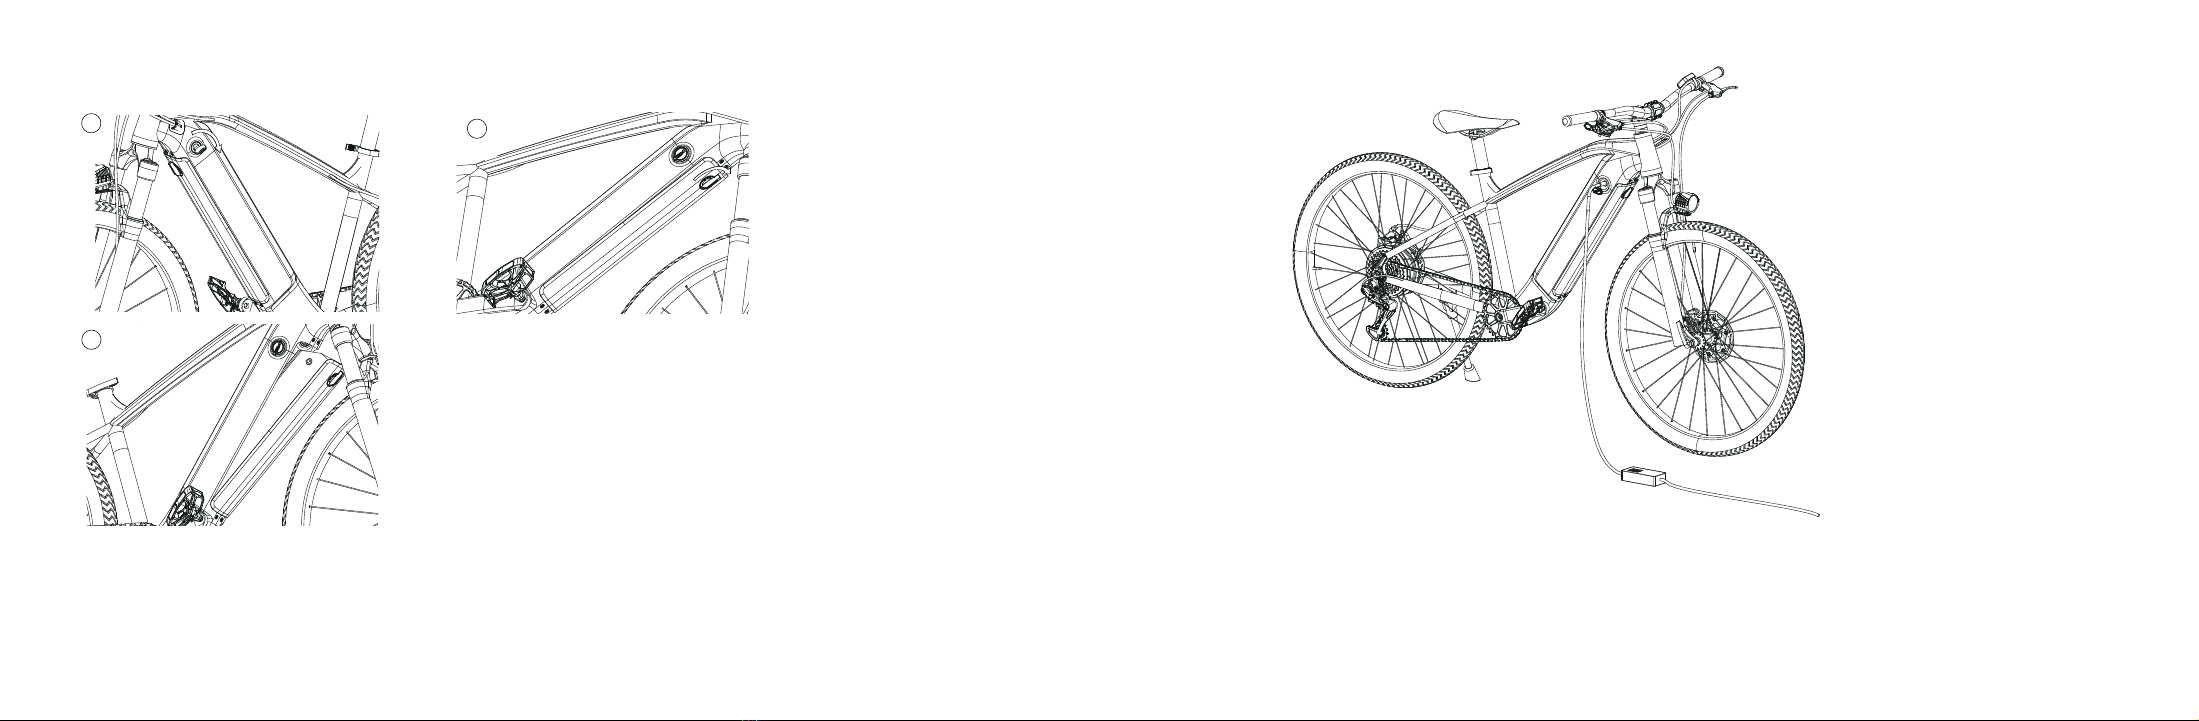
10. How To Take Off The Battery
1. Insert the key and turn 90 degrees clockwise to open the battery lock of the frame.
2. There is a separate battery lock at the bottom of the frame, which can be opened left or right.
3. Take out the battery upwards from the bottom of the frame.
Your electric bike will be fully charged when the LED light on the charger changes from red (charging) to green (fully charged).
After a period of full charge, it will automatically cut off the charging.
Even so, we still don't recommend to charge your electric bike for a long time.
Do not connect the charger if the charging port is wet. Cover the charging port when not use.

15
12. Notes of Charging
1. Charging time: 4 hours 80% full charge , full charge in 5-6 hours.
2. The small light on the charger in RED indicates it is in charging; GREEN indicates it is fully charged.
3. Insufficient charging will not influence the battery lifecycle. AVOIDING deep discharge is helpful to protect the
battery and extend its lifecycle.
4. Pay attention to check whether the surface temperature of the battery case rises too high during charging. It is
FORBIDDEN to cover battery with flammable and explosive materials while charging.
5. Due to high temperature in summer, it is NOT advised to charge it immediately after riding.
FORBIDDEN to charge the battery OUTSIDE where the temperature is below 32-degree F. You are recommended
to charge it in room temperature.
6. If the battery will not be used for a long time, take it off from the bike and discharge its capacity to 60%-80% for
stock. Disconnect it from the charger and place it in a dry, ventilated place without direct sunlight. In order to maintain
a long lifecycle, it is recommended to charge the battery every two months.
13. Daily Care And Maintenance
Cleaning and storage
If you see stains on the electric bike's body, wipe them off with a damp cloth. If the stains won't scrub off, put on some toothpaste, and brush them with a toothbrush,
then wipe them off with a damp cloth. If you see scratches on plastic parts, use sandpaper or other abrasive materials to polish them.
Notes: do not clean the electric bike with alcohol, gasoline, kerosene or other corrosive and volatile chemical solvents to prevent dire damage. Do not wash the
electric bike with a high-pressure water spray. During cleaning, make sure that the electric bike's turned off, the charging cable is unplugged as water leakage may
result in electric shock or other major problems.
When the electric bike's not in use, keep it indoors where it is dry and cool. Do not put it outdoors for long time. Excessive sunlight, overheating and overcooling
accelerate tire aging and compromise the electric bike and the battery pack's lifespan. (Lorsque le electric bike n'est pas utilisé, gardez-le à l'intérieur dans un
endroit sec et frais. Ne le mettez pas en plein air pendant longtemps. La lumière du soleil excessive, la surchauffe et le sur-refroidissement accélèrent le vieillisse-
ment des pneus et compromettent le electric bike et la durée de vie de la batterie.)
WARNING!
Battery maintenance
1. Use original battery packs, use of other models or brands may bring about safety issues;
2. Do not touch the contacts. Do not dismantle or puncture the casing. Keep the contacts away from metal objects to prevent short circuit which may result in battery
damage or even injuries and deaths;
3. Use original power adapter to avoid potential damage or fifire;
4. Mishandling of used batteries may do tremendous harm to the environment. To protect natural environment, please follow local regulations to properly dispose used
batteries;
5. After every use, fully charge the battery to prolong its lifespan.
Do not place the battery in an environment where the ambient temperature is higher than 104°F or lower than 14°F (e.g., do not leave the electric bike or the battery
pack in a car under direct sunlight for an extended time). Do not throw the battery pack into fifire as it may lead to battery failure, battery overheating, and even another
fifire. If the electric bike is expected to be left idle for more than 30 days, please fully charge the battery and place it in a dry and cool place. Keep in mind to recharge
it every 60 days to protect the battery from potential damage which is beyond limited warranty.
Always charge before exhausting the battery to prolong the battery's lifespan. The battery pack performs better at normal temperature, and poor when it is below 32°F.
For instance, when it is below -4°F, the riding range is only half or less at normal state. When the temperature rises, the riding range restores.
The damage caused by prolonged no charge is irreversible and is beyond limited warranty. Once the damage is done, the battery can not be recharged.
14

15. Limited Warranty Statement
30 DAY SATISFACTION GUARANTEED RETURN POLICY
If you are unsatisfied with your purchase, Hiboy's return policy allows you to return your undamaged Hiboy product purchased on the Authorization channel within 30 days counting
from the date of receipt of shipment, and request a refund from the Authorization channel for any reason. Note: The cost of return shipping will be borne by the customer if the
product has no quality issue.
For the return request, Hiboy is not responsible for lost packages due to the carrier, or products received that cannot be verified. Received products that have damage determined
to have been caused by the end-user may be subject to denial of the return request.
LIMITED PRODUCT WARRANTY
Hiboy product basically will be free from defects in materials and workmanship under normal use for a period aforementioned.
Hiboy does not warrant the operation of the product will be uninterrupted or error-free.
Hiboy is not responsible for damage arising from failure to follow instructions relating to the product's usage.
TO QUALIFY FOR A REFUND, ALL THE FOLLOWING CONDITIONS MUST BE MET:
1. A Return Merchandise Authorization (RMA) must be requested from Hiboy within 30 days from the date of receipt of shipment. To request an RMA, contact Hiboy Service
Team at support@hiboy.com.
2. The cost of return shipping will be borne by the customer.
3. For warranty service, please keep your receipt and/or invoice to validate proof of purchase.
4. Returned product must be in good physical condition (not physically broken or damaged).
5. All accessories originally included with your purchase must be included with your return.
6. If you return a product to Hiboy, (a) without an RMA from Hiboy(b) without all parts included in the original package, Hiboy retains the right to refuse delivery of such return.
1716
14. Specifications
P7
Dimensions
Size
Tire
Item weight
Max. load
Age
Max Speed
Pure Electric Riding Dist.(Load 143lb)
Pedal Assist Riding Dist.(Load 143lb)
Max Angle of Climb
70.1*28.9*41.5inch (178*73.5*105.5cm)
mountain tires 27.5*2.2inch
55.8lbs (25.3kg)
265lbs (120kg)
16–50
28mph (45km/h)
37mile (60km)
68mile (110km)
20%
IP Rating
Variable Speed
Frame Material
Input Vol.
Output Vol.
Bike IPX4, Battery IPX5
9 speeds
Aluminum alloy
AC 100-240V
DC54.6V 2A
Weight
Riding
Requirements
Main
Parameters
Charging adapter
ItemsSpecififications
[1] Item height: from the ground to the top of the bike;
[2] Pure Electric Riding Dist./Pedal Assist Riding Dist.: On flat surfaces, no wind, and 77°F, the bike was pedal-assisted in 1st
gear assist with a fully charged load of 165 lbs.
The real battery life vary with dierent factors of the load, humidity, wind speed and operation habits...etc

1918
REMEDIES
If a hardware defect is found and a valid claim is received by Hiboy within the Warranty Period, Hiboy will at its option and to the extent permitted by law, either (1) repair the
product at no charge, using new or refurbished replacement parts, (2) replace the product with a new or refurbished product. In the event of a defect, to the extent permitted
by law, these are your sole and exclusive remedies. Shipping and handling charges may apply except where prohibited by applicable law. This Limited Warranty is valid only in
the jurisdictions where the products are sold by www.hiboy.com, and is valid to the extent permitted by the applicable laws of such jurisdictions. Any replacement hardware
product will be warranted for the remainder of the original warranty period or thirty (30) days, whichever is longer, or for any additional period of time that may be applicable in
your jurisdiction.
HOW TO OBTAIN WARRANTY SERVICE
A Warranty Service Order must be requested from Hiboy within Warranty Period from the date of receipt of shipment. To request a Warranty Service Order, contact Hiboy
Service Team support@hiboy.com.
To obtain warranty service, you must deliver the product, in either its original packaging or packaging providing an equal degree of protection, to the address specified by
Hiboy. In accordance with applicable law, Hiboy may require the customer to furnish proof of purchase details and/or comply with registration requirements before receiving
warranty service period or thirty (30) days, whichever is longer, or for any additional period of time that may be applicable in your jurisdiction.
LIMITATION OF DAMAGES
Except to the extent prohibited by applicable law, Hiboy shall not be liable for any incidental, indirect, special, or consequential damages, including but not limited to loss of
profits, revenue or data, resulting from any breach of express or implied warranty or condition, or under any other legal theory, even when Hiboy has been advised of the
possibility of such damages. Some jurisdictions do not allow the exclusion or limitation of special, indirect, incidental or consequential damages, so the above limitation or
exclusion may not apply to you.
16. Question & Answer
1. Is there any necessary information need to be included before contacting with Hiboy Support Team?
A: Yes, if you need any support from Hiboy, please contact us at [email protected], and please always include your order number, correct model No., descriptions of
the problem, pictures, and videos that can show details about the issue in the email, thanks.
2. My electric bike can’t be turned on, what can I do?
A: First please make sure you are not turning on the electric bike during charging, because for safety consideration, we have set the electric bike can’t be turned on
during charging. Second please make sure the electric bike has been charged for a while to have enough battery to support it can be turned on, otherwise please
3. I can’t charge my electric bike, what’s the problem?
A: Please note if the electric bike is charging, then the led on the charger will show red color, if the electric bike is fully charged, then the led on the charger will show
green color.
So please help to verify if the charger is defective first: Plug the charger into the socket but not connecting to electric bike, if the charger led is NOT on or it is NOT
green color, then it means the charger is defective.
4.What if the electric bike arrived missing accessory or broken part?
A: Please take a photo and send to Hiboy Support Team’s email: [email protected], Hiboy Support Team will reply you soon and send correct accessory or part
replacement.
5. My electric bike is stolen, can you help me?
A: I’m sorry we can’t track on the location or serial number of the electric bike, please call the local policeman and ask them for help.
A: Our Hiboy Support Team will reply to you within 1 working day, if you didn’t receive any reply from us, please also kindly check your spam box, and add
[email protected] on your whitelist to make sure our reply is not blocked. In addition, you can also contact us on the platform where you purchased the electric bike
for example Amazon chat box, leave message on hiboy.com website, eBay chat box...etc.

2120
7. Why the speed can’t reach 28 mph?
Please make sure you have clicked the power button to set the assit lever to mode 5 on the left of the handlebar and the speed mode to 9 on the right .
After setting the speed mode to 5 and the power mode to 9s and the speed still can’t reach 28 mph, then please contact hiboy support team to change the controller .
In addition, the battery status, rider weight and road situation will also influence the max speed, with enough battery, within 220 lbs weight and ride on flat road can
reach 28 mph speed easily.
8. Why the max distance is lower than advertised max distance?
A: Please note the max distance is measured when it is no wind and at 77°F, the electric bike's fully charged to ride at a even speed of 21 mph (33.8 km/h) on a at
surface with a load of 165 pounds (75 kg). The real battery life vary with different factors of the load , humidity , wind speed and operation habits...etc.
9.Can I ride the electric bike in the rainy days?
A: Kindly note the electric bike waterproof level is IPX4, we don’t suggest you to ride it in the rainy days.
10. Is there any caution for storing the electric bike if I need to go out for a long time vacation?
A: Please make sure the electric bike is stored in a dry & cool place, do not put it outdoors for long time, and if the electric bike is expected to be left idle for more
than 30 days, please fully charge the battery, keep in mind to recharge it every 60 days to protect the battery from potential damage which is beyond limited warranty
Trouble Shooting
Error code Error description Solution
E2 Brake handle error Need to replace the brake handle
E3 Sensor error Need to replace the sensor
E6 Battery low voltage error Need to replace the battery and controller
E7 Moter error Need to replace the motor
E8 Handlebar error Need to replace the handlebar
E9 Controller error Need to replace the controller
E10 Communication error
Plug and unplug the communication cable
again,if there is still an error of 10,replace the
communication cable
/ Headlight not work/Horn not sound Need to replace the headlight only

22
17. Contact Us
Contact us if you experience issues relating to riding, maintenance and safety, or errors/faults with your Hiboy Electric Bike P7.
E-mail Service: support@hiboy.com
@HiboyUS
HiboyUS
www.hiboy.com
@Hiboy_Official
Table of contents
Other Hiboy Scooter manuals


