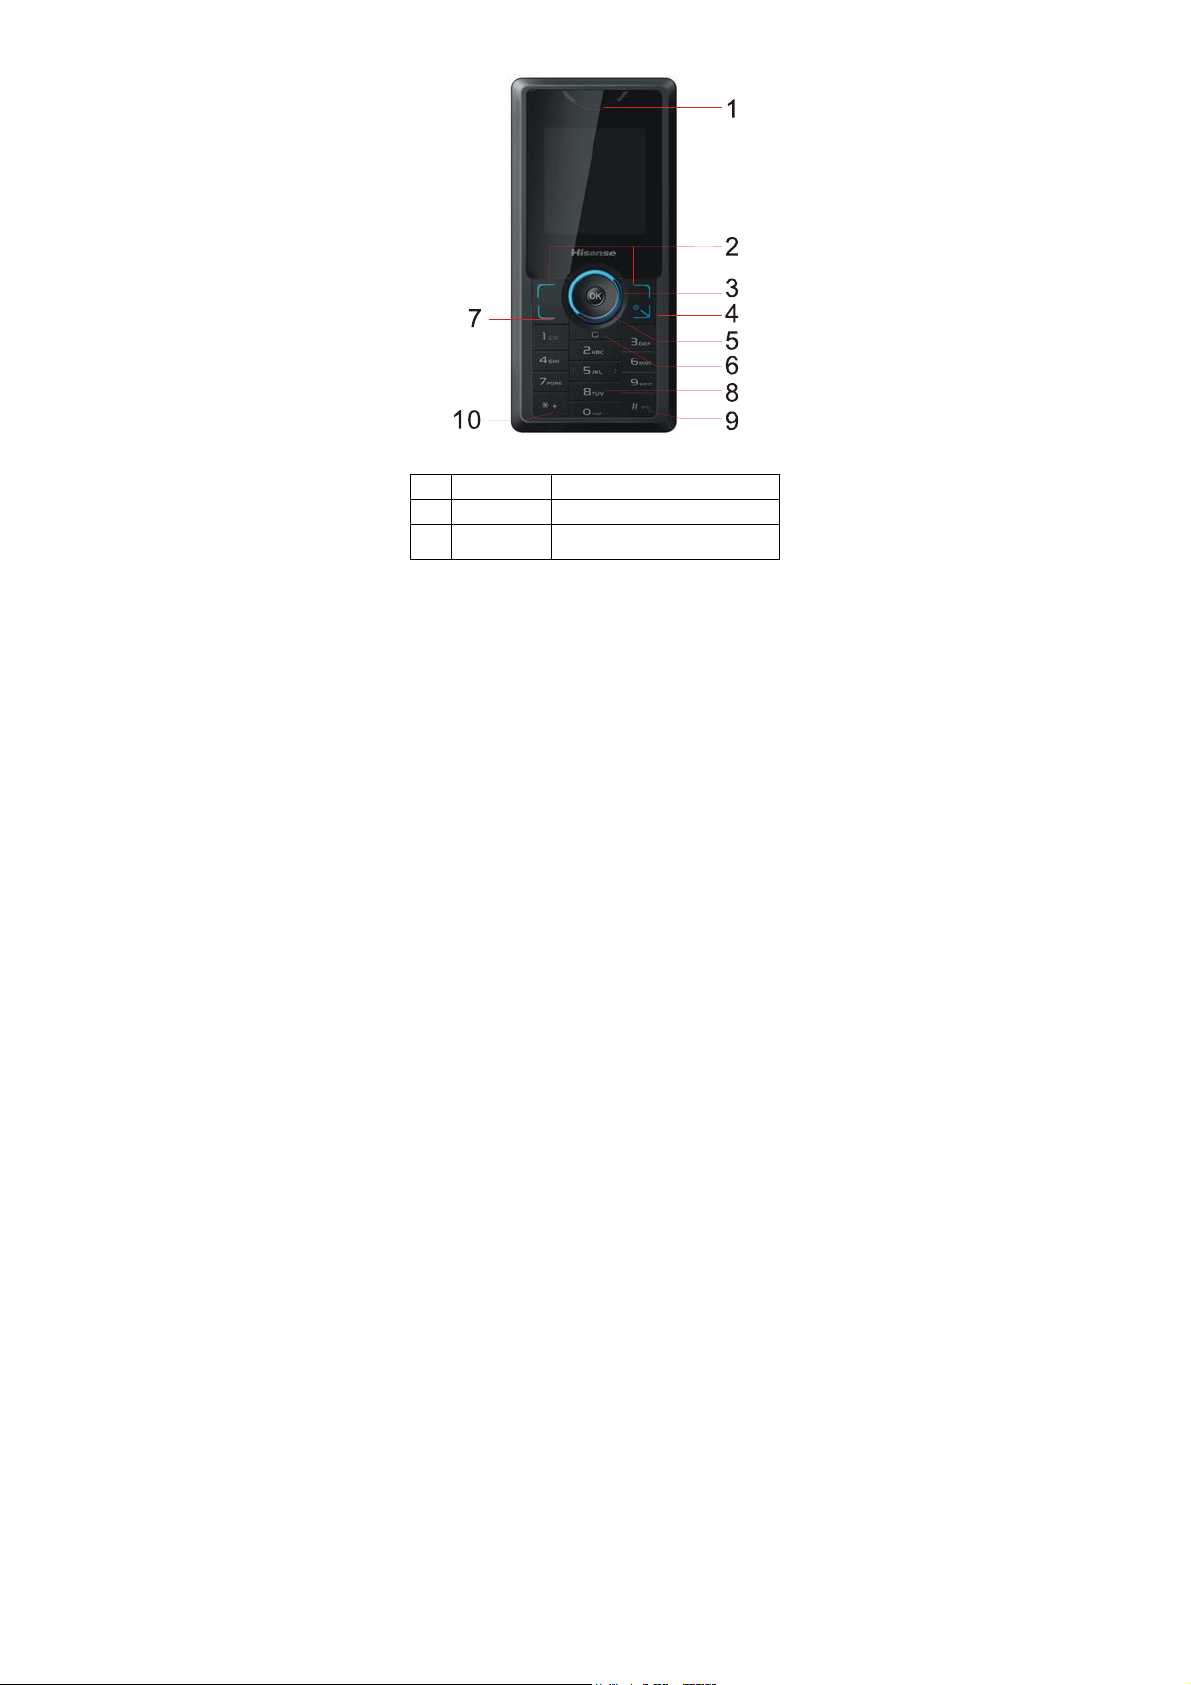
Hisense HS-C199A User manual

HS-C199A
CDMA 1X Mobile Phone
User Manual

Part Names and Functions
Name Function
1 Earpiece Hear voices here during a talk.
2 Left/Right
Soft Keys Perform the functions identified
by the prompts displayed at the

left and right bottom of the
screen.
When in idle screen, press Left
Soft key to display main menu.
When in idle screen, press
Right Soft key to display
phbook content.
3 “OK” Key Enter the select menu when in
menu operations. Press to best
tone from the idle screen.
4 Power Key Power on/off your phone.
When powered on and in any
other screen, press Power key
to the idle screen.
5 Multi-Direc
tional
Keys
From idle screen, press Up key
to display the SMS menu,
press Down key to display
BREW menu, press Right key
to display profile,press Left
key to view the entermainment.
When in menu operation, scroll
through and highlight the menu
item.
6 Clear Key Return to the super menu.
7 Send key Send and receive a call. Press
to view the outgoing calls from
idle screen.
8 Numeric
keys Input numbers and characters.

9 # Key From idle screen, press and
hold to switch the Profiles
menus quickly.
10 * Key From idle screen, press and
hold to lock your phone.
Note:
The preset code is “0000”.
MainLCD
1. Icon area
Display the current CDMA network signal
strength. The more bars show, the
stronger the signal is. When there is no
network signal available, it displays×.
Indicate that the phone is in call or a call is
incoming. Or indicate that data connection
is activated for data services.
Indicate that there are unread messages.
Indicate that your phone is in General
mode.
Indicate that your phone is in mut mode.
Indicate that your phone is in meeting
mode.
Indicate that your phone is in outdoor
mode.
Indicate that message box is full.
Indicate that your phone has been locked.

Indicate that your keyboard has been
locked.
Indicate that your phone is in roaming
state.
Indicate that alarm clock has been set.
Indicate that earphone has been inserted.
Indicate the current battery volume level.
Note:
Roam Indicate only displays in international roaming
state.
2. Date and time
The currently date and time display on the idle screen.
3. Soft Key Labels
Display the corresponding functions for Left/Right Soft
key.
The Idle Display is the standard display that you see
when you are not on a call or using the menu.
Installing the card
Your phone must work with an card provided by your
service provider. Your card contains all your
subscription information.

Insert card with the metal contacts facing down and
the cut corner aligned with that of the compartment.
Install the battery.
Note:
1. If no card is installed, or there are errors in the
installation, or your card is damaged, then your
phone’s LCD will display “Insert card” when it’s
powered on.
2. If your card is locked, your phone will display
“unlock PIN”. Please contact your network
service provider.
3. When installing card, please keep it away from
possible damage caused by static, scratch and
bend, and put it where is not available for
children.

Installing the Battery
You must install and charge the battery to use your
phone. Insert the ridge at the side of the battery into
the base of the phone, then push the battery down
and snap it into place.
Note:
Your phone is designed to be used only with Original
batteries and chargers. Use of other batteries or
charger may cause damage to your phone and void
the warranty.
Charging the Battery
New batteries are shipped partially charged. Before
you can use your phone, you need to charge the
battery, as indicated by the following instructions.
Some batteries perform best after several full
charge/discharge cycles.
1. Connect charging line and changing base. Plug
the charger into your phone’s connector port

with the arrow facing up.
2. Plug the other end of the charger into the
appropriate electrical outlet (100~230VAC).
3. When your phone indicates that the battery is
fully charged, press the release tab and remove
the travel charger.
Note:
1. Before charge, make sure the battery is
installed in the phone.
2. If the status lamp flashes in red, please remove
your travel charger and insert it again. If this
makes no effect, stop charge and send the
charger for repair.
3. If the battery’s charge is extremely low, the sub
LCD may not light even when charge has
begun. After a period of charge then the LCD
can light.
Removing the Battery
Make sure your phone is powered off so that you don’t
lose any unsaved information.
Push down the battery release latch and lift the
battery off the phone.

Battery Level Indicator
Your Phone is equipped with a Lithium Ion (Li-Ion)
battery which can be recharged before completely
drained. The battery provides approx 2 hours of
continuous talk time or approx 5 days of continuous
standby time.
Battery Level Indicator changes according to the
battery’s charge volume as below:
Full charge
Partial charge
Low charge
Extremely low charge
If the charge continues to get low, the Indicator begins
flashing. When the charge becomes drained, your

phone gives an alert and the message of “Low
battery” is displayed on the screen. Several minutes
later your phone will alert again and then turn off
automatically.
Battery performance
800mAh (standard battery)
Standby
time* About 7 days
Talking time* About 240 minutes
zLocal network conditions, phone’s settings,
game and music playing, data services and
frequent operations can affect battery’s standby
time.
zThe battery performance is also affected by
charge state, temperature.
Basic functions
Mainmenu
surfing Memory
status
Auto power
on/off
Best Tone Recent calls PIM
i Music Missed calls Alarm
Download Received
calls
Calendar
PhBook Outgoing
calls
Memo
Search by
name
Call time Calculator

Add Call record Stopwatch
Search by
group
My Document Timer
Search by
position
User Converter
Speed dial My data State number
Own number Picture World time
Phbook
management
Ring Entertainment
SMS Other Game
Write
message
Memory
status
Custom service
Inbox Settings Customer
Hotline
Outbox Profiles Mobile e-hall
Draft Security
settings
Club
Settings Call settings Calling
Secretary
Reserved
SMS
Display
Settings
My Subscription
Send report Keystoke
Settings
Phone service
guide
Turning Your Phone On and Off
1. Press and hold Power key for more than 3
seconds to turn on your phone.
2. When a network is found, the phone will enter
Idle display, from which you can send calls and
do other operations.

3. Press and hold Power key for more than 2
seconds to turn off your phone.
Usingthemenu
1. Press Left Soft key to enter the main menu.
2. Press Up/Down key to scroll through and highlight
the menu item.
3. Press OK key to enter the selected menu.
4. To enter the submenu, you have two methods:
zPress Up/Down key to select the menu, press
OK key to enter the menu.
zPress the corresponding number to enter the
submenu.
5. Press Right Soft key to pre-menu.
6. Press Power key to return the idle screen.
Lockthekeyboard
Press and hold *key to lock the keyboard, press Left
Soft Key and *key to undo the lock.
MakingaCall
Your Phone offers a variety of ways to make a call,
including Speed Dialing and dial from Call Logs and
phonebook.
Making a Call Using the Keypad
To make a call using the keypad from idle display:
Press Numeric keys to dial the phone number.
If you make a mistake, press Right Soft Key to delete
last digit.
If you want to dial extension number at one time,
press and hold * key to input “P” and follow with

extension number.
Press Send key to make the call.
For the extension number, you need to press Send
key again.
To end the call, press Power key.
Making a Call Using Phonebook
To dial directly from a Phonebook record from idle
display:
1. Press Right Soft key to enter phonebook menu,
select Search.
2. Now search by name. Input the first letter, or
letters of the name you are looking for and
press OK, then a list of records beginning with
those letters are displayed.
Or you can choose to search by group.
Or you can just press OK to view all records list
and scroll through to find the record you want.
3. Enter the record to see detail. Select a phone
number and press Send key to dial it.
If one record has more than one phone number
stored and you dial it directly, the first number is
selected and dialed out.
4. To end the call, press End/Power key.
Making a Call with a Speed Dial
If you input one number and press Send key, then the
entry stored in this location is selected and dialed out.
Answering a Call
When you receive a call, your phone rings and/or
vibrates and displays an incoming call message. At

the same time it displays the using net service.
Press Send key to answer the call.
Press Power key to reject the incoming call.
Note:
When you are talking using the phone and another
phone are calling, you can choose receive or reject it.
If you receive it, the formerly one will be auto-rejected.
Recent Calls
■Dialed Calls
Press Send key to view dialed calls list from idle
display. Select the record you want with Up/Down keys
and press Send key to dial it, or press OK key to view
its detail.
■Received Calls
Press Left key to view the received calls list from idle
display. Press Right key to view the missed calls list
from idle display.
Select the record you want with Up/Down keys and
press Send key to dial it, or press OK key to view its
detail.
When viewing list of incoming/received/missed calls,
press Right Soft key to pop up the submenu.
ReadaMessage
When a new message is received, your phone will
alert according to your settings and the message
unread icon will be displayed. Press Left Soft key to
read it.

EnteringText
Multiple methods are provided making it easy for you
to enter names, numbers, and messages on your
phone.
Choosing a Text-Entry Method.
The input methods provided as:
1 En Let the phone predict each word as
you enter it. Enter English words.
2 1 Enter numbers only.
3 A Enter capital letters.
4 a Enter lowercase
Whenever in a text-entry screen, press # key to
selecting input method.
Press 1 key to enter punctuations and symbols in any
text-entry method except number method. Use
Up/Down key to scroll to other page, use Left/Right
key to scroll in one line.
Press a number key one or more times to select a
letter, number, or symbol showing.
Using English Entry Method
Predictive Text Entry lets you enter a word using one
keypad per letter. This software analyzes the
combination of letters you have entered using an
intuitive word database, and creates a suitable word
automatically.
Alternative words and letter combinations are shown
at the bottom of the display. The word choices are
updated with each keypad. Press Up/Down key for
other choices.
Press Left/Right key to highlight the word you want.

Press * key to change the words to initial character
capitalized, all capital characters, or all lowercase
characters.
Press OK key to enter the word at the cursor location.
A space is automatically inserted after the word.
Note:
The database of the predictive input software contains
20,000 most frequently used words. If the word you
desired is not in the word choices, you can enter it by
Tap Method.
Entering Numbers
Press corresponding numeric key to enter the desired
number.
Enter capital letters
Press the keyboard to enter the letters one by one.
You can press one key many times to choose the right
letter, number or symbol.
Enter lowercase letters
Enter the lowercase letters with tap method.
Text Entry Submenu
When entering texts, press Right Soft Key to display
submenu.
Eg: press “3” to enter paste mode. Use Left/Right
Direction Keys to move to the position you want to
paste the copied texts and press OK to paste them.
Note:
Press the number key to select the corresponding
function in the submenu directly. E.g.: if the submenu
has pop up, press “7” to select an expression.

FCC Warning
NOTE: This equipment has been tested and found to
comply with the limits for a Class B digital device,
pursuant to part 15 of the FCC Rules. These limits are
designed to provide reasonable protection against
harmful interference in a residential installation. This
equipment generates, uses and can radiate radio
frequency energy and, if not installed and used in
accordance with the instructions, may cause harmful
interference to radio communications. However, there
is no guarantee that interference will not occur in a
particular installation.
If this equipment does cause harmful interference to
radio or television reception, which can be determined
by turning the equipment off and on, the user is
encouraged to try to correct the interference by one or
more of the following measures:
—Reorient or relocate the receiving antenna.
—Increase the separation between the equipment and receiver.
—Connect the equipment into an outlet on a circuit different from
that to which the receiver is connected.
—Consult the dealer or an experienced radio/TV technician for
help.
This device complies with part 15 of the FCC Rules.
Operation is subject to the following two conditions:
(1) The device may not cause harmful interference, and (2) this
device must accept any interference received, including
interference that may cause undesired operation.
Changes or modification not expressly approved by
the party responsible for compliance could void the
user’s authority to operate the equipment.

FCC Radio Frequency Exposure statement, This
product has been evaluated under FCC Bulletin OET
65C and found compliant to the requirement asset as
set forth in CFR 47 section 2.1093 addressing RF
Exposure from radio frequency device. The redialed
output power of this product is far below the FCC
radio frequency exposure limits.
The SAR limit of USA (FCC) is 1.6W/kg averaged
over one gram of tissue. Device types HS-C199A
(FCC ID: SARHISENSEC199A) has also been tested
against this SAR limit. The Highest SAR Values
reported under this standard during product
certification for use at the ear is 1.02 W/kg and when
properly worn on the body is 0.514 W/kg. This device
was tested for typical body-worn operations with the
back of the handset kept 1.5 cm from the body. To
maintain compliance with FCC RF exposure
requirements, use accessories that maintain a 1.5cm
separation distance between the user’s body and the
back of the handset. The use of belt clips, holsters
and similar accessories should not contain metallic
components in its assembly. The use of accessories
that do not satisfy these requirements may not comply
with FCC RF exposure requirements, and should be
avoided.
Table of contents
Other Hisense Cell Phone manuals

Hisense
Hisense U909 User manual

Hisense
Hisense E860 User manual

Hisense
Hisense U980 User manual

Hisense
Hisense Rocks 6 User manual

Hisense
Hisense E60 Lite User manual

Hisense
Hisense Infinity H50 User manual

Hisense
Hisense F20 User manual

Hisense
Hisense E40 User manual

Hisense
Hisense HLTE228E User manual

Hisense
Hisense Infinity F24-CN User manual

Hisense
Hisense HLTE310E User manual

Hisense
Hisense V40i User manual

Hisense
Hisense L675 User manual

Hisense
Hisense U971 User manual

Hisense
Hisense F10 User manual

Hisense
Hisense E50Lite User manual

Hisense
Hisense F24 User manual

Hisense
Hisense H60 Smart User manual

Hisense
Hisense Rock 5 User manual

Hisense
Hisense Infinity H60 5G User manual