Hobo MX2501 User manual
Quick Start for the HOBO® MX pH and Temperature Logger (MX2501)
22510-F MAN-MX2501-QSG
IMPORTANT: The logger is shipped with the pH electrode installed and submerged in storage solution. The pH sensor must be kept in
storage solution when not being calibrated or deployed in water. The hydration layer surrounding the sensor starts to break down after
10 minutes if the pH sensor is not submerged in storage solution or calibration solution, or deployed in water.
IMPORTANT: The pH electrode is uncalibrated. You must calibrate the logger as described in step 2 before configuring and deploying it.
1 Download and open HOBOmobile.
a. Download HOBOmobile® to your phone or tablet.
b. Open HOBOmobile. If prompted, enable Bluetooth® in your device settings.
c. Slide the switch on the mounting end of the logger to wake it up (see diagram on back). Tap the HOBOs icon at the bottom
of the screen. The logger should appear in the list. If it does not, make sure it is within range of your phone or tablet.
2 Calibrate the logger.
Before you begin: To complete these steps, you will need
deionized or distilled water, a squirt bottle, calibration
solution (also known as buffer solution), and beakers.
Note: pH values of calibration buffers and samples will vary
depending on their temperature. As a result of this, it is
important that the logger is calibrated in buffers that have
the same temperature as that of the sample. Refer to the
chart on the calibration buffer bottles or in the logger manual
for the effect of temperature on the buffer pH values.
a. Pour each calibration solution into its own beaker (for
two-point calibrations, use pH 7.00 and pH 4.01, or pH
7.00 and pH 10.00 solution; for three-point calibration,
use pH 7.00, pH 4.01, and pH 10.00 solution). You will
need enough solution in the beaker to cover the sensor
end cap and closure cap on the logger.
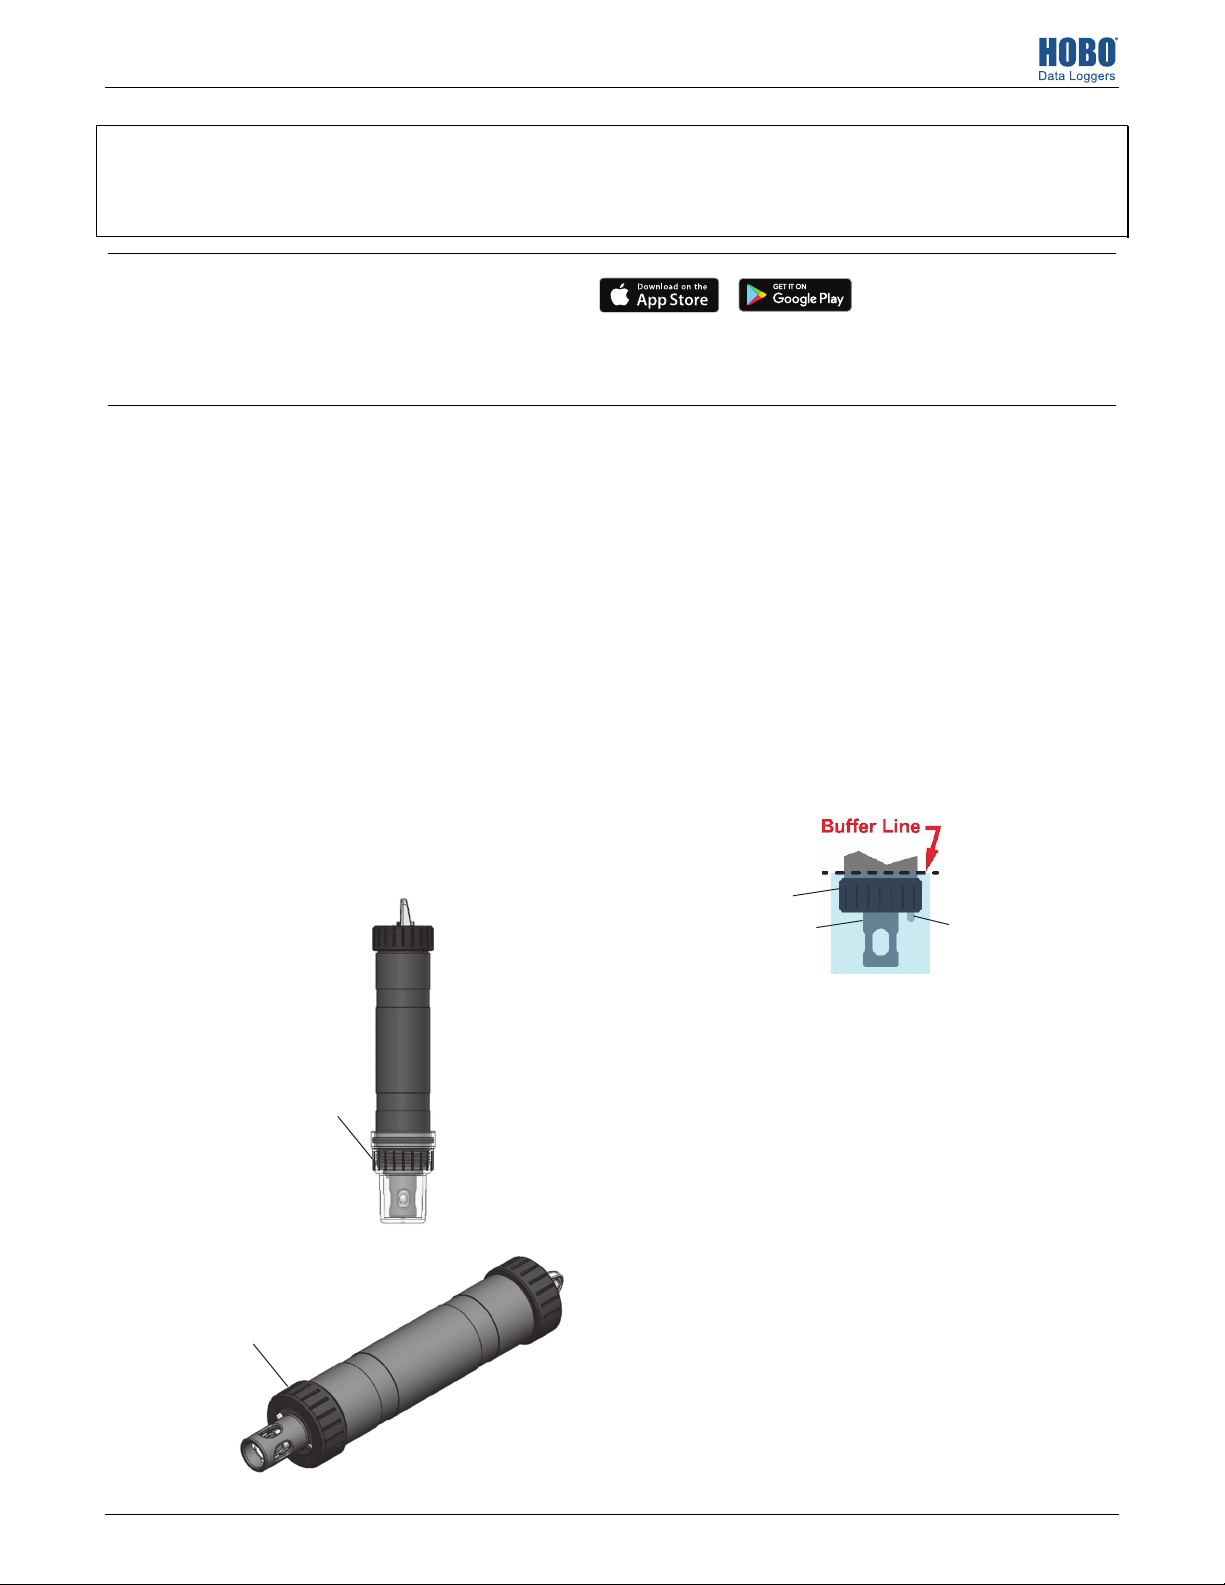
b. Unscrew the clear storage cap filled with storage solution
and remove it from the logger. Keep the cap filled with
storage solution nearby in case you need to reinstall it
after calibrating and before deploying the logger.
c. Screw the closure cap onto the logger.
d. Use a squirt bottle to rinse the pH sensor with deionized
or distilled water.
e. In HOBOmobile, tap the HOBOs icon at the bottom of the
screen and then tap the logger in the list.
f. Once connected, tap Yes if prompted to calibrate the
logger. Otherwise, select pH Calibration.
g. Select the calibration type (two-point using pH 7.00 and
4.01 solution, two-point using pH 7.00 and 10.00
solution, or three-point using pH 7.00, 4.01, and 10.00
solution). Tap Start Calibration.
h. Place the sensor end of the logger in the pH 7.00
solution. Make sure the sensor end cap, temperature
sensor, and closure cap are submerged in the solution as
shown in the illustration. Follow the instructions on the
screen. Once the pH reading is stable, tap Confirm Buffer.
i. Rinse the pH sensor with deionized or distilled water. Tap
Next Buffer.
j. Place the sensor end of the logger in either the pH 4.01
or 10.00 solution as prompted in HOBOmobile. Follow
the instructions on the screen. Once the pH reading is
stable, tap Confirm Buffer.
k. If you selected three-point calibration, repeat steps i–j.
l. Tap Save Calibration.
m. Rinse the pH sensor with deionized or distilled water.
If you will not be deploying the logger immediately, place
the pH electrode back into the storage solution. Unscrew
the sensor end cap you installed in step c. Make sure the
storage solution reaches the marked fill line on the clear
storage cap; pour more into the cap if necessary. Carefully
screw the clear cap with storage solution onto the logger.
Only use storage solution in the clear cap; do not use water.
Do not use the copper guard when the pH electrode is in
storage solution.
Unscrew the clear
cap filled with
storage solution
from the logger
Screw the closure
cap onto the logger
before calibrating
Closure cap
Sensor end cap Temperature sensor

1-800-LOGGERS (564-4377) • 508-759-9500
www.onsetcomp.com/support/contact
© 2018 Onset Computer Corporation. All rights reserved. Onset, HOBO, and HOBOmobile are registered trademarks of
Onset Computer Corporation. App Store is a service mark of Apple Inc. Google Play is a trademark of Google Inc. Bluetooth
is a registered trademark of Bluetooth SIG, Inc. All other trademarks are the property of their respective companies.
This product has been manufactured by Onset Computer Corporation and in compliance with Onset’s ISO 9001:2015
Quality Management System.
Patent #: 8,860,569 22510-F MAN-MX2501-QSG
3
Configure the logger.
a. Tap Configure from the Connected screen in HOBOmobile. (If the logger is not connected, tap the HOBOs icon and then
select the logger).
b. Choose the logger settings. Note that the default Bluetooth setting for the logger is Bluetooth Always On, which means it will
“advertise” or regularly send out a Bluetooth signal for the phone or tablet to find via HOBOmobile. This setting uses battery
power. You can change this to one of the following power saving modes:
• Bluetooth Always Off. The logger will only advertise when you slide the switch on top of the
logger to wake it up.
• Bluetooth Off Water Detect. The logger will only advertise when it is out of water. When it is in
water, the Bluetooth signal is automatically disabled.
c. Tap Start in the upper right corner of the Configure screen after you have selected all the
settings. The logger will begin logging data based on the settings you selected. If you configured
the logger to start or stop logging with the On Button Push option, slide the switch on the
mounting end of the logger for 3 seconds.
4
Deploy the logger.
Deploy the logger to the location where you will be monitoring the conditions. Remove the clear
storage cap from the logger if installed and replace it with the closure cap. If your water sample is
prone to biofouling, insert the optional copper anti-biofouling guard around the pH sensor as shown
at right. Gently twist the copper guard so that the holes line up with the holes in the sensor end cap
and pH electrode. Do not use the copper guard when the pH sensor is being calibrated or in storage
solution, or if the sensor is placed in a very small container with still water or in water where copper
can affect the environment.
5
Download data from the logger.
a. Open HOBOmobile.
b. If the logger was configured with Bluetooth Always Off, slide the switch on the logger for 1 second to wake it up. If the logger
was configured with Bluetooth Off Water Detect and it is deployed in water, remove it from the water.
c. Tap the HOBOs icon in HOBOmobile and tap the logger to connect to it.
d. Once connected, tap Readout. The data file from the logger is saved to your device. Tap the Data Files icon and then tap the
mini-graph to view a larger version of the graph or to share the file.
For information on using this logger, refer to the complete product manual. Scan the code at left or go to
www.onsetcomp.com/support/manuals/22511-mx2501-manual.
Copper guard
installed to
protect against
biofouling
Slide switch to start or stop
logging or to wake up the logger
Make sure the closure cap is installed
before deploying the logger
Other manuals for MX2501
4
Other Hobo Data Logger manuals


Hobo
Hobo H11-001 User manual

Hobo
Hobo MX2001-0 Series User manual

Hobo
Hobo MicroRX Station RX2103 User manual

Hobo
Hobo RXMOD-RXW Series User manual

Hobo
Hobo UX100-023A User manual

Hobo
Hobo UX90-002 Series User manual

Hobo
Hobo MX2306 User manual

Hobo
Hobo U12-012 User manual

Hobo
Hobo Micro Station User manual

Hobo
Hobo MX1104 User manual


