manuals.online logo
Brands
  1. Home
  2. •
  3. Brands
  4. •
  5. Honeywell Home
  6. •
  7. Security Sensor
  8. •
  9. Honeywell Home PROSiX Series Assembly instructions

Honeywell Home PROSiX Series Assembly instructions

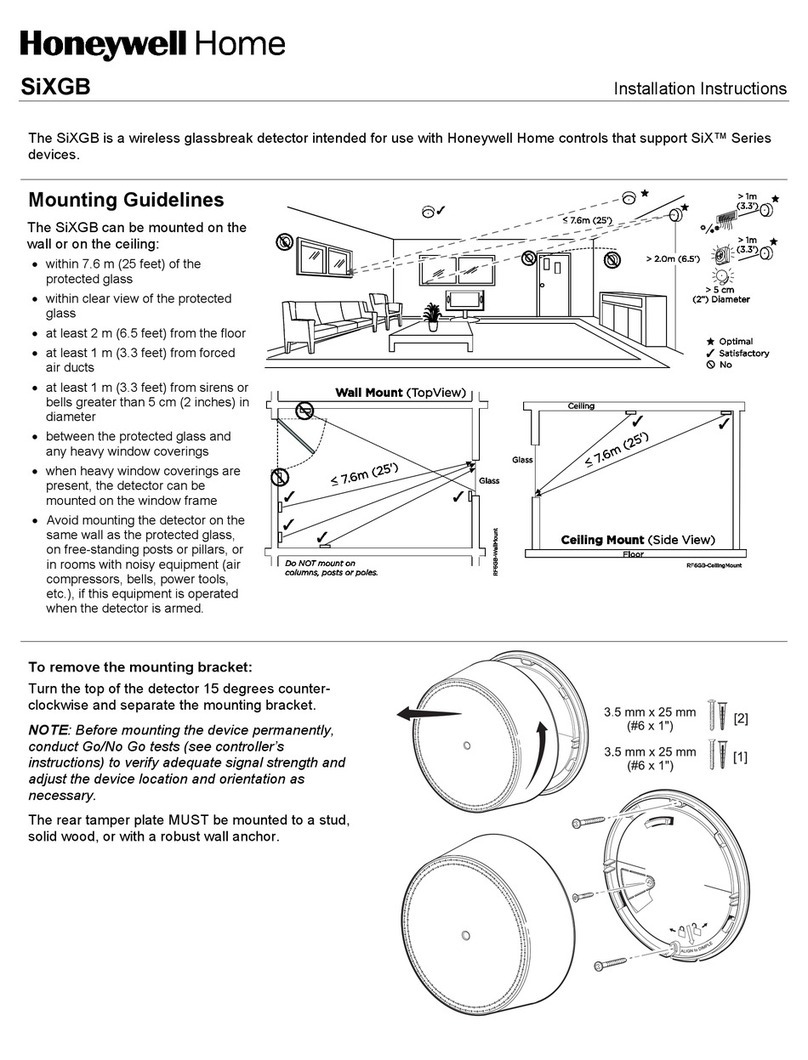
PROSiXGB
Wireless Glass Break Detector
Installation and Setup Guide
The PROSiXGB is a wireless glassbreak detector intended for use with Honeywell Home controls that support
PROSiX™ Series devices.
MOUNTING GUIDELINES
The PROSiXGB can be mounted
on the wall or on the ceiling:
•within 7.6 m (25 feet) of the
protected glass
•within clear view of the protected
glass
•at least 2 m (6.5 feet) from the floor
•at least 1 m (3.3 feet) from forced
air ducts
•at least 1 m (3.3 feet) from sirens or
bells greater than 5 cm (2 inches) in
diameter
•between the protected glass and
any heavy window coverings
•when heavy window coverings are
present, the detector can be
mounted on the window frame
•Avoid mounting the detector on the
same wall as the protected glass,
on free-standing posts or pillars, or
in rooms with noisy equipment (air
compressors, bells, power tools,
etc.), if this equipment is operated
when the detector is armed.
To remove the mounting bracket:
Turn the top of the detector 15 degrees counter-
clockwise and separate the mounting bracket.
NOTE: Before mounting the device permanently,
conduct a sensor test (see controller’s
instructions) to verify adequate signal
strength and adjust the device location and
orientation as necessary.
The rear tamper plate MUST be mounted to a stud,
solid wood, or with a robust wall anchor.
2
ENROLL
Set the controller in Programming Mode and when prompted:
1. Remove the battery tab to activate the device and begin the enrollment process.
2. The Green [G1]1LED flashes during enrollment (up to about 20 seconds*) The device sends its unique MAC ID
(Serial Number) and Services information to the controller.
*NOTE: Enrollment time varies depending on the signal strength between the device and the controller.
3. The Green [G1] LED is ON for 3 seconds.
If the sensor is not successfully enrolled during the enrollment period, the LED turns off and the device powers down.
Activate the tamper, power down and up again, or use the FG-701 Glassbreak Simulator to restart the enrollment
process.
1Refer to the PROSiXGB LEDs section.
NOTE: Once enrolled in a system, the detector cannot be used with another controller until it is removed from the
current controller. See the Controller’s instructions for details.
PROGRAM THE PROSIXGB
Consult the Controller’s instructions for programming
the device in the system.
Adjust the detector sensitivity setting in the controller
programming mode. Refer to the table on the right for
sensitivity options.
Sensitivity Setting Approximate Range
High* 4.6-7.6m / 15-25 ft.
Medium 3-4.6m / 10-15 ft.
Low 1.5-3m / 5-10 ft.
Lowest 0-1.5m / 0-5 ft.
*Factory default. Change the sensitivity setting at
the Controller.
3
PROSIXGB LEDS
The detector has three LEDs which are visible when
the unit is mounted.
Green 1 [G1] LED indicates device enrollment and
tamper status.
The Red [R] and Green 2 [G2] LEDs provide
information on detector status during Test Mode. The
Green 2LED indicates events and the Red LED
indicates Alarms.
LED INDICATIONS TABLE
G1 Red G2 Status
1
10 minute Test Mode
Event detected during Test Mode
Alarm detected during Test Mode
2
2
Low Battery detected during Test Mode
Device not enrolled; Enrollment activated
Device enrolled and tamper detected
NOTE: Before using the Test Mode, the detector must first be enrolled in the controller.
1If the PROSiXGB Test Mode is activated by the FG701, the [G2] LED will flicker, then be off for 3 seconds, then flash once per second.
2
This feature is used for field diagnosis. To save power, the LEDs are not visible during Normal Mode.
TEST THE PROSIXGB
The detector should be tested after installation and at least once a
year.
Test Mode can be activated remotely from the Controller (see
Controller’s manual), or on-site with an FG-701 Glassbreak
Simulator, only when the system is disarmed.
Follow directions in the FG-701 Glassbreak Simulator Operating
Instructions to activate and test the PROSiXGB detector.
BATTERY REPLACEMENT
1. Twist the front cover counterclockwise 15 degrees
and separate it from the mounting bracket.
2. Remove the old battery.
3. Wait 10 seconds.
4. Insert a new battery. Replacement batteries:
Resideo 466, Panasonic CR123A
Duracell D123, Duracell D123A
5. Carefully realign the front cover as shown;
reattach and twist the front cover 15 degrees
clockwise to lock it in place.
BATTERY CAUTION: Risk of fire, explosion and burns.
Do not recharge, disassemble, heat above 100° C (212° F) or
incinerate. Dispose of used batteries properly. Keep away from
children.
SPECIFICATIONS
Range:
0’- 25’/ 0 – 7.6m; Selectable
Battery
: 1 x 3V, Lithium; Resideo 466, Panasonic CR123A, Duracell DL 123, Duracell DL 123A
Tamper
: Cover and Wall
RF Frequency
: 2.4GHz
Operating Temperature
: 0° to 50° C / 32° to 122° F (Agency compliance 0° to 49° C
/ 32° to 120° F)
Relative Humidity
: 95% max. (Agency compliance – 93% max.), non-condensing
Dimensions: 96 mm Diameter x 29mm Thick / 3.78” Diameter x 1.14” Thick
APPROVAL LISTINGS
FCC / IC
cETLus Listed
Conforms to UL 639
Certified to ULC-S306
Other Standards:
RoHS
Protected Glass Types Chart
NOTE: The PROSiXGB is NOT recommended for protection of glass areas smaller than 27.6 cm x 27.6 cm (10-7/8 inches x 10-7/8 inches).
Glass Type*
Nominal Thickness
Minimum
Maximum
Plate3a
2mm (3/32 in.)
10mm (3/8 in.)
Tempered
3mm (1/8 in.)
10mm (3/8 in.)
Laminated1
4mm (5/32 in.)
14mm (9/16 in.)
Wired
6mm (1/4 in.)
6mm (1/4 in.)
Coated
2
3mm (1/8 in.)
6mm (1/4 in.)
Sealed Insulating3b
3mm (1/8 in.) [13mm (1/2 in.) overall]
6mm (1/4 in.) [19mm (3/4 in.) overall]
* Minimum size for all types is 28cm (11 in.) square; glass must be framed in the wall or mounted in a barrier at least 0.9m (36 in.) wide.
1 Protected only if both plates in the unit are broken
2 Coated glass with security films up to 0.35mm (14 mils) thick (including films for solar protection) may be used. Evaluated with the these products: 3M®SCOTCHSHIELD®
SH14CLARL – 0.35mm (14 mils), 4 ply film; Film Technologies International, Inc.’s GLASS-GARD GGLL 1200 has been evaluated with this product by Underwriters
Laboratories, Inc.
3 In compliance with Underwriters Laboratories of Canada’s Standard for Intrusion Detection Units (CAN/ULC-S306-M89):
a. Plate glass 2.5mm (3/32 in.) to 10mm (3/8-in.) can be used.
b. Seal Insulating glass 4mm (5/32 in.) [15mm (19/32 in.) overall] to 6mm (1/4 in.) [(19mm) 3/4 in. overall] can be used. Sensitivity should be set to High when protection
range is greater than 3.8m (12.5 ft).
FEDERAL COMMUNICATIONS COMMISSION (FCC) & INDUSTRY CANADA (IC) STATEMENTS
The user shall not make any changes or modifications to the equipment unless authorized by the Installation Instructions or User's Manual. Unauthorized changes or modifications could
void the user's authority to operate the equipment.
CLASS B DIGITAL DEVICE STATEMENT
This equipment has been tested and found to comply with the limits for a Class B digital device, as defined by FCC Rules Part 15.105. The Class B Digital Device statement can be
viewed at:
https://customer.resideo.com/en-US/support/residential/codes-and-standards/FCC15105/Pages/default.aspx
FCC / IC STATEMENT
This device complies with Part 15 of the FCC Rules, and Industry Canada’s license-exempt RSSs. Operation is subject to the following two conditions: (1) This device may not cause
harmful interference, and (2) This device must accept any interference received, including interference that may cause undesired operation.
Cet appareil est conforme à la partie 15 des règles de la FCC et exempt de licence RSS d’Industrie Canada. Son fonctionnement est soumis aux conditions suivantes: (1) Cet appareil ne
doit pas causer d’interférences nuisibles. (2) Cet appareil doit accepter toute interférence reçue y compris les interférences causant une réception indésirable.
RF EXPOSURE
Warning – The antenna(s) used for this device must be installed to provide a separation distance of at least 7.8 inches (20 cm) from all persons and must not be co-located or operating
in conjunction with any other antenna or transmitter except in accordance with FCC multi-transmitter product procedures.
Mise en Garde
Exposition aux Frequences Radio: L'antenne (s) utilisée pour cet émetteur doit être installée à une distance de séparation d'au moins
7,8 pouces (20 cm) de toutes les personnes.
REFER TO THE INSTALLATION INSTRUCTIONS FOR THE CONTROL WITH WHICH THIS DEVICE IS USED, FOR DETAILS REGARDING LIMITATIONS OF THE ENTIRE
ALARM SYSTEM.
Responsible Party / Issuer of Supplier’s Declaration of Conformity: Ademco Inc., a subsidiary of Resideo Technologies, Inc., 2 Corporate Center Drive.,
Melville, NY 11747, Ph: 516-577-2000
The product should not be disposed of with other household waste. Check for the nearest authorized collection centers or authorized recyclers. The
correct disposal of end-of-life equipment will help prevent potential negative consequences for the environment and human health.
Any attempt to reverse-engineer this device by decoding proprietary protocols, de-compiling firmware, or any similar actions is strictly prohibited.
SUPPORT & WARRANTY INFORMATION
For the latest documentation and support, please go to:
www.resideo.com
For the latest warranty information, please go to:
www.security.honeywellhome.com/warranty
The Honeywell Home Trademark is used under license from Honeywell International Inc.
This product is manufactured by Resideo Technologies, Inc. and its affiliates.
Ê800-25231B+Š
800-25231B 2/19 Rev B
2 Corporate Center Drive, Suite 100
P.O. Box 9040, Melville, NY 11747
© 2020 Resideo Technologies, Inc.
www.resideo.com

This manual suits for next models

1

Other Honeywell Home Security Sensor manuals

Honeywell Home PROSiXFLOOD Assembly instructions

Honeywell Home

Honeywell Home PROSiXFLOOD Assembly instructions

Honeywell Home HS3PIR2X User manual

Honeywell Home

Honeywell Home HS3PIR2X User manual

Honeywell Home Resideo PROSIXPIR User manual

Honeywell Home

Honeywell Home Resideo PROSIXPIR User manual

Honeywell Home CHW3610W User manual

Honeywell Home

Honeywell Home CHW3610W User manual

Honeywell Home PROSiXSMOKEV User manual

Honeywell Home

Honeywell Home PROSiXSMOKEV User manual

Honeywell Home VISTA-GSM4G Assembly instructions

Honeywell Home

Honeywell Home VISTA-GSM4G Assembly instructions

Honeywell Home SiX Series User manual

Honeywell Home

Honeywell Home SiX Series User manual

Honeywell Home PROSiXCT User manual

Honeywell Home

Honeywell Home PROSiXCT User manual

Honeywell Home PROSiXCOMBO Assembly instructions

Honeywell Home

Honeywell Home PROSiXCOMBO Assembly instructions

Honeywell Home PROSiXPANIC User manual

Honeywell Home

Honeywell Home PROSiXPANIC User manual

Honeywell Home 5821 User manual

Honeywell Home

Honeywell Home 5821 User manual

Honeywell Home PROSiXCOMBOC User manual

Honeywell Home

Honeywell Home PROSiXCOMBOC User manual

Honeywell Home HS3PIR1X User manual

Honeywell Home

Honeywell Home HS3PIR1X User manual

Honeywell Home DO8EZS User manual

Honeywell Home

Honeywell Home DO8EZS User manual

Honeywell Home FlexGuard 5853 Operating instructions

Honeywell Home

Honeywell Home FlexGuard 5853 Operating instructions

Honeywell Home SIXCOMBO-CN User manual

Honeywell Home

Honeywell Home SIXCOMBO-CN User manual

Honeywell Home PROSiXMINI Assembly instructions

Honeywell Home

Honeywell Home PROSiXMINI Assembly instructions

Honeywell Home 5800PIR-RES Assembly instructions

Honeywell Home

Honeywell Home 5800PIR-RES Assembly instructions

Honeywell Home C7089R1013 User manual

Honeywell Home

Honeywell Home C7089R1013 User manual

Honeywell Home PROSiXCOCN Assembly instructions

Honeywell Home

Honeywell Home PROSiXCOCN Assembly instructions

Honeywell Home 5819S Assembly instructions

Honeywell Home

Honeywell Home 5819S Assembly instructions

Popular Security Sensor manuals by other brands

Motorola hmsm4160 quick start guide

Motorola

Motorola hmsm4160 quick start guide

Berker BLC Operation and assembly instructions

Berker

Berker BLC Operation and assembly instructions

Better Water PB2 instructions

Better Water

Better Water PB2 instructions

jablotron JA-159P manual

jablotron

jablotron JA-159P manual

Satel FD-1 quick start guide

Satel

Satel FD-1 quick start guide

Wenglor IR3F001 operating instructions

Wenglor

Wenglor IR3F001 operating instructions

System Sensor 2151 Installation and maintenance instructions

System Sensor

System Sensor 2151 Installation and maintenance instructions

Satel GREY manual

Satel

Satel GREY manual

Honeywell Miller Falcon MP50G-LE User instruction

Honeywell

Honeywell Miller Falcon MP50G-LE User instruction

Baumer URDK 10N8914/S35A quick start guide

Baumer

Baumer URDK 10N8914/S35A quick start guide

Teknim TFD-1260A Installation & user manual

Teknim

Teknim TFD-1260A Installation & user manual

SkyLink WD-101 operating instructions

SkyLink

SkyLink WD-101 operating instructions

Bosch Anatel Professional Series installation instructions

Bosch

Bosch Anatel Professional Series installation instructions

DELTA DORE TYXAL DF installation guide

DELTA DORE

DELTA DORE TYXAL DF installation guide

PCB Piezotronics 132B38/010PH Installation and operating manual

PCB Piezotronics

PCB Piezotronics 132B38/010PH Installation and operating manual

Firefighter EC-FF2-433 Installation manual & users guide

Firefighter

Firefighter EC-FF2-433 Installation manual & users guide

BEA IXIO Series quick guide

BEA

BEA IXIO Series quick guide

Dectris PILATUS3 R Technical Specifications and Operating Procedure

Dectris

Dectris PILATUS3 R Technical Specifications and Operating Procedure

manuals.online logo
manuals.online logoBrands
  • About & Mission
  • Contact us
  • Privacy Policy
  • Terms and Conditions

Copyright 2025 Manuals.Online. All Rights Reserved.