manuals.online logo
Brands
  1. Home
  2. •
  3. Brands
  4. •
  5. Honeywell
  6. •
  7. Security Sensor
  8. •
  9. Honeywell Satronic IRD 1020 User manual

Honeywell Satronic IRD 1020 User manual

1
A Honeywell Company
certified Qualitysystem
ISO 9001 / EN 29001
Reg. Nr. 10529
750e/02/99
IRD 1020
Flame detection device for
oil and gas flames
INTRODUCTION
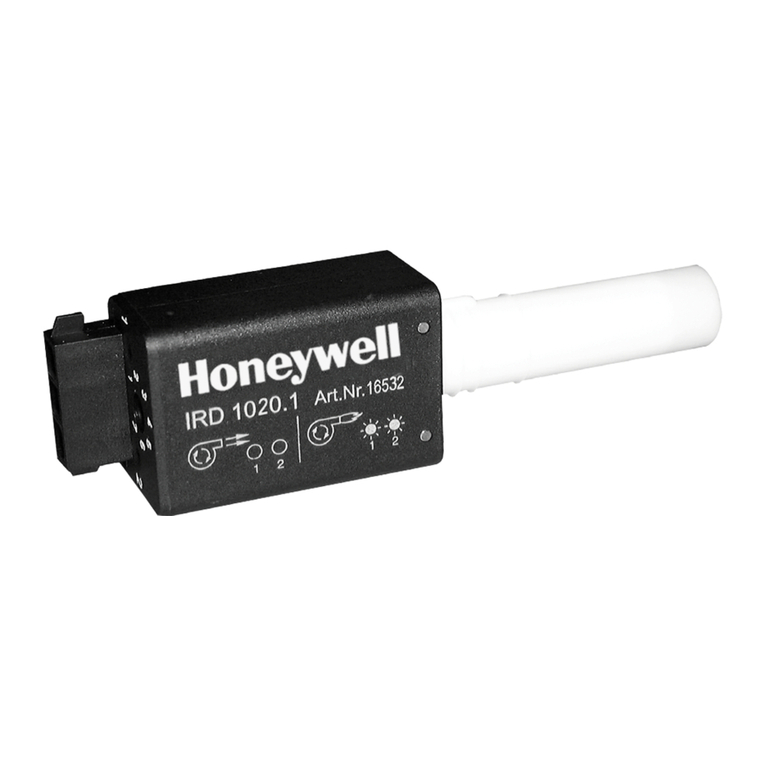
The IRD 1020 detector is used to supervise gas or oil flames.
This flame monitoring device should be connected to a
Satronic oil burner control box. Monitoring is based on the
infra-red flicker principle, in other words, the flickering infra-
red light of the flame is detected. The steady radiation from,
for example, the glowing refractory layer on the inside of the
boiler, has no effect on the detector. The IRD 1020 replaces
the IRD 920. When exchanging the units, care must be taken
to wire them correctly.
TYPES AVAILABLE (also see page 4)
Item no. Designation
16521 Flicker detector IRD 1020 side-on-right
16522 Flicker detector IRD 1020 end-on viewing
16523 Flicker detector IRD 1020 side-on left
The infra-red flicker detector can be used with any one of the
following control boxes:
IRD 1020 DKG 972
DLG 974, 976
DMG 970, 971, 972, 973
TFI 812.2
MMI 810, 811, 812, 815, 816, 962
MMG 810, 811, 816,
TMG 740-2, 740-3
SGU 930, 930i
CONSTRUCTIONAL FEATURES
The infra-red sensor and the pre-amplifier are hermetically
sealed in glass and along with the electronics form an
integrated unit in the flame detector. Wiring is by way of a
plug connection. The sensitivity control and two LED’s for
indication of the flame signal are situated on the rear of the
flicker detector.
Infra-red flicker detector
TECHNICAL DATA
Supply voltage 220 / 240 V (-15... +10%)
50 Hz (50 - 60 Hz)
Nominal current input approx. 4 mA
Power consumption 1 VA
Ambient temperature -20°C to +60°C
Insulation standard IP 41
Mounting attitude any
Weight 40 g
Flame viewing attitude side-on or end-on according
to type
Spectral response 800 - 1100 nm
(with daylight filter) maximum 950 nm
Frequency range 15 Hz.... 250 Hz (-12 dB)
Sensitivity adjustment
range approx. 1 : 20 (26 dB)
Switch-on delay
(after connecting
operating voltage) < 3.5 sec.
Response time < 0.1 sec.
Cut-out time < 1 sec.
2
TECHNICAL FEATURES
1. Flame detection
- Yellow- as well as blue-burning oil- and gas flames can be
monitored.
- The flame detector is suitable for operation where the
ambient temperature is within the range -20°to +60°C.
- The flickering detector IRD 1020 becomes active not
before a minimum threshold-level of steady light is
exceeded. That guarantees that neither electromagnetic-
nor ignition-spark noise are affecting the IRD.
- Sensitivity is adjustable.
- LED 1 is a warning indicator for the pre-purge phase as
well as normal operation. LED 2 indicates the actual status
of the detector: On or off.
- During pre-purge, LED 1 indicates possible stray light,
which may be produced either by a flickering or by
a steady light source, before the detector switches on
(LED 2).
- When the burner is operating normally, LED 1 acts as a
warning indication of the flame signal current sensitivity
being set too low - it begins to flicker or extinguishes
before the detector switches off.
- The compact size makes it possible to mount the detector
on any burner. For this reason the IRD mounting flange
M93 has the same dimensions and fixing holes as the FZ
flange M74. This magnetic flange provides the switch-off
facility specified in the European standard. The IRD 1020
therefore only functions with the M93 flange.
- Unlike the ultra-violet cell, the parameters of the IRD 1020
do not change with ageing.
2. Installation instructions
- The detector probe should be fitted so that it receives the
light which pulsates most strongly. This can be achieved
by positioning the detector as close as possible to the
flame or by directing it at a particular zone of the flame (e.g.
by using a sighting tube).
- No stray light must be allowed to fall on the detector (e.g.
through cracks or from a sight glass). Pulsating stray light
(e.g. from fluorescent lighting or light bulbs) could cause
the system to switch to lockout. Due to the very high
sensitivity of the detector, it should not be exposed
directly or indirectly (reflections) to the ignition spark.
- The infra-red flicker detector should be fitted in such a way
that the ambient temperature cannot under any
circumstances rise above 60 °C. At higher temperatures,
thereisariskofincorrectoperationandthelifeexpectancy
of the unit could be reduced. In addition, care should be
taken that the detector is not subjected to unusually harsh
vibration and receives no hard knocks.
- It is necessary for the magnetic IRD M93 flange to be
mounted on a flat surface to avoid any mechanical stress
which could otherwise damage it.
COMMISSIONING AND MAINTENANCE
During commissioning and after servicing, the flame
monitoringsystemshouldbecheckedforfaultlessoperation
as follows:
- Check that the detector is connected properly. Wrong
connectionsarearisktosafety,andcouldcausedamage
to the detector unit or burner system.
- Adjust to maximum sensitivity and start the burner: If the
LED indicator is lit after the start impulse, carefully adjust
the sensitivity control until LED 1 extinguishes. No LED
should light up during the pre-purge phase.
- With the system set for normal operation, pull out the
detector probe and cover it up to cut off light. Both LED
indicatorsmustextinguish.Thecontrolboxshouldswitch
to lockout or attempt to re-start the sequence.
- Attempt to re-start with the flame detector covered.
There must be no indication from the LED’s after the start
impulse. The burner control box must switch to lockout
at the end of the safety interval.
- Attempt to start the burner with the detector exposed to
stray light e.g. from fluorescent lighting, a cigarette
lighter or light bulb (not daylight or an electric torch):
Depending on the type of control box, it should switch to
lockout either immediately or at the end of the pre-purge,
as a result of stray light.
- When the burner is operating normally, carefully turn
back the sensitivity control until LED 1 begins to flicker.
Increase the setting again by one or two increments until
both LED’s are lit. If LED 1 does not flicker even at
position 1: Leave potentiometer at position 1-2. This
adjustment should be carried out when the flame signal
current is weakest (at a cold-start, shortly after flame
establishment or after stabilisation).
The flame detection device requires no maintenance of any
kind, and as it is classed as safety equipment, no attempt
should be made to open the housing.
Because the nature of the flame can change in time due to
the accumulation of dirt, the indicators on the detector
should be checked periodically.
Please note:
Burner operating normally = both LED’s on
Burner in pre-purge phase = both LED’s off
For safety reasons the sensitivity must not be set
higher than necessary.
Safety Checks:
1. Shut off the fuel supply when the burner is in the "run"
position. The indicator LEDs should extinguish and the
control box go to lockout.
2. Start the burner with the fuel supply shut off. The control
box must go to lockout at the end of the safety time due
to absence of flame.
3. Remove the detector from its mounting flange during a
pause, fit onto it a second flange M93. Start the burner
with straylight on the detector (e.g. by a cigarette-lighter,
bulb or a neonlight. Daylight or a torch is not suitable).
The control box must go to lockout due to stray light
either immediately or at the end of the pre-purge,
depending on the model.
Test switch-off facility:
1. Remove the detector durning the "run" position from its
special M93 flange. The control box must go to lockout
due to the activated switch-off facility.
IRD 1020
3
CONNECTION OF IRD 1020 TO SATRONIC BURNER CONTROL BOXES
IRD 1020
IRD 1020
IRD 1020
blue
black
brown
blue
black
brown
blue
black
brown
IRD 1020 TERMINALS
1
2
3
4
5
6
7
1 2
brown black blue
Possible faults
1. LED’s light up during the pre-purge phase (control
box switches to lockout):
a) Sensitivity set too high
b) Stray light
c) Ignitionsparkvisible todetector(directly orreflection).
Correct by preventing direct sight of ignition spark.
d) Interference from ignition cable (lay cables some
distance apart, or possibly screen the detector).
2. Noindicationfrom LED’safterestablishmentof flame:
a) Incorrect or faulty wiring
b) Sensitivity set too low
c) Detector positioned wrongly (receives no light)
d) Detector or viewing window dirty
e) Defective detector
f) IRDflangeM93defective (cracks or other mechanical
defects)
The standard-sensitive version of the IRD 1020 has a
blueinprint.Whiteorred inprintsaremarking detectors
with special attributes.They may be used only on
burners which are approved for these detectors.
IRD 1020
Control box type TFI 812 DKG 97. DMG 97.
DLG 97.
Terminal no. 8 8 8
Terminal no. 1 1 2
Terminal no. 9 9 9
Control box type MMI MMG
Terminal no. 8 8
Terminal no. 2 2
Terminal no. 9 9
Control box type TMG 740 SGU 930(i)
Terminal no. 8 N
Terminal no. 1 15
Terminal no. 20 1
4
A Honeywell Company
Satronic AG
Brüelstrasse 7
Postfach 324
CH-8157 Dielsdorf
IRD 1020
ORDERING INFORMATION
ITEM DESIGNATION ITEM NO.
Flame sensor Flicker detector IRD 1020 side-on right 16521
optional Flicker detector IRD 1020 end-on viewing 16522
optional Flicker detector IRD 1020 side-on left 16523
Mounting flange Flange M93 59093
Sensor cable Plug type, 3-wire, 0.6 m with tag wire ends 7236001
The above ordering information refers to the standard version.
Special versions are also included in our product range.
Specifications subject to change without notice.
FLICKER DETECTOR IRD 1020
VARIANTS
Satronic
IRD 1020
Satronic
IRD 1020
Satronic
IRD 1020
Light entrance from right Item no. 16521
35
3
26
4.5
15.1
48
ø20.5
4
17
14
104
29 50 44
ø13.5
21.8
End-on light entrance Item no. 16522
Light entrance from left Item no. 16523
HOLDER M93

Other Honeywell Security Sensor manuals

Honeywell 5800PIR User manual

Honeywell

Honeywell 5800PIR User manual

Honeywell SS2 Series User manual

Honeywell

Honeywell SS2 Series User manual

Honeywell Connected Home DO8EZS User manual

Honeywell

Honeywell Connected Home DO8EZS User manual

Honeywell C554A User manual

Honeywell

Honeywell C554A User manual

Honeywell 1031030 User manual

Honeywell

Honeywell 1031030 User manual

Honeywell Ex-Or MLS2401CDR Installation and operation manual

Honeywell

Honeywell Ex-Or MLS2401CDR Installation and operation manual

Honeywell 5800COMBO Assembly instructions

Honeywell

Honeywell 5800COMBO Assembly instructions

Honeywell Miller MightEvac Operator's manual

Honeywell

Honeywell Miller MightEvac Operator's manual

Honeywell ADEMCO 5821 User manual

Honeywell

Honeywell ADEMCO 5821 User manual

Honeywell FS20X Series User manual

Honeywell

Honeywell FS20X Series User manual

Honeywell C7061 A User manual

Honeywell

Honeywell C7061 A User manual

Honeywell FF-SB12 Series User manual

Honeywell

Honeywell FF-SB12 Series User manual

Honeywell FlexGuard FG-1625F User manual

Honeywell

Honeywell FlexGuard FG-1625F User manual

Honeywell Filtrex TC844A1007 User manual

Honeywell

Honeywell Filtrex TC844A1007 User manual

Honeywell Fire-Lite Alarms SD365T User manual

Honeywell

Honeywell Fire-Lite Alarms SD365T User manual

Honeywell 5800PIR-COM User manual

Honeywell

Honeywell 5800PIR-COM User manual

Honeywell SiX Series User manual

Honeywell

Honeywell SiX Series User manual

Honeywell Sensepoint XCD User manual

Honeywell

Honeywell Sensepoint XCD User manual

Honeywell 5800PIR User manual

Honeywell

Honeywell 5800PIR User manual

Honeywell FIRE-LITE ALARMS H365 User manual

Honeywell

Honeywell FIRE-LITE ALARMS H365 User manual

Honeywell FlexGuard FG-1625 User manual

Honeywell

Honeywell FlexGuard FG-1625 User manual

Honeywell RCA902N User manual

Honeywell

Honeywell RCA902N User manual

Honeywell 5800COMBO-CN User manual

Honeywell

Honeywell 5800COMBO-CN User manual

Honeywell SC105 User manual

Honeywell

Honeywell SC105 User manual

Popular Security Sensor manuals by other brands

Velleman VTEMF user manual

Velleman

Velleman VTEMF user manual

SAFETY SIREN HS80004 owner's manual

SAFETY SIREN

SAFETY SIREN HS80004 owner's manual

Xtrails ICAM IFT Series Communications guide

Xtrails

Xtrails ICAM IFT Series Communications guide

SafeGuard Compass user guide

SafeGuard

SafeGuard Compass user guide

Texecom Premier External TD-W installation manual

Texecom

Texecom Premier External TD-W installation manual

IFM Electronic efector 500 PF20 operating instructions

IFM Electronic

IFM Electronic efector 500 PF20 operating instructions

Denios PolySafe-Depot PSR 8.8 manual

Denios

Denios PolySafe-Depot PSR 8.8 manual

Ness LUX Installation notes

Ness

Ness LUX Installation notes

Wavetronix SmartSensor HD Installation & quick start guide

Wavetronix

Wavetronix SmartSensor HD Installation & quick start guide

Leuze electronic MLC 500 Original operating instructions

Leuze electronic

Leuze electronic MLC 500 Original operating instructions

Teknetics Turbo Operation manual

Teknetics

Teknetics Turbo Operation manual

MyTana ML2011 AccuCane user guide

MyTana

MyTana ML2011 AccuCane user guide

IFM UGT515 operating instructions

IFM

IFM UGT515 operating instructions

F&F DRL-60-12 manual

F&F

F&F DRL-60-12 manual

SAINT-GOBAIN ONESuit Flash User guide and technical manual

SAINT-GOBAIN

SAINT-GOBAIN ONESuit Flash User guide and technical manual

Sonifex RB-SD1IP Handbook

Sonifex

Sonifex RB-SD1IP Handbook

SmartRoom SR-ZSPWBPW-PI11-01 user manual

SmartRoom

SmartRoom SR-ZSPWBPW-PI11-01 user manual

FORTEZA FM-60(24)-BT user manual

FORTEZA

FORTEZA FM-60(24)-BT user manual

manuals.online logo
manuals.online logoBrands
  • About & Mission
  • Contact us
  • Privacy Policy
  • Terms and Conditions

Copyright 2025 Manuals.Online. All Rights Reserved.