Garanti
Produktgarantien er i henhold til købeloven. Garantiperioden starter den dag produktet er blevet købt.
Garantihåndtering
Et fejlbehæftet produkt skal returneres til købsstedet sammen med en gyldig kvittering. Hvis produktet får
en fejl i løbet af garantiperioden, skal produktet returneres til købsstedet.
Fraskrivelse af garanti
Skade eller defekter der opstår ved mislighold, eller ved ukorrekt brug af produktet, dækkes ikke af ga-
rantien. Garantien dækker heller ikke force majeure, som lynnedslag, oversvømmelse, ildebrand eller
skader sket under transport. Garantien vil bortfalde, hvis der på nogen måde er foretaget modikationer på
produktet, eller hvis produktet er forsøgt repareret af en udenforstående tredjepart.
3
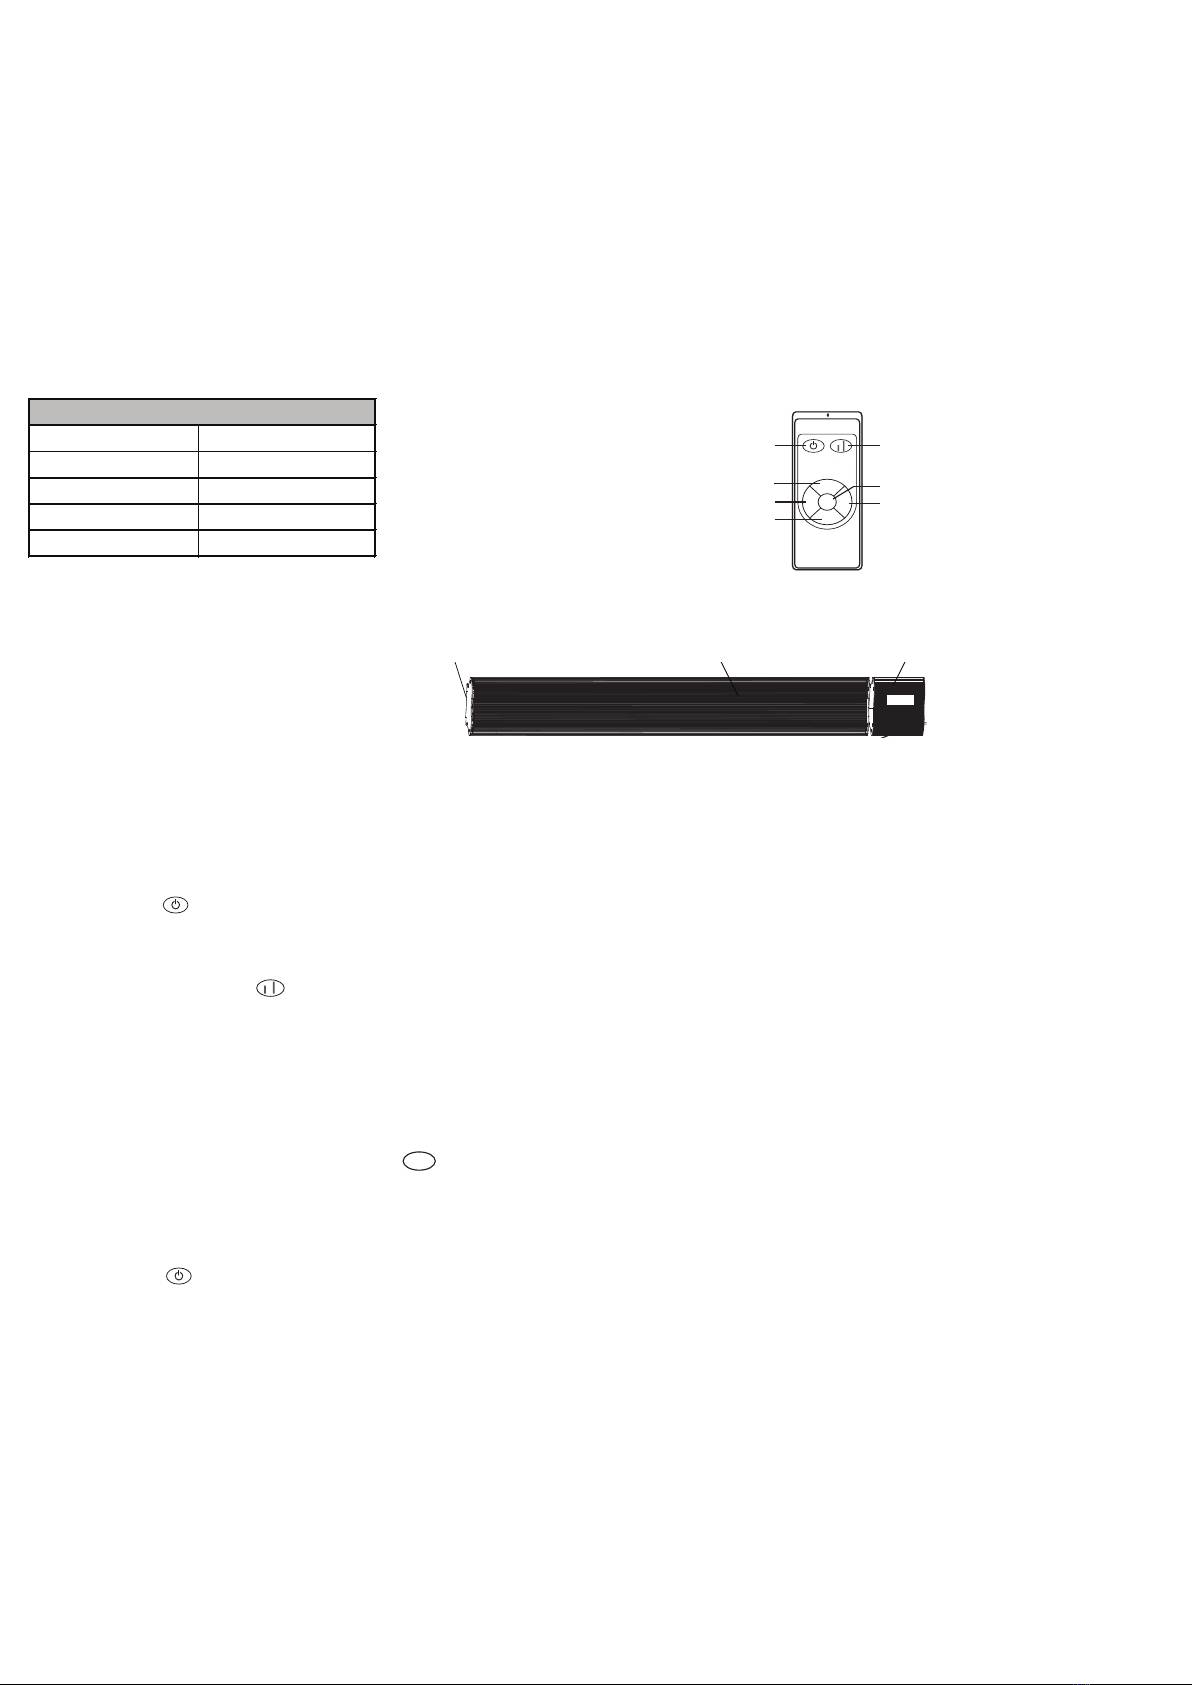
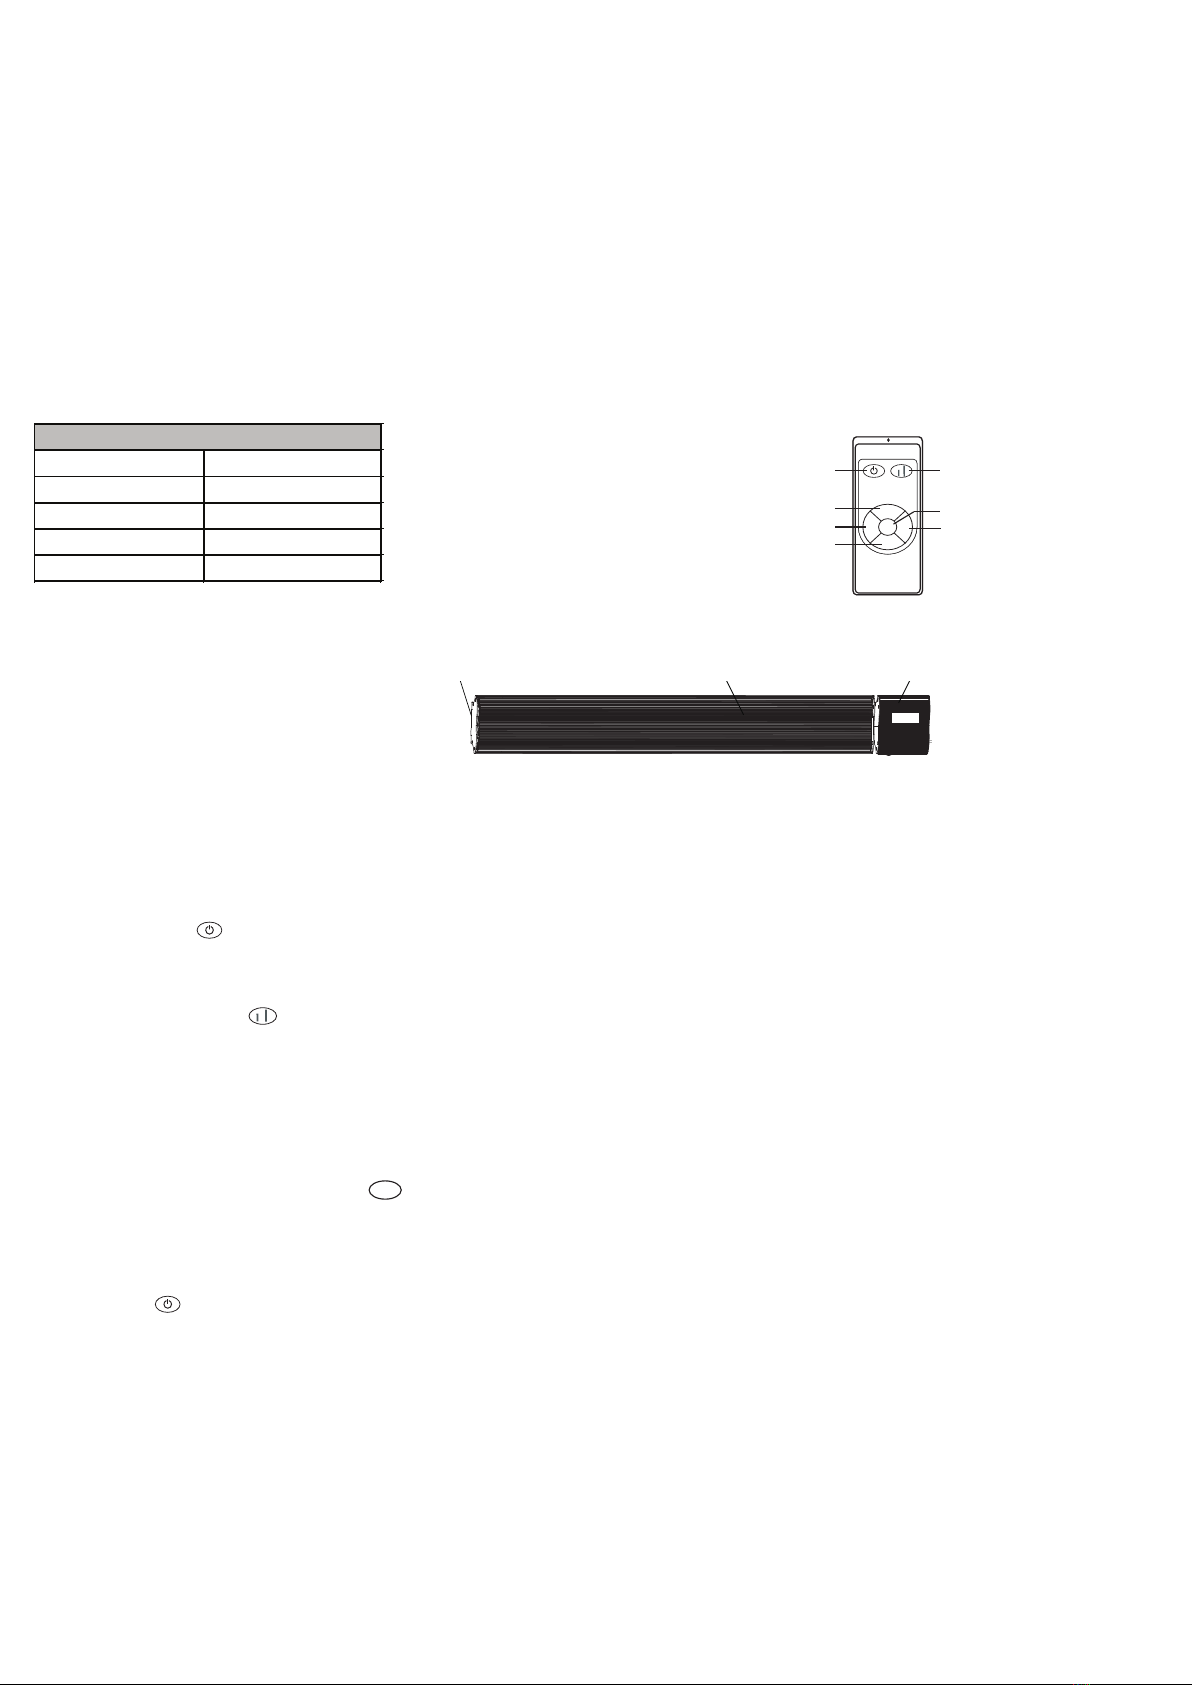
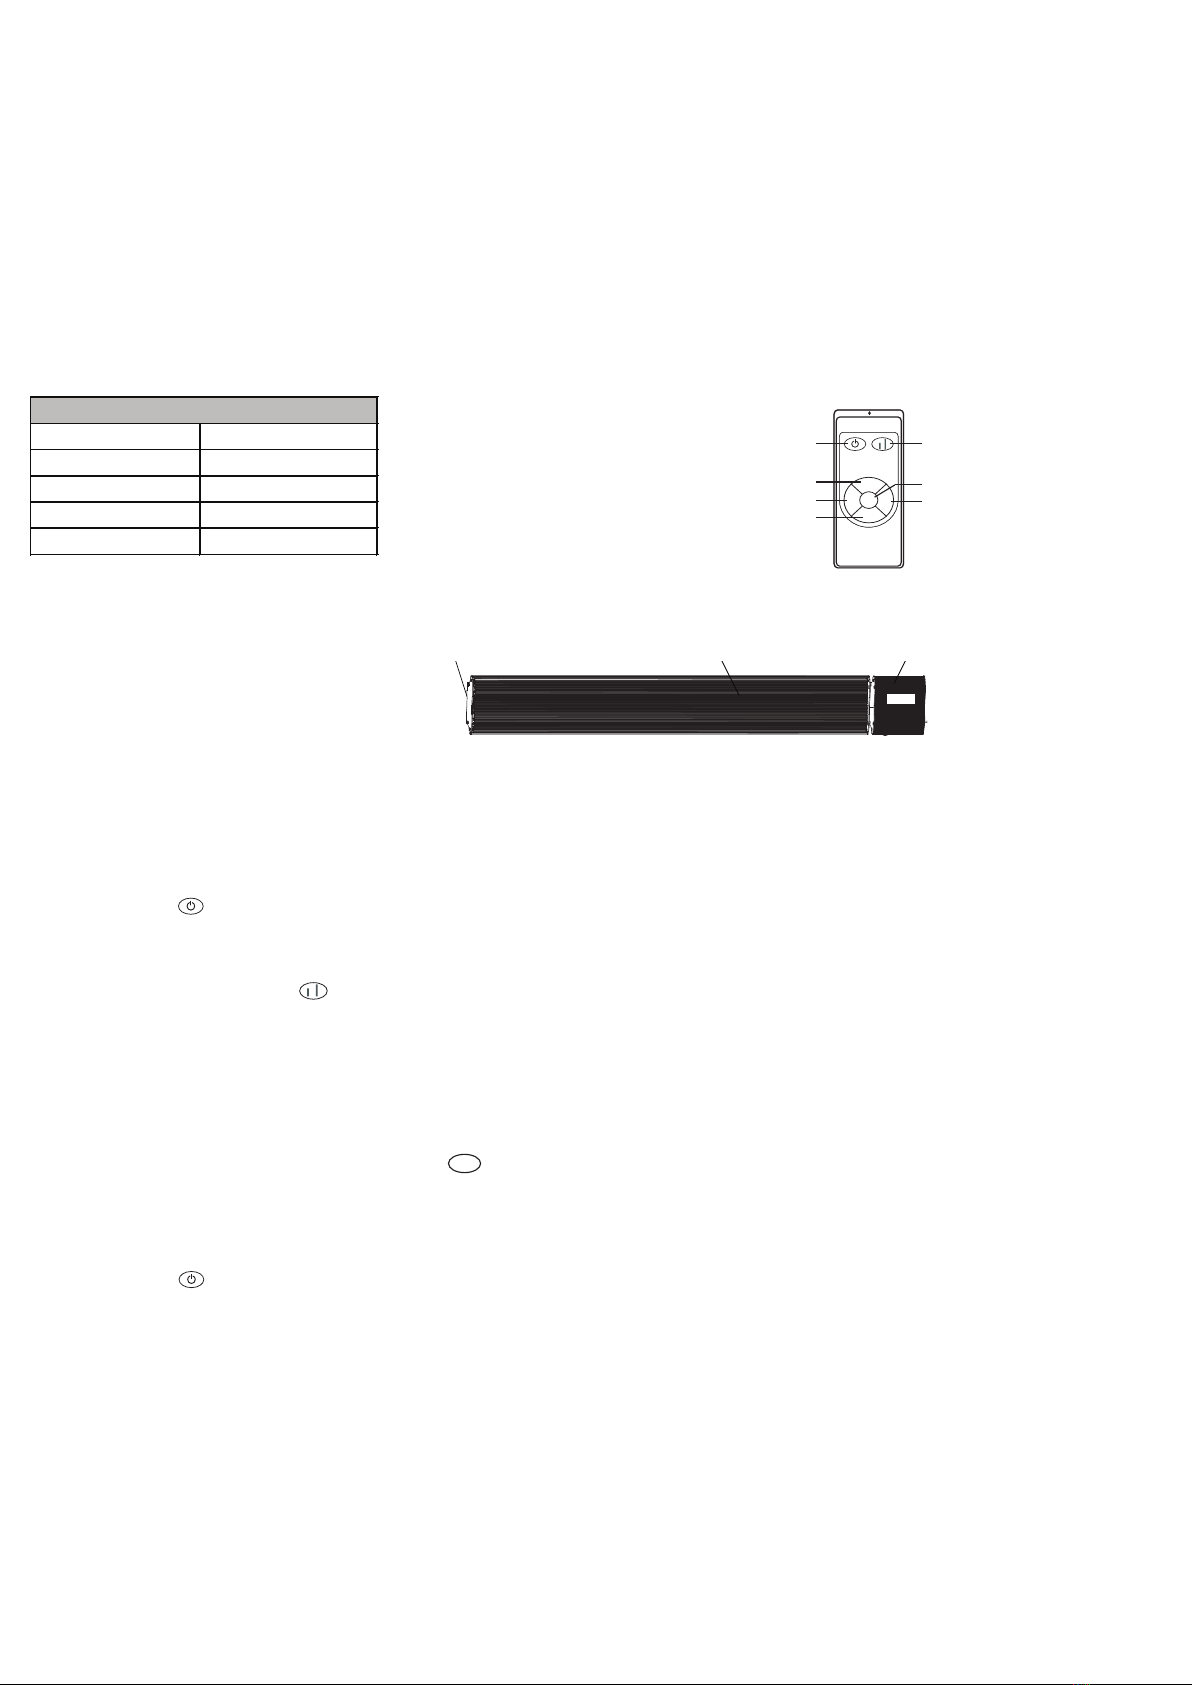
Fjernbetjening
1. ON/OFF knap
2. Display ON/OFF “ECO”
3. Pil op knap
4. Låsekanp “LOCK”
5. Timer knap “TIME”
6. Pil ned knap
THE-18DS(A)
THE-12DS(A)
THE-24DS(A)
THE-30DS(A)
L1
L2
1h
2h
3h
4h 5h
12
4
5
7
6
3
1、Display screen ON/OFF button 2、 HIGH/LOW function button
3、1h timing button 4、5h timing button
5、2h timing button 6、4h timing button
7、3h timing button
Press " " the power light is lighting , the product is
ready to working.
2.3 HIGH\LOW function button
Press " " ,you can set the product power is high or low,the function light
is lighting..
Timing set button
Press " " timing button , you can set 1(max=5hours)
hour working ,the time light is linghting,after the time
set ,the system will automatically save and product is
working untill the seting time,the time light is out.
2. 4
1h
High function light
Power light
Low function light
Timing set light
935
1235
1535
1835
KontrolboksVarmepanelCover
BETJENING
Tænd
Lyset i displayet lyser, når terrassevarmeren forbindes til et strømudtag, og når der er tændt for•
ON/OFF knappen på siden af terrassevarmeren.
Tryk på “ ” knappen (1) på fjernbetjeningen for at tænde for terrassevarmeren.•
HIGH/LOW funktion
Ved at trykke på knappen (2) på fjernbetjeningen kan du vælge mellem LOW (900W) eller HIGH•
(1800W) varmeffekt. Tryk én gang på knappen, og et grønt lys i displayet lyser. Terrassevarmeren er nu
indstillet til 900W effekt. Tryk på knappen igen, og to grønne lys i displayet lyser. Varmeapparatet er nu
indstillet til 1800W effekt.
Timer funktion
Ved at trykke på knapperne (3) til (7) på fjernbetjeningen kan du indstille timeren til at slukke for ter-•
rassevarmeren efter 1,2,3,4 eller 5 timer.
Sluk
Tryk på “1.
TIME
2.5 temperature setting
Press" "or" "you can set the temperature, press the" " or" "
to increase or decrease 1℃. The maximum is 36℃, the lowest is
5℃. Finally,set the temperature to the effective temperature,the
system will automatically save the set temperature,and automatically
to operational status, and displays the room return temperature.
2.6 Timing switch OFF setting
When press the" " , the"88"will flashes, then press the" " or" "
you can set the time, the minimum set-up time is one hour,the
maximum set time is 9 hours.Each time you press the" " or" "
the time will increase or decrease by 1 hour.After the time set,the
system will automatically save and return t o operational status,
temperature and time again exchanged display.
3 Switch OFF.
Press" " to turn off the device at any time, except for the power
light no display outside any state.
4 WARNING.
This heater heats up when in use.To avoid burns,do not touch the
surface.hot
5 SERVICE.
When you require service, contact the local dealer or qualified service
center.
The function of switch on the screen.
Press" " ,the screen will power off but indication light will be lighting,
Press" " again the screen will be lighting again.
ECO
ECO
2.4 Display screen ON/OFF function
OPERATION GUIDE
1. Before first use,please read this manual
1.1 Take out the heater from the carton carefully.please save the carton
for off-season storage,
1.2 Firmly fixed heaters according to the installation instructions,
1.3 Do not use the same socket with other high-power appliance to avoid
overloading.
2 Switch ON.
2.1 The power light flashes when heater is connected with power.
2.3 lock function
Press the fir firstly when operation then press the and "LOCK"" " " "
indicator lights light up. all keys are invalid when Lock function is
activated.
LOCK
Press turn on the heater, screen show temperature of the room, if it
lower than preset temperature , the heater will be worked. Indicator light
will blink.
" "
2.2
CIRCUIT DIAGRAM
4
PRODUCT SIZE
Model Power Length(mm)Wide(mm)High(mm)
THC-12D 1200W 900 150 65
THC-18D 1800W 1200 150 65
THC-20D 2000W 1350 150 65
THC-24D 2400W 1500 150 65
PRODUCT INSTRUCTION
Heating Plate
Out Covering
THC-30D 3000W 1800 150 65
Control Box
5
220V-240V 50Hz
L
N
N1 NTC
Heating plate
1
2
3
4
5
6
ION
Se t
TIME
ECO
PRODUCT CONTROL PANEL
1. Power Switch button
2. Display screen ON/OFF button
3. Up button
4. Lock button
LOCK
L1
5. timing switch
6. Down button
Switch
6 REPLACEMENT OF POWER CORD.
The power cord damaged must be replaced by a service agent or
equivalent persons in order to prevent a hazard.
7 CHILD SUPERVISION.
This appliance is not intended to be use by children or infirm persons
without supervision.
” knappen (1) på fjernbetjeningen for at slukke for terrassevarmeren.
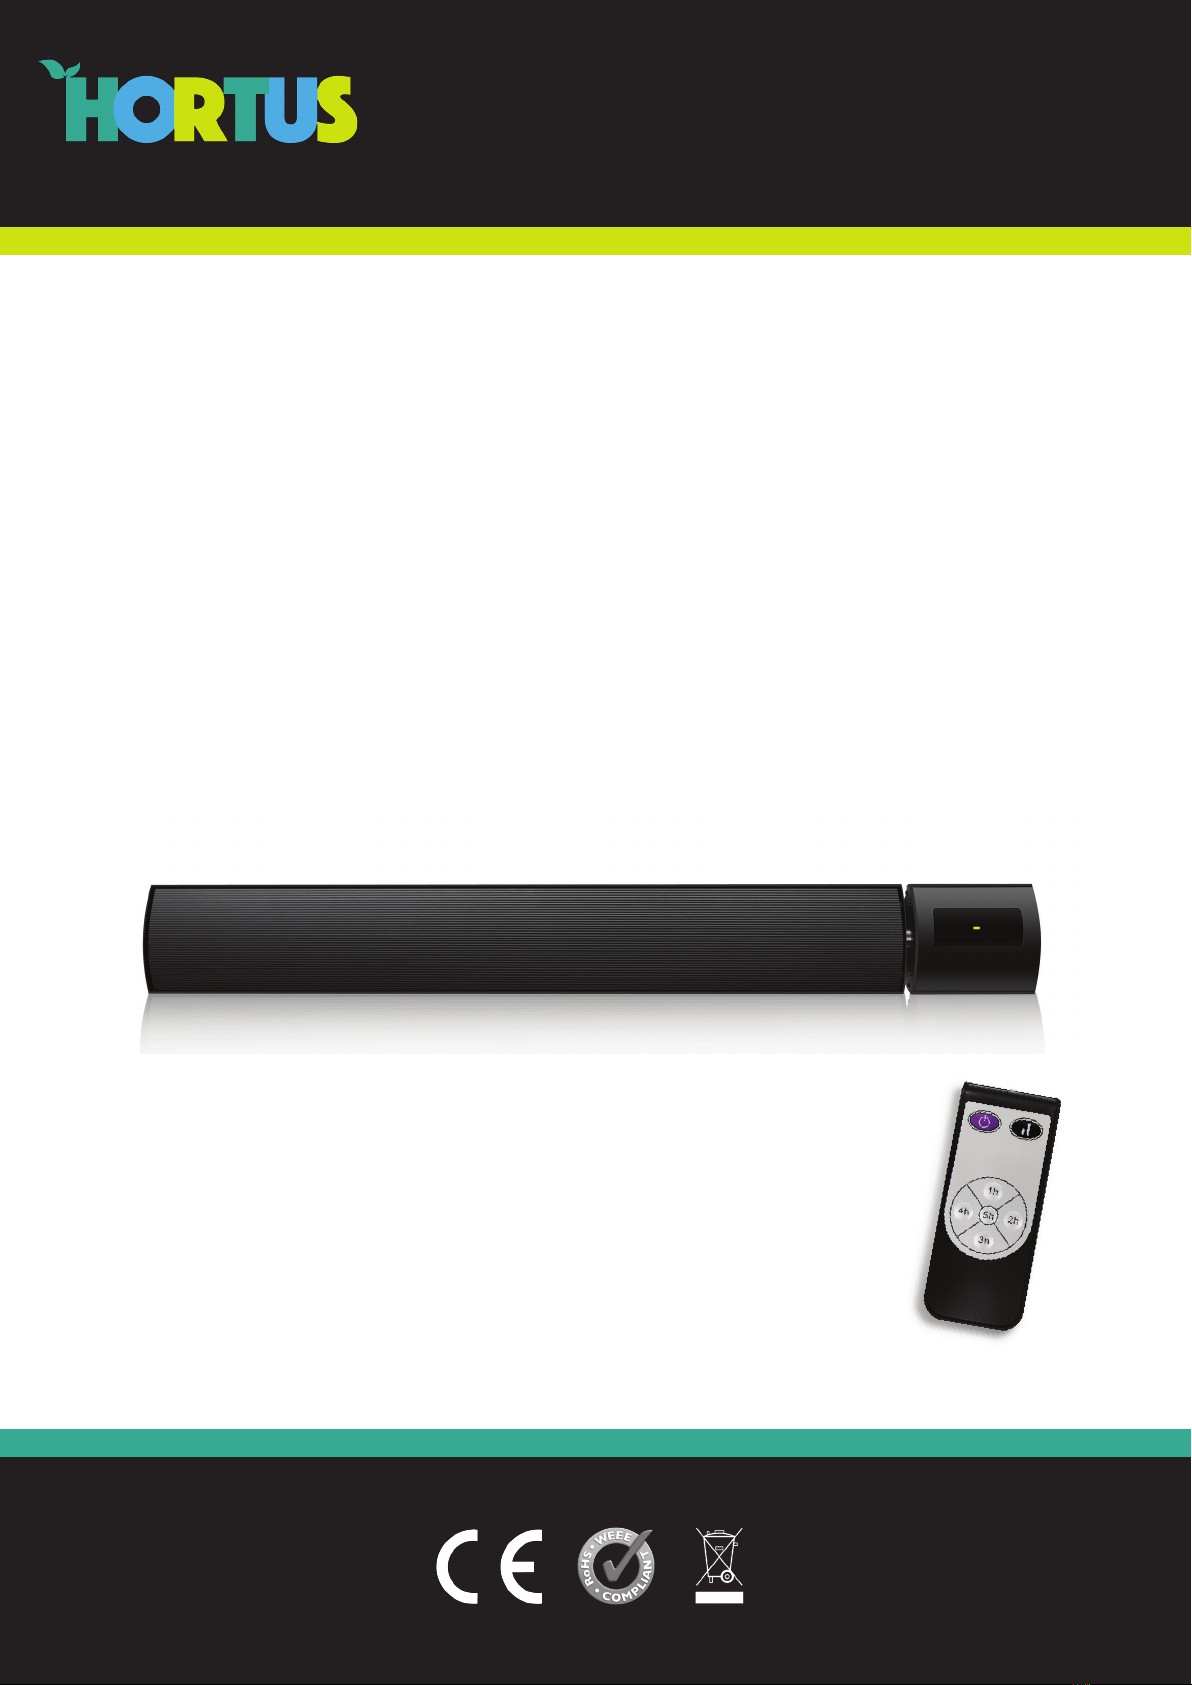
Model no. THE-18DS (A)
Varenr. 211-331
Str ømki ld e 230V AC ~ 50 Hz
Strømforbrug 1800W
Kapslingsklasse IP44
THE-18DS(A)
THE-12DS(A)
THE-24DS(A)
THE-30DS(A)
L1
L2
1h
2h
3h
4h 5h
12
4
5
7
6
3
1、Display screen ON/OFF button 2、 HIGH/LOW function button
3、1h timing button 4、5h timing button
5、2h timing button 6、4h timing button
7、3h timing button
Press " " the power light is lighting , the product is
ready to working.
2.3 HIGH\LOW function button
Press " " ,you can set the product power is high or low,the function light
is lighting..
Timing set button
Press " " timing button , you can set 1(max=5hours)
hour working ,the time light is linghting,after the time
set , the system will automatically save and product is
working untill the seting time,the time light is out.
2. 4
1h
High function light
Power light
Low function light
Timing set light
935
1235
1535
1835
TIME
2.5 temperature setting
Press" "or" "you can set the temperature, press the" " or" "
to increase or decrease 1℃. The maximum is 36℃, the lowest is
5℃. Finally,set the temperature to the effective temperature,the
system will automatically save the set temperature,and automatically
to operational status, and displays the room return temperature.
2.6 Timing switch OFF setting
When press the" " , the"88"will flashes, then press the" " or" "
you can set the time, the minimum set-up time is one hour,the
maximum set time is 9 hours.Each time you press the" " or" "
the time will increase or decrease by 1 hour.After the time set,the
system will automatically save and return t o operational status,
temperature and time again exchanged display.
3 Switch OFF.
Press" " to turn off the device at any time, except for the power
light no display outside any state.
4 WARNING.
This heater heats up when in use.To avoid burns,do not touch the
surface.hot
5 SERVICE.
When you require service, contact the local dealer or qualified service
center.
The function of switch on the screen.
Press" " ,the screen will power off but indication light will be lighting,
Press" " again the screen will be lighting again.
ECO
ECO
2.4 Display screen ON/OFF function
OPERATION GUIDE
1. Before first use,please read this manual
1.1 Take out the heater from the carton carefully.please save the carton
for off-season storage,
1.2 Firmly fixed heaters according to the installation instructions,
1.3 Do not use the same socket with other high-power appliance to avoid
overloading.
2 Switch ON.
2.1 The power light flashes when heater is connected with power.
2.3 lock function
Press the fir firstly when operation then press the and "LOCK"" " " "
indicator lights light up. all keys are invalid when Lock function is
activated.
LOCK
Press turn on the heater, screen show temperature of the room, if it
lower than preset temperature , the heater will be worked. Indicator light
will blink.
" "
2.2
CIRCUIT DIAGRAM
4
PRODUCT SIZE
Model Power Length(mm)Wide(mm)High(mm)
THC-12D 1200W 900 150 65
THC-18D 1800W 1200 150 65
THC-20D 2000W 1350 150 65
THC-24D 2400W 1500 150 65
PRODUCT INSTRUCTION
Heating Plate
Out Covering
THC-30D 3000W 1800 150 65
Control Box
5
220V-240V 50Hz
L
N
N1 NTC
Heating plate
1
2
3
4
5
6
ION
Se t
TIME
ECO
PRODUCT CONTROL PANEL
1. Power Switch button
2. Display screen ON/OFF button
3. Up button
4. Lock button
LOCK
L1
5. timing switch
6. Down button
Switch
6 REPLACEMENT OF POWER CORD.
The power cord damaged must be replaced by a service agent or
equivalent persons in order to prevent a hazard.
7 CHILD SUPERVISION.
This appliance is not intended to be use by children or infirm persons
without supervision.
THE-18DS(A)
THE-12DS(A)
THE-24DS(A)
THE-30DS(A)
L1
L2
1h
2h
3h
4h 5h
12
4
5
7
6
3
1、Display screen ON/OFF button 2、 HIGH/LOW function button
3、1h timing button 4、5h timing button
5、2h timing button 6、4h timing button
7、3h timing button
Press " " the power light is lighting , the product is
ready to working.
2.3 HIGH\LOW function button
Press " " ,you can set the product power is high or low,the function light
is lighting..
Timing set button
Press " " timing button , you can set 1(max=5hours)
hour working ,the time light is linghting,after the time
set ,the system will automatically save and product is
working untill the seting time,the time light is out.
2. 4
1h
High function light
Power light
Low function light
Timing set light
935
1235
1535
1835