manuals.online logo
Brands
  1. Home
  2. •
  3. Brands
  4. •
  5. HP
  6. •
  7. Printer Accessories
  8. •
  9. HP PageWide XL User manual

HP PageWide XL User manual

1
© Copyright 2021 HP Development Company, L.P.
Large Format Division
Camí de Can Graells 1-21
08174 · Sant Cugat del Vallès
Barcelona · Spain
All rights reserved
Printed in XXX
ZHCN
KO
JA
FR
DE
ID
EN HP PageWide XL Top Stacker
Assembly Instructions
HP PageWide XL Empileur
Supérieur
Instructions d’assemblage
HP PageWide XL Oberen Staplers
Einbauanweisungen
HP PageWide XLトップ スタッカ
組み立ておよびセットアップ
手順
HP PageWide XL 顶部堆纸器
组装说明
HP PageWide XL 상단 스태커
조립 지침
Penumpuk Atas HP PageWide XL
Petunjuk Pemasangan
EN 2 people are required to perform certain tasks.
FR L’exécution de certaines tâches nécessite la présence de 2personnes.
DE Für bestimmte Tätigkeiten werden 2 Personen benötigt.
JA 特定の作業は、2名で行う必要があります。
ZHCN 某些任务需要 2 人完成。
KO 일부 작업의 경우 2명이 필요합니다.
ID Diperlukan 2 orang untuk menjalankan tugas tertentu.
EN
Box number Subsystem
1Accessories
2Structure
3Media path
4Top Tray
5Arms
6Cover
FR
Numéro de
boîte
Sous-système
1Accessoires
2Structure
3Chemin du support
4Bac supérieur
5Bras
6Capot
DE
Box-Num-
mer
Teilsystem
1Zubehör
2Struktur
3Medienpfad
4Oberes Papierfach
5Arme
6Abdeckung
JA
箱番号 サブシステム
1アクセサリ
2骨組み
3用紙経路
4上部トレイ
5アーム
6カバー
KO
상자 번호 하위 시스템
1부속품
2구조물
3용지 경로
4상단 용지함
5암
6덮개
ID
Nomor kotak Subsistem
1Aksesori
2Struktur
3Jalur media
4Baki Atas
5Lengan
6Penutup
ZHCN
箱号 子系统
1附件
2结构
3介质通道
4上纸盘
5臂
6盖子
90’
EN Time required for assembly isapproximately 90 minutes .
FR Le temps requis pour l’assemblage de l’imprimante est d’environ 90 minutes.
DE Der Zusammenbau des Druckers dauert etwa 90 Minuten.
JA 組み立て所要時間は約90分です。
ZHCN 组装打印机大约需要 90 分钟时间。
KO 조립에 소요되는 시간은 약 90분입니다.
ID Waktu yang diperlukan untuk pemasangan adalah sekitar 90 menit.
Edition 2
2
ZHCN
KO
JA
ID
EN
ZHCN
KO
JA
FR
DE
ID
EN
FR
DE
Remove the accessory hook (if installed), or the cover.
Retirez le crochet des accessoires (si celui-ci est installé) ou
le capot.
Entfernen Sie den Zubehörhaken (falls installiert) oder die
Abdeckung.
アクセサリ フック(取り付けられている場合)または
カバーを取り外します。
卸下附件挂钩(如已安装)或盖子。
부속품 고리(설치된 경우) 또는 덮개를 거합니다.
Lepaskan pengait aksesori (jika terpasang), atau penutup.
HP PageWide XL Pro only: Use a 5mm Allen key to turn the
axis pin at both sides to unlock the system.
Remove the upper lateral covers, 1 from each side.
Retirez les capots latéraux supérieurs, 1 de chaque côté.
Entfernen Sie die oberen seitlichen Abdeckungen, 1 von jeder
Seite.
両側から上部側面カバー、1を取り外します。
每侧拆下一个上侧盖。
각 면에서 상단 측면 덮개를 하나씩 제거합니다.
Lepaskan penutup lateral atas, 1 dari setiap sisi.
Printer preparation for top
stacker installation
Préparation de l’imprimante pour
l’installation de l’empileur
supérieur
Vorbereitung des Druckers für die
Installation des oberen Staplers
トップ スタッカの取り付けに備
えたプリンタの
安装顶部堆纸器前的
打印机准备工作
상단 스태커를 위한 프린터 준비
설치
Persiapan printer untuk
pemasangan penumpuk atas
1 2 3
HP PageWide XL Pro uniquement: Utilisez une clé Allen de
5mm pour faire tourner la cheville de l’axe des deux côtés et
déverrouiller le système.
Nur HP PageWide XL Pro: Verwenden Sie einen 5-mm-
Inbusschlüssel, um den Achsstift auf beiden Seiten zu
drehen, um das System zu entriegeln.
HP PageWide XL Pro のみ: 5mm六角レンチを使用して両
側の軸ピンを回し、システムのロックを解除します。
HP PageWide XL Pro: 使用 5 毫米内六角扳手转动轴销两侧
以解锁系统。
HP PageWide XL Pro 만 해당: 5mm 육각 렌치로 양쪽의 축
핀을 돌려 시스템의 잠금을 해제합니다.
HP PageWide XL Pro: Gunakan kunci Allen 5 mm untuk
memutar pin poros di kedua sisi agar dapat membuka kunci
sistem.
3
ZHCN
KO
JA
FR
DE
ID
EN HP PageWide XL Pro only: Unscrew the cam pin at both sides.
You can do this by hand, or use a tool.
HP PageWide XL Pro uniquement: Dévissez l’axe de la broche
cam de chaque côté ou à l’aide d’un outil.
Nur HP PageWide XL Pro: Schrauben Sie die Nockenstiftachse
auf jeder Seite von Hand oder mit einem Werkzeug heraus.
HP PageWide XL Pro のみ: 手または工具を使用して、両
側のカム ピン軸のネジを外します。
HP PageWide XL Pro のみ: 用手或工具拧下凸轮销轴的
螺钉。
HP PageWide XL Pro 만 해당: 도구를 사용하여 각 측면에
있는 캄 핀 축의 문을 손으로 해제합니다.
Khusus HP PageWide XL Pro: Lepaskan sekrup poros pin cam
di setiap sisi dengan tangan atau alat.
With the printer turned o, open the output module on the
back.
L’imprimante éteinte, ouvrez le module de sortie à l’arrière.
Önen Sie bei ausgeschaltetem Drucker das Ausgabemodul
auf der Rückseite.
プリンタの電源をオフにした状態で、背面の排紙モジ
ュールを開きます。
在打印机关闭的情况下,打开背面的输出模块。
프린터를 끄고 후면에 있는 출력 모듈을 엽니다.
Saat printer mati, buka modul output di bagian belakang.
Remove the 10 black screws.
Note: Take care not to drop the screws.
Retirez les 10 vis noires.
Remarque: Prenez soin de ne pas faire tomber les vis.
Entfernen Sie die 10 schwarzen Schrauben.
Hinweis: Lassen Sie die Schrauben nicht fallen.
卸下 10 颗黑色的螺钉。
注意: 小心不要让螺钉掉落。
10本の黒いネジを外します。
注記: ネジを落とさないよう注意してください。
검은색 나사 10개를 제거합니다.
참고: 나사를 떨어뜨리지 않도록 주의하십시오.
Lepaskan 10 sekrup hitam.
Catatan: Hati-hati agar tidak menjatuhkan sekrup.
Remove the 5 black screws.
Note: Take care not to drop the screws.
Retirez les 5 vis noires.
Remarque: Prenez soin de ne pas faire tomber les vis.
Entfernen Sie die 5 schwarzen Schrauben.
Hinweis: Lassen Sie die Schrauben nicht fallen.
卸下 5 颗黑色的螺钉。
注意: 小心不要让螺钉掉落。
5本の黒いネジを外します。
注記: ネジを落とさないよう注意してください。
검은색 나사 5개를 제거합니다.
참고: 나사를 떨어뜨리지 않도록 주의하십시오.
Lepaskan 5 sekrup hitam.
Catatan: Hati-hati agar tidak menjatuhkan sekrup.
4 5 6 7
4
ZHCN
KO
JA
FR
DE
ID
EN Remove the 6 screws and lateral cover from the front panel
side.
Retirez les 6vis et le capot latéral du côté du panneau avant.
Entfernen Sie die 6 Schrauben und die seitliche Abdeckung
über dem Anzeigebildschirm.
フロントパネル側から6本のネジと側面カバーを取り外
します。
从前面板侧卸下 6 颗螺钉和侧盖。
전면 조작부 쪽에서 6개의 나사와 측면 덮개를
제거합니다.
Lepaskan 6 sekrup dan penutup lateral dari sisi panel depan.
Remove the 3 screws and lateral cover from the other side.
Retirez les 3vis et le capot latéral de l’autre côté.
Entfernen Sie die 3 Schrauben und die seitliche Abdeckung von
der anderen Seite.
反対側から3本のネジと側面カバーを取り外します。
卸下另一侧的 3 颗螺钉和侧盖。
반대편에서 나사 3개와 측면 덮개를 제거합니다.
Lepaskan 3 sekrup dan penutup lateral dari sisi lainnya.
Remove the 2 output module covers starting with the upper
one.
Retirez les 2 capots du module de sortie en commençant par
le celui du haut.
Entfernen Sie die 2 Abdeckungen des Ausgabemoduls,
beginnend mit der oberen.
卸下 2 个输出模块盖子,先卸上面一个。
2個の排紙モジュールカバーを上のカバーから取り外
します。
2개의 출력 모듈 덮개 중 위의 것부터 제거합니다.
Lepas 2 penutup modul output, dimulai dengan bagian atas.
Remove the plastic pieces; there is a tab in the inner part, pull
it down in order to easily remove the pieces. The tabs can then
be discarded.
Retirez les pièces en plastique; il y a une languette dans la
partie intérieure, tirez-la vers le bas an de facilement retirer
les pièces. Ces languettes peuvent être mises au rebut.
Entfernen Sie die Kunststoteile. Im inneren Teil bendet sich
eine Lasche. Ziehen Sie diese nach unten, um die Teile leicht
entfernen zu können. Die Laschen können dann entsorgt
werden.
卸下塑料件; 内部部件上有个标签卷,将其下拉,以便
轻松卸下塑料件。 然后可将标签卷丢弃。
プラスチック部品を取り外します。 内側にあるタブを
引くと、簡単に部品を取り外せます。 このタブは廃棄
してもかまいません。
플라스틱 부품을 제거합니다. 내부에는 탭이 있습니다. 탭을
아래로 잡아당기면 쉽게 부품을 제거할 수 있습니다. 그런
다음, 탭을 버릴 수 있습니다.
Lepaskan bagian plastik; terdapat tab di sebelah dalam, tarik
ke bawah agar mudah mengeluarkan bagian tersebut. Tab
dapat dibuang.
8 9 10 11
5
ZHCN
KO
JA
FR
DE
ID
EN
ZHCN
KO
JA
FR
DE
ID
EN
Gas springs installation
Installation des ressorts à gaz
Einbau der Gasfedern
ガス スプリングの取り付け
气弹簧安装
가스 스프링 설치
Pemasangan pegas udara
Remove the lateral side of both covers, there are 2 screws on
each.
Retirez le côté latéral des deux capots; il y a 2vis sur chaque.
Entfernen Sie die beiden seitlichen Abdeckungen, je 2
Schrauben auf beiden Seiten.
両方のカバーの側面を外します。これにはそれぞれ2本
のネジがあります。
卸下两个盖板的侧面,每侧有 2 颗螺钉。
덮개 2개 모두 측면을 제거합니다. 여기에는 각각 2개의
나사가 있습니다.
Lepaskan sisi lateral kedua penutup, tersedia 2 sekrup di
setiap sisi.
Remove the circlip from both sides and release the crank.
Note: Do not discard the circlips as they will be required later.
Retirez le circlip des deux côtés et relâchez la manivelle.
Remarque: Ne jetez pas les circlips, car ils seront nécessaires
ultérieurement.
Entfernen Sie den Sicherungsring von beiden Seiten und lösen
Sie die Kurbel.
Hinweis: Werfen Sie die Sicherungsringe nicht weg, da sie
später noch benötigt werden.
両側からサークリップを外して、クランクを解放します。
注記: 後で必要になるため、サークリップを廃棄しな
いでください。
从两侧卸下卡簧,然后松开曲柄。
注意: 请勿丢弃卡簧,因为后面还会用到。
양옆에서 서클립을 제거하고 크랭크를 풉니다.
참C고: 나중에 서클립이 필요하므로 버리지 마십시오.
Lepaskan snap ring dari kedua sisi dan lepaskan crank.
Catatan: Tidak membuang snap ring karena akan diperlukan
kemudian.
Remove the holding tools from the box.
Retirez les outils de maintien du carton.
Nehmen Sie die Haltewerkzeuge aus dem Karton.
箱から固定ツールを取り出します。
从包装箱中取出新的夹持工具。
상자에서 지지 도구를 제거합니다.
Keluarkan alat pemegang dari kotak.
12 13 14
6
M4 x 8 mm (x3)
ZHCN
KO
JA
FR
DE
ID
EN Hang 1 holding tool on each side.
Accrochez 1 outil de xation de chaque côté.
Hängen Sie auf jeder Seite 1 Haltewerkzeug ein.
各側に1個の固定ツールをかけます。
在每侧悬挂 1 个夹持工具。
각 면에 지지 도구를 한 개씩 겁니다.
Gantung 1 alat pemegang di setiap sisi.
Fix the holding tools by moving the output module up until
the holes align, then xing with 1 screw at the bottom and the
metal strip and 2 screws above.
Fixez les outils de xation en déplaçant le module de sortie
vers le haut jusqu’à ce que les orices s’alignent, en les
attachant ensuite avec 1vis en bas et la bande métallique et
2vis au-dessus.
Befestigen Sie die Haltewerkzeuge, indem Sie das
Ausgabemodul nach oben schieben, bis die Löcher
ausgerichtet sind, und dann mit 1 Schraube unten und dem
Metallstreifen und 2 Schrauben oben befestigen
排紙モジュールを穴の位置が合うまで上に上げてか
ら、下部および金属片に1本のネジと、上部に2本のネ
ジを使用して固定ツールを固定します。
将输出模块向上移动直至安装孔对齐,然后使用 1 颗螺
钉固定底部和金属条并在上方安装 2 颗螺钉,以此固定
夹持工具。
구멍과 맞도록 출력 모듈을 움직여 지지 도구를 고정한 다음
아래쪽에서 나사 한 개와 금속 띠로, 위쪽에서 나사 두 개로
고정합니다.
Pasang pemegang alat dengan menggerakkan modul output
ke atas hingga sejajar dengan lubang, kemudian pasang 1
sekrup di bagian bawah dan setrip logam dan 2 sekrup di atas.
Remove the cables from the belt motor.
Retirez les câbles du moteur de courroie.
Entfernen Sie die Kabel vom Riemenmotor.
ベルト モーターからケーブルを取り外します。
从皮带电机上取下电缆。
벨트 모터에서 케이블을 제거합니다.
Lepaskan kabel dari belt motor.
Remove the 3 outer screws, then loosen the 3 inner ones and
remove the belt motor.
Retirez les 3vis extérieures, puis desserrez les 3vis intérieures
et retirez le moteur de la courroie.
Entfernen Sie die 3 äußeren Schrauben, lösen Sie dann die 3
inneren und nehmen Sie den Riemenmotor ab.
外側の3本のネジを外してから、内側の3本のネジを緩
めて、ベルト モーターを取り外します。
卸下 3 颗外螺钉,然后拧松 3 颗内螺钉,再卸下皮带电
机。
바깥쪽 나사 3개를 제거한 다음, 안쪽 나사 3개를 풀고 벨트
모터를 제거합니다.
Lepaskan 3 sekrup luar, lalu longgarkan 3 sekrup dalam dan
lepaskan belt motor.
15 16 17 18
7
ZHCN
KO
JA
FR
DE
ID
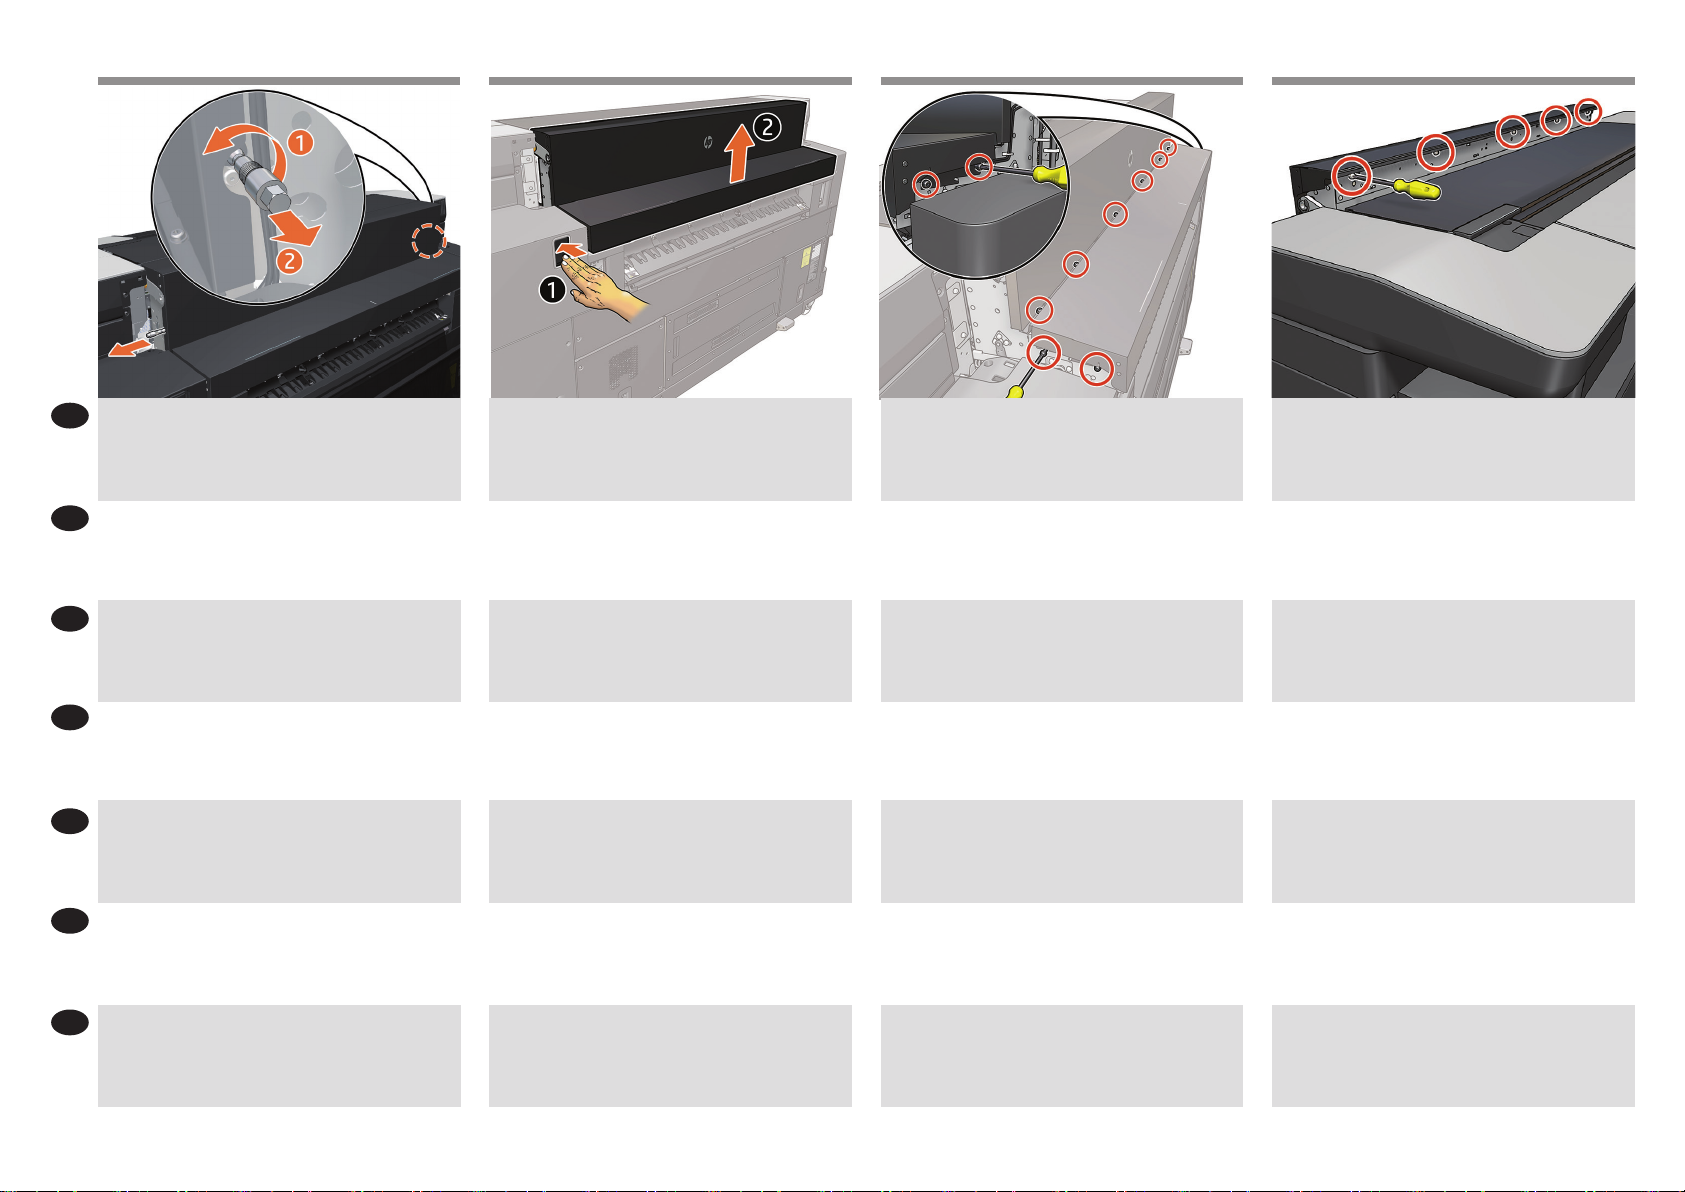
EN Remove the top screw from both gas springs, and then remove
the gas springs.
Retirez la vis du haut des deux ressorts à gaz, puis retirez les
ressorts à gaz.
Entfernen Sie die obere Schraube von beiden Gasfedern und
nehmen Sie dann die Gasfedern heraus.
両方のガス スプリングから上部のネジを外し、ガス ス
プリングを取り外します。
卸下两个气弹簧的顶部螺钉,然后取出气弹簧。
두 개의 가스 스프링 모두에서 위쪽 나사를 제거하고 가스
스프링을 제거합니다.
Lepaskan sekrup atas dari kedua pegas udara, dan kemudian
lepaskan pegas udara tersebut.
Remove the bottom screw from both gas springs.
Note: You can lock it with the L screwdriver inside, and then
rotate the outside.
Retirez la vis du bas des deux ressorts à gaz.
Remarque: Vous pouvez la verrouiller à l’aide du tournevis en
L à l’intérieur, puis faire pivoter l’extérieur.
Entfernen Sie die untere Schraube von beiden Gasfedern.
Hinweis: Sie können sie mit dem Schraubendreher L innen
festziehen und dann die Außenseite drehen.
両方のガス スプリングから下部のネジを外します。
注記: 内側にL字型ドライバを使用して固定しながら、
外側を回転することができます。
从两个气弹簧上卸下底部螺钉。
注意: 您可以在内侧使用 L 螺丝刀将其锁定,然后在外
侧旋转。
두 개의 가스 스프링 모두에서 아래쪽 나사를 제거합니다.
참고: 내부의 L자형 드라이버로 잠글 수 있습니다. 그러고
나서 바깥쪽을 회전시킵니다.
Lepaskan sekrup bawah dari kedua pegas udara.
Catatan: Anda dapat menguncinya dengan obeng L di dalam,
dan kemudian memutarnya dari bagian luar.
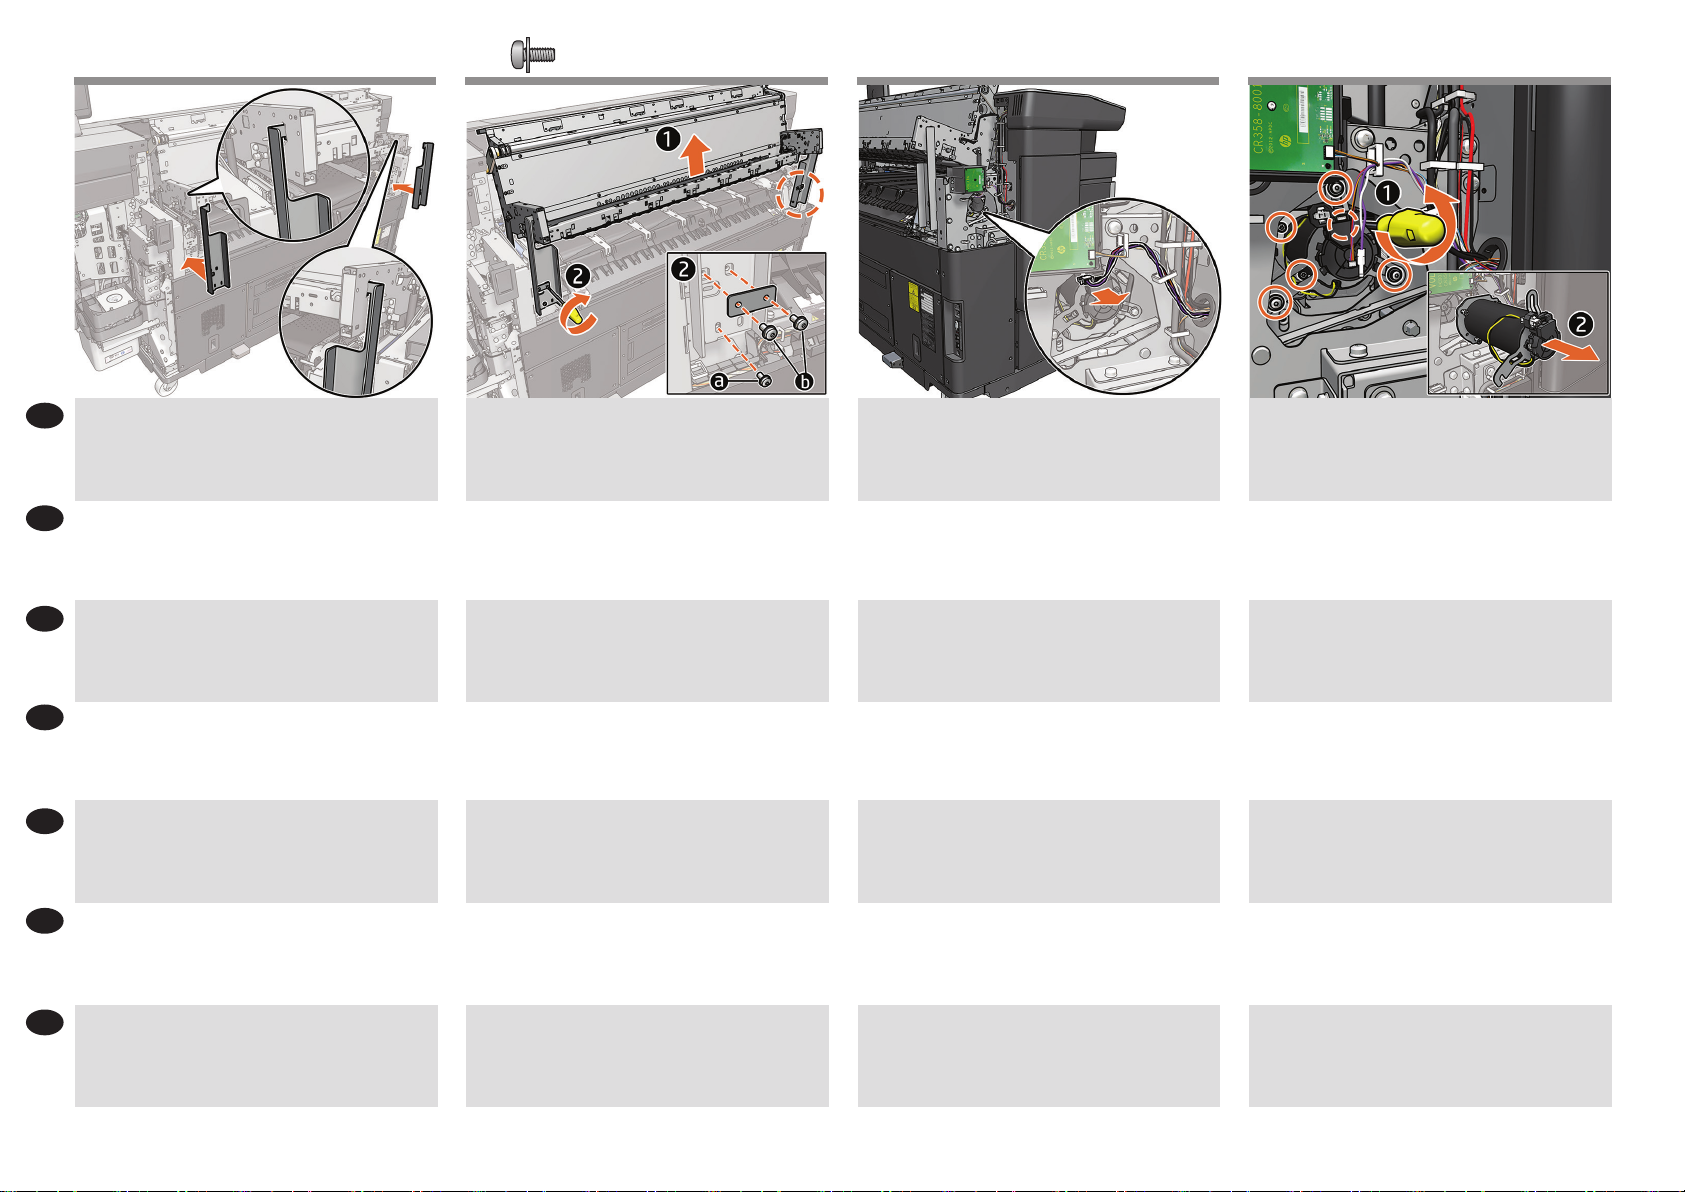
Install the new gas springs.
Note: For the bottom screw you can lock it with the L
screwdriver inside, and then rotate the outside.
Note: If the hole and screw are not aligned, push the output
module horizontally to align them.
Installez les nouveaux ressorts à gaz.
Remarque: Pour la vis du bas, vous pouvez la verrouiller avec
le tournevis en L à l’intérieur, puis faites pivoter l’extérieur.
Remarque: Si le trou et la vis ne sont pas alignés, poussez la
sortie pour les aligner horizontalement.
Setzen Sie die neuen Gasfedern ein.
Hinweis: Für die untere Schraube können Sie sie mit dem
L-Schraubendreherinnen festziehen und dann die Außenseite
drehen.
Hinweis: Wenn das Bohrloch und die Schraube nicht
ausgerichtet sind, drücken Sie das Ausgabemodul waagerecht,
um sie auszurichten.
新しいガス スプリングを取り付けます。
注記: 下部のネジは、内側にL字型ドライバを使用して
固定しながら、外側を回転することでロックできます。
注記: 穴とネジの位置が合っていない場合、排紙モジ
ュールを水平に押して合わせます。
安装新的气弹簧。
注意: 对于底部螺钉,可以在内侧使用 L 螺丝刀将其锁
定,然后在外侧旋转。
注意: 如果孔和螺钉未对齐,水平推动输出模块将其对
齐。
새 가스 스프링을 설치합니다.
참고: 아래쪽 나사는 내부의 L자형 드라이버로 잠글 수
있습니다. 그러고 나서 바깥쪽을 회전시킵니다.
참고: 구멍과 나사가 정렬되지 않은 경우에는 출력 모듈을
수평으로 밀어 정렬합니다.
Pasang pegas udara yang baru.
Catatan: Untuk sekrup bawah, Anda dapat menguncinya
menggunakan obeng L di bagian dalam, dan kemudian
memutarnya dari luar.
Catatan: Jika lubang dan sekrup tidak sejajar, tekan modul
output secara horizontal untuk menyelaraskannya.
Take the new gas springs from the box and lock them.
Note: The spring goes in the bottom part.
Prenez les nouveaux ressorts à gaz du carton et
verrouillez-les.
Remarque: Le ressort se place dans la partie inférieure.
Nehmen Sie die neuen Gasfedern aus dem Karton und
verriegeln Sie sie.
Hinweis: Die Feder gehört in den unteren Teil.
箱から新しいガス スプリングを取り出し、ロックしま
す。
注記: スプリングは、下部に取り付けます。
将新的气弹簧从包装箱中取出,并将其锁定。
注意: 弹簧进入底部。
상자에서 새 가스 스프링을 꺼내 잠급니다.
참고: 스프링은 하단 부분으로 들어갑니다.
Ambil pegas udara yang baru dari kotak dan kunci.
Catatan: Pegas akan berada di bagian bawah.
19 20 21 22
8
M4 x 8mm (x8)
ZHCN
KO
JA
FR
DE
ID
EN
Install the top stacker structure
Installation de la structure de
l’empileur supérieur
Installieren des Rahmens des
oberen Staplers
トップ スタッカの骨組みの取り
付け
安装顶部堆纸器结构
상단 스태커 구조물 설치
Pasang struktur penumpuk atas
ZHCN
KO
JA
FR
DE
ID
EN
Remove the holding tools; rst the top screws and metal strip,
then the bottom screw.
Retirez les outils de xation; d’abord les vis supérieures et la
bande métallique, puis la vis inférieure.
Entfernen Sie die Haltewerkzeuge; zuerst die oberen
Schrauben und den Metallstreifen, dann die untere Schraube.
固定ツールを外します。 最初に、上部のネジと金属片
を外してから、下部のネジを外します。
卸下夹持工具; 首先卸下顶部螺钉和金属片,然后卸下
底部螺钉。
지지 도구를 제거합니다. 먼저 위쪽 나사와 금속 띠를
제거한 다음, 아래쪽 나사를 제거합니다.
Lepaskan alat pemegang; pertama-tama sekrup atas dan
setrip logam, kemudian sekrup bagian bawah.
Close the crank, and replace the circlips removed earlier on
both sides.
Fermez la manivelle et replacez les circlips retirés
précédemment des deux côtés.
Schließen Sie die Kurbel und setzen Sie die zuvor entfernten
Sicherungsringe auf beiden Seiten wieder ein.
クランクを閉じ、前の手順で外したサークリップを両
側に取り付けます。
合上曲柄,然后在两侧安装上之前卸下的卡簧。
크랭크를 닫고 앞서 양옆에서 제거한 서클립을
교체합니다.
Tutup crank, lalu pasang kembali snap ring yang sebelumnya
dilepaskan pada kedua sisi.
Fix the 2 L supports with 4 screws each.
Attachez les 2 supports en L avec 4vis chacun.
Befestigen Sie die 2 L-Stützen mit je 4 Schrauben.
それぞれ4本のネジを使用して2個のL字型サポートを固
定します。
安装 2 L 支架,每个支架用 4 颗螺钉固定。
2개의 L자형 지지대를 각각 4개의 나사로 고정합니다.
Kencangkan 2 L yang ditahan oleh 4 sekrup pada masing-
masing bagian.
23 24 25
9
M4 x14 mm (x8)
ZHCN
KO
JA
FR
DE
ID
EN HP PageWide XL only : Install the belt motor tightening the
3 inner screws and xing in place with the 3 outer ones. Now
plug it in.
Modèles HP PageWide XL uniquement: Installez le moteur
de la courroie en serrant les 3vis intérieures et en le xant en
place avec les trois vis extérieures. Branchez-le à présent.
Nur HP PageWide XL Modelle: Installieren Sie den
Riemenmotor, indem Sie die 3 inneren Schrauben anziehen
und mit den 3 äußeren Schrauben xieren. Stecken Sie ihn
jetzt ein.
HP PageWide XL モデルのみ:内側の3本のネジを締め、
外側の3本のネジを固定して、ベルトモーターを取り付
けます。 次に、プラグを差し込みます。
仅限 HP PageWide XL 型号:安装皮带电机,拧紧 3 颗内
螺钉,然后使用 3 颗外螺钉将
其固定到位。 现在将其插入。
HP PageWide XL 모델만 해당: 안쪽 나사 3개로 조이고
바깥쪽 나사 3개로 제자리에 고정한 벨트 모터를
설치합니다. 이제 연결합니다.
Khusus model HP PageWide XL: Memasang belt motor
mengencangkan 3 sekrup dalam dan menjaganya tetap di
tempatnya dengan 3 sekrup luar. Sekarang tancapkan.
HP PageWide XL PRO only : Install the belt motor and tighten
the 3 inner screws only.
Important: Do not insert the outer screws as this could
damage the printer.
Modèles HP PageWide XL Pro uniquement: Installez
le moteur de la courroie en serrant les 3vis intérieures
uniquement.
Important: Ne placez pas les vis extérieures, car cela
endommagerait l’imprimante.
Nur HP PageWide XL Pro-Modelle: Installieren Sie den
Riemenmotor, indem Sie nur die 3 inneren Schrauben
anziehen.
Wichtig: Bringen Sie nicht die äußeren Schrauben an, da dies
zu einer Beschädigung des Druckers führen würde.
HP PageWide XL Proモデルのみ:3本の雌ネジのみを締め
て、ベルト モーターを取り付けます。
重要:プリンタが破損する可能性があるため、雄ネジ
は付けないでください。
仅限 HP PageWide XL Pro 型号:安装皮带电机,但仅拧
紧 3 个内螺钉。
重要提示:请勿拧紧外螺钉,因为这样可能会损坏打印
机。
HP PageWide XL Pro 모델만 해당: 벨트 모터를 설치하며
내부 나사 3개만 조입니다.
중요: 프린터가 손상될 수 있으므로 외장 나사를 넣지
마십시오.
Khusus model HP PageWide XL Pro: Pasang motor sabuk
dengan hanya mengencangkan 3 sekrup internal.
Penting: Jangan pasang sekrup eksternal karena dapat
menyebabkan kerusakan pada printer.
Install the 7 white clamps.
Note: 3 of the same type are placed on the side and 4 on the
top.
Installez les 7attaches blanches.
Remarque: 3 du même type sont placées sur le côté et 4 sur
le haut.
Installieren Sie die 7 weißen Klemmen.
Hinweis: 3 desselben Typs werden an der Seite und 4 oben
angebracht.
7個の白いクランプを取り付けます。
注記: 側面に同じタイプの3個のクランプを取り付け、
上部に4個を取り付けます。
安装 7 个白色夹。
注意: 相同类型的 3 个放在侧面,其他 4 个放在顶部。
백색 클램프 7개를 설치합니다.
참고: 동일한 종류가 측면에 3개, 상단에 4개가 있습니다.
Pasang 7 penjepit putih.
Catatan: Tempatkan 3 jenis yang sama di bagian sisi dan 4 di
bagian atas.
Install 4 wire frame shaft supports (2 middle ones and 2
external ones). Fix them with 2 screws in each.
Important: Take care to not drop the screws.
Installez 4 supports d’arbre de cadre métallique (2 au milieu et
2 externes). Fixez-les avec 2 vis pour chaque.
Important: Prenez soin de ne pas faire tomber les vis.
Montieren Sie 4 Leiter-Rahmenschaftstützen (2 mittlere und 2
äußere). Befestigen Sie diese mit je 2 Schrauben.
Wichtig: Achten Sie darauf, dass die Schrauben nicht
herunterfallen.
4個のワイヤ フレーム シャフト サポートを取り付けま
す(中央に2個と外側に2個)。 それぞれ2本のネジで
固定します。
重要: ネジを落とさないように注意してください。
安装 4 个线框轴支架(2 个中间,2 个外部)。 每个支架
用 2 颗螺钉固定。
重要提示: 小心不要让螺钉掉落。
4개의 와이어 프레임 샤프트 지지대를 설치합니다(중간에 2
개, 외부에 2개). 각각 나사 2개를 사용하여 고정합니다.
중요: 나사를 떨어뜨리지 않도록 주의하십시오.
Pasang 4 rangka kawat penyangga poros (2 di tengah dan
2 eksternal). Kencangkan menggunakan 2 sekrup di setiap
bagian.
Penting: Hati-hati agar tidak menjatuhkan sekrup.
26 27 28 29
10
M4 x14 mm (x12)
ZHCN
KO
JA
FR
DE
ID
EN Close the output module.
Fermez le module de sortie.
Schließen Sie das Ausgabemodul.
排紙モジュールを閉じます。
关上输出模块。
출력 모듈을 닫습니다.
Tutup modul output.
1. Remove the end-caps.
2. Lift the structure at each side (Warning: never lift it in the
middle).
3. Remove the plastic bag.
4. Remove the desecant bag.
1. Retirez les capuchons d’extrémité.
2. Soulevez la structure de chaque côté (Avertissement: ne
jamais la soulever par le milieu).
3. Retirez le sac plastique.
4. Retirez le sachet déshydratant.
1. Entfernen Sie die Endkappen.
2. Heben Sie die Struktur an jeder Seite an (Achtung: niemals
in der Mitte anheben).
3. Entnehmen Sie den Plastikbeutel.
4. Entnehmen Sie den Trockenmittelbeutel.
1. エンド キャップを取り外します。
2. 各側の構造を持ち上げます (警告: 中央にある場合は
持ち上げないでください)。
3. ビニール袋を取り外します。
4. 乾燥材を取り除きます。
1. 卸下端盖。
2. 提起两侧的结构部件(警告: 切勿提起中间部分)。
3. 取下塑料袋。
4. 取出干燥剂袋。
1. 끝 캡을 제거합니다.
2. 양쪽에서 구조물을 들어 올립니다. (경고: 가운데에서
들어 올리지 마십시오.
3. 플라스틱 봉지를 제거합니다.
4. 건조제 봉지를 제거합니다.
1. Lepas kedua penutup ujung.
2. Angkat struktur di setiap sisi (Peringatan: jangan angkat dari
bagian tengah).
3. Lepas kantong plastik.
4. Lepas kantong penyerap kelembaban.
Install the structure making sure the pin matches on the front
panel side.
Installez la structure en vous assurant que la broche
correspond au côté du panneau avant.
Montieren Sie die Struktur und achten Sie darauf, dass der Stift
auf der Seite des Anzeigebildschirms passt.
ピンがフロントパネル側面に合うことを確認しなが
ら、骨組みを取り付けます。
安装结构,确保前面板侧的销钉匹配。
핀이 전면 조작부 쪽과 일치하도록 구조물을
설치합니다.
Pasang struktur dan pastikan pin sesuai di sisi panel depan.
Fix the structure on both sides with the 2 screws removed
earlier plus 4 new ones each. Do it in the order indicated.
Fixez la structure des deux côtés avec les 2vis retirées
précédemment plus 4nouvelles sur chaque. Faites-le dans
l’ordre indiqué.
Befestigen Sie die Struktur auf beiden Seiten mit den 2 zuvor
entfernten Schrauben und je 4 neuen Schrauben. Gehen Sie
dabei in der angegebenen Reihenfolge vor.
前の手順で外したそれぞれ2本のネジと、4本の新しい
ネジで骨組みを固定します。 手順は記載されている順
序に従ってください。
在两侧的每侧各使用之前卸下的 2 颗螺钉和另外 4 颗新螺
钉固定结构。 请按所示顺序执行。
앞서 제거한 나사 2개와 새 나사 4개를 사용하여 양옆에
구조물을 고정합니다. 설명된 순서에 따라 수행합니다.
Kencangkan struktur pada kedua sisi menggunakan 2 sekrup
yang dilepaskan sebelumnya, ditambah 4 sekrup baru pada
tiap sisi. Lakukan dalam urutan yang ditunjukkan.
3331 32
30
11
ZHCN
KO
JA
FR
DE
ID
EN
ZHCN
KO
JA
FR
DE
ID
EN Route the cable.
Acheminez le câble.
Verlegen Sie das Kabel.
ケーブルを配線します。
布置线缆。
케이블을 배선합니다.
Rutekan kabel.
Remove the 5 plastic pieces.
Note: Do not discard them, they will be required later.
Retirez les 5 pièces en plastique.
Remarque: Ne les jetez pas, elles seront nécessaires
ultérieurement.
Entfernen Sie die 5 Kunststoteile.
Hinweis: Werfen Sie sie nicht weg, sie werden später noch
benötigt.
5個のプラスチック部品を取り外します。
注記: 後で必要になるため、この部品は廃棄しないで
ください。
卸下 5 个塑料片。
注意: 请勿丢弃塑料片,后面还会用到。
플라스틱 부품 5개를 제거합니다.
참고: 나중에 필요하므로 버리지 마십시오.
Lepaskan 5 bagian plastik.
Catatan: Jangan dibuang, karena nanti akan diperlukan.
Install paper path module
Installation du module d’accès
papier
Papierwegmodul installieren
用 紙 経 路 モジュール を取り付け
ます
安装纸路模块
용지 경로 모듈 설치
Pasang modul jalur kertas
Remove the desiccant bag and packaging.
Warning! Never handle the top stacker paper path door
in the middle, always hold it at the sides.
Retirez le sachet déshydratant et l’emballage.
Avertissement! Ne manipulez jamais la porte d’accès papier
de l’empileur supérieur au milieu, tenez-la toujours par les
côtés.
Entnehmen Sie den Trockenmittelbeutel und die Verpackung.
Warnung! Fassen Sie die Tür des Papierpfads des oberen
Staplers nie in der Mitte an, sondern immer an den Seiten.
乾燥剤の袋とパッケージを取り除きます。
警告! トップスタッカーの用紙経路ドアが中央にある
ときは取り扱わないでください。必ず、横に寄せてく
ださい。
移除干燥剂包和包装。
警告! 切勿握住顶部堆纸器送纸道端盖中间,应始终握
住两侧。
건조제 봉지와 포장을 제거합니다.
경고! 중앙에서 상단 스태거 용지 경로 도어를 들지
마십시오. 항상 양쪽에서 잡으십시오.
Singkirkan kantong bahan pengering dan kemasan.
Peringatan! Jangan tangani pintu jalur kertas penumpuk
atas dari bagian tengah, namun selalu pegang pada kedua
sisinya.
35 36
34
12
M4 x 8mm (x4)
ZHCN
KO
JA
FR
DE
ID
EN With the door open, install the module by inserting the top
hooks.
Note: Take care not to catch or damage the cable or the paper
path rollers, and also not to hurt ngers as the door may fall
open.
Une fois la porte ouverte, installez le module en insérant les
crochets supérieurs.
Remarque: Prenez soin de ne pas capturer ni endommager
le câble ou les galets d’accès papier, et aussi de ne pas vous
blesser les doigts car la porte peut tomber.
Installieren Sie das Modul bei geöneter Tür, indem Sie die
oberen Haken einsetzen.
Hinweis: Achten Sie darauf, dass Sie das Kabel oder die
Papierpfadrollen nicht einklemmen oder beschädigen und sich
nicht die Finger verletzen, da die Tür auallen kann.
ドアを開けた状態で、上部のフックを差し込んで、モ
ジュールを取り付けます。
注記: ケーブルまたは用紙経路を挟んだり、損傷した
り、ドアが開いて指を怪我することがないように注意
してください。
在打开端盖的情况下,插入顶部挂钩以安装模块。
注意: 小心不要缠住或损坏电缆或送纸道辊,也不要弄
伤手指,因为端盖在打开时可能会掉下。
도어가 열린 상태로 상단 고리를 삽입하여 모듈을
설치합니다.
참고: 케이블이나 용지 경로 롤러를 잡지 않도록 또는
케이블이나 용지 경로 롤러가 손상되지 않도록 주의하고
도어가 저절로 열릴 수 있으므로 손가락을 다치지 않도록
주의하십시오.
Saat pintu dalam keadaan terbuka, pasang modul tersebut
dengan memasukkan pengait atas.
Catatan: Hati-hati agar kabel atau rol jalur kertas tidak
tersangkut atau rusak, dan juga tidak melukai jari karena pintu
dapat jatuh terbuka.
Plug in and route the cable.
Branchez le câble et acheminez-le.
Verbinden Sie das Netzkabel und verlegen Sie es.
プラグを差し込み、ケーブルを配線します。
插入并布置好电缆。
케이블을 연결하고 배선합니다.
Sambungkan dan rutekan kabel.
Remove the foam.
Retirez la mousse.
Nehmen Sie das Schaumstopolster heraus.
フォームを外します。
取下泡沫塑料。
폼을 제거합니다.
Lepaskan busa.
Fix the module with 2 screws at each side.
Fixez le module avec 2 vis de chaque côté.
Befestigen Sie das Modul mit 2 Schrauben an jeder Seite.
各側に2本のネジを使用して、モジュールを固定しま
す。
每侧各使用 2 颗螺钉将模块固定。
각 면에 나사 2개를 사용하여 모듈을 고정합니다.
Kencangkan modul menggunakan 2 sekrup di setiap sisi.
39 40
3837
13
41
ZHCN
KO
JA
FR
DE
ID
EN
ZHCN
KO
JA
FR
DE
ID
EN Close the paper path module door.
Fermez la porte du module d’accès papier.
Schließen Sie die Tür des Papierpfadmoduls.
用紙経路モジュールのドアを閉じます。
盖上纸路模块端盖。
용지 경로 모듈 도어를 닫습니다.
Tutup pintu modul jalur kertas.
Diverter interface adjustment
Réglage de l’interface du
déviateur
Anpassung der Schnittstelle der
Umlenkeinheit
誘 導 イ ン タ ーフ ェ イ ス の 調 整
转向器接口调整
다이버터 인터페이스 조정
Penyesuaian antarmuka
pengalih
Loosen one screw of each side.
Desserrez une vis de chaque côté.
Lösen Sie eine Schraube an jeder Seite.
各側で1本のネジを緩めます。
每侧拧松一颗螺钉。
각 면의 나사 한 개를 풉니다.
Longgarkan satu sekrup pada setiap sisi.
Remove the diverter cover.
Retirez le capot du déviateur.
Entfernen Sie die Abdeckung der Umlenkeinheit.
誘導インターフェイスのカバーを外します。
拆除转向器盖。
다이버터 덮개를 제거합니다.
Lepaskan penutup pengalih.
4342
14
45
ZHCN
KO
JA
FR
DE
ID
EN Place the 2 adjustment tools under the plastic interface.
Note: The door must be kept closed and the diverter-interface
in the upper position.
Placez les 2 outils de réglage sous l’interface plastique.
Remarque: La porte doit être fermée et l’interface du
déviateur dans la position supérieure.
Legen Sie die 2 Einstellwerkzeuge unter die
Kunststoschnittstelle.
Hinweis: Die Tür muss geschlossen und die Schnittstelle der
Umlenkeinheit in der oberen Position gehalten werden.
2個の調整ツールをプラスチック製インターフェイスの
下に配置します。
注記: ドアを閉じ、誘導インターフェイスを上の位置
に保持する必要があります。
将 2 个调整工具放在塑料接口下方。
注意: 端盖必须保持关闭,转向器接口位于上部位置。
플라스틱 인터페이스 아래에 2개의 조정 도구를 놓습니다.
참고: 도어는 닫혀 있어야 하며 다이버터 인터페이스가
상단에 있어야 합니다.
Letakkan 2 alat pengatur di bawah antarmuka plastik.
Catatan: Pintu harus tetap tertutup dan antarmuka pengalih
berada di posisi atas.
Lower the diverter valve.
Abaissez la valve du déviateur.
Senken Sie das Umlenkventil ab.
誘導バルブを下げます。
调低转向器阀。
다이버터 밸브를 내립니다.
Turunkan katup pengalih.
Pull down the plastic interface until it touches both adjustment
tools.
Tirez vers le bas l’interface en plastique jusqu’à ce qu’elle
touche les deux outils de réglage.
Ziehen Sie die Kunststoschnittstelle nach unten, bis sie die
beiden Einstellwerkzeuge berührt.
プラスチック製インターフェイスが両方の調整ツール
に触れるまで、下に引きます。
向下拉塑料接口,直至其碰到两个调整工具。
플라스틱 인터페이스가 2개의 조정 도구에 모두 닿을
때까지 아래로 잡아당깁니다.
Tarik ke bawah antarmuka plastik hingga menyentuh kedua
alat pengatur.
Fix 1 screw on each side.
Fixez 1 vis de chaque côté.
Bringen Sie eine Schraube an jeder Seite an.
各側の1本のネジを固定します。
每侧用 1 颗螺钉固定。
각 면에 나사 1개를 고정합니다.
Pasang 1 sekrup di setiap sisi.
46 47
44
15
ZHCN
KO
JA
FR
DE
ID
EN
ZHCN
KO
JA
FR
DE
ID
EN Open the output module by pressing the button, then remove
the adjustment tools.
Ouvrez le module de sortie en appuyant sur le bouton, puis
retirez les outils de réglage.
Önen Sie das Ausgabemodul, indem Sie auf die Schaltäche
drücken, und entfernen Sie die Einstellwerkzeuge.
ボタンを押して排紙モジュールを開いてから、調整ツ
ールを取り外します。
按下按钮打开输出模块,然后卸下调整工具。
버튼을 눌러 출력 모듈을 연 다음, 조정 도구를
제거합니다.
Buka modul output dengan menekan tombol, lalu lepaskan
alat pengatur.
Replace the diverter cover.
Replacez le capot du déviateur.
Bringen Sie die Abdeckung der Umlenkeinheit wieder an.
誘導インターフェイスのカバーを戻します。
将转向器盖装回原处。
다이버터 덮개를 다시 덮습니다.
Pasang kembali penutup pengalih.
Connect the cables
Connexion des câbles
Kabel anschließen
ケーブル の 接 続
连接线缆
케이블 연결
Hubungkan semua kabel Pass the cable connector through the left side-plate, close the
saddle part, and plug it in.
Passez le connecteur du câble par la plaque latérale gauche,
fermez la partie et branchez-le.
Führen Sie den Kabelanschluss durch die linke Seitenplatte,
schließen Sie das Sattelteil und stecken Sie ihn ein.
ケーブル コネクタを左の側面プレートに通し、サドル
部分を閉じて、プラグを差し込みます。
将电缆连接器穿过左侧板,合上鞍座部分,并将其插入。
왼쪽 플레이트를 통해 케이블 커넥터를 통과시키고
새들부를 닫은 다음, 연결합니다.
Arahkan konektor kabel melalui pelat sisi kiri, dekat bagian
pelana, lalu tancapkan.
5049
48
16
ZHCN
KO
JA
FR
DE
ID
EN
ZHCN
KO
JA
FR
DE
ID
EN Route the cable through the clamps.
Acheminez le câble par les attaches.
Führen Sie das Kabel durch die Klemmen.
ケーブルをクランプに通します。
布置电缆使其穿过电缆夹。
클램프를 통해 케이블을 배선합니다.
Rutekan kabel melalui penjepit.
Tray assembly
Assemblage du bac
Montage des Fachs
トレイの組み立て
纸盘组装
용지함 조립
Memasang baki Close the output module.
Fermez le module de sortie.
Schließen Sie das Ausgabemodul.
排紙モジュールを閉じます。
关上输出模块。
출력 모듈을 닫습니다.
Tutup modul output.
Place the 2 trays by sliding them from left to right.
Placez les 2bacs en les faisant glisser de gauche à droite.
Setzen Sie die beiden Fächer ein, indem Sie sie von links nach
rechts schieben.
2個のトレイを左から右にスライドさせて取り付けま
す。
从左向右滑动,放置 2 个纸盘。
용지함 2개를 왼쪽에서 오른쪽으로 밀어 배치합니다.
Letakkan 2 baki dengan menggesernya dari sisi kiri ke kanan.
52 53
51
17
M3 x 8mm (x2)M4 x14mm (x4)
ZHCN
KO
ID
JA
FR
DE
EN Close the trays. Place the 2 missing wire frame shaft supports,
and x them with 2 screws in each.
Fermez les bacs. Placez les 2supports d’arbre de l
manquants, et xez-les avec 2vis dans chaque.
Schließen Sie die Fächer. Montieren Sie die beiden fehlenden
Leiter-Rahmenschaftstützen und befestigen Sie sie mit jeweils
zwei Schrauben.
トレイを閉じます。 2個のワイヤ フレーム シャフト サ
ポートを戻し、それぞれ2本のネジで固定します。
合上纸盘。 安装 2 个缺少的线框轴支架,每个各用 2 颗
螺钉固定。
용지함을 닫습니다. 누락된 와이어 프레임 샤프트 지지대 2
개를 놓고 각각 나사 2개로 고정합니다.
Tutup baki. Pasang 2 bingkai kawat penyangga poros, lalu
kencangkan dengan 2 sekrup pada tiap sisi.
Open the trays and x the 2 grounding plates on the rear side
with M3 x 8mm screws.
Ouvrez les bacs et xez les 2plaques de terre sur le côté
arrière avec des vis M3x8mm.
Önen Sie die Fächer und befestigen Sie die 2 Erdungsplatten
auf der Rückseite mit M3 x 8mm Schrauben.
トレイを開き、背面にM3 x 8mmのネジを使用して2個の
接地プレートを固定します。
打开纸盘并用 M3 x 8 毫米螺钉将 2 个接地板固定在背面上。
용지함을 열고 M3 x 8mm 나사로 접지판 2개를 뒷면에
고정합니다.
Buka baki dan pasang 2 pelat pengardean di bagian sisi
belakang dengan sekrup M3 x 8 mm.
Replace the plastic pieces removed earlier starting with the
central one.
Replacez les pièces en plastique retirées précédemment, en
commençant par la partie centrale.
Setzen Sie die zuvor entfernten Kunststoteile wieder ein,
beginnend mit dem mittleren Stück.
前の手順で外したプラスチック部品を取り付けます。
この際、中央のものから取り付けてください。
从中间开始,将之前卸下的塑料件安装回去。
앞서 제거한 플라스틱 부품을 중앙부터 다시 놓습니다.
Pasang kembali bagian plastik yang dilepaskan sebelumnya
dimulai dengan bagian tengah.
WARNING! Only to be used with NTP. (Natural Tracing Paper)
Insert the bottom tip into the hole, then rotate it and insert the
top tip into the other hole. Slide the wire backwards to x the
position by snapping the top tip into the plastic hole.
AVERTISSEMENT: A n’utiliser qu’avec du NTP. (Papier calque
naturel) Insérez l’embout inférieur dans l’orice, puis faites-le
pivoter et insérez l’embout supérieur dans l’autre orice. Faites
glisser le l vers l’arrière pour le maintenir en position en
accrochant l’embout supérieur dans l’orice en plastique.
WARNUNG! Nur für die Verwendung mit NTP. (Natürliches
Pauspapier) Stecken Sie die untere Spitze in das Loch, drehen
Sie sie dann und stecken Sie die obere Spitze in das andere
Loch. Schieben Sie den Leiter nach hinten, um die Position
zu xieren, indem Sie die obere Spitze in das Kunststooch
einrasten lassen.
警告! NTPでのみ使用してください。 (モノクロ カラー
トレーシング ペーパ)
下部の先端を穴に差し込み、回転して上部の先端をも
う一方の穴に差し込みます。 上部の先端をプラスチッ
クの穴に差し込むことで、ワイヤを後方にスライドさ
せて位置を固定します。
警告! 仅与 NTP 一起使用。 (本色描图纸)
将底部尖端插入到孔中,然后旋转并将顶部尖端插入到
另一个孔中。 向后滑动线缆并将顶部尖端卡入塑料孔以
固定位置。
경고! NTP에서만 사용해야 합니다. (천연 트레이싱 용지)
하단의 뾰족한 끝을 구멍에 끼운 다음 회전하고 상단의
뾰족한 끝을 다른 구멍에 끼웁니다. 와이어를 뒤쪽으로
밀어서 상단의 뾰족한 끝을 플라스틱 구멍에 맞춰 위치를
고정합니다.
PERINGATAN! Hanya untuk digunakan dengan NTP. Natural
Tracing Paper (Kertas Kalkir Alami)
Masukkan ujung bawah ke dalam lubang, lalu putar.
Selanjutnya, masukkan ujung atas ke dalam lubang lainnya.
Geser kabel ke belakang untuk memperbaiki posisi dengan
memasukkan ujung atas ke dalam lubang plastik.
54 56
55 57
18
M3 x 8mm (x1)
Top stacker cover assembly
Assemblage du capot de
l’empileur supérieur
Montage der oberen Staplerab-
deckung
トップ スタッカ カバーの組み立て
顶部堆纸器盖子组装
상단 스태커 덮개 조립
Memasang penutup penumpuk atas
ZHCN
KO
JA
FR
DE
ID
EN
ZHCN
KO
JA
FR
DE
ID
EN Rotate the grounding plate 180° from the stacker.
Faites pivoter la plaque de terre de 180° par rapport à
l’empileur.
Drehen Sie die Erdungsplatte um 180° vom Stapler weg.
接地プレートをスタッカから180度回転します。
将接地板相对堆纸器旋旋转 180 度。
접지판을 스태커에서 180° 회전시킵니다.
Putar pelat pengardean 180° dari penumpuk.
Open the stacker cover paper path module door, and slide the
assembly into place.
Ouvrez la porte du module d’accès papier du capot de
l’empileur, puis faites glisser l’assemblage en place.
Önen Sie die Tür des Papierpfadmoduls der
Staplerabdeckung und schieben Sie die Baugruppe an ihren
Platz.
スタッカ カバーの用紙経路モジュールのドアを開き、
アセンブリをスライドさせて所定の位置に配置します。
打开堆纸器盖上的纸路模块端盖,并将组件滑入到位。
스태커 덮개 용지 경로 모듈 도어를 열고 조립한 장치를
제자리에 밀어 넣습니다.
Buka pintu modul jalur kertas penumpuk, kemudian geser unit
hingga terpasang pada tempatnya.
Fix the grounding plate with 1 screw.
Fixez la plaque de terre avec 1 vis.
Befestigen Sie die Erdungsplatte mit 1 Schraube.
接地プレートを1本のネジで固定します。
用 1 颗螺钉固定接地板。
나사 1개를 사용하여 접지판을 고정합니다.
Kencangkan pelat pengardean dengan 1 sekrup.
5958 60
19
M3 x 8mm (x1) M4 x 8mm (x4)
ZHCN
KO
JA
FR
DE
ID
EN Fix the 2 struts with 2 screws each.
Attachez les 2 xations avec 2 vis chacune.
Befestigen Sie die 2 Streben mit je 2 Schrauben.
それぞれ2本のネジで2本の支柱を固定します。
每侧使用 2 颗螺钉固定 2 个结构杆。
각각 2개의 나사로 버팀대 2개를 고정합니다.
Kencangkan 2 penopang menggunakan masing-masing 2
sekrup.
Fix the part on the side indicated with 1 screw.
Fixez la pièce sur le côté indiqué avec une vis.
Befestigen Sie das Teil an der angegebenen Seite mit 1
Schraube.
1本のネジを使用して示された側面に部品を固定します。
在图中所示的这一侧使用 1 颗螺钉固定部件。
나사 1개로 표시된 면에 부품을 고정합니다.
Kencangkan komponen pada sisi yang ditunjuk menggunakan
1 sekrup.
HP PageWide XL Pro: Fix the 2 cam pin axis into place (1 each
side).
Modèles HP PageWide XL Pro uniquement: Fixez l’axe de la
broche cam de chaque côté.
Nur HP PageWide XL Pro-Modelle: Befestigen Sie die
Nockenstiftachse auf jeder Seite.
HP PageWide XL Proモデルのみ: 両側でカム ピン軸を固
定します。
限 HP PageWide XL Pro 型号: 固定每侧的凸轮销轴。
HP PageWide XL Pro 모델만 해당: 각 측면에 캄 핀 축을
고정합니다.
Khusus model HP PageWide XL Pro: Kencangkan poros pin
cam di setiap sisi.
HP PageWide XL Pro only: Use a 5mm Allen key to turn the
axis pin at both sides to lock the system.
6261 63 64
Modèles HP PageWide XL Pro uniquement: Utilisez une clé
Allen de 5mm pour faire tourner la cheville de l’axe des
deux côtés et verrouiller le système.
Nur HP PageWide XL Pro-Modelle: Verwenden Sie einen 5-
mm-Inbusschlüssel, um den Achsstift auf beiden Seiten zu
drehen, um das System zu verriegeln.
HP PageWide XL Proモデルのみ: 5mm六角レンチを使用
して両側の軸ピンを回し、システムをロックします。
限 HP PageWide XL Pro 型号: 使用 5 毫米内六角扳手转
动轴销两侧以锁定系统。
HP PageWide XL Pro 모델만 해당: 5mm 육각 렌치로 양
쪽의 축 핀을 돌려 시스템을 잠급니다.
Khusus model HP PageWide XL Pro: Gunakan kunci Allen 5
mm untuk memutar pin poros di kedua sisi agar dapat
menutup kunci sistem.
20
M4 x 8mm (x6)
ZHCN
KO
JA
FR
DE
ID
EN Insert the 17 plastic parts under the module.
Insérez les 17 pièces en plastique sous le module.
Setzen Sie die 17 Kunststoteile unter dem Modul ein.
モジュールの下に17個のプラスチック部品を差し込み
ます。
在模块下方插入 17 个塑料件。
모듈 아래에 17개의 플라스틱 부품을 삽입합니다.
Masukkan 17 komponen plastik di bawah modul.
Switch the printer on at the back.
Mettez l’imprimante sous tension à l’aide de l’interrupteur
situé à l’arrière.
Schalten Sie den Drucker an der Rückseite ein.
プリンタ背面のスイッチを押して電源を入れます。
从打印机后面打开打印机电源。
뒤에서 프린터를 켭니다.
Hidupkan printer di bagian belakang.
Replace all the covers starting with the old ones, then the new
ones, xing them into place with 3 screws at each side.
Note: For the new covers it is necessary to open the output
module in order to access the third screw.
Remplacez tous les capots en commençant par les anciens,
puis les nouveaux, en les xant en place avec trois vis de
chaque côté.
Remarque: Pour les nouveaux capots, il est nécessaire
d’ouvrir le module de sortie an d’accéder à la troisième vis.
Bringen Sie alle Abdeckungen wieder an, zuerst die alten, dann
die neuen, und befestigen Sie sie mit je 3 Schrauben auf jeder
Seite.
Hinweis: Für die neuen Abdeckungen müssen Sie das
Ausgabemodul önen, um an die dritte Schraube zu gelangen.
古いものから順にカバーをすべて戻し、各側で3本のネ
ジを使用して所定の位置に固定します。
注記: 新しいカバーの場合、3番目のネジにアクセスす
るために、排紙モジュールを開く必要があります。
从旧到新,将所有盖子安装回去,每侧各使用 3 颗螺钉
将其固定到位。
注意: 对于新的盖子,需要打开输出模块,才能看到第
三颗螺钉。
오래된 것부터 시작하여 모든 덮개를 교체하고 각 면에서 3
개의 나사로 제자리에 고정합니다.
참고: 새 덮개의 경우 세 번째 나사에 접근하려면 출력
모듈을 열어야 합니다.
Pasang kembali semua penutup dimulai dengan yang lama,
lalu yang baru, kencangkan hingga terpasang pada tempatnya
menggunakan 3 sekrup di setiap sisi.
Catatan: Untuk memasang penutup baru, modul output harus
dibuka agar sekrup yang ketiga dapat diakses.
66 67
65

This manual suits for next models

1

Other HP Printer Accessories manuals

HP 5100 - LaserJet B/W Laser Printer User manual

HP

HP 5100 - LaserJet B/W Laser Printer User manual

HP Ink Tank 110 series User manual

HP

HP Ink Tank 110 series User manual

HP LaserJet Enterprise 600 User manual

HP

HP LaserJet Enterprise 600 User manual

HP Designjet 8000s Series User manual

HP

HP Designjet 8000s Series User manual

HP Digital Sender 8100C User manual

HP

HP Digital Sender 8100C User manual

HP 5100 - LaserJet B/W Laser Printer User manual

HP

HP 5100 - LaserJet B/W Laser Printer User manual

HP C2H57A User manual

HP

HP C2H57A User manual

HP CM6040f - Color LaserJet MFP Laser User manual

HP

HP CM6040f - Color LaserJet MFP Laser User manual

HP Color LaserJet CP2025 User manual

HP

HP Color LaserJet CP2025 User manual

HP Designjet 4500 Series Manual

HP

HP Designjet 4500 Series Manual

HP DeskJet 400 User manual

HP

HP DeskJet 400 User manual

HP LaserJet Enterprise 600 User manual

HP

HP LaserJet Enterprise 600 User manual

HP LaserJet Enterprise 600 User manual

HP

HP LaserJet Enterprise 600 User manual

HP Q3952A User manual

HP

HP Q3952A User manual

HP CM4540 COLOR LASERJET Manual

HP

HP CM4540 COLOR LASERJET Manual

HP LaserJet 4MV Series User manual

HP

HP LaserJet 4MV Series User manual

HP CP4525N COLOR LASERJET ENTERPRISE User manual

HP

HP CP4525N COLOR LASERJET ENTERPRISE User manual

HP DESIGNJET 3D User manual

HP

HP DESIGNJET 3D User manual

HP C User manual

HP

HP C User manual

HP LaserJet M4345 - Multifunction Printer User manual

HP

HP LaserJet M4345 - Multifunction Printer User manual

HP LaserJet M5035 Series User manual

HP

HP LaserJet M5035 Series User manual

HP ScanJet Scanners User manual

HP

HP ScanJet Scanners User manual

HP IU 690 User manual

HP

HP IU 690 User manual

HP CB519A User manual

HP

HP CB519A User manual

Popular Printer Accessories manuals by other brands

Lexmark 10G0149 - PrintCryption Card Encryption... manual

Lexmark

Lexmark 10G0149 - PrintCryption Card Encryption... manual

Konica Minolta HT-509 installation manual

Konica Minolta

Konica Minolta HT-509 installation manual

Canon Color Network UFR Printer Kit-C1 Quick setup guide

Canon

Canon Color Network UFR Printer Kit-C1 Quick setup guide

GBC AdvancedPunch Pro Operation & instruction manual

GBC

GBC AdvancedPunch Pro Operation & instruction manual

oliser MS instructions

oliser

oliser MS instructions

Intermec EasyCoder 601XP installation instructions

Intermec

Intermec EasyCoder 601XP installation instructions

Brother TN2000 instructions

Brother

Brother TN2000 instructions

Xerox 6130N - Phaser Color Laser Printer instruction sheet

Xerox

Xerox 6130N - Phaser Color Laser Printer instruction sheet

GBC StreamPunch Ultra Service manual

GBC

GBC StreamPunch Ultra Service manual

Seiko SII LTP02-245-13 Technical reference

Seiko

Seiko SII LTP02-245-13 Technical reference

Epson Stylus Photo 820 Product information sheet

Epson

Epson Stylus Photo 820 Product information sheet

Xerox C11 - DocuPrint Color Inkjet Printer installation guide

Xerox

Xerox C11 - DocuPrint Color Inkjet Printer installation guide

Sharp AR-PB2A Service manual

Sharp

Sharp AR-PB2A Service manual

BIXOLON SMP6350 user manual

BIXOLON

BIXOLON SMP6350 user manual

Epson Printer Interface Cartridge Operation manual

Epson

Epson Printer Interface Cartridge Operation manual

Sharp SF-S55N Service manual

Sharp

Sharp SF-S55N Service manual

Konica Minolta magicolor 2430 DL user guide

Konica Minolta

Konica Minolta magicolor 2430 DL user guide

Canon imagePROGRAF RU-63 Setup guide

Canon

Canon imagePROGRAF RU-63 Setup guide

manuals.online logo
manuals.online logoBrands
  • About & Mission
  • Contact us
  • Privacy Policy
  • Terms and Conditions

Copyright 2025 Manuals.Online. All Rights Reserved.