HUALIAN HL-P-350 User manual

DONGGUAN HUALIAN AUTOMATION EQUIPMENT CO.,LTD

1
Table of Content
Foreword……………………………………………………..………3
1.Safety Precautions……………………………………………..…3
2.Machine description
2.1.Machine application…………………………………………………….4
2.2.Structural features………………………………………………………4
2.3.Machine outline and names for each part ………………………………...4
2.4.Positions and names of adjusting components………………………….5
2.5.Technical specification………………………………………………….5
3.Installation
3.1.Ground requirement…………………………….……………………….5
3.2.Environment Conditions……………………….………………………..7
3.3.Steps of installation……………………………….……………………..7
3.4.Switch on and test ………………………………………………………7
4.Machine Adjustment
4.1.Feeding mechanism……………………………………………………..7
4.2.Paper feeding mechanism……………………………………………….7
4.3.Bag maker……………………………………………………………….9
4.4.Mid sealing mechanism…………………………………...…………….9
4.5.End sealing mechanism………………………………… …………….10
5.Operation
5.1.Human-machine interface………………………………………………12
5.2.Temperature control…………………………………………………….22
5.3.Color mark electric eye…………………………………………………22
5.4.Start…………………………………………………………… ……...23
5.5.Stop ……………………………………………………………………...23
6.Maintenance
6.1.Per shift clean and maintenance…………………………………..…….23
6.2.Monthly clean and maintenance …………………………………..……23
6.3.Biannual clean and maintenance…………………………………..……23
7.Resolving abnormalities………………………………..………….24

2
8.List of attached documents, fittings and tool…………………….25
9.Appendices
A.Electric schematic diagram………………………………………………...26
B.Electric wiring diagram……………………………………………………27
3
Foreword
Welcome to use automatic rotary type rotary pillow packing machine!
If it is the first time to use our pillow packing machine, please read carefully and
thoroughly this “operation manual”, it will help you to use and maintain the
machine correctly, assure the safety of people and machine, full play the
performance of the machine, reduce troubles and prolong the service life of the
machine.
1.Safety Precautions
1) Never start the machine before make familiar with the correct operation
methods and safety regulations.
2) Untrained and unauthorized persons are not allowed to operate this machine.
3) Carefully read this manual and understand all of the content and requirement in
this manual before using the machine.
4) The machine can be operated only after it is completely installed and properly
adjusted.
5) Before starting the machine, make sure there is no tool or any other object on
top of the machine.
6) Before switch off the power, never touch the inside of the machine or the
electric equipment.
7) Never leave the running machine unattended---operators should not leave the
working scope of the machine during the machine is running.
8) When the machine is running, never touch the sealing wheel, sealing die and
moving parts.
9) Electric control circuit must be checked and repaired by professional
electricians.
10)
Do not refit the machine, or install any device, tool or peripheral equipment to
the machine without the permission of our company in order to avoid any
danger.
11)If there is anything in the manual you cannot understand, or if you encounter
any problem that cannot be solved with this manual, please contact our
company or our sealer, never try to handle it yourself.
12)Do not use this machine in the environment other than the stipulated.
Warning: For your safety and the safety of the machine, do observe all above
safety precautions, otherwise, this company will be free from any
responsibility for any accident out of inobservance.

4
2.Machine Description
2.1.Machine Application
This machine is designed for packing fixed shaped materials into pillow packages, suitable for
packaging soft , strip and unorganized objects like towels , tissues , noodles , egg rolls , sausages ,
fish , ice-lollies , soft candies , biscuits , fresh fruits , etc. commodities, industrial parts etc. For
small pieces and separated articles, they should be put in to boxes or tied into blocks before this
machine can be used to pack them, and this packing method is also applicable to pack other
nonsolid products.
2.2. Structural features
1) Dual frequency converter control, bag length is adjustable, no need to adjust
idle running distance, adjustment can be make in one step, save time and film.
2) Text type human-machine interface, parameter setting is convenient and quick.
3) Problem self diagnose function, any trouble is clear at a glance.
4) Highly sensible photoelectric eye for color mark tracking, which makes sealing
and cutting position more accurate.
5) Independent temperature PID control, more suitable for packing films of all
kinds of materials.
6) Position fix stop function, free from cutter sticking and film waste.
7) Simple driving system, work is more reliable, and maintenance is more
convenient.
8) All controls are carried out with software, it is convenient for function
adjustment and upgrade, and it will never drop behind.
2.3. Machine outline and names for each part (see diagram 1)
C
C
光眼 急停 电源
MAGICEYE EMERGENCYSTOP POWER
中封 端封
MID-SEALING END-SEALING
开 关 开 关
ON OFFON OFF
启动 停机 点动
INCHINGSTOPSTART
Feeding mechanism Bag maker Control system Mid-sealing mechanism Rotary type end sealing mechanism
Frame Paper feeding me chanism Driving mechanism Belt type discharg e mechani sm
Diagram 1. Outline of 350X Rotary type pillow packing machine and the components
5
2.4. Positions and names of the adjusting components(see diagram 2)
End sealing pressure adjusting screw
Both ends
End sealing up down adjusting screw
Middle
Level adjusting screw
Push finger chain tension
adjusting handwheel
C
C
光眼 急停 电源
MAGIC EYE E MERGENCYSTOP P OW ER
中封 端封
MID-SEALI NG END- SEALING
开 关 开 关
ON OFFON OFF
启动 停机 点动
INCHINGSTOPST ART
End sealing knife speed
adjusting handwheel
Push finger position
adjusting handwheel
Swing roll position
adjusting handwheel
Press-fit wheel speed
adjusting handwheel
Press-fit wheel
open-and-close handle
Paper pulling wheel
open-and-close handle
Rubber cylinder open-and-close handle
Packing film central line
adjusting handwheel
Diagram 2. Positions and names of the adjusting components for 350 XRotary type
pillow packing machine
2.5. Technical specification
Type 350X
Film width Max. 350mm
Bag length
120-280mm
Bag width
50-160mm
Product height
10~40mm
Film roll diameter Max. 320mm
Packaging rate 40-230bag/min
Power 220V,50/60HZ,2.8KVA
Machine size (L)4020×(W)720×(H)1320
Machine quality 900Kg
Remarks
3. Machine installation
3.1. Ground requirement
This machine should be installed on a flat and hard surface. Enough space should
be kept around the machine for operation and maintenance (see diagram 3).

6
10001000
1 0 0 0 1 0 0 0
720
2720
3 8 7 0
5 8 7 0
Diagram 3. Floor plan for model 600X Rotary type pillow packing machine
3.2. Environment conditions
1) Temperature:Normal environment temperature should be within 5℃~40℃.
2) Humidity: 30%~90%。
3) Keep away from gasoline, chemicals, acid and alkali materials, explosives, and
combustibles.
4) Environment illumination: Above 300 LUX
5) Keep away from direct sunlight
6) Keep away from vibrating machines.
7) Avoid direct fan blowing.
3. 3. Steps of installation
1) The first step is to determine the installation position, refer to diagram 3. After the
machine is set, take the worktable as the level reference to adjust the four level
adjusting screws, set the main machine in a level position.
2) Install the feeding machine, fix it to the left side of the main machine with bolts,
then adjust the two level adjusting screws of the feeding machine, set it in a level
position. For the part connecting with the main machine, the bottom of the feeding
chute and the main machine table should be aligned and kept in a same level.
3) Install the push finger chain. Loosen the left handwheel (see diagram 2) of the
feeding machine, and install and connect the push finger chain. Turn the
handwheel to adjust the push finger chain to a proper tension.
4) Connect power supply line. This machine uses single-phase 220V, 50HZ power
supply. Never connect to 380V or other unqualified power supply. Special
attention must be paid to this requirement! In order to ensure safety, all wiring
7
work should be carried out by qualified professional electricians. Connecting
cable is attached to the machine. If you use your own power plug, 1.5m ㎡three
core cable must be used, correctly connect the live wire(L), the zero wire (N), and
the grounded wire (E).
3.4. Switch on the power and test run
1) Make sure that the power supply is correct(test L, N with a test pencil).
2) Connect all the circuit breakers in the control cabinet, check if all meters and
power indicator lamps on the control panel are normal.
3) Press inching button, check if the machine can operate normally.
4) On the human –machine interface, set the packing speed to 40 packages per
minute, then press the start button (green), run the machine normally for 3 to 5
minutes, after make sure the machine can operate normally, press the stop button
(red). Now a correct installation is completed.
4. Machine Adjustment
4.1. Feeding mechanism
The feeding mechanism of this machine is equipped with a push finger chain, the
tension of the chain is adjusted the two “push finger chain tension adjusting
handwheels” on the left end of the feeding mechanism. After the product to be
packed is determined, adjust the width of the guide chute of the feeding
mechanism to an extent so long as the product to be packed can pass through the
guide chute smoothly.
4.2. Paper feeding mechanism
1) Packing film circumambulating route
After the packing film roll installed on the automatic central aligning clamping roller,
the film should circumambulate through certain route. The circumambulating route
will be slightly different as whether a code printing machine is installed or not.
a)When the machine is equipped with a code printing machine, the circumambulating route
should be arranged as shown in diagram 4.

8
Do wn s ea li ng k ni fe
U pp er s ea li ng k ni fe
He a ti ng b lo ck
P ap er pu ll w he el
P r es s- fi t wh ee l
B ag m a ke r
Pa ck e d pr od uc t Pa pe r pu ll w he el
op en -a nd -c lo s e ha nd le
Pr es s -f it w he el s p e ed
a dj u st in g ha nd wh ee l
P re ss -f it w he el
o pe n -a nd -c lo se h an dl e
R oc ki ng be am r ol le r
Pa ck in g f il m
C od e pr in ti ng m a ch in e ro ll er Pa ck in g f il m ro ll
Dr iv e r ol le r
Co lo r m ar k el ec tr ic e ye
Ru bb er ro ll er
Diagram 4. The film circumambulating route when the machine is equipped with a code printing machine.
b). When the machine is not equipped with a code printing machine, the
circumambulating route should be arranged as shown in diagram 5.
Do wn s ea li ng k ni fe
U pp er s ea li ng k ni fe
He a ti ng b lo ck
P ap er pu ll w he el
P r es s- fi t wh ee l
B ag m a ke r
Pa ck e d pr od uc t Pa pe r pu ll w he el
op en -a nd -c lo s e ha nd le
Pr es s -f it w he el s p e ed
a dj u st in g ha nd wh ee l
P re ss -f it w he el
o pe n -a nd -c lo se h an dl e
R oc ki ng be am r ol le r
Pa ck in g f il m
Pa ck in g f il m ro ll
Dr iv e r ol le r
Co lo r m ar k el ec tr ic e ye
Ru bb er ro ll er
Diagram 5. The film circumambulating route when the machine is not equipped with a code
printing machine.
9
Regardless what circumambulating route is adopted, when the film enters the bag
maker, open the mid-sealing open-and-close handle, make the paper pass through the
paper pull wheel, mid-sealing heating board, press-fit wheel, then close the
open-and-close handle, run the machine by inching, make the packing film pass
through the end sealing knife, now the film installation is completed.
2) Packing film tension and central aligning adjusting
When the packing film pass through the bag maker, if the tension of the packing
film is uneven, i.e., loose in the middle and tight on both sides, or tight in the
middle and loose on both sides, the paper transfer will become unsmooth, at this
time, it needs to adjust the position of the swing roll (see diagram 2) or the angle of
the swing link, this will change the relative position between the swing roll and the
bag maker, thus the tension of the packing film will be adjusted to a even tension as
required.
If the mid-sealing of the packed product is uneven, it needs to adjust the “packing
film central aligning adjusting handwheel” (see diagram 2), until the two sides of
the mid-sealing are lined up. Adjustment in each time should not be too large (the
adjusted result will not be reflected immediately).
4.3. Bag maker
The width of the bag maker can be adjusted . The proper width of the bag maker
should be the width of the packed product plus 5mm positive allowance.
4.4. Mid-sealing mechanism
Mid-sealing mechanism consists of a paper-pull wheel, heating block, press-fit
wheel, open-and-close handwheel, press-fit wheel speed adjusting handwheel etc.
When the packing film passes through the paper-pull wheel, heating block, press-fit
wheel, if paper is laid up or strained, it should be adjusted with the “press-fit wheel
speed adjusting handwheel”.
Adjusting the height of the mid-sealing mechanism.The height of the mid-sealing
mechanism should be adjusted according to the height of the packed product .
Mid-sealing should result a tight sealing and clear lines, otherwise it should be
adjusted, and following is the adjusting method:
1) Put two white papers, between which a carbon paper is sandwiched, onto the
mid-sealing wheel and turn it one revolution, open the two white papers, the
printed marks on the two white papers should be clear, it not, adjust the meshing
position between the two wheels, check the printed marks again, until the printed
marks are clear on the papers.
2) If the meshing is correct and the temperature is proper, but sealing quality is still
undesirable, it needs to adjust the set screws to limit the meshing pressure of the
sealing wheel, till the sealing becomes desirable.

10
The mid-sealing parts have been adjusted properly in the factory, so it is generally
do not need to adjust.
4.5. End sealing mechanism (Rotary type)
1) End sealing knife seat and cutter adjustment
The cutter seat have been adjusted, tested and inspected in a strict way and
generally it does not need make further adjustment. In case adjustment is need,
use two white papers, between which a carbon paper is sandwiched, to test and
check if the pressed marks on the paper are even and clear, if they are clear, the
cutter seat position is correct and no adjustment is required, if not, adjustment to
the cutter seat is required, to adjust, loosen the screw M10 (not completely take
off), then adjust the crossing adjusting screw to correct the position of the cutter
seat, until proper result is reached. At last tighten the screw M10. Adjustment of
the cutter seat can be carried out without heating.
The adjustment of the cutter is generally made by pacing copper sheets. The
proper adjustment is that it adjust cut off the film without making much nose. If
the cutter is unable to be adjusted well, is must be replaced. Adjustment of the
cutter must be carried out under heating (about 120℃).
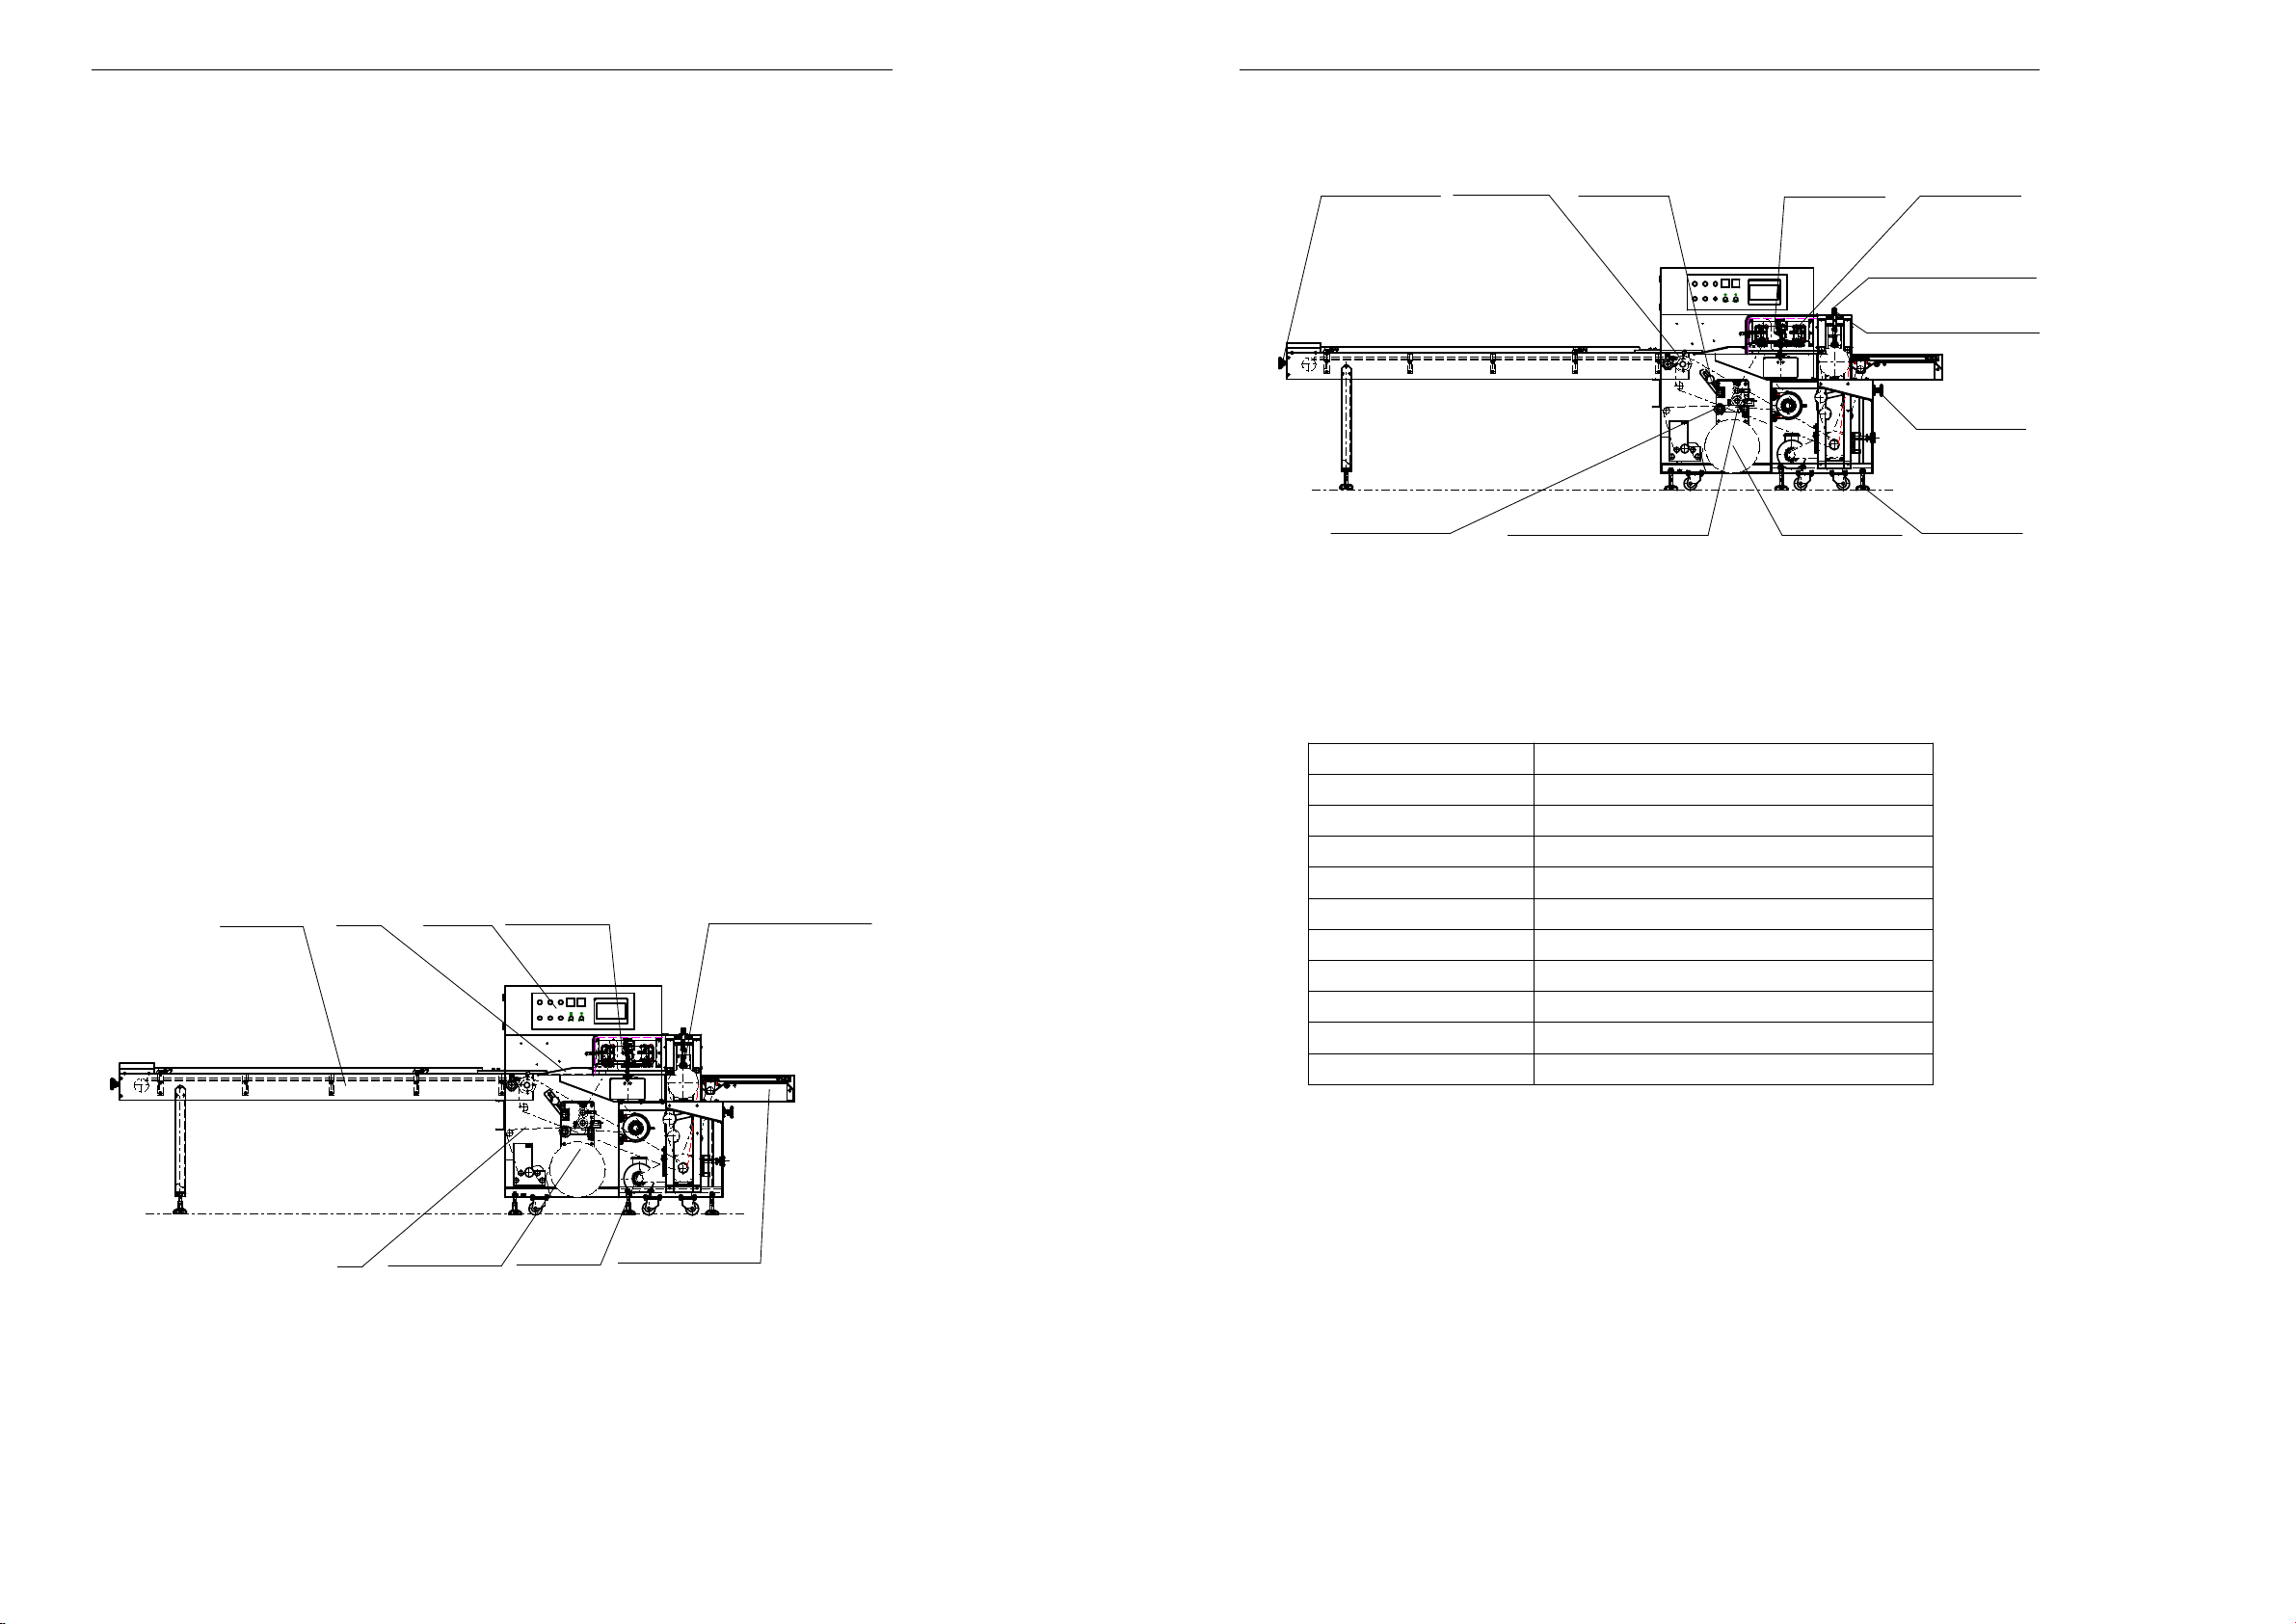
2) Adjusting the height of the end dealing knife holder
The height of the end dealing knife holder should be adjusted according to eh height
of the packed product so as to make the meshing center of the sealing knife align
with the height of the center of the packed articles, as shown in diagram 4 and 5. To
adjust, loosen the four screws of the side board of the cutter holder, then adjust the
up-and-down adjusting screw of the end sealing (the middle screw), making the
distance between the meshing position of the upper and lower sealing knives and
the working plane is about a half of the height of the packed product. After
adjustment, don’t forget to tight the four loosened screws before restart the machine
again.
3) Adjusting the end sealing knife speed
The speed of the end sealing knifes should be adjusted according to the different
lengths of the packages. The speed should be adjusted so that the linear velocity of
the end sealing knifes is equal to the speed of the packing film, there is no paper lay
up and straining paper cutting at the cutter. If there is lay up, is means the knife
speed is slow and it needs to increase the speed with the “end sealing knife
adjusting handwheel” (see diagram 2); if the paper is strained, is means the knife
speed is too high and it needs to decrease the speed with the “end sealing knife
adjusting handwheel”, until reach the synchronized speed.
11
4) Adjusting the cutting position of the end sealing knives
In this feeding machine, the linkage relationship between the between the push rod
and the end sealing knives is different according to the lengths of the packages. The
method and procedures for adjusting the synchronous relationship between the
between the push finger and the end sealing knives are as following:
(A) When color marks are printed on the film package:
(1) When there is no product in packages, select “parameter setting” display and set
the value of the “cutting position” with the human-machine interface so as to
adjust the cutting position of the end sealing knives. (refer to section 5.1 for
setting method),set the cutting position at the color mark.
(2) Put 3 to 5 packed articles between the push fingers of the feeding mechanism,
star the machine, when the packed articles reach 100mm away from the front of
the end sealing, stop the machine.
(3) Check to see if the packed articles are between the two color marks, and
measure the deviation direction and amount and record them.
(4) Take out the packed articles, adjust the push finger position with the “finger
position adjusting handwheel” (the handwheel can be turned after it is pushed
inward), so as to adjust the position of the packed articles.
(5) Repeat steps 2 to 4, until the packed articles are just between the two color
marks.
(B)When there is no color mark on the film package:
(1) Put 3 to 5 packed articles between the push fingers of the feeding mechanism,
star the machine, when the packed articles reach 100mm away from the front of
the end sealing, stop the machine.
(2) Check visually to judge if the end sealing position is between the two packed
articles and measure the deviation direction and amount and record them.
(3) Take out the packed articles, adjust the push finger position with the “finger
position adjusting handwheel” (the handwheel can be turned after it is pushed
inward), so as to adjust the position of the packed articles.
(4) Repeat steps 1 to 3, until the packed articles are just between the two color
marks.
5. Machine operation
1) Safety check: Check and make sure there is no foreign matter on the conveyer
belt, working table, and end sealing knives, and there is no other person around
the machine.
2) Switch on the power. Open the door of the cabinet and connect the main breaker,
close the cabinet, check to see if all thermostats and power supply indicator lamp
on the control board are normal, and see if the display of the human-machine
interface is normal.
After safety check and the power supply is normal, carry out the following operation:

12
5.1. Human-machine interface
The main parameters of this machine are set with the human-machine interface.
After the power is switched on, the first page of the human-machine interface is
displayed, as shown in diagram 6.
ENTER
A L M
S E T
E N T
0
5 6 7 8 9 + / -
C L R4321
E S C
Welcome to use
Diagram 6. The first page of the human-machine interface
Follow the description on the screen, press the touch key ( ↓), the human-machine
interface will give a sound and enters the next page (the main menu), as shown in
diagram 7.
13
E S C
A L M
S E T
E N T
0
5 6 7 8 9 + / -
C L R4321
SETTING
COUNTER
F O L L O W U P
INFLATE
Q U A N T I T Y
M A N U A L
S Y S T E M
H O M E P A G E
CLR
SET
ENT
ESC
Diagram 7. The main menu of the human-machine interface
(A)Parameter setting
Follow the indication in the “main menu of the human-machine interface”
(diagram 7), press(←)key, it enters the “parameter setting” display, as shown in
diagram 8. Press (ESC)key, return to the “main menu of the human-machine
interface”, as shown in diagram 7.
E S C
A L M
S E T
E N T
0
5 6 7 8 9 + / -
C L R4321
C u t p o s i t i o n : ? ? ? m m
L e n g t h : ? ? ? m m
S p e e d : ? ? ? b a g / m i n
Parameter setting Back
ESC
Diagram 8. The parameter setting display of the human-machine interface

14
1) Setting “packing speed”: Follow the description of the “parameter setting” display
(diagram 8), press(←)key to enter the “packing speed” display (see diagram 9),
enter the values by following the descriptions on the screen, if the speed value
excels the rated the speed of the machine, an error signal will be displayed and ask
you to reset the value, until the set value is correct.
E S C
A L M
S E T
E N T
0
5 6 7 8 9 + / -
C L R4321
S p e e d
※ ※ ※
s e t t i n g
B a c k
ESC
S E T S t a r t
← →
S E T
0 9
- -
E N T o k
Diagram 9. The packing speed setting display
2) Setting “package length”: Follow the description of the “parameter setting” display
(diagram 8), press (→) key to enter the “package length” display (see diagram 10),
enter the values by following the descriptions on the screen, if value of package
length excels the rated value of the machine, an error signal will be displayed and
ask you to reset it, until the set value is correct.
15
E S C
A L M
S E T
E N T
0
5 6 7 8 9 + / -
C L R4321
B a c k
ESC
※ ※ ※
s e t t i n g
B a c k
L e n g t h S E T S t a r t
← →
S E T
0 9
- -
E N T o k
Diagram 10. The package length setting display
3) Setting “cutting position”: Follow the description of the “parameter setting” display
(diagram 8), press (↓)
key to enter the “cutting position” display (see diagram 11),
enter the values by following the descriptions on the screen. To confirm the input
value, at first, set the parameter of the cutting position to “0”, seal and cut the
empty bags, measure the distance “L” between the cutting point and the color mark
E S C
A L M
S E T
E N T
0
5 6 7 8 9 + / -
C L R4321
B a c k
ESC
s e t t i n g
B a c k
C u t p o s i t i o n
※ ※ ※
S E T S t a r t
← →
S E T
0 9
- -
E N T o k
Diagram 11. Cutting position setting display

16
(see diagram 12), and then input the measured value “L” to the “cutting position”
parameter.
LColor mark
Diagram 12. Cutting position measuring
(B)Counting
Follow the indication in the “main menu of the human-machine interface”
(diagram 7), press
(→)
key to enter the “counting” display, as shown in diagram 13.
E S C
A L M
S E T
E N T
0
5 6 7 8 9 + / -
C L R4321
CLR
Shift output: ※※※※※※※※※ p
Total output: ※※※※※※※※※ p
Total time: ※※※※※※※※※ min
B a c kR e s e t
ESC
Diagram 13. Yield counting display
17
This display mainly record the accumulated working time, accumulated output and
shift output, so as to facilitate production management for users. Shift output can be
reset by pressing(CLR)key. Press(ESC)key to return to the “main menu of the
human-machine interface” (diagram 7).
(C) Follow up method
Follow the indication in the “main menu of the human-machine interface”
(diagram 7), press
(↓)
key to enter into the “follow up method” display, as shown
in diagram 14. Press
(ESC)
key to return to the “main menu of the human-machine
interface” (diagram 7).
E S C
A L M
S E T
E N T
0
5 6 7 8 9 + / -
C L R4321
ESC
B a c k
F o l l o w u p c u t t i n g
L e n g t h s e t c u t t i n g
Diagram 14. Follow up method display
Press(←)key, the machine will enter into “Follow up cutting” mode, Press(→)
key, the machine will enter into “Length set cutting” mode. For packages with
color marks (i.e. for product to be followed up through color marks), “Follow up
cutting” is used; for packages without color marks, “Length set cutting” mode” is
used.
(D)Inflating setting ( option)
Follow the indication in the “main menu of the human-machine interface”
(diagram 7), press
(↑)
key to enter into the “Inflating setting” display, as shown
in diagram 15. Press (ESC )key to return to the “main menu of the
human-machine interface” (diagram 7).

18
E S C
A L M
S E T
E N T
0
5 6 7 8 9 + / -
C L R4321
S t a t e :
S w i t c h :
D e l a y : ※ ※ ※
I n f l a t e : ※ ※ ※
o n
B a c k
o f f
ESC
s e t t i n g
s e t t i n g
Diagram 15. Inflating display
1) Setting inflating delay: Follow the indication in the “inflating setting”
display(diagram 15), press (↑)key to enter into the “inflating delay” setting
display (see diagram 16), input the value by following the indication on the screen.
The input value should be decided by inflating effect.
Press(ESC)key to return to the “inflating setting” display (diagram 15).
E S C
A L M
S E T
E N T
0
5 6 7 8 9 + / -
C L R4321
B a c k
ESC
B a c k
※ ※ ※
I n f l a t i n g
d e l a y t i m e
S E T S t a r t
← →
SET
0 9
- -
E N T o k
Diagram 16. Inflating delay display
19
2) Setting inflating time: Follow the indication in the “inflating setting” display
(diagram 15), press(↓)key to enter into the “inflating time” setting display (see
diagram 17), input the value by following the indication on the screen. The input
value should be decided by inflating effect.
Press(ESC)key to return to the “inflating setting” display (diagram 15).
E S C
A L M
S E T
E N T
0
5 6 7 8 9 + / -
C L R4321
B a c k
ESC
B a c k
※ ※ ※
I n f l a t i n g
t i m e
S E T S t a r t
← →
S E T
0 9
- -
E N T o k
Diagram 17. Inflating time display
(E)Manual operation
Follow the description in the “main menu of the human-machine interface”
(diagram 7), press
(SET)
key to enter into the “Manual operation” display, as shown
in diagram 18. Press
(ESC)
key to return to the “main menu of the human-machine
interface” (diagram 7).

20
E S C
A L M
S E T
E N T
0
5 6 7 8 9 + / -
C L R4321
B a c k
ESC
B a c k
SET
ENT
F i l m ←
K n i f e ←
F i l m →
K n i f e →
M i d - s e a l o p e n
M i d - s e a l c o l s e
Diagram 18. Single action display
This display is used for single action operation:
a) Paper feed system moves forward and backward
b) End sealing system moves forward and backward
c) Mid-sealing system opens and closes
(F)Quantity packing
This machine contain fixed quantity packing function.When to open the
fixed quantity packing and set up the fixed packing quantity, this time,
start the packing machine, It normal wouks.When the quantity of packing
arrives the packing number set up, the packing machine stops
automatically.Such, can then the convenience calculates to handle the
finished product of packing.
After shutting down midway, start the packing machine again, this time,
the fixed quantity packing starts calculating from the zero.
Follow the indication in the “main menu of the human-machine interface” (diagram 7),
press
(CLR)
key to enter into the “Quantity setting” display, as shown in diagram 19.
Press (ESC )key to return to the “main menu of the human-machine interface”
(diagram 7).
21
E S C
A L M
S E T
E N T
0
5 6 7 8 9 + / -
C L R4321
B a c k
ESC
off
o n
Q u a n t i t y S t a t e :
S w i t c h :
Q u a n t i t y : ※ ※ ※ ※ ※
Diagram 19. Quantity display
Press
(←)
key to open the “quantity function” , Press
(→)
key to close the “quantity
function”, press (↑)key to enter into the “quantity range” display, as shown in
diagram 20. input the value of the quantity range in accordance with the description in
the human-machine interface .
E S C
A L M
S E T
E N T
0
5 6 7 8 9 + / -
C L R4321
B a c k
ESC
B a c k
Q u a n t i t y
Setting
※※※※※
S E T S t a r t
← →
SET
0 9
- -
E N T o k
Diagram 20. Quantity range display

22
(G)System
There will be no further description about the maintenance; please talk to the
commissioning technicians for detailed method about the system.
5.2. Temperature control
This machine has two sets of temperature control systems, which control the
“mid-sealing temperature” and the “end-sealing temperature” respectively. The
temperature setting value for each set of temperature control system is determined
according to the packing speed, the thickness of the packing film, and the
environment temperature. The optimum temperature setting value should have a
result that there is no leakage and burnt crimple for both mid-sealing and end-sealing.
The operation method for thermostat is described in the thermostat instruction manual
attached to the machine.
5.3. Color mark magic eye
Magic eye is required for products to which following up is needed. After the
packing film is installed, adjust the position of the magic eye; along the light beam
emitted from the magic eye with to the place where color marks pass by, as shown
in diagram 21.
Color mark Light beam
Diagram 21. Position for light beam of the color mark magic eye
The sensitivity of the color mark magic eye has been adjusted properly in factory. If
further adjustment is needed, follow the magic eye instruction manual attached to the
machine.
23
5.4. Start
1) Inching
Press and hold the inching button (black), the machine will run in speed of 30
packages per minutes, when the key is released, the machine will stop
immediately.
2) Continuous running
Press the start button (green), the machine will run continuously with the set speed
until the stop button (red) or emergency stop button (mushroom shaped) is
pressed.
5.5. Stop
1) Normal stop
Press the stop button (red), the machine will stop with the end-sealing knife in
the level position.
2) Emergency stop
Press the emergency stop button (mushroom shaped), the machine will stop
immediately, to restart the machine, the reset button must be pressed.
6.Maintenance
6.1. Shift cleaning and maintenance
1) Before cleaning the machine, cut off the power supply to the machine so as to
ensure the safety of people and the machine.
2) Clean the working table and the surface of the machine with a clean and
moistened cloth.
3) Clean off the film scraps stuck to the feeding mechanism, mid-sealing
mechanism and the end-sealing mechanism with compressed air.
4) Clean off the film scraps stuck to the end-sealing knife with a steel wire brush.
6.2. Monthly check and maintenance
1) Add lubricating oil to the meshing gears of the drive system and the chains of
the chain wheel, a thin layer of lubricating oil is enough. It is not allowed to add
lubricating oil to the synchronous belt of the machine and the flat conveyer belt.
2) Add lubricating oil to the end-sealing bearing.
3) Check the tension of the drive chain and belt, retighten if necessary.
4) Check all the screws and nuts, if there is any for loose screw or nut, retighten it.
5) Check carbon deposit, clean if necessary.
6.3. Biannual check and maintenance
1) Check the wearing condition of the drive belt and the flat conveyer belt,
replace if necessary.
2) Check all the wearing parts, replace the worn parts in time.
3) Check the wearing condition of the drive parts, replace if necessary.
4) Check the electric wiring and tighten if necessary. Clean the dust from the
electric elements with compressed air.

24
7. Resolving abnormalities
Problems
Possible causes
Remedies
Cutting position is deviated
from the color marks
1. Color mark follow up is not
used
2. The film color mark is weak.
3.Film is slipping.
1. Change follow up method into “follow up
cut” in the follow up method display of
the human-machine interface.
2. Refer to the magic eye instruction
manual attached to adjust the sensitivity
of the magic eye.
3.Adjust the tension of the rubber roller or
the degree of tightness of the brake.
The cutter cut on products 1. The push rod and the cutter are
asynchronous.
2. The height of the cutter seat
is improper.
3.Packing speed is too high.
1. Refer to section 4.6.4 about push finger
position.
2.Adjust he height of the end-sealing parts,
adjust the sealing knife meshing center to
the half of the product height.
3. Decrease the packing speed.
Burnt crimples appear on the
seal
1. Temperature is too high.
2. Speed is too low.
3. The thermal endurance of the
film’s outer layer is poor.
1. Bring down the temperature.
2. Increase the speed
3. Replace with better film
Sealing is loose or missed 1.Temperature is too low.
2.Speed is too high.
3.The thermal endurance of the
film’s inner layer is poor.
1.Increase the temperature.
2.Decrease the speed
3.Replace with better film.
Thermostat does not control
temperature
1. Heating element is damaged
2. Solid state relay is burnt.
3. Thermocouple is damaged
4.Temperature control meter
is damaged
1. Replace the heating element.
2. Replace the solid state relay
3. Replace the thermocouple
4. Replace the thermostat
Table of contents
Other HUALIAN Packaging Equipment manuals
Popular Packaging Equipment manuals by other brands

Extend
Extend EXS-206 Operation & maintenance manual

Matco
Matco T7 PRO CC Basic Manual

lnauen Maschinen
lnauen Maschinen VC999 04i operating instructions

Signode
Signode TENSION-WELD VT-32 Operation, parts and safety manual

strapex
strapex STR 64 operating instructions

Audion Elektro
Audion Elektro VMS 43 manual