Huawei T7200 User manual

Make the most of now.
HUAWEI T7200 Mobile Phone
User Guide
T7200.book Page 1 Sunday, September 30, 2007 3:54 PM

1
Getting to Know Your Phone 1
Packing List................................................1
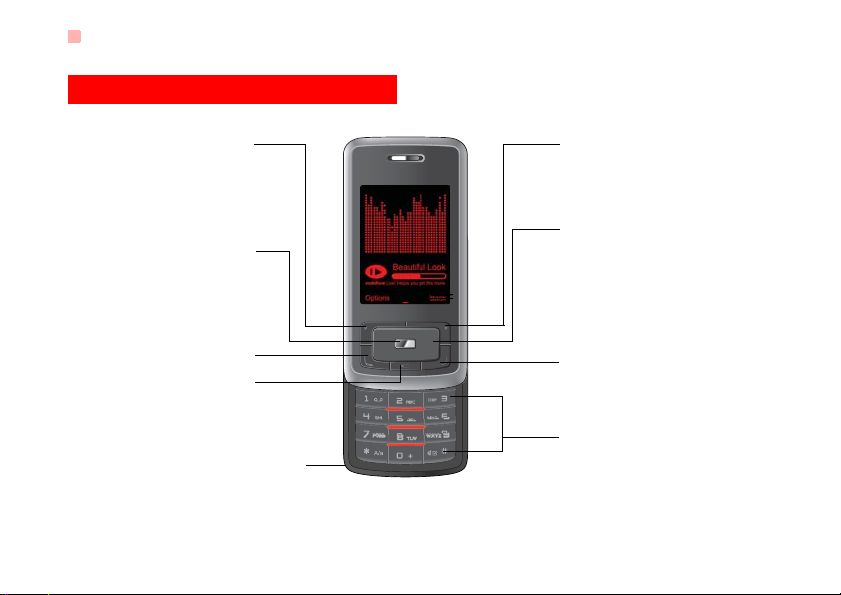
Your Phone ................................................2
Getting Started 6
Loading the SIM Card ................................6
Unloading the SIM Card.............................7
Charging the Battery ..................................7
Loading/Removing a Memory Card............8
Powering On/Off.........................................9
Call Service 11
Making or Answering Calls.......................11
Operations During a Voice Call...............12
Calls .........................................................13
Text Input 14
T9®Input Method ....................................14
Traditional Input Method ..........................14
"123" Numeric Input Method ....................15
Symbol Input Method ...............................15
Input Different Languages........................15
Contacts 16
Making Calls from the Contacts ...............16
Searching for a Contact............................16
Viewing Contacts in Phone/SIM...............16
Other Operations......................................16
Groups......................................................17
Messaging 19
Messages.................................................19
Email........................................................21
Broadcast Inbox.......................................24
Templates ................................................24
Music 25
Music Library............................................25
Playlists....................................................26
Organiser & Tools 27
Alarms......................................................27
Calendar ..................................................27
Task .........................................................28
Memo.......................................................29
Synchronise .............................................29
Calculator.................................................30
Unit Converter..........................................30
Currency Converter..................................31
Voice Recorder ........................................31
World Time...............................................32
Stopwatch ................................................32
Timer........................................................32
Service Dial Number................................32
My Files 33
Browser 34
Open homepage......................................34
Open new page........................................34
Bookmarks...............................................34
Saved pages............................................34
History......................................................35
Resume....................................................35
Table of Contents
T7200.book Page 1 Sunday, September 30, 2007 3:54 PM

2
Settings ....................................................35
Entertainment 36
Games......................................................36
Camera.....................................................36
Music........................................................38
Connections 39
Bluetooth®...............................................39
USB..........................................................41
Settings 44
Phone Settings.........................................44
Display Settings........................................45
Message Settings.....................................46
Call Settings .............................................46
Contacts Settings .....................................48
JavaTM Settings.......................................48
Connectivity..............................................48
Network ...................................................48
Security ...................................................49
DRM Setting.............................................50
Warnings and Precautions 51
Electronic Device......................................51
Hospital ....................................................51
Storage Environment................................52
Children Safety.........................................52
Operating Environment ............................53
Cleaning and Maintenance.......................53
Environmental Protection .........................54
Emergency Calls ......................................54
Battery......................................................54
Charger....................................................55
Using the USB Cable...............................56
Certification Information (SAR) ................56
Acronyms and Abbreviations 60
Appendix 61
Index 1
T7200.book Page 2 Sunday, September 30, 2007 3:54 PM

1Please read the safety precautions carefully to
ensure the correct and safe use of your wireless
device. For detailed information, refer to the
2section “Warnings and Precautions”.
Do not switch on your phone when it is
prohibited to use mobile phones or
when the phone may cause interfer-
ence or danger.
Do not use your phone while driving.
Follow any rules or regulations in
hospitals and health care facilities.
Switch off your phone near medical
apparatus.
Switch off your phone in aircraft. The
phone may cause interference to
control signals of the aircraft.
Switch off your phone near high-preci-
sion electronic devices. The phone may
affect the performance of these
devices.
Do not attempt to disassemble your
phone or its accessories. Only qualified
personnel are allowed to service or
repair the phone.
Do not place your phone or its accesso-
ries in containers with strong electro-
magnetic field.
Do not place magnetic storage media
near your phone. Radiation from the
phone may erase the information stored
on them.
Do not put your phone in a high-
temperature place or use it in a place
with flammable gas such as a gas
station.
Keep your phone and its accessories
away from children. Do not allow
children to use your phone without
guidance.
Use only approved batteries and
chargers to avoid the risk of explosions.
Safety Precautions
T7200.book Page 4 Sunday, September 30, 2007 3:54 PM

Observe any laws or regulations on the
use of wireless device. Respect others’
privacy and legal rights when using
your wireless device.
Strictly follow the relevant instructions
on 56 of this manual while using the
USB cable. Otherwise your phone or
PC may be damaged.
T7200.book Page 5 Sunday, September 30, 2007 3:54 PM

1
1
Getting to Know Your Phone
1Getting to Know Your Phone
Your phone can operate in virtually all countries,
automatically switching between
GSM/GPRS/EDGE 850/900/1800/1900 networks.
This allows you to enjoy communication wherever
you use your mobile phone.
Note
The services supported by your phone
should be also supported by the network
from where you use the phone. For details,
please contact your local network operator.
Packing List
Your phone package box contains the following:
1One T7200 mobile phone
2One travel charger
3One Li-polymer battery
4One User Guide
5One stereo headset (optional)
6One USB data cable (optional)
T7200.book Page 1 Sunday, September 30, 2007 3:54 PM

Your Phone
2
Your Phone
Clear key
• In the editing mode, press this key to
delete a character before the cursor.
Scroll key
• Press this key to scroll through a menu.
• In standby mode,
press the up scroll key to access Quick
Menu, press the down scroll key to access
Contacts, press the left scroll key to
access the New SMS screen, and then
press the right scroll key to access My
Files.
Left function key
• Press this key to activate the function
indicated at the left of the prompt bar.
• In standby mode, press this key to
access the main menu.
Send key
• Press this key to make or answer a call.
• Press this key to access the Calls
screen in standby mode.
Right function key
• Press this key to activate the function indi-
cated at the right of the prompt bar on the
screen.
• In standby mode, press this key to access
homepage.
OK key
• Press this key to start the selected func-
tion in the menu.
• In standby mode, press this key to
access the main menu.
Power/End key
• Press this key to end an ongoing call or
reject an incoming call.
• Press this key to return to the Home
screen.
• Press and hold it to power on or power off
the phone.
Character/Number keys
• Use to enter numbers or characters.
• Press and hold the #key to switch to the
silent profile from the current profile.
Microphone
T7200.book Page 2 Sunday, September 30, 2007 3:54 PM

Your Phone
3
1
Getting to Know Your Phone
Front View and Back View
Side View
Home Screen
◆Icon bar
This area displays the phone status. The following
table illustrates the icons that may appear on this bar.
Earpiece Camera
Battery
Strap hole
Screen
Volume keys
Memory card
Music key
• Press this key to access
theMusic screeninthe
standby mode.
Charger connector/Cable
connector/Headset Jack
Camera shortcut key
• Press and hold this key
for few seconds to
activate the camera in
the standby mode..
Icon Description
The phone is in a call.
Forwarding all incoming voice calls to
line 1.
Call line 2 is enabled currently.
Icon bar
Prompt bar
To display the operations and the function
options.
Desktop
To display the operations currently available.
T7200.book Page 3 Sunday, September 30, 2007 3:54 PM

Your Phone
4
Introduction to the Menu
Your phone provides an extensive range of functions.
You can use these functions by navigating the follow-
ing menus: Entertainment, Music, Calls, Browser,
Messaging, My Files, Organiser & Tools, Contacts,
Camera, Profiles, Camera and Settings.
1In the standby mode, press to display the
main menu.
2Press the scroll key to scroll through the menu,
and then press to select the desired item.
3If the menu contains further submenus, repeat
step 2.
Forwarding all incoming voice calls to
line 2.
You have new text messages.
You have new multimedia messages.
You have new PUSH messages.
You have new emails.
You have new voice mail.
Indicates signal strength. The more hori-
zontal bars that appear, the stronger the
signal.
The phone is currently in a GSM
network.
You are using the roaming service.
Alarm clock is enabled.
Bluetooth is enabled.
The normal profile is activated.
Icon Description The headset is plugged in.
Your PC connects to the Internet
through your phone.
Indicates power level of the battery.
Icon Description
T7200.book Page 4 Sunday, September 30, 2007 3:54 PM

Your Phone
5
1
Getting to Know Your Phone
4Use the selected function according to the
prompts on the screen.
5Select Back to return to the previous menu.
Press to return to the standby mode.
T7200.book Page 5 Sunday, September 30, 2007 3:54 PM

6
2Getting Started
Loading the SIM Card
Load your SIM card before using your phone. To use
the SIM card properly, please read the following
instructions carefully.
Note
• Keep the SIM card out of the reach of chil-
dren.
• The SIM card and its metal contacts can
be easily damaged by scratching or bend-
ing. Ensure care when you carry, load or
remove it.
• Always disconnect the charger from the
phone before loading or removing the SIM
card.
To load the SIM card, do as follows:
1Position the card at the card slot entrance, mak-
ing sure it is facing the same way as shown in
the diagram below, with the notched corner at
the top right. Then slide in as shown.
2Fit the battery into the battery slot on back of the
phone. Press the battery down until it clicks into
place.
3Slide the back cover to the phone.
T7200.book Page 6 Sunday, September 30, 2007 3:54 PM

Unloading the SIM Card
7
Getting Started
2
Unloading the SIM Card
Only unload the SIM card and the battery after pow-
ering off your phone. Otherwise, your phone may be
damaged.
To unload the SIM card:
1Unload the back cover out of the phone.
2Please unload the battery according to the fol-
lowing picture.
3Press the SIM card with one finger and slide it
out of the slot.
Charging the Battery
Before charging the battery, please read the following
precautions carefully.
Note
• When you charge the battery for the first
time, please charge it for a minimum of 12
hours.
• The battery discharges even while not
being used. If you have not used it for a
long time, please recharge it first.
• The charging time depends on the envi-
ronmental temperature and the age of the
battery.
• The battery can be recharged but eventu-
ally wears out. If the battery lasts for a
T7200.book Page 7 Sunday, September 30, 2007 3:54 PM

Loading/Removing a Memory Card
8
shorter time period than usual after being
charged normally, replace it with a battery
of the same type.
• Do not strike, throw or cause any kind of
violent shock to the battery, otherwise liq-
uid leakage, body damage, overheating,
explosion or fire may occur.
• Charge the battery by using the charger
supplied with your phone.
Charging with a Cable Charger
Before charging the battery with a cable charger,
ensure that the battery has been properly loaded into
your phone.
To charge the battery, do as follows:
1Insert the plug of the charger into the connector
of the phone as shown in the following figure.
2Plug in the connector of the charger to a power
socket.
Note
• When the battery power level is very low,
the phone makes alert sounds and dis-
plays a prompt. When the battery power
level is too low, the phone will power off
automatically.
• When the battery is being charged, the
charging indicator blinks continuously.
When the charging indicator stops blink-
ing, it indicates that the battery is full.
Loading/Removing a Memory Card
The phone supports a memory card (micro-SD) with
a capacity up to 2 GB.
1Insert the memory card into the slot, as shown in
the following figure.
T7200.book Page 8 Sunday, September 30, 2007 3:54 PM

Powering On/Off
9
Getting Started
2
2To remove a memory card, open the rubber cap
and press the memory card gently. Now the
memory card will pop up automatically. Then
take it out as shown in the following figure.
Powering On/Off
Powering On
Ensure that the SIM card is in your phone and that
the battery has been charged.
Press and hold to power on your phone.
Powering Off
Press and hold to power off your phone.
Access Codes
If you have set the phone password and the PIN is
ON, you have to enter the corresponding access
codes when you power on your phone. For setting
and changing the access codes, please refer to "Set-
tings/Security Setup" on page 49.
◆Phone Password
The phone password is used to protect your phone
from unauthorized use. The phone password is
preset as 0000 for your phone.
◆PIN
The personal identification number (PIN) code is
used to protect your SIM card from unauthorized use.
The PIN code is usually provided when you get the
SIM card from your service provider. If you have not
received a PIN code or if you have forgotten it, con-
tact your service provider.
T7200.book Page 9 Sunday, September 30, 2007 3:54 PM

Powering On/Off
10
◆PIN2
Some SIM cards provide a PIN2 code. Some special
functions such as the "Fixed Dialer Number" are not
available until you enter the PIN2 code. At the same
time, your SIM card should support these functions.
◆PUK
To unlock a locked SIM card, you need to enter the
PIN Unblocking Key (PUK) code. The PUK code is
usually provided when you get the SIM card from
your service provider. If you have not receiveda PUK
code or if you have forgotten it, contact your service
provider.
◆PUK2
Some SIM cards provide a PUK2 code that is used to
unlock a locked PIN2 code. The PUK2 code is usu-
ally provided when you get the SIM card from your
service provider. If you have not received a PUK2
code or if you have forgotten it, contact your service
provider.
T7200.book Page 10 Sunday, September 30, 2007 3:54 PM

11
3Call Service
Making or Answering Calls
Making a Voice Call
1Enter or edit a phone number in one of the fol-
lowing ways:
• Enter a phone number through the keypad.
• Select a number from the Calls screen.
• Select a number from the Contacts screen.
2Press to dial.
3Press to end the call.
Making Voice Calls Using SDN
You can make a voice call through speed dialing. For
instructions on assigning speed dialing numbers,
refer to "Contacts/Other Operations" on page 16.
To make a call by speed dialing number (SDN), press
and hold the number key until the phone dials the
corresponding phone number.
Answering or Rejecting Calls
You can set the answer mode to Slide up, Any key
or Send key. For details, refer to "Settings/Call Set-
tings/Answer Mode".
The following describes how to answer or reject a call
in different answer modes:
Operation Description
Answer
a call • If the answer mode is Slide up, slide
the front flip up.
• If the answer mode is Any key, press
any key except .
• If the answer mode is Send key,
press .
• If the headset is in use, press the con-
trol key on the headset.
Reject
a call Press or select Options > Reject.
End a call • If the headset is not in use, you can
slide the front flip down or press .
• If the headset is in use, press the con-
trol key of the headset.
T7200.book Page 11 Sunday, September 30, 2007 3:54 PM

Operations During a Voice Call
12
Note
When the phone is closed and there is no
ongoing call, you can press and hold the
camera key to mute the ringtone of an
incoming call. You can also press and hold
the volume keys to reject the call.
You can also set the auto answer mode to Immedi-
ate answer, Text message or Recorded voice.
For details, refer to “Settings/Call settings/Auto
Answer”.
Operations During a Voice Call
Icon Description
: A call is ongoing.
: The call is on hold.
Operations
During a voice call, you can select Options to per-
form the following operations.
• Hold/Resume: To hold or resume the call during a
call.
• End call: To end all calls, the active call, the current
call or the on hold call.
• Handfree/Earpiece: To switch between the Hand-
free and the Earpiece modes during a call.
• Recording started /recording stopped: to record or
stop recording the conversation.
• Other Applications: To access he Contacts screen,
the Messaging screen, the Calls screen or the
Calendar screen.
• Answer/Reject: Your phone allows you to handle
two calls simultaneously. During a call, if there is a
new incoming call, select Options > Answer to
answer it or select Options > Reject to reject it.
• Swap: To swap between calls during a 3-party call.
• Conference call/Private call: To switch to the con-
ference call during a 3-party call or to talk with a
party privately during a conference call.
Reply by
message To send a predefined message to the
caller.
Operation Description
T7200.book Page 12 Sunday, September 30, 2007 3:54 PM

Calls
13
Call Service
3
Calls
The recently dialed calls, received calls and missed
calls are saved automatically.
Select Calls in the main menu and then press
the left/right scroll key to select All calls ,
Missed , Received or Dialed . Then select
Options for the following options.
• Send message: To send a message or MMS.
• Save number: To save the numbers of the selected
record.
• Call: To make a voice call.
• Display mode: You can select Normal to display all
records or select Simple to ignore the duplicated
records.
• Delete: To delete the selected record.
• Mark/Unmark: To mark/unmark a record or all
records.
• Calls status: To display the information on voice
calls and data services. In the voice call and data
page, you can select Reset to clear all records.
T7200.book Page 13 Sunday, September 30, 2007 3:54 PM

14
4Text Input
You can use the keypad to enter alphanumeric char-
acters and symbols. For example, you can add
entries to the contacts, write messages or schedule
events on the calendar.
Note
While entering text:
• Press to switch between input meth-
ods. Press and hold the key to enable
or disable the T9 input mode.
• Press to display the symbols list.
Press and hold the key to setthe input
language.
• Press to delete the letter before the
cursor.
T9®Input Method
With the T9 input method, you can easily and quickly
enter words. T9 is a predictive text entry mode. It
allows you to easily and quickly enter words. Press
the relevant key that corresponds to the desired letter
and T9 will offer you candidate words.
Press each key carrying the desired letter once, and
then the predictive text scheme will present the can-
didate words composed by the letters you have
entered in the drop-down menu.
For example, to enter the word "good" with the T9
input method, follow these steps.
1Press successively the keys , , , and
which "g", "o", "o", and "d" belong to, and the
candidate words "good", "home" etc. composed
by these letters will be shown in the drop-down
menu.
2Use the up/down scroll key to select "good".
Then press to enter a space for entering the
next word.
Note
Press repeatedly and you will see "T9
abc", "T9 Abc" and "T9 ABC" on the upper
left corner of the screen successively. It indi-
cates the words to be entered will be in
lower case, first letter capitalized or in upper
case.
Traditional Input Method
When T9 input method is off, you can use the tradi-
tional input method for entering alphabetic charac-
T7200.book Page 14 Sunday, September 30, 2007 3:54 PM

"123" Numeric Input Method
15
Text Input
4
ters. Repeatedly press the key that carries the letter
to be entered when it appears on the screen.
For example, to enter the word "Hello" with the tradi-
tional input method, follow these steps.
1Press that carries "h" repeatedly and all let-
ters carried by this key will be displayed succes-
sively on the screen. You can scroll through this
list and select the character you want. Stop when
you see an "h" on the screen.
2After entering the first letter, you can directly
press another key (except ) to enter the next
letter. If the next desired letter is on the same
key as the current one, wait until the cursor
appears to the right of the current letter and then
you can enter the next one.
3Enter "e", "l", "l" and "o" in the same way.
Note
Press repeatedly and you will see "abc",
"Abc" or "ABC" on the upper left corner of
the screen successively. It indicates the
words to be entered will be in lower case,
first letter capitalized or in upper case.
"123" Numeric Input Method
In a text editing screen, press and hold the character/
number keys to enter corresponding numeric charac-
ters.
You can also press successively the key to switch
to the "123" numeric input method, and enter corre-
sponding numeric characters by pressing the charac-
ter/number keys.
Symbol Input Method
You can press to display the symbols list and then
select Recent to display recent symbols.
You can also press to input the commonly-used
symbols in a text editing screen.
Input Different Languages
In a text editing screen, Press and hold the key to
set the language for the text. The selected language
will be displayed on the upper right part of the editing
screen.
T7200.book Page 15 Sunday, September 30, 2007 3:54 PM
Table of contents
Other Huawei Cell Phone manuals

Huawei
Huawei Nova Smart User manual

Huawei
Huawei U3315 User manual

Huawei
Huawei U8180 User manual

Huawei
Huawei T565 Assembly instructions

Huawei
Huawei nova Y60 User manual

Huawei
Huawei U2800A User manual

Huawei
Huawei Tap User manual

Huawei
Huawei GR3 2017 User manual

Huawei
Huawei Ascend P1 User manual

Huawei
Huawei CUN-L33 User manual

Huawei
Huawei U3311 User manual

Huawei
Huawei ANA-NX9 User manual

Huawei
Huawei Ascend G 301 User manual

Huawei
Huawei Vision User manual

Huawei
Huawei Nova 4 User manual

Huawei
Huawei U8600 User manual

Huawei
Huawei P20 lite HWV32 Service manual

Huawei
Huawei Mate 10 User manual

Huawei
Huawei U8180 Dimensions

Huawei
Huawei Y6s Starry Black User manual