HYBREX DK9 Series User manual

│
www.hybrex.com
Notification
Notification is hereby given that Auto Telecom Company Ltd. reserves the right to modify,
change, update or revise this document from time to time as required without the prior
obligation to notify any person, company or organization. Further, Auto Telecom Company Ltd.
makes no warranty or representation, either express or implied, with respect to merchantability,
or fitness of its products for a particular purpose.
© 2019 Auto Telecom Company Ltd.
This document or any parts thereof are not to be reproduced or transmitted in any form or by
any means, electronic or mechanical, including photocopying, recording, or information storage
and retrieval systems for any purpose whatsoever without the express written permission of
Auto Telecom Company Ltd.

│
www.hybrex.com
Table of Contents
Notification................................................................................................................................................... 2
Table of Contents........................................................................................................................................ 3
1. Introduction......................................................................................................................................... 1
2. HYBREX’s Digital Telephone DK9-25 ............................................................................................... 2
2.1 Mechanical Specifications of DK9-25............................................................................................... 3
2.2 Specifications...................................................................................................................................... 3
2.3 8 x 30 characters LCD Display shows .............................................................................................. 3
2.4 Top View & Description...................................................................................................................... 4
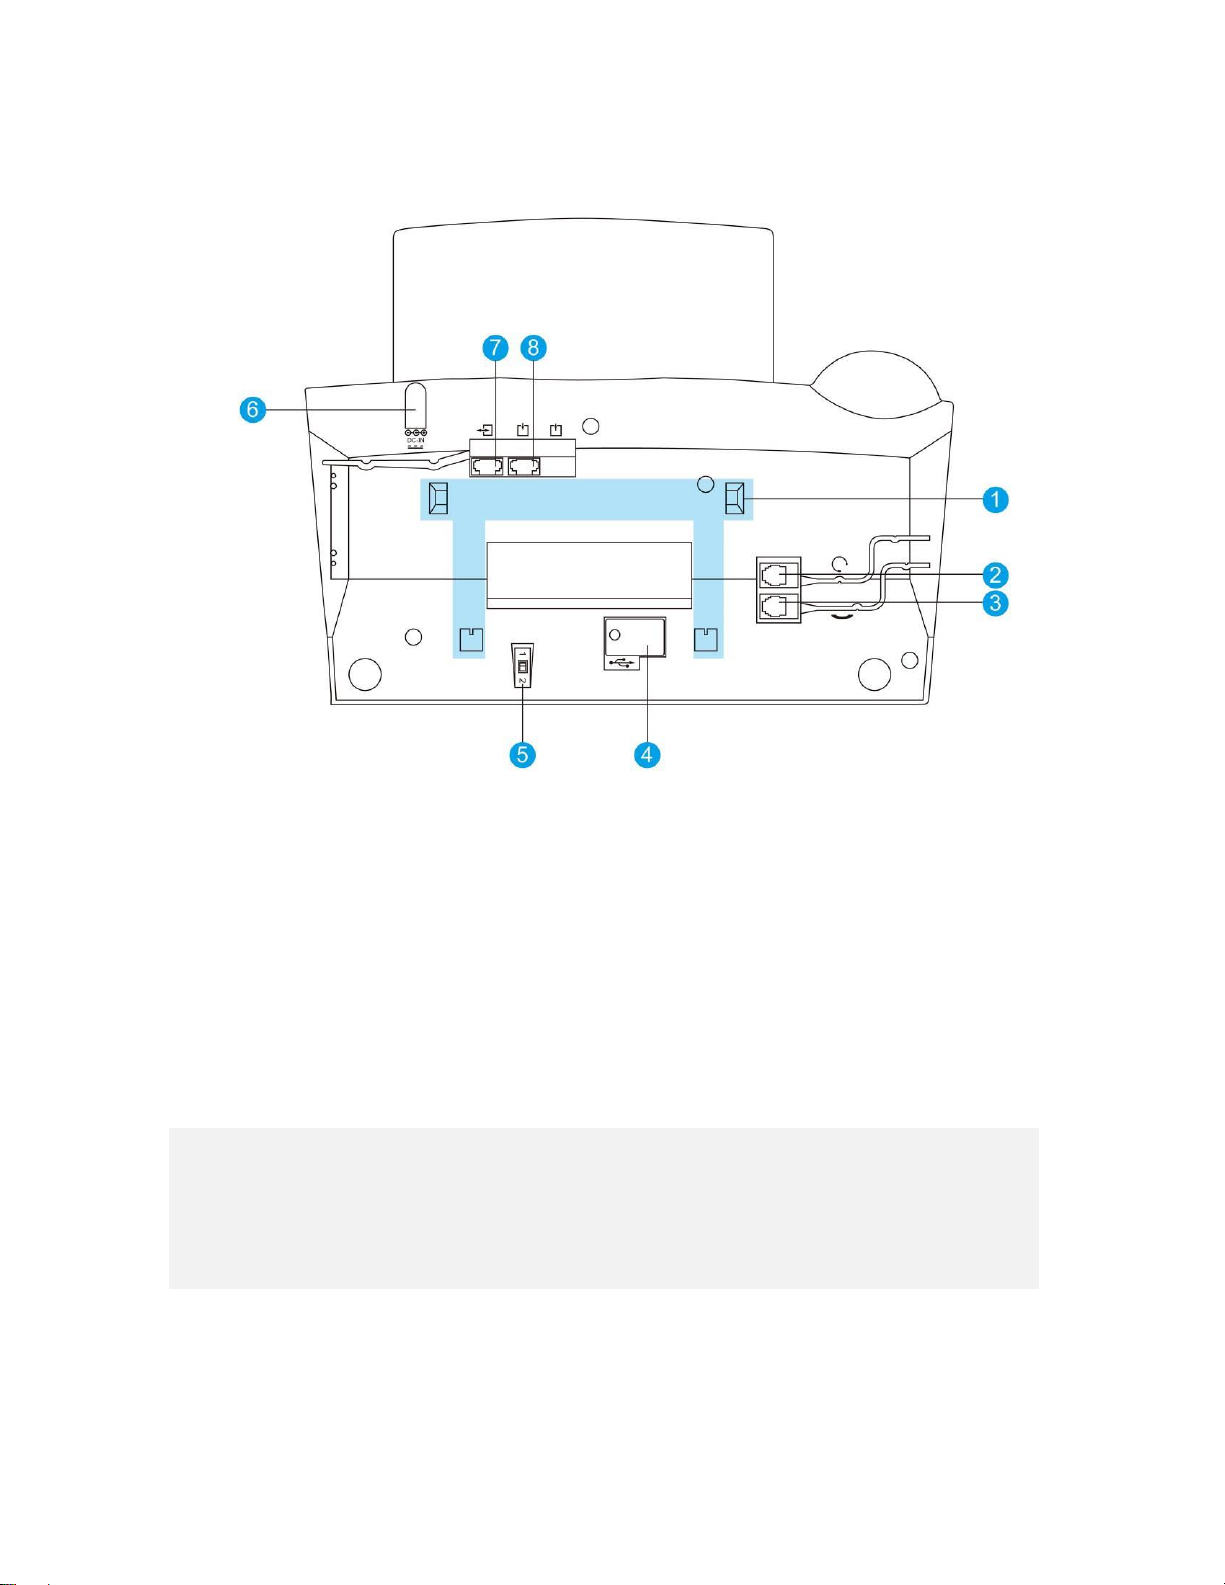
2.5 Bottom View & Description................................................................................................................ 5
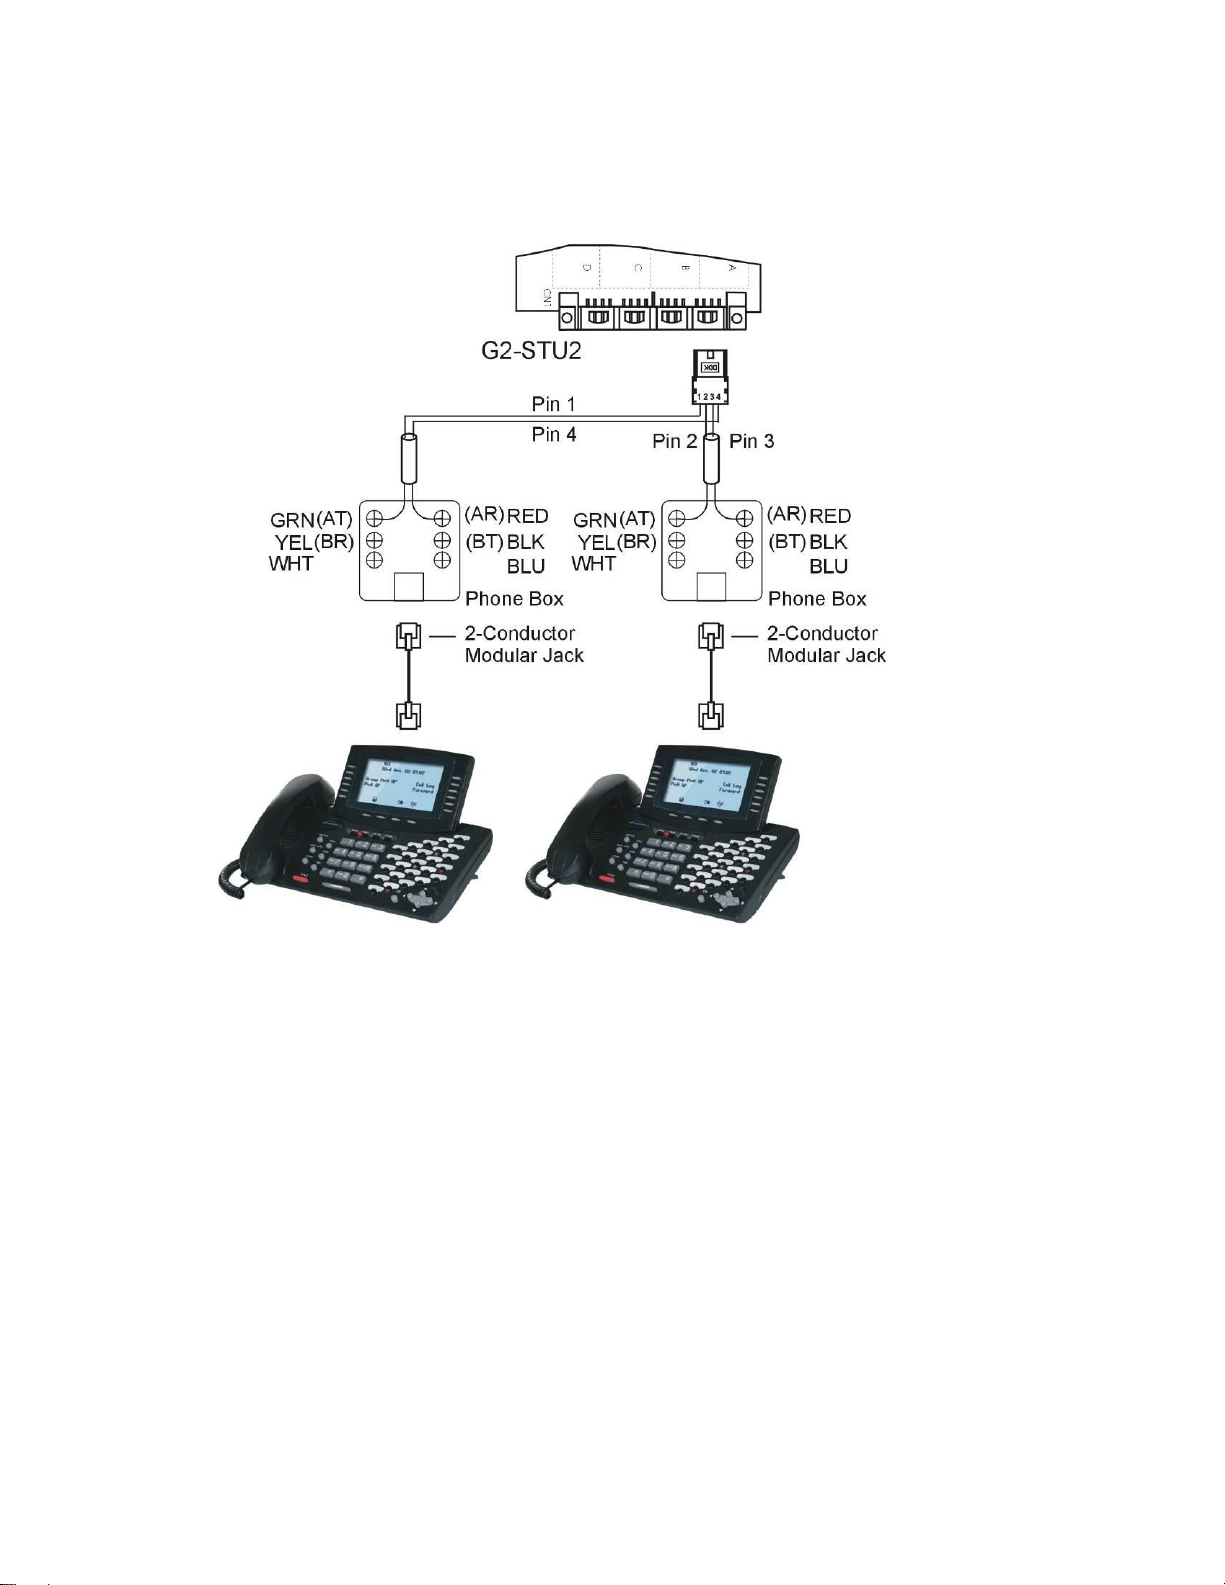
2.6 Digital Key Telephone –DK9-25 on STU2 Card............................................................................... 6
2.7 Digital Key Telephone –DK9-25/DK9-DSS on STU2 Card.............................................................. 7
2.8 Description of DK9-25 DSS Key Position......................................................................................... 8
2.9 DK9-DSS Phone Programming Description..................................................................................... 9
2.10 Menu Status Description.................................................................................................................. 10

2 │
www.transtel.co
2. HYBREX’s Digital Telephone DK9-25

3 │
www.transtel.co
2.1 Mechanical Specifications of DK9-25
•Dimension (L x W x H): 295 x 162 x 160 mm
•Weight: 1980g
•Body Material: ABS
•Color: Black
•Mounting: On Desk
•Max / Min. Temperature (operating) : 0ºto 45º C
•Max / Min. Temperature (storage) : -30º to 66º C
•Humidity: 10% to 95% relative
•Max. Loop Resistance/Impedance: < 40 Ohms 26 AWG/200m
2.2 Specifications
•25 Dual Color DSS Keys
•33 Function Keys
•8 Ringer Frequencies
•Adjustable Volume Level for Handset / Speaker / Ringer
•Handsfree
•Wired Headset Interface Jack
•Polyphonic Ringtone
•Ring / Message Indication Lamp
•Speakerphone
•Tilt Angle Adjustable LCD Panel
•Compatible with TDS-600 on MPUN 01ABr and IPU 1bz firmware or above
2.3 8 x 30 characters LCD Display shows
•Menu Keys
•Call Logs
•Calling Party Number and Name
•CO Line Names
•Dialed Telephone Number
•Last Number Redial
•Absent Messages
•Phone / System Setting Values
•Speed Dial Directory
•Speed Dial Number
•Status of Operation/Function
•Time
•Voice Mail Messages

4 │
www.transtel.co
2.4 Top View & Description
1. Function Keys
2. Dual Color DSS Keys
3. Microphone
4. Function Keys
5. Numeric dial key pad
6. Speaker

5 │
www.transtel.co
2.5 Bottom View & Description
1. 4-connecter hole for Phone Stand
2. Connects to a Headset
3. Connects to a Handset
4. Firmware upgrade
5. 1st or 2nd station (select for 1st station when G2-STU2 connected)
6. Non use
7. Connects to DK9-DSS
8. Connects to G2-STU2
Note:
1. 4-conductor wiring (with two digit ports) is required for the DK9-25 if DK9-DSS
phone connected.
2. 2-conductor wiring is used between DK9-25 and DK9-DSS phone.

6 │
www.transtel.co
2.6 Digital Key Telephone –DK9-25 on STU2 Card

7 │
www.transtel.co
2.7 Digital Key Telephone –DK9-25/DK9-DSS on STU2 Card

8 │
www.transtel.co
2.8 Description of DK9-25 DSS Key Position
Each key can be assigned as a Trunk, a Trunk Group, a Station, a Pilot Number, a
Speed Dial or a Function.
Each DK9-25 can be assigned to use two groups by refer Mode 41-st-(02 & 03).
DSS key position on mode 07
Figure 2-1 DSS Key Position on Mode 07

9 │
www.transtel.co
2.9 DK9-DSS Phone Programming Description
A DSS console will be recognized by the system and the Station number will be
displayed as _101 for example.
To assign the DSS phone(s) to be controlled by a particular station, enter that
Station number with the Underscore first. EG: _101 means this DSS phone will be
controlled by Station 101. In extension programming the DSS port will always be
displayed with the underscore to differentiate between the DSS port(s) and the
controlling station port.
M-1 (1~30) and M-2 (31~60) is DSS key position on mode 08 by refer setting at
mode 41-DK9DSS-02
M-3 (1~30) and M-4 (31~60) is DSS key position on mode 08 by refer setting at
mode 41-DK9DSS-03

10 │
www.transtel.co
2.10 Menu Status Description
A. Menu status when idle
Call Pick up:
Pick up same Group by pressing Group Pick up when same group extension ringing
Direct Call Pick up by pressing Pick Up + ringing Extension number
B. Menu status when pressing [CID Log]
Jack 89661356
89661356 89661356
08/07 12:17 Miss 08/07 12:17 Miss
C. Menu status when pressing [MSG] key
When another extension leave Call Waiting for you, the LED of [MSG] key flashes

11 │
www.transtel.co
When Voice Mail leave Message for you, the LED of [MSG] key flashes
Press Mail Icon to recall to voice mail.

12 │
www.transtel.co
Menu status when calling (Voice Call)
D. Menu status when calling (Ring Call)
E. Menu status when dialing to busy Extension/Trunk

13 │
www.transtel.co
F. Menu status when ringed by Trunk/Extension ( mailbox requested for extension
if forward to Voice mail pressed)
G. Menu status when in conversation with Trunk
101 Jack
Park to Orbit#0 (Park to Orbit#1……….. Park to Orbit#9)
Transfer to V.M. to transfer call to voice mail of an extension by pressing Transfer
to V.M. →forwarded extension number
On Line Recording setting for GDS:
1. Assign a DSS key of FN: 34 in mode 07.
2. Assign mailbox for extension in mode 31.
3. Set On line record to _ and _ in mode 24

14 │
www.transtel.co
4. Press DSS key of Fn: 34 during conversation with CO to start recording, press DSS
key of Fn: 34 again to stop recording.
5. Check mailbox by press [MSG], [SPK]…….
H. Menu status when pressing [PRG] key
[PRG] [Speed]= Set Personal Speed Dial numbers
[PRG] [Alarm] (Hold)= time-Reminding Service (User’s Alarm)
Absent Msg.= Any telephone can be programmed to use this feature. When a caller calls
a telephone with an Absent Message, one of the following Absent Messages will display
on the caller's telephone LCD.
Absent Message (0 to 9):
Message 0= Vacation Message 5= DND
Message 1= Will back Message 6= Call EXT
Message 2= Lunch Message 7= Off duty
Message 3= Meeting Message 8= Business trip
Message 4= Call Message 9= (Future feature)
Examples:
Message 0= Vacation 12/24 Message 4= Call 9578244
Message 1= Will back 15:30 Message 5= DND 12:30/13:30
Message 2= Lunch 12:00 Message 6= Call EXT 16
Message 3= Meeting 10:10 Message 7= Off Duty 17:30
NOTE: 1. Each "Absent Message" can have a maximum of 16 characters, the Absent Message included.
2. Press [*] key to insert a colon (:).
3. Press [#] key to insert a slash (/).
To cancel: [PRG], [Absent Msg], [Save]

15 │
www.transtel.co
I. Menu status when pressing [PRG], [Volume adjust] / [6]. Select a Volume Item
which you want to adjust then dial the number keys [1] ~ [8] for volume
adjustment
J. Menu Status when pressing [Hotel] key (Console only and Wake Up Call is not
available)

16 │
www.transtel.co
Other manuals for DK9 Series
1
This manual suits for next models
3
Table of contents
Other HYBREX IP Phone manuals
Popular IP Phone manuals by other brands

Grandstream Networks
Grandstream Networks WP822 Quick installation guide

Yealink
Yealink T46G Skype For Business Edition Quick reference guide

Yealink
Yealink T53 Quick reference guide

AudioCodes
AudioCodes 420HD user manual

AudioCodes
AudioCodes C450HD User and administrator guide

Cisco
Cisco Cisco Unified IP Phone 7960G Phone guide