Hydor Pico Filter User manual

1
Italiano
1
Italiano
Filter
for mini aquariums
and turtle tanks
User’s Guide

2
Important safety instructions
WARNING -To guard against injury, basic safety precautions should be observed, including the following: read and follow all safety instructions
DANGER -To avoid possible electric shock, special care should be taken in the use of aquarium equipment. For each of the following situations, do not
attempt repairs yourself; return the appliance to an authorized service facility for service or discard the appliance.
1. A) If the appliance shows any sign of abnormal water leakage, immediately unplug from the power source
B) Carefully examine the appliance after installation. It should not be plugged in if there is water on parts not intended to be wet.
C) Do not operate any appliance if it has a damaged cord or plug, or if it is malfunctioning or if it is dropped or damaged in any
manner. Inspect power cord insulation to be sure there are no cuts or exposed wire. If so, discard and order a new replacement.
D) To avoid the possibility of the appliance plug or receptacle getting wet, position aquarium stand and tank to one side of a wall mounted receptacle
to prevent water from dripping onto the receptacle or plug. A“drip loop”, shown in the Figure at right, should be arranged by the user for each
cord connecting an aquarium appliance to a receptacle.The“drip loop”is that part of the cord below the level of the receptacle or the connector if
an extension cord is used, to prevent water traveling along the cord and coming in contact with the receptacle. If the plug or receptacle does get
wet, DON’T unplug the cord. Disconnect the fuse or circuit breaker that supplies power to the appliance.Then unplug and examine for presence of
water in the receptacle.
2. Close supervision is necessary when any appliance is used by or near children.
3. To avoid injury, do not contact moving parts or hot parts such as heaters, reectors, lamp bulbs, etc.
4. Always unplug an appliance from an outlet when not in use, before putting on or taking o parts, and before cleaning. Never yank cord to pull plug
from outlet. Grasp the plug and pull to disconnect.

3
5. Do not use an appliance for other than intended use. The use of attachments not
recommended or sold by the appliance manufacturer may cause an unsafe condition.
6. Do not install or store the appliance where it will be exposed to the weather or to
temperatures below freezing.
7. Make sure an appliance mounted on a tank is securely installed before operating it.
8. Read and observe all the important notices on the appliance.
9. If an extension cord is necessary, a cord with a proper rating should be
used. A cord rated for less amperes or watts than the appliance rating may
over heat. Care should be taken to arrange the cord so that it will not be tripped over or pulled.
Save these instructions

4
Assembly g 1 A B C D
E F

5
g 2 g 3 g 4

6
Contents
English pag 7
Deutsch pag 9
Française pag 11
Español pag 13
Italiano pag 15
Nederlandse pag 17
Polska pag 19
Руссо pag 21
日本 pag 23

7
English
Filter for mini aquarium and turtle tanks
Dear Fish keeper,
We thank you for purchasing this high quality ltration product. Please read the following in-structions very carefully for the best understanding of how this
lter is used and its advantages.
Description - Fig. 1-
A. Pump body
B. Rotor assembly
C. Filter lid
D. Filter sponge
E. Outlet tube
F. Suction cups
Installation
Attention: please verify that all com-ponents of the lter are undamaged before putting it into function.
Clean the place where you intend to put the lter and whenever necessary x it with the included suction cups. -Fig. 2-
We suggest to avoid lateral contact to the glass walls of the tank to avoid resonance caused by vibration. For best results we suggest you to position the lter so that the water outlet is
completely covered by water. By doing this you will obtain more regular and silent recycling of the water.
Regulation
The lter is provided with a 7 po-sition system for regulation and control of the outlet. By moving the control knob as indicated in Fig. 3, it is possible to adjust the ow of the water to
suit the dierent applications required.

8English
Maintaneance
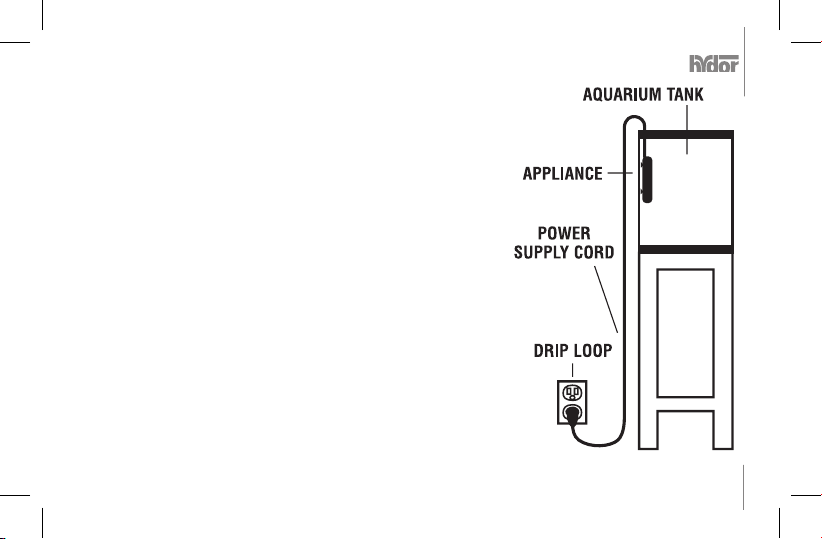
Attention: always disconnect the electrical supply to the lter and other
• Electrical items placed into the same water before any kind of intervention.
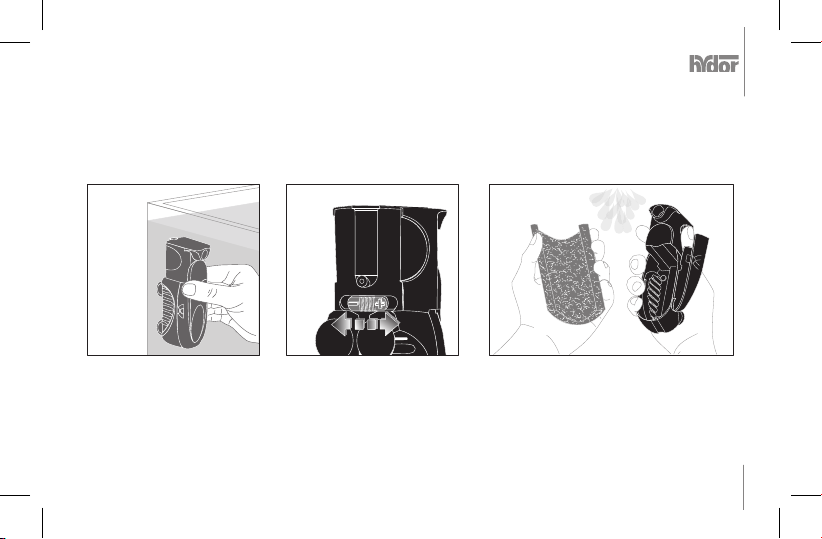
• Remove the lter lid from the pump body and take out the rotor assembly.
• Clean the rotor assembly from deposits eventually by using a sti brush.
• Remove sponge from lter and rinse it thoroughly under running lukewarm water -g. 4- And reassemble everything in reverse order. Make sure that the rotor spins regularly.
• Do not use any sort of solvents or detergents.
• Regular cleaning and maintenance of the lter will guarantee better perfor-mance and longer life.
Cautions
• His lter is intended for indoor use only and it is designed for use in uids up to 35° c.
• Be sure that the voltage of the mains supply corresponds to the voltage shown on the label of the unit.
• Before connecting to the mains supply be sure that the cord and the lter are undamaged.
• The cord of this lter cannot be replaced or repaired; in case of damage it will be necessary to replace the whole unit.
• This appliance is not intended for use by young children or inrm persons without supervision. Young children should be supervised to ensure that they do not play with the appliance.
• The supply cord cannot be replaced. if the cord is damaged, the appliance should be scrapped.
Guarrantee
This device is guaranteed for a period of 24 months from the day of purchase, against defects in material or manufacturing defects. Our guarantee does not apply to claims the cause of
which is dueto installationand operation faults, lack ofmaintenance, misuseof the appliance, eects offrost, furring andlime deposits oramateur attemptsat repairwork. The consumable
materials andthe parts subjected to wear and tear, that must beperiodically replaced fornormal maintenance of thedevice, arenot included in ourguarantee.Thecerticate ofguarantee
must be completed by the retailer and is to be sent with the appliance in case of return, together with the purchase receipt recording the day of purchase.
European union disposal information
This symbol means that according to local laws and regulations your product should be disposed of separately from household waste.When this product reaches its end of life,
take it to a collection point designated by local authorities. Some collection points accept products for free.The separate collection and recycling of your product at the time of
disposal will help conserve natural resources and ensure that it is recycled in a manner that protects human health and the environment.

9
Filter for mini aquarium and turtle tanks
Sehr geehrter Fischfreund!
Wir danken Ihnen, daß Sie dieses hochwertige Qualitätsprodukt gewählt haben.
Bitte, lesen Sie die folgenden Informationen vor Inbetriebnahme des Gerätes sorgfältig durch, damit Sie Ihren neuen Filter bei Montage, Betrieb und Reinigung
sicher handhaben können.
Beschreibung -Fig. 1-
A. Pumpenkörper
B. Rotor
C. Deckel
D. Filterschwamm
E. Einstellknopf
F. Saugnäpfe
Installation
Achtung: Überzeugen Sie sich vor dem Anschluß an das Netz, daß der Filter in allen ihren Komponenten unbeschädigt ist!
Bevor Sieden Filter ander Innenseite des Aquariums anbringen, reinigen Sie die vorgesehene Stellesorgfältig von allenAlgen und Ablagerungen.Dann pressen Sieden Filter kräftiggegen
die Wand des Aquariums, so daß die Saugnäpfe den Filter sicher zu befestigen vermögen. -Fig. 2-
Wir schlagen Ihnen vor, den Filter so anzubringen, daß derWasserauslaß vollständig von Wasser bedeckt ist; dadurch erreichen Sie einen regelmäßigeren und leiseren Wasserumlauf.
Einstellung
Der Filter hat ein System zur Regelung und Kontrolle des Wasserdurchsatzes. Der Einstellknopf ermöglicht sieben verschiedene Einstellungen. -Fig. 3- Damit können Sie den
Wasserdurchsatz allen Erfordernissen anpassen.
Deutsch

10
Pege
Achtung: Trennen Sie vor jeder Pegetätigkeit alle im Aquarium bendlichen elektrischen Geräte vom Netz!
• Ziehen Sie den Deckel von dem Filterskörper ab und nehmen Sie den Rotor heraus.
• Die Reinigung des Rotors von verschiedenen Ablagerungen ge-schieht an besten mit einer Bürste.
• Ziehen Sie den Filterschwamm heraus und reinigen Sie ihn unter lauwarmem Fließwasser. -Fig. 4- .
• Bauen Sie die gereinigten Filterteile in umgekehrter Reihenfolge wieder zusammen.Versichern Sie sich, daß der Rotor frei und ordentlich dreht.
• Benutzen Sie keine Lösungs- oder Reinigungsmittel.
• Regelmäßige Reinigung und gute Pege des Filters sind wesentlich für seine gute Funktion und lange Lebensdauer.
Vorsichtsmassnahmen
• Der Filter darf nur IM HAUSE verwendet werden und ist für Flüssigkeiten bis maximal 35° Celsius geeignet.
• Versichern Sie sich, daß Ihre Netzspannung jener entspricht, die auf dem Kennschild des Filters angegeben ist!
• Vergewissern Sie sich vor dem Anschluß an das Netz, daß der Filter und sein Anschlußkabel unbeschädigt sind!
• Das Anschlußkabel kann weder ausgetauscht noch repariert werden.
• Im Falle einer Beschädigung müssen der Filter und das Anschlußkabel als Ganzes ausgetauscht werden.
Garantiebedingungen
Wir garantieren für 24 Monate ab Kaufdatum für fehlerhaftes Material und Fabrikationsfehler. Von der Garantie ausgeschlossen sind Schäden, die auf Montage- oder Behandlungsfehler,
fehlende Wartung, Frostschäden, Kalkablagerungen oder unsachgemäße Reparationen zurückzuführen sind sowie Verbrauchs- und Verschleißmaterial, das zur ordnungsgemäßen
Wartung und Reinigung in regelmäßigen Abständen ausgetauscht werden muss. Im Garantiefall schicken Sie bitte das reklamierte Gerät mit der vom Händler ausgefüllten Garantiekarte
und der datierten Kaufquittung oder Rechnung ein.
Europäische union information zur entsorgung
Dieses Symbolweist darauf hin, dassdieses Produkt entsprechend dengeltenden gesetzlichenVorschriften undgetrennt vom Hausmüllentsorgt werden muss.Geben Sie dieses
Produkt zur Entsorgung bei einer oziellen Sammelstelle ab. Bei einigen Sammelstellen können Produkte zur Entsorgung unentgeltlich abgegeben werden. Durch getrenntes
Sammeln und Recycling werden die Rohsto-Reserven geschont, und es ist sichergestellt, dass beim Recycling des Produkts alle Bestimmungen zum Schutz von Gesundheit
und Umwelt eingehalten werden.
Deutsch

11
Filter for mini aquarium and turtle tanks
Cher client,
Nous Vous remercions d’avoir choisi ce produit de qualité. NousVous demandons de prendre connaissance des brèves instructions qui suivent pour utiliser au
mieux ce ltre et d’apprécier ces caractérisitques particulières.
Description -g. 1-
A. Pompe
B. Turbine
C. Filtre
D. Cartouche de ltration
E. Robinet
F. Ventouses
Installation
Attention: avant de mettre en fonction le ltre, vérier l’intégrité de toutes les pièces.
Nettoyez l’endroit oùVous désirez placer le ltre et le xer au bac avec les ventouses avec une légère pression. -Fig. 2-
Pour un meilleur fonctionnement nous conseillons de positionner le ltre de manière que le rejet se trouve en dessous du niveau d’eau; ainsi on obtiendra un recyclage plus régulier et
silencieux.
Reglage
Le ltre est fourni d’un système de réglage à sept positions, qui permet de varier le débit. Agissant sur le robinet selon indication -Fig. 3- il sera donc possible d’adapter le ux d’eau selon
les exigences et les diérentes applications.
Française

12
Entretien
Attention: débrancher le ltre et toutes les installations électriques avant de procéder à l’entretien de l’aquarium.
• Séparer le ltre de la pompe et enlever la turbine.
• Nettoyer la turbine et son logement des déchets calcaires en utilisant éventuellement une brosse souple.
• Déboîter la cartouche du ltre et la rincer sous eau tiède courante -Fig. 4-, ou remplacer, le cas échéant, l’éponge.
• Remonter le tout dans l’ordre in-verse en vériant que la turbine tourne librement.
• Ne pas utiliser de dissolvants ou de détergents.
• Le nettoyage régulier du ltre garantit un fonctionnement correct et une durée plus longue.
Normes de securite
• Ce ltre est uniquement pour utilisation interne avec une température d’eau inférieure à 35° C.
• Vérier que le voltage indiqué sur l’étiquette correspond à celui de votre réseau.
• Vérier que câble et ltre ne soient pas endommagés, avant de bran-cher l’appareil à votre réseau.
• Le câble de ce ltre ne peut pas être remplacé ou réparé, si le câble ou le ltre sont endommagés, l’appareil doit etre mis au rebut et remplacé.
Garantie
Cet appareil est garanti pour une période de 24 mois à partir de la date d’achat, contres tous vices de fabrication. Notre garantie se limite aux défauts de matériaux et de fabrication. Ne
tombent pas sous la garantie les réclamations dues à une installation ou une utilisation non conforme, manque d’entretien, eets de gel, dépôts calcaires, interventions ou réparations
non conformes. Ne tombent pas sous la garantie les matériaux de ltration et toutes les pièces soumises à usure normale, qui doivent être périodiquement remplacés pour l’entretien et
le nettoyage de cet appareil. Ce certicat de garantie doit être complété par le revendeur et devra accompagner l’appareil en cas de retour, avec un justicatif prouvant la date d’achat.
Union européenne informations sur l’élimination
Ce symbole signie que vous devez vous débarrasser de votre produit sans le mélanger avec les ordures ménagères, selon les normes et la législation de votre pays. Lorsque ce
produit n’estplus utilisable, portez-le dansun centrede traitement desdéchets agréé par lesautorités locales.Certains centres acceptent lesproduits gratuitement. Letraitement
et le recyclage séparé de votre produit lors de son élimination aideront à préserver les ressources naturelles et à protéger l’environnement et la santé des êtres humains.
Française

13
Filter for mini aquarium and turtle tanks
Apreciado Cliente,
Le agradecemos su preferencia por este producto de calidad. Le pedimos lea con atención las breves instrucciones para poder utilizar este ltro y apreciar sus
especiales caracteristicas.
Descripción -g. 1
A. Cuerpo bomba
B. Rotor
C. Cuerpo ltro
D. Cartucho ltrante
E. Llave
F. Ventosas
Instalacion
Atención: antes de poner en funcionamiento el ltro, asegúrese de la integridad de todas sus partes.
Limpiar cuidadosamente la zona del acuario donde vayamos a colocarlo y lo jaremos con sus correspondientes ventosas ejerciendo una ligera presion. -Fig. 2-
Para un mejor funcianamiento se aconseja situar el ltro de manera que la salida del agua este un poco por debajo del nivel del agua, de este modo se obtiene una circulación más regular
y silenciosa.
Regulacion
El ltro esta provisto de un sistema de regulación con siete posiciones que permite regular el caudal. Moviendo la llave como se indica en la Fig. 3, es posible regular el caudal sus
necesidades.
Español

14
Mantenimiento
Atención: antes de cualquier intervención desachufar el ltro y todos les aparatos electricos sumergidos.
• Sacar el cuerpo del ltro de la bomba y girar el rotor.
• Limpiar el rotor y su ubicación de deposito calcáreos utilizando incluso un cepillo blando.
• Extraer el cartucho ltrante del cuerpo del ltro -Fig. 4- y enjuagarlo con agua tibia corriente.
• Reensamblar todo en orden inverso teniendo cuidado de vericar que el rotor gira libremente.
• No usar disolventes o detergentes de ningún tipo.
• La limpieza regular de la bomba garantiza un correcto funcionamiento y una larga duración.
Normas de seguridad
• Este ltro es para un uso interior exclusivamente y la temperatura del agua no debe ser superior a los 35° C.
• Asegurese que la tensión escrita en la etiqueta se corresponde a la red eléctrica.
• Antes de enchufar el aparato a la red, asegurese que el enchufe cable y el ltro no están dañados.
• El cable de este ltro no se puede sustituir o reparar, en caso de daños sustituir la unidad entera.
Garantía
Este aparato está garantizado por un periodo de 24 meses desde la fecha de compra, contra defectos de materiales y de fabricación. No están cubiertas por nuestra garantía aquellas
reclamaciones cuyas causas se deban a errores de montaje, de maniobra y de falta de manutención, a la acción del frío intenso, a incrustaciones calcáreas o a intentos no correctos de
reparación. No están cubiertos por la garantía tampoco los materiales de consumo y todos los componentes sujetos a desgaste, que tienen que ser sustituidos periodicamente para la
manutención ordinaria y la limpieza del aparato. El certicado de garantía tiene que ser rellenado por el vendedor y tendrá que acompañar el aparato, en caso sea devuelto, junto con el
ticket o recibo scal comprobante la fecha de compra.
Unión europea información sobre el desecho de residuos
Este símbolo indica que, de acuerdo con la legislación local, la eliminación de este producto debe realizarse de forma separada de la de los residuos domésticos. Cuando este
producto ya no pueda utilizarse, llévelo a uno de los puntos de recogida especicados por las autoridades locales. Algunos de estos puntos de recogida prestan el servicio
gratuitamente. La recogida selectiva y el reciclaje de su producto en el momento de desecharlo contribuirán a la conservación de los recursos naturales y garantizarán un
procesamiento de los residuos respetuoso con la salud de las personas y con el medio ambiente.
Español

15
Filter for mini aquarium and turtle tanks
Gentile cliente,
La ringraziamo per aver dato la Sua preferenza a questo prodotto di qualità. Le chiediamo di prendere visione delle brevi istruzioni che seguono per usare al
meglio questo ltro ed apprezzarne le qualità.
Descrizione -g. 1-
A. Corpo pompa
B. Rotore
C. Corpo ltro
D. Cartuccia ltrante
E. Rubinetto
F. Ventoses
Installatione
Attenzione: prima di mettere in funzione il ltro, vericare l’integrità di tutte le sue parti.
Pulire la zona in cui si desidera posizionare il ltro e, ssarlo con le ventose in dotazione, esercitando una leggera pressione. -Fig. 2-
Per un migliore funzionamento si consiglia di posizionare il ltro in modo che la mandata sia al di sotto del livello dell’acqua, così facendo si otterrà un ricircolo più regolare e silenzioso.
Regolazione
Il ltro è provvisto di un sistema di regolazione a sette posizioni che consente di variarne la portata. Agendo sul rubinetto come indicato in Fig. 3 sarà quindi possibile adeguare il usso
dell’acqua alle esigenze delle diverse applicazioni.
Italiano

16
Manutenzione
Attenzione: prima di qualunque intervento scollegare dall’alimentazione il ltro e tutti gli apparecchi elettrici immersi con esso.
• Togliere il corpo ltro dal corpo pompa.
• Pulire la girante e la sua sede da depositi calcarei utilizzando even-tualmente uno spazzolino morbido.
• Estrarre la cartuccia ltrante dal corpo ltro e risciacquarla sotto acqua tiepida corrente. -Fig. 4-
• Riassemblare il tutto in ordine inverso, avendo cura di vericare che il rotore giri liberamente.
• Non usare solventi o detergenti di alcun tipo.
• La regolare pulizia del ltro ne garantisce un corretto funzionamento ed una più lunga durata.
Norme di sicurezza
• Questo ltro è per esclusivo uso interno con acqua avente una temperatura non superiore a 35° C.
• Vericare che la tensione riportata sull’etichetta corrisponda a quella della vostra rete.
• Prima di collegare l’apparecchio alla rete, vericare che cavo e ltro non risultino in alcun modo danneggiati.
• Il cavo di questo ltro non può essere sostituito o riparato; in caso di danneggiamento sostituire l’intera unità.
Garanzia
Questo apparecchio è garantito per un periodo di 24 mesi dalla data di acquisto, da difetti di materiale e di fabbricazione. Non rientrano nella copertura della nostra garanzia i reclami le
cui cause sono dovute ad errori di montaggio, di manovra e di mancanza di manutenzione, all’azione del gelo, a depositi calcarei o a tentativi non appropriati di riparazione. Non rientrano
nella copertura della garanzia anche i materiali di consumo e tutti i componenti soggetti ad usura che devono essere sostituiti periodicamente per l’ordinaria manutenzione e pulizia
dell’apparecchio.Il certicato di garanzia deve essere compilato a cura del rivenditore e dovrà accompagnare l’apparecchio, nel caso venga restituito, assieme allo scontrino o ricevuta
scale comprovante la data di acquisto.
Unione europea informazioni per l’eliminazione
Questo simbolo signica che, in base alle leggi e alle norme locali, il prodotto dovrebbe essere eliminato separatamente dai riuti casalinghi. Quando il prodotto diventa
inutilizzabile, portalo nelpunto di raccolta stabilitodalle autorità locali. Alcunipunti di raccolta accettanoi prodotti gratuitamente.La raccolta separata e ilriciclaggio del prodotto
al momento dell’eliminazione aiutano a conservare le risorse naturali e assicurano che venga riciclato in maniera tale da salvaguardare la salute umana e l’ambiente.
Italiano

17
Filter for mini aquarium and turtle tanks
Beste klant,
Wij danken U voor Uw keuze van dit kwaliteitsprodukt.Wij vragen U om de onderstaande korte instructies even door te nemen om deze lter zo goed mogelijk
te gebruiken en de bijzondere karakteristieken ervan te waarderen.
Omschrijving -Fig. 1-
A. Pomplichaam
B. Rotor
C. Filterlichaam
D. Filtrerende huls
E. Kraan
F. Zuignappen
Installatie
Attentie: vooraleer de lter in werking te brengen, alle verschillende delen nakijken.
De plaats waar U de lter wenst te brengen reinigen en de lter met de bijgevoegde zuignapjes vastmaken door zacht te drukken. -Fig. 2-
Voor een betere werking raadt men aan om de lter zodanig te plaatsen dat de compressie onder het waterniveau is; zo verkrijgt men een regelmatige en geluidsloze recyclage.
Reglementering
De lter is voorzien van een regelingsysteem met zeven posities die toelaat het draagvermogen te veranderen. Door de kraan te laten werken, zie g. 3, is het dus mogelijk de watervloed
aan te passen aan de eisen van de verschillende werkingen.
Nederlandse

18
Onderhoud
Attentie: vooraleer gelijk welke ingreep uit te voeren, de lter van de alimentatie en van alle ingebrachte elektrische apparaten ontbinden.
• Het lterlichaam van het pom-plichaam en de rotor verwijderen.
• Het draaistuk reinigen en kalkafzettingen, eventueel met een zacht borsteltje, verwijderen.
• De ltrerende huls uit het lter lichaam trekken en onder stromend lauw water spoelen. -Fig. 4-
• Alles in omgekeerde volgorde ineenstekenen er voor zorgen dat de rotor vrij draait.
• Geen oplosmiddelen of wasmiddelen gebruiken.
• De regelmatige reiniging van de lter garandeert een correcte werking en een langere duur.
Veiligheidsnormen
• Deze lter mag enkel intern gebruikt worden met een maximale water-temperatuur van 35° C.
• Nagaan dat de op het etiket aangeduide spanning overeenkomt met dit van Uw netwerk.
• Vooraleer het apparaat aan het netwerk te verbinden, nakijken dat kabel en lter niet beschadigd zijn.
• De kabel van deze lter mag niet vervangen of hersteld worden; in geval van beschadiging de gehele eenheid vervangen.
Garantie
Op dit product wordt vanaf de aankoopdatum 24 maanden garantie verleend voor materiaal- en fabrieksfouten. De klachten waarvan de oorzaken te wijten zijn aan een verkeerde
montage, verkeerde manoeuvres of geen onderhoud, bevriezing, kalkaanslag of onjuiste reparatiepogingen vallen niet onder de dekking van de door ons verleende garantie. De
verbruiksmaterialen en alle onderdelen die onderhevig zijn aan slijtage die regelmatig vervangen moeten worden tijdens het gewone onderhoud en de reiniging van het apparaat vallen
ook niet onderde dekking vande garantie. Hetgarantiebewijs moet doorde verkoper ingevuldworden en moetsamen met de bonof de kwitantie waaruit de aankoopdatum blijkt bij het
apparaat gevoegd worden als het apparaat teruggezonden wordt.
Europese unie gescheiden inzameling
Dit symbool geeft aan dat dit product volgens de lokale regelgeving niet samen met huishoudelijk afval mag worden weggegooid. Wanneer dit product niet meer bruikbaar is,
brengt uhet naar een hiertoedoor de lokale autoriteiten aangewezen inzamelingspunt. Sommige inzamelingspunten vragenhiervoor geenvergoeding.Het apart inzamelen en
recyclen vanuw product betekent datnatuurlijke hulpbronnen niet onnodigworden aangesproken endat het product zodanig wordt gerecycled dathet milieu en degezondheid
van de mens worden beschermd.
Nederlandse

19
Filter for mini aquarium and turtle tanks
Drogi kliencie!
Dziękujemy Państwu za wybranie tego wysokiej jakości produktu. Jednocześnie prosimy o dokładne zapoznanie się z poniższymi informacjami, tak aby móc
bezpiecznie obchodzić się z ltrem przy montażu i czyszczeniu.
Opis
A. Korpus pompy
B. Wirnik
C. Przykrywa
D. Gąbka ltrująca
E. Pokrętło
F. Przyssawki
Instalacja
Uwaga: Przed podłączeniem do prądu proszę się upewnić, że części ltra nie są uszkodzone.
Zanim umieszczą Państwo ltr na wewnętrznej ściance akwarium, proszę dokładnie wyczyścić z wodorostów i osadów przeznaczone na to miejsce. Następnie proszę mocno docisnąć ltr
do ścianki akwarium, aby przyssawki, na których umieszczony jest ltr, zostały stabilnie i bezpiecznie przymocowane. Polecamy umocować ltr tak, aby wypływ wody znajdował się pod
jej powierzchnią; dzięki temu osiągną Państwo regularny i cichy przepływ wody.
Ustawienie
Filtr wyposażony jest w system do regulacji i kontroli przepływu wody. Pokrętło umożliwia siedem różnych ustawień. Dzięki temu mogą Państwo dostosować przepływ wody do
wszystkich wymogów i potrzeb.
Polska

20
Użytkowanie
Uwaga: Przed jakąkolwiek interwencją w akwarium proszę odłączyć wszystkie, znajdujące się w nim elektryczne przedmioty od prądu.
• Proszę zdjąć przykrywkę z korpusu ltra i wyjąć wirnik.
• Proszę oczyścić wirnik z osadów używając szczoteczki.
• Następnie wyjąć gąbkę ltrującą i opłukać ją pod letnią, bieżącą wodą.
• Proszę zmontować pompę w odwrotnej kolejności z oczyszczonych części i upewnić się czy wirnik może swobodnie się obracać.
• Proszę nie używać żadnych detergentów i rozpuszczalników.
• Regularne czyszczenie ltra i utrzymanie w dobrym stanie gwarantuje jego sprawne i długotrwałe funkcjonowanie..
Środki bezpieczeństwa
• Filtr powinien być używanyTYLKO w domu i jest przeznaczony do cieczy o max. temp. 35 stopni C.
• Proszę sprawdzić, czy napięcie podane na kablu odpowiada napięciu w Państwa sieci.
• Przed podłączeniem do prądu proszę się upewnić, że ltr i kabel nie są uszkodzone.
• Kabel przyłączeniowy nie może być wymieniany ani reperowany.
• W przypadku uszkodzenia ltr i kabel przyłączeniowy muszą być wymienione razem jako całość.
Gwarancja
Gwarancjatego urządzenia obejmuje24 miesiące od daty zakupu. Obejmujeona wady materiału iwady fabryczne. Gwarancja nie obejmujereklamacji będących efektem nieodpowiedniej
instalacji bądź użytkowania, braku konserwacji, zamarznięcia, nalotów wapiennych, niefachowych prób naprawy. Gwarancja nie obejmuje również wszystkich części ulegających
normalnemu zużyciu, które powinny być regularnie wymieniane ze względu na konserwację i czystość urządzenia. Certykat gwarancji powinien być wypełniony przez sprzedawcę i
dołączony do produktu, który może być reklamowany jedynie wraz z paragonem kasowym bądź fakturą, które są dowodem potwierdzającym datę zakupu.
Európska únia informácie ku likvidácii
Tento symbol poukazuje na to, že tento výrobok musí byť zlikvidovaný podľa platných zákonných predpisov, oddelene od domového odpadu. Výrobok odovzdajte na likvidáciu
len na ociálnom zbernom mieste. Na urãitých zberných miestach vám výrobok prevezmú a zlikvidujú bezodplatne.Triedením a recykláciou je zabezpeãená ochrana zdravia a
životného prostredia.
Polska
Table of contents
Languages:
Other Hydor Aquarium manuals

Hydor
Hydor Professional 150 User manual

Hydor
Hydor MIXO User manual

Hydor
Hydor CAPRI 60 LED User manual

Hydor
Hydor KORALIA Magnum 5 User manual

Hydor
Hydor AQAMAI LR User manual

Hydor
Hydor EKOMIXO User manual

Hydor
Hydor AUTOMATIC FEEDER User manual

Hydor
Hydor MIXO User manual

Hydor
Hydor Prime 10 User manual

Hydor
Hydor HYDROKABLE User manual
Popular Aquarium manuals by other brands

Royal Exclusiv
Royal Exclusiv Bubble King DeLuxe 300 datasheet

Maxspect
Maxspect Jump Series owner's manual

Dupla MARIN
Dupla MARIN Skimmer 110 Instructions for use

Zilla
Zilla Basking Platform Filter instructions

koller
koller AP22000GBFFP user manual

Casa Del Vetro
Casa Del Vetro Aloha 40 Luxline instructions