Hydrofarm Magnetic Ballast Series User manual

Magnetic Ballast Series
The Xtrasun Magnec ballast series offers reliable service at value prices. These ballasts
are compable with all Hydrofarm reflectors and most other brands. The Xtrasun’s unique
aluminum housing, with convecon cooling, runs so cool that it’s helped make the Xtrasun the
most popular value-priced ballast on the market. Other features include a mul-mount handle
and rubber feet. The Xtrasun operates on a 120V/240V power supply and, for highest efficiency,
should be operated with the appropriate waage lamp. All Xtrasun ballasts now feature the
dual lamp receptacle, as well as a metal support clip to keep the power cord in place.
INSTRUCTION MANUAL
TM

3
2 www.hydrofarm.com
WARNINGS:
• Use the Xtrasun ballast indoors only. Posion it in an area away from excessive heat or
contact with liquids.
• This ballast does not rely on the luminance enclosure for protecon against accidental
contact with live parts.
• Use the Xtrasun ballast with a maximum lamp cord length of 30 feet.
• Disconnect the ballast from the power supply before performing any maintenance,
lamp changes, or other modificaons.
• Contact the retailer for service if the ballast does not work aer confirming the power
connecon, output connecon, and bulb operaon.
• Opening the ballast will void the warranty.
ALWAYS DISCONNECT THE XTRASUN BALLAST’S POWER CORD
BEFORE MOVING UNIT OR CHANGING LAMPS.
INSTALLING AND CONNECTING THE XTRASUN MAGNETIC BALLAST
For proper lamp break-in, we recommend that you run the Xtrasun Ballast and bulb
for at least 12 straight hours aŌer iniƟal startup. This will improve lamp life and
performance.
1. Find a suitable locaon for the ballast with sufficient cooling and away from any heat
source.
2. Install the lamp firmly into the lamp socket and connect the lamp cord to the ballast.
3. Plug the power cord into the power input panel on the side of the ballast.
4. Plug the power cord into the power source (electrical outlet).
INSTRUCTION MANUAL
INSTRUCTION MANUAL
Model Sodium Halide Main Voltage Watts
BAC100A x x 120V/240V 1000W
BAC400A x x 120V/240V 400W
BAS600A x 120V/240V 600W
BAS400A x 120V/240V 400W
BAH100A x 120V/240V 1000W
BAH400A x 120V/240V 400W
USING THE CONVERSION SWITCH
Two Xtrasun converƟble models, the BAC100A and BAC400A, allow a simple flick of the
switch to operate either metal halide or high pressure sodium bulbs. Custom tune your
spectrum of light from seed to harvest in one ballast.
1. Unplug the Xtrasun ballast from the power source and allow the lamp to cool.
2. Remove the current lamp from its socket and replace it with the new bulb.
3. Flip the toggle switch to the corresponding bulb side (sodium or halide).
4. Plug the power cord back into the power source.
Important: Never flip the toggle switch on the ballast while the ballast is sll plugged into
a power source.
BALLAST NOTES
• The Xtrasun Magnec ballast is equipped with a dual voltage input power arrangement
that allows 120V or 240V input power. Each system comes standard with the 120V
power cord. To change to 240V input, purchase the 240V power cord (Part #BACD6)
from your local retailer.
• All Xtrasun ballasts include the exclusive “Lock & Seal” inline connector between the
ballast and reflector. Follow all the reflector assembly instrucons and install the bulb
into the socket before plugging in the connector or the power supply cord. Simply plug
the end from the reflector into the receptacle in the ballast enclosure. Firmly push it in
so that it is seated all the way to the base of the receptacle. If you have any quesons,
please contact the place of purchase. Do not plug anything except the designated
fixture and bulb into the proper ballast enclosure.
USING THE ADAPTOR AND SUPPORT CLIP
The Xtrasun ballast comes pre-wired with a dual lamp receptacle, which allows you to
plug in all common reflectors without
the use of an adapter plug. Perform the
following with the reflector unplugged.
1. Slide the aached plasc cover on the
adapter over the unused side. Plug
in the Xtrasun to the correct lamp
receptacle (already aached to the
ballast).
2. Spread the two metal prongs of the
metal support clip (included in the
hardware bag) apart so they fit over

5
4 www.hydrofarm.com
INSTRUCTION MANUAL
INSTRUCCIONES
5
5
on reflective
materials
WARRANTY
Hydrofarm warrants the Xtrasun ballast to be free from defects in materials and workmanship.
The warranty term is 3 years full/2 years prorated beginning on the date of purchase. This
warranty does not cover misuse, abuse, or failure to follow instrucons. Hydrofarm will, at
our discreon, repair or replace the ballast covered under this warranty if it is returned to the
original place of purchase. To request warranty service, please return the ballast, with original
sales receipt and packaging, to your place of purchase. The purchase date is based on your
original sales receipt.
the holes on either side of the plug. The holes
are in the grooved porons of either side of the
reflector lamp cord head. It may be helpful to
move the piece of black plasc blocking the outlet
not in use.
3. Hook the aached metal support clip (included in
the hardware bag) over the lamp cord to prevent
the plug and cord from being detached while in
use.
WARNINGS
• Do not place the open ends of the metal support clip into the power receptacle or any
power supply.
• Do not place the open ends of the metal support clip into the fins or any other openings
on the ballast.
• Do not use the metal support clip to aach or pin down any other cords.
La serie de balastos electromagnécos Xtrasun ofrece un servicio fiable a buen precio.
Estos balastos son compables con todos los reflectores Hydrofarm y la mayoría de re-
flectores de otras marcas. La carcasa de aluminio única de Xtrasun, con refrigeración por
convección, funciona tan bien que ha ayudado a hacer que Xtrasun sea el más popular de
los balastos más compevos del mercado. Otra caracterísca es que incluye una palanca
mul- montaje y patas de goma. Xtrasun trabaja con una entrada de alimentación dual de
120V/240V. Para una mayor eficacia, la lámpara debe tener la potencia adecuada. Ahora,
todos los Xtrasun cuentan con un entrada dual (doble tensión de alimentación), así como
un soporte de clip metálico para sujetar el cable de alimentación en su lugar.
ADVERTENCIAS:
• Ulice únicamente el balasto electromagnéco Xtrasun en interior. Colóquelo en un
lugar alejado del exceso de calor y el contacto con líquidos.
• Este balasto no depende de la envolvente de la luminaria para la protección contra
contactos eléctricos accidentales a causa de partes acvas en tensión.
• Ulice el balasto Xtrasun con una longitud de cable máxima de 9 metros para la ali-
mentación de la lámpara.
• Desconecte el balasto de la red eléctrica antes de realizar cualquier trabajo de manten-
imiento, sustución de lámparas, u otras modificaciones.
• Póngase en contacto con el servicio de distribución si el balasto no funciona después
de haber asegurado la conexión eléctrica de alimentación, la conexión de salida, y el
funcionamiento de la lámpara.
• La apertura del balasto anula la garana.
DESCONECTE SIEMPRE EL CABLE DE ALIMENTACIÓN DEL BALASTO XTRASUN
ANTES DE MOVER LA UNIDAD O REALIZAR SUSTITUCIÓN DE LÁMPARAS.
MODELO Vapor de Sodio Halogenuros Metálicos Tensión de Alimentación Vatios
BAC100A x x 120V/240V 1000W
BAC400A x x 120V/240V 400W
BAS600A x 120V/240V 600W
BAS400A x 120V/240V 400W
BAH100A x 120V/240V 1000W
BAH400A x 120V/240V 400W

7
6 www.hydrofarm.com
INSTRUCCIONES INSTRUCCIONES
Operation
INSTALACIÓN Y CONEXIÓN DEL BALASTO ELECTROMAGNÉTICO
XTRASUN
Para un correcto funcionamiento de la lámpara, le recomendamos que mantenga en
funcionamiento el balasto Xtrasun y la lámpara por lo menos durante 12 horas seguidas
después del primer arranque. Esto mejorará la vida úl de la lámpara y su rendimiento.
1. Localice un lugar adecuado para el balasto, con refrigeración suficiente y lejos de
cualquier fuente de calor.
2. Instale la lámpara firmemente en su soporte y conecte el cable de interconexión entre
la lámpara y el balasto.
3. Conecte el cable de alimentación de red en el balasto.
4. Conecte el cable de alimentación a la red (toma de corriente eléctrica).
USO DEL INTERRUPTOR DE
SELECCIÓN
Los dos modelos Xtrasun selecvos, el BAC100A
y BAC400A, permiten que con un simple giro
del interruptor se pueda operar con lámparas
de Halogenuros Metálicos o lámparas de Vapor
de Sodio de alta presión. Ajuste su espectro de
luz desde la semilla hasta la cosecha con un solo
balasto.
1. Desenchufe el balasto Xtrasun de la fuente de
alimentación y permita que la lámpara se enfríe.
2. Desconecte la lámpara de la toma y reemplazarla
por la nueva.
3. Gire el interruptor de selección al lado
correspondiente (lámpara de Vapor de Sodio o
Halogenuros Metálicos).
4. Conecte el cable de alimentación a la red.
Importante: Nunca manipule el interruptor de selección mientras que el balasto esté
enchufado a una fuente de alimentación.
NOTAS
El balasto electromagnéco Xtrasun está equipado con una entrada dual (doble tensión
de alimentación), que permite alimentación de red a 120V o 240V. Cada equipo viene de
serie con el cable de alimentación de 120 V. Para cambiar a la entrada de 240V, hay que
comprar el cable de alimentación de 240 V (parte # BACD6) en su distribuidor local.
Todos los Xtrasun incluyen el exclusivo conector "Lock & Seal" de interconexión entre
el balasto y el reflector. Siga todas las instrucciones de montaje del reflector e instale la
lámpara en el zócalo antes de enchufar el conector o el cable de alimentación. Sólo ene
que conectar el extremo del reflector en el receptáculo de la envolvente del balasto.
Empuje firmemente por toda la guía hasta que quede asentado en la base del receptáculo.
Si usted ene alguna pregunta, por favor póngase en contacto en su lugar de compra. No
conecte nada, excepto la lámpara y el accesorio designado dentro de la envolvente del
balasto.
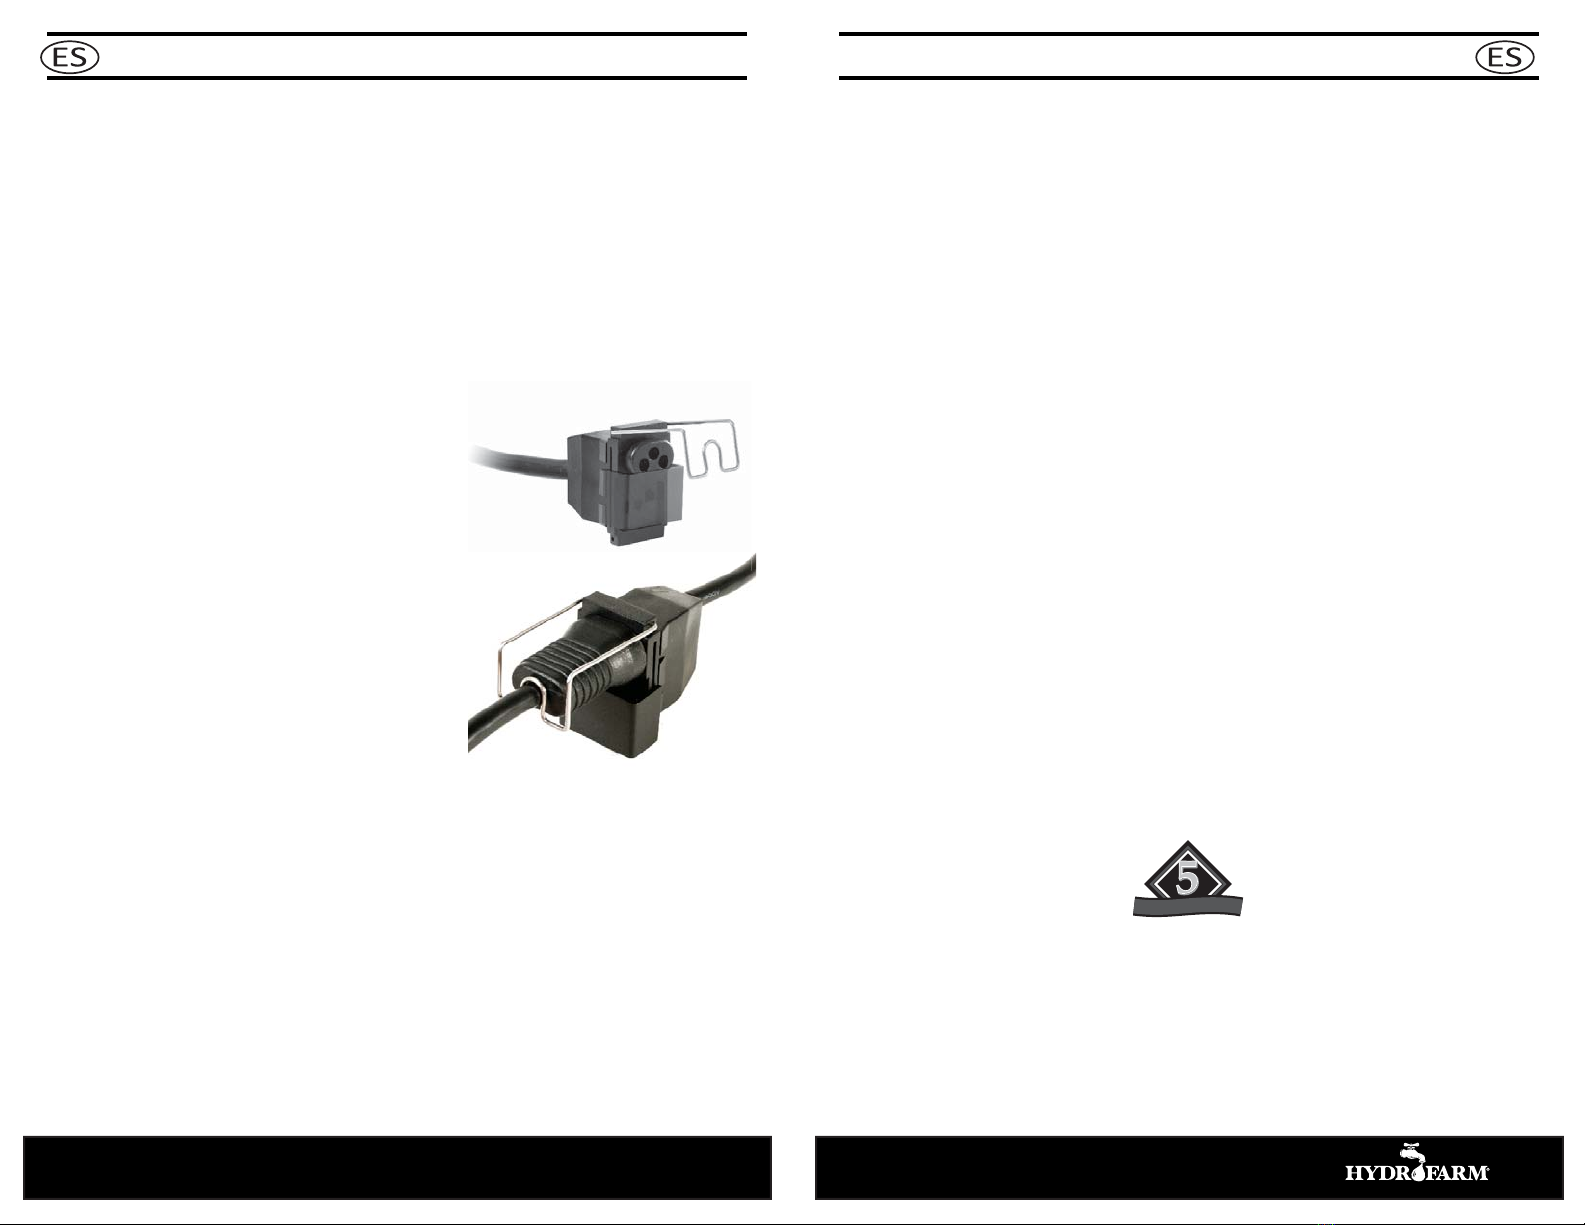
USO DEL ADAPTADOR Y EL SOPORTE DE CLIP METÁLICO
El balasto Xtrasun viene pre-cableado con una nueva toma dual de salida a lámpara, que le
permite conectar todos los reflectores estándar sin necesidad de un adaptador. Realice los
siguientes pasos con el reflector desenchufado.
1. Deslice la cubierta de plásco sobre el lado no ulizable. Conecte el Xtrasun a la toma
de salida para la lámpara correcta (ya conectada al balasto).
2. Extender las dos puntas metálicas del soporte de clip metálico (incluido en la bolsa de
hardware) que encajen en los orificios, en cada lado de la clavija. Los agujeros están en
las partes ranuradas de cada lado del extremo del cable de la lámpara. Puede ser úl
para mover la pieza negra de plásco el bloqueando la salida que no esté en uso.
3. Conecte el soporte clip de metálico (incluido en la bolsa de accesorios) en el cable
de alimetación de la lámpara para evitar que el toma de conexión y el cable queden
separados durante su uso.
ADVERTENCIAS
• No coloque los extremos abiertos del soporte de clip metálico en la toma de corriente o
cualquier fuente de alimentación.
• No coloque los extremos abiertos del soporte de clip metálico en las aletas o cualquier
otra abertura del balasto.
• No ulice del soporte de clip metálico para sujetar o inmovilizar cualquier otro cable.
GARANTÍA
Hydrofarm garanza que el balasto Xtrasun está libre de defectos en materiales y mano de obra.
El plazo de garana es de 3 años completos / 2 años prorrateados al comienzo de la fecha de com-
pra. El mal uso, abuso o incumplimiento de las instrucciones no están cubiertos por esta garana.
Hydrofarm, a nuestra discreción, reparará o reemplazará el balasto cubierto por esta garana si es
devuelto a su lugar original de compra. Para solicitar el servicio de garana, devuelva el balasto con
el recibo de compra original y el embalaje a su lugar de compra. La fecha de compra se basa en su
recibo de compra original.
5
5
en componentes del lastre
A
ñ
o
s
d
e
g
a
r
a
n
t
í
a

8 www.hydrofarm.com
This manual suits for next models
1
Table of contents
Languages:
Other Hydrofarm Lighting Equipment manuals

Hydrofarm
Hydrofarm Phantom CMh 315 User manual

Hydrofarm
Hydrofarm Jump Start T5 User manual

Hydrofarm
Hydrofarm PHANTOM CMH User manual

Hydrofarm
Hydrofarm RAPTOR User manual

Hydrofarm
Hydrofarm PHR3150 User manual

Hydrofarm
Hydrofarm powerPAR User manual

Hydrofarm
Hydrofarm Phantom II Digital User manual

Hydrofarm
Hydrofarm Autopilot ECLIPSE F60 User manual

Hydrofarm
Hydrofarm XT49HV User manual

Hydrofarm
Hydrofarm JUMP START User manual