manuals.online logo
Brands
  1. Home
  2. •
  3. Brands
  4. •
  5. Hydrotech
  6. •
  7. Water Dispenser
  8. •
  9. Hydrotech 765 Specification sheet

Hydrotech 765 Specification sheet

,WHP
'HVF
6HULDO
<0/
<0/
')
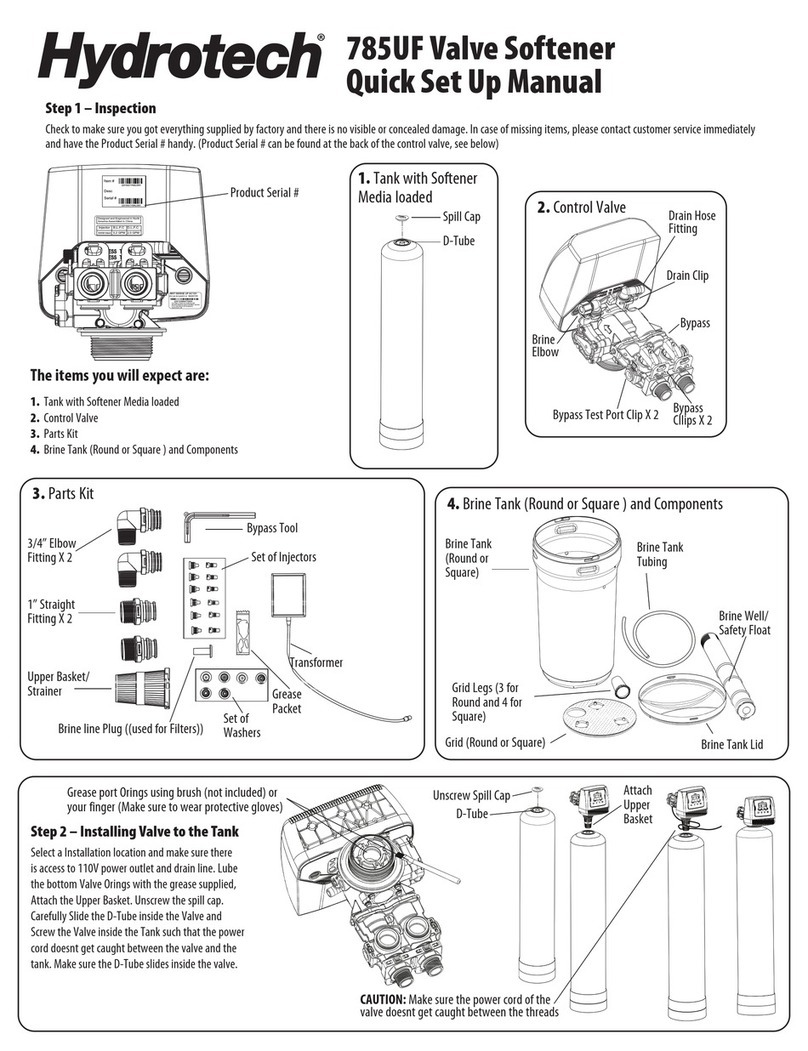
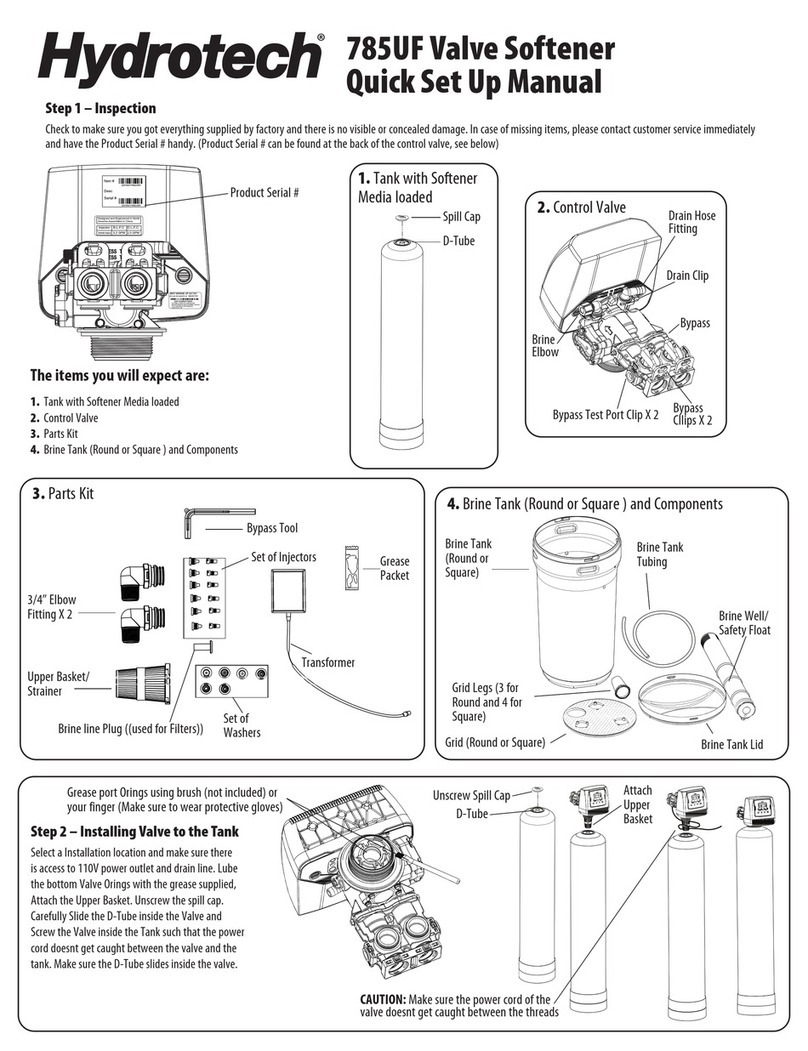
2. Control Valve
Brine
Elbow
Drain Clip
Bypass
Bypass
Cllips X 2
Drain Hose Fitting
Bypass Test Port Clip X 2
CAUTION: Make sure the power cord of the
valve doesnt get caught between the threads
Brine Tank
(Round or
Square)
Brine Tank
Tubing
Brine Well/
Safety Float
Brine Tank Lid
Grid (Round or Square)
Grid Legs (3 for
Round and 4 for
Square)
4. Brine Tank (Round or Square ) and Components
3. Parts Kit
Brine line Plug (Not used
in Softeners)
Grease port Orings using brush (not included) or
your finger (Make sure to wear protective gloves)
3/4” Elbow
Fitting X 2
1” Straight
Fitting X 2
Bypass Tool
Set of Injectors
Transformer
Grease
Packet
Set of
Washers
Upper Basket/
Strainer
Product Serial # 1. Tank with
Media loaded
Spill Cap
D-Tube
D-Tube
Unscrew Spill Cap Attach
Upper
Basket
765 Valve Softener
Quick Set Up Manual
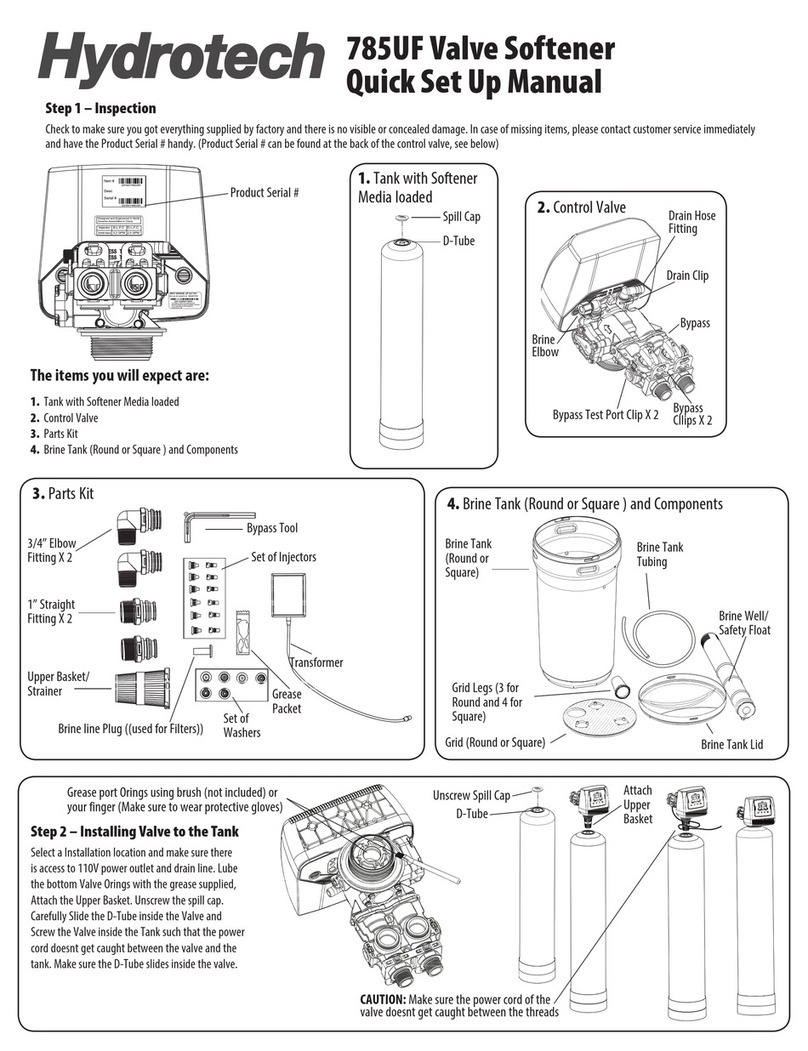
Step 1 – Inspection
Check to make sure you got everything supplied by factory and there is no visible or concealed damage. In case of missing items, please contact customer service immediately
and have the Product Serial # handy. (Product Serial # can be found at the back of the control valve, see below)
The items you will expect are:
1. Tank with Media loaded
2. Control Valve
3. Parts Kit
4. Brine Tank (Round or Square ) and Components
Step 2 – Installing Valve to the Tank
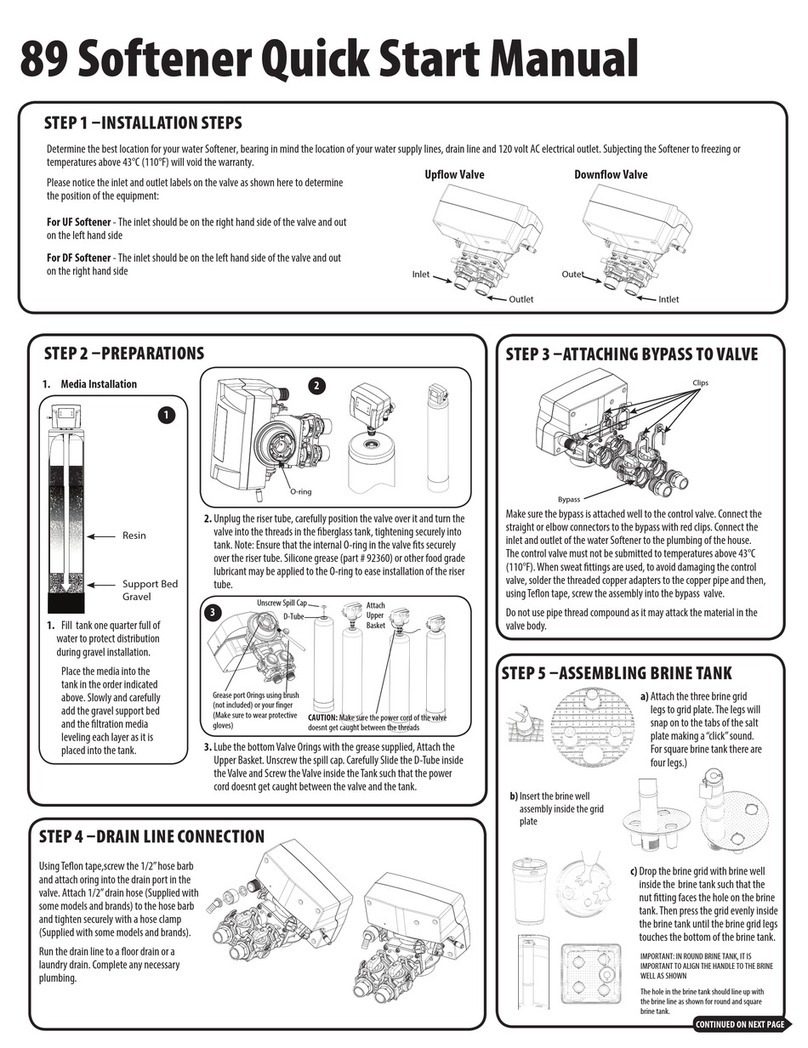
Select a Installation location and make sure there
is access to 110V power outlet and drain line. Lube
the bottom Valve Orings with the grease supplied,
Attach the Upper Basket. Unscrew the spill cap.
Carefully Slide the D-Tube inside the Valve and
Screw the Valve inside the Tank such that the power
cord doesnt get caught between the valve and the
tank
6(77,1*6 83
'2:16(/(&7
HARDNESS
020GPG
6(77,1*6 83
'2:16(/(&7
TIME
08:27 AM
6(77,1*6 83
'2:16(/(&7
TIME
08:27 AM
6(77,1*6 83
'2:16(/(&7
REMAIN
GAL 1060
6(77,1*6 83
'2:16(/(&7
PEOPLE
04
6(77,1*6 83
'2:16(/(&7
TIME
08:27 AM
Make sure the blue
clip is secure
KEYPAD
Insert Sleeve
Hole
Step 5 – Power and Program the Valve
Attach the Transformer cable to the valve and plug in the transformer to the 110V Power outlet. you will notice the two screens on right will alternate.
1. Press SETTINGS key to advance to TIME OF DAY. TIME OF DAY will flash.
2. Press the UP or DOWN key to adjust the TIME OF DAY. Press & hold the UP or DOWN key to quickly advance the hour and minutes. When desired time is displayed press
SELECT to advance to the HARDNESS setting. HARDNESS will flash.
3. Press the UP or DOWN key to adjust the HARDNESS (Min 1.Max 199). When desired hardness is displayed press SELECT to advance to the PEOPLE setting (Min1/Max9).
People will flash.
4. When desired number of people is displayed press SELECT to complete pro-gramming.
Step 3 – Assembling Brine Tank
a. Attach the three brine grid legs to grid plate. The legs will snap on to the tabs of
the salt plate making a “click” sound. For square brine tank there are four legs.
Step 4 – Attaching Brine Tubing to the Valve
b. Insert the brine well assembly inside the grid plate as well below.
c. Drop the brine grid with brine well inside the brine tank such that the nut fitting
faces the hole on the brine tank. Then press the grid evenly inside the brine tank
until the brine grid legs touches the bottom of the brine tank.
The hole in the brine tank
should line up with the brine
line as shown for round and
square brine tank.
d. Take the brine tube and insert the nut and plastic sleeve as shown below.
e. Insert the tube in the float assembly elbow and hand tighten the nut. In many
cases the brine line already come installed from the factory. Leave the other end
of the brine line tube inside the brine tank
f. For installation of brine tank at the installation site, pull the other end of the
brine tube from the hole on the brine tank. The completed assembly is
shown below.
TOLL-FREE: 1-877-288-9888
Regina, SK • Cambridge, ON • Carmel, IN • Fridley, MN • Phoenix, AZ
www.hydrotechwater.com
Follow the Instruction Manual to Complete
the Installation of the Product
55118 05/16
IMPORTANT: IN
ROUND BRINE TANK,
IT IS IMPORTANT TO
ALIGN THE HANDLE TO
THE BRINE WELL AS
SHOWN

Other Hydrotech Water Dispenser manuals

Hydrotech 785UF Specification sheet

Hydrotech

Hydrotech 785UF Specification sheet

Hydrotech 89DF HIM User manual

Hydrotech

Hydrotech 89DF HIM User manual

Hydrotech 7000 SXT Valve User manual

Hydrotech

Hydrotech 7000 SXT Valve User manual

Hydrotech 785 DF User manual

Hydrotech

Hydrotech 785 DF User manual

Hydrotech 89DF Series User manual

Hydrotech

Hydrotech 89DF Series User manual

Hydrotech 785HE Specification sheet

Hydrotech

Hydrotech 785HE Specification sheet

Hydrotech 89HE Instruction manual

Hydrotech

Hydrotech 89HE Instruction manual

Hydrotech 5600 Calendar Clock Valve User manual

Hydrotech

Hydrotech 5600 Calendar Clock Valve User manual

Hydrotech 565BM-75 User manual

Hydrotech

Hydrotech 565BM-75 User manual

Hydrotech 785 MBTO User manual

Hydrotech

Hydrotech 785 MBTO User manual

Hydrotech NRV TO-150 User manual

Hydrotech

Hydrotech NRV TO-150 User manual

Hydrotech 89 Valve User manual

Hydrotech

Hydrotech 89 Valve User manual

Hydrotech 565 Specification sheet

Hydrotech

Hydrotech 565 Specification sheet

Hydrotech 89 HIMTLC Series User manual

Hydrotech

Hydrotech 89 HIMTLC Series User manual

Hydrotech 785 Series Specification sheet

Hydrotech

Hydrotech 785 Series Specification sheet

Hydrotech 89 Instruction manual

Hydrotech

Hydrotech 89 Instruction manual

Hydrotech 6700XTR Series User manual

Hydrotech

Hydrotech 6700XTR Series User manual

Hydrotech 89UF Series User manual

Hydrotech

Hydrotech 89UF Series User manual

Popular Water Dispenser manuals by other brands

Hahn HF-600 installation instructions

Hahn

Hahn HF-600 installation instructions

Everpure ESO Replacement Cartridge EV9607-20 Specification sheet

Everpure

Everpure ESO Replacement Cartridge EV9607-20 Specification sheet

Pentair Fleck 2510 ECONOMINDER Service manual

Pentair

Pentair Fleck 2510 ECONOMINDER Service manual

BWT 2005 user guide

BWT

BWT 2005 user guide

Omnifilter R800 installation instructions

Omnifilter

Omnifilter R800 installation instructions

Frost Italy BOREA Operation manual

Frost Italy

Frost Italy BOREA Operation manual

GreenTech pureWash ProX2 owner's manual

GreenTech

GreenTech pureWash ProX2 owner's manual

KENT 11063 Instruction handbook

KENT

KENT 11063 Instruction handbook

Crysalli CR-2 Installation & service manual

Crysalli

Crysalli CR-2 Installation & service manual

resideo Braukmann KaltecSoft KS10S installation instructions

resideo

resideo Braukmann KaltecSoft KS10S installation instructions

Dennerle OSMOSE COMPACT 130 operating instructions

Dennerle

Dennerle OSMOSE COMPACT 130 operating instructions

EcoWater Waterworks WS 2000 Installating and operation manual

EcoWater

EcoWater Waterworks WS 2000 Installating and operation manual

Parker Hiross Hypercool WRN Series user manual

Parker Hiross

Parker Hiross Hypercool WRN Series user manual

Elkay Deluxe EFHA8 1L Series Installation, care & use manual

Elkay

Elkay Deluxe EFHA8 1L Series Installation, care & use manual

Mistral DRINKPAD manual

Mistral

Mistral DRINKPAD manual

Oase FiltoMatic CWS operating instructions

Oase

Oase FiltoMatic CWS operating instructions

Glacial 8LDIECH-SC-WFC-SSF user manual

Glacial

Glacial 8LDIECH-SC-WFC-SSF user manual

vitapur VWD8000W-F Specification sheet

vitapur

vitapur VWD8000W-F Specification sheet

manuals.online logo
manuals.online logoBrands
  • About & Mission
  • Contact us
  • Privacy Policy
  • Terms and Conditions

Copyright 2025 Manuals.Online. All Rights Reserved.