Icom IC-4088S User manual

INSTRUCTION MANUAL
UHF C.R.S. TRANSCEIVER
i4088S
IC-4088S.qxd 03.10.2 8:20 Page A (1,1)

i
FOREWORD
Thank you for purchasing the IC-4088S
UHF C.R.S. (Citizen Radio
Service) FM transceiver. This C.R.S. FM transceiver is designed for
those who require top quality, performance and outstanding relia-
bility under the most demanding conditions.
IMPORTANT
READ ALL INSTRUCTIONS carefully and completely before using
the transceiver.
SAVE THIS INSTRUCTION MANUAL— This instruction manual
contains important operating instructions for the transceiver.
PRECAUTION
RWARNING! NEVER hold the transceiver so that the antenna
is very close to, or touching exposed parts of the body, especially
the face or eyes, while transmitting. The transceiver will perform
best if the microphone is 5 to 10 cm away and the transceiver is
vertical.
RWARNING! NEVER operate the transceiver with a headset
or other audio accessories at high volume levels.
NEVER attempt to charge alkaline cell batteries. Be aware that
external DC power connections will charge batteries inside the bat-
tery case. This will damage not only the battery case but also the
transceiver.
DO NOT operate the transceiver near unshielded electrical blast-
ing caps or in an explosive atmosphere.
DO NOT push the PTT when not actually desiring to transmit.
IC-4088S.qxd 03.10.2 8:20 Page i (1,1)

Place the unit in a secure place to avoid inadvertent use by children.
AVOID using or placing the transceiver in direct sunlight or in
areas with temperatures below 0°C or above +55°C.
The use of non-Icom battery packs may impair transceiver perfor-
mance and invalidate the warranty.
Even when the transceiver power is OFF, a slight current still flows
in the radio. Remove the alkaline cells or battery pack from the
transceiver when not using it for a long time. Otherwise, the in-
stalled batteries will become exhausted.
DO NOT modify the transceiver for any reason.
KEEP the transceiver from the heavy rain, and NEVER immerse
it in the water. The transceiver construction is weather resis-
tant, (meets JIS grade 4) not waterproof.
When the low battery indicator blinks, the performance of the trans-
ceiver cannot be guaranteed.
DO NOT transmit for more than 3 sec., when operating with the
group mode and/or call ring function. Transmission in a form other
than speech is limited, and should be of a duration of less than 3
sec. as a compliance to ACA requirements in Australia.
This device complies with Standard Australia
Specification No. AS/NZS4365-1996.
SUPPLIED ACCESSORY
• Belt clip ………………………………… 1
ii
IC-4088S.qxd 03.10.2 8:20 Page ii (1,1)

iii
TABLE OF CONTENTS
FOREWORD …………………………………………………………………… i
IMPORTANT …………………………………………………………………… i
PRECAUTION ………………………………………………………………… i–ii
SUPPLIED ACCESSORY……………………………………………………… ii
TABLE OF CONTENTS ……………………………………………………… iii
1 PREPARATION …………………………………………………………… 1
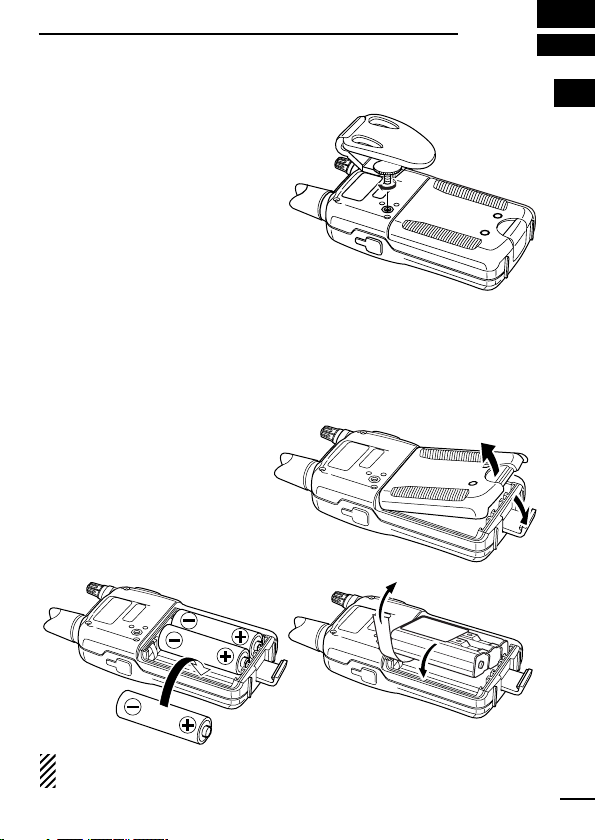
■Belt clip attachment ……………………………………………………… 1
■Battery installation ……………………………………………………… 1
2 PANEL DESCRIPTION ………………………………………………… 2–4
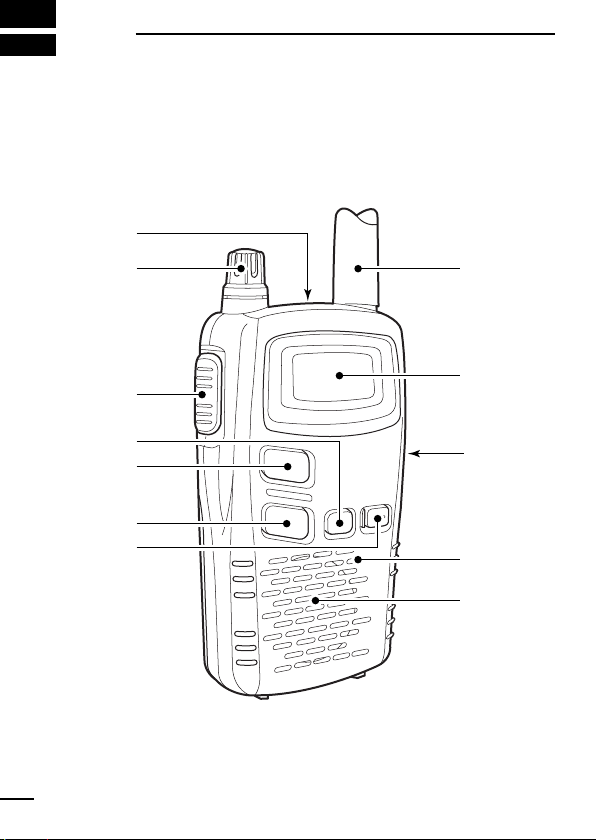
■Switches, controls, keys and connectors ……………………………… 2
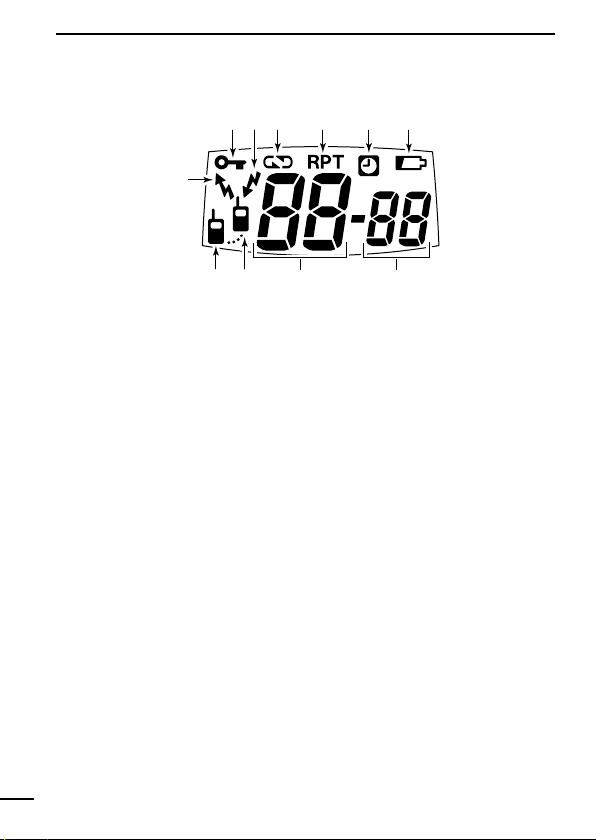
■Function display ………………………………………………………… 4
3 BATTERY CHARGING ………………………………………………… 5–7
■Battery caution …………………………………………………………… 5
■Charging connections …………………………………………………… 6
4 BASIC OPERATION …………………………………………………… 8–9
■Power ON ………………………………………………………………… 8
■Adjusting the volume …………………………………………………… 8
■Selecting the operating channel………………………………………… 9
5 RECEIVE AND TRANSMIT ………………………………………… 10–11
6 REPEATER FUNCTION ………………………………………………… 12
7 SCAN FUNCTION ………………………………………………………… 13
8 GROUP MODE (CTCSS) …………………………………………… 14–15
■Setting the group code ………………………………………………… 14
9 RING FUNCTIONS ……………………………………………………… 16
■Smart-Ring ……………………………………………………………… 16
■Call-Ring ………………………………………………………………… 16
10 OTHER FUNCTIONS ………………………………………………… 17–22
■Voice scrambler function ……………………………………………… 17
■Initial set mode ………………………………………………………… 17
■Lock function …………………………………………………………… 20
■Low battery indicator …………………………………………………… 20
■Auto power save………………………………………………………… 20
■ATS (Automatic Transponder System) ……………………………… 21
■Resetting the transceiver ……………………………………………… 21
■Optional HM-75A functions …………………………………………… 22
11 OPTIONS…………………………………………………………………… 23
12 SPECIFICATIONS …………………………………………………… 24–25
13 WARRANTY…………………………………………………………… 26–27
IC-4088S.qxd 03.10.2 8:20 Page iii (1,1)

1
1
PREPARATION
1
■Belt clip attachment
Attach the belt clip using the
supplied screw. Conveniently
attaches to a belt.
■Battery installation
Install 3 R6 (AA) size alkaline cell batteries or the optional BP-202
BATTERY PACK
as illustrated below.
qRemove the battery case
cover from the transceiver.
wInstall 3×R6 (AA) size alka-
line cell batteries or BP-
202.
• Be sure to observe the cor-
rect polarity.
NOTE: Keep battery contacts clean. It’s good idea to clean bat-
tery terminals once a week.
Alkaline cells
BP-202
IC-4088S.qxd 03.10.2 8:20 Page 1 (1,1)

2
2PANEL DESCRIPTION
■Switches, controls, keys and
connectors
q
Antenna
Function
display
(p. 4)
Speaker
Microphone
w
e
r
t
y
u
i
IC-4088S.qxd 03.10.2 8:20 Page 2 (1,1)

3
2
PANEL DESCRIPTION
2
qEXTERNAL SPEAKER AND MICROPHONE JACKS
Connect an optional speaker-microphone or headset, if desired.
wVOLUME CONTROL [VOL]
Rotate clockwise to increase and counterclockwise to decrease
volume.
ePTT SWITCH [PTT]
Push and hold to transmit; release to receive.
rMODE SWITCH [MODE]
➥Push to enter and select set mode for group (p. 14) and voice
scrambler code. (p. 17)
➥Push and hold for 1 sec. to turn the monitor function ON and
OFF. (p. 8)
tCHANNEL UP SWITCH [Y]
➥Push to increment the operating channel.
➥Push and hold to increment the operating channel continu-
ously.
➥While scanning, changes scanning direction. (p. 13)
yCHANNEL DOWN SWITCH [Z]
➥Push to decrement the operating channel.
➥Push and hold to decrement the operating channel continu-
ously.
➥While scanning, changes scanning direction. (p. 13)
uPOWER SWITCH [PWR]
➥Push to turn the power ON.
➥Push to switch between repeater and simplex operation.
(p. 12)
➥Push and hold this key to toggle the key lock function
ON/OFF. (p. 20)
iEXTERNAL DC IN JACK [DC 6V] (p. 6)
Connects the AC adapter or DC power cable for battery charg-
ing.
IC-4088S.qxd 03.10.2 8:21 Page 3 (1,1)

4
2PANEL DESCRIPTION
■Function display
qKEY LOCK INDICATOR
Appears during the key lock function ON.
wBUSY INDICATOR
Appears while receiving a signal or when the squelch is open.
eVOICE SCRAMBLER INDICATOR
Appears while the voice scrambler function is in use.
rREPEATER INDICATOR
Appears when repeater operation is selected.
tAUTO POWER OFF INDICATOR
Appears while the auto power off function is ON.
yLOW BATTERY INDICATOR
Appears or blinks when the battery decreases to a specified level.
uGROUP NUMBER INDICATOR
Indicates the selected group number during the group function ON.
iCHANNEL NUMBER INDICATOR
Indicates the selected operating channel number.
oPOWER ON INDICATOR
Appears while the power is ON.
!0 ANSWER BACK INDICATOR
➥
Appears when you and your group are in the conversation area.
➥Blinks when you or your group is out of the conversation area.
!1 TRANSMIT INDICATOR
Appears during PTT ON.
qewtry
uio!0
!1
IC-4088S.qxd 03.10.2 8:21 Page 4 (1,1)

5
3
BATTERY CHARGING
2
3
■Battery caution
CAUTION NEVER short the terminals.
NEVER mix old and new batteries.
NEVER incinerate used battery cells. Internal battery gas may
cause explosion.
Make sure all battery cells are the same brand, type and capacity.
AVOID over charging—The BP-202 can be charged when the AC
adapter or the DC power cable with a DC power supply is con-
nected. To prevent over charging, the IC-4088S has charging timer
that automatically disconnecting the charging line electronically
after 15 hours from charging. However, the charging timer will reset
and start charging again when disconnect then re-connecting the
AC adapter or DC power cable more than 1 min. interval.
Recommended temperature range for charging: +10˚C to +40˚C
NEVER connect an AC adapter or DC power cable with an external
DC power supply that outputs lower than 5.7 V DC and more than
6.3 V DC voltage when charging the installed BP-202.
The optional BP-202
BATTERY PACK
includes rechargeable Ni-Cd
batteries and can be charged approx. 300 times. Charge the battery
pack before first operating the transceiver or when the battery pack
becomes exhausted.
If the battery pack seems to have no capacity even after being fully
charged, completely discharge it by leaving the power ON all day.
Then, fully charge the battery pack again.
If the battery pack still does not retain a charge (or very little), a new
battery pack must be purchased.
DDOperating period
Depending on the installed battery, the operating period of the
transceiver varies. Refer to p. 24 for operating period details.
IC-4088S.qxd 03.10.2 8:21 Page 5 (1,1)

6
3BATTERY CHARGING
■Charging connections
DDRegular charging via [DC 6V] jack
➥Connect the AC adapter or DC power cable with an external DC
power supply to [DC 6V].
•The supplied voltage must be within the range of 5.7 to 6.3 V
DC.
•Charging period: approx. 15 hours
IMPORTANT!:
Use the AC adapter or DC power cable with an external DC
power supply (6.0 V DC ±0.3 V), which specified by Icom Aus-
tralia, ONLY. Other type of AC adapter or DC power cable with
an external power supply may damage the transceiver.
The optional BP-202 can only be charged—other AA (R6) size
rechargeable Ni-Cd cannot be charged.
to [DC 6V]
jack
DC power cable
AC adapter
to a DC power supply
to AC outlet
Turn the power OFF!
When the installed Ni-Cd
battery is nearly exhausted
and the function display
blinks in intermittently,
push [PWR] until the trans-
ceiver’s power goes OFF.
*About the plug
Polarity:
Outer: 4.0±0.1 mm (d)
Inner: 1.7±0.05 mm (d)
Length: 9.5±0.5 mm
+_
*
*
IC-4088S.qxd 03.10.2 8:21 Page 6 (1,1)

7
3
BATTERY CHARGING
3
DDRapid charging with the BC-119N+AD-105
qInsert the optional AD-105
DESKTOP CHARGER ADAPTER
into the
charging slot of the BC-119N.
wInsert the battery pack, either by itself or attached to the trans-
ceiver, into the charger.
IC-4088S BP-202
AD-105
BC-119N
AC adapter
NOT used:
Fix the 3-pin connector to the bottom of the charger with the
adhesive tape, etc., to prevent catching or touching the 3-pin
connector’s terminals with the adapter’s leads, etc.
*
*NOTE: Put the Ni-Cd battery
adapter into the AD-105 rear
slot when the BP-202 is
attached to the transceiver.
Turn the power OFF!
When the installed Ni-Cd
battery is nearly exhausted
and the function display
blinks in intermittently,
push [PWR] until the trans-
ceiver’s power goes OFF.
IC-4088S.qxd 03.10.2 8:21 Page 7 (1,1)

8
4BASIC OPERATION
■Power ON
➥Push [PWR] for 1sec. to turn the
power ON.
•“ ”and operating channel num-
ber appear on the display.
■Adjusting the volume
qPush and hold [MODE] for
1sec. to open the squelch.
•“ ” indicator appears on the
display while the squelch is
open.
wAdjust the audio to a suitable
level using [VOL].
ePush and hold [MODE] for
1sec. to close the squelch.
✔What is squelch?
A squelch circuit allows muting of undesired noise while receiving
no signal and emit audio while receiving signals.
This provides quiet standby. The [MODE] key changes the
squelch setting. This is useful to listen to weak signals that do
not open the squelch.
[PWR]
[MODE]
Appears
[VOL]
IC-4088S.qxd 03.10.2 8:21 Page 8 (1,1)

9
4
BASIC OPERATION
4
■Selecting the operating channel
Push [Y] or [Z] keys several times
until the desired operating channel
number appears on the display.
•While pushing and holding [Y] or
[Z] keys, the displayed channel
changes continuously until chan-
nel number “1”appears.
To keep the automatic selection,
release the [Y] or [Z] keys then
push and hold them again.
•When displayed channel stops at channel number “1,”a beep is
emitted.
NOTE:
•The transceiver has 40 operating frequency channels.
•The selected channel is memorised when the transceiver is
turned off.
[Y]
[Z]
IC-4088S.qxd 03.10.2 8:21 Page 9 (1,1)

10
5RECEIVE AND TRANSMIT
qSelect the desired operating
channel with [Y]/[Z].
When a signal is received:
•“”indicator appears on the
display.
•Squelch opens and audio is
emitted from the speaker.
- Further adjustment of [VOL]
may be necessary at this point.
wPush and hold [PTT] to transmit
then speak into the microphone.
•Do not hold the transceiver too
close to your mouth or speak too
loudly. This may distort the sig-
nal.
•The transmit indicator “”ap-
pears on the display.
eRelease [PTT] to return to re-
ceive.
IMPORTANT:
To maximize the readability of the transmitted signal, pause a
few sec. after pushing [PTT], hold the transceiver 10 to 15 cm
from your mouth and speak at a normal voice level.
NOTE:
The transceiver has an auto power save function to conserve
the battery power. The power save function activates automati-
cally when no signal is received for 5 sec.
[Y]
[Z]
[PTT]
Appears
IC-4088S.qxd 03.10.2 8:21 Page 10 (1,1)

11
5
RECEIVE AND TRANSMIT
5
✔Talk Range
The IC-4088S is designed to maximize performance and improve
transmission range in the field. However, the single most impor-
tant factor in transmit range (talk power) is the surrounding envi-
ronment. These radios are “line of sight”radios and as such,
transmission range are influenced by the degree to which you
can “see”the other communicating party. Large concrete struc-
tures and heavy foliage or transmission from inside a building or
vehicle will reduce the talk power range.
•Optimal range: wide, open areas free of obstructions.
•Medium range: large buildings or trees blocking your line of
sight.
•Minimum range: mountainous areas or areas of heavy foliage.
IC-4088S.qxd 03.10.2 8:21 Page 11 (1,1)

12
6REPEATER FUNCTION
A repeater amplifies received signals and re-transmits them on a
different channel, allowing you to communicate over greater dis-
tances with improved reliability. When using a repeater, the transmit
channel is shifted from the receive channel by 30 channels. Please
ask you dealer regarding repeater availability in your local area.
qPush [Y] or [Z] to select the
desired channel from 1 to 8.
•If group code appears next to
the operating channel number,
push [MODE], then select
“- - - ”with [Y] or [Z] to can-
cel the group mode (p. 14).
CAUTION!
As group mode is not com-
patible with repeater opera-
tion, no audio will be heard.
wPush [PWR] momentarily to set repeater mode.
•“RPT”appears in the display.
•The duplex setting affects the selected channel only and the
setting is retained after channel selection.
ePush and hold [PTT] to transmit.
•The displayed channel automatically changes to the transmit
channel (repeater input channel).
rRelease [PTT] to receive.
tTo cancel the duplex setting, push [PWR] momentarily on the de-
sired channel.
[PWR]
Appears
While receiving While transmitting
IC-4088S.qxd 03.10.2 8:21 Page 12 (1,1)

13
7
SCAN FUNCTION
6
7
Scanning is an efficient way to locate signals quickly over all chan-
nels. Select scan resume condition in advance, using Initial Set
Mode (p. 18)
DStarting the scan
➥While pushing [Y], push [Z] to
start the scan.
•“-”flashes.
•While pushing [Z], pushing
[Y] also starts the scan.
•Push [Z] or [Y] to change the
scanning direction or resume
the scan manually.
•To cancel the scan, push [Z]
(or [Y]) while [Y] (or [Z]) is
pushed, or push [PTT].
CH 40 CH 3
CH 2CH 1
CH 4CH 5
[Z]
[Y]
IC-4088S.qxd 03.10.2 8:21 Page 13 (1,1)

14
8GROUP MODE (CTCSS)
■Setting the group code
The IC-4088S is equipped with 38 group codes. Group mode oper-
ation provides communication with silent standby since you will only
receive calls from group members using the same group number.
First of all, set the same group code number for all group member’s
transceivers.
To turn ON the group mode op-
eration:
q
Push [MODE] to enter set mode.
•“---”(group mode OFF) appears
on the display.
wPush [Y] or [Z] to select the de-
sired code number.
ePush [MODE] twice to set the
group code number and exit set
mode.
To cancel the group mode oper-
ation:
q
Push [MODE] to enter set mode.
•Channel number disappears on
the display.
wPush [Y] or [Z] to select “---”
(group mode OFF).
ePush [MODE] twice to cancel
the group mode and return to
operating condition.
NOTE: Only stations with the same group channel number can
be heard during group mode operation, even when the busy in-
dicator appears on the display.
[Y]
[Z]
[MODE]
IC-4088S.qxd 03.10.2 8:21 Page 14 (1,1)

15
8
GROUP MODE (CTCSS)
8
DDCTCSS code table
(unit: Hz)
CH Freq. CH Freq. CH Freq. CH Freq.
01 67.0 11 97.4 21 136.5 31 192.8
02 71.9 12 100.0 22 141.3 32 203.5
03 74.4 13 103.5 23 146.2 33 210.7
04 77.0 14 107.2 24 151.4 34 218.1
05 79.7 15 110.9 25 156.7 35 225.7
06 82.5 16 114.8 26 162.2 36 233.6
07 85.4 17 118.8 27 167.9 37 241.8
08 88.5 18 123.0 28 173.8 38 250.3
09 91.5 19 127.3 29 179.9 --- OFF
10 94.8 20 131.8 30 186.2
✔What is CTCSS (Continuous Tone Coded Squelch System)
GROUP MODE ?
CTCSS (Continuous Tone Coded Squelch System) GROUP
MODE allows communication with silent stand by. Only signals
containing a specific group code can open the squelch.
This conveniently eliminates unwanted audio and is useful in group
activities or security related activities where unwanted output can
be a problem. Note that CTCSS group mode is not private—any-
one can receive your calls.
The IC-4088S is equipped with 38 tone codes for CTCSS GROUP
MODE use. Selecting a code applies it to all 40 operating channels.
Each push of [PTT] superimposes your group code over your trans-
mit signal; and, only signals containing the same code can open
your squelch. To temporarily hear all signals (including noise) push
and hold [MODE]. Do not use CTCSS GROUP MODE if you want
to be able to hear signals on all channels.
IC-4088S.qxd 03.10.2 8:21 Page 15 (1,1)

16
9RING FUNCTIONS
■Smart-Ring
The ring function has an answer back feature. This allows confir-
mation of whether or not a call has reached the receiving party even
if the operator is temporarily away from the transceiver.
qSet the same group channel
number for all of the group
transceivers. (See p. 14)
wWhile pushing [PTT], push [Y] .
•A beep is emitted and “”blinks
on the display.
eRelease the [PTT].
•When a member of a specific
group answers a call, the trans-
ceiver emits beep tones for
10 sec. and blinks “.”
•When no answer comes back, the transceiver emits short faint
beep tones.
rPush [PTT] to answer and to stop the beeps and flashing.
NOTE: This function is available only when the called station has
set the same group number and the same operating channels
as you.
■Call-Ring
Sends the ring tones during trans-
mit mode.
➥While pushing [PTT], push [Z]
to send a ring tone.
•The ring tone is emitted while
pushing [Z].
•The microphone signal is auto-
matically cut while pushing [Z].
[PTT]
[Y]
[PTT]
[Z]
IC-4088S.qxd 03.10.2 8:21 Page 16 (1,1)
Table of contents
Other Icom Transceiver manuals

Icom
Icom IC-F1821D User manual

Icom
Icom IC-E208 User manual

Icom
Icom IC-F1100D Series User manual

Icom
Icom IC-271A User manual

Icom
Icom IC-M400BB User manual

Icom
Icom IC-F6021 User manual

Icom
Icom IC-F15 User manual

Icom
Icom IC-A24 User manual

Icom
Icom ID-1 Installation and operating instructions

Icom
Icom IC-751 User manual