IKEA FRAMTID HGR1K User manual

FRAMTID
HGR1K
GB
DE
FR
IT


ENGLISH 4
DEUTSCH 14
FRANÇAIS 25
ITALIANO 40

Contents
Safety information 4
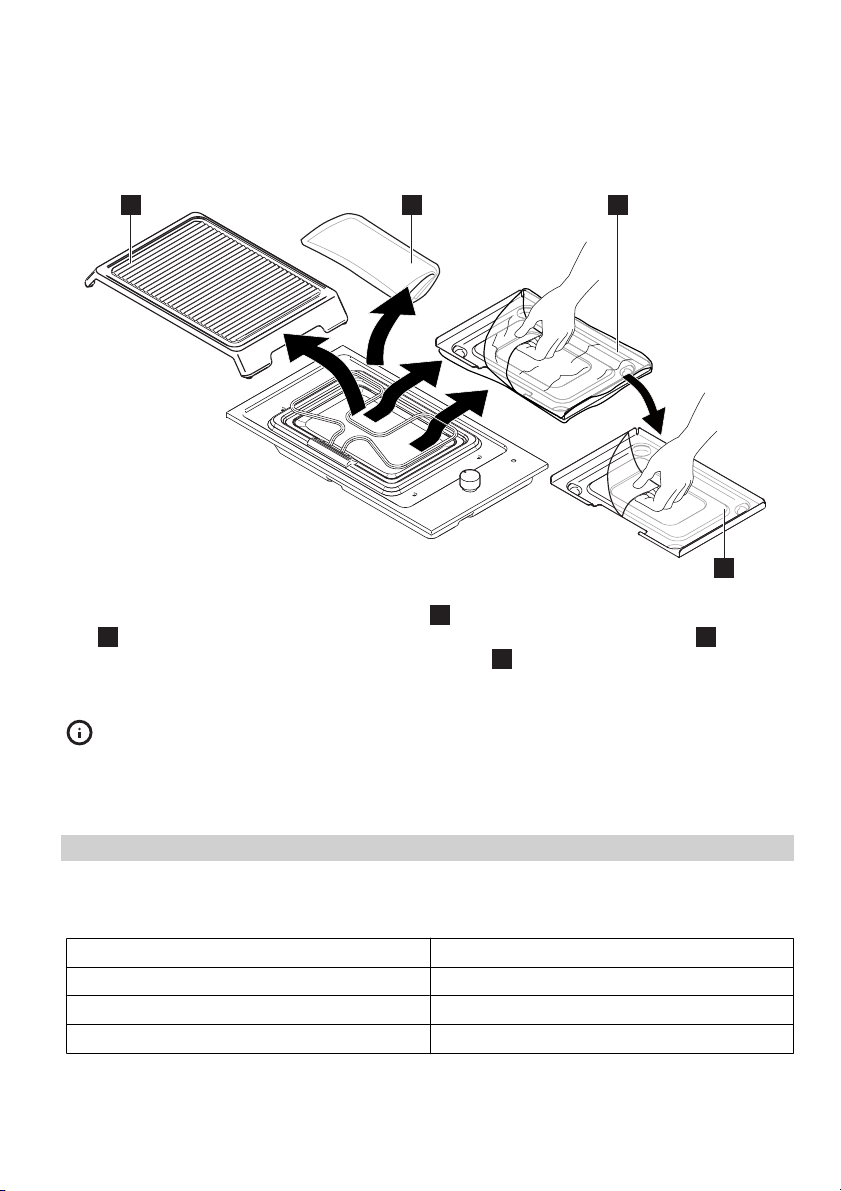
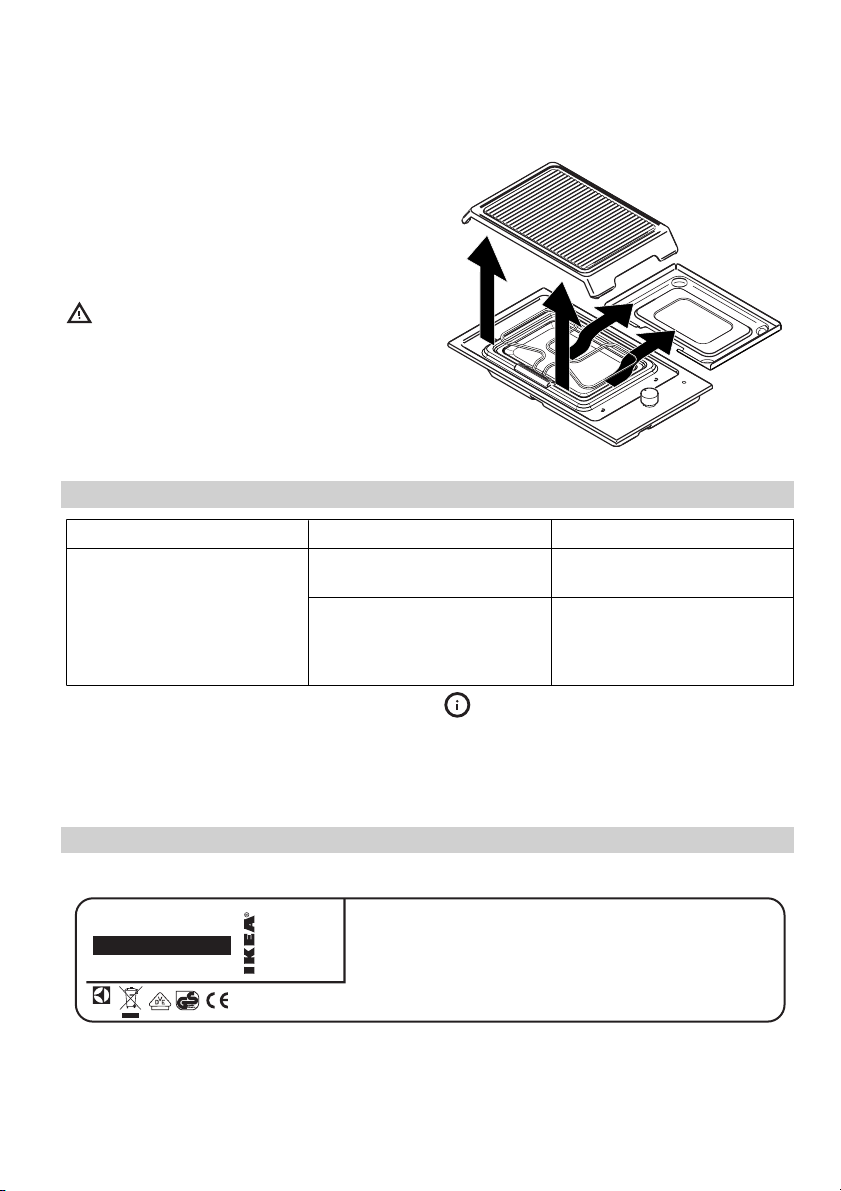
Product description 5
Before first use 5
Daily use 6
Helpful hints and tips 7
Care and cleaning 7
What to do if… 8
Technical data 8
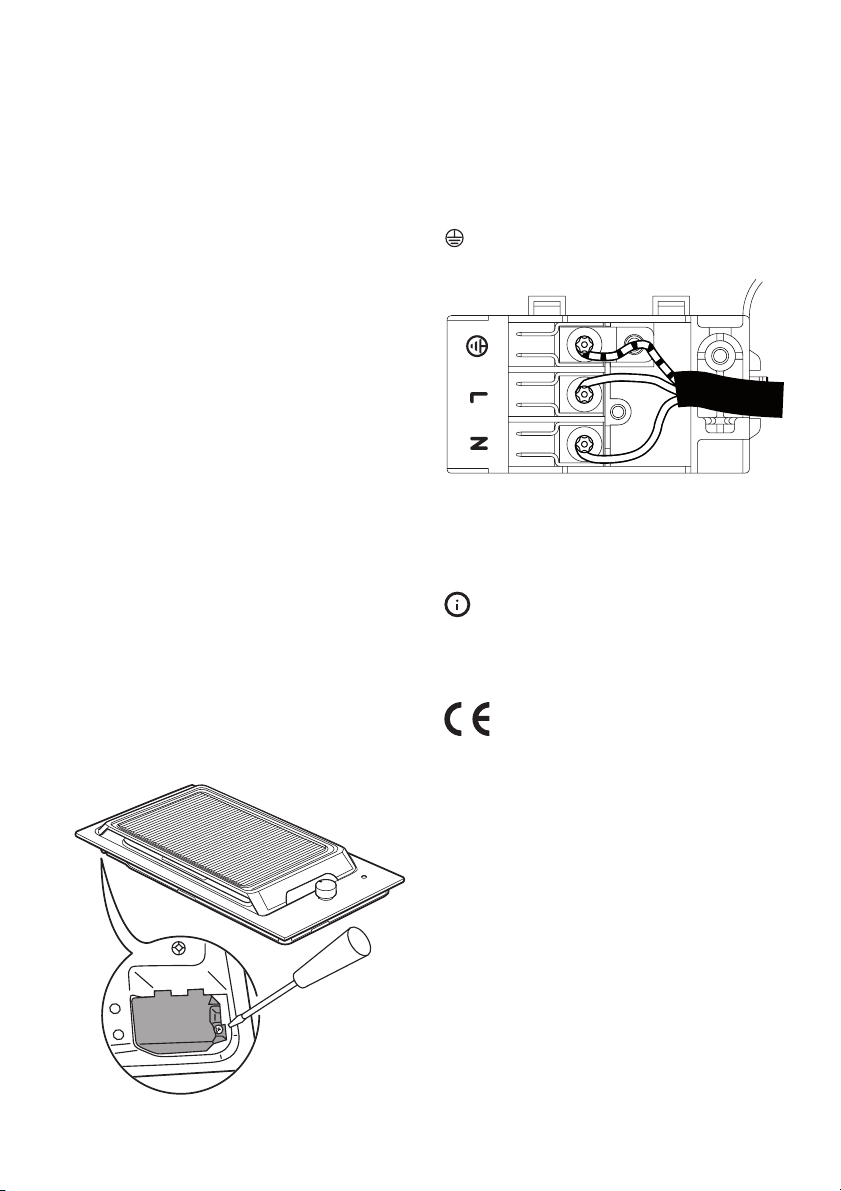
Installation instructions 9
Environment concerns 11
IKEA GUARANTEE 11
Subject to change without notice
Safety information
For your safety and correct operation of
the appliance, read this manual carefully
before installation and use. Always keep these
instructions with the appliance even if you
move or sell it. Users must fully know the oper-
ation and safety features of the appliance.
Correct use
• Do not leave the appliance unattended dur-
ing operation.
• The appliance is designed exclusively for
domestic use.
• The appliance must not be used as a work
surface or as a storage surface.
• Do not place or store flammable liquids,
highly inflammable materials or fusible ob-
jects (e.g. plastic film, plastic, aluminium) in
or near the appliance.
• Watch out when connecting electric appli-
ances to sockets nearby. Do not allow con-
necting leads to come into contact with or to
catch underneath the appliance or hot cook-
ware.
• Do not do repairs yourself to prevent injury
and damage to the appliance. Always con-
tact your local After Sales Service (refer to
the Service chapter).
Child safety
• Only adults can use this appliance. Children
must get supervision to make sure that they
do not play with the appliance.
• Keep all packaging away from children.
There is a risk of suffocation.
• Keep children away from the appliance
when it is on.
General safety
• This appliance is not intended for use by
persons (including children) with reduced
physical, sensory or mental capabilities, or
lack of experience and knowledge, unless
they have been given supervision or instruc-
tion concerning use of the appliance by a
person responsible for their safety.
Installation
• Make sure that the appliance is not dam-
aged because of transport. Do not connect
a damaged appliance. If necessary, contact
the After Sales Service (refer to the Service
chapter).
• Only an authorized service engineer can in-
stall, connect or repair this appliance. Use
only original spare parts.
• Built-in appliances can only be used after
they are built into suitable built-in units and
work surfaces that meet standards.
• Do not change the specifications or modify
this product. Risk of injury and damage to
the appliance.
Warning! Carefully obey the instructions
for electrical connections.
Safety during use
• Remove all packaging, stickers and film from
the appliance before the first use.
Warning! Fire hazard! Overheated fats
and oils can ignite very quickly.
• Switch the cooking zone off after each use.
• Risk of burns! Cast iron broiler and accessi-
ble parts become hot during use.
ENGLISH 4

Product description
Cooking surface layout
1
1
2
3
2
5
4
1Cast iron broiler
2Pilot lamp
3Control knob
4Heating element
5Steel protection pan
Before first use
Warning! Before using the appliance
remove all packaging, including the
advertising labels and any protective film.
ENGLISH 5

1
123
4
1. Remove all parts under the cast iron broiler
1
: the plastic bag with the instruction booklet
2
, the sealing gasket for the installation procedure, the polyphrene sheet
3
and the
protective film which cover the steel protection pan
4
.
2. Re-fit the steel protection pan and the cast iron broiler into their original position.
3. Switch the empty broiler on for about 10 minutes at the maximum setting.
It is important to note that the cast iron
broiler may smoke a little and produce a
slightly unpleasant odour when used for the
first time. This is quite normal and will disap-
pear after a few minutes.
Daily use
Preheat the broiler on the maximum heat set-
ting for 15 minutes, than turn the control knob
to the required heat setting.
Symbol Description
0 The appliance is switched off
1 Minimum heat setting
max Maximum heat setting
ENGLISH 6

Helpful hints and tips
Suggestions for correct settings cooking times,
given in a table below, are intended as a guide
only. It maybe necessary to adjust tempera-
ture, to suit individual preferences.
It is recommended to use intermediate settings
to avoid a smoke, while cooking fat foods (ba-
con, sausages, etc.)
After long cooking sessions, front part of the
broiler will remain hot for at least 45 minutes.
Always use oven gloves to remove or replace
food on the broiler.
Warning! Take care when cooking food
using hot oil or fat, as the overheated
splashes could easily ignite.
Warning! Never leave the broiler on
without food or a pan on it or with an
empty pan on it.
Type of
food
Quantity
(g)
Pieces of
food
Heat set-
ting
Pre-heat
minutes
Cooking time (in mi-
nutes)
Upper side Lower side
Sausages about 500 6 4 15 8-10 6-8
Pork chops about 400 4 max 10 5-6 5-6
Steak about 600 1 max 10 5-6 5-6
Bacon about 400 4
1)
5154-54-5
Aubergine - - max 10 6-7 5-6
Chicory - - 4 10 4-5 3-4
Stale bread - 6 slices max 10 6-7 5-6
Dry bread - 6 slices max 10 5-6 3-4
Tomatoes - 4 max 10 6-7 6-7
1) slices
Care and cleaning
Warning! Switch the appliance off and
let it cool down before you clean it.
Warning! For safety reasons, do not
clean the appliance with steam blasters
or high-pressure cleaners.
The hob is best cleaned whilst it is still
warm, as spillage can be removed more
easily than if it is left to cool.
The Hob Top
Regularly wipe over the hob top using a soft
cloth well wrung out in warm water to which a
little washing up liquid has been added.
Avoid the use of the following:
• household detergent and bleaches;
• impregnated pads unsuitable for non-stick
saucepans;
• steel wool pads;
• bath/sink stain removers.
If the hob top become heavily soiled, the
following products are recommended:
• For stainless steel hobs use a proprietary
stainless steel cleaner.
• For other hobs use warm water and soft de-
tergent.
The control knobs may be removed by care-
fully pulling them upward for easier cleaning.
ENGLISH 7

The Cast Iron Broiler
Always clean the cast iron broiler after it has
cooled down. Wash it in the sink with warm
water and soft detergent, or using a soft cloth
well wrung out in warm water. Carefully dry
the cast iron broiler before placing it back in
its position on the hob.
Caution! If you remove the steel
protection pan under the heating element
for a more thorough cleaning , ensure the
protection pan is placed back in its correct
position. This is utmost important for the proper
functioning of the hob.
What to do if…
Problem Possible cause and Remedy
The cooking zones are not
functioning. The desired heat setting is not
set. Set the heat setting.
The fuse in the house’s electri-
cal installation (fuse box) has
been tripped.
Check the house electric in-
stallation fuse. If the fuses trip
a number of times, please call
an authorised electrician.
If there is a fault, first try to find a solution to
the problem yourself. If you cannot find a sol-
ution to the problem yourself, contact your
dealer or the After Sales Service.
If you operated the appliance wrongly, or
the installation was not carried out by a
registered engineer, the visit from the customer
service technician or dealer may not take
place free of charge, even during the warranty
period.
Technical data
Rating Plate
201-541-62
Made In Italy
© Inter IKEA Systems B.V. 1999
21552
PQM
EU
PNC. 949738660
TYPE H3MF0B-0/**
kW max = 1
230 V ~50 Hz
ZO
The graphic above represents rating plate of
the appliance (without serial number which is
generated dynamically during the production
process), which is located at its underneath
surface of the casing.
Dear Customer, please apply here aside the
sticker you can find in the dedicate plastic bag
inserted inside the hob packaging. This will al-
low us to assist you better, by identifying pre-
ENGLISH 8

cisely your hob, in case you will need in future
our assistance. Thank you for your help!
Installation instructions
Manufacturer is not responsible for any injury
to persons and pets or damage to property
caused by failure to comply following require-
ments.
Caution! To proceed with the installation
refer to the assembly instructions.
Warning! Installation process must follow
the laws, ordinances, directives and
standards (electrical safety rules and
regulations, proper recycling in accordance
with the regulations, etc.) in force in the country
of use!
Warning! The appliance must be
earthed!
Warning! Risk of injury from electrical
current.
• The electrical mains terminal is live.
• Make electrical mains terminal free of volt-
age.
• Loose and inappropriate plug and socket
connections can make the terminal over-
heat.
• Have the clamping connections correctly in-
stalled.
• Use strain relief clamp on cable.
• Follow the connection diagram.
Important! You must observe the minimum
distances to other appliances and furniture
cabinets or other units according to Assembly
Instruction.
If there is no oven beneath the hob insert a di-
viding panel at a minimum distance of 20 mm
from the bottom of the hob.
Protect the cut surfaces of the worktop against
moisture using a suitable sealant included in
the product in fitting bag. The sealant seals the
appliance to the work top with no gap. Do not
use silicon sealant between the appliance and
the worktop. Avoid installing the appliance
next to doors and under windows as hot cook-
ware may be knocked off the rings when doors
and windows are opened.
Only an authorized service engineer can in-
stall, connect or repair this appliance. Use only
original spare parts.
Only an authorized service engineer can in-
stall, connect or repair this appliance. Use only
original spare parts.
Electrical connection
Before connecting, check that the nominal volt-
age of the appliance stated on the rating
plate, corresponds to the available supply
voltage. Also, check the power rating of the
appliance and ensure that the wire is suitably
sized to suit the appliance power rating (refer
to the Technical data chapter).
The rating plate is located on the lower casing
of the hob.
The appliance is supplied with a connection
cable. This has to be provided with a proper
plug, able to support the load marked on the
identification plate (refer to the Technical data
chapter).
ENGLISH 9

The plug has to be fitted in a proper socket. If
connecting the appliance directly to the elec-
tric system, it is necessary that you install a
double pole switch between the appliance
and the electricity supply, with a minimum gap
of 3 mm between the switch contacts. The dou-
ble pole has to be of a type suitable for the
required load in compliance with the current
rules.
The connection cable has to be placed in order
that, in each part, it cannot reach a 90 °C tem-
perature. The blue neutral cable must be con-
nected to the terminal block marked with "N".
The brown (or black) phase cable (fitted in the
terminal block contact marked with "L") must
always be connected to the live phase.
Replacement of the connection cable.
If the connection cable must be replaced, only
a type H05V2V2-F T90 cable must be used.
The cable section must be suitable to the volt-
age and the working temperature. The yel-
low/green earth wire must be approximately
2 cm. longer than the brown (or black) phase
wire.
To open the terminal block and reach
the terminals, proceed as follows:
1. insert the point of a screwdriver into one of
the two visible protruding part of the ter-
minal block
2. exert a light pressure and lift
The hob is supplied with a three pole terminal
block designed for a 230 V connection. The
yellow/green earth wire must always be con-
nected to the terminal marked with the symbol
.
Upon completion, secure the connection cable
with the cable clamp and close the terminal
block.
A duplicate rating plate is supplied with
this appliance. For a fast identification af-
ter installation, please stick it directly on the
user manual booklet after Technical data
chapter close to the rating plate drawing.
ENGLISH 10

Environment concerns
The symbol on the product or on its
packaging indicates that this product may not
be treated as household waste. Instead it
should be taken to the appropriate collection
point for the recycling of electrical and
electronic equipment. By ensuring this product
is disposed of correctly, you will help prevent
potential negative consequences for the
environment and human health, which could
otherwise be caused by inappropriate waste
handling of this product. For more detailed
information about recycling of this product,
please contact your local council, your
household waste disposal service or the shop
where you purchased the product.
Packaging materials
The materials with the symbol are recycla-
ble. Dispose the packaging in a suitable col-
lection containers to recycle it.
Before disposal of appliance
Warning! Do these steps to dispose the
appliance:
• Pull the mains plug out of the mains socket.
• Cut off the mains cable and discard it.
IKEA GUARANTEE
How long is the IKEA guarantee valid?
This guarantee is valid for five (5) years from
the original date of purchase of Your appli-
ance at IKEA, unless the appliance is named
LAGAN in which case two (2) years of guar-
antee apply. The original sales receipt is re-
quired as proof of purchase. If service work is
carried out under guarantee, this will not ex-
tend the guarantee period for the appliance,
Which appliances are not covered by the
IKEA five (5) years guarantee?
The range of appliances named LAGAN and
all appliances purchased in IKEA before 1st of
August 2007
Who will execute the service?
IKEA service provider will provide the service
through its own service operations or author-
ized service partner network.
What does this guarantee cover?
The guarantee covers faults of the appliance,
which have been caused by faulty construction
or material faults from the date of purchase
from IKEA. This guarantee applies to domestic
use only. The exceptions are specified under
the headline “What is not covered under this
guarantee?” Within the guarantee period, the
costs to remedy the fault e.g. repairs, parts, la-
bour and travel will be covered, provided that
the appliance is accessible for repair without
special expenditure. On these conditions the
EU guidelines (Nr. 99/44/EG) and the respec-
tive local regulations are applicable. Replaced
parts become the property of IKEA.
What will IKEA do to correct the problem?
IKEA appointed service provider will examine
the product and decide, at its sole discretion,
if it is covered under this guarantee. If consid-
ered covered, IKEA service provider or its au-
thorized service partner through its own serv-
ice operations, will then, at its sole discretion,
either repair the defective product or replace
it with the same or a comparable product.
What is not covered under this guarantee?
• Normal wear and tear.
ENGLISH 11

• Deliberate or negligent damage, damage
caused by failure to observe operating in-
structions, incorrect installation or by con-
nection to the wrong voltage, damage
caused by chemical or electro-chemical re-
action, rust, corrosion or water damage in-
cluding but not limited to damage caused by
excessive lime in the water supply, damage
caused by abnormal environmental condi-
tions.
• Consumable parts including batteries and
lamps.
• Non-functional and decorative parts which
do not affect normal use of the appliance,
including any scratches and possible color
differences.
• Accidental damage caused by foreign ob-
jects or substances and cleaning or unblock-
ing of filters, drainage systems or soap
drawers.
• Damage to the following parts: ceramic
glass, accessories, crockery and cutlery bas-
kets, feed and drainage pipes, seals, lamps
and lamp covers, screens, knobs, casings
and parts of casings. Unless such damages
can be proved to have been caused by pro-
duction faults.
• Cases where no fault could be found during
a technician’s visit.
• Repairs not carried out by our appointed
service providers and/or an authorized
service contractual partner or where non-
original parts have been used.
• Repairs caused by installation which is faulty
or not according to specification.
• The use of the appliance in a non-domestic
environment i.e. professional use.
• Transportation damages. If a customer
transports the product to their home or other
address, IKEA is not liable for any damage
that may occur during transport. However,
if IKEA delivers the product to the customer's
delivery address, then damage to the prod-
uct that occurs during this delivery will be
covered by this guarantee.
• Cost for carrying out the initial installation of
the IKEA appliance. However, if an IKEA
service provider or its authorized service
partner repairs or replaces the appliance
under the terms of this guarantee, the serv-
ice provider or its authorized service partner
will re-install the repaired appliance or in-
stall the replacement, if necessary.
This restriction do not apply to fault-free work
carried out by a qualified specialist using our
original parts in order to adapt the appliance
to the technical safety specifications of another
EU country.
How country law applies
The IKEA guarantee gives You specific legal
rights, which covers or exceed local demands.
However these conditions do not limit in any
way consumer rights described in the local
legislation
Area of validity
For appliances which are purchased in one EU
country and taken to another EU country, the
services will be provided in the framework of
the guarantee conditions normal in the new
country. An obligation to carry out services in
the framework of the guarantee exists only if
the appliance complies and is installed in ac-
cordance with:
• the technical specifications of the country in
which the guarantee claim is made;
• the Assembly Instructions and User Manual
Safety Information;
The dedicated After Sales Service for IKEA
appliances:
Please do not hesitate to contact IKEA After
Sales Service to:
1. make a service request under this guaran-
tee;
2. ask for clarification on installation of the
IKEA appliance in the dedicated IKEA
kitchen furniture. The service won’t provide
clarifications related to:
– the overall IKEA kitchen installation;
– connections to electricity (if machine
comes without plug and cable), to water
and to gas since they have to be execu-
ted by an authorized service engineer.
ENGLISH 12

3. ask for clarification on user manual con-
tents and specifications of the IKEA appli-
ance.
To ensure that we provide you with the best
assistance, please read carefully the Assembly
Instructions and/or the User Manual section of
this booklet before contacting us.
How to reach us if You need our service
Please refer to the last page of this manual for
the full list of IKEA appointed contacts and rel-
ative national phone numbers.
Important! In order to provide You with a
quicker service, we recommend that You use
the specific phone numbers listed at the end of
this manual. Always refer to the numbers listed
in the booklet of the specific appliance You
need an assistance for. Before calling us,
assure that You have to hand the IKEA article
number (8 digit code) for the appliance of
which you need our assistance.
Important! SAVE THE SALES RECEIPT! It is
Your proof of purchase and required for the
guarantee to apply. Note that the receipt
reports also the IKEA article name and number
(8 digit code) for each of the appliances you
have purchased.
Do You need extra help?
For any additional questions not related to Af-
ter Sales of your appliances, please contact
our nearest IKEA store call centre. We recom-
mend you read the appliance documentation
carefully before contacting us.
ENGLISH 13

Inhalt
Sicherheitshinweise 14
Gerätebeschreibung 15
Vor der ersten Inbetriebnahme 15
Täglicher Gebrauch 16
Praktische Tipps und Hinweise 17
Reinigung und Pflege 17
Was tun, wenn … 18
Technische Daten 19
Aufstellanweisung 19
Umwelttipps 21
IKEA GARANTIE 22
Änderungen vorbehalten
Sicherheitshinweise
Lesen Sie diese Bedienungsanleitung bit-
te sorgfältig durch, bevor Sie das Gerät
anschließen und benutzen, um Gefahren zu
vermeiden und einen korrekten Betrieb des
Geräts zu gewährleisten. Bewahren Sie diese
Bedienungsanleitung in der Nähe des Geräts
auf, auch wenn Sie dieses anderswo aufstellen.
Wenn Sie das Gerät verkaufen, geben Siedem
Käufer die Bedienungsanleitung mit. Jeder,
der dieses Gerät benutzt, sollte mit der Bedie-
nung und den Sicherheitsmerkmalen vertraut
sein.
Bestimmungsgemäße Verwendung
•LassenSiedasGerätbei Betrieb nicht un-
beaufsichtigt.
• Das Gerät ist ausschließlich zur Verwen-
dung im Haushalt bestimmt.
• Das Gerät darf nicht als Arbeits- oder Ab-
stellfläche verwendet werden.
• Brennbare Flüssigkeiten, leicht entzündliche
Materialien oder schmelzbare Materialien
(z.B. Folien, Kunststoff, Aluminium) dürfen
nicht auf dem Gerät oder in dessen Nähe
abgestellt oder gelagert werden.
• Vorsicht bei Anschluss von Elektrogeräten
an Steckdosen in Gerätenähe. Die An-
schlussleitungen dürfen nicht unter dem Ge-
rät oder heißem Kochgeschirr eingeklemmt
werden oder damit in Berührung kommen.
• Versuchen Sie nicht, selbst Reparaturen aus-
zuführen. Andernfalls besteht Unfallgefahr
und das Gerät könnte beschädigt werden.
Wenden Sie sich stets an Ihren lokalen Kun-
dendienst (siehe hierzu den Abschnitt "War-
tung").
Sicherheit von Kindern
• Nur Erwachsene dürfen dieses Gerät bedie-
nen. Kinder müssen beaufsichtigt werden, so
dass sie nicht mit dem Gerät spielen können.
• Halten Sie das Verpackungsmaterial von
Kindern fern. Andernfalls besteht Ersti-
ckungsgefahr.
• Halten Sie Kinder von dem Gerät fern, wenn
es in Betrieb ist.
Allgemeine Sicherheit
• Personen (einschließlich Kinder), die auf-
grund ihrer physischen, sensorischen oder
geistigen Fähigkeiten oder ihrer Unerfah-
renheit oder Unkenntnis nicht in der Lage
sind, das Gerät sicher zu bedienen, sollten
dieses Gerät nicht ohne Aufsicht oder An-
weisung durch eine verantwortliche Person
benutzen.
Installation
• Vergewissern Sie sich, dass das Gerät beim
Transport nicht beschädigt wurde. Schließen
Sie ein beschädigtes Gerät nicht an. Wen-
den Sie sich bei Bedarf an den Kundendienst
(siehe hierzu den Abschnitt "Wartung").
• Das Gerät darf nur von einem Servicetech-
niker einer autorisierten Kundendienststelle
aufgestellt, angeschlossen oder repariert
werden. Dabei dürfen ausschließlich Origi-
nalersatzteile verwendet werden.
• Einbaugeräte dürfen nur nach dem Einbau
in normgerechte, passende Einbauschränke
und Arbeitsplatten betrieben werden.
• Nehmen Sie weder technische noch ander-
weitige Modifikationen am Gerät vor. An-
dernfalls besteht Unfallgefahr und das Ge-
rät könnte beschädigt werden.
DEUTSCH 14

Warnung! Beachten Sie genau sämtliche
Anweisungen zu den elektrischen
Anschlüssen.
Sicherheit während der Benutzung
• Entfernen Sie vor der ersten Benutzung des
Geräts sämtliches Verpackungsmaterial so-
wie alle Aufkleber und Folien.
Warnung! Brandgefahr! Überhitzte Fette
und Öle entzünden sich sehr schnell.
• Schalten Sie das Gerät nach jedem Ge-
brauch aus.
• Verbrennungsgefahr! Der Grillrost und zu-
gängliche Geräteteile werden beim Betrieb
sehr heiß.
Gerätebeschreibung
Ausstattung Kochfeld
1
1
2
3
2
5
4
1Grillrost aus Gusseisen
2Kontrolllampe
3Einstellknopf
4Heizelement
5Stahlschutzplatte
Vor der ersten Inbetriebnahme
Warnung! Entfernen Sie vor der ersten
Benutzung das gesamte Verpackungsmaterial, die Werbebroschüren
und den Schutzfilm.
DEUTSCH 15

1
123
4
1. Entfernen Sie alle Teile unter dem Grillrost
1
: Plastiktüte mit Bedienungsanleitung
2
,
Dichtung für die Installation, die Polyäthylenfolie
3
sowie die Schutzfolie der Stahlschutz-
platte
4
.
2. Setzen Sie die Stahlschutzplatte und den Grillrost in ihre ursprüngliche Position ein.
3. Lassen Sie den leeren Grill ca. 10 Minuten lang bei Maximaltemperatur laufen.
Bitte beachten Sie, dass der Grillrost beim
ersten Einschalten des Geräts rauchen
und einen unangenehmen Geruch von sich ge-
ben kann. Dies ist normal, und der Rauch sowie
der Geruch verschwinden nach einigen Minu-
ten.
Täglicher Gebrauch
Heizen Sie den Grillrost bei Maximaltempera-
tur ca. 15 Minuten lang vor und stellen Sie
dann den Einstellknopf auf die gewünschte
Grillstufe.
Symbol Beschreibung
0 Das Gerät ist abgeschaltet
1 Niedrigste Grillstufe
max Höchste Grillstufe
DEUTSCH 16

Praktische Tipps und Hinweise
Die empfohlenen Werte in der nachfolgenden
Tabelle sind lediglich als Richtwerte gedacht.
Die Temperaturen sind gegebenfalls je nach
persönlichen Vorlieben und Geschmack zu er-
höhen oder zu verringern.
Zum Vermeiden von Rauchbildung wird emp-
fohlen, fetthaltige Lebensmittel wie Schinken-
speck, Würstchen usw. bei mittlerer Hitze zu
garen.
Nach längerem Betrieb ist der vordere Bereich
des Grillrostes noch mindestens 45 Minuten
lang heiß. Verwenden Sie immer Topfhand-
schuhe, um das Gargut vom Grillrost zu neh-
men bzw. auf diesen aufzulegen.
Warnung! Seien Sie beim Braten mit
heißem Öl oder Fett vorsichtig, da sich
überhitzte Öl- oder Fettspritzer leicht
entzünden.
Warnung! Lassen Sie den Grill niemals
eingeschaltet, wenn sich kein Gargut
bzw. leeres Kochgeschirr darauf befindet.
Art der
Speise
Menge (g) Stückzahl Kochstufe Vorheiz-
zeit in Mi-
nuten
Garzeit in Minuten
Obers Unters
Grillwürste ca. 500 6 4 15 8-10 6-8
Schweins-
kotelett ca. 400 4 max 10 5-6 5-6
Steaks ca. 600 1 max 10 5-6 5-6
Schinken-
speck ca. 400 4
1)
5154-54-5
Aubergine - - max 10 6-7 5-6
Chicorée - - 4 10 4-5 3-4
Altbacke-
nes Brot -6Scheibenmax 10 6-7 5-6
Trockenes
Brot -6Scheibenmax 10 5-6 3-4
Tomaten - 4 max 10 6-7 6-7
1) Streifen
Reinigung und Pflege
Warnung! Schalten Sie das Gerät vor
dem Reinigen aus und lassen Sie es
abkühlen.
Warnung! Aus Sicherheitsgründen darf
das Gerät nicht mit einem Dampfstrahl-
oder Hochdruckreiniger gereinigt werden.
Die Kochmulde lässt sich am einfachsten
reinigen, solange sie noch warm ist; auf
diese Weise können Speisereste leichter ent-
fernt werden.
DEUTSCH 17

Kochmuldenplatte
Wischen Sie regelmäßig die Kochmuldenplat-
te mit einem weichen Lappen ab, den Sie in
warmem Wasser mit etwas flüssigem Reini-
gungsmittel angefeuchtet haben.
Benutzen Sie nie:
• Haushaltsreiniger und Bleichlauge;
• imprägnierte Reinigungschwämme, die für
Kochtöpfe mit Antihaftbeschichtung unge-
eignet sind;
• Metallschwämmchen;
• Waschbecken-/Spülen - Fleckentferner.
Bei starker Verschmutzung sollte die
Oberfläche des Gerätes mit einem der
folgenden Produkte gereinigt werden:
• Geräte aus Edelstahl: ein handelsübliches
Reinigungsmittel für Edelstahl
• Andere Geräte: warmes Wasser und ein
mildes Reinigungsmittel
Ziehen Sie den Einstellknopf zum Reinigen vor-
sichtig nach oben ab.
Grillrost aus Gusseisen
Reinigen Sie den Grillrost stets, nachdem er
sich abgekühlt hat. Waschen Sie ihn im Becken
mit warmem Wasser und einem milden Reini-
gungsmittel oder wischen Sie ihn mit einem
weichen, in warmem Wasser angefeuchteten
und gut ausgewrungenen Tuch ab. Trocknen
Sie den Grillrost sorgfältig, bevor Sie ihn auf
das Gerät aufsetzen.
Vorsicht! Wenn die Stahlschutzplatte
unter dem Heizelelement zur
gründlicheren Reinigung abgenommen
wurde, muss sie sich vor dem Aufsetzen des
Grillrosts in ihrer ordnungsgemäßen Position
befinden. Dies ist für den ordnungsgemäßen
Betrieb des Grillfeldes äußerst wichtig.
Was tun, wenn …
Störung Mögliche Ursachen und Abhilfe
Die Kochzonen funktionieren
nicht. Die gewünschte Kochstufe ist
nicht eingestellt. Die Kochstufe einstellen.
Die Sicherung in der Hausin-
stallation (Sicherungskasten)
hat ausgelöst.
Die Sicherung in der Hausin-
stallation prüfen. Sollten die
Sicherungen mehrfach auslö-
sen, rufen Sie bitte einen zu-
gelassenen Elektroinstalla-
teur.
Versuchen Sie, die Ursache des Problems he-
rauszufinden und das Problem selbst zu behe-
ben. Wenn Sie das Problem nicht selbst lösen
können, wenden Sie sich an den Händler oder
Kundendienst.
Wenn Sie das Gerät falsch bedient haben
oder es nicht von einer autorisierten
Fachkraft angeschlossen wurde, kann auch
während der Garantiezeit für den Besuch ei-
DEUTSCH 18

nes Kundendiensttechnikers oder Händlers ei-
ne Gebühr anfallen.
Technische Daten
Typenschild
201-541-62
Made In Italy
© Inter IKEA Systems B.V. 1999
21552
PQM
EU
PNC. 949738660
TYPE H3MF0B-0/**
kW max = 1
230 V ~50 Hz
ZO
Die Grafik oben stellt das Typenschild des Ge-
rätes dar (ohne die Seriennummer, da diese
dynamisch während des Produktionsvorgangs
erzeugt wird), das sich an der Gehäuseunter-
seite befindet.
Sehr geehrter Kunde: bitte kleben Sie hier an
dieser Stelle den Aufkleber auf, den Sie im
Kunststoffbeipack in der Verpackung des Her-
des finden. Anhand dieses Aufklebers lässt sich
Ihr Kochfeld genau identifizieren. So können
wir Ihnen besser helfen, wenn Sie sich in Zu-
kunft mit Fragen an uns wenden. Wir bedan-
ken uns für Ihre Unterstützung!
Aufstellanweisung
Der Hersteller übernimmt keinerlei Haftung für
Verletzungen von Personen oder Tieren oder
für Schäden an Eigentum, wenn dies auf die
Nichteinhaltung der folgenden Bedingungen
zurückzuführen ist.
Vorsicht! Beachten Sie bei der
Installation die Montageanleitung.
Warnung! Die Montage muss sich nach
den im Einsatzland geltenden Gesetze,
Verordnungen, Richtlinien und Normen
richten! (Sicherheitsbestimmungen und
Vorschriften für Elektrik/Elektronik, sach- und
ordnungsgemäßes Recycling etc.)!
Warnung! Das Gerät muss geerdet sein!
Warnung! Schäden durch elektrischen
Strom.
• Die Netzanschlussklemme liegt an Span-
nung.
• Netzanschlussklemme spannungsfrei ma-
chen.
• Lockere und unsachgemäße Steckverbin-
dungen können die Klemme überhitzen.
• Klemmverbindungen müssen fachgerecht
von einem Fachmann ausgeführt werden.
• Kabel zugentlasten.
• Anschlussschema beachten.
DEUTSCH 19

Wichtig! Die Mindestabstände zu anderen
Geräten und Küchenschränken oder anderen
Möbelstücken sind wie in der
Montageanleitung beschrieben einzuhalten.
Befindet sich unter dem Kochfeld kein Back-
ofen, setzen Sie eine Trennwand mit einem
Mindestabstand von 20 mm von der Untersei-
te des Kochfelds ein.
Schützen Sie die Schnittflächen der Arbeits-
platte mit einem geeigneten Dichtungsmateri-
al (ist im Beipack des Produktes enthalten) vor
Feuchtigkeit. Die Dichtung schließt das Gerät
spaltfrei mit der Arbeitsplatte ab. Tragen Sie
zwischen Gerät und Arbeitsplatte keine Sili-
kon-Dichtungsmasse auf. Installieren Sie das
Gerät nicht direkt neben Türen und unter Fen-
stern, da bei geöffneten Türen und Fenstern
heißes Kochgeschirr von den Kochfelder he-
runter gefegt werden kann.
Das Gerät darf nur von einem Servicetechniker
einer autorisierten Kundendienststelle aufge-
stellt, angeschlossen oder repariert werden.
Dabei dürfen ausschließlich Originalersatztei-
le verwendet werden.
Das Gerät darf nur von einem Servicetechniker
einer autorisierten Kundendienststelle aufge-
stellt, angeschlossen oder repariert werden.
Dabei dürfen ausschließlich Originalersatztei-
le verwendet werden.
Elektrischer Anschluss
Kontrollieren Sie vor dem ersten Einschalten,
dass die auf dem Typenschild des Gerätes an-
gegebene Nennspannung mit der aktuell ver-
fügbaren Spannung identisch ist. Prüfen Sie
auch die Leistungsaufnahme des Gerätes und
stellen Sie sicher, dass das Kabel für den An-
schluss des Gerätes korrekt ausgelegt ist (nä-
heres siehe den Abschnitt "Technische Da-
ten").
Das Typenschild ist unten am Kochfeldgehäu-
se angebracht.
Das Gerät wird mit einem Anschlusskabel ge-
liefert. An das Kabel ist ein geeigneter Stecker
anzuschließen, der für die auf dem Typenschild
vermerkte Leistung ausgelegt ist (siehe Kapitel
Technische Daten).
Der Stecker muss in eine passende Steckdose
gesteckt werden. Bei einem Direktanschluss
des Gerätes an das Netz muss zwischen dem
Gerät und dem Netz ein zweipoliger Trenn-
schalter mit einer Mindest-Kontaktöffnung von
3 mm eingebaut werden. Der zweipolige
Trennschalter muss für die erforderliche Last in
Übereinstimmung mit den geltenden Vor-
schriften ausgelegt sein.
Das Anschlusskabel ist so zu führen, dass es
nirgendwo eine Temperatur von 90 °C errei-
chen kann. Der blaue Neutralleiter ist an den
Anschluss "N" der Klemmleiste anzuschließen.
Der braune (oder schwarze) Phasenleiter
(Klemme "L" auf der Klemmleiste) muss immer
an die Strom führende Phase angeschlossen
werden.
Netzkabel ersetzen.
Für den Austausch des Anschlusskabels stets
nur Kabel vom Typ H05V2V2-F T90 verwen-
den. Der Kabelquerschnitt muss für die ange-
gebene Spannung und Betriebstemperatur
ausgelegt sein. Der gelb-grüne Erdleiter muss
ca. 2 cm länger als der braune (bzw. schwarze)
Phasenleiter sein.
Gehen Sie wie folgt vor, um die
Klemmleiste zu öffnen und Zugang zu
den Anschlussklemmen zu erhalten:
1. Die Spitze eines Schraubendrehers in eine
der beiden vorstehenden Nasen der
Klemmleiste stecken
2. Leichten Druck ausüben und anheben
DEUTSCH 20
Table of contents
Languages:
Other IKEA Grill manuals
Popular Grill manuals by other brands

Power Smokeless Grill
Power Smokeless Grill GR-200 owner's manual

Zanussi
Zanussi Zanussi Professional 178090 Technical data

King Kooker
King Kooker CS2016 Assembly instructions and use and care manual

Lynx
Lynx L42 Series User's manual & installation instructions

Unold
Unold 48735 Instructions for use

Star
Star GRILL-MAX 30SCE Specification sheet