manuals.online logo
Brands
  1. Home
  2. •
  3. Brands
  4. •
  5. InFocus
  6. •
  7. Projector Accessories
  8. •
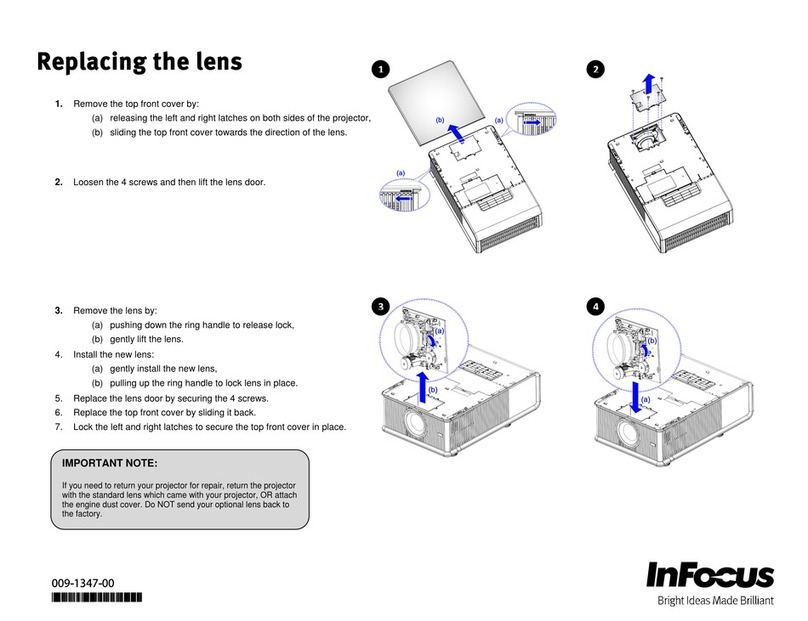
  9. InFocus LNS-W01 Guide

InFocus LNS-W01 Guide

- 1 -
LCD PROJECTOR
LENS REPLACEMENT AND INSTALLATION PROCEDURES
CAUTION
When installing or replacing the Projection Lens, refer to this manual. For
installation of the lens, use the parts designated in the manual. Do not use the
installation manual and Light-Block Sheets in the lens package.
Check the following parts supplied to this projector.
NOTES ON LENS INSTALLATION
●Lens installation and replacement should be made by the qualified service
personnel.
●Be sure to install the lens following this procedure precisely.
●Do not touch or remove any parts except the lens and related parts. It may
result in malfunctions, electrical shock, fire hazard or other accidents.
●Before installing or replacing the lens, check that the Model No. of the
Projection Lens matches to the projector.
●When moving or setting up the projector, be sure to replace the Lens Cover
to protect the surface. And be careful not to hold or subject the lens to
strong forces. It may damage the lens, cabinet, or mechanical parts.
●For details of the lens and installation, contact the sales dealer where you
purchased the projector.
● LIGHT-BLOCK SHEETS 3 pcs.
● LENS MOUNTING ADAPTERS 2 pcs.
● ADAPTER SCREWS 8 pcs.
1AA6P1P2922-- (MV6A) a
This projector applies the Projection Lenses listed below. Use the suitable lens for
where the projector is used.
✳ For installing those lenses, attaching Lens Mounting Adapters or removing Guide Pins is
required. Make sure the Model No. of the lens and the installation procedure on next pages
and be sure to install the lens precisely.
Model NO.
LNS-W01✳
LNS-W01Z
LNS-T01✳
LNS-T01Z
LNS-T02
LNS-W02✳
LNS-W02Z
LNS-M01✳
LNS-M01Z
LNS-S01✳
LNS-S02✳
LNS-S02Z
Type
Fixed Short Throw Lens
Fixed Long Throw Lens
Long Throw Zoom Lens
Short Throw Zoom Lens I
Semi-Long Throw
Zoom Lens
Standard Zoom Lens II
Standard Zoom Lens I
Zoom
Motor Driven
Fixed Manual
Focus
Fixed
Motor Driven
Motor Driven
Motor Driven
Motor Driven
Manual
Motor Driven
Motor Driven
Motor Driven
Motor Driven
Motor Driven
AVAILABLE LENS
LNS-W03
LNS-S03
Short Throw Zoom Lens II
Standard Zoom Lens III
Fixed Manual
Motor Driven Motor Driven
- 2 -
NOTE : The installation procedure and needed parts
for lens installation depend on the type of the
Projection Lens. Check the Model No. of the
Projection Lens and be sure to install or replace the
lens following procedure below.
1 Remove Lower Lens Cover. Remove 2 Screws A.
Push part B and pull Lower Lens Cover down.
(See Fig. 1.)
2 Remove 4 Screws C. Pull Upper Lens Cover
toward front and remove. (See Fig. 2.)
3 Remove 2 Screws D and Cover Plate on the back
of Upper Lens Cover. (See Fig. 3.)
LENS REPLACEMENT AND INSTALLATION PROCEDURE
A
C
C
B
Fig-3
Fig-1
Fig-2
UPPER LENS
COVER
COVER PLATE
UPPER LENS
COVER
LOWER LENS
COVER
D
5 Connect Lens Motor Lead to the connector
"K96T" on the circuit board under the lens. (The
model with Lens Motor only.) Fix Lens Motor
Lead with the wire holder on the circuit board.
For installing the lenses listed below, attaching Lens Mounting Adapters is required. Before
mounting the lens, attach Lens Mounting Adapters. Refer to "LENS MOUNTING ADAPTER
INSTALLATION."
Model No.: LNS-W02, LNS-S01, LNS-M01
For installing the lenses listed below, removing Guide Pins is required. Before mounting the lens,
remove 2 Guide Pins from Lens Mounting Bracket. (See Fig. 4.)
Model No.: LNS-W01, LNS-S02, LNS-T01
4 Replace Lens Cap on the rear (mounting side) of Projection Lens and mount the lens on Lens
Mounting Bracket with 4 Screws. When installing the model with Lens Motor, be sure to mount the
lens with Lens Motor on the right. (See Fig. 4.)
GUIDE PIN
LENS LOCK
SCREW
Fig-4
DRIVER
IN THE LENS
LOCATE MOTOR
ON RIGHT SIDE
LENS MOUNTING
BRACKET
- 3 -
Fig-5
K96T
CONNECTOR LENS MOTOR LEAD
Part No. (610 275 6029)
- 4 -
6 This projector has 3 Light-Block Sheets. Use Light-Block Sheet corresponding with lens. (Refer to the list
below.)
Set Light-Block Sheet through the lens.
Make sure the shape of the Light-Block Sheets are correct and be sure to set them as shown in the Fig. 6.
NOTE:
●Be sure to set each Light-Block Sheet as shown in Fig-6.
● Make sure the mark (TOP and BACK) on Light-Block Sheets are correct and set them properly.
Light-Block Sheets For each lens.
Lens Model No.
LNS-S02, LNS-S02Z, LNS-S03
LNS-M01, LNS-T02, LNS-W02
LNS-M01Z, LNS-W02Z, LNS-S01
LNS-W03
LNS-W01, LNS-T01, LNS-W01Z
LNS-T01Z
Type No. (Part No.)
TYPE FD1 (610 290 9258)
TYPE FE1 (610 293 8937)
TYPE FF1 (610 293 8944)
Fig-6
LIGHT BLOCK SHEET
Make sure the sheet figure is
correct and put in proper position.
- 5 -
7 Adjust focus of the Projection Lens. (LNS-W01, LNS-W01Z, LNS-T01, LNS-T01Z and LNS-W03
only.) Set up the projector and project image on the screen. Loosen Focus Lens Lock Screw and
rotate Projection Lens to obtain proper focus. After adjusting focus, be sure to lock Projection Lens
with Focus Lens Lock Screw securely. (See Fig. 4.) Adjust focus of Projection Lens MODEL LNS-
W03, following Focus Adjustment on page 6.
8 Replace Upper Lens Cover. Slide Light-Block Sheets into the guide of Upper Lens Cover and set
them in front of the flap. (See Fig. 7.) Fix Upper Lens Cover with 4 Screws C. (See Fig. 2.)
9 Replace Lower Lens Cover. Slide Light-Block Sheets into the guide of Lower Lens Cover and set
them in front of the flap. (See Fig. 7.) Fix Lower Lens Cover with 2 Screws A. (See Fig. 1.)
10 Turn the projector on and operate Lens shift, Zoom and Focus fully to check Light-Block Sheets.
If Light-Block Sheets interfere with those operations, check Light-Block Sheets are set properly.
Fig-7
LOWER LENS
COVER
LIGHT-BLOCK
SHEETS
Slide into front
of the flap.
FLAP
Slide both upper sides of LIGHT BLOCK
Sheets in between and .
2
1
GUIDE
1
2
UPPER LENS
COVER
FLAP
- 6 -
FOCUS ADJUSTMENT (For Model LNS-W03)
Set up the projector and project image on the screen.
1. Loosen the Focus Lock Screw on the projection
lens.
2. Rotate the projection lens to obtain proper focus
on center area of the screen.
When the distance of the screen and lens is 1 meter,
set ●mark (yellow) of the lens on Focus Lock Screw
position.
3. Lock the Focus Lock Screw securely.
When proper focus is not observed at outer area of
the screen, proceed following adjustments.
4. Loosen the Focus Lock Ring on the projection
lens. (Turn the Lock Ring counter-clockwise.)
5. Rotate the lens to obtain proper focus on outer
area of the screen.
6. Lock the Focus Lock Ring securely. (Turn the Lock
Ring to clockwise.)
If proper focus is not observed over the entire screen,
repeat above adjustments 1~ 6.
Focus Lock Screw
Focus Lock Ring
●mark (yellow)
- 7 -
For installing the lenses listed below, attaching Lens Mounting Adapters is required.
Model No.: LNS-W02, LNS-S01, LNS-M01
1 Set Lens Mounting Adapters on the lens with 4
Screws. Use the round head screws.
(See Fig. 8.)
LENS MOUNTING ADAPTER INSTALLATION
Check the following parts supplied with the adapters.
ADAPTER SCREWS 8 pcs.
(4 pcs. for mounting Adapters on the lens and 4 pcs. for mounting Lens on the projector.)
NOTE: Do not use the screws in the lens package.
2 Mount Projection Lens on the projector with 4
Screws supplied to the adapters. (See Fig. 9.)
BE SURE TO CHECK FOR SAFETY
After installing or replacing the lens, be sure to check the following for safety.
1. Check the lens is securely fixed with the screws.
2. Check no wiring is damaged or tangled on the gear of the lens motor or
the other mechanical parts.
3. Check no part is missing, and no mounting part is loose.
Fig-8
Fig-9
DRIVER IN THE LENS
C
A ADAPTER PART NO. 610 289 1676
B SCREW PART NO. 411 001 9303
C SCREW PART NO. 412 062 4009
✳1 PC NO.
ROUND HEAD SCREWS
ADAPTER
A
B
For installing the lens, “refer to LENS REPLACEMENT
AND INSTALLATION PROCEDURE.”
A
Some parts are not used for installation or replacement. Keep these parts for later use.
NOTE: Figures in this manual may differ from the actual product.
- 8 -
NOTE: Following table shows approximate measurement. Actual measurement depends on lens and projectors.
SPECIFICATIONS (Throw distance and screen size, screen of lens shift. )
Model No.
LNS-S02
LNS-S02Z
Zoom 40 60 80 100 120 150 180 200 250 300 350 400 500 600
LNS-W02
LNS-W02Z
LNS-T02
LNS-M01
LNS-M01Z
LNS-S01
LNS-W01
LNS-W01Z
LNS-T01
LNS-T01Z
MIN
MAX
MIN
MAX
MIN
MAX
MIN
MAX
MIN
MAX
NONE
NONE
1.9
1.5
1.4
1.1
5.1
3.8
3.6
2.9
2.3
1.5
3.0
2.4
2.1
1.7
7.5
5.5
5.4
4.3
3.5
2.2
4.1
3.2
2.9
2.3
10.0
7.3
7.2
5.7
4.6
2.9
5.2
4.0
3.6
2.9
12.5
9.1
9.0
7.1
5.8
3.7
6.3
4.9
4.4
3.4
14.9
10.8
10.8
8.5
7
4.4
7.9
6.1
5.5
4.3
18.6
13.5
13.5
10.5
8.8
5.6
9.6
7.4
6.7
5.2
22.3
16.1
16.2
12.6
10.6
6.7
10.7
8.3
7.4
5.8
24.8
17.9
18.0
14.0
11.8
7.4
13.4
10.4
9.3
7.2
31.0
22.3
22.5
17.5
14.8
9.3
16.1
12.5
11.2
8.6
37.1
26.7
27.0
21.0
17.8
11.2
18.9
14.6
13.1
10.1
43.3
31.1
31.5
34.4
20.8
13
21.6
16.7
15.0
11.5
49.5
35.5
36.0
27.9
23.8
14.9
27.1
20.9
13.7
14.4
61.8
44.3
45.0
34.9
29.7
18.6
32.5
25.1
22.5
17.3
74.2
53.1
54.0
41.8
35.7
22.4
0.9
5.6
1.4
8.4
1.9
11.2
2.4
14.0
2.9
16.8
3.6
21.0
4.4
25.3
4.9
28.1
6.1
35.1
7.4
42.1
8.6
49.2
9.9
56.2
12.3
70.3
14.8
84.3
U/D (MAX)
010
18
1 8
18
010
18
18
SCREEN SIZE (INCH) AND THROW DISTANCE (m) LENS SHIFT/
CENTER RATIO
LENS SHIFT (UP/DOWN)
H2
H1
H2
H1
Upper max Down max
010
LNS-W03 NONE
MIN ------ ------ ------
0.6 0.9 1.3 1.6 1.9 2.4 2.9 3.3 4.1 4.9 5.8 6.6 8.3 9.9 NONE
MAX ------ ------ ------ 5.2
7.1
6.3
8.6
7.9
10.7
9.5
12.9
10.6
14.4
13.3
18.0
16.0
21.6
18.7
25.3
21.4
28.9
26.8
36.1
32.2
43.4
LNS-S03
H1 H2

This manual suits for next models

13

Other InFocus Projector Accessories manuals

InFocus LiteShow network adapter User manual

InFocus

InFocus LiteShow network adapter User manual

InFocus WT96 User manual

InFocus

InFocus WT96 User manual

InFocus LP 240 Operating and safety instructions

InFocus

InFocus LP 240 Operating and safety instructions

InFocus LP630 User manual

InFocus

InFocus LP630 User manual

InFocus SP-CEIL-006 User manual

InFocus

InFocus SP-CEIL-006 User manual

InFocus SP-LAMP-092 Guide

InFocus

InFocus SP-LAMP-092 Guide

InFocus SP-CEIL-003 User manual

InFocus

InFocus SP-CEIL-003 User manual

InFocus LASER PROJECTOR LP 540 Guide

InFocus

InFocus LASER PROJECTOR LP 540 Guide

InFocus CEILING MOUNT LP 1000 SERIES User manual

InFocus

InFocus CEILING MOUNT LP 1000 SERIES User manual

InFocus LP 650 Guide

InFocus

InFocus LP 650 Guide

InFocus LP790 User manual

InFocus

InFocus LP790 User manual

InFocus SP-LAMP-086 Guide

InFocus

InFocus SP-LAMP-086 Guide

InFocus SP-CEIL-008 User manual

InFocus

InFocus SP-CEIL-008 User manual

InFocus SP-LAMP-090 Guide

InFocus

InFocus SP-LAMP-090 Guide

InFocus RPM A-C User manual

InFocus

InFocus RPM A-C User manual

InFocus SP-LAMP-080 Guide

InFocus

InFocus SP-LAMP-080 Guide

InFocus CableWizard SP-CW3 Quick start guide

InFocus

InFocus CableWizard SP-CW3 Quick start guide

InFocus SP-CEIL-001 User manual

InFocus

InFocus SP-CEIL-001 User manual

InFocus SP-CEIL-012 User manual

InFocus

InFocus SP-CEIL-012 User manual

InFocus SP-CEIL-UNIV Guide

InFocus

InFocus SP-CEIL-UNIV Guide

InFocus LITESHOW4 DB+ User manual

InFocus

InFocus LITESHOW4 DB+ User manual

InFocus LiteShow 4 DB+ User manual

InFocus

InFocus LiteShow 4 DB+ User manual

InFocus SP-CEIL-010 User manual

InFocus

InFocus SP-CEIL-010 User manual

InFocus LP70+ Guide

InFocus

InFocus LP70+ Guide

Popular Projector Accessories manuals by other brands

QualGear pro-av QG-PRO-PM-3IN-B installation manual

QualGear

QualGear pro-av QG-PRO-PM-3IN-B installation manual

AllSportSystems DIY Bay installation guide

AllSportSystems

AllSportSystems DIY Bay installation guide

LG HECTO Series Install manual

LG

LG HECTO Series Install manual

Elite Screens ezCinema Plus Series user guide

Elite Screens

Elite Screens ezCinema Plus Series user guide

Draper AeroLift 35 Installation & operating instructions

Draper

Draper AeroLift 35 Installation & operating instructions

Da-Lite DESIGNER DA-TAB ELECTROL Instruction book

Da-Lite

Da-Lite DESIGNER DA-TAB ELECTROL Instruction book

Sony LMP-F230 operating instructions

Sony

Sony LMP-F230 operating instructions

Sony VID-P110 operating instructions

Sony

Sony VID-P110 operating instructions

RGBlink D6 user manual

RGBlink

RGBlink D6 user manual

Sony VID-P150 operating instructions

Sony

Sony VID-P150 operating instructions

Kanto S1000 Series user manual

Kanto

Kanto S1000 Series user manual

Philips LCA2211/00 Installation information

Philips

Philips LCA2211/00 Installation information

Pyle PRJTPFL102 user manual

Pyle

Pyle PRJTPFL102 user manual

Epson ELPBU01 user guide

Epson

Epson ELPBU01 user guide

Kramer VIA CONNECT PRO user manual

Kramer

Kramer VIA CONNECT PRO user manual

Crestron MPS-200 Operation guide

Crestron

Crestron MPS-200 Operation guide

Panasonic ET-DLE020 operating instructions

Panasonic

Panasonic ET-DLE020 operating instructions

Draper Large Targa Installation and operating instructions

Draper

Draper Large Targa Installation and operating instructions

manuals.online logo
manuals.online logoBrands
  • About & Mission
  • Contact us
  • Privacy Policy
  • Terms and Conditions

Copyright 2025 Manuals.Online. All Rights Reserved.