iRoom touchDock User manual
MANUAL
touchDock
EnglishDeutsch
intelligence. on.
iRoom touchDock 2020 Lineart
iRoom touchDock with device
iRoom touchDock without device
iRoom touchDock simple

ENGLISH
Page 3
for iRoom‘s touchDock
MANUAL
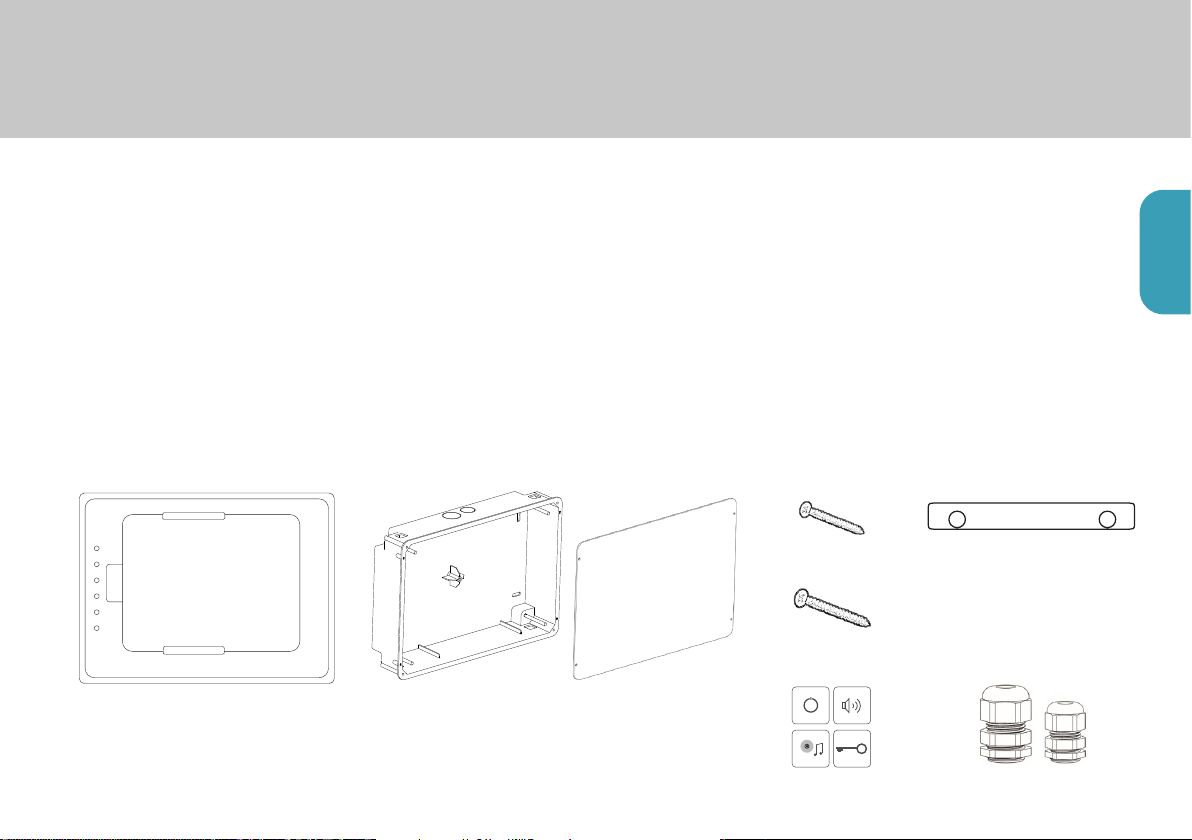
Package Content
iRoom‘s touchDock Back Box with Aluminum
Frame (1), Mounting Clamps
(4), Washers (4), Slotted
Screws 3 x 20 (4)
Protective
Cardboard Cover /
Cut-Out Template (1)
Introduction
Thank you for purchasing iRoom‘s touchDock (motorized in-wall docking station) with programmable Quick Keys.
This MANUAL is designed to guide you through the hardware installation and initial software configuration.
The warranty terms are also included in this MANUAL.
For details on configuring iRoom‘s touchDock, to download the TCP-interface description, latest drivers, latest
FAQ‘s or user manuals in other languages, please visit: www.iRoomiO.com
iRoom touchDock 2020 Lineart
iRoom touchDock with device
iRoom touchDock without device
iRoom touchDock simple
Icon Set (1) Cable Glands (2)
M3x12 Screws (6)
Flat Head, Torx 10
Alternative Guide Rails for
some iPad models (2)
Included with some
touchDock models
M3x6 Screws (4),
Flat Head, Torx 10

Page 4
intelligence. on.
Back Box
Aluminum Frame
(attached to Back Box)
Magnetic Glass Frame
Docking Station
Glass Panel
Installation
The iRoom‘s touchDock may only be used with the included back
box! Operating the device without the back box leads to a loss of
warranty rights. Use for purposes not intended by the manufacturer
will void warranty.
The following products and tools are
mandatory for proper installation:
• Back Box with pre-assembled Aluminum
Frame. Installation without iRoom‘s
back box voids warranty!
• Prepared wiring
• Screwdriver Slotted
• Screwdriver Phillips #2
• Screwdriver Torx 10
• Wire stripper and cutter
• Free App is required to configure the
touchDock


Page 6
intelligence. on.
1. Prepare the recess in the wall
using the included cut-out
template. See also cut-out
dimensions on page 24.
2. Unscrew the 4 screws to
detach the aluminum frame
from the plastic back box
3. Remove the knockout(s) for the
power cable from the back box.
If you use PoE+ to power
your touchDock you‘ll need
to remove only the small
knockout. If you use a regular
power cable you‘ll need
to remove both the large
knockout for the power cable
and the small knockout for the
LAN cable.
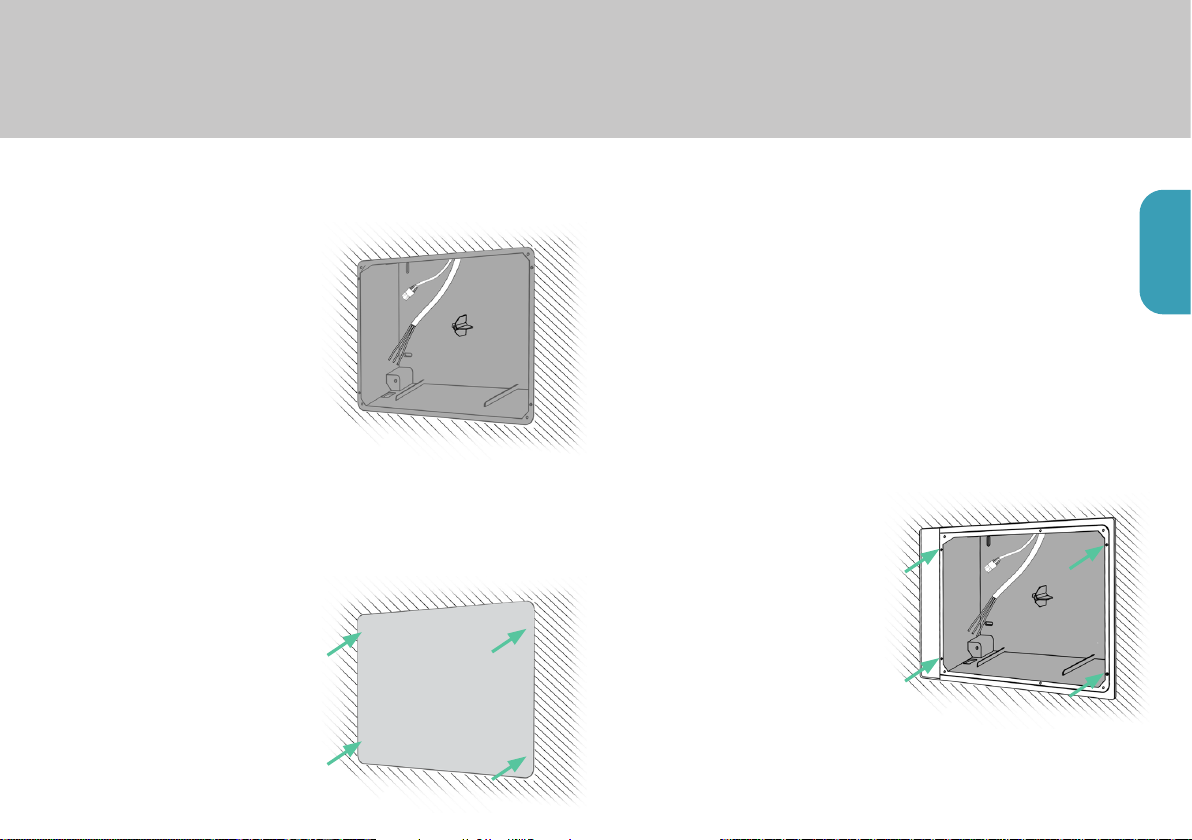
4. Feed the power cable and/
or network cable through the
openings in the back box. Use
the included cable fittings that
provide strain-relief.
Back Box Installation in Masonry
ENGLISH
Page 7
for iRoom‘s touchDock
MANUAL
5. Place and fix the back box in
the wall recess. Do not deform
the backbox. The back box
needs to align with the right
side of the wall recess for
horizontal installation or with
the top side of the wall recess
for vertical installation.
There will be a gap between
the left / top side of the wall
recess and the back box which
is going to be covered by the
aluminum frame
6. Attach the protective
cardboard cover to the back
box, using the same screws
(3x20mm) that held the
aluminum frame.
7. Fill the gap between the back
box and the recess in the wall
with a plaster-based filler to
create a mechanical bond
between back box and wall.
Make sure the back box sits
straight and flush in the wall
recess.
8. After finishing plasterwork
remove the cardboard cover.
9. Attach the aluminum frame
to the back box and using the
3x20mm screws.

Page 8
intelligence. on.
1. Prepare the recess in the wall
using the included cut-out
template. See also cut-out
dimensions on page 24.
2. Remove the knockout(s) for the
power cable from the back box.
If you use PoE+ to power
your touchDock you‘ll need
to remove only the small
knockout. If you use a regular
power cable you‘ll need
to remove both the large
knockout for the power cable
and the small knockout for the
LAN cable.
3. Feed the power cable through
the opening in the back box.
Use the included cable fitting(s)
that provide strain-relief.
4. With a cardboard knife, cut
small holes into the silver
safety strips that cover the
corner openings for the
mounting clamps.
Do not remove the safety
strips since they protect your
docking station from dust and
dirt buildup.
Back Box Installation in Drywalls

ENGLISH
Page 9
for iRoom‘s touchDock
MANUAL
5. Insert the backbox with the
attached aluminum frame into
the recess. Do not deform the
back box.
The wider side of the
aluminum frame needs to be
on the left side for horizontal
installation or on the bottom
side for vertical installation.
6. Feed the mounting clamps /
doglegs through the openings
in the corners of the back
box and and use the included
screws and washer to press
the clamps tightly against the
back of the drywall.
Make sure the back box sits
straight and flush in the wall
recess.
Page 10
intelligence. on.
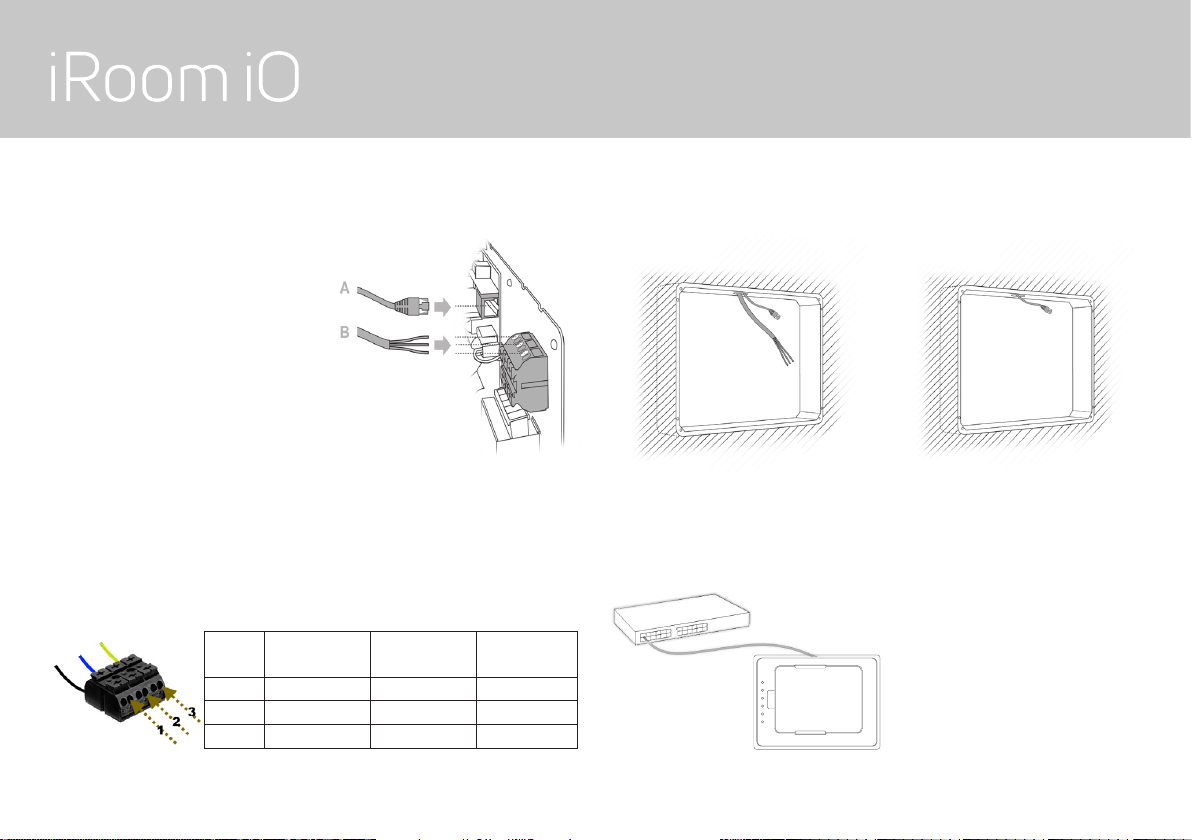
Option I: LAN & 110-240V AC Option II: PoE+ (IEEE 802.3at)
Connect network cable (A) and
optional power wires (B) to the
connectors on the mainboard of
the docking station. Power wires
are only needed if you choose to
power the unit through 110 - 240
V AC.
Important Note
If you use a managed PoE+
switch set the PoE+ port
power output for your
docking station to 30 Watts
(IEEE 802.3at). touchDock
will not work with 15 Watts
(IEEE 802.af) or passive
PoE 24V.
Number European stan-
dard color code
US standard
color code Naming
1 black/brown black hot (L)
2 blue white neutral (N)
3 yellow/green green ground (PE)
This information is supplied without liability.
Option I: Connecting 110-240VAC
Connect the wires to the terminal according to color-code.
Option II: PoE+ Switch or Injector
PoE+ (IEEE 802.3at)
Switch or Injector
iRoom‘s touchDock
PoE+ CAT5e/6
cable
iRoom touchDock 2020 Lineart
iRoom touchDock with device
iRoom touchDock without device
iRoom touchDock simple
Connect Power / Ethernet Cables to the Docking Station
This manual suits for next models
1
Table of contents
Languages:
Other iRoom Docking Station manuals

iRoom
iRoom iDock Basic User manual

iRoom
iRoom iDock Portrait User manual

iRoom
iRoom surDock-mini User manual

iRoom
iRoom iDock Basic User manual

iRoom
iRoom iDock Landscape User manual

iRoom
iRoom miniDock User manual

iRoom
iRoom iDock Basic User manual

iRoom
iRoom iBezel Series User manual

iRoom
iRoom iTop User manual

iRoom
iRoom iTop OnWall User manual


