manuals.online logo
Brands
  1. Home
  2. •
  3. Brands
  4. •
  5. Iwata
  6. •
  7. Paint Sprayer
  8. •
  9. Iwata Eclipse G6 User manual

Iwata Eclipse G6 User manual

IWATA G6 MANUAL & PARTS GUIDE
3
Congratulations on your purchase of an Iwata Eclipse™ airbrush, a versatile, reliable and high-performance airbrush.The Iwata Eclipse
G6 Pistol Grip Airbrush is a breakthrough in large-format airbrushes. The ability to control detailed spray and finely atomize large
swaths of paint highlight the airbrush’s unique spray characteristics. It can also adjust spray pattern shapes from round circles to
flattened ovals, and everything in between. A stainless-steel nozzle, paint passage and heat-tempered needle, reflect Iwata’s
unceasing commitment to long-lasting, peak-performance spray equipment.
Should the need arise, the G6 uses reliable, easily serviceable air-valve and air-valve-packing cartridge sets. Cartridges can be
serviced outside the airbrush and easily replaced.
The G6 is a side-feed airbrush that produces remarkable atomization with precise control of the spray pattern from 1/16" to 2.5".
The interchangeable siphon-feed bottle makes color changes quick and easy. The side-mounted paint feed allows the bottle to
rotate for spraying horizontal, vertical or even underneath surfaces.
Designed for use with the Iwata Studio Series Power Jet, Power Jet Lite or Power Jet Pro compressors, this low-air- consumption
airbrush provides high atomization while minimizing overspray.
Ideal uses for the G6 include automotive touch-up, custom automotive painting, motorcycle painting, illustration, background
spraying, large studio work, murals and airbrush tanning.
Iwata airbrushes are designed for the demanding professional. Modern precision machining and carefully selected materials are used in the
manufacturing process to ensure consistent high performance and long life. Each Iwata airbrush is spray-tested before shipment to assure
maximum performance and adherence to Iwata’s strict quality standards. To maintain your Eclipse at its peak performance, proper care and
attention must be observed.
ONLY FROM IWATA-MEDEA
4
Iwata Eclipse G6 Airbrush
This multi-purpose, high-paint-flow, Eclipse Series airbrush covers a wide range of uses. Commonly used to
spray pre-mixed or heavier paints, it’s well suited for uses that demand precise control of spray when
applying moderate-to-large amounts of paint to a variety of surfaces and to various-sized areas. This Eclipse
Series brush has established a new benchmark for excellence in an all-purpose airbrush.
A unique “Pistol Grip” airbrush, the Eclipse G6 airbrush looks like a miniature spray gun, but sprays and
performs like a large airbrush with its 0.6-mm stainless-steel nozzle.
· Equipped with a long tapered needle that ensures a smooth, wide background spray
· Utilizes a dual-purpose air cap and a fan adjustment valve that lets the airbrush spray a round or oval pattern
· The round pattern is useful for painting graphics, while the oval shape creates a smooth background spray
· Uses a special fitting so airbrush bottles can be used instead of a gravity-feed cup, allowing for multiple
color bottles to be interchanged quickly without having to clean a cup thoroughly – another unique feature
for this type of spray unit. Optional gravity-feed cups available
· Works well with the Iwata Studio Series Power Jet and Power Jet Lite Compressors
NOTE: Only round pattern can be achieved with these air sources.
5
Spray-Gun
Trigger
Design
3 oz. Side-Feed Jar
Airbrush-Style Nozzle
and Needle
Air Inlet Regulator
Fluid Adjustment Control
Fan Air Control
6
GETTING STARTED G6
Pre-Check the Airbrush Settings
1. Close the pattern adjustment knob (#15) fully by gently twisting
it clockwise until it stops. It doesn’t need to be tight.
2. Open the fluid-adjustment knob (#20) fully by gently twisting it
counterclockwise. NOTE: You might unscrew the fluid adjust-
ment knob off of the airbrush. Don’t worry. Screw it back
on one or two full turns.
3. Open the air adjustment knob (#21) fully by twisting it counter
clockwise until it stops. It doesn’t need to be tight.
4.Twist the air cap (#1), specifically the little finger-like projections
until they are horizontal to the ground.
Spraying
1. Pull the trigger back slightly and only the air will come out.
2. Pull the trigger back more until paint starts to spray in small
amounts.
3. Pulling the trigger back further releases even more paint until
the trigger is pulled as far as it can go.
Assembly
1. Screw the airhose firmly onto the air source outlet.
NOTE: In many cases the air source is a compressor.
2. Screw the air hose firmly onto the G6’s air inlet beneath
the handle.
Spraying
1. Fill a bottle at least ½ of the way full of properly prepared paint.
2. Screw the lid (bottle cap set) onto the bottle.
3. Push the metal nipple of the bottle firmly onto the bottle joint
adaptor (#6). NOTE: Twist the bottle firmly into the bottle joint
adaptor ensuring a tight fit.
4. Adjust the air source pressure to 35 psi and spray away.
Fine-Line Spray
1. Pull the trigger back slightly to start the air.
2. Position the airbrush close to the surface. About 1 inch or
2.5 cm.
3. Pull the trigger back a little more to start the flow of paint.
Control line thickness by adjusting the distance between the
airbrush and the surface, and also by adjusting the paint flow
amount.
GENERAL OPERATION G6
7
Background Spraying
1. Position the airbrush further from the surface – 4-6 inches or
10-16 cm is common.
2. Pull the trigger back a lot to release a large amount of paint.
Control spray width by adjusting the distance between the
airbrush and the surface and by opening the pattern adjustment
knob. Opening the pattern adjustment knob changes the spray
pattern shape from a circle to an oval.
Control spray consistency over large areas by setting
the fluid adjustment knob (#20) to limit the amount of paint
volume sprayed.
1. Pull the trigger back to the desired amount of spray.
2. Screw the fluid-adjustment knob in until it pushes the trigger.
CLEANING
Cleaning the Airbrush between Colors
1. Replace the color bottle with a bottle containing the appropri-
ate cleaning solution.
2. Spray until the solution sprays clear and clean.
3. Remove the bottle of cleaning solution.
4. Spray air until the airbrush sprays dry.
5. Fit a color bottle with the new color and spray.
6. Repeat the procedure when finished.
Before Each Session
Spray water, or appropriate solvent,through the airbrush to ensure
the airbrush is in proper working order.
After Each Session
Or any time the airbrush becomes clogged:
1. Increase the air pressure.
2. Spray cleaning solution through the airbrush for a short time.
3. Unscrew the fluid adjustment knob (#20).
4. Remove the spring (#16).
5. Pull out the needle (#5).
6.Wipe down the needle.
7. Gently reinsert the needle. NOTE: The needle is delicate and
sharp. Be careful not to bend the tip of the needle or hurt
yourself while reinserting it.
8. Place the spring on the needle.
9. Screw the fluid adjustment knob onto the airbrush.
The higher air pressure will help to thoroughly clean out the paint.
Safety Tips
•Always spray in a well-ventilated area.
•Do not spray solvent-based (flammable) paints around open flames.
•Use the appropriate respirator to safely filter out the paint vapors
particular to the to the kind of paint you are using.
•Wear eye protection to prevent paint contact with eyes.
•Never use air pressure that exceeds the airbrush’s limit. (6.8 bar,
10.68 MPa, 98 psi)
8
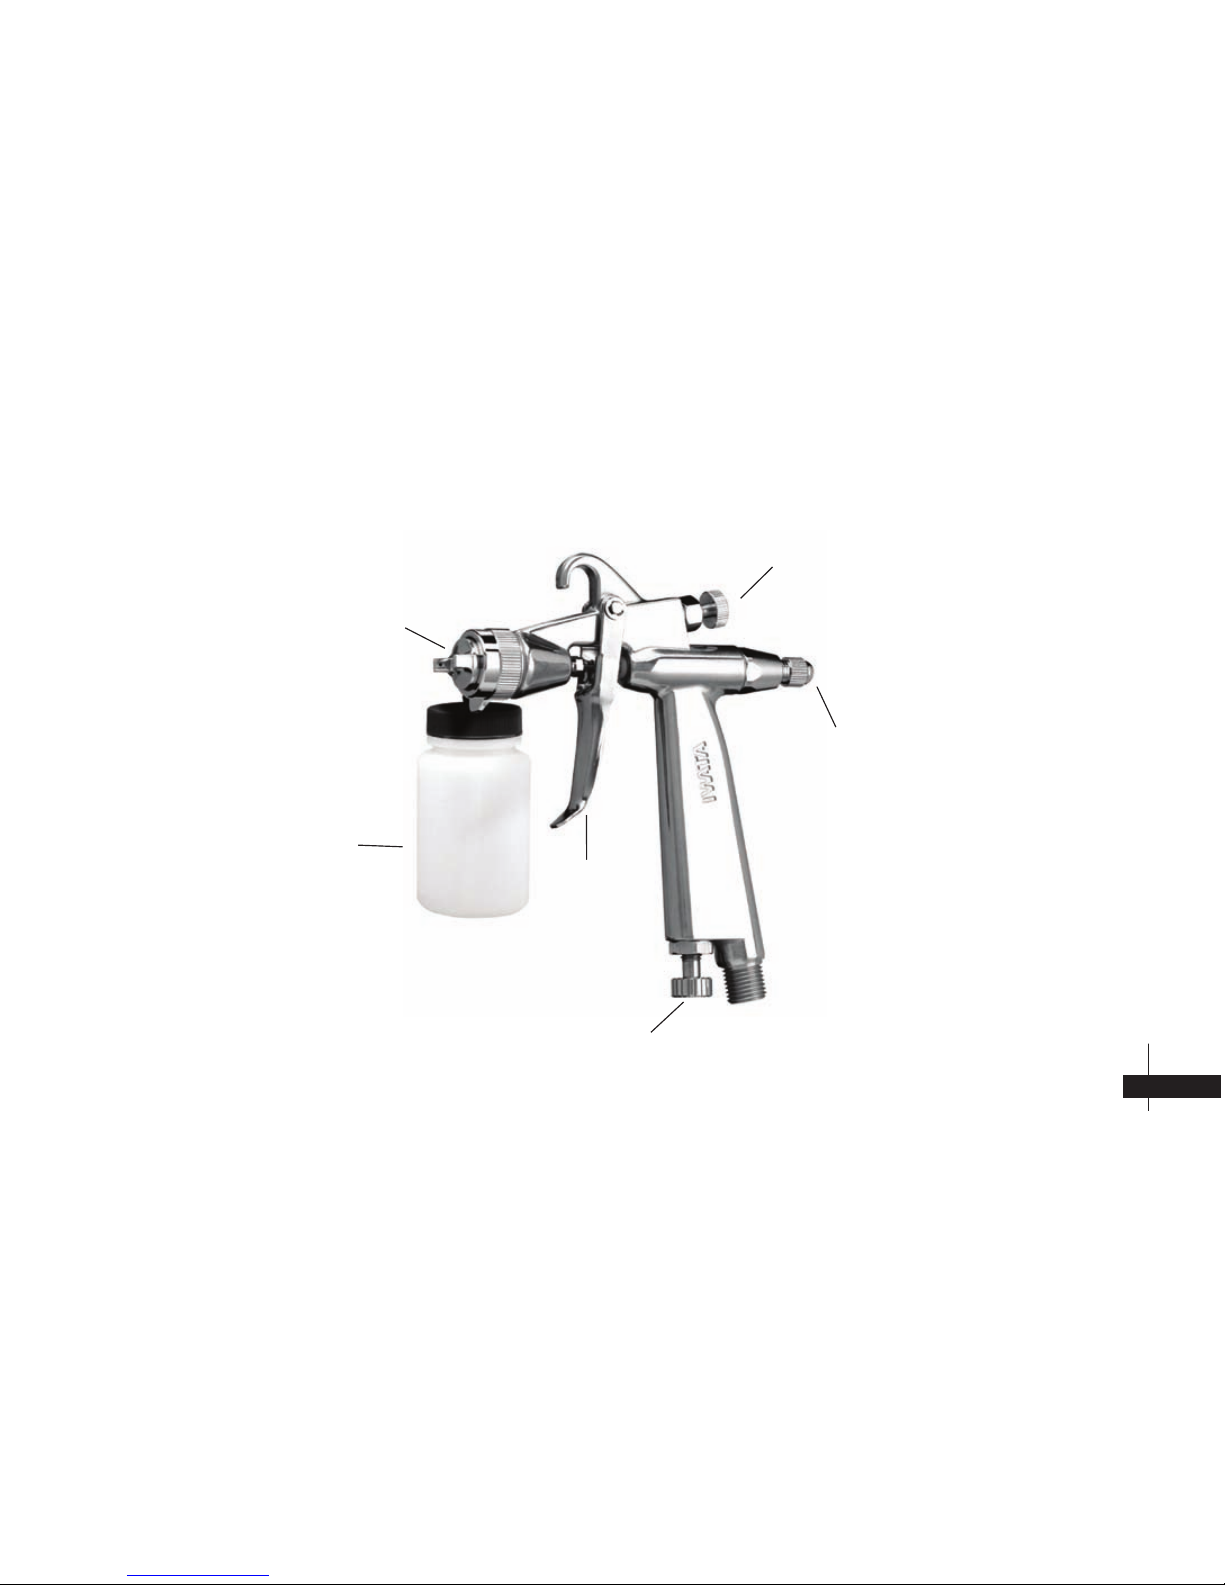
ECLIPSE G6 DESCRIPTION OF FEATURES
Pattern Adjustment Set (#15)
This adjustment creates a circular- or oval-shaped spray pattern.
When the valve is fully closed, twisted fully clockwise, the spray
pattern will be a round shape. The round pattern is best for doing
graphics in small areas. When the valve is fully opened, twisted fully
counter-clockwise, the spray pattern will be an oval shape, also
known as a fan pattern. The oval fan pattern provides a smooth
background spray.
When using the Power Jet compressor, the pattern adjustment
valve should only be opened a maximum of ½ turn. Using a
compressor with power greater than 1 HP allows the valve to be
fully opened, creating the fan pattern shape.
Air Cap (#1)
The air cap produces a round or an oval fan-shaped pattern
depending on how the pattern adjustment valve is set. Refer to
the Pattern Adjustment Set Instructions if necessary.
Orientation of the oval varies based on where the finger-like
protrusions are oriented. The finger-like protrusions dictate
where the fat part of the oval will be. Spray with the fat part of the
oval.If the oval is vertical, spray up and down. If the oval is horizon-
tal, spray side to side.
Change the orientation by simply twisting the aircap.
Fluid Adjustment Knob (#20)
The fluid adjustment knob limits how much fluid will be sprayed
when the trigger is pulled all the way back. After setting the spray
pattern (see #15 and #1 descriptions), the fluid adjustment knob
sets the amount of spray delivered to an object’s surface. This
feature proves invaluable each time the trigger is pulled back while
spraying large areas that need precise, repeatable spray output. It’s
cruise control for the long haul.
1. Start spraying with the knob fully opened, but don’t screw it
entirely off the airbrush!
2. Find the best trigger position for the best spray.
3. Screw the knob clockwise until the trigger pull is limited to the
desired position.
Don’t forget! Unscrew the knob when you can’t figure out why
you don’t get as much spray as you used to.
Air Adjusting Set (#21)
For beginners
The air adjustment knob sets the amount of air flowing through
the airbrush. It’s a convenient way to adjust the pressure on the fly.
Start with the knob set at the full open position by twisting it
counterclockwise until it stops. After you’re familiar with the
airbrush, adjust the air pressure to achieve the best spray pattern as
necessary.
For the experienced
It’s a pressure regulator on the bottom of your spray gun. Enjoy.
9
GENERAL OPERATION G6
Air Cap # 1
Trigger #9
Air Adjustment
Set #21
Pattern Adjustment Set
#15
Fluid Adjustment
Knob # 20
10
IWATA ECLIPSE G6 SERIES AIRBRUSHES • MASTER PARTS LIST
11
23
# Code # Part Name
Airhose Adapter
(1/4”-1/8”)
3 oz. Fluid Bottle
4 oz. Fluid Bottle
(PC-61)
Spanner
Fluid Cup 4 oz. (PC-61)
Fluid Cup 7 oz. (PC-51)
Fluid Cup 8 oz. (PC-5 )
Fluid Cup Lid (PC-61)
Fluid Cup Lid (PC-51)
Fluid Cup Lid (PC-5 )
1624 1
1480 3
1210 1
1230 1
1210 1
1210 2
1210 3
1211 1
1211 2
1211 3
Air Cap 0.6 mm
Air Cap Packing
Air Cap Cover Ring
Fluid Nozzle 0.6 mm
Fluid Needle 0.6 mm
Airbrush Body Set
Fluid Cup Joint
Bottle Joint Adapter
Fluid Needle Packing
Needle Packing Seat
Trigger
E Stopper 2 pcs/pk
Trigger Stud
Air Valve Shaft
Air Valve Seat Set
Gasket Air Valve Seat
Air Valve Seat Screw
Pattern Adjusting Set
Air Valve Spring
Air Valve
Fluid Adjust Guide Set
Needle Spring
Fluid Adjusting Knob
Air Adjusting Set
# Code # Part Name
1600 1
1600 2
1600 3
1600 4
1617 4
1307 1
1212 2
1623 1
1215 2
1219 2
1233 1
1332 1
1234 1
1202 3
1205 2
1217 1
1205 3
1625 1
1206 2
1202 3
1208 2
1225 2
1209 1
1626 1
1
2
3
4
5
6
6-1
6-2
7
8
9
10
11
12
13
13-1
14
15
16
17
18
19
20
21
12
GENERAL OPERATION G6
Air Cap # 1
Trigger #9
Air Adjustment
Set #21
Pattern Adjustment Set
#15
Fluid Adjustment
Knob # 20
WWW.IWATA-MEDEA.COM
Iwata-Medea, Inc. •
P.O. Box 14397
•
Portland, Oregon 97293
tel: 503-253-7308
•
fax: 503-253-0721
•
[email protected]

Other Iwata Paint Sprayer manuals

Iwata Hi-Line HP-AH User manual

Iwata

Iwata Hi-Line HP-AH User manual

Iwata Revolution TR1 Manual

Iwata

Iwata Revolution TR1 Manual

Iwata PT2S User manual

Iwata

Iwata PT2S User manual

Iwata NEO TRN1 User manual

Iwata

Iwata NEO TRN1 User manual

Iwata NEO BCN User manual

Iwata

Iwata NEO BCN User manual

Iwata Eclipse G3 User manual

Iwata

Iwata Eclipse G3 User manual

Iwata Custom Micron B User manual

Iwata

Iwata Custom Micron B User manual

Iwata LPH-440-141 User manual

Iwata

Iwata LPH-440-141 User manual

Iwata AZ3 HTE P.A.S. Concept User manual

Iwata

Iwata AZ3 HTE P.A.S. Concept User manual

Iwata Kustom K9200 User manual

Iwata

Iwata Kustom K9200 User manual

Iwata Airrex Katana Plus User manual

Iwata

Iwata Airrex Katana Plus User manual

Iwata Super Nova WS-400-1301B User manual

Iwata

Iwata Super Nova WS-400-1301B User manual

Iwata Custom Micron CM-B User manual

Iwata

Iwata Custom Micron CM-B User manual

Iwata Full Finish G-Series G6 Instruction Manual

Iwata

Iwata Full Finish G-Series G6 Instruction Manual

Popular Paint Sprayer manuals by other brands

Demco SM14 Operator's manual

Demco

Demco SM14 Operator's manual

Graco 25T804 Operation, parts

Graco

Graco 25T804 Operation, parts

Graco 296984 Installation-Parts

Graco

Graco 296984 Installation-Parts

P.A. RL60 Technical manual

P.A.

P.A. RL60 Technical manual

Goizper Group DESHERBAGE TOTAL-7 instruction manual

Goizper Group

Goizper Group DESHERBAGE TOTAL-7 instruction manual

Binks 80-295-CE manual

Binks

Binks 80-295-CE manual

Goizper Group OSATU KALE-6 manual

Goizper Group

Goizper Group OSATU KALE-6 manual

Dynalabs DYN-IS-40 product manual

Dynalabs

Dynalabs DYN-IS-40 product manual

RUST-OLEUM SPRAYSMART Use and care instructions

RUST-OLEUM

RUST-OLEUM SPRAYSMART Use and care instructions

NEU MASTER NSG0110-US500 instructions

NEU MASTER

NEU MASTER NSG0110-US500 instructions

Titan HELIX 0138010 operating manual

Titan

Titan HELIX 0138010 operating manual

Loctite 3609 Technical data sheet

Loctite

Loctite 3609 Technical data sheet

Maddox ML11 owner's manual

Maddox

Maddox ML11 owner's manual

Graco 278675 Operation

Graco

Graco 278675 Operation

Titan IMPACT 840 Service manual

Titan

Titan IMPACT 840 Service manual

WALTHER PILOT PILOT WA XV operating instructions

WALTHER PILOT

WALTHER PILOT PILOT WA XV operating instructions

Solo 453 instruction manual

Solo

Solo 453 instruction manual

Flowzone STORM 2.5 Operation guide

Flowzone

Flowzone STORM 2.5 Operation guide

manuals.online logo
manuals.online logoBrands
  • About & Mission
  • Contact us
  • Privacy Policy
  • Terms and Conditions

Copyright 2025 Manuals.Online. All Rights Reserved.