Iwata NEO TRN1 User manual

NEO SERIES MANUAL
Congratulations on your purchase of a
NEO SERIES MANUAL
airbrush.
NEO FOR IWATA TRN1 AND TRN2 TRIGGER AIRBRUSH MANUAL
TRN1 GRAVITY-FEED
TRIGGER AIRBRUSH
TRN2 SIDE-FEED
TRIGGER AIRBRUSH
1
ANEST IWATA-MEDEA, INC.
Portland, Oregon U.S.A.
+1-503-253-7308
www.Iwata-medea.com
ANEST IWATA AUSTRALIA PTY LTD.
Mt. Druitt, NSW
+61-(02)-9853-2000
www.anest-iwata.com.au
ANEST IWATA EUROPE S.R.L.
Torino, Italy
+39-01-1248-0868
www.anest-iwataeu.com
ANEST IWATA SOUTH-EAST ASIA CO., LTD.
Bangkok, Thailand
+66-(0)-2643-2870
www.anest-iwatasoutheastasia.com
ANEST IWATA SHANGHAI
Shanghai, China
+86-(0)21-6407-9713 / 15 / 16
www.anest-iwata-sh.com/ja
ANEST IWATA RUS LLC
Moscow, Russia
+7-495-938-77-28
www.anestiwata.ru
ANEST IWATA CORPORATION
Yokohama, Japan
+81-(0)45-591-1111
www.anest-iwata.co.jp
ANEST IWATA (U.K.) LTD.
Neots Cambs, England
+44-(0)1480-474742
www.anest-iwata.co.jp
ANEST IWATA MOTHERSON LTD.
Uttar Pradesh, India
+91-(0)120-4600500 / 14 / 17
www.motherson.com
ANEST IWATA SOUTH AFRICA (PTY) LTD.
Johannesburg, Republic of South Africa
+27-11-463-2169/2265/2223
ANEST IWATA DO BRASIL COMERCIAL LTDA.
Bairro do Paraiso, Sao Paulo
+55-11-3171-0072
www.anest-iwata.net.br
CENTURY TRADING CO., LTD.
Seoul, Korea
82-2-2163-0300
www.centrading.co.kr
If you have any issues with this product,
call ANEST IWATA-MEDEA (U.S.A.) 503-253-7308 (M-F 8am-4pm Pacic Time)
or your local ANEST IWATA aliate before returning to your place of purchase.
NEED ASSISTANCE
TRN1 GRAVITY-FEED
TRIGGER AIRBRUSH
TRN2 SIDE-FEED
TRIGGER AIRBRUSH
TRN1 TRN2

TRN1
Begin by attaching your airbrush hose (Iwata hose
sold separately) to your NEO Trigger airbrush.
Make sure the other end of your airbrush hose is
attached to your air source such as the NEO AIR for
Iwata Miniature Air Compressor (sold separately).
For the gravity-feed NEO, put a small amount of paint into the color cup
on top of the airbrush (note you have 2 choices of cup size). The airbrush
will also hold 1/32 oz. (1cc) of paint without a cup attached.
For the side-feed NEO, attach one of the cups to the side of the airbrush by
pushing it directly into the airbrush and tightening the lock nut and add
paint. When using bottles, screw the side-feed adapter lock nut onto the
airbrush, then push the bottle (lled with paint) into the side-feed adapter.
BEGIN
1
PAINT
2
TO AIR SOURCE
GRAVITY-FEED NEO
SIDE-FEED NEO
CUP
BOTTLE
TRN1
Turn your air compressor on. Gently pull back on the trigger for air ow
and then pull farther for paint spray. As you pull back on the trigger,
move your airbrush along the surface to be painted – keep moving!
The pre-set knob limits how far back you can pull the trigger. Turn the
pre-set to set the desired maximum amount of paint spray.
To clean your airbrush, ush it out with the appropriate cleaner for your
medium or use Medea Airbrush Cleaner, good for water-based mediums,
and spray airbrush until it sprays clear.
CLEANING
START AIRBRUSHING
3
TRN1
TRN1
AIR AIR
&
PAINT
QUICK START GUIDE INCLUDED WITH YOUR AIRBRUSH
2

ASSEMBLY
Fine-Line Spray
1. Depress the main lever to start air flow.
2. Position the airbrush close to the surface, between 1/16 and 1/2 inch is
common.
3. Pull the main lever back slightly to start the flow of paint.
Line thickness can be controlled by adjusting the distance between the
airbrush and the surface and also by varying the paint flow by manipulating
the main lever’s position.
Wide-Line and Background Spraying
1. Depress the main lever.
2. Position the airbrush further away from the surface, from 1 to 6 inches is
common.
3. Pull the main lever back much farther releasing more paint to cover the
bigger area.
Increase the distance between the airbrush and painted surface to control the
line’s width. Increasing the air pressure will also affect the spray width.
Air Pressure
For the NEO, working pressures generally vary between 10 and 60 psi, de-
pending on what type of work is being done and what textures are desired.
A good working
pressure may average around 15-25 psi.The viscosity of the paint and
your desired spray characteristics will also affect your ideal pressure.As a
general rule, larger amounts of paint or thicker paints, will be sprayed with
higher pressures.
WARNING: Do not exceed 100psi.
Paint Preparation
For non-airbrush-ready paints, proper preparation, including filtering
the paint through a nylon mesh, is recommended for best performance.
Paint should be thinned with its proper solvent. It is best to prepare paint
relatively thin and make repeated passes across the work to achieve the
desired shade. This will also improve the
quality of your work and decrease the cleaning time of your airbrush.
Safety Tips
• Always spray in a well-ventilated area.
• Do not spray solvent-based (flammable) paints around open flames.
• Use the appropriate respirator to safely filter out the paint vapors par-
ticular
to the kind of paint you are using.
• Wear eye protection to prevent paint contact with eyes.
• Never use air pressure that exceeds the airbrush’s limit (100 psi).
GENERAL OPERATION REFER TO DIAGRAM ABOVE
3
1. Screw the air hose onto the airbrush (Iwata air hose sold separately).
2. Screw the air hose onto the compressor.
TO COMPRESSOR
TO AIRBRUSH
TRN1 GRAVITY-FEED
TRIGGER AIRBRUSH
TRN2 SIDE-FEED
TRIGGER AIRBRUSH
trigger
color cup
needle cap
nozzle cap handle side feed
cup
bottle
air hose
TRN1
OR
side-feed
adapter

4
Cleaning the Airbrush (TRN2)
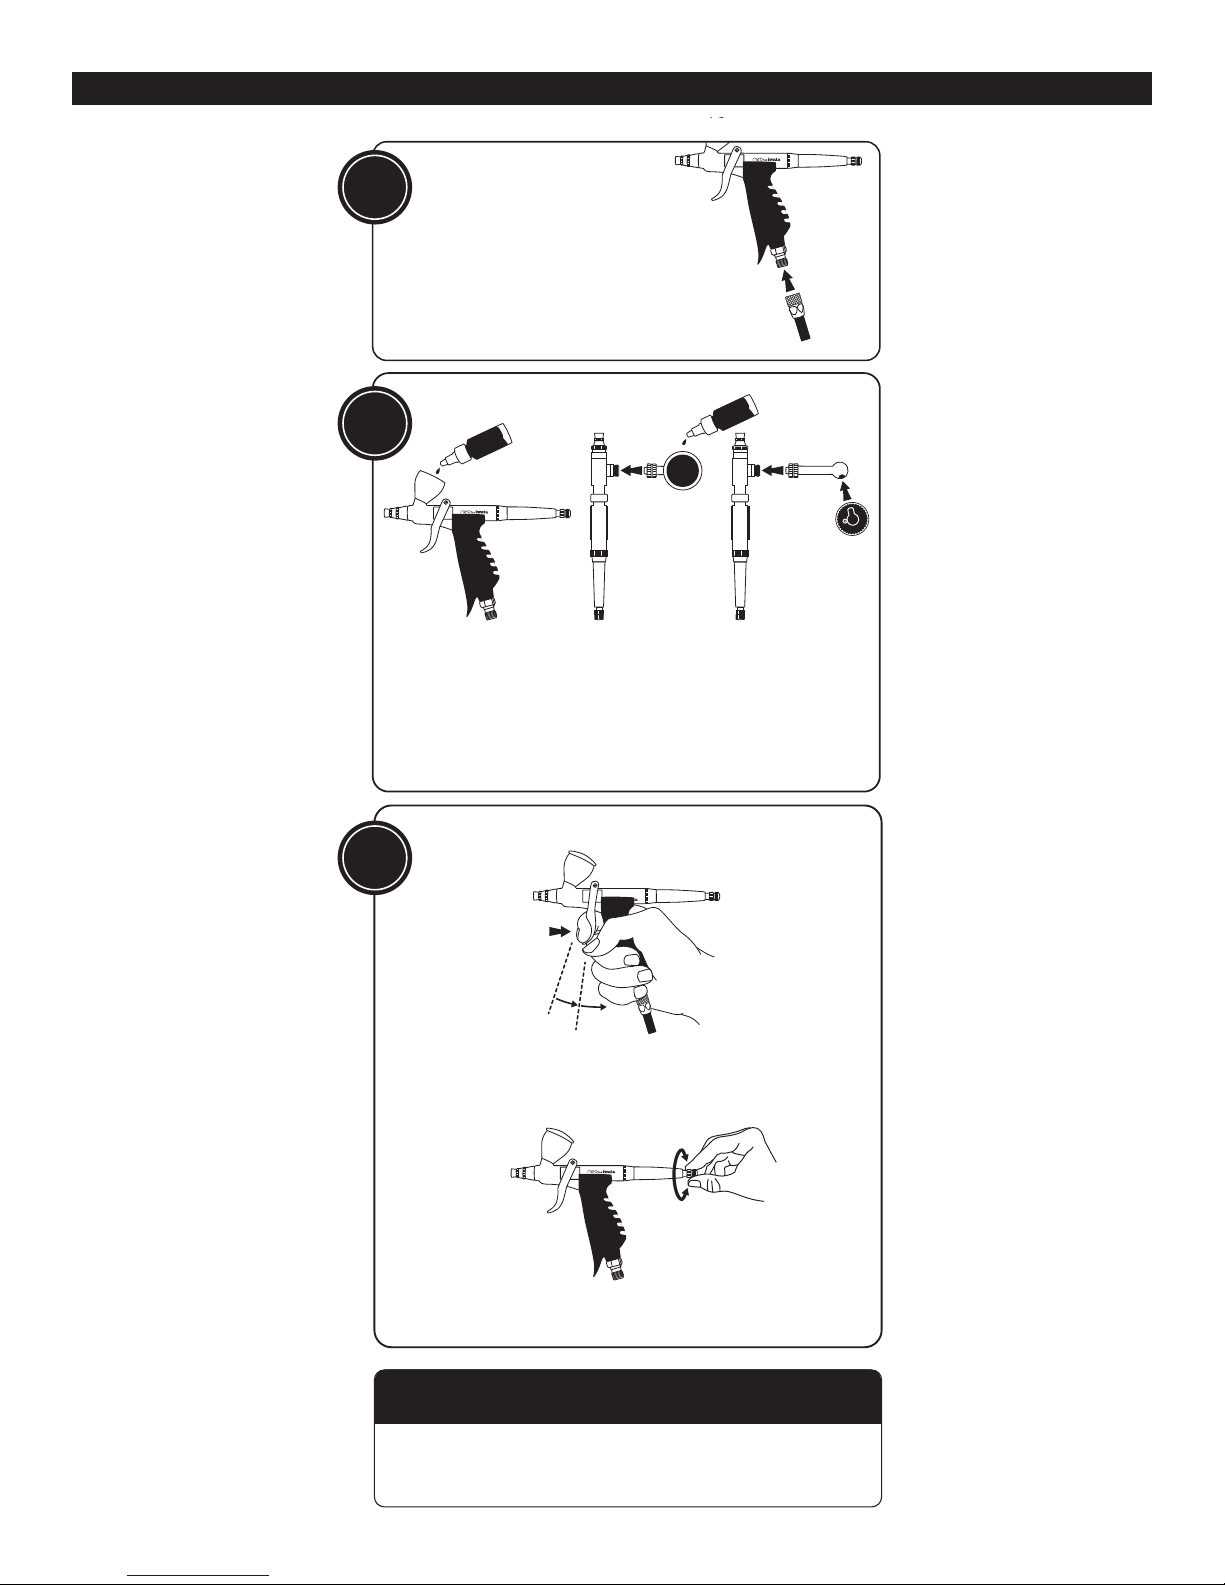
1. Remove the paint bottle.
2.Attach a bottle containing the appropriate cleaning solution. (Note:
Medea Airbrush Cleaner works great for water-based media.)
3. Spray until the solution sprays clear.
4. Remove the bottle of cleaning solution.
5. Spray air until the airbrush sprays dry.
6.Attach a bottle containing the next color.
7. Repeat cleaning procedure when finished.
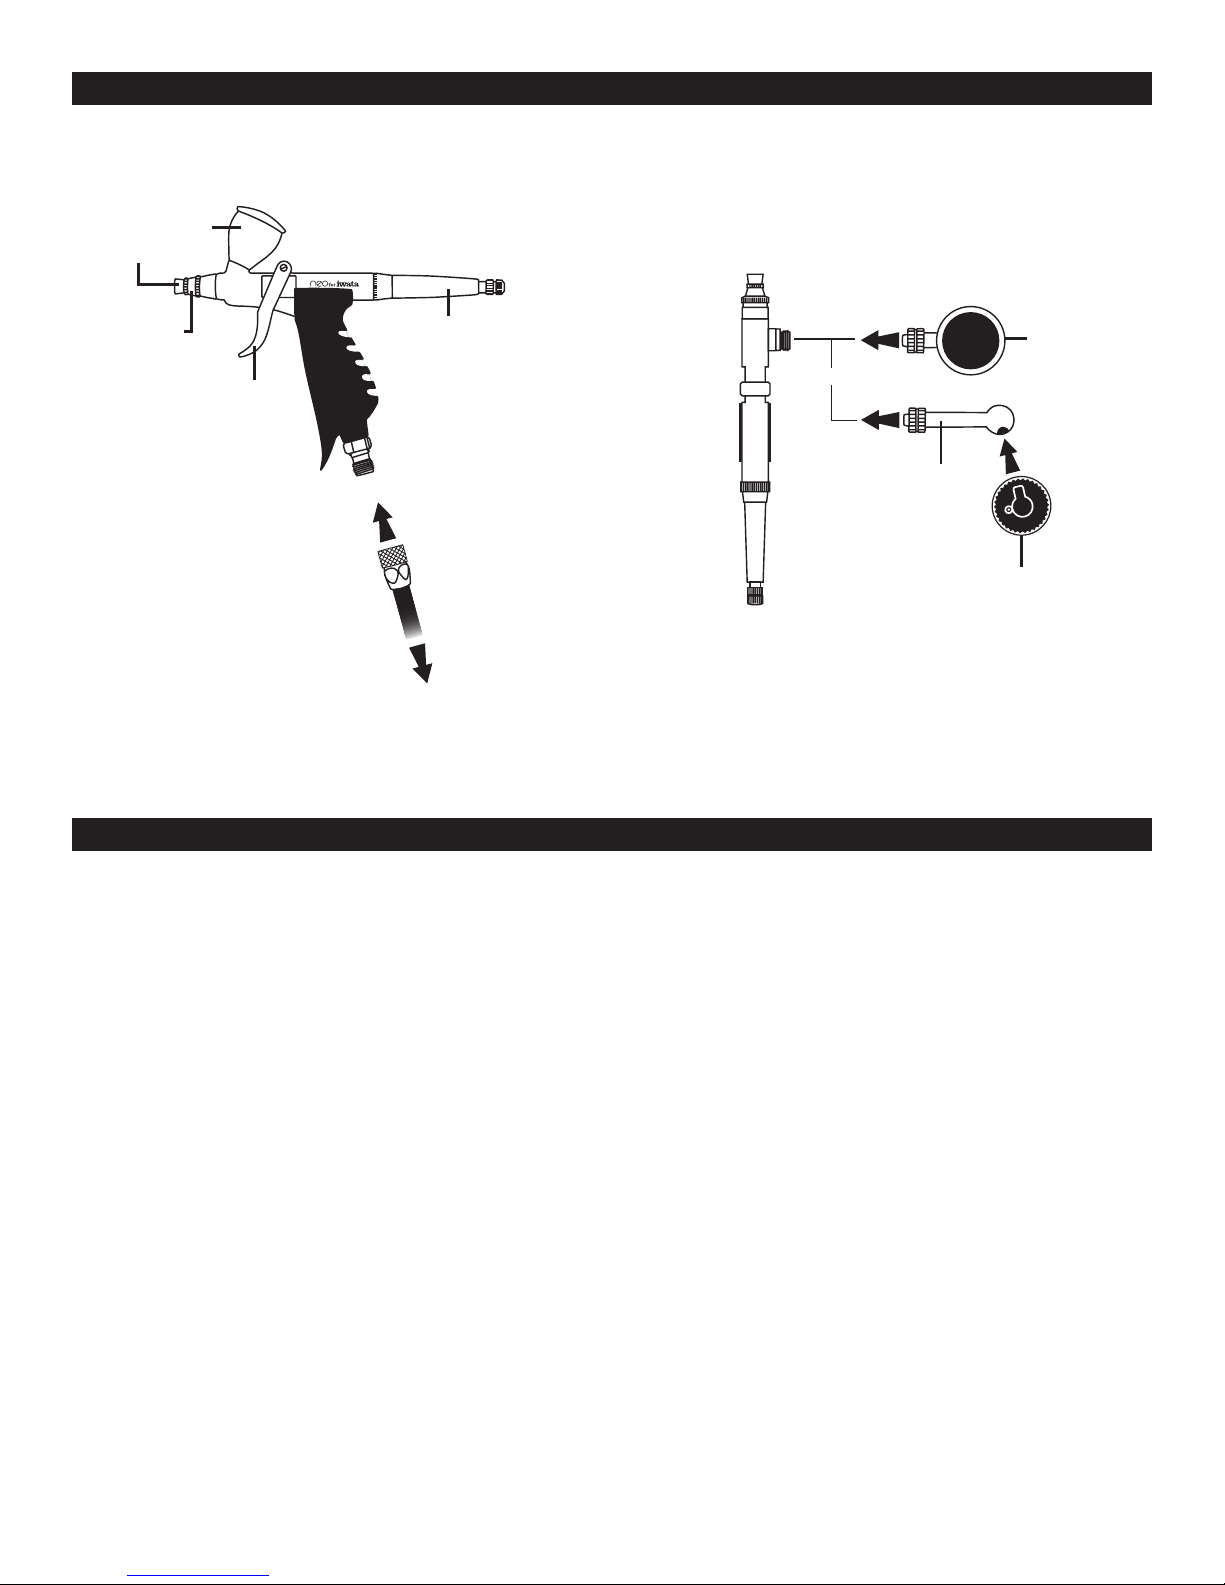
Cleaning the Airbrush (TRN1)
1. Dump out the color cup’s excess paint.
2. Rinse the cup with the appropriate cleaning solution. (Note: Medea
Airbrush Cleaner works great for water-based media.)
3. Use a paper towel to wipe out any left-over paint.
4. Fill the bottom of the cup with cleaner.
5. Spray cleaner until the spray is clear.
6.Add the next color to the color cup.
7. Repeat cleaning procedure when finished.
Cleaning the Needle (TRN2,TRN1)
Before removing the needle, clean the airbrush as recommended.
1. Unscrew the handle from the airbrush body.
2. Loosen the needle chucking nut.
3. Gently pull the needle straight out.
4. Fold a soft cloth damp with cleaner over the needle.
5. Rotate the needle to gently wipe the residual paint off.
6. Carefully insert the needle into the airbrush until it seats fully against
the nozzle.
CAUTION:The most probable time to damage the needle is when the
needle passes through the main lever. If the needle stops abruptly, retract
and examine the trigger mechanism for proper assembly and re-insert
the needle.
7.Tighten the needle chucking nut finger tight.
• Pull the main lever back and forth to visually confirm the needle’s abil-
ity to move.
8. Screw the handle back onto the airbrush body.
Before Each Session
Spray water or the appropriate cleaning solution through the airbrush to
make sure the airbrush is working properly.
After Each Session
Or any time the airbrush becomes clogged:
1. Increase the air pressure.
2. Spray cleaning solution for a short time.
3. Clean the needle if necessary
Cleaning the airbrush this way helps clean the paint passage, the nozzle
and the needle thoroughly.
Periodically
To ensure smooth main lever action lubricate the needle and the main
lever
mechanism when necessary.
1. Unscrew the handle.
2. Loosen the needle chucking nut.
3. Remove the needle.
4. Coat the needle lightly at the front where the taper starts with a high-
quality
lubricant, like Medea Super Lube.
5.Wipe the needle with a soft, clean cloth, leaving a light coat of lube
behind.
6. Re-insert the needle gently into the airbrush.
7.Tighten the needle chucking nut.
8. Screw the handle onto the airbrush body.
Use a tiny drop of lube on the main lever’s piston. DO NOT over-lube the
needle
or the main lever mechanism, since it is possible to transfer excess lube
into the nozzle causing severe paint flow problems. DO NOT use light
machine oil or WD-40 for lubrication.These will cause the needle to stick
as it moves through the needle packing o-ring.
CAUTION: If it becomes absolutely necessary to dismantle the airbrush
remember that in most situations tools are not needed.
MAINTENANCE REFER TO MASTER PARTS LIST ON PAGE 5

5
NEO SERIES FOR IWATA - TRN1 AND TRN2 TRIGGER
PRICE ITEM TRN2 TRN1 ALSO
# ITEM DESCRIPTION CODE # N 5000 N 5500 FITS
17 Needle 0.35 mm A N 075 3 opt n
0.50 mm A N 075 4 nopt
18 Handle Cap Set D N 090 2 nn
19 TriggerWithTrigger Screw A N 100 2 nn
20 Air Piston Set A N 010 1 nn
21 Valve Set C N 020 2 nn
22 Grip Mount/Extension D N 160 1 nn
23 Grip B N 160 2 nn
24 Bottle Adapter C N 040 1 nx
25 Side Cup Lid 1/2 oz (15 cc) A N 095 2 nx
26 Side Cup 1/2 oz (15 cc) A N 070 6 nx
27 Side Cup Lid 1/4 oz (7 cc) A N 095 3 nx
28 Side Cup 1/4 oz (7 cc) D N 070 5 nx
29 Fluid Gravity Cup w/O-Ring 1/10 oz (3 cc) C N 070 2 x n NEO CN
30 Fluid Gravity Cup w/O-Ring 1/4 oz (7 cc) D N 070 1 x n NEO CN
31 Fluid Gravity Cup Lid 1/4 oz (7 cc) A N 095 4 x n NEO CN
32 Spanner A N 165 1 x n NEO CN/
NEO BCN
33 Spanner A N 165 2 n x
PRICE ITEM TRN2 TRN1 ALSO
# ITEM DESCRIPTION CODE # N 5000 N 5500 FITS
1 Needle Cap A N 110 2 nn
2 Nozzle Cap 0.35 mm A N 140 3 opt n
0.50 mm A N 140 4 nopt
3 Nozzle 0.35 mm C N 080 3 opt n
0.50 mm C N 080 4 nopt
4 Nozzle Cap O-Ring A N 150 4 nopt
5A Head Base A N 135 3 x n
5B Head Base A N 135 4 n x
6 Head Base Packing (PTFE) A N 150 5 nn
7 Main Body Ring Screw A N 131 2 nn
8 Needle Packing (PTFE) A N 150 7 nn
9 Needle Packing Screw A N 125 2 nn
10 Slide Cam A N 130 1 nn
11 Spring Side Cam A N 130 2 nn
12 Main Body Ring A N 131 1 nn
13 Needle Chucking Guide A N 115 2 nn
14 Needle Spring A N 135 2 nn
15 Spring Guide A N 170 2 nn
16 Needle Chucking Nut A N 120 2 nn
2
3
4
7
30
89
10
11 12
13
32
19
16
15
20
17
18
14
5A
5B
6
29
TRN1
TRN2
21
22
23
33
25
26
27
28
24
31
n= yes x= no opt = optional

Nozzle
In time, the nozzle may wear or be damaged and may need to be replaced.
1.Unscrew the handle.
2.Loosen the needle chucking nut.
3.Gently pull the needle part way back. It doesn’t need to be fully pulled
out.
4.Unscrew the needle cap and the nozzle cap.
5.Unscrew the nozzle counter-clockwise with the provided wrench.
6.Screw the new nozzle into the airbrush body with your fingers.
7.Slightly tighten the nozzle with the provided wrench.
• DO NOT OVER TIGHTEN!
8.Screw the needle cap and nozzle cap onto the airbrush body.
9.Push the needle all the way forward until it seats with the new nozzle.
10.Tighten the needle chucking nut.
11. Screw the handle onto the airbrush body.
TIP: Keep a spare nozzle on hand for unforeseen accidents.
Needle
Needles are subject to easy physical damage because of the long tapered,
extremely fine tip. If the needle point becomes severely bent, it must be
straightened before pulling it back through the nozzle. If not, the bent
needle might damage the nozzle
as it’s pulled through.
TIP: Keep a spare needle on hand for unforeseen accidents.
Copyright © 2014 Iwata-Medea Inc. All rights reserved. The Iwata-Medea logo, Iwata-Medea®, Iwata Eclipse™, Iwata Revolution™, Iwata Kustom™, Iwata Micron™, Sprint Jet™, Smart Jet™, Power Jet Pro™, Power Jet Lite™, Medea Super Lube ™, Pistol Grip Filter™, and
all products denoted with ® or ™ are registered trademarks or trademarks of Iwata-Medea Inc. • Iwata® and the Iwata logo are registered trademarks of Anest Iwata Japan. For more information visit www.iwata-medea.com
Rev4 10/15
— www.IWATANEO.com —
ANEST IWATA-MEDEA, Inc. • 1336 N. Mason St., Portland, OR 97217
REPLACEMENT PARTS AND ACCESSORIES REFER TO MASTER PARTS LIST ON PAGE 4
WARRANTY
All NEO for Iwata airbrushes are Warranted against all manufacturing defects of material and manufacture or workmanship for a period of FIVE years from the
date of purchase. This warranty does not cover uid needles or uid nozzles since these parts need to be replaced occasionally due to normal wear. Any other part or
material that is or becomes defective so as not to be usable within this period will be repaired or replaced. This warranty does not cover damage caused by negligence
or airbrushes that have been altered or abused in any way. Call or email Iwata-Medea before returning an airbrush for the appropriate procedure for warranty repairs.
6
This manual suits for next models
1
Table of contents
Other Iwata Paint Sprayer manuals

Iwata
Iwata Eclipse G3 User manual

Iwata
Iwata PT2S User manual

Iwata
Iwata Custom Micron CM-B User manual

Iwata
Iwata Eclipse G6 User manual

Iwata
Iwata AZ3 HTE P.A.S. Concept User manual

Iwata
Iwata Kustom K9200 User manual

Iwata
Iwata LPH-440-141 User manual

Iwata
Iwata Airrex Katana Plus User manual

Iwata
Iwata Revolution TR1 Manual

Iwata
Iwata Super Nova WS-400-1301B User manual