manuals.online logo
Brands
  1. Home
  2. •
  3. Brands
  4. •
  5. Jack Wolfskin
  6. •
  7. Tent
  8. •
  9. Jack Wolfskin YELLOWSTONE VENT II User manual

Jack Wolfskin YELLOWSTONE VENT II User manual

The YELLOWSTONE II/III/IV are classic
2 - 4 person dome tents with innovative Jack
Wolfskin details.
The additional roof pole can be used to rig two
weatherproof entrance porches with ample
storage space for extra gear. The mosquito
mesh inner tent screens and the roof vents
(chimney ventilation effect) provide air
conditioned comfort.
In tropical regions or in hot weather the flysheet
can be dispensed with entirely. The inner tent
then serves as a comfortable, insect proof
accommodation unit.
Additional useful features include a variable roll-
shut pack sack, mesh storage pouches and
drying line loops in the inner cabin.
YELLOWSTONE II/III/IV sind klassische
2-Bogen-Kuppelzelte für 2 oder 4 Personen mit
innovativen Jack Wolfskin Details.
Die zusätzliche Dachstange bildet zwei
wetterfeste Eingangsapsiden mit viel Platz für
zusätzliche Ausrüstung. Die Moskitonetz-
Innenzeltfenster und die Dachbelüftung
(Kamineffekt) sorgen für besten Klimakomfort.
In tropisch heißen Gegenden kann das Überzelt
auch ganz weggenommen werden und das
Innenzelt dient dann als komfortabler
Moskitoschutz.
Zusätzlichen Nutzen bieten der variable Roll-
Packsack, die Netztaschen und
Wäscheleinenschlaufen im Innenzelt.
CONTENTS OF TENT PACK SACK
· 1 inner tent/ 1 flysheet
· 16 pegs, repair materials & seam
sealant in peg bag
· 1 pole bag
· 2 pole components
(1 set linked poles, 1 short roof pole)
· 1 pole repair sleeve
JACK WOLFSKIN entwickelt seine Produkte ständig weiter. Wir behalten uns vor, einzelne Komponenten zu verändern.Abbildungen
der Aufbauanleitung können vom aktuellen Produkt abweichen.
At JACK WOLFSKIN we are continually improving and upgrading our products. We therefore reserve the right to make changes
to individual components. Diagrams used for the pitching instructions may differ slightly from the actual product.
ZELTPACKSACKINHALT
· 1 Innenzelt/1 Außenzelt
· 16 Heringe, Reparaturmaterialien &
Nahtabdichter im Heringspackbeutel
· 1 Stangenpackbeutel
· 2 Stangen
(1 Gestängeverbund, 1 Dachstange)
· 1 Reparaturhülse
BELÜFTUNG
Ihr Zelt ist mit ausreichenden
Belüftungsmöglichkeiten ausgestattet. Sorgen
Sie immer für eine gute Luftzirkulation um die
Gefahr der Kondenswasserbildung zu
vermindern. Dennoch ist Kondenswasserbildung
unvermeidbar. Verwechseln Sie Kondenswasser
bitte nicht mit eindringender Feuchtigkeit.
PFLEGE
Reinigen Sie Ihr Zelt in aufgebautem Zustand
ausschließlich mit Wasser und wenig Seife.
Befreien Sie vor allem die Reißverschlüsse
regelmäßig von Schmutz und Sand. Auf keinen
Fall in die Waschmaschine oder Reinigung
geben, da hier die Beschichtung irreversibel
zerstört werden kann. Geeignete
Silikonschmiermittel schützen Stangen vor
Korrosion und Reißverschlüsse vor dem
Einfrieren.
FEUER
Offenes Feuer und Flammen sind eine Gefahr
für Zeltgewebe. Vermeiden Sie offenes Feuer
in unmittelbarer Nähe des Zeltes.
VENTILATON
Your tent is equipped with sufficient ventilation
options. Try to ensure that there is always a
good flow of air through the tent to reduce the
risk of condensation build-up. However,
condensation cannot completely be avoided.
Please do not confuse condensation with actual
water penetration through the fabric of the tent.
CARE AND MAINTENANCE
Clean your tent when pitched, using only a little
soap and water. Zips in particular should be
cleaned regularly to remove dirt and grit. On no
account should the tent be machine washed or
dry cleaned, since this could cause irreversible
damage to the protective coating on the tent
fabric. Suitable silicone-based lubricants protect
poles from corrosion and prevent zips freezing.
FIRE PREVENTION
Open fires and flames are a hazard for tent
materials.Avoid naked flames in the immediate
vicinity of the tent.
Beim ersten Aufbau: Sie sollten Ihr neues
Zelt erst einmal probeweise aufbauen, und
sich vor Antritt der ersten Reise mit allen
Aufbauschritten vertraut machen.
Wählen Sie zunächst einen geeigneten
Standort für Ihr Zelt aus (1) und entfernen
Sie dort alle spitzen Gegenstände, die den
Zeltboden beschädigen könnten. Breiten
Sie Ihr Zelt flach auf dem Boden aus und
fügen Sie die Segmente des
Stangenverbundes sorgfältig zusammen,
so dass diese fest ineinander sitzen (2).
Achten Sie darauf, dass während des
Aufbaus alle Reißverschlüsse geschlossen
sind.
Pitching your tent for the first time:
We recommend you to do a dry run with
your new tent, in order to familiarise yourself
with all the pitching instructions before your
first trip.
Choose a suitable site (1), removing any
sharp objects which might damage the
groundsheet. Spread out the tent on the
ground and carefully connect all pole
sections of the linked pole framework,
ensuring they lock together firmly (2).
Ensure that all zips are closed when
pitching the tent.
Legen Sie das verbundene Stangenkreuz
über das ausgebreitete Innenzelt. Achten
Sie darauf, dass das T-förmige
Verbindungselement am Kunststoff-
Kreuzgelenk nach unten zum Innenzelt
zeigt.
Klicken Sie die runden ballförmigen
Stangenenden in die Kunststoff-
Gestängeaufnahme an den jeweiligen
Bodeneckbändern und bilden so eine
Kreuzkuppel (1/2).
Spread out the inner tent and lay the linked
pole framework on top. Ensure that the T-
shaped connector piece located on the
plastic cross joint points downwards
towards the inner tent.
Click the ball-shaped pole end tips into the
plastic FAST PITCH pole feet located on
the corresponding corner tapes to form the
crossover dome shape (1/2).
Fixieren Sie die Innendachmitte, indem
Sie den hufeisenförmigen
Kunststoffschieber auf das T-förmige
Verbindungselement am Stangenkreuz
aufschieben (3).
Befestigen Sie das restliche Innenzelt mit
den Kunststoffclips an den Stangen (4).
Fix the inner tent roof in position by sliding
the horseshoe-shaped plastic slider onto
the T-shaped pole connector piece located
at the point of intersection of the poles (3).
Attach the rest of the inner tent to the
poles using the plastic clips (4).
Fixieren Sie das Innenzelt an den
Bodeneckpunkten mit Heringen (1).
Schieben Sie die kurze Dachstange durch
den Stangenkanal am Außenzelt und
fixieren Sie die spitzen Dachstangenenden
in die Bandösen an den Ecken der
Außenzelt-Firstlinie (2/3).
Legen Sie nun das Außenzelt mit
Dachstange über das Innenzelt (4).
Anchor the inner tent at the bottom corners
with pegs (1).
Slide the short roof pole through the pole
channel on the flysheet and slot the pointed
end tips into the tape eyelet at the corners
of the flysheet ridge (2/3).
Now drape the flysheet with the roof pole
over the inner tent (4).
Fixieren Sie nachfolgend alle vier Ecken
des Außenzeltes an den jeweiligen
Bodeneckpunkten des Innenzeltes. Dazu
jeweils den Kunststoff-Clip in den dafür
vorgesehenen Steg an der Kunststoff-
Gestängeaufnahme einklicken. Bringen
Sie nun das Überdach über die
verstellbaren Clips auf Spannung (1).
Ziehen Sie nun an den übrigen
Befestigungsschlaufen die beidenApsiden
aus und befestigen diese mit weiteren
Heringen (2).
Attach all four corners of the flysheet to the
corresponding corners of the inner tent by
clicking each plastic clip into its respective
FAST PITCH pole foot. Next, place the
flysheet under tension using the adjustable
clips (1).
Next, take hold of the remaining anchor
loops, pull the two vestibules out and peg
them out (2).
Finally, use the guy lines and the remaining
pegs to tension the tent and render it wind
stable (3).
It is recommended that the Velcro tapes
on the inside of the flysheet are also
attached to the poles.
The guy lines should be pegged out in line
with the poles and seams of the dome
construction. When wet the tent material
may stretch. Re-guy if necessary.
Spannen Sie Ihr Zelt anschließend mit Hilfe
der dafür vorgesehenen Abspannleinen
und der restlichen Heringe sturmstabil aus
(3). Dazu empfiehlt es sich die Klettbänder
auf der Innenseite des Überdachs um die
Stangen zusätzlich zu befestigen.
Die Ausrichtung der Abspannleinen sollte
dem Stangen- und Nahtverlauf der
Kreuzkuppel folgen. Bei Nässe kann sich
das Zeltmaterial dehnen. Es muss dann
etwas nachgespannt werden.
Achten Sie beimAbbau unbedingt darauf,
die Spannung des Außenzeltes zu lösen
bevor Sie die Dachstange entnehmen. Um
das Einpacken und den nächsten Aufbau
zu erleichtern, fassen Sie die
Abspannleinen so kurz wie möglich und
beachten Sie folgende Schritte:
Legen Sie das Außenzelt längs halbiert
auf die Seite (1) und und schlagen Sie die
Apsiden ein (2).
Dritteln Sie das Zelt erst längs (3) und dann
quer (4).
Schließlich wird das Zelt mit Hilfe des
Gestängesacks eingerollt (5/6).
When dismantling the tent, make sure that
you release the tension on the flysheet
before removing the roof pole. In order to
simplify the packing and future pitching
procedures, roll the guy lines up as short
as possible and take note of the following
steps:
Fold the outer tent lengthways into two,
lay it on its side (1) and fold in the vestibule
sections (2).
Separately fold the flysheet and then the
inner tent lengthways into three and put
on tent on the other (3). Then fold both
crossways (4).
Finally, roll the tent up around the pole bag
(5/6).
WEITERE TIPPS
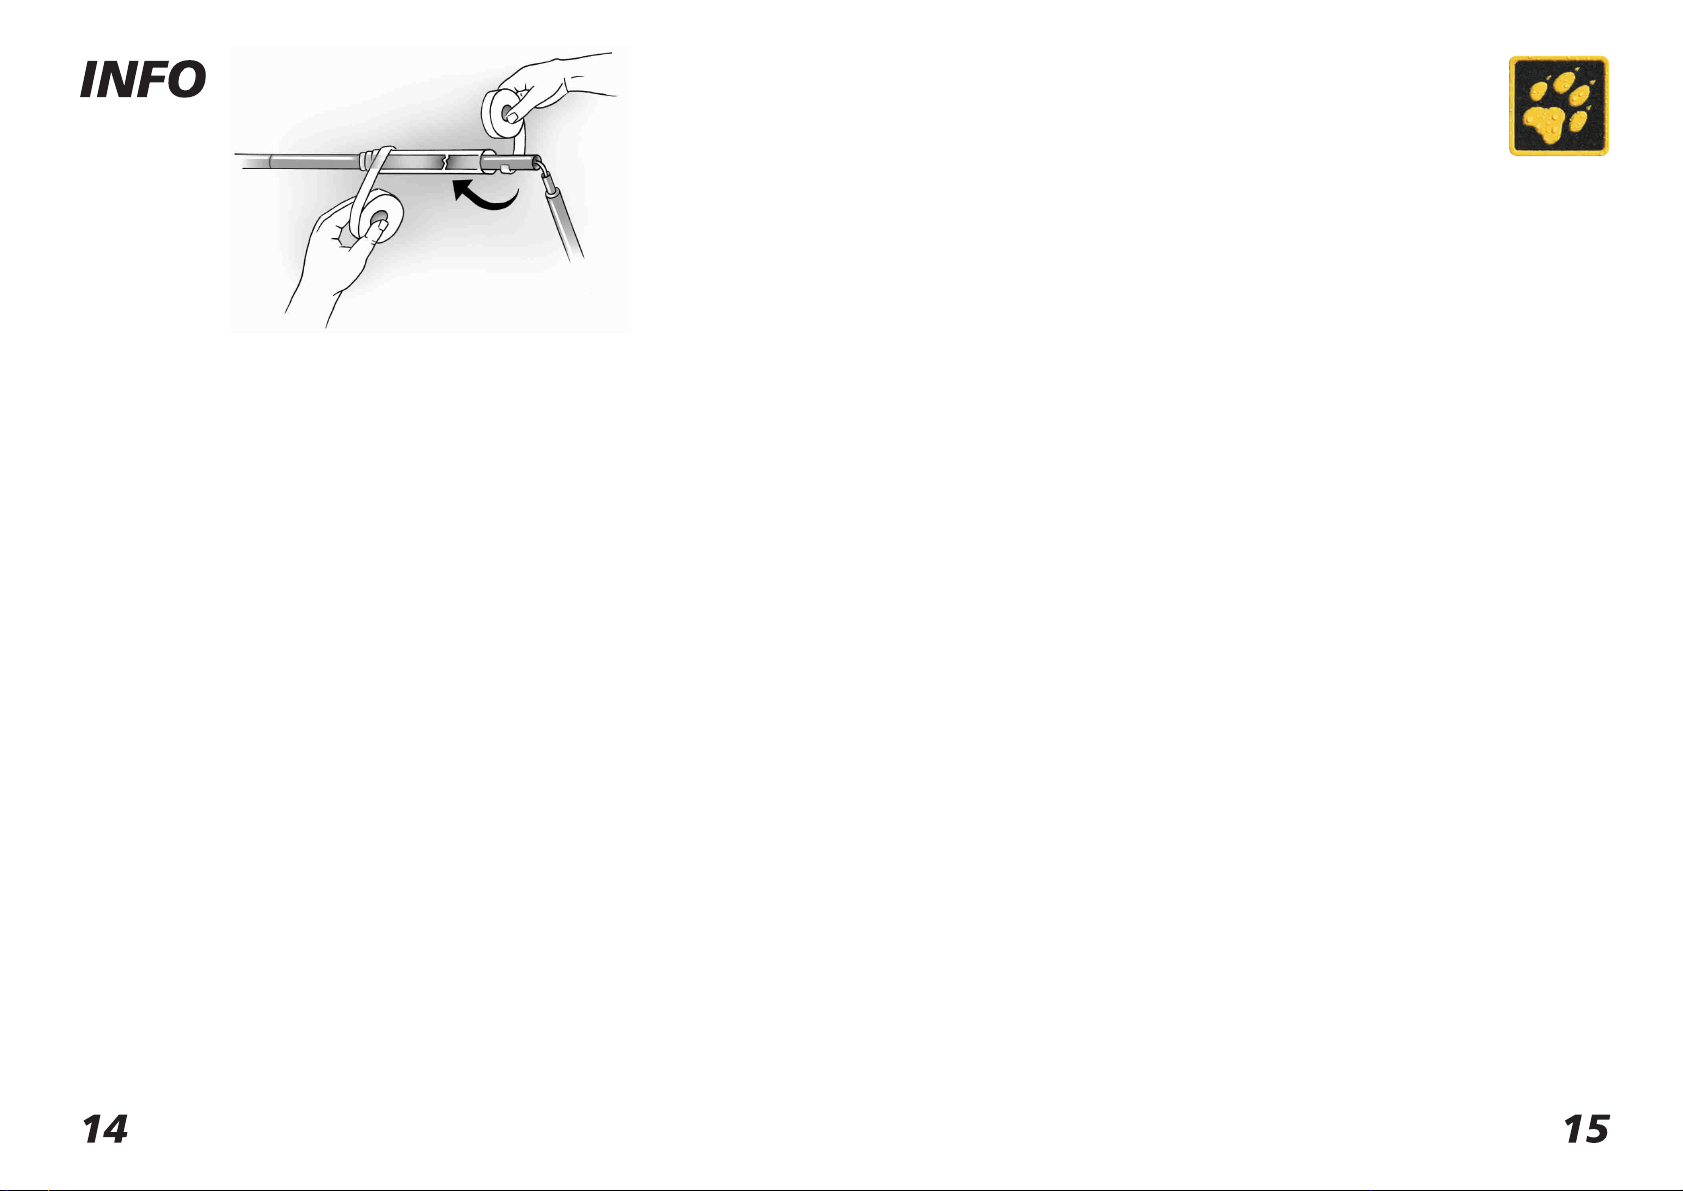
Die stramme Grundspannung der Stangen, des
Überzeltes und der Abspannleinen sind die
Voraussetzung für besten Stand und
Sturmstabilität Ihres Zeltes.
Überprüfen Sie den Sitz der Stangen und
spannen Sie Überzelt undAbspannleinen immer
straff aus. Investieren Sie beimAufbau ruhig ein
paar Minuten mehr an Zeit und Mühe, dann
können Sie beim nächsten Wettereinbruch ganz
„entspannt“ sein.
NAHTDICHTER
Die wichtigsten Nähte sind mit einer speziellen
Nahtbandversiegelung versehen. Es empfiehlt
sich Nahtstellen, in die Bänder oder Gummilitzen
mit eingefasst sind und die so die Bandabklebung
unterbrechen, von innen und außen zusätzlich
mit beiliegendem PU Nahtdichter abzudichten.
Eine Garantie für die Verklebung ist
ausgeschlossen.
FURTHER TIPS
Correct initial tensioning of the poles, the flysheet
and the guy lines are the prerequisites for a
secure pitch and optimum wind stability.
Check that the poles are correctly positioned
and seated and always tension the flysheet and
the guylines correctly. Take your time; a few
minutes spent checking the tent during pitching
will mean that you can relax when the weather
next turns bad!
SEAM SEALANT
The important seams are specially tape sealed.
However we do recommend additional sealing
with the PU seam sealant provided, particularly
at those points of the seam where tapes or
rubber tensioning loops are integrated into seam
and thus interrupt the continuity of the tape seal.
We offer no guarantee on the seam taping of
the seams.
REPARATUREN
Reparaturmaterialien für kleine Reparaturen
unterwegs liegen bei. Produktionsfehler werden
im Rahmen der Garantieleistungen repariert.
Andere Reparaturen führen wir gegen eine
Gebühr gerne aus. Schicken Sie das gereinigte
Zelt mit klarer Reparaturkennzeichnung/-
anweisung und Ihrem Kaufbeleg über Ihren
Fachhändler ein.
LAGERUNG
Bevor Sie Ihr Zelt längere Zeit lagern, muss es
vollkommen durchgetrocknet sein, sonst besteht
Gefahr von Schimmel- und Stockfleckenbildung.
UV STRAHLUNG
Ultraviolette (UV) Strahlung zerstört mit der Zeit
alle modernen Zeltmaterialien. Das spezielle
Polyester-Zeltmaterial erhöht die Lebensdauer
gegenüber herkömmlichen Nylon-
Zeltmaterialien, kann aber auch auf Dauer der
Natur nicht trotzen. Bitte vermeiden Sie deshalb
dauerhafte intensive Sonneneinwirkung. JACK
WOLFSKIN übernimmt keine Garantie für
Schäden durch UV Strahlung.
REPAIRS
Repair materials for minor repairs during usage
are provided. Production faults will be repaired
under the terms of our guarantee. Our service
department will be pleased to perform other
repairs for a small charge. Please send in your
cleaned tent via your nearest dealer, enclosing
clear repair instructions and proof of purchase.
STORAGE
Allow your tent to dry thoroughly while still
assembled before storing it for any longer period.
This will prevent mildew and damp stains
forming.
UV LIGHT
Ultraviolet (UV) radiation reduces the tear
strength of all tent materials in the course of
time. The special polyester tent material
increases the service life in comparison with
conventional nylon materials. Tent materials,
however, cannot permanently defy the effects
of nature. Therefore, please avoid subjecting
the tent to intensive sunlight for extended periods
of time. JACK WOLFSKIN will not assume any
liability for damage caused by ultraviolet light.

Other manuals for YELLOWSTONE VENT II

2

This manual suits for next models

5

Other Jack Wolfskin Tent manuals

Jack Wolfskin BASE CAMP DOME User manual

Jack Wolfskin

Jack Wolfskin BASE CAMP DOME User manual

Jack Wolfskin Front Porch User manual

Jack Wolfskin

Jack Wolfskin Front Porch User manual

Jack Wolfskin beach club User manual

Jack Wolfskin

Jack Wolfskin beach club User manual

Jack Wolfskin Termite II User manual

Jack Wolfskin

Jack Wolfskin Termite II User manual

Jack Wolfskin diamond tarp User manual

Jack Wolfskin

Jack Wolfskin diamond tarp User manual

Jack Wolfskin TRAVEL LODGE RT User manual

Jack Wolfskin

Jack Wolfskin TRAVEL LODGE RT User manual

Jack Wolfskin ELLOWSTONE VENT II User manual

Jack Wolfskin

Jack Wolfskin ELLOWSTONE VENT II User manual

Jack Wolfskin skylight User manual

Jack Wolfskin

Jack Wolfskin skylight User manual

Jack Wolfskin SKYROCKET II DOME User manual

Jack Wolfskin

Jack Wolfskin SKYROCKET II DOME User manual

Jack Wolfskin YELLOWSTONE VENT II User manual

Jack Wolfskin

Jack Wolfskin YELLOWSTONE VENT II User manual

Jack Wolfskin mesa grande User manual

Jack Wolfskin

Jack Wolfskin mesa grande User manual

Jack Wolfskin NORTH BAY II User manual

Jack Wolfskin

Jack Wolfskin NORTH BAY II User manual

Jack Wolfskin ECLiPSE II User manual

Jack Wolfskin

Jack Wolfskin ECLiPSE II User manual

Jack Wolfskin grand illusion ii/ grand illusion iv User manual

Jack Wolfskin

Jack Wolfskin grand illusion ii/ grand illusion iv User manual

Jack Wolfskin TRAVEL LODGE RT User manual

Jack Wolfskin

Jack Wolfskin TRAVEL LODGE RT User manual

Jack Wolfskin Termite II User manual

Jack Wolfskin

Jack Wolfskin Termite II User manual

Jack Wolfskin Beach Shelter III User manual

Jack Wolfskin

Jack Wolfskin Beach Shelter III User manual

Jack Wolfskin STARLIGHT User manual

Jack Wolfskin

Jack Wolfskin STARLIGHT User manual

Jack Wolfskin gossamer User manual

Jack Wolfskin

Jack Wolfskin gossamer User manual

Jack Wolfskin pyramid tarp xt User manual

Jack Wolfskin

Jack Wolfskin pyramid tarp xt User manual

Jack Wolfskin GRAND ILLUSION IV User manual

Jack Wolfskin

Jack Wolfskin GRAND ILLUSION IV User manual

Jack Wolfskin time tunnel ii Rt User manual

Jack Wolfskin

Jack Wolfskin time tunnel ii Rt User manual

Jack Wolfskin gossamer User manual

Jack Wolfskin

Jack Wolfskin gossamer User manual

Jack Wolfskin MOONSHADOW User manual

Jack Wolfskin

Jack Wolfskin MOONSHADOW User manual

Popular Tent manuals by other brands

HOMEbox HOMEBOX manual

HOMEbox

HOMEbox HOMEBOX manual

OZtrail CTC-1209-D owner's manual

OZtrail

OZtrail CTC-1209-D owner's manual

OZtrail MP-SDF owner's manual

OZtrail

OZtrail MP-SDF owner's manual

Wenzel Durango Magnetic Screen House 73652520FN Assembly instructions

Wenzel

Wenzel Durango Magnetic Screen House 73652520FN Assembly instructions

T.A. Plastic Evolution installation guide

T.A. Plastic

T.A. Plastic Evolution installation guide

ClearSpan 104450 instruction manual

ClearSpan

ClearSpan 104450 instruction manual

Infinity Marquee 15 x 80 Setup instructions

Infinity

Infinity Marquee 15 x 80 Setup instructions

Pinnacle Tents 1014 Setup and Assembly Instructions

Pinnacle Tents

Pinnacle Tents 1014 Setup and Assembly Instructions

Coleman LAKESIDE 9163-150 instructions

Coleman

Coleman LAKESIDE 9163-150 instructions

Exped VENUS III DLX EXTREME instructions

Exped

Exped VENUS III DLX EXTREME instructions

Ventura Camping Basic X Large quick start guide

Ventura Camping

Ventura Camping Basic X Large quick start guide

toolport PT-L1-Q1 Assembly instructions

toolport

toolport PT-L1-Q1 Assembly instructions

Outer Tents OSPREY installation manual

Outer Tents

Outer Tents OSPREY installation manual

SHELTER GS3065 Assembly manual

SHELTER

SHELTER GS3065 Assembly manual

P.Lindberg SS-22630 Original manual

P.Lindberg

P.Lindberg SS-22630 Original manual

Outdoor Revolution Movelite XL quick start guide

Outdoor Revolution

Outdoor Revolution Movelite XL quick start guide

Napier BACKROADZ 13100 quick start guide

Napier

Napier BACKROADZ 13100 quick start guide

Vortex 6400 Louvre Pergola owner's manual

Vortex

Vortex 6400 Louvre Pergola owner's manual

manuals.online logo
manuals.online logoBrands
  • About & Mission
  • Contact us
  • Privacy Policy
  • Terms and Conditions

Copyright 2025 Manuals.Online. All Rights Reserved.