manuals.online logo
Brands
  1. Home
  2. •
  3. Brands
  4. •
  5. Jaga
  6. •
  7. Heater
  8. •
  9. Jaga OXYGEN Hybrid Campus User manual

Jaga OXYGEN Hybrid Campus User manual

Montagehandleiding / Instructions de montage / Instrucciones de montaje / Mounting instructions
OXYGEN Hybrid Campus
www.theoxygenradiator.com
Ø12.5
3.5 3.9
28.5
27
15
40
L
51.3
18
M 24 18.95
3.8 1.5
max 8
Afmetingen / Dimensions / Dimensiones / Dimensions
Afmetingen aansluiting hydraulisch / Dimensions raccordement hydraulique
Cotas de conexiones hidráulicas / Dimensions hydraulic connections
Filter vervangen / Remplacer le filtre / Cambio de filtros / Replace the filter
El cambio de filtros no es necesario que lo
realice una empresa de mantenimiento.
Werking / Opération / Funcionamiento / Operation
Wij adviseren de filter regelmatig te vervan-
gen, interval hangt af van belasting en situatie
van omgeving.
Bij het vervangen van de filter dient u het nets
-
noer uit het stopcontact te verwijderen.
Nous vous recommandons de remplacer le
filtre régulièrement en fonction de l’environne
-
ment et des conditions d’utilisation.
Lors du replacement du filtre, retirez la fiche
de la prise de courant.
We recommend that the filter is changed
periodically, the interval will depend on the
location, for example if the building is on a
main road or in a town centre.
When changing the filter the unit should be
disconnected from the mains power.
No specialist required!
Se recomienda cambiar el filtro periodicamente
wechseln.
Filter / Filtros :
G3, code: 8800.1271
M6, code 8800.1274
F9, code 8800.1277
A
A
B
L > 105 125 145 165 185 205 225 245 265
La vida útil depende de la situación, por ejemplo
si el edificio está en el centro de ciudad o cerca de
una autopista.
Se debe desconectar la alimentación para realizar
el cambio de filtro.
No es necesario personal especializado!
www.theoxygenradiator.com
Demonteer de voorste bekleding / Retirer le couvercle avant / Desmontar el panel frontal / Remove the front cover
1
A
B
C
Draai de schroef een kwart-slag naar links om het voorpaneel te ontgrendelen.
Tourner la vis de un quart de tour vers la sauche pour déverrouiller le panneau
avant.
Girar los dos cierres 90° (1/4 de vuelta) con un destornillador para desbloquear
el panel frontal
Rotate screw 90° (1/4 turn) to unlock the front panel.
www.theoxygenradiator.com
Gaten voor buitenluchtaanvoer / Trous pour l’alimentation en air extérieur / Perforaciones para ventilación / Hole for the inlet air
27
27
27
27
27
27
L 105
L 125 cm
L 145 cm
L 165 cm
L 185 cm L 205 cm
L 225 cm
L 245 cm
L 265 cm
62.5 62.5
8045 40
10045 40 60 6045 40
707045 40
808045 40
60606045 40
6045 40
52.5 52.5
27
27
27
1 1 2 32
1 1 2 32
1 1 2 32
1 1 2 3 4
1
±5°
Belangrijk / Important / Importante
Boor het gat (125 mm) voor de buitenluchttoevo-
er onder een hoek van minimaal 5° naar bene-
den (van binnen naar buiten om inwatering van
buitenaf te voorkomen).
Percez le trou (125 mm) pour l’alimentation
d’air d’extérieur en formant un coin de 5° mini-
mum en bas (de l’intérieur vers l’extérieur pour
prévenir suintement de l’extérieur).
Perforar agujero (125 mm) para la entrada de
aire exterior con un ángulo Mínimo de 5° hacia
fuera (para prevenir la entrada de agua exterior).
Drill the hole (125 mm) for the air supply outside
at an angle of 5° minimum (from inside to out-
side to prevent external soaking).
Boren van gaten voor buitenluchtaanvoer
Percer des trous pour l’alimentation en air extérieur.
Perforar los agujeros para la entrada de aire
Drill holes for the inlet air
2
www.theoxygenradiator.com
Belangrijk / Important / Wichtig
Het type wand bepaalt welk soort plug en schroef
(niet meegeleverd) gebruikt dient te worden.
Le type de mur détermine le type de vis (Non
inclus) ou le module d’extention qui est utilisé.
El tipo de pared determinará el tipo de tornillos
(No incluidos) necesarios para la instalación.
The type of wall etermines the type of screw or
plug (not included) that is used.
Belangrijk / Importante / Wichtig
Jaga adviseert een buisdiameter van Ø 125 mm
toe te passen. Een kleinere diameter kan een
lagere flow en een hogere geluidsproductie
veroorzaken.
Gebruik een muurrooster dat bestand is tegen
regeninslag en wind invloeden.
- bepaal de lengte van de kunststof doorvoerbuis
en zaag deze op maat
- de buis mag aan de binnen/buitenzijde niet
uitsteken en gelijk zijn met de muur
- bevestig de buis en buitenrooster in de muur en
kit rondom af
Jaga conseille d’appliquer un tuyau d’un dia-
mètre de Ø 125 mm. Un diamètre plus petit peut
causer un flux plus faible et une plus grande
production de bruit.
Utilisez un tableau mural rèsistant aux impacts
de pluie et influences du vent.
- déterminez la longueur du tube synthétique et
coupez-le à la dimension souhaitée
- il ne doit pas dépasser du mur ni à l’intérieur ni
à l’extérieur
- fixation du tuyau et de la grille extérieure au
mur, Isoler autour
Jaga recomienda un tubo de Ø 125 mm de diámetro
Un diametro menor puede provocar niveles sono-
ros más altos o pérdida de caudal
Usar una rejilla que impida la entrada de agua.
- determinar la longitud del tubo sintético y
cortar a la medida correcta.
- asegurarse de que el tubo no sobresale de
lapared ni en el interior ni el exterior.
- Fijar el tubo y la rejilla exterior. Aislar por
ambos lados.
Jaga advises a pipe diameter of Ø 125 mm. A
smaller diameter may lead to lower flow and
higher noise levels.
Use a wall grille that will prevent the ingress of
rain and drafts.
- determine the length of the plastic lead through
pipe, and saw to the correct length.
- ensure the tube is cut so that it does not pro-
trude from the wall! The tube must be parallel
with the wall.
- fix the tube and external grille in the wall. Iso-
late on all sides.
Boren van gaten voor wandbevestiging / Percer des trous pour le fixation murale.
Hacer las perforaciones para el anclaje a pared / Drill holes for the wall fixing Plaatsen van buis en buitenrooster / Mettre le tuyau et la grille extérieure
Colocar el tubo y la rejilla exterior / Place the tube and external grille
3 4
9 mm
5mm
Boor de gaten t.b.v. het ophangen van het appa-
raat.
Plaats muurpluggen.
Percer les trous pour l’appareil.
Fixation chevilles.
Perforar los agujeros para colgar la unidad.
Introducir los tornillos.
Drill the holes on behalf of hanging the appliance.
Fit wall plugs.
Draai er de schroeven (min 5x60) in en laat ze 5
mm uit de muur steken.
Visser les vis fournis (min 5x60) et faites-les pro-
tubérer 5 mm du mur.
Poner los tornillos (min 5x60) dejar la cabeza 5
mm sobresaliendo de la pared.
Drive in the screws (min 5x60) and let them put
out 5 mm from the wall.
Rondom afkitten / Isoler autour / Aislar por ambos lados / Isolate on all sides
www.theoxygenradiator.com
Plaats de slobgaten over de schroeven en schuif
het geheel naar beneden.
Draai de schroeven of bouten NIET te strak aan. Te
vast aandraaien kan de werking van het toestel ne-
gatief beïnvloeden (v.b. bij niet rechte wand).
Placez l’appareil contre le mur, par dessus les vis
et faites le coulisser sur les têtes de vis pour le
maintenir en place.
Ne serrez PAS les vis ou boulons trop fermement.
Visser trop fort peut influencer négativement le
fonctionnement de l’appareil (inégalités du mur).
Place the slots on the screws and sliding it down.
Please do NOT over tighten the screws, as this may
hinder the performance of the apparatus. (defor-
mation of the wall).
Aansluiting hydraulisch / Raccordement hydraulique
Conexión hidráulica / Hydraulic connections
Toestel plaatsen / Mounting the Device
Montaje del equipo / Montage du dispositif
5 6
CODE
/ ART.-Nr.
5090.1120
Pro Sleutel / Clé Pro
Llave Jaga Pro / Pro Key
Gereedschap voor montage van het pro ventiel
Outillage pour le montage de la vanne Jaga Pro
Llave necesaria para las válvulas Jaga Pro
Tool for easy mounting of he Jaga Pro valve
M 24
2.5
M 24
2.1
3.1
CODE / ART.-Nr. 5095.020
Bocht 90°/ Courbe 90°
Curva de 90°/ Curve 90°
M24 x M24
Aansluiting naar de wand met bochten
Raccordement vers le mur avec courbes
Para conexión de a pared con curvas
Connection to the wall with curves
Thermostaatkoppen / Tête de vanne thermostatique / Cabezal termostático / Thermostatic heads
CODE
/ ART.-Nr.
5090.1125 CODE
/ ART.-Nr.
5090.1104
CODE
/ ART.-Nr.
5090.1126 CODE
/ ART.-Nr.
5090.1110
CODE
/ ART.-Nr.
5090.1119 CODE
/ ART.-Nr.
5090.1111
max. 96
max. 96
CODE 5095.020
1.5
3.8
1.5
3.8 19
19
2.5
4.5
M24
max. 96
CODE 5095.020
1.5
3.8
1.5
3.8 19
19
2.5
4.5
M24
Naar de muur / Vers le mur / Hacia la pared / To the wall
Naar de vloer / Vers le sol / Hacia el suelo / To the floor
Situar el equipo haciendo coincidir los tornillos con
los anclajes de la carcasa y deslizar hacia bajo.
Atención. No reapretar los tornillos. esto puede
afectar negativamente al rendimiento del equipo
(por deformación contra la pared).
www.theoxygenradiator.com
Aansluiting elektrisch / Raccordement électrique
Conexiones eléctricas / Electrical connections Aansluiting Green Wire / Raccordement Green Wire
Conexión Green Wire / Green Wire connection
Met OXAM.001 analoge module 0..10V / Avec OXAM.001 module analogique 0..10V
con Módulo analógico OXAM.001 a 0 .. 10V / With OXAM.001 analog module 0 .. 10V
M 24 189,5
3.8 1.5
max 8
230V
GREEN
WIRE
7 8
OPTIE
OPTION
Bruin / Brun
Marrón /Brown
Blauw / Bleu
Azul / Blue
Geel-groen
Jaune-vert
Amarillo-Verde
Yellow-green
(L) 230 VAC
(N) 230 VAC
0 geleider / Tierra / Neutral
← 230 VAC
Geel / Jaune
Amarillo / Yellow
GREEN WIRE
Open de contactdoos en sluit de elektrische
bedrading aan op het aansluitblokje met de cor-
responderende kleur (zie schema).
Ouvrez la boîte de branchement et raccordez le
câble. Connectez les fils de couleur à leur con-
necteur correspondant. (voir schéma).
Open the wiring box and connect the electric ca-
bles. Ensure that you connect all wires to their
corresponding colors to prevent malfunction
(see diagram for details).
Open de contactdoos en sluit de “+” (rood) van
de OXAM aan op het aansluitblokje met de gele
bedrading, en de“-” (blauw) op het aansluit-
blokje met de blauwe bedrading (zie schema).
Ouvrez la boîte de branchement et raccordez
les câbles à l’interface avec la couleur de câble
correspondante (voir schéma).
Open the wiring box and connect the cables to
the terminal blocks with the reference colour
(see diagram for details).
GREEN WIRE
Geel / Jaune
Amarillo / Yellow
Blauw / Bleu
Azul / Blue
Rood / Rouge
Rojo / Red
←
←
OPCIÓN / OPTION: OXAM.001 →
Abrir la caja de conexiones y conectar los
cables. Asegurese de conectar todos los cables
con sus correspondientes colores para evitar
problemas de funcionamiento. (ver esquema)
Abrir la caja de conexiones y conectar los cables
a las clemas. Asegurese de conectar los cables
con sus correspondientes colores. (ver esquema)
Se puede instalar el módulo analógico OXAM.001
dentro de la caja de conexiones.
www.theoxygenradiator.com 27200.23200080 - 0212 - Jaga N.V.
Monteer de voorste bekleding / Montaje del panel frontal
9
C
A
B
Draai de schroef een kwart-slag naar om het voorpaneel te vergrendelen.
Tourner la vis de un quart de tour pour verrouiller le panneau avant.
Rotate screw 90° (1/4 turn) to lock the front panel.
Girar 90° (1/4 de vuelta) para bloquear el panel frontal.

Other Jaga Heater manuals

Jaga Micro Canal User manual

Jaga

Jaga Micro Canal User manual

Jaga Eyecatchers Sani Ronda User manual

Jaga

Jaga Eyecatchers Sani Ronda User manual

Jaga DBH SET User manual

Jaga

Jaga DBH SET User manual

Jaga STRADA User manual

Jaga

Jaga STRADA User manual

Jaga BRIZA 12 User manual

Jaga

Jaga BRIZA 12 User manual
Jaga Knockonwood User manual

Jaga

Jaga Knockonwood User manual

Jaga IGUANA APLANO APLW User manual

Jaga

Jaga IGUANA APLANO APLW User manual

Jaga Vertiga User manual

Jaga

Jaga Vertiga User manual

Jaga CLIMA CANAL HYBRID User manual

Jaga

Jaga CLIMA CANAL HYBRID User manual

Jaga VERTIGA HYBRID Series User manual

Jaga

Jaga VERTIGA HYBRID Series User manual

Jaga GEO 180 User manual

Jaga

Jaga GEO 180 User manual

Jaga Clima Canal H8 User manual

Jaga

Jaga Clima Canal H8 User manual

Jaga Eyecatchers Iguana Aplano User manual

Jaga

Jaga Eyecatchers Iguana Aplano User manual

Jaga MINI DYNAMIC CANAL User manual

Jaga

Jaga MINI DYNAMIC CANAL User manual
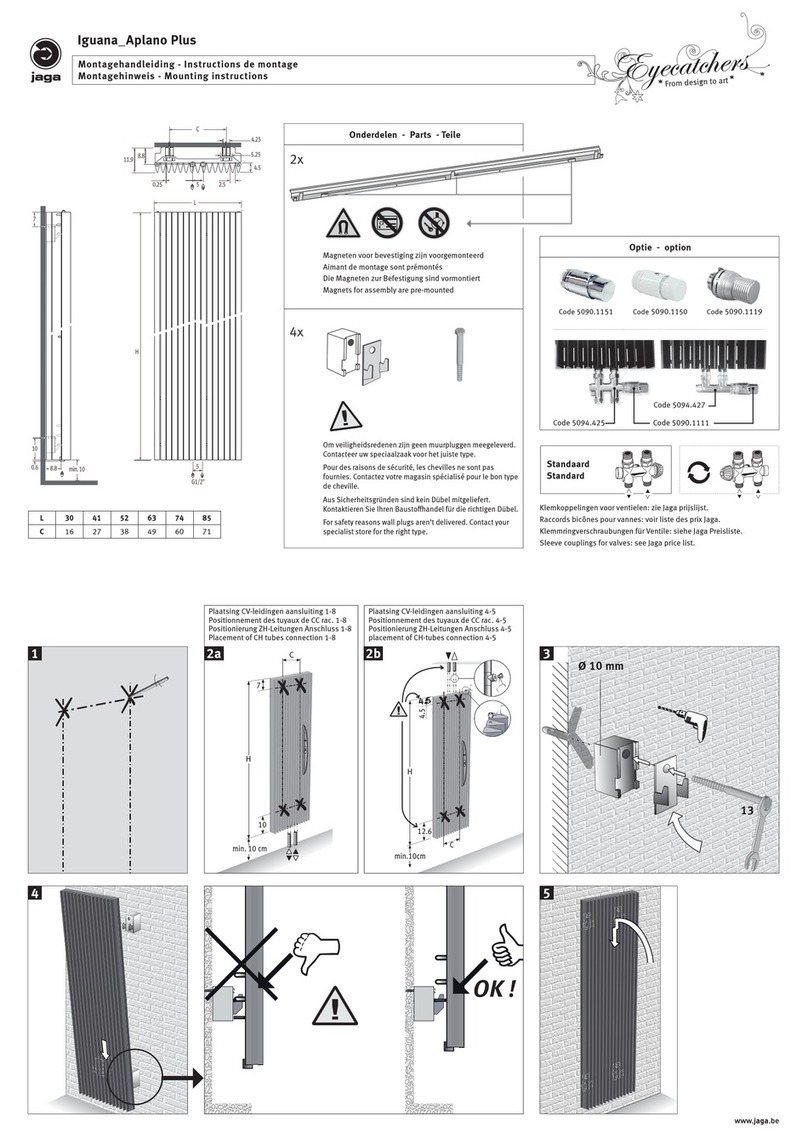
Jaga Knockonwood DBE KNUF User manual

Jaga

Jaga Knockonwood DBE KNUF User manual

Jaga BRIZA041 Wall User manual

Jaga

Jaga BRIZA041 Wall User manual

Jaga BRIZA 041 Wall User manual

Jaga

Jaga BRIZA 041 Wall User manual

Jaga BRIZA RAD 041 User manual

Jaga

Jaga BRIZA RAD 041 User manual

Jaga Maxi WT User manual

Jaga

Jaga Maxi WT User manual

Jaga IGUANA CIRCO Corner User manual

Jaga

Jaga IGUANA CIRCO Corner User manual

Jaga STRADA DBE 2.0 User manual

Jaga

Jaga STRADA DBE 2.0 User manual
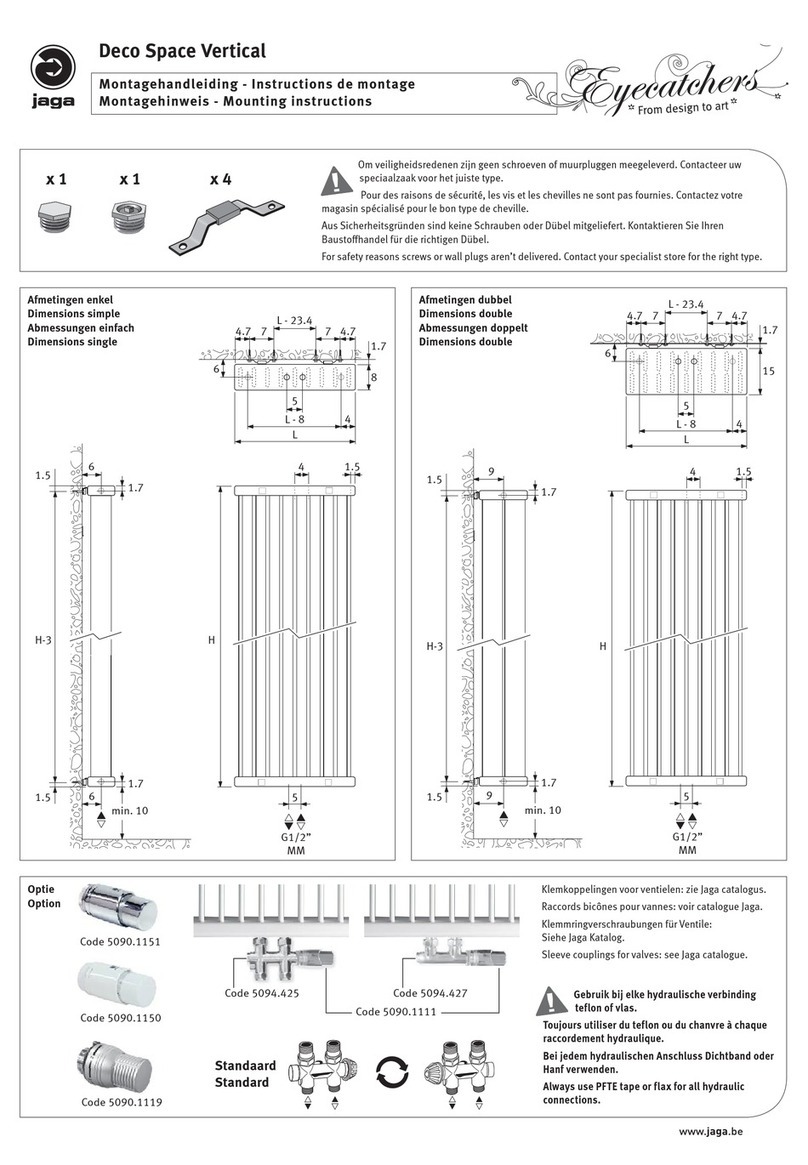
Jaga BRIZA 12 User manual

Jaga

Jaga BRIZA 12 User manual

Jaga KNOCKONWOOD User manual

Jaga

Jaga KNOCKONWOOD User manual

Jaga Eyecatchers Iguana Circo User manual

Jaga

Jaga Eyecatchers Iguana Circo User manual

Popular Heater manuals by other brands

Archgard 27-DVIM22N-2 Installation, operation and maintenance manual

Archgard

Archgard 27-DVIM22N-2 Installation, operation and maintenance manual

Toyotomi RC-41F Type A user guide

Toyotomi

Toyotomi RC-41F Type A user guide

Rotel CONVECTORHEATER761CH1 Instructions for use

Rotel

Rotel CONVECTORHEATER761CH1 Instructions for use

EUROM GOLDEN 2000 AMBER SMART instruction manual

EUROM

EUROM GOLDEN 2000 AMBER SMART instruction manual

Goelst Qurails G-Motion GM-1 Quick manual

Goelst

Goelst Qurails G-Motion GM-1 Quick manual

Convair CTH04 Owner's instruction manual

Convair

Convair CTH04 Owner's instruction manual

Goldair GFH135 operating instructions

Goldair

Goldair GFH135 operating instructions

Medisana HKS instruction manual

Medisana

Medisana HKS instruction manual

Flama 2362FL instruction manual

Flama

Flama 2362FL instruction manual

izzy TG200 IP3 instruction manual

izzy

izzy TG200 IP3 instruction manual

EMGA MO-EL MAUI 840C Use and maintenance

EMGA

EMGA MO-EL MAUI 840C Use and maintenance

Holmes HCH6001 owner's guide

Holmes

Holmes HCH6001 owner's guide

Lanair DUCTABLE DHI-300 Installation and operating instructions

Lanair

Lanair DUCTABLE DHI-300 Installation and operating instructions

Atlantic Maradja Digital manual

Atlantic

Atlantic Maradja Digital manual

Taurus Alpatec DAKAR 1500 instructions

Taurus Alpatec

Taurus Alpatec DAKAR 1500 instructions

AKO K 811 Installation and operating instructions

AKO

AKO K 811 Installation and operating instructions

Marta MT-2522 instruction manual

Marta

Marta MT-2522 instruction manual

Volkstechnik AHC 0622 Operation instructions

Volkstechnik

Volkstechnik AHC 0622 Operation instructions

manuals.online logo
manuals.online logoBrands
  • About & Mission
  • Contact us
  • Privacy Policy
  • Terms and Conditions

Copyright 2025 Manuals.Online. All Rights Reserved.