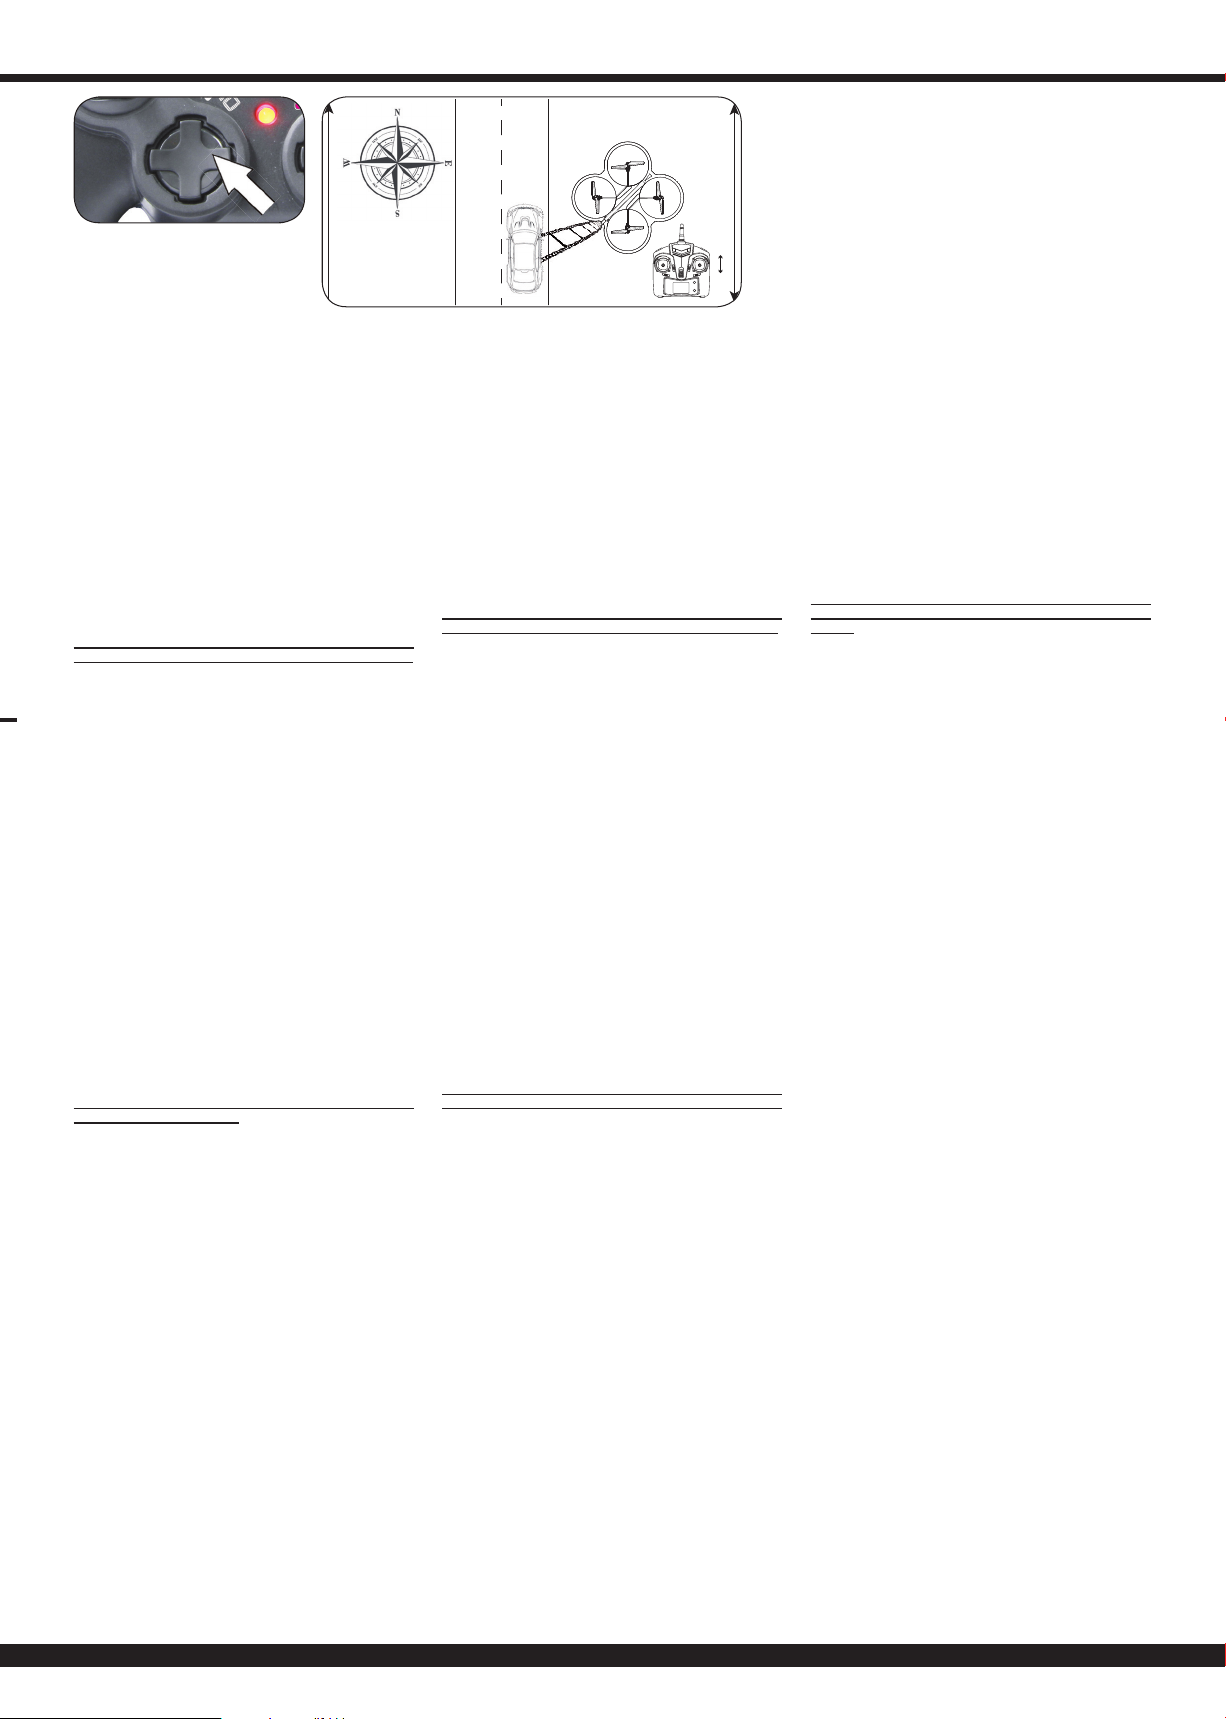
Jamara Catro AHP+ 2,4 GHz User manual

Axis
Achsen
K
m/h
K
K
m
K
m
m
K
m
K
m
K
m
K
m
/h
m/h
m
m/h
m
/h
/h
m/h
m
/h
40
DE - Allgemeine Hinweise
Jamara e. K. übernimmt keine Haftung für Schäden, die an dem Produkt selbst oder durch dieses
entstehen, sofern diese auf falsche Bedienung oder Handhabungsfehler zurückzuführen sind. Der
Kunde allein trägt die volle Verantwortung für die richtige Bedienung und Handhabung; dies umfasst
insbesondere die Montage, den Ladevorgang, die Verwendung bis hin zur Wahl des Einsatzberei-
ches. Bitte beachten Sie hierzu die Bedienungs- und Gebrauchsanleitung, diese enthält wichtige
Informationen und Warnhinweise.
GB - General information
Jamara e.K. is not liable for any damage caused to the product itself or through this, provided this
is due to improper operation or handling errors. The Customer alone bears the full responsibility for
the proper use and handling, including without limitation, the assembly, the charging process, the
use and choice of the operation area. Please refer to the operating and user instructions, it contains
important information and warnings.
FR - Remarques générales
La société Jamara e. K. n’est pas responsable de dommages, que ce soit au niveau du modèle ou
causé par celui-ci, résultant d’une utilisation non appropriée. Seul le client est responsable con-
cernant la mise en oeuvre et l’utilisation conforme du matériel; cela va de l’assemblage, en passant
par la charge des accus et allant jusqu’au domaine d’utilisation. Pour cela, veillez lire attentivement
la notice d’assemblage et d’utilisation, celle-ci contient d’importantes informations ainsi que les con-
signes de sécurités.
IT - Informazioni generali
Jamara e. K. non e´responsabile per danni, sostenute al prodotto stesso o attraverso questo, dovuti
ad una gestione non corretta del articolo. Solo il cliente si assume la piena responsabilità per la
manutenzione e l´utilizzo corretto dello stesso; questo include il montaggio, la ricarica, l´utilizzo,
noallasceltadellaaereadiapplicazione.Sipregadinotareerispettareleistruzionid´uso,questi
contengono informazioni e avvertimenti molto importanti.
ES - Información general
Jamara K. no se hace responsable de los daños causados al producto en sí o por medio de esto,
a menos que esto se debe al mal funcionamiento o errores de manejo. El cliente solo tiene la re-
sponsabilidad completa para el uso y manejo adecuado, incluyendo, sin limitaciones, el montaje,
el proceso de carga, el uso de hasta la elección de la zona de aplicación. Por favor, consulte las
instrucciones de uso y funcionamiento, contiene información y avisos importantes.
DE - Konformitätserklärung
Hiermit erklärt JAMARA e.K., dass das Modell‚ “Catro AHP+ 2,4 GHz mit HD Kamera, No. 422004“
in Übereinstimmung mit den grundlegenden Anforderungen und den anderen relevanten Vorschrif-
tenderRichtlinien2014/53/EU,2011/65/EUbendet.
WeitereInformationenndenSieauchunter:www.jamara-shop.com/Konformitaet
GB - Certi cate of Conformity
JAMARA e.K. hereby declares that “Catro AHP+ 2,4 GHz mit HD Kamera, No. 422004“ follow the
regulations and requirements as well as any ther relivant directives of the EEC directive
2014/53/EU and 2011/65/EU.
Furtherinformationcanalsobefoundat:www.jamara-shop.com/Conformity
FR - Déclaration de conformité
Par la présente, la société Jamara e.K. déclare que ce modèle “Catro AHP+ 2,4 GHz mit HD Kame-
ra, No. 422004“ est conforme en tous points avec les textes de la directive de l’union européenne
sous les directives 2014/53/EU, 2011/65/EU.
VospourrezégalementtrouverdesinformationssurnotresiteInternet:
www.jamara-shop.com/Conformite
IT - Dichiarazione di conformita’
Jamara e. K. dichiara qui di seguito che il modello “Catro AHP+ 2,4 GHz mit HD Kamera, No.
422004“ è in linea con le norme ed altre rilevanti disposizioni comunitarie 2014/53/EU, 2011/65/EU.
Piuinformazioni:www.jamara-shop.com/Conformita
ES - Declaración de conformidad
Por medio de la presente, la empresa Jamara e. K. declara que el modelo “Catro AHP+ 2,4 GHz
mit HD Kamera, No. 422004“ de conformidad con los requisitos esenciales y otras disposiciones
pertinentes de la Directiva 2014/53/EU, 2011/65/EU se encuentra.
Encontrarámásinformaciónen:www.jamara-shop.com/Conformidad
DE - Dieses ferngesteuerte Modell ist kein Spielzeug!
Geeignet für Personen ab 14 Jahren.
Achtung: Kinder unter 36 Monaten unbedingt fernhalten. ERSTICKUNGSGEFAHR!
Enthält verschluckbare Kleinteile.
GB - This model is not a toy!
Not suitable for people under 14 year.
Warning: Keep away necessarily children under 36 months. RISK OF SUFFOCATION!
Contains small parts which can be swallowed.
FR - Ce modèle réduit n‘est pas un jouet!
N‘est pas adapté pour les personnes de moins de 14 ans.
Attention: Garder loin nécessairement enfants de moins de 36 mois.
DANGER D‘ETOUFFEMENT! Contient de petites pièces facilement avalables.
IT - Questo modello non é un giocattolo!
Sconsiliato per persone inferiori di 14 anni.
Attenzione: Tenere lontano assolutamente i bambini inferiori ai 36 mesi. PERICOLO DI AFFO-
GAMENTO!
Contiene pezzi piccoli.
ES - Este modelo no es un juguete!
No apropriado para menores de 14 años.
Atención: Mantenga necesariamente lejos de niños menores de 36 meses. ASFIXIA!
Contiene piezas pequeñas.
5TURBO
49/15
Catro AHP+ 2,4 GHz
mit HD Kamera
No. 422004
DE - Gebrauchsanleitung
GB - Instruction
FR - Notice
IT - Istruzione
ES - Instrucciones
DE - Entsorgungshinweise
Bitte sorgen Sie für eine fachgerechte, den gesetzlichen Vorschriften entsprechende
Entsorgung der Batterien und/oder der Akkus. Bitte werfen Sie nur entladene Akkus in
die Sammelboxen beim Handel oder den Kommunen.
GB - Disposal instructions
Please ensure that you dispose of the batteries and/or battery pack in an environmen-
tallycorrectandlegalway.Onlydisposeofatbatterypacksinthecollectionboxesin
your local shops or authorities.
FR - Consignes de recyclage
Veuillez respecter les consignes de recyclage des accus et/ou piles. Veuillez ne jeter que des piles/
accus vides dans les bacs de collecte que vous trouverez dans différents commerces ou au centre
de recyclage de votre commune.
IT - Istruzioni per lo smaltimento
Si prega di assicurarsi che le batterie (ricaricabili e non) siano smaltite a regola d‘arte, conforme-
mente alla normativa vigente. Gettare soltanto batterie scariche negli appositi contenitori presso i ri-
venditori o gli enti comunali (in genere le batterie sono scariche quando il modello non funziona più).
ES - Notas sobre el reciclado
Respete la normativa vigente sobre la eliminación de residuos, especialmente sobre baterías y
pilas. Lleve a reciclar las baterías solo si están descargadas.

2
DE - Achtung!
Vor dem Betrieb:
Erst das Modell und dann den Sender einschalten.
Bei Beendigung:
Erst das Modell und dann den Sender ausschalten.
●Betreiben Sie Ihr Modell niemals in Distanzen die außer-
halb Ihrer Sichtweite liegen. Sowohl die max. Sichtweite
als auch die max. Reichweite Ihres Modells hängen von
vielen Faktoren wie Witterung, Einsatzort und vorhande-
nen Störfrequenzen ab. Führen Sie deshalb vor jedem Ein-
satz mit einer zweiten Person, die das Modell während des
Tests sicher xiert hält, einen Reichweitentest durch und
prüfen Sie auch wie sich das Modell während des Betriebs
bei einem Signalausfall wie z.B. bei leeren Senderbatteri-
en oder ausgeschaltetem bzw. ausgefallenem Sender ver-
hält.
GB - Attention!
Before operating:
Switch the model on rst then the transmitter.
When nished:
First switch off the model then the transmitter.
● Never operate your model beyond sight. Both the
maximum visibility as well as the max. range of your
model will depend on many factors such as weather,
location and interfering frequencies. Therefore, before
each use perform a range test with a second person
securely holding the model and also check how the
model reacts if there is a signal failure e.g. when empty
transmitter batteries are installed.
FR - Attention!
Avant l’utilisation:
Allumez en premier modèle puis seulement votre l’émetteur.
Après utilisation:
Arrêtez le modèle en premier puis votre radiocommande.
●N’utilisez jamais le modèle à une distance hors de votre
visibilité. La visibilité maximale ainsi que la portée maxi-
male dépendent de plusieurs facteurs tels que le temps, le
lieu d’utilisation et les présentes fréquences pertur-
batrices. Pour cela, avant chaque usage, veuillez effectuer
un test de visibilité et de portée avec une deuxième
personne qui tient le modèle xé et véri ez les réactions
du modèle en usage en cas de pertes de signal due par
exemple à des piles usées ou à un émetteur éteint.
IT - Attenzione!
Prima dell‘uso:
Accendete prima il modello e poi la trasmittente.
Dopo l‘uso:
Spegnere prima il modello e poi la trasmittente.
●Non utilizzare il suo modello fuori della distanzia di vista.
Sia la visibilità come la portata massima del vostro
modello dipendono da molti fattori, come il tempo,
disturbo di frequenza e il luogo di utilizzo. Eseguire un
test prima di ogni utilizzo del modello con una seconda
persona che tiene ssato il modello. Con questa
procedura potete testare come reagisce il modello
durante la perdita del segnale causato per esempio da una
batterie scarica oppure la radio spenta.
ES - ¡Atención!
Antes del uso:
Encender primero el modelo, y después la emisora.
Después del uso:
Apagar primero el modelo, y después la emisora.
●No utilizar su modelo fuera de la distancias de visibilidad.
Tanto la visibilidad como la capacidad máxima de su
modelo depende de muchos factores, tales como el
tiempo, frecuencia de interferencia y el lugar de
utilización. Realice una prueba antes de cada uso del
modelo con una segunda persona que fija el modelo.
Con este procedimiento se puede comprobar cómo el
modelo reacciona durante la pérdida de señal causada
por ejemplo por una batería descargada o la emisora
apagada.
DE
Bezeichnung der Komponenten
1. Rotorblätter
2. Motor
3. Rotorschutz
4. Landegestell
5. Kamera
6. Ein-/Ausschalter
7. Akkufach
GB
Component Description
1. Rotor blades
2. Motor
3. Protect cover
4. Landing gear
5. Camera
6. ON/OFF Switch
7. Battery compartment
FR - Désignations des
différentes pièces
1. Pales du rotor
2. Moteur
3. Pale de protection rotor
4. Patin d‘atterrissage
5. Caméra
6. Interrupteur On/Of
7. Compartiment de accu
IT - Denominazione dei
componenti
1. Rotore
2. Motore
3. Carello
4. Landegestell
5. Camera
6. Pulsante ON/OFF
7. Scomparto batterie
ES - Descripción de las
diferentes partes
1. Palas rotor
2. Motor
3. Protección de las palas del rotor
4. Patines de aterrizaje
5. Cámara
6. Interruptor On/OFF
7. Compartimiento de la batería
1
2
36
7
5
4
DE
Bezeichnung der Komponenten
1. LCD-Display
2. Turbo
3. Gasknüppel /Gieren
4. Photofunktion
5. LED Licht ein/aus
6. Videofunktion
7. Kompass- & Flybackfunktion
8 Ein-/Ausschalter
9. Flipmodus
10. Steuerhebel Nick/Roll
(vorwärts/rückwärts,
links/rechts)
11. Power LED
12. Rolltrimmung (links/rechts)
13. Nicktrimmung (vor/zurück)
LCD-Display
A. Licht
B. Batteriestatus
C. Trimmung
D. Ausschlagsanzeige
E. Photo- / Videoanzeige
Batterien in Sender einlegen
Auf Polarität achten.
GB
Component Description
1. LCD display
2. Turbo
3. Speed control stick / Rudder
4. Photo function
5. LED light on / off
6. Video function
7. Compass & Flyback function
8. Power switch
8. Flip mode
10. Nick/Roll control stick
(left/right, forward/backward)
11. Power LED
12. Roll trim (left/right)
13. Nick trim (forward/backward)
LCD display
A. Light
B. Power indication
C. Tuning indication
D. Throttle output display
E. Take photo / video
Fitting the transmitter batteries
Observe the polarity.
FR - Désignations des
différentes pièces
1. AfcheurLCD
2. Turbo
3. Gaz-/manche d’anti-couple
4. Fonction photo
5. LED lumière on / off
6. Fonction vidéo
7. Fonction boussole & Flyback
8. Interrupteur On/Off
9. Mode de Flip
10. Manche Roll-/Nick
(droite/gauche, avant/arrière)
11. Power LED
12. Trim Roll (droite/gauche)
13. Trim Nick (avant/arrière)
Af cheur LCD
A. Lumière
B. Etat des piles de l’émetteur
C. Trimmage
D. Afchagedesortiegaz
E. Fonction photo / vidéo
Mise en place des piles dans
l‘émetteur
Respectant la polarité.
IT - Denominazione dei
componenti
1. Display
2. LED luce on / off | Turbo
3. Leva Gas/Coda
4. Funzione foto
5. LED luce on / off
6. Funzione video
7. Funzione Bussola & Flyback
8. Interruttore ON/OFF
9. Flip mode
10. Leva Roll/Nick
(destra/sinistra, avanti/indietro)
11. Power LED
12. Trim Roll (destra/sinistra)
13. Trim Nick (avanti/indietro)
Display
A. Luce
B. Stato batteria trasmittente
C. Trim
D. Display di uscita
dell‘acceleratore
E. Funzione foto / video
Montaggio delle pile nella
trasmittente
Rispettando la polarità
ES - Descripción de las
diferentes partes
1. LCD
2. Turbo
3. Gas / dirección palanqua
4. Función de foto
5. LED luz on/off
6. Función de vídeo
7. Función brújula & Flyback
8. Interruptor ON/OFF
9. Flip mode
10. Roll-/Nick palanqua
(izquierda/derecha,
delante/atraz)
11. Power LED
12. Equilibrio Roll
(izquierda/derecha)
13. Equilibrio Nick (delante/atraz)
LCD-Display
A. Luz
B. Estado de la batería en la
emisora
C. Equilibrio
D. Visualización de salida del
acelerador
E. Función de foto / de video
Instalación de las pilas en la emi-
sora
Preste atención a la polaridad
1
CC
C
D
E
A B
2
3
4
5
7
6
8
9
10
11
12
13
4x AA

3
DE - Endmontage
1. Mit dem beiliegenden Schraubendreher befestigen Sie das
Landegestell und den Rotorschutz.
2. Schrauben Sie die beiden Landegestelle mit 4 Schrauben
an die Unterseite des Modells (siehe Bild 2).
3. Schrauben Sie die vier Rotorschutze (Bild 3) wie gezeigt,
fest.
GB - Model assemble
1. Prepare screw driver, bracket and protect cover.
2. Insert the two sets brackets into the bracket holes at the
bottom of the model (as picture shown), and then lock the
four screws tightly.
3. Insert four protection covers into the holes of the protection
cover, which beside the four blades, and use the screw knife
to lock four screws tightly.
FR - L‘assemblage nal
1. Utilisezletournevisfourni,xezletraind´atterrissageetla
protection du rotor.
2. Vissez les deux trains d’atterrissage avec 4 vis au fond du
modèle (voir image 2).
3. Vissez les 4 protections de rotor (image 3).
IT - Montaggio nale
1. Utilizare il cacciavite incluso, collegare il carrello e la
protezione del rotore.
2. Avvitare i due carrelli con le 4 viti sul fondo del modello
(vedigura2)
3. Avvitarele4protezionidelrotore,comemostraingura3
ES - Montaje nal
1. Utilice el destornillador incluso, conecte el tren de aterrizaje
y la protección del rotor.
2. Atornillar los dos trenes de aterrizaje con 4 tornillos de la
parte inferior del modelo (ver imagen 2)
3. Atornillar la 4 protecciónes de rotor, como se muestra en la
imagen 3.
DE - Flugakku au aden
1. Öffnen Sie den Batteriefachdeckel.
2. Trennen Sie die Steckverbindung vom Modell zum Akku (aus
Sicherheitsgründen wird empfohlen den Akku dem Modell zu
entnehmen).
3. Schließen Sie das Steckernetzteil an eine Wechselsstrom-
steckdose an, die Lade-LED leuchten auf, sie zeigen Lade-
bereitschaft an.
4. Verbinden Sie das Ladegerät mit dem Akku. Die LED
wechselt die Farbe und zeigt den Ladevorgang an. Wenn die
LEDwieder die Farbe wechselt ist der Akku fertig geladen.
Nach etwa 40 - 60 min. ist der Ladevorgang abgeschlossen, die
Flugzeit bei vollgeladenen Akku beträgt ca. 5 - 10 Min.
Wichtige Hinweise:
Wenn sich der Akku während des Ladevorgangs erwärmt,
trennen Sie ihn bitte umgehend vom Ladegerät, damit der
Akku nicht zerstört wird. Setzen Sie niemals ein anderes La-
degerät ein, der Akku könnte zerstört werden Nach einem
Flug ist der Akku u.U. stark erwärmt. In diesem Fall muss
der Akku erst ca. 30 Min. lang abkühlen bevor er wieder auf-
geladen wird. Bringen Sie einen LiPo-Akku niemals mit einer
offenen Flamme in Berührung, es besteht Explosionsgefahr.
GB - Recharging the ight battery
1. Remove the battery hatch.
2. Disconnect the connector from the model to the battery (for
safety it is recommended to the battery taken from the
model).
3. Plug the charger into an AC outlet, the LED will switch on
and indicate that it’s now ready for charging.
4. Connect the charger to the battery pack. The LED will
change the color to show it is charging. Once the LED
changing the color again, charge has been completed.
The charging process should take approx. 40 - 60 min. and
shouldgiveyouapprox.5-10min.yingtime.
Note:
If the battery heats up during charging, disconnect it. Failure
to do so may destroy the battery. After ying the battery will
be hot, allow it to cool for app. 30 minutes before charging.
Never allow batteries to come into contact with open re as
this may cause the batteries to explode.
FR - Charge de l’accu de propulsion
1. Retirez le couvercle de la batterie.
2. Coupez le connecteur de l’modèle à l’accu (pour les raisons
de sécurités on recommande d’enlever l’accu).
3. Branchez l‘alimentation du chargeur sur une prise secteur.
La LED du chargeur indique que celui-ci est utilisable pour la
charge.
4. Branchez l’accu avec le chargeur. La LED change sa couleur
et indique que le processus de charge est en cours.
La charge est complète après environ 40 - 60 minutes et la
durée de vol est de l‘ordre de 5 - 10 minutes.
Remarque importante:
Si votre accu venait à chauffer fortement lors du processus
de charge, séparez celui-ci immédiatement du chargeur
a n que l‘accu ne soit pas détruit. Après un vol, votre accu
est chaud. Dans ce cas, laissez le refroidir environ 30 mi-
nutes avant de le recharger. N‘utilisez jamais un amme
vive dans les environs immédiats de votre accu LiPo et sur-
tout ne rentrez pas en contact avec celui-ci, il y a danger
d‘explosion.
IT - Carica della batteria di potenza
1. Togliere il coperchio del scomparto batterie
2. Sconnettere il collegamento tra la batteria e il modello (per
motivi di sicurezza).
3. Collegare il caricabatterie alla presa di corrente. Il LED sul
carica batteria indica la disposizione per il caricamento.
4. Collegare il caricabatterie alla batteria. Il LED si spegne e
viene visualizzata la ricarica.
La ricarica é completata in 40 - 60 min‘ e la durata del volo é
mediamente di 5 - 10 min.
Nota importate:
Se notate che la vostra batteria appena collegata per la ri-
carica riscalda fortemente, staccatela immediatamente! Per
evitarne la distruzione. Lasciate raffreddare la batterie dopo
un volo prima di ricaricarle. Evitate di avvicinare amme li-
bere alle batterie LiPo evitando assolutamente di avvicinarle
a forti fonti di carore, perché potrebbero esplodere.
ES - Cargar la batería principal
1. Suelte para retirar la tapa.
2. Desconecte el conector del modelo a la batería (por razones
de seguridad, se recomienda de sacar la batería del
modelo).
3. Conecte el cable de la fuente de alimentación de a la toma
de entrade del bloque de carga. Los LEDs se encenderán,
indicando que está listo para cargar.
4. Conecte el cable del cargador en el buje de la batería. A la
salida de la caja de carga, el LED de carga va a cambiar el
color. Cuando la carga se ha completado el LED va a
cambiar de nuevo el color.
Tempodecarga:40-60min.,
Tempodevuelo:5-10min
Aviso importante:
Si la batería se calienta demasiado durante la carga, desco-
néctelas rápidamente del cargador, así evitará que se estro-
pee. Normalmente, tras volar la batería se habrá calentado.
En esto casos, se debe dehar enfriar la batería durante 30
minutos antes de bolber a cargarla. Nunca exponga una ba-
tería LiPo a una llama, podría provocar una exprosión.
123

4
DE - Binden von Sender und Modell
Der Empfänger in Ihrem Modell ist mit einer Einschalt-Sicher-
heitsfunktion versehen. Das garantiert, dass das Modell nur bin-
det wenn es ein gültiges Sendersignal erhält.
Achtung!
Erst das Modell und dann den Sender einschalten.
DiekorrekteVorgehensweiseistwiefolgt:
1. Stellen Sie den Gashebel ganz auf die unterste Position (kein
Gas). Der Sender ist ausgeschaltet!
2. PlatzierenSiedasModellaufeinergeradenOberäche.
Schieben Sie den Akku ein und verbinden Sie den Akku mit
dem Modell. Schließen Sie das Akkufach und schalten das
Modell ein. Nun das Modell nicht mehr bewegen, damit der
Gyro sich einstellen kann. Die LEDs am Modell beginnen zu
blinken. Schalten Sie jetzt den Sender ein.
3. Zum initialisieren schieben Sie den Gashebel ganz nach oben
und wieder zurück, dabei ertönt ein akustisches Signal. Damit
sich das Gyrosystem während des Bindens initialisieren
kann, sollte das Modell auf einer ebenen Fläche stehen.
Wenn die LEDs am Modell dauerhaft brennen ist der Binde-
vorgang abgeschlossen. Sollte es nicht funktionieren,
wiederholen Sie den Prozess.
B - Binding of transmitter and model
Your RC model is tted with a Power-On failsafe. This is de-
signed to ensure that the model’s motor will not start unless it
detects a suitable radio-control signal when the LiPo battery is
connected.
Attention:
Switch the model on rst then the transmitter.
ThecorrectStart-Upsequenceisasfollows:
1. Make sure that the throttle stick are at the bottom (no throttle
is given)! The transmitter is off!
2. With the model places on level surface, push the lipo battery
packinthedirectionuntilxedintoposition.Closethebattery
compartment and turn on the model. At this time avoid moving
the model so the radio and gyro system can initialize. The
LEDs on the model blinking. Turn on the transmitter.
3. For instalation put the gas pedal to the top and back, now an
acoustic voice. The model should stand on a level place, so
that the Gyrosystem during the connection can install. If the
LEDs on the model permanently light, the binding process is
completed. After the radio binding is done, you don‘t need
to re-bind it anymore.
FR - Synchroniser le modèle avec l‘émetteur.
Le récepteur de votre modèle est équipé d‘une fonction de sé-
curité. Cela garantit que le modèle se connecte uniquement si
les signaux de l’ émetteur sont valides.
Attention!
Allumez en premier modèle puis seulement votre l’émetteur.
Laprocédureàsuivreestlasuivante:
1. Poussez la manette des gaz jusqu’ à la position la plus basse
(pas de gaz). L‘émetteur est éteint!
2. Placez l’modèle sur une surface horizontale plane. Mettez en
place l’accu et branchez-le. Fermez le compartiment à piles et
tournezsurlemodèle.Nebougezplusl’modéleanquele
gyroscope puisse se régler. Les lumières LED à sur le châssis
commencent à clignoter. Allumez le récepteur.
3. Pour l’initialisation, poussez le manche des gaz
complètement en avant puis retour, un signal acoustique se
fera entendre. Pendant l’opération le modèle devra se situer
sur une surface plane de sorte que le gyroscope puisse
s’initialiser pendant la synchronisation. Les lumières LEDs sur
le modèle brûlent en permanence. L’modèle est maintenant
utilisable. Si la LED recommence à clignoter il faut réitérer
le process.
IT - Binding trasmettitore e modello
Èimportantedinontoccare/sorarel’elicotterodurantelafase
del binding.
Attenzione!
Accendete prima il modello e poi la trasmittente.
Altrimenti il Gyro non si può inizializzare.
1. Portare l‘acceleratore nella posizione più bassa (gas a zero).
Il trasmettitore è spento!
2. Il Binding deve avvenire su un tavolo oppure per terra.
Collegare il pacco batteria. Chiudere il vano batterie e
accendere il modello. I LED del telaio cominciano a
lampeggiare. Accendere il trasmittente.
3.Perinizializzarepremerelalevadelgasnosopraetuttoil
tragitto indietro. Durante questa manovra si sente un segnale
acustico. Per permettere al sistema - giroscopio di
inizializzarsi,ilmodellodeveessereposatosuunasupercie
piana. Se i LED sono accesi sul modelo è completato il
processo di associazione. In caso che il LED lampeggia,
ripetete la procedura.
ES - Binding del modelo y la emisora
Si el proceso de combinar ambos se viera afectado por interfe-
rencias, empieze de nuevo.
¡Atención!
Encender primero el modelo, y después la emisora.
1. Baje el stick del acelerador del todo (ninguna aceleración).
El emisora se apaga!
2. Pongaelmodeloenunasupercieplana.Metalabateríaen
su sitio. Cierre el compartimiento de la batería y encienda el
modelo. Ahora no mueva mas el modelo, para que se pueda
inicializar el giróscopo. Los LEDs comienzan a parpadear.
Encienda la emisora.
3. Para iniciar, presione la palanca de gas hacia arriba y nueve
mente hacia atrás, te va a suenar un señal acústico. Para
que el sistema giroscópico durante el binding puede ini cia
lizar,elmodelodebeestarenunasupercieplana.SilosLED
del modelo queman de forma permanente el proceso de
unión es completa. Si el LED vuelve a parpadear o sigue
parpadeando, repita el proceso de combinación.
DE - Trimmen der Fluglage
Lassen Sie das Model ruhig auf einer
Stelle schweben und beobachten Sie
die Veränderungen beim Betätigen der
jeweiligen Trimmregler.
1. Trimmen der Nicklage
2. Trimmen der Roll-Lage
Akkubedingt müssen Sie das Model
regelmäßig je nach Akkustand aus-
trimmen um eine stabile Fluglage zu
erhalten.
GB - Trimming the model
Let the model hover in one spot and
watch the changes in the respective by
pressing the trimm controls.
1. Trimming the pitch
2. Trim the roll position
Depending on the condition of the bat-
tery you need to get the model regular-
ly trimmed to get a stable ight.
FR - Trimmage du vol
Laissez planer le modèle à une certaine
hauteur et observez les changements
quand vous actionnez les régulateurs du
trimmage
1. Trim nick
2. Trim du roulement
Il faut régulièrement remettre le mo-
dèle dans une position stable en ef-
fectuant un nouveau réglage à cause
des accus.
IT - Trim del modello
Fare volare il modello ad una certa altez-
za e osservare i cambiamenti quando si
preme i regolatori dei trim.
1. Trim nick
2. Trim roll
Tramite i trim e anche possibile rego-
lare il modello così, che resta pratica-
mente fermo durante il volo. Queste
regolazione sono da effettuare ogni
volta che si collega la batteria, dato
che si tratta di regolazioni dipendenti
dalla tensione della batteria.
ES - Trim del modelo
Flotar tranquilamente el modelo y obser-
var los cambios mientras pulses el regu-
lador de trim.
1. Trim nick
2. Trim roll
A través del trim es posible regular el
modelo para obtener un vuelo estable
durante el vuelo. Esta regulación se ti-
ene que hacer cada vez que se conec-
ta la batería, ya que esta regulación
depende de la tensión de la batería.
1
2

5
DE - Flugübungen
BevorSiemitdemModeliegeninformierenSiesichzuerstüber
seine Steuerfunktionen und führen einige Übungen durch.
Platzieren Sie das Model mit der Hinterseite zu Ihnen zeigend
(schwarze Markierung) auf einer ebenen Fläche. Üben Sie zu-
erst den Schwebeug mit dem Gasknüppel zu kontrollieren.
Anschließend versuchen Sie die Position des Models mit Hilfe
des rechten Steuerknüppels zu verändern (vorwärts, rückwärts
und seitwärts) und gegebenenfalls abzufangen. Zuletzt sollten
Sie das Drehen des Models um die eigene Achse mit dem linken
Steuerknüppel üben. Wenn Sie die Grundfunktionen des Models
beherrschen können Sie sich an Ihren ersten kontrollierten Flug
machen.
GB - Practice simulation ight
Beforeyingwiththemodelcheckrstaboutitscontrolfunctions
and perform some exercises. Place the model with the back fa-
cingtoyou(blackmark)onaatsurface.Practiceonlytohover
with the throttle control. Then, you try to change the position of
the model using the right stick (forward, backward, sideways)
andpossibly correctthe ight.Atlast, youshould practicetur-
ning the model around its own axis with the left stick. If you are
intothebasicfunctionsofthemodelyoucanperformyourrst
controlledight.
FR - Voler dans la pratique
Avant de faire voler le modèle, informez vous de toutes ses fonc-
tions de contrôle et faîtes quelques essais. Placez le modèle sur
une surface platte, placez vous derrière le modèle (marque noir).
Essayez de le faire planer avec la manette des gaz. Ensuite es-
sayez de changer la position du modèle à l’aide de la manette
droite (marche avant, marche arrière, sur les cotés). Si vous con-
trôlez toutes les fonctions de base du modèle vous pouvez faire
les premiers vols.
IT - La pratica
Prima di volare il modello, consigliamo fare conoscenza con tutte
le funzioni di controllo e di effettuare i primi voli di test. Posiziona-
reilmodellosuunasuperciepiatta,davantialpilota.Leeliche
del modello devono essere in posizione posteriore. Per primo,
provare ad alzare il modello in volo, e tenerlo “fermo” in volo.
Poi provare a cambiare la posizione del modello utilizzando la
levetta destra (per farlo andare in avanti/indietro e destra/sinist-
ra). Appena imparato le funzioni di base, procedere ad effettuare
i primi voli.
ES - Volando en la práctica
Antes de volar con el modelo, se recomienda conocer todas la
funciones de control y hacer el primero vuelo de prueba. Posicio-
narelmodeloenunasupercieplana,enfrentedelpilota(marca
negra). Las palas del modelo deben estar en la posición trasera.
En primo lugar, pruebe a despegar el modelo en vuelo, y tener
joenelvuelo.Acontinuación,intenteacambiarlaposicióndel
modelo usando la palanca derecha (para que vas hacia ade-
lante/atrás y izquierda/derecha). Cuando se ha aprendido las
funciones básico, proceda con los primero vuelos.
red mark
forward
red mark
forward
red mark
forward
forward
1234
DE
Kombination von Gas, Gieren, Roll und Nick
Nach dem Sie sich mit den verschiedenen Steuermethoden des
Models vertraut gemacht haben versuchen Sie nun die verschie-
denen Steuerungen zu kombinieren.
Ändern der Flugperspektive
Nach dem Sie das Fliegen des Models von der Sicht von hinten
auf das Model beherrschen ist es an der Zeit den Flug aus der
seitlich vom Model stehenden Position und von der vom Model
zugewandten Seite aus zu üben. Denken Sie daran, dass Sie
zum Teil invertiert (umgekehrt) steuern müssen.
360 Grad Flip Figur
WennSiedieFlipfunktioneingestellthaben,iegenSieinmin.
2 Meter Höhe und bewegen den Steuerknüppel in die jeweilige
Richtung in die das Modell den Flip ausführen soll.
Achtung! Der Flipmodus bleibt so lange aktiv bis die Fliptaste
erneut gedrückt wird.
GB
Combination of gas, rudder, roll and pitch
After you are into the different control methods of the model now
you can try to combine the various controls.
Change of ight perspective
Afteryoumastertheyingofthemodeloftheviewfromtherear
ofthemodelitistimetopracticetheightfromthesideofthe
model and from facing towards to the model. Remember, you
need to invert the controls (vice versa).
360 deg ip gure
Ifyousettheipfunction,youyin2metersinheightandmove
the joystick in the appropriate direction in which the model is to
performtheip.
Attention!Themodelstaysinipmodeuntilyoupresstheip
mode button again.
FR
Combinaison entre le gaz, le trim, le roulement et le nick
Si vous contrôlez toutes les différentes fonctions de contrôle,
vous pouvez combiner plusieurs fonctions entre-elles.
Changement de la perspective du vol
Après avoir fait des essais de vol en voyant le modèle de
l’arrière, il est maintenant temps de s’exercer en ayant le modèle
sur le coté. Pensez, qu’il faut commander le modèle à l’inverse.
360° Figure Flip
Quand vous avez actionner la fonction Flip, vous volez à au
moins 2m de hauteur. vous pouvez alors bouger le manche de
contrôle dans la direction, dans laquelle le modèle devra faire
leip.
Attention! Lemodeipresteactivejusqu‘àcequelatouchede
bascule soit à nouveau appuyée.
IT
Combinazione dei comandi (gas, rotazione, roll e nick)
Appena imparato i singoli comandi, provate a combinarle l’uno
con l’altro.
Cambiare la perspettiva del volo
Dopo i test di volo, avete imparato di comandare il modello vis-
to da dietro. Adesso fate volare il modello vista dal lato, oppure
davanti. In questo caso cambia il senso di comando ed anche il
gradodidifcoltà.
360° Effettuare un Flip durante il volo
Attivando il Flip funzione , è mantenere almeno 2 m di altezza,
si possono effettuare dei Flip durante il volo. Basta azionare la
leva.
Attenzione! IlmodeFliprimaneattivatonchesiripremeiltasto
Flip.
ES
Combinacion de los controles (gas, rotación, roll y nick)
Después de que haya familiarizado con los diferentes métodos
de control del modelo, probar ahora de combinar los diversos
controles
Cambio de la prespectiva de vuelo
Después de los vuelos de pruebas, has aprendido a controlar el
modelo de la vista desde atrás. Ahora hacer volar de la vista des-
de el lado del modelo o delante. En esta caso cambia el sentido
demandoytambienelgradodedicultad.
360° efectuar un Flip durante el vuelo
Activando el Flip función y mantener al modelo 2 m de altura,
se pueden efectuar Flips durante el vuelo. Semplemente activar
la palanca.
Atención! El modo Flip resta activado hasta que presiona de
nuevo el botón Flip.
LED
red
LED
white
LED
white
LED
red

6
DE -
Anfänger-/Fortgeschrittener-Modus
Das Model hat vier Flug-Modi, für Anfänger und Fortgeschrittene.
Einsteiger-Modus
1 x drücken (25%, 1 akustisches Signal)
2 x drücken (50%, 2 akustische Signale)
Das Modell hat geringe Ausschläge, Steuerbefehle werden sanft
ausgeführt.
Fortgeschrittener-Modus
3 x drücken (75%, 3 akustische Signale)
4 x drücken (100%, 4 akustische Signale)
Die Ausschläge des Modells sind größer, Steuerbefehle werden
direkter ausgeführt.
GB - Beginners/advanced mode
Themodelhastwoightmodes,forbeginnersandadvanced.
Beginner mode
press 1 x (25%, 1 BEEP sound)
press 2 x (50%, 2 BEEP sound)
Themodelhassmalldeexions,controlsareperformed
smoothly.
Advanced mode
press 3 x (75%, 3 x BEEP sound)
press 4 x (100%, 4 x BEEP sound)
Thedeexionsarehigher,controlsareperformeddirectly.
FR - Mode débutant/avancé
L’modèle a deux modes de vol, pour les débutants et les
avancés.
Mode débutant
1 x appui (25%, 1 x signal acoustique)
2 x appui (50%, 2 x signal acoustique)
Lemodèleadesdéviationsinsigniantes,commandesde
contrôle sont accomplis doucement.
Le mode avancé
3 x appui (75%, 3 x signal acoustique)
4 x appui (100%, 4 x signal acoustique)
Les déviations sont plus grandes, commandes de contrôle sont
accomplis plus direct.
IT - Modus principiante/avanzato
Il‘modelloedotatodiduemodidivolo:principianteedavanzato:
Modus principiante
premere 1x (25%, 1 segnale acustico)
premere 2x (50%, 1 segnali acustici)
Il modello reagisce molto docile e “morbido” ai comandi.
Modus avanzato
premere 3x (75%, 3 segnali acustici)
premere 4x (100%, 4 segnali acustici)
La reazione del modello e più preciso.
ES - Modo Principiante/Avanzado
El modelo tiene dos modos de vuelo, para principiantes y
avanzados.
Modo principiante
pulsar 1x (25 %, 1 señal acústico)
pulsar 2x (50%, 2 señal acústicos)
El modelo tiene pequenas erupciones, los comandos de control
vienen efectuado delicado.
Modo avanzado
pulsar 3x (75%, 3 señal acústicos)
pulsar 4x (100%, 4 señal acústicos) Los erup-
ciones son más grandes, los comandos de control vienen
efectuado directamente.
DE
Alternativer Mode 4 Steuermodus.
Um in den alternativen Mode 4 Steu-
ermodus zu gelangen gehen Sie wie
folgtvor:
Schalten Sie das Modell ein. Halten
Sie entweder die linke vordere oder
die rechte vordere Taste am Sender
während des Einschaltens gedrückt.
Lassen Sie die Taste wieder los und
geben einmal Gas und nehmen den
Gashebel wieder zurück. Das Modell
bendetsich nunim neuenModus.
Um wieder in den gewohnten Mode
2 Steuermodus zu gelangen halten
Sie beim nächsten Einschalten von
Modell und Sender keine der 2 vor-
deren Tasten gedrückt. Das Modell
ist wieder im Steuermodus Mode 2.
Im Steuermodus Mode 4 ist die Be-
legung des Senders wie abgebildet.
Bezeichnung der Funktionen
1. Rollen links
2. Gas / Roll (links/rechts)
3. Photofunktion
4. Licht ein/aus
5. Videofunktion
6. Anfänger-/Expert-Modus
7. Ein-/Ausschalter
8. Rollen rechts
9. Vorwärts/rückwärts, Drehen)
10. Flip vorwärts
11. Flip rechts
12. Flip rückwärts
13. Flip links
GB
Alternative Mode 4 control mode.
To get to the alternative Mode 4
control mode proceed as follows.
Turn on the model. Hold either the
left front or right front button on the
transmitter pressed during power
up. Let release the button and enter
once full throttle and take the thrott-
le back again. The model is now in
the new mode. To return to the usual
Mode 2 control mode do not hold
any of the 2 front buttons the next
time you power on the transmitter.
The model is back in control mode
Mode 2. In the control mode Mode
4 the assignment of the transmitter
isasshown:
Description of Functions
1. Roll left
2. Gas / Roll (left/right)
3. Photo
4. Light ON/OFF
5. Video
6. Beginner / Expert mode
7. ON/OFF switch
8. Roll right
9. forward/backward, turn
10. Flip forward
11. Flip right
12. Flip backward
13. Flip left
FR - Mode 4
Mode de pilotage alternatif
Pour accéder au mode de pilotage
alternatif, veuillez procéder les pas
suivants. Mettez le modèle en mar-
che. Pendant la mise en marche
pressez la touche gauche ou droite
antérieure de l’émetteur. Lâchez la
touche et accélérez une fois, après
vous pousser le levier de comman-
de en arrière. Le modèle se trouve
maintenant au mode nouveau. Pour
rentrer au mode 2 ne poussez au-
cune touche pendant la prochaine
mise en marche du modèle. Le mo-
dèle se trouve au mode 2. Au mode
de pilotage l’émetteur est revêtit
commesuit:
Description des fonctions
1. Roll gauche
2. Gaz / Roll (gauche/droite)
3. Fonction photo
4. LED lumière on / off
5. Fonction vidéo
6. Mode débutant/avancé
7. Interrupteur On/Off
8. Roll droite
9. avant/arrière, tourner
10. Flip avant
11. Flip droite
12. Flip arrière
13. Flip gauche
IT - Alternativo Mode 4 modalità
di controllo.
Per raggiungere la modalità di con-
trollo alternativo Mode 4 procedere
come segue. Accendere il modello.
Tenere il pulsante de la parte ante-
riore sinistro o frontale destro della
radio premuto durante l‘accensione.
Lasciate il pulsante e date una volta
gas e tirare la leva di gas indietro. Il
modello è ora nella nuova modalità.
Per tornare alla consueta modalità
di controllo Modalità 2 non tenere
nessuno dei 2 tasti frontali premuti
alla prossima volta che si accende
il modello e la radio. Il modello è
tornato in modalità di controllo Mode
2. Nella modalità di controllo Mode
4 l‘assegnazione della radio è come
indicato:
Descrizione delle funzioni
1. Roll destra
2. Gas / Roll (destra/sinistra)
3. Funzione foto
4. LED luce on / off
5. Funzione video
6. Modus principiante/avanzato
7. Interruttore ON/OFF
8. Roll sinistra
9. avanti/indietro, girare)
10. Flip avanti
11. Flip sinistra
12. Flip indietro
13. Flip destra
ES - Alternativo Mode 4 modalità
di controllo.
Per raggiungere la modalità di con-
trollo alternativo Mode 4 procedere
come segue. Accendere il modelo.
Tenere il pulsante de la parte ante-
riore sinistro o frontale destro della
radio premuto durante l‘accensione.
Lasciate il pulsante e date una volta
gas e tirare la leva di gas indietro. Il
modelo è ora nella nuova modalità.
Per tornare alla consueta modalità
di controllo Modalità 2 non tenere
nessuno dei 2 tasti frontali premuti
alla prossima volta che si accende
il modello e la radio. Il modelo è tor-
nato in modalità di controllo Mode
2. Nella modalità di controllo Mode
4 l‘assegnazione della radio è come
indicato:
Descripción de funciones
1. Roll izquierda
2. Gas / Roll (izquierda/derecha)
3. Función de foto
4. LED luz on/off
5. Función de vídeo
6. Modo Principiante/Avanzado
7. Interruptor ON/OFF
8. Roll derecha
9. delante/atrás,girar
10. Flip delante
11. Flip derecha
12. Flip atrás
13. Flip izquierda
1
2
3
4
5
6
8
7
9
10
11
12
13

7
Kompassrichtung A
Flugrichtung
B
A
B
A
DE
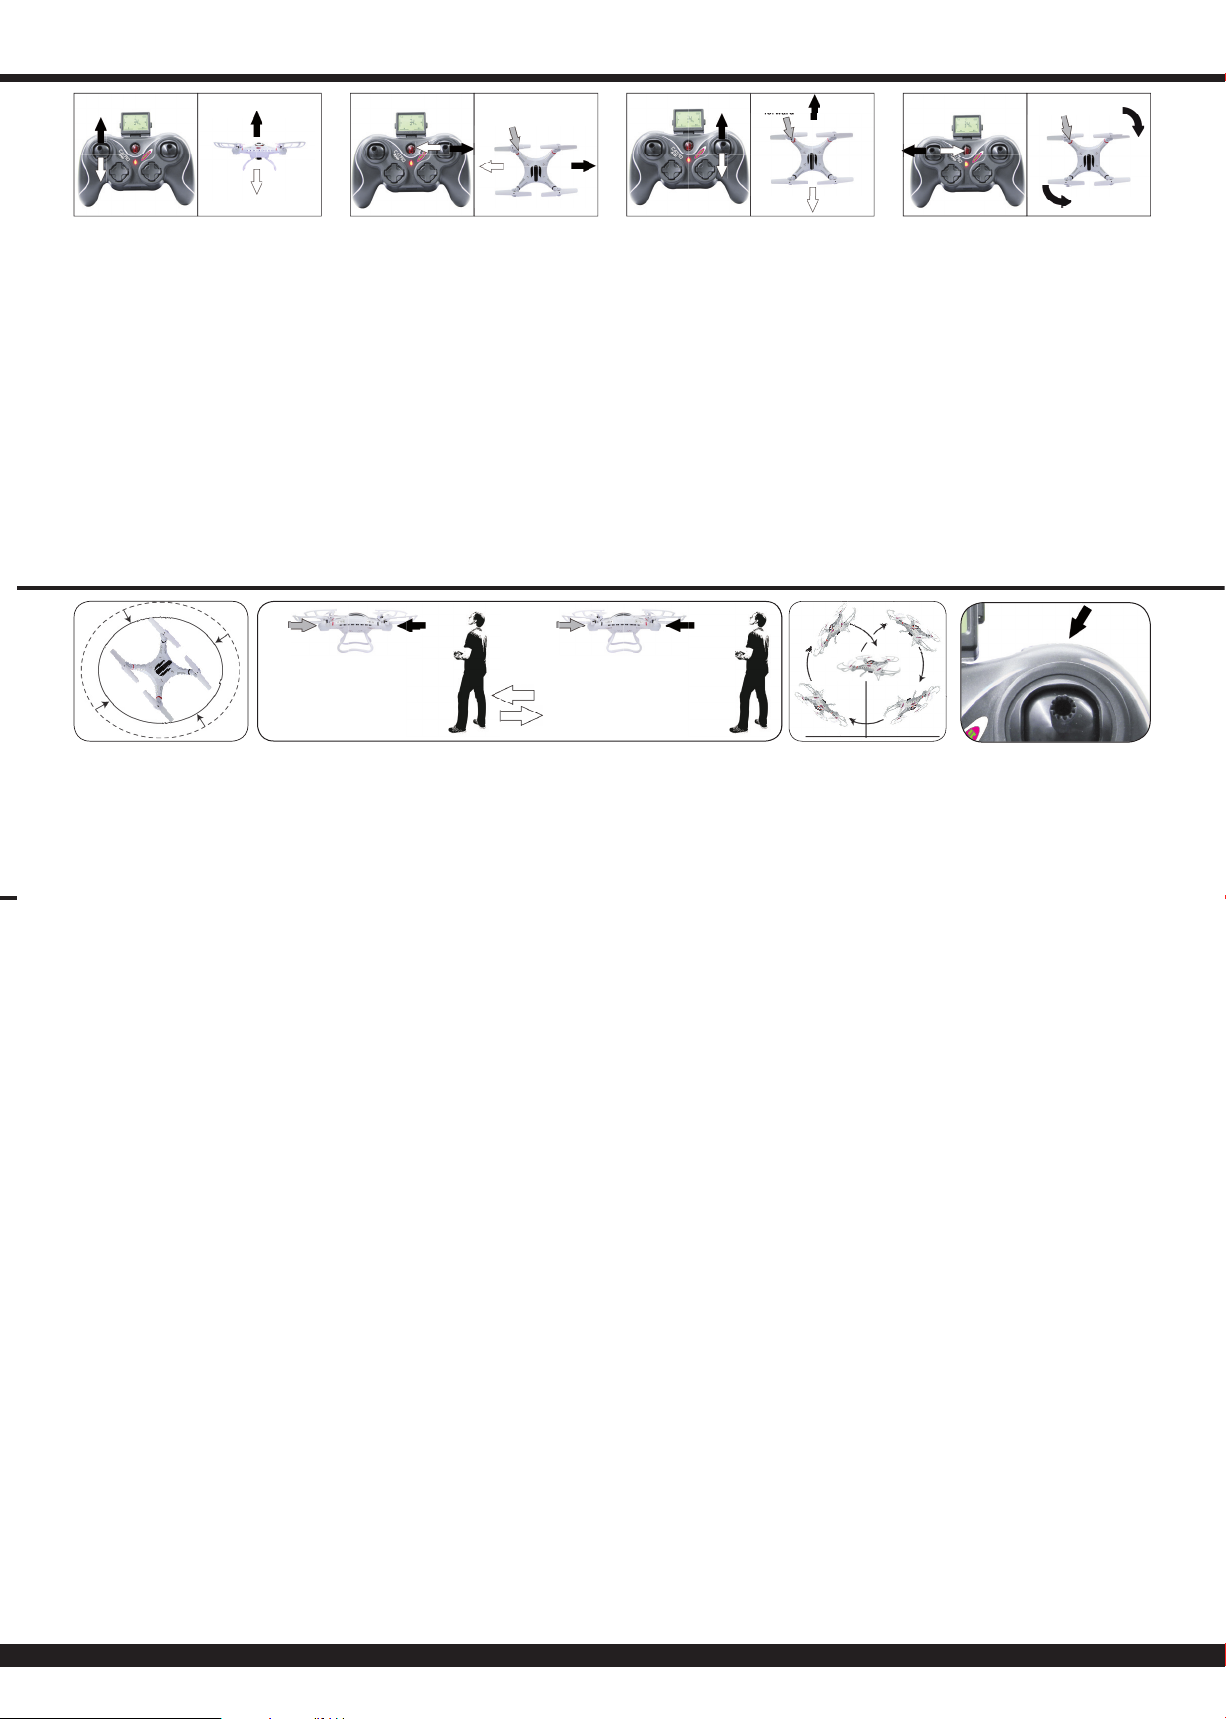
Flyback- & Kompassfunktion:
Ihr Modell verfügt über eine Flyback- & Kompassfunktion. Das
heißt es ist in der Lage trotz einer Drehung in eine gewünschte
Richtung (der Rumpf zeigt nicht mehr in Flugrichtung) die ur-
sprüngliche Flugrichtung beizubehalten und halbautomatisch zu
Ihnenzurückzuiegen
Vorbereitung:
Zuerst sollten Sie sich Gedanken machen welche Richtung Sie
im Kompass des Models abspeichern wollen. Diese Richtung
wird beim aktivieren des Kompassmodus automatisch zur ab-
gespeicherten Flugrichtung. Möchten Sie also z.B. eine Stra-
ße entlang iegen und während dessen den Kompassmodus
verwenden wählen Sie die Richtung in die die Straße führt als
Grundrichtung für den Kompass. Wenn Sie nun das Modell im
Kompassmodus um die eigene Achse drehen lassen müssen
Sie sich keine Gedanken um die Flugrichtung an der Fernsteue-
rung machen. Wenn Sie den rechten Steuerknüppel nach vorne
drücken wird das Model in Richtung der Straße von ihnen weg-
iegen. Wenn Sie den rechten Steuerhebel zu sich herziehen
wird sich das Model der Straße entlang auf Sie zu bewegen.
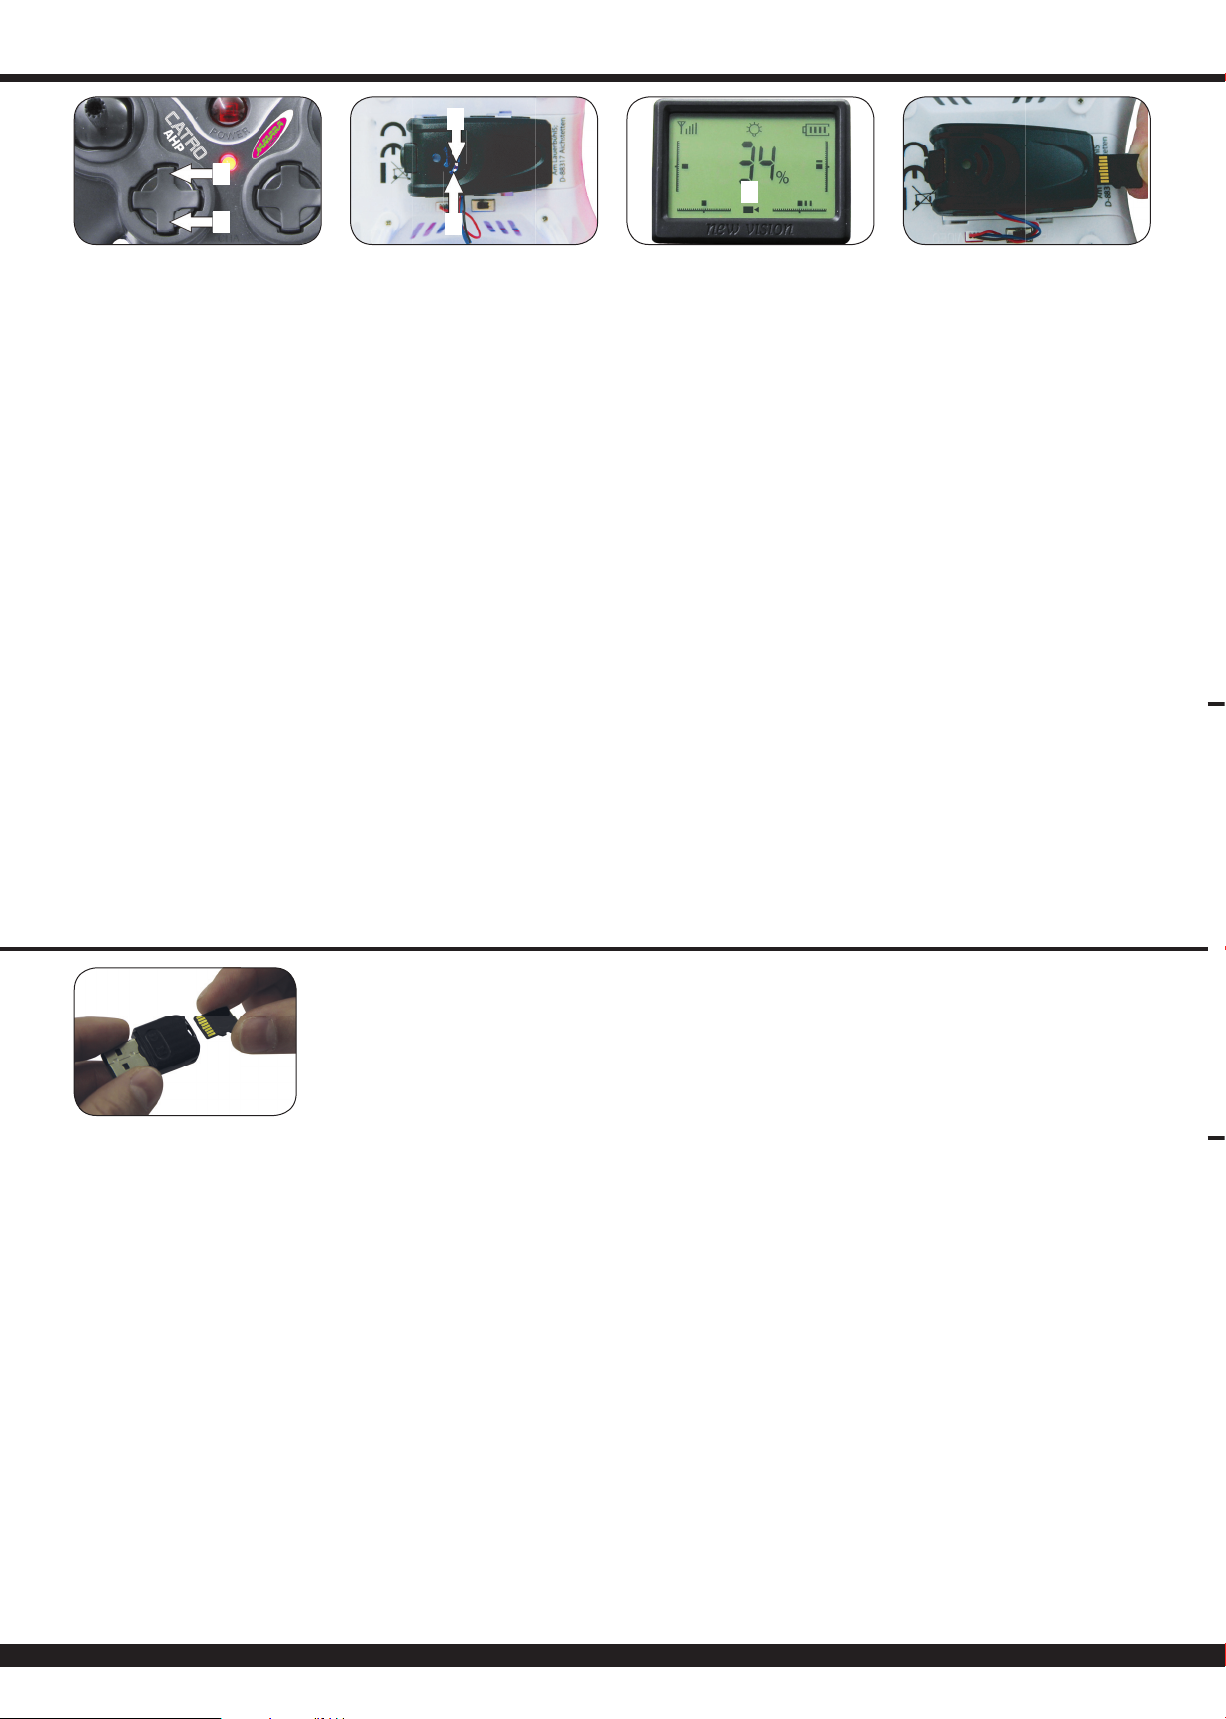
Einrichtung des Flyback- & Kompassmodus:
Die Richtung in die das Modell beim ersten Start gerichtet ist
wird fest als Flyback bzw. Kompassrichtung abgespeichert.
Die Flyback- & Kompassfunktion kann im Flug durch drücken
der Kompass- und Flybacktaste aktiviert werden. Durch Blinken
der Led´s und Piepsen am Sender signalisiert das Modell das
es im Flyback- bzw. Kompassmodus ist. Das Modell folgt nun
unabhängig in welche Richtung der Rumpf des Models zeigt
der vorher einprogrammierten Kompassrichtung zurück in Ihre
Richtung (Flyback) bis Sie den rechten Steuerknüppel bewegen.
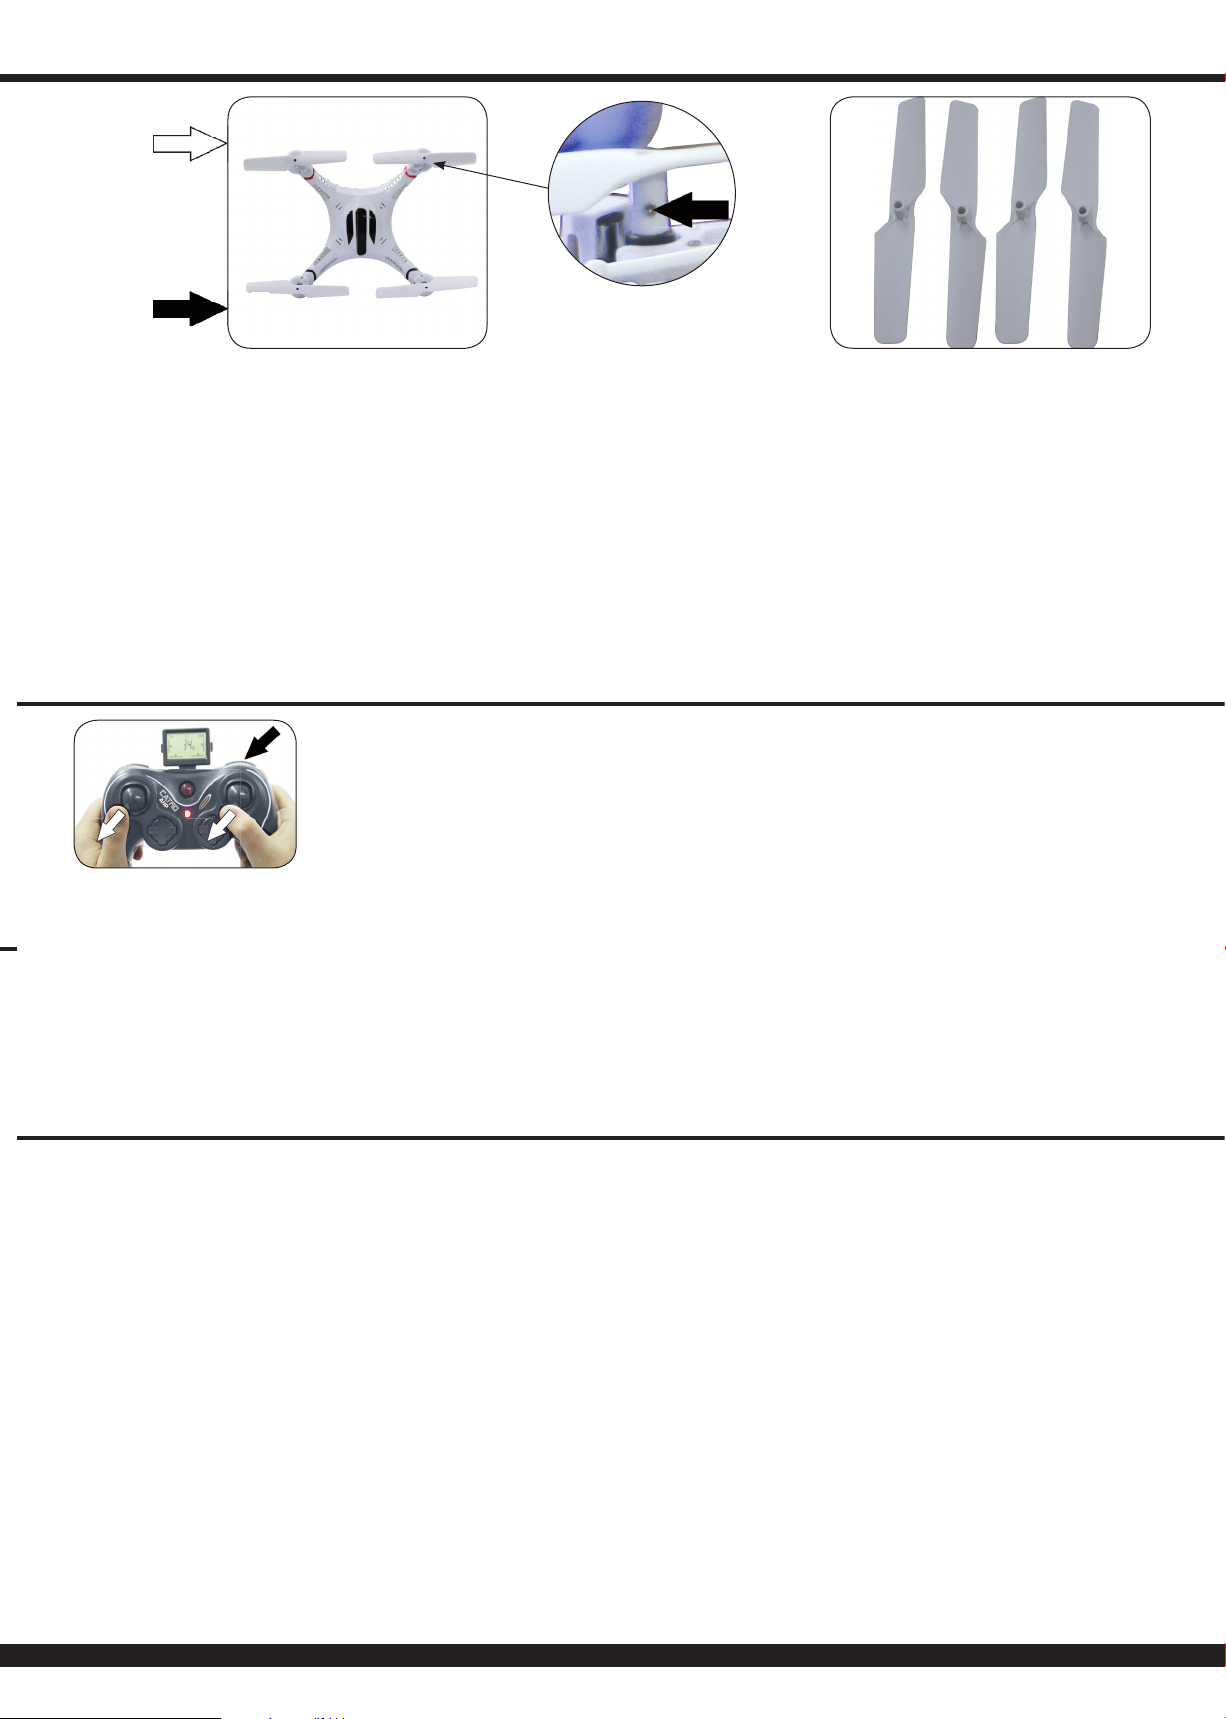
NachdemSiedenrechtenSteuerhebelbewegthabenbendet
sich das Modell autom. Im Kompassmodus. Während des Fly-
back- bzw. Kompassmodus müssen Sie weiterhin mit dem Gas-
hebel die Höhe des Modells kontrollieren.
GB - Compass & Flyback function
Your model has a Compass & Flyback function. This means it
is able to keep the desired yback direction even if it turns in
anotherdirectionduringight(thefrontdoesnotfacetheight
directionanymore)andiesbacktoyousemi-automatic.
First steps:
First of all you should choose the direction that you want to save
in the compass of the model. This direction is used by the com-
passasthe mainightdirection.Forexample,youyalonga
straight street and would like to use the compass mode; you
havetochoosethedirectionofthestreetasthemainightdirec-
tion. Now if you are using the compass mode to follow a moving
objectyoudonothavetowasteathoughtontheyingdirection
of the model. If you push the steering stick to the front the model
willyawayfromyou.Ifyoupullthesteeringsticktotheback
themodelwillybacktoyoufollowingthedirectionofthestreet
(Compass function).
Setting up the Compass & Flyback mode:
The direction in which the model is facing at the rst start is
saved as Compass direction.
The Compass & Flyback function can only be activated while the
model is in the air and by pressing the left direction button right
on your remote control. Indicated by the LEDs and sound from
the remote control the model is entering Compass & Flyback
mode. The model now automatically follows the programmed
compass direction in Flyback mode regardless in which direction
it is facing until you move the right control stick. After moving the
right control stick the model is automatically in Compass Mode
for you to control it on the compass direction. During use of the
Compass & Flyback function you need to control the altitude with
the throttle stick.
FR - Fonction boussole & yback
Votremodèleaunefonctionboussoleetyback.Ilpeutgarder
sa direction de vol initiale malgré une rotation dans une direction
souhaitée (le fuselage ne se trouve plus en direction du vol.) et
de façon semi-automatique revenir vers vous.
Préparation:
D’abordvousdevriezrééchiràladirectiondanslaquellevous
voulez sauvegarder la boussole du modèle. Cette direction
sera la nouvelle direction de vol automatiquement sauvegardée
quand vous activez la boussole. Si vous voulez voler le long de
la route et au même moment prendre le mode boussole, choisis-
sez la direction dans laquelle mène la route comme direction de
base pour la boussole. Quand vous tournez le modèle en mode
boussolesursonaxe,pourlmerunobjetquisetrouveàcôté
devotremodèle,ilnefautpasrééchirsurladirectiondevolàla
radiocommande. Si vous pressez le levier de commande droit an
avant, le modèle va s’envoler de vous en direction route. Quand
vous rapprochez le levier de commande à vous le modèle va se
bouger le long de la route vers vous.
Installation du mode compas et yback:
La direction dans laquelle le modèle est au départ placé
reste sauvegardée comme la direction compas ou yback.
Lafonctioncompasetybackpeutêtreactivéependantlevol.
Dirigez le modèle dans la direction souhaitée et appuyez le bou-
ton compas. Le clignotement des DEL vous signale que le mo-
dèlesetrouveenmodecompasetyback.Lemodèlesuitalors
la direction compas installée en avance, indépendamment de la
direction que montre le fuselage et retourne vers vous jusqu’à ce
que vous bougez le levier droit. Après que vous n’ayez bougé
le levier droit, le modèle se retrouve automatiquement en mode
boussole.Enmodeboussoleouyback,vousdevezcontinuer
par contrôler la hauteur du vol par le levier d’accélération.
IT - Funzione Flyback- & Bussola:
Il modello ha una funzione Flyback- & Bussola. Questo signi-
cacheéin grado nonostante unarotazionein una direzione
desiderata (La fusoliera non è in direzione di volo) mantenere
la direzione originale del volo e semiautomatico volare di nuovo
indietro verso di voi.
Preparazione:
Per primo deve aver una idea in quale direzione desidera memo-
rizzare la bussola del modello. Questa direzione quando attiva
il modo bussola e automaticamente la nuova direzione di volo.
Quindi, se volete per esempio volare lungo la strada e usare la
modalità bussola scelga la direzione in cui la strada conduce
come la direzione di base della bussola. Se ora deve far ruo-
tare il modello attorno al proprio asse in modalità bussola non
ce bisogno di preoccuparsi per la direzione di volo sulla radio.
Se preme la leva di controllo destro in avanti il modello volerà
in direzione della strada via da voi. Se preme la leva di control-
lo destro verso di voi il modello volerà in direzione della strada
verso di voi.
Installazione della Modalità Flyback- & Bussola:
La direzzione in cui il modello é diretto, viene memorizzatoa
in modo permanente come Flyback ossia direzione bussola.
La funzione Flyback- & Bussola puo essere attivato durante il
volo attraverso premendo il pulsante in altro a destra (Bussola- e
Pulsante Flyback). Dal lampeggio del LED e segnale acustico
viene segnalato che il modello é in Flyback- ossia modalità bus-
sola. Il modello segue ora la direzione indipendente, in cui la
fusoliera del modello indica di come era stata programmata la
direzionebussolaindietroversodiLei(Flyback)nchemuovera
la leva di controllo destra. Dopo aver spostato la leva di controllo
destra il modello si trova automaticamente nella modalitá bus-
sola. Durante la modalità Flyback- ossia bussola é necessario
continuare a controllare l’altezza del modello attraverso la leva
del gas.
ES - Función Flyback- & Brújula:
SumodelotieneunafunciónFlyback-&Brújula.Estosignica
que no obstante un giro en una dirección deseada (El fuselaje no
está en la dirección de vuelo) mantiene la dirección original de
vuelo y semiautomático vola de nuevo hacia Usted.
Preparación:
Al primero usted debe tener una idea en que dirección desea
almacenar en la brújula del modelo. Esta dirección cuando se
activa el modo de brújula es automáticamente la nueva dirección
del vuelo. Así que si por ejemplo quieres volar a lo largo de una
calle y utilizar el modo de brújula selecciona la dirección en la
que el camino conduce como la dirección básica de la brújula.
Si ahora hace girar el modelo alrededor de su propio eje en el
modo de brújula no tiene que preocuparse de la dirección de
vuelo en la emisora. Si presiona la palanca de control derecha
hacia adelante el modelo va a volar en la dirección de la calle
lejos de usted. Si tire la planca de control derecha hacia usted el
modelo va a volar en la dirección de la calle hacia usted.
Instalación del modo Flyback- & Brújula:
La dirección en la que el modelo se dirige vien almacena-
do permanentemente como Flyback o bien dirección de la
brújula.
La función Flyback- & Brújula se puede activar durante el vuelo
atravez pulsar el botón en la parte superior derecha (botón Brú-
jula- y Flyback). Por intermitente de los LEDs y pitidos en la emi-
sora le senalas que el modelo esta en el mode Flyback o bien
Brújula. El modelo ahora sigue la dirección independiente en el
que el fuselaje del modelo muestra cómo estaba programado
anteriormente moverse lentamente hacia usted (Flyback) hasta
que vas a mover la palanca de control derecho. Después de
mover la palanca de control de la derecha el modelo esta en
automático en el modo brújula. Durante el modo Flyback- o bien
Brújula, se debe continuar a controlar la altura de su modelo con
la palanca de gas.

8
DE - USB
1. Stecken Sie die Speicherkarte in den USB-Adapter und
diesen in den USB-Anschluß ihres PCs oder Laptop.
2. Der USB-Adapter sollte von ihrem Computer automatisch
erkannt werden und wird als Laufwerk angezeigt.
Das Anschauen der Videos sollte mit verschiedenen Media-
Playern möglich sein.
Achtung!
● SolltenSieProblemebeimabspielenderDatenhaben,
probieren Sie es mit einem anderen Mediaplayer. Sie können
Online nach einem kostenlosen Download eines AVI- oder
VLC-Players suchen.
● MitderVideofunktionkönnennurVideosaufgenommen
werden. Tonaufnahmen sind nicht möglich.
GB - USB
1. Insert the memory card into the USB adapter and these in the
USB port of your PC or laptop.
2. The USB adapter should be automatically detected by your
computer and appears as a drive. The viewing of the video
should be possible with different media players.
Attention!
● IfyouhavetroubleplayingtheleswithQuicktimetryyour
other media players. You can also look online for
recommended free downloadable AVI player.
● Videocameradoesnotrecordsound.
#
FR - USB
1. Engagez la carte mémoire dans le lecteur USB puis branchez
l’ensemble sur un des ports USB de votre PC ou ordinateur
portable.
2. L‘adaptateur USB doit être automatiquement détecté par
votre ordinateur et apparaît comme un lecteur. En regardant
la vidéo devrait être possible avec des joueurs de différents
médias.
Attention!
● Sivousavezdessoucispourlirevosenregistrements,
veillez changer de lecteur media. Vous pouvez télécharger
Online des lecteurs AVI ou VLC non payants.
● Aveclafonctionvidéovousnepouvezenregistrerquedes
vidéos sans son. L’enregistrement de son n’est pas possible.
IT - USB
1. Inserire la scheda di memoria nel adattatore USB e poi nella
porta USB del suo PC o del portatile.
2. L‘adattatore USB dovrebbe essere rilevato automaticamente
dal computer e appare come un disco. Guardareil video
dovrebbe essere possibile con vari Media-Player.
Attenzione!
● Seavetedifficoltàaguardareidati,provareautilizzareun
altro Mediaplayer. È possibile cercare online per il download
gratuito di AVI- o VLC-Players.
● Conlafunzionevideosololeimmaginipossonoessere
registrate. Non é possibile registrare l’audio.
ES - USB
1. Inserir la tarjeta de memoria en el adaptador USB y este en la
conexion USB de su ordenador o portátil.
2. El adaptador USB debe ser detectado automáticamente por
el ordenador y aparece como una unidad. Mirando el vídeo
debe ser posible con con varios Media Players.
Atención!
● Sitieneproblemasenverlosdatos,tienesqueusarunotro
Mediaplayer. Puedes buscar online para descargar
gratuitivamente un Player AVI- o VLC.
● Conlafuncióndevídeosólosepuedengrabarlasimágenes.
La grabación de sonido no es posible.
DE - Videofunktion und Übertragung auf den PC
1. Mit den Tasten für Foto (1) bzw. Video (2) am Sender können
Sie eine Aufnahme starten.
2. Nach dem Starten des Modells zeigt eine blaue LED (4). die
betriebsbereitschaft der Kamera an.
3. Drücken Sie die Fototaste (1) einmal und lassen Sie wieder
los. Die rote LED (3) blinkt kurz und auf dem Display am
Sender erschient kurz ein Kamera-Symbol (5). Ein Standbild
wurde abgespeichert.
4. Drücken Sie die Videotaste (2) einmal und lassen Sie sie
wieder los. Die rote LED leuchtet. Dies signalisiert das die
Aufnahme läuft. Drücken Sie die Videotaste nochmal erlischt
die rote LED wieder, die Aufnahme wird beendet und das
Video abgespeichert. Während der Aufnahme ist auf dem
Display das Kamera-Symbol zu sehen.
5. Die Speicherkarte kann problemlos durch eine Ersatzkarte
ausgetauscht werden. Entfernen Sie die Speicherkarte indem
Sie leicht auf die Micro-SD-Karte drücken, die Speicherkarte
springt ein Stück heraus. Nun können Sie die Speicherkarte
leicht herausziehen.
Achtung!
● SetzenSiedieKartemitdengoldenenKontaktpunktnach
oben (zum Propeller) in den Einschub ein und schieben Sie
sie so weit hinein, bis sie einrastet.
GB - Photo / Video
1. Using the buttons on the transmitter for photo (1) or video (2),
you can start recording.
2. A light under the video camera will glow blue (4) when in
stand-by mode.
3. Press the Foto button (1) again and release again. The red
LED(3)ashesandyouseeacameraicon(5)onthedisplay
of the transmitter. A still image is stored.
4. Press the Video button (2) once and release it again. The red
LED is lit permanently. It signals that the recording. Press the
Video button again turns off the LED and the recording is
stopped and the video will be saved. While recording can be
seen on the screen the camera icon.
5. To view recording remove the Micro SD Card, by slightly
depressing the Micro SD Card and allowing it to then spring
out enough to grab it and pull it out of the slot.
Attention!
● MicroSDcardshouldbeplacedwiththelittlecopper
connections upward (to the propeller)
FR - Fonction photos / vidéo
1. Avec la touche pour photos (1) et vidéo (2) de l’émetteur vous
pouvez démarrer les prises de vues.
2. Après le démarrage du modèle, une LED bleue (4) indique
l‘état de préparation opérationnelle de la caméra.
3. Appuyez sur la touche photo (1) une fois et la lâchez tout
aussitôt. LED rouge (3) clignote brièvement et sur le display
de l’émetteur vous voyez un symbole caméra (5) pour
quelquetemps.Uneimagexeétaitsauvegardée
4. Appuyez sur la touche vidéo (2) une fois et la lâchez tout
aussitôt. La LED s’allume continuellement pour signaliser
que l’enregistrement est en court. Appuyez à nouveau sur la
touche vidéo, la LED rouge s’éteint, l’enregistrement est
terminé et est sauvegardé. Pendant la réception on peut voir
le symbole caméra sur le display.
5. La carte mémoire peut être échangée par une carte
équivalente. Enlevez la carte mémoire par appuyer sur la
carte SD micro à la face du modèle. La carte mémoire
disjoncte et vous pouvez la puiser facilement.
Attention !
● Mettezlacarteaveclepointdecontactdoréverslehaut
(au hélice) dans le tiroir.
IT - Foto/Video
1. Utilizzando i pulsanti sul trasmittente per foto (1) o video (2),
si avvia la registrazione
2. Dopo aver avviato il modello, un LED blu (4) indica la
prontezza operativa della telecamera.
3. Premere il pulsante immagine (1) di nuovo e rilasciarlo di
nuovo. Il LED rosso (3) lampeggia e nel display della radio
appare brevemente una icona della foto camera (5). Un
immagine viene memorizzata.
4. Premere il pulsante video (2) una volta e rilasciarlo
nuovamente.Il LED rosso si accende in modo permanente. Si
segnala che la registrazione e in corso. Ripremere il pulsante
video e la LED rossa si spegne è la registrazione viene
interrotta e il video viene salvato. Durante la registrazione, si
può vedere sullo display l‘icona della fotocamera.
5. La scheda di memoria può essere facilmente sostituito da una
carta sostitutiva. Rimovere premendo sul lato della modello
facilmente sulla scheda Micro SD, la scheda di memoria
uscirá leggermente. Ora può facilmente estrarre la scheda di
memoria
Attenzione!
● Inserirelaschedaconilpuntodicontattodorataversol‘alto
(alelica)nellafessuraespingerlanoaquandononsi
incastri.
ES - Función Foto/Vídeo
1. Utilizando los botones de la emisora para foto (1) o video (2),
puedes iniciar la grabación.
2. Después de iniciar el modelo, un LED azul (4) indica la
disponibilidad operacional de la cámara.
3. !Pulse el botón de imagen (1) y vuelva a soltar. El LED rojo
(3) parpadea y en el display de la emisora aparece
brevemente un icono de la cámara (5). Una imagen se ha
memorizado.
4. Pulse el botón de vídeo (2) una vez y suelte de nuevo. El LED
rojo se ilumina de forma permanente. Señala que la grabación
se esta realizando. Pulse el botón de vídeo otravez, se apaga
la luz LED roja y la grabación se detiene y el vídeo se
memoriza. Durante la grabación, se puede ver en el display el
icono de la cámara.
5. La tarjeta de memoria puede ser fácilmente sustituida por una
tarjeta de reemplazo. Remover la tarjeta de memoria
pulsando fácilmente en la lateral de la modelo, la tarjeta de
memoria saldrá ligeramente. Ahora se puede sacar la tarjeta
de memoria.
Atención!
● Insertelatarjetaconelpuntodecontactodoradohacia
arriba (al helice) en la ranura y empujarlo hasta que se
encastre.
1
2
5
4
3

9
DE - Austauschen der Rotorblätter
Sollte ein Rotorblatt gewechselt werden, muss darauf geachtet
werden das richtige Blatt an den richtigen Rotor zu montieren.
Achten Sie auch darauf welches Blatt (A + B) links und rechts-
montiert wird! Orientieren Sie sich dabei an der Abbildung (Bild
1) und den Beschriftungen unten an den Rotoblättern (Bild 3).
Bei falsch montierten Rotorblättern wird das Modell unkon-
trollierbar sein! Zum Tausch der Blätter entfernen Sie die Hal-
teschraube (Bild 2) und ziehen das Blatt vorsichtig ab. Drücken
Sie das neue Blatt wieder vorsichtig auf und Schrauben Sie die
Halteschraube wieder ein.
GB - Changing the main blades
If you have to change a main blade you have to pay attention of
the rotor position of each main blade. The white coloured main
blades are meant to the front and the black ones are meant for
the rear . Also pay attention of the left and right mounting position
of the blades (A + B)! Take an Example on the picture (pic. 1)
and the labels on the bottom of the rotor blades (pic. 2). If you
mount the main blades in wrong position the model will get
out of control! To change the main blades remove the screw
(pic. 2) and drop out the main blade carefully. Press the main
blade back again and secure it again with the screw.
FR - Echange des pales de rotor
Quand une pale de rotor doit être remplacée, il faut prendre soin
de monter la bonne pale au rotor correct. Les pales de rotor
blanc doivent être montées devant et ces noir pales de rotors
en arrière. Faites attention quelle pale sera montée à gauche et
laquelle à droite (A + B)! Veuillez regardez attentivement l’image
(image 1) et les étiquettes sur la face bas des pales de rotor
(image 3). Le modèle sera ingérable en cas des pales de
rotor sont montées mal! Pour échanger les pales enlevez la
vis (image 2) et enlevez la pale tout en douceur. Apposez la
nouvelle pale timidement et vissez la vis.
IT - Sostituzione de la pala rotore
Se deve cambiare una pala del rotore, si deve assicurare di
montare la pala al rotore corretto. Assicurarsi quale pala viene
montata a destra e a sinistra! Orientarsi all’immagine ( gura
1) e le etichette sul lato sotto delle pale del rotore ( gura 3) .Se
si montano le pale del rotore non correttamente, il modello
sarà incontrollabile! Per sostituire le pale rimuovere la vite di
ssaggio ( gura 2) ed tirare la pala delicatamente. Premere la
nuovapalaconcuraeavvitarelavitadissaggio.
ES - Sustitución de la pala del rotor
Si tiene que cambiar una pala de rotor, debe asegurarse de
que montar la pala en el rotor correcto (A + B). Orientarse a la
imagen (Figura 1) y las etiquetas en el bajo de las palas del rotor
(Figura 3). Asegúrese qual pala vien montada a la izquierda
y qual pala en la derecha! Para cambiar la palas quitar el tor-
nillodejación(Figura 2) y tire la pala con cauta. Presione la
nuevapalaconcautayatornillareltornillodejación.
vorne
front
devant
avanti
adelante
hinten
rear
derrière
dietro
detrás
DE - Rekalibrierung
Falls sich das Modell nach einem Crash oder in Folge eines sehr hekti-
schen Flugmanövers nicht mehr austrimmen läßt muß es neu kalibriert wer-
den. Das Modell muß dazu auf einem ebenen Untergrund komplett waag-
recht stehen. Während das Modell in Betrieb ist drücken Sie kurz die Flip
Taste rechts oben am Sender. Der Sender piepst. Anschliessend drücken
Sie den linken und den rechten Steuerknüppel nach unten Links und warten
bis das Modell die Kalibrierung mit kurzem Blinken bestätigt. Anschliessend
sollte das Modell sich wieder normal verhalten.
GB - Calibrating:
In case you had a crash or the model can no longer be trimmed due to a
hecticightmanoevreyouwillhavetocalibratethemodel.Placethemodel
on a horizontal surface such as a table. The model should be switched on;
pressthetoprightbutton(ip)onyourtransmitter.Thetransmitterwillmake
a sound. After the sound pull the right and left control stick in the bottom left
cornerandwaitforthemodeltoconrmcalibrationbyblinkinglights.Once
nishedthemodelshouldreactnormal.
FR - Recalibration
Au cas où le modèle ne se fait plus centrer suite à un crash ou à un manœu-
vre de vol mouvementé, il doit être recalibré. L’appareil doit pour ce faire
être posé sur une surface totalement horizontale. Pendant que le modèle
estenfonctionnement,vousdevezappuyerbrièvementsurlatoucheip
à droite près de l’émetteur. L’émetteur bipe et par la suite appuyer les
leviers de commande droit et gauche vers le bas à gauche et attendez que
lemodèleconrmelacalibrationparunclignotementbref.L’appareildevra
ainsiennbiensecomporter.
IT - Ricalibrazione:
Se il modello non si lascia trimare dopo un incidente o una manovra di
volo molto frenetica, deve essere ricalibrato. Poggiare il modello su una
superciepianacompletamenteorizzontale.Mentreilmodelloèaccesso,
premere brevemente il pulsante Flip in alto a destra della radio. La radio da
un bip quindi premere la leva sinistra e destra verso in basso a sinistra e
attendere che il modello confermi con un piccolo lampeggio la calibrazione.
Successivamente, il modello è ricalibrato.
ES - Recalibración:
Si el modelo no se deja trimar después de un accidente o como consecuen-
cia de una maniobra de vuelo muy agitado, debe ser recalibrado. Posició-
narelmodeloenunasupercieplanacompletamentehorizontal.Mientras
que el modelo está encendido, pulse brevemente el botón Flip en la parte
superior derecha de la emisora. La emisora va a dar un bip y luego presi-
one la palanca de control izquierda y derecha hacia abajo a la izquierda y
esperarqueelmodeloconrmelacalibraciónconunpequeñoparpadeo.
Seguidamente el modelo está recalibrado.
DE
Problembehebung und Lösungen
Die Empfangselektronik blinkt.
1. Das Modell empfängt kein Signal.
- Überprüfen Sie ob das Modell gebunden ist und der Sender
eingeschaltet ist.
Das Modell reagiert nicht.
1. Sie sind ausser Reichweite.
- Verringern Sie die Distanz zum Modell
2. Die Senderbatterien sind zu schwach.
- Erneuern Sie die Senderbatterien.
Die Rotoren machen ungewöhnliche Geräusche.
1. Ein Rotorblatt ist beschädigt.
- Wechseln Sie das Rotorblatt.
Nach dem Blatt-Tausch iegt das Modell nicht richtig.
1. Die Blätter sind falsch montiert.
- Montieren Sie die Blätter richtig.
Nach dem Laden hebt das Modell nicht ab.
1. Akku oder Ladegerät sind defekt.
- Akku oder Ladegerät ersetzen.
2. Der Akku ist nicht voll aufgeladen.
- Laden Sie den Akku immer vollständig auf.
Die Kamera blinkt und eine Aufnahme ist nicht möglich.
1. Die Speicherkarte ist voll oder nicht eingelegt.
- Bereinigen Sie die Speicherkarte bzw. legen Sie die
Speicherkarte ein.
GB
Problems and solutions
The LED on the receiver is blinking.
1. The receiver don´t recieve a signal.
- Check the binding of the model and make sure that the
transmitter is turned on.
The model don´t recognize.
1. You are out of reach.
- Decrease the distance to the model.
2. The transmitter batterys are to low.
- Put new batterys into the transmitter.
The rotor is making strange noises.
1. The rotor blade is damaged.
- Replace the rotor.
After changing the blades the model don´t ies properly.
1. The blades are not installed properly.
- Install the blades properly
The model don´t rise up after charging.
1. Battery or charger are damaged.
- Replace battery or charger.
2. The battery was not charged enough.
- Always charge the battery till it is full charged.
The camera is blinking.
1. The memory card is full or not inserted.
- Emtying the memory card resp. Insert the memory card.
FR
Problèmes possibles et solutions
L‘électronique récepteur clignote.
1. Le modèle ne reçoit pas de signal
-Vériezsilemodèleestconnectéetl‘émetteurestmisen
marche.
Le Modèle ne réagit pas.
1. Vous êtes hors d‘atteinte
- Diminuez la distance au modèle
2. Les piles de l‘émetteur sont trop faibles
- Renouvelez les piles de l‘émetteur.
Les rotors font des bruits inhabituels.
1. Un rotor est abîmé.
- Remplacez la pale.
Après l‘échange de pale le modèle ne vole pas
correctement.
1. Les pales sont montées mal.
- Montez les pales correctement.
Le modèle ne décolle pas.
1. L‘accu ou le chargeur sont en panne.
- Remplacez l‘accu ou le chargeur.
2. L‘accu n‘est pas chargé complètement.
- Chargez l‘accu toujours totalement.
La caméra clignote et une prise n’est pas possible.
1. La carte de mémoire est pleine ou pas mis en place.
- Videz la carte de mémoire ou mettez la en place.
A
1 3
2
A
B
B
A
A
B
B

10
DE - Ersatzteile | GB - Spare parts | FR - Pièces détachées | IT - Pezzi di ricambio - ES - Lista de repuestos
Tuning
No. 03 8669
Rumpf (o. Rotorblätter)
Canopy (w/o rotor blades)
Cabine (sans pale de rotor)
Cappottina
(senza pale di rotore)
Cabina
(sin palas de repuesto)
No. 038673
Hauptzahnrad inkl. Welle VE1
Main gear incl. shaft 1 pc
engrenage principal incl.
arbre 1 p.
Ingranaggio princip. incl.
albero 1 p.
Engranaje principal incl. eje,
1 pz.
No. 038674
Empfangselektronik
Receiving electronics
Electronique de réception
Ricezione elettronica
Receptor electrónico
No. 03 8666
Fernsteuerung
Transmitter
Radiocommande
Trasmittente
Emisora
No. 03 8670
Ladegerät
Charger
Chargeur
Caricatore
Cargador
No. 03 8671
Rotorschutz
Chassis
Châssis
Chassi
Chassi
No. 03 8667
Rotorblätter
Rotor blades
Pale de rotor
Pale di rotore
Palas de repuesto
No. 03 8668
Motor
Motor
Moteur
Motore
Motor
No. 038665
Akku
Battery
Accu
Batteria
Baterìa
No. 038675
Kamera HD 2 GB 720P
Camera HD 2 GB 720P
Caméra HD 2 GB 720P
Camera HD 2 GB 720P
Cámara HD 2 GB 720P
IT
Soluzione del problema
La ricevente elettronica lampeggia.
1. Il modello non riceve alcun segnale
-Vericareseilmodelloestatofattoilbindingelaradiosia
accesa.
Il modello non risponde.
1. Siete fuori della autonomia.
- Ridurre la distanza dal modello.
2. Le batterie della radio sono deboli.
- Cambiare le batterie della radio.
I rotori fanno rumori insoliti
1. Una pala e danneggiate.
- Cambiare la pala.
Dopo aver cambiato la pala, il modello non vola
correttamente.
1. Le pale sono montate non correttamente.
- Montare le pale correttamente.
Dopo la carica, il modello non decolla.
1. Batteria o caricatore sono difettosi.
- Sostituire la batteria o caricatore
2. La batteria non e completamente caricata.
- Caricare la batteria sempre completamente
La fotocamera lampeggia e la registrazione non è possibile.
1. La scheda di memoria é piena o non inserita.
- Pulire la scheda di memoria e inserire la scheda di memoria.
ES
Solución de problemas y soluciones
La electrónica receptor parpadea.
1. El modelo no recibe ninguna senal.
- Comprobar si el modelo está echo el binding y la emisora
encendida.
El modelo no responde.
1. Usted está fuera de su alcance.
- Reduzca la distancia en su modelo.
2. La baterías son débiles.
- Reemplace las baterías de la emisora.
Los rotores hacen ruidos inusuales.
1. Una pala de rotor está dañada.
- Cambiar la pala.
Después de sustituir la pala, el modelo no vuela
correctamente.
1. Las palas no estan montado bien.
- Montar las palas correctamente.
Después de la carga, el modelo no esta despegando.
1. Batería o el cargador estan defectuoso.
- Cambiar la batería o el cargador.
2. La batería no esta cargada completamente. Cargar la batería
siempre completamente.
La cámara parpadea y la grabación no es posible.
1. La tarjeta de memoria está llena o no insertada.
- Limpiear la tarjeta de memoriay inserte la tarjeta de
memoria.
DE - Sicherheitshinweise
• Bitte lesen Sie die Bedienungsanleitung und Sicherheitshinweise
sorgfältig durch bevor Sie das Modell in Betrieb nehmen.
•DiesesGerätistnichtdafürbestimmt,durchPersonen(einschließlichKinder)mit
eingeschränkten physischen, sensorischen oder geistigen Fähigkeiten oder man-
gels Erfahrung und/oder mangels Wissen benutzt zu werden, es sei denn, sie
werden durch eine für ihre Sicherheit zuständige Person beaufsichtigt oder erhiel-
ten Anweisungen, wie das Gerät zu benutzen ist.
• DerBenutzeristimvollemUmfangfürdenrichtigenUmgangmitdemModell
verantwortlich.
• Achtung:
Gefahr von Augenverletzungen! Halten Sie einen Sicherheitsabstand von 1 -
2 Meter um sich oder andere vor Verletzungen zu schützen.
• JeglicheManipulationanderStrukturdesModellsistnichterlaubtundführtzum
sofortigen Verlust der Gewährleistung.
•FliegenSieinkeinerUmgebungmitmehrals+45°Cundwenigerals10°C.
•SetzenSiedasModellkeinerdirektenSonneneinstrahlung,hoherLuftfeuchtigkeit
oder Staubeinwirkung aus.
•AchtenSiedarauf,dassmancheTeileamModellheißwerdenkönnen.
Betrieb
•Achtung!
In einigen Ländern ist es vorgeschrieben für den Betrieb eines Modells eine
spezielleModellhalterhaftpichtversicherungabzuschließen.Informationenhierzu
bekommen Sie bei den Modellsportverbänden oder bei einer Versicherung.
•BenutzenSiedasFluggerät niemals in der Nähe von Flughäfen, Bahnanlagen
oder Straßen. Halten Sie immer ausreichend Abstand von den gefahrenträchtigen
und besonders geschützten Bereichen.
•BetreibenSieIhrModellnichtinderNähevonFunkstationen,Hochspannungs-
leitungen, Transformatorkästen oder ähnlichem! Diese Einrichtungen können
Funkstörungen verursachen!
• UmUnfällezuvermeiden,iegenSiedasModellnieinderNähevonPersonen,
Tieren oder sonstigen Hindernissen. Hände, Haare und lose Kleidung vom Rotor
entfernt halten. Nicht in die Rotoren greifen!
• SetzenSieOutdoor-ModellenurbeigutemWetterein.BeiRegen,Sturmodergar
Gewitter dürfen Sie diese Modelle nicht betreiben
•SuchenSieeinFluggelände,dasdengesetzlichenVoraussetzungenentspricht
und frei von Hindernissen wie Bäumen, Häusern usw. ist.
• AusGründenderSicherheitundumzufriedenstellendeFlugergebnissezuer-
zielen, ist auf einen ausreichend großen freien Raum (ca. 6 x 5 x 2,5 m) zu achten.
Dabei muss der Raum frei von Hindernissen (Lampen, losen Gegenständen, etc.)
sein. Außerdem sollte kein Luftzug vorhanden sein.
• DasModellnichtausgroßenHöhenfallenoderabstürzenlassen.Dieskanndie
Flugeigenschaften und die Lebenszeit des Modells beeinträchtigen.
Akkusicherheitshinweise
Durch die hohe Energiedichte (bis zu 150Wh/kg) sind die Zellen nicht ungefährlich
und bedürfen einer besonderen Sorgfalt! Die Firma JAMARA schließt daher ausdrück-
lich jegliche Haftung für Schäden aus, die durch den fehlerhaften Umgang mit den
Lithium-Polymer-Zellen entstehen.
• BeiunsachgemäßerVerwendungdesAkkusbestehtBrand-oderVerätzungs-
gefahr.
• Überladen,zuhoheStröme,oderTiefentladenzerstörtdieZelle.
• VormechanischerBelastung(Quetschen,Drücken,Biegen,Bohren)schützen.

11
DE
• Akkuskeinesfallsöffnenoderaufschneiden,nichtinsFeuerwerfen,vonKindern
fernhalten.
• BehandelnSiebeschädigteoderauslaufendeAkkusmitäußersterVorsicht.Es
können Verletzungen oder Schäden am Gerät entstehen.
• AkkusaufkeinenFallkurzschließenundimmeraufdierichtigePolungachten
• AkkusvorHitzeeinwirkungüber65°Cschützen,fernvonheißenTeilen(z.B.
Auspuff) montieren.
• VorderLagerung(z.B.imWinter)dieAkkusladen-nichtimentladenenundnicht
im vollgeladenen Zustand lagern! Bei längerer Lagerzeit sollte der Ladezustand
gelegentlich kontrolliert werden.
• DerInhaltderZelleistschädlichfürHautundAuge.
• NachHautkontaktmitvielWasserabspülenundbenetzteKleidungablegen.
• NachAugenkontaktmitvielWasserabspülenundeinenArztkonsultieren.
Sollte die Zelle sich überhitzen, aufblähen, rauchen oder brennen, darf dieses
nicht mehr berührt werden. Halten Sie Sicherheitsabstand und stellen Sie ge-
eignete Löschmittel bereit (kein Wasser Explosionsgefahr, gut trockener Sand,
Feuerlöscher, Löschdecken, Salzwasser).
GB - Security instructions
• Read the instructions and security instructions carefully before using the
model.
•Thisproductisnotintendedforusebyindividuals(includingchildren)withreduced
physical, sensory or mental capabilities or lack of experience and / or knowledge,
unless they are supervised by a person responsible for their safety and is able to
give instructions about how the product should be used. Children should be super-
vised to ensure that they do not play with the product.
• TheUserisfullyresponsibleforthecorrectuseofthemodel.
•Warning:
Risk of eye injury! Keep a safe distance of 1 - 2 meters to yourself or others to
protect against injury.
• Themodelshouldnotbechangedinanyway,doingsowillinvalidatethe
guarantee.
•Donotyintemperaturesabove+45°Corbelow10°C.
•Protectthemodelfromstrongsunlight,moistureanddust.
•Beawarethatsomepartsofthemodelmaygethot.
Operating
•Attention!
In some countries it is a legal requirement to carry third party indemnity insurance
when operating a radio controlled model. Please ask your local dealer, governing
body or your insurance company for details.
•Never use the model near an airport, railway or roads. Always keep a safe distance
from potentially hazardous and specially protected areas.
•Donotoperateyourmodelnearradiostations,powerlines,transformerboxesor
similar facilities! This can result in radio interference, causing loss of control over
the model.
• Itmustbeobservedthatneitherpersonsoranimalsorotherobstaclesarewithin
the operating enviroment. Keep hands, hair and loose clothing away from the rotor,
not reach into the rotors.
• TheOutdoor-modelcanonlybeowningoodweather.Donotyinwind,rainor
thunder storms.
•Findaplacetoywhichcomplieswithanylaws,andisfreefromobstaclessuchas
trees, houses and / or other obstacles.
• Toensuresafetyandforbestresults,themodelmayonlybeowninalargeopen
room (~ 6 x 5 x 2,5 m), free of obstacles such as lights or furniture. In addition, no
draft should be available.
• Donotletthemodelfallorcrashfromhighheight.Thismayaffecttheight
characteristics and lifetime of your model.
Safety precausions for battery
Because of the high power compactivity (up to 150 Wh/kg) the cells are quite dan-
gerous and need special care! The company Jamara excludes explicitly, all types of
liability for damages, that can occure when using the Lithium-Polymer-
Cells indequate.
•Whenusingthebatteryincorrectthereisariskofgettingreoracid-injuries.
•Overcharging,toohighpower,ordischargingatlowleveldestroysthecell.
•Protectfrommechanicalstress(squeezing,pushing,bending,drilling).
•Neveropenorcutbatteries,donotthrowintore,keepawayfromchildren.
•Handledamagedorleakingbatterywithcare.Injuriesordamagestotheproduct
can occure.
•Undernocircumstanceshort-circuitthedeviceandalwayswatchoutforcorrect
polarity.
•Protectbatteriesfromheatabove65°C,mountawayfromhotobjects(forexample
exhaust pipe).
•Beforestoringbatteries(forexampleinthewinter)chargethebattery.Donotstore
in fully charged or in non charged state!
•Thecontentsofthecellisharmfullforskinandeye.
•Ifthecontentcomesintocontactwithskin,cleanwithplentyofwaterandtakeoff
moisted clothes.
•Ifthecontentcomesintocontactwiththeeyes,cleanwithplentyofwaterand
consult a doctor.
If the cell overheats, swells, burns or smoke is coming from it, do not touch it
under any circumstances. Keep away in a safe distance and prepare adequate
extinguishing agents such (No water explosion, well dry sand, re extinguis-
hers, re blanket, salt water).
FR - Consignes de sécurités
• Veillez lire attentivement la notice et sécurités d’utilisation avant
d’utiliser!
FR
•Cedispositifn‘estpasdestinéàêtreutilisépardespersonnes(ycomprisles
enfants) dont les capacités physiques, sensorielles ou mentales ou manque
d‘expérience et / ou les connaissances pour être, sauf s‘ils sont surveillés par une
personne responsable de leur sécurité ou reçu des instructions sur la façon dont
l‘appareil doit être utilisé. Les enfants doivent être surveillés pour s‘assurer qu‘ils ne
jouent pas avec l‘appareil.
• L’utilisateurprendlaresponsabilitéentièreducorrectmaniementdumodèle.
• Attention:
Risque de blessures à l‘oeil! Distance de sécurité d‘au moins 1 à 2 mètres à
eux-mêmes ou d‘autres protègent contre les blessures.
• Manipulezlesélémentsendommagésavecénormémentdeprécautions.Des
brûlures acides ou des dommages sur l‘appareil. Sont à craindre.
•Nevolezpassil‘airambiantfaitplusde+45°Coumoinsde10°C.
•N‘exposezjamaisvotremodèledirectementdanslesrayonsdusoleil,nel‘utilisez
pas par temps avec humidité relative élevée ou dans un endroit plein de poussière.
•Attention,certainespiècesdevotremodèlepeuventchauffer.
Mise en marche
•Attention !
Dans quelques pays il est nécessaire de souscrire à une assurance spéciale si
vous souhaitez utiliser des modèles réduits. Pour avoir plus d‘informations à ce
sujet, veillez vous adresser au club de modèles réduits le plus proche ou un
organisme d‘assurance.
• N‘utilisezjamais votre modèle volant dans les environs d‘un aérodrome ou
aéroport, installations de chemins de fer ou de routes. Gardez toujours une
distancesufsanteparrapportauzonesdedangersouprotégées.
•N’utilisezjamaisvotremodèledanslesenvironsdestationsd’émissions,lignesà
haute tensions, transformateurs ou équi valent! Ces installations peuvent
provoquer des perturbations et entraîner la perte du contrôle de votre modèle ou
même du modèle lui-même!
• Aucunepersonne,aucunanimalououtreobstraclenedolventsetrouterdans
l‘espace de fonctionnement de modèle. Gardez les mains, cheveux et vêtement à
bonne distance des parties en rotations, pas la main dans les rotors.
• N’utilisezvotremodèleoutdoorquepartempsensoleillé.Surtoutpass’ilpleut,s’il
y a beaucoup de vent ou lors d’un orage.
•Choisissezunterrainrépondantauxexigencesdestextesdeloisenvigueurpour
faire évoluer votre modèle et libre de tout obstacle comme par exemple arbres ou
maisons etc.
• Pourdesraisonsdesécuritésetandeproterpleinementduplaisirenvol,veillez
toujoursutiliservotremodèledansunendroitayantsufsammentdeplace
(~ 6 x 5 x 2,5 m) pour évoluer. Pour cela il est conseillé d‘avoir le moins d‘obstacles
possibles (lampes, bibelots,…) pouvant être fatal pour votre modèle. Uniquement
utiliser à l‘intérieur, à l‘abri des courants d‘air.
• Nepaslaissertomberlemodèledehauteursélevées;cecipourraitlimiterles
qualité de vol et la durée de vie du modèle.
Consignes de sécurité de la accu
De part leur énorme densité énergétique (jusqu‘à 150Wh/Kg), les éléments Lithium
ne sont pas sans dangers et nécessitent un soin accu! De ce fait, la société Jamara
décline toute garantie pour les dégâts qui peuvent résulter d‘une utilisation non con-
forme des éléments Lithium.
•Uneutilisationnonconformepeutdéclencherunincendieoudesbrûluresacides.
•Surcharge,descourantstropélevésouunetropgrandedéchargedétruisentles
éléments.
•Protégezlesélémentscontredeschocsmécaniques(pincement,pression,torsion,
perçage).
•N‘ouvrezounedécoupezenaucuncaslesaccus,nelesjetezpasdanslefeu,et
tenez les à bonne distance des enfants.
• Manipulezlesélémentsendommagésavecénormémentdeprécautions.Des
brûlures acides ou des dommages sur l‘appareil. Sont à craindre.
•Necourt-circuitezenaucuncaslesaccusetveillezàtoujoursrespecterlabonne
polarité.
•Protégélesaccusd‘unetempératureau-dessusde65°Ceteloignezceux-cide
corpschauffants(parex.:potsd‘échappements).
•Chargezlesaccusavantstockage(parex.:enhivers).Ceux-cinedoiventpasêtre
ni dans un état déchargé ni pleinement chargé.
•Lecontenudesélémentsesttrèsdangereuxpourlesyeuxetpeau.
•Aprèsuncontactaveclapeau,rincezlazoneavecbeaucoupd‘eauetenlevezles
vêtements touchés.
•Aprèsuncontactaveclesyeux,rincezavecbeaucoupd‘eauetconsultezun
médecin.
Si les éléments venaient à surchauffer, goner ou prendre feu, il ne surtout
plus les toucher. Tenez-vous à bonne distance de celles-ci et cherchez un ex-
tincteur adapté (Pas l‘eau (risque d’explosion), ainsi le sable sec, extincteur,
l‘eau salée).
IT - Istruzioni per la sicurezza
• Vi preghiamo di leggere attentamente le istruzioni e Istruzioni per la
sicurezza prima di usare il modello.
•Questoprodottononèdestinatoadessereutilizzatodapersone(bambini
compresi)concapacitàsichelimitate,conlimitazionisensorialeomentalioppure
mancanza di esperienza e/o di conoscenza. A meno che siano sorvegliate da una
persona responsabile della loro sicurezza o ricevano istruzioni su come usare il
prodotto in modo corretto. Bambini devono essere supervisionati per assicurare
che non giocano con l’apparecchio.
• L’utenteéresponsabileinpienoperilcorrettoutilizzodelmodello.
• Attenzione:
Rischio di lesioni agli occhi! Distanza di sicurezza di 1 - 2 metri per sé o per altri
protezione contro eventuali lesioni. Vola il modello mai in prossimità di persone.
• Ognimodicaallepartidiunkitneannullerannolagaranzia.
•Nonvolatecontemperaturesuperioria45°Cemenodi10°C.

Irrtum und technische Änderungen vorbehalten. Copyright JAMARA e.K. 2015
Kopie und Nachdruck, auch auszugsweise, nur mit Genehmigung von JAMARA e. K.
All rights reserved. Copyright JAMARA e.K. 2015
Copying or reproduction in whole or part, only with the expressed permission of JAMARA e.K.
JAMARA e.K.
Inh. Manuel Natterer
Am Lauerbühl 5 - DE-88317 Aichstetten
Tel. +49 (0) 75 65/94 12-0 - Fax +49 (0) 75 65/94 12-23
Service - Tel. +49 (0) 75 65/94 12-66
kundenservice@ jamara.com
DE - Servicehändler | GB - Service centre | FR - Revendeur de service | IT - Centro assistenza | ES - Servicio asistencia
DE - Reitter Modellbau Versand, Patricia Reitter, Degerfeldstrasse 11, 72461 Albstadt, Tel. 07432 9802700, Fax 07432 2009594,
DE - Bay-Tec Modelltechnik, Martin Schaaf, Am Bahndamm 6, 86650 Wemding, Tel. 07151 5002192, Fax 07151 5002193, [email protected], www.bay-tec.de
DE - Extra Trade, Rudolf Müller & Gerrit Müller GdbR, Lindenstraße 82, 66787 Wadgassen, Tel. 06834 9604952, Fax 06834 9604963, [email protected], www.extra-trade.de
CH - Modellbau Zentral, Peter Hofer, Bresteneggstrasse 2, CH -6460 Altdorf, Tel. +41 794296225, Fax +41 418700213, [email protected], www.modellbau-zentral.ch
AT - Sigi‘s Modellbau Shop, Siegfried Costa, Bundesstr. 30, AT -6923 Lauterach, Tel. +43 557483657, Fax +43 557483657,
AT - AignerModellbau,EdmundAigner,Graben2,AT-3300Amstetten,Tel.+43747224655,Fax+43747223358,of[email protected],www.modellbau-amstetten.at
IT
•Nonusateilmodellodirettamenteairaggisolari,ambientitroppoumidi,polverosio
troppo soleggiati.
•Assicurarsichealcunepartidelmodellopossonoesserecaldi.
Funzionamento
•Attenzione!
In molti Paesi l‘ impiego di modelli radiocomandati richiede una assicurazione
obbligatoria. Informatevi perciò presso il vostro assicuratore o presso il vostro
negoziantediducia.
•Nonutilizzaremai l´unita di volo nelle vicinanze di aeroporti, ferrovie o stazioni
ferroviarie e strade. Mantenere sempre una distanza di sicurezza adeguata dalle
zone potenzialmente pericolose o di alta protezione.
•Nonusateilmodellonellevicinanzedistazioneradio,lineadialtatensione,casse
di trasformazione oppure simile. Queste installazioni causano disturbi frequenza
cheportanoallaperditadelcontrollonoallaperditadelmodello!
• Nelluogodifunzionamentonondevonoesserepresentipersoneoanimaliné
ostacoli di alcun tipo. Tenete mani, capelli e parti svolazzanti lontane dalle pale in
rotazione, non toccare i rotori.
•Evitatedivolareconventoforte,pioggiaotemporale.
•Volatesempreinareeliberelegalmenteautorizzate,lontanedacase,alberie/oaltri
ostacoli.
• Fatevolareilvostromodellolontanodaostacoliedinunospazio(~6x5x2,5m)
abbastanza grande da evitare che il modello possa scontrarsi con ostacoli che lo
danneggerebbero. Utilizzare esclusivamente in ambiente interno privo di correnti
d‘aria.
• Nonlasciatecheilmodelloprecipitadiunagrandealtezza.Questopuòinuenzare
le caratteristiche di volo e la durata del modello.
Sicurezza della batteria
Dovutoalgrandecaricoenergetico(noa150KW/hlebatterieLitiononvannosotto-
valutate e prese alla leggera, ma richiedono una particolare cura. Per questo JAMARA
e.K. declina ogni responsabilità sull‘ impiego di queste batterie e dai danni che potreb-
bero derivare dal loro utilizzo.
•Unusononappropiatodiquestebatteriepuòprovocareincendi.Erelativeustioni.
•Isovraccarichiadaltaintensitàolescaricheprofondepossonodanneggiarle.
•Evitatelesollecitazionimeccaniche(schiacciare,piegare,forare.)
•Nonaprite,nongettatenelfuocoenonlasciatevicinoaibambini
•Manipolateconmoltaattenzionelebatteriedanneggiateoconperditadiliquido.
Possono causare danni alle apparecchiature
•Noncortocircuitateleevericatesemprechelapolaritàsiacorretta.
•Vericatechenonsorpassinomaii65°Cenonmontatelevicinoafontidicalore
(tubi di scarico dei motori o simili)
•Primadimetterleviaperunasostanelloroimpiego,caricatelesoloametà.Non
conservatele mai a pieno carico. Durante il periodo di conservazione controllatele
periodicamente.
•Illiquidocontenutonellebatterieédannosoperlapelleepergliocchi.
•Incasodicontattocongliocchi,lavateabbondantementeconacquaeconsultateil
medico.
•Incasodicontattoconlapelle,lavateconacquaetoglieteimmediatamenteivestiti
che si siano.
In caso che il pacco batterie si dovrebbe riscaldare troppo rapidamente, gon-
arsi, fumare o prendere fuco non la prendete nelle mani e non toccatela. Mante-
nete und distanza di sicurezza e in caso di incendio, spegnarla con polvere an-
tifuoco oppure con sabbia (No, acqua, pericolo di esplosione, sabbia asciutta,
estintore, coperta anti incendio, acqua di mare).
ES - Seguridad
• Lea atentamente las instrucciones y seguridad antes de poner el
modelo en funcionamiento!
•Esproductonoesparapersonas(incluidosniños)condiscapacidadfísica,mental
y sensonriais. O ninguna experiencia ni conocimiento, a menos que vayan
acompañados de un responsable o recibir instrucciones ¿Cómo se debe usar. Los
niños deben ser supervisados para asegurarse de que no te metas con el producto.
• Elusarioesresponsableensutotalidadparaelusocorrectodelmodelo.
• Precaución:peligrodelesionesenlosojos!Distanciadeseguridadmínimade1-2
metros a sí mismos oa otros protegen contra lesiones.
• Seprohíbecualquiermodicacióndelaestructuradelmodeloyaqueanularála
garantía inmediatamente.
•Nuncavueleenentornosdondelatemperaturaseasuperiora+45°oinferiora
10°C.
•Noexpongaelmodeloalosrayossolaresdirectos,aaltosíndicesdehumedado
entornos muy polvorientos.
•Noolvidequemuchaspiezasdelmodelopuedencalentarse.
Operación
•¡Atención!
En algunos países es imprescindible suscribir una póliza de seguros especial con
cobertura para la práctica del aeromodelismo. Encontrará más información sobre
esto en su club local o contactando con una aseguradora.
• Nunca utilizar el aparato de vuelo cerca de los aeropuertos, ferrocarriles o
carreteras. Mantenga siempre una distancia segura de las áreas potencialmente
peligrosas y especialmente protegida.
•Nohagafuncionarsumodeloenlasproximidadesdelasestacionesderadio,líneas
eléctricas,cajasdetransformadores,ocomo!Estosignicaquepuedela
interferencia de radio princi pal causa la pérda de control sobre el modelo!
• Enelentornodefuncionamientonodebenhaberpersonas,animalesniotros
obstáculos. Mantenga las manos y el cabello lejos del rotor, no introduzca las
manos en los rotores.
• UtiliceelmodelooutdoorsolocuandolascondicionesatmosféricasseanBuenas.
No debería utilizar el modelo si llueve, hay tormentas o se prevén malas
condiciones atmosféricas.
•Busqueunespacioabierto,quecumplaconlanormativavigente,ylibrede
obstáculoscomoárboles,ediciosy/ootrosobstáculos.
• Paragarantizarlaseguridad,sedebevolarenlasdivisiones(~6x5x2,5m)
amplias y sin obstáculos, como lámparas y muebles. Use el modelo sólo en un
interior sin corriente de aire.
• Nodejequeelmodelocaedesdeunagranaltura.Estepuedeafectaralas
características de vuelo y la duración del modelo.
Seguridad de la batería
¡Debido a su densidad energética (hasta 150Kw/Kg.), los elementos no son inofen-
sivos y necesitan de unos cuidados mínimos!. La empresa Jamara e. K., de manera
explicita, declina cualquier responsabilidad sobre los daños causado o derivados, por
un manejo erróneo de las baterías Litio.
•Unautilizacióninapropiadaconllevariesgodelesionesy/oincendios.
•Loselementossedañaránporsobrecargas,corrientesmuyaltas,odescargas
profundas.
•Protejalasbateríasdegolpes,dobleces,perforaciones,tensiones,etc.
•Bajoningúnconceptolasabraocorte,nolasarrojealfuego,manténgalaslejosdel
alcance de los niños.
•Siestánoxidadasopierdenelectrolitos,manéjelasconmuchocuidado.Pueden
estropear el dispositivo o causarle lesiones.
•Nuncalascortocircuite,respetandoentodomomentolapolaridad.
•Nopermitaquesecalientenamásde65ºC,aléjelasdepartescalientes(P.Ej.,la
salida del escape).
•Cárguelasantesdeguardarlas(p.ej.,eninvierno)-¡Nolasguardedescargadani
tampoco a plena carga! Controle regularmente el nivel de carga durante los
periodos de almacenamiento prolongados.
•Elcontenidodeloselementosesdañinoparalapielylosojos.
•Sientraencontactoconlapiel,láveseconaguayquíteselaropausada.
•Encontactoconlosojos,enjuágueseconabundanteaguayvisitealmédico.
En caso de sobrecalentamiento de la batería, o cuando se ina, humea o em-
pieza a quemarse, ya no debe tocarse de ningún modo. Por favor manténga una
distancia de seguridad y ponga a disposición agentes para extinción adecua-
dos (No hay peligro de explosión en el agua, arena seca, extintores, mantas,
agua salada).
This manual suits for next models
1
Table of contents
Other Jamara Quadcopter manuals

Jamara
Jamara Loky User manual

Jamara
Jamara CYANOS Altitude User manual

Jamara
Jamara FlyScout 03 8561 User manual

Jamara
Jamara Compo AHP 2,4 GHZ User manual

Jamara
Jamara QCR 038300 User manual

Jamara
Jamara Lupo User manual

Jamara
Jamara Alien Attack V2 User manual

Jamara
Jamara CamAlu FPV AHP+ 2,4 GHz User manual

Jamara
Jamara Motion Fly 2,4 GHz User manual

Jamara
Jamara MiCoSpy WiFi 2,4 GHz User manual