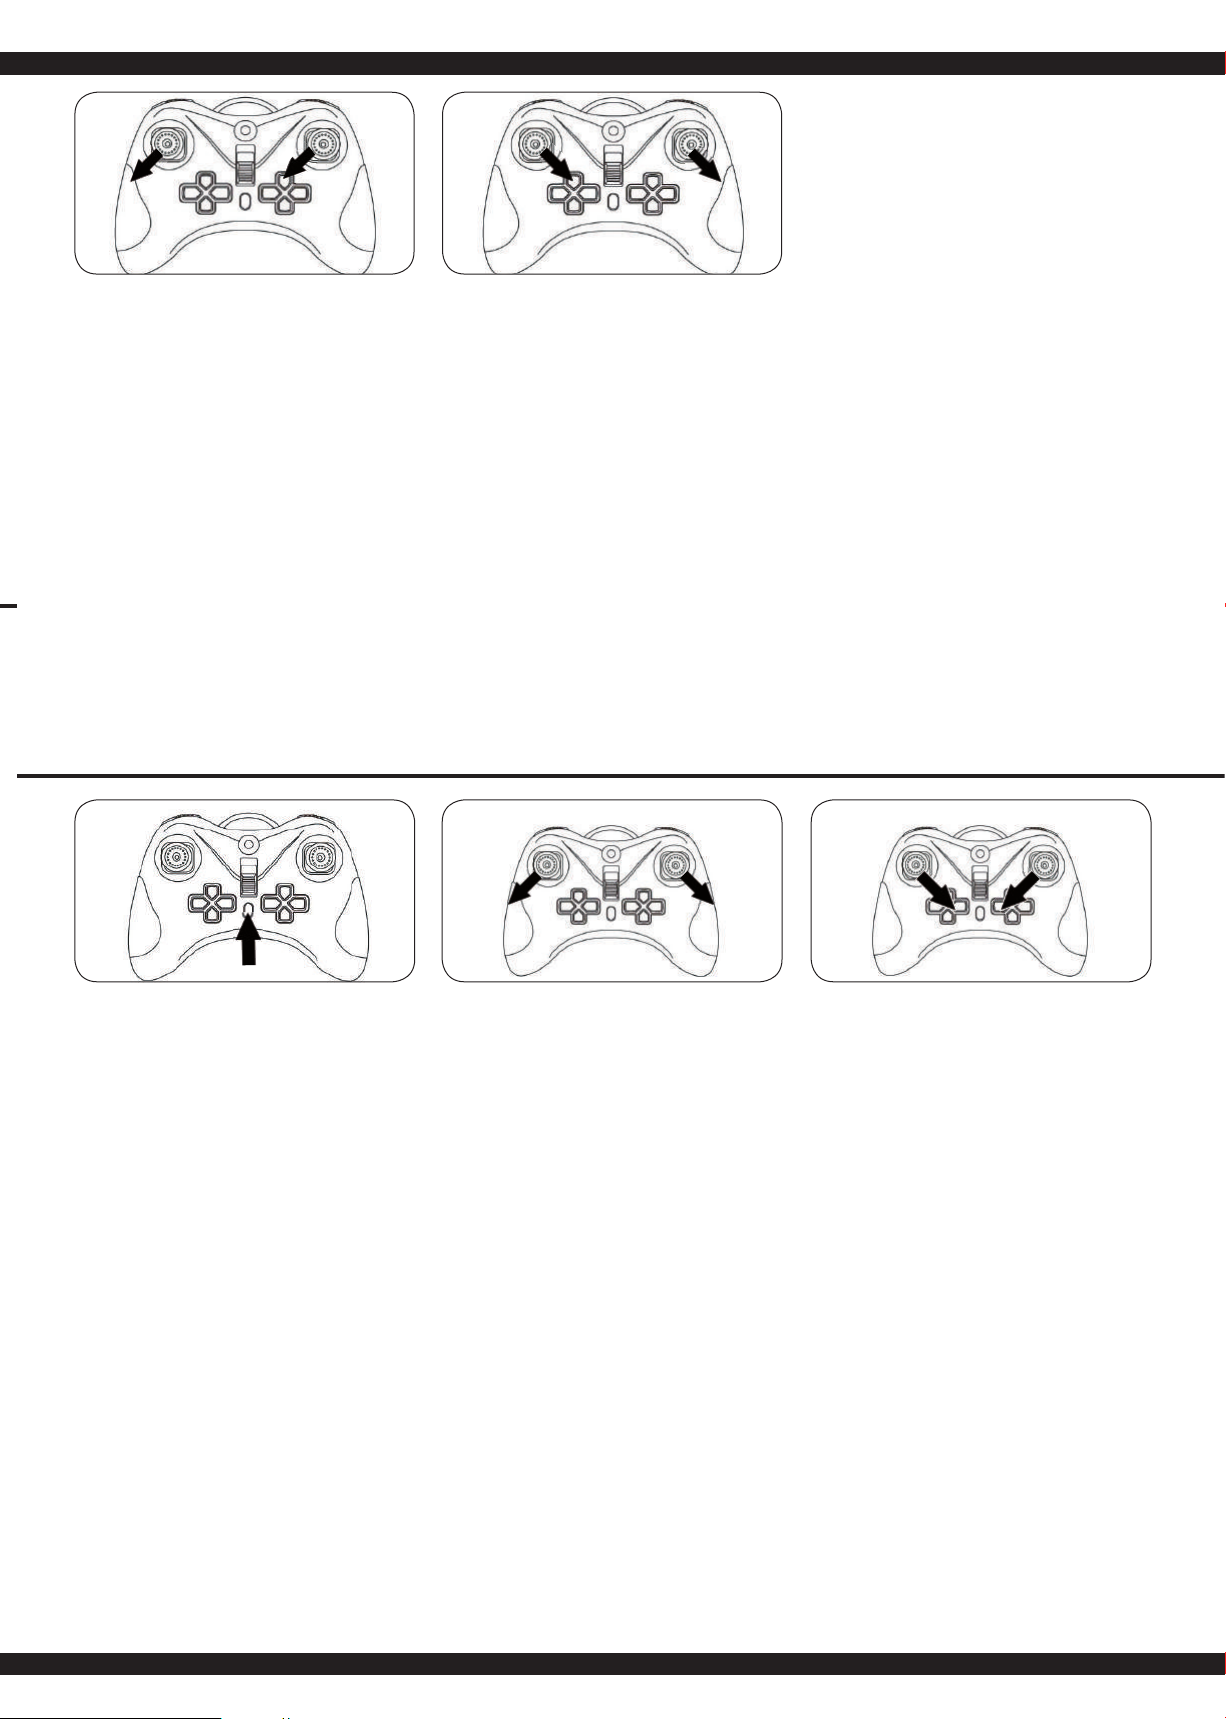
manuals.online logo
Brands
  1. Home
  2. •
  3. Brands
  4. •
  5. Jamara
  6. •
  7. Quadcopter
  8. •
  9. Jamara CYANOS Altitude User manual

Jamara CYANOS Altitude User manual

This manual suits for next models

1

Other Jamara Quadcopter manuals

Jamara Q 180 Series User manual

Jamara

Jamara Q 180 Series User manual

Jamara Triefly AHP 2 User manual

Jamara

Jamara Triefly AHP 2 User manual

Jamara FlyScout 03 8561 User manual

Jamara

Jamara FlyScout 03 8561 User manual

Jamara CamAlu FPV AHP+ 2,4 GHz User manual

Jamara

Jamara CamAlu FPV AHP+ 2,4 GHz User manual

Jamara QCR 038300 User manual

Jamara

Jamara QCR 038300 User manual

Jamara Compo AHP 2,4 GHZ User manual

Jamara

Jamara Compo AHP 2,4 GHZ User manual

Jamara Loky User manual

Jamara

Jamara Loky User manual

Jamara Payload Altitude GPS 2,4 GHz User manual

Jamara

Jamara Payload Altitude GPS 2,4 GHz User manual

Jamara MiCoSpy WiFi 2,4 GHz User manual

Jamara

Jamara MiCoSpy WiFi 2,4 GHz User manual

Jamara Lupo User manual

Jamara

Jamara Lupo User manual

Jamara Alien Attack V2 User manual

Jamara

Jamara Alien Attack V2 User manual

Jamara Korix 2,4 GHz User manual

Jamara

Jamara Korix 2,4 GHz User manual

Jamara Triefly AHP 2 User manual

Jamara

Jamara Triefly AHP 2 User manual

Jamara Catro AHP+ 2,4 GHz User manual

Jamara

Jamara Catro AHP+ 2,4 GHz User manual

Jamara Motion Fly 2,4 GHz User manual

Jamara

Jamara Motion Fly 2,4 GHz User manual

Jamara 4Joy AHP+ 2,4 GHZ User manual

Jamara

Jamara 4Joy AHP+ 2,4 GHZ User manual

Popular Quadcopter manuals by other brands

Alias 6608 owner's manual

Alias

Alias 6608 owner's manual

Autel Robotics EVO II Dual 640T quick guide

Autel Robotics

Autel Robotics EVO II Dual 640T quick guide

Carson X4 NANO instruction manual

Carson

Carson X4 NANO instruction manual

Kaiser Baas KBA15007 user guide

Kaiser Baas

Kaiser Baas KBA15007 user guide

Denver Electronics DCH-261 instructions

Denver Electronics

Denver Electronics DCH-261 instructions

Craig INTERCEPTOR owner's manual

Craig

Craig INTERCEPTOR owner's manual

IMAGINARIUM droni stream instructions

IMAGINARIUM

IMAGINARIUM droni stream instructions

dji MAVIC 2 PRO quick start guide

dji

dji MAVIC 2 PRO quick start guide

Walkera QR X900 quick start guide

Walkera

Walkera QR X900 quick start guide

dji PHANTOM 3 4K user manual

dji

dji PHANTOM 3 4K user manual

Attop W80 Instructions for use

Attop

Attop W80 Instructions for use

Ares RECON FPV owner's manual

Ares

Ares RECON FPV owner's manual

Skycat XS user manual

Skycat

Skycat XS user manual

Falcon S2-210 quick start guide

Falcon

Falcon S2-210 quick start guide

MJX X300C instruction manual

MJX

MJX X300C instruction manual

dji NAZA-F45 Assembling and parameters setup

dji

dji NAZA-F45 Assembling and parameters setup

Propel Trampolines HD VIDEO DRONE Setup guide

Propel Trampolines

Propel Trampolines HD VIDEO DRONE Setup guide

HobbyZone Zugo instruction manual

HobbyZone

HobbyZone Zugo instruction manual

manuals.online logo
manuals.online logoBrands
  • About & Mission
  • Contact us
  • Privacy Policy
  • Terms and Conditions

Copyright 2025 Manuals.Online. All Rights Reserved.

CYANOS Altitude
2,4 GHz
No. 422036
COMPASS
CYANOS Altitude
2,4 GHz
2,4 GHz
C
OMP
OMP
OMP
AS
AS
AS
AS
AS
AS
AS
AS
AS
AS
OMPASOMP
OMPASOMP
OMPASOMP
S
S
S
S
S
S
S
DE - Gebrauchsanleitung
GB - Instruction
FR - Notice
IT - Istruzione
ES - Instrucción
DE - Allgemeine Hinweise
Jamara e. K. übernimmt keine Haftung für Schäden, die an dem Produkt selbst oder durch dieses
entstehen, sofern diese auf falsche Bedienung oder Handhabungsfehler zurückzuführen sind. Der
Kunde allein trägt die volle Verantwortung für die richtige Bedienung und Handhabung; dies umfasst
insbesondere die Montage, den Ladevorgang, die Verwendung bis hin zur Wahl des Einsatzberei-
ches. Bitte beachten Sie hierzu die Bedienungs- und Gebrauchsanleitung, diese enthält wichtige
Informationen und Warnhinweise.
GB - General information
Jamara e.K. is not liable for any damage caused to the product itself or through this, provided this
is due to improper operation or handling errors. The Customer alone bears the full responsibility for
the proper use and handling, including without limitation, the assembly, the charging process, the
use and choice of the operation area. Please refer to the operating and user instructions, it contains
important information and warnings.
FR - Remarques générales
La société Jamara e. K. n’est pas responsable de dommages, que ce soit au niveau du modèle ou
causé par celui-ci, résultant d’une utilisation non appropriée. Seul le client est responsable con-
cernant la mise en oeuvre et l’utilisation conforme du matériel; cela va de l’assemblage, en passant
par la charge des accus et allant jusqu’au domaine d’utilisation. Pour cela, veillez lire attentivement
la notice d’assemblage et d’utilisation, celle-ci contient d’importantes informations ainsi que les con-
signes de sécurités.
IT - Informazioni generali
Jamara e. K. non e´responsabile per danni, sostenute al prodotto stesso o attraverso questo, dovuti
ad una gestione non corretta del articolo. Solo il cliente si assume la piena responsabilità per la
manutenzione e l´utilizzo corretto dello stesso; questo include il montaggio, la ricarica, l´utilizzo,
 no alla scelta della aerea di applicazione. Si prega di notare e rispettare le istruzioni d´uso, questi
contengono informazioni e avvertimenti molto importanti.
ES - Información general
Jamara K. no se hace responsable de los daños causados al producto en sí o por medio de esto,
a menos que esto se debe al mal funcionamiento o errores de manejo. El cliente solo tiene la re-
sponsabilidad completa para el uso y manejo adecuado, incluyendo, sin limitaciones, el montaje,
el proceso de carga, el uso de hasta la elección de la zona de aplicación. Por favor, consulte las
instrucciones de uso y funcionamiento, contiene información y avisos importantes.
DE - Konformitätserklärung
Hiermit erklärt JAMARA e.K., dass sich das Modell‚ “Cyanos Altitude 2,4 GHz,
No. 422036“ in Übereinstimmung mit den grundlegenden Anforderungen und den
anderen relevanten Vorschriften der Richtlinien 2014/53/EU und 2011/65/EU be n-
det. Weitere Informationen  nden Sie auch unter:
www.jamara-shop.com/Konformitaet
GB - Certi cate of Conformity
JAMARA e.K. hereb “Cyanos Altitude 2,4 GHz, No. 422036“ follow the regulations and require-
ments as well as any ther relivant directives of the EEC directive 2014/53/EU and 2011/65/EU.
Further information can also be found at: www.jamara-shop.com/Conformity
FR - Déclaration de conformité
Par la présente, la société Jamara e.K. déclare que ce modèle“Cyanos Altitude 2,4 GHz,
No. 422036“ est conforme en tous points avec les textes de la directive de l’union européenne sous
les directives 2014/53/EU et 2011/65/EU.
Vos pourrez également trouver des informations sur notre site Internet:
www.jamara-shop.com/Conformity
IT - Dichiarazione di conformita’
Jamara e. K. dichiara qui di seguito che il modello “Cyanos Altitude 2,4 GHz, No. 422036“ è in linea
con le norme ed altre rilevanti disposizioni comunitarie 2014/53/EU e 2011/65/EU.
Piu informazioni: www.jamara-shop.com/Conformity
ES - Declaración de conformidad
Por medio de la presente, la empresa Jamara e. K. declara que el modelo “Cyanos Altitude 2,4 GHz,
No. 422036“ de conformidad con los requisitos esenciales y otras disposiciones pertinentes de la
Directiva 2014/53/EU y 2011/65/EU se encuentra.
Encontrará más información en: www.jamara-shop.com/Conformity
DE - Dieses ferngesteuerte Modell ist kein Spielzeug!
Geeignet für Personen ab 14 Jahren.
Achtung: Für Kinder unter 36 Monaten nicht geeignet. ERSTICKUNGSGEFAHR.
Enthält verschluckbare Kleinteile. Von Kleinkindern unbedingt fernhalten.
GB - This model is not a toy!
Not suitable for people under 14 year.
Warning: Not suitable for children under 36 months. RISK OF SUFFOCATION!
Contains small parts which can be swallowed. Keep away necessarily from children.
FR - Ce modèle réduit n‘est pas un jouet!
N‘est pas adapté pour les personnes de moins de 14 ans.
Attention: Ne convient pas aux enfants de moins de 36 mois. DANGER D‘ETOUFFEMENT!
Contient de petites pièces facilement avalables. Garder lion nécessairement enfants.
IT - Questo modello non é un giocattolo!
Sconsiliato per persone inferiori di 14 anni.
Attenzione: Non adattato ai bambini inferioti ai 36 mesi. PERICOLO DI SOFFOCAMENTO!
Contiene pezzi piccoli. Tenere lontano assolutamente dei bambini.
ES - Este modelo no es un juguete!
No apropriado para menores de 14 años.
Atención: No es recomendable para los niños menores de 36 meses. ASFIXIA!
Contiene piezas pequeñas. Mantenga necesariamente lejosde los niños.
48NE17
DE
ACHTUNG!
Bei Film-/Fotoaufnahmen:
Machen Sie niemals Foto- und Film-
aufnahmen von Personen, ohne
dass diese eingewilligt haben. Das
unerlaubte Anfertigen verletzt die
Privatsphäre und Persönlichkeits-
rechte des Abgebildeten und kann
strafbar sein!
GB
ATTENTION!
Video and photo recording:
Never take photo and  lm footage of
people without their permission. The
unauthorised recordings violate the
privacy and rights of the person and
may be punishable by law!
FR
ATTENTION!
Lors de prises de vues
photo / vidéo:
Ne faites jamais de prises de vue
photo ou vidéo de personnes sans
que celles-ci vous en donnent
l’autorisation. Un enregistrement
non autorisé porte atteinte à la vie
privée des personnes concernées et
est considéré comme intrusion dans
leur intimité, cela est punissable par
la loi!
IT
ATTENZIONE!
Durante i Vostri servizi fotogra ci
o di  lmati:
Non scattare fotogra e o  lmati, sen-
za che le persone coinvolte hanno
dato il loro consenso. La realizzazio-
ne non autorizzata viola la privacy e
i diretti della persona raf gurata ed è
legalmente punibile!
ES
Atencion!
En Film-/Fotografía:
Nunca toma una fotografía y  lma-
ciones de personas, que no los han
aceptado. La fabricación no auto-
rizada viola la privacidad y los de-
rechos de la personas representan-
da y puede ser penado por ley.
DE - Bitte lesen Sie die komplette
Bedienungsanleitung und Sicher-
heitshinweise sorgfältig durch bevor
Sie das Modell in Betrieb nehmen.
GB - Read the complete instructions
and security instructions carefully
before using the model.
FR - Veuillez lire attentivement et en-
tièrement la notice et les consignes
de sécurités avant tout utilisation de
ce produit!
IT - Vi preghiamo di leggere attenta-
mente la istruzione completa e Istru-
zioni per la sicurezza prima di usare
il modello.
ES - Lea atentamente la instrucci-
on completa y seguridad antes de
poner el modelo en funcionamiento!
2
DE
Bezeichnung der Komponenten
1. Rotorblätter vorne
2. Rotorblätter hinten
3. Rotorschutz
4. LEDs, vorne (blau)
5. LEDs, hinten (rot)
6. Kamera
7. Ein-/Ausschalter
8. Akkufach
GB
Component Description
1. Rotor blades, front
2. Rotor blades, rear
3. Protecting ring
4. LEDs, front (blue)
5. LEDs, rear (red)
6. Camera
7. On-Off Switch
8. Battery
FR
Désignations des différentes
pièces
1. Pales du rotor avant
2. Pales du rotor arrière
3. Protection contre les pales du
rotor
4. LED, avant (bleu)
5. LED, arrière (rouge)
6. Caméra
7. Interrupteur On/Off
8. Compartiment de la batterie
IT
Denominazione dei componenti
1. Pales du rotor avant
2. Pales du rotor arrière
3. Protezione dei rotori
4. LED, avant (blu)
5. LED, dietro (rosso)
6. Fotocamera
7. Interruttore ON/OFF
8. Compartimiento de la batería
ES
Descripción de las diferentes
partes
1. Palas rotor delante
2. Palas rotor atrás
3. Protección de las palas del rotor
4. LED, delante (azul)
5. LED, atrás (rojo)
6. Cámara
7. Interruptor On/OFF
8. Compartimiento de la batería
1
2
3
4
5
6
7
8
DE - Bezeichnung der
Komponenten
1. Gasknüppel /Gieren
2. Steuerhebel Nick/Roll
(links/rechts,
vorwärts/rückwärts)
3. Ein-/Ausschalter
4. Einsteiger/Pro modus
5. Videofunktion
6. Fotofunktion
7. Start/Landeassistent
8. Nicktrimmung (vor/zurück)
9. Rolltrimmung (links/rechts)
10. Kompassfunktion/
Flybackfunktion
11. Flipmodus
12. Batteriefach
Batterien in Sender einlegen
Auf Polarität achten
GB - Component Description
1. Speed control stick/Rudder
2. Nick/Roll control stick
(left/right, forward/backward)
3. Power switch
4. Beginner and expert mode
5. Video function
6. Photo function
7. Start / Landing assistant
8. Nick trim (forward/backward)
9. Roll trim (left/right)
10. Compass function/
Flyback function
11. Flip mode
12. Battery cover
Fitting the transmitter batteries
Observe the polarity.
FR - Désignations des différentes
pièces
1. Gaz-/manche d’anti-couple
2. Manche Roll-/Nick
(droite/gauche, avant/arrière)
3. Interrupteur On/Off
4. Mode début. et experts
5. Fonction vidéo
6. Fonction photo
7. Atterrissage assistant
8. Trim Nick (avant/arrière)
9. Trim Roll (droite/gauche)
10. Fonction boussole/
Fonction Flyback
11. Mode de Flip
12. Compartiment pour piles
Mise en place des piles
Respecter la polarité.
IT - Denominazione dei
componenti
1. Leva Gas/Coda
2. Leva Roll/Nick
(destra/sinistra, avanti/indietro)
3. Interruttore ON/OFF
4. Modo principianti e esperti
5. Funzione video
6. Funzione foto
7. Assistente di atterraggio
8. Trim Nick (avanti/indietro)
9. Trim Roll (destra/sinistra)
10. Funzione Bussola/
Fonction Flyback
11. Flip mode
12. Compartimento batteria
Montaggio delle pile
Rispettando la polarità.
ES - Descripción de las diferentes
partes
1. Gas / dirección palanqua
2. Roll-/Nick palanqua
(izquierda/derecha,
delante/atraz)
3. Interruptor ON/OFF
4. Modo principiantes y
profesionales
5. Función de vídeo
6. Función de foto
7. Asistente de aterrizaje
8. Equilibrio Nick (delante/atraz)
9. Equilibrio Roll
(izquierda/derecha)
10. Función brújula/
Función Flyback
11. Flip mode
12. Compartimento de la batería
Instalación de las pilas
Preste atención a la polaridad
4x AA
11 10
12
1
3
4
5
6
7
2
8
9
10 11
DE - Achtung!
Vor dem Betrieb:
Erst das Modell und dann den Sender einschalten.
Bei Beendigung:
Erst das Modell und dann den Sender ausschalten.
● Betreiben Sie Ihr Modell niemals in Distanzen die außer-
halb Ihrer Sichtweite liegen. Sowohl die max. Sichtweite
als auch die max. Reichweite Ihres Modells hängen von
vielen Faktoren wie Witterung, Einsatzort und vorhan-
denen Störfrequenzen ab. Führen Sie deshalb vor jedem
Einsatz unter sicheren kontrollierbaren Bedingungen ei-
nen Reichweitentest durch und prüfen Sie auch wie sich
das Modell während des Betriebs bei einem Signalausfall
wie z.B. bei leeren Senderbatterien oder ausgeschaltetem
bzw. ausgefallenem Sender verhält. Quadrocopter mit
Altitude-Technologie sollten bei einem Funktions-
oder Reichweitentest nicht festgehalten werden da die
Höhenkontrolle so lange Vollgas gibt bis ein Höhenan-
stieg registriert wird. Statt dessen emp ehlt es sich das
Modell von unten an einem Seil zu  xieren das nicht auf
Spannung gebracht wird sondern locker gelassen wird.
GB - Attention!
Before operating:
Switch the model on  rst then the transmitter.
When  nished:
First switch off the model then the transmitter.
● Never operate your model beyond sight. Both the
maximum visibility as well as the max. range of your
model will depend on many factors such as weather,
location and interfering frequencies. Before each use,
perform a range test under safe, controllable conditions,
and also check how the model is operating during a
signal failure e.g. in the case of empty transmitter
batteries or switched-off or failed transmitter.
Quadrocopters with Altitude technology should not be
held in your hand during a functional or range test, as the
altitude control will give full throttle until a rise in altitude
is registered. Instead it is recommended to  x the model
from below on a rope which is not put on tension, but is
left loose.
FR - Attention!
Avant l’utilisation:
Allumez en premier modèle puis seulement votre l’émetteur.
Après utilisation:
Arrêtez le modèle en premier puis votre radiocommande.
●N’utilisez jamais le modèle à une distance hors de votre
visibilité. La visibilité maximale ainsi que la ortée
maximale dépendent de plusieurs facteurs tels que le
temps, le lieu d’utilisation et les présentes fréquences
perturbatrices. Effectuez pour ce faire avant utilisation un
test de portée dans des conditions contrôlées et véri ez
comment le modèle se comporte en cas de perte de
signal. Les drones équipés d’altimètre ne devraient pas
être tenus pendant le test. Ces derniers tendent à
accélérer jusqu’à ce qu’une monté soit enregistrée par le
drone. Il est donc plutôt recommandé de  xer le drone à
un  l non tendu a n de faire un test approprié.
IT - Attenzione!
Prima dell‘uso:
Accendete prima il modello e poi la trasmittente.
Dopo l‘uso:
Spegnere prima il modello e poi la trasmittente.
●Non utilizzare il suo modello fuori della distanzia di vista.
Sia la visibilità come la portata massima del vostro
modello dipendono da molti fattori, come il tempo,
disturbo di frequenza e il luogo di utilizzo.
Prima di ogni utilizzo, eseguire un test di portata sotto
sicurezza,
condizioni controllabili e anche controllare come il
modello funziona in caso di mancanza si segnale ad
esempio nel caso di batterie vuote della trasmittente o la
trasmittente spenta o fallita. Quadrocopter con
tecnologia Altitude non devono essere tenuti in mano
durante un test funzionale o test di portata, perché il
controllo d´altezza da tutto gas  n o a quando viene
registrato un aumento d´altezza. Invece, si raccomanda
di  ssare il modello dal basso su una corda che non viene
messa in tensione, ma lasciato sciolto.
ES - ¡Atención!
Antes del uso:
Encender primero el modelo, y después la emisora.
Después del uso:
Apagar primero el modelo, y después la emisora.
●No utilizar su modelo fuera de la distancias de visibilidad.
Tanto la visibilidad como la capacidad máxima de su
modelo depende de muchos factores, tales como el
tiempo, frecuencia de interferencia y el lugar de
utilización. Antes de cada uso, realizar una prueba de
alcance bajo de seguridad, condiciones controlables y
compruebe tambien cómo funciona el modelo durante
una falla de señal por ejemplo en el caso de baterías
vacías de emisora, emisora apagada o fallada.
Quadrocopter con la tecnología Altitude no se deben
tener en la mano durante una prueba de alcance, porque
el control de altura va a dar todo el gas has que se registra
un aumento de altura. En lugar de ello, se recomienda
para fijar el modelo desde el bajo en una cuerda que no se
tiene que tensar, pero se deja suelto.
DE -
Batteriehinweis:
Nicht wiederau aden!
Nicht öffnen!
Nicht ins Feuer werfen!
GB -
Battery warning:
Do not recharge!
Do not open!
Do not dispose of in  re!
FR -
Indications relatives aux piles:
Ne pas recharger!
Ne pas ouvrir!
Ne pas mettre dans le feu!
IT -
Avvertenza sulle batterie:
Non ricaricabili!
Non aprire!
Non gettare nel fuoco!
ES -
Advertencia sobre las baterías:
No recargar!
No abrir!
No arrojar al fuego!
3
12
DE - Endmontage
1. Mit dem beiliegenden Schraubendreher befestigen Sie den
Rotorschutz.
2. Nehmen Sie die Landegestelle. Stecken Sie diese an die
vorgesehenen Positionen unten am Modell. Schrauben Sie
die Landegestelle mit je einer Schraube an der Unterseite des
Modells fest.
3. Schrauben Sie die vier Rotorschützer (Bild 3) wie gezeigt,
fest.
4. Achten Sie darauf, dass Sie das richtige Blatt an den richtigen
Rotor montieren. Achten Sie auch darauf welches Blatt
(A + B) links und rechts montiert wird! Orientieren Sie sich
dabei an der Abbildung 5. Bei falsch montierten Rotor-
blättern wird das Modell unkontrollierbar sein!
GB - Model assemble
1. Prepare screw driver, bracket and protect cover.
2. Take the landing skid. Insert the brackets into the bracket
holes at the bottom of the model. Firmly screw in the landing
skid to the frame with a screwdriver.
3. Insert four protection covers into the holes of the protection
cover, which beside the four blades, and use the screw knife
to lock four screws tightly (pic.3).
4. Have to pay attention of the rotor position of each main blade.
Also pay attention of the left and right mounting position of the
blades (A + B)! Take an Example on the picture (pic. 5) and
the labels on the bottom of the rotor blades. If you mount the
main blades in wrong position the model will get out of
control!
FR - L‘assemblage  nal
1. Utilisez le tournevis fourni,  xez le train d´atterrissage et la
protection du rotor.
2. Prenez le train d‘atterrissage. Branchez-les aux endroits
appropriés ci-dessous le modèle. Visser le train d‘atterrissage
 xe avec une vis à la base du modèle.
3. Vissez les 4 protections de rotor (image 3).
4. Il faut prendre soin de monter la bonne pale au rotor correct.
Faites attention quelle pale sera montée à gauche et laquelle
à droite (A + B)! Veuillez regardez attentivement l’image
(image 5) et les étiquettes sur la face bas des pales de rotor.
Le modèle sera ingérable en cas des pales de rotor sont
montées mal!
IT - Montaggio  nale
1. Utilizare il cacciavite incluso, collegare il carrello e la
protezione del rotore.
2. Prendere i carrelli. Posizionarli appropriate al di sotto del
modello. Avvitare il carrello con una vita nella parte inferiore
del modello.
3. Avvitare le 4 protezioni del rotore, come mostra in  gura 3
4. Si deve assicurare di montare la pala al rotore corretto.
Assicurarsi quale pala (A+B) viene montata a destra e a
sinistra! Orientarsi all’immagine ( gura 5) e le etichette
sul lato sotto delle pale del rotore. Se si montano le pale
del rotore non correttamente, il modello sarà
incontrollabile!
ES - Montaje  nal
1. Utilice el destornillador incluso, conecte el tren de aterrizaje
y la protección del rotor.
2. Tome los tren de aterrizaje. Posicionar a los lugares
apropiados por debajo de la modelo. Atornillar el tren de
aterrizaje  jo con un tornillo en la parte inferior del modelo.
3. Atornillar la 4 protecciónes de rotor, como se muestra en la
imagen 3.
4. Debe asegurarse de que montar la pala en el rotor correcto
(A + B). Orientarse a la imagen (Figura 5) y las etiquetas en el
bajo de las palas del rotor. Asegúrese qual pala vien
montada a la izquierda y qual pala en la derecha!
DE - Ladevorgang USB (Akku)
- Trennen Sie die Steckverbindung vom Modell zum Akku (aus
Sicherheitsgründen wird empfohlen den Akku dem Modell zu
entnehmen).
- Stecken Sie den USB-Stecker des Ladekabels in die USB-
Buchse ihres PC`s (optional Ladeadapter, No. 179948).
- Verbinden Sie den Akku mit dem USB Stecker.
- Während des Ladevorgangs leuchtet die LED rot. Erlischt die
LED ist der Ladevorgang abgeschlossen.
Nach etwa 120 min. ist der Ladevorgang abgeschlossen, die
Flugzeit bei vollgeladenen Akku beträgt ca. 5 - 10 Min.
Achtung!
Lassen Sie dem Modell nach jedem Einsatz genügend Zeit
um abzukühlen bevor Sie es wieder in Betrieb nehmen. Beim
Verwenden eines etwaigen Tauschakkus muß zwischen je-
demAkkuwechsel mindestens eine Abkühlphase von 10 Mi-
nuten eingehalten werden bis das Modell wieder betrieben
wird. Bei Überhitzung kann Beschädigung der Elektronik
oder Brandgefahr die Folge sein.
GB - Charging by USB (Battery)
- Disconnect the connector from the model to the battery. (for
safety it is recommended to the battery taken from the
model).
- Insert the USB plug from the USB cable into the USB socket
of your PC (optional charging adapter, no. 179948)
- Connect the battery with USB charger.
- During charging, the red LED lights. The LED turns on when
charging is complete.
The charging process should take approx. 120 min. and should
give you approx. 5 - 10 min.  ying time
Attention!
Let the model cool off suf ciently after each use before put-
ting it back into operation. When using an additional batte-
ries let it cool off for minimum 10 minutes until the model is
operated again. Overheating can damage the electronics or
may result in  re.
FR - Processus de charge USB (Accu)
- Coupez le connecteur de modéle à l’accu (pour les raisons
de sécurités on recommande d’enlever l’accu)
- Mettez le connecteur de câble chargé dans la prise USB de
votre PC (réf. 179948 chargeur USB optionel)
- Connectez l’accu avec le connecteur USB.
- Pendant le chargement la lampe LED rouge s‘allume. Le
chargement est achevé si la lampe LED s‘éteint.
La charge est complète après environ 120 minutes et la durée
de vol est de l‘ordre de 5 - 10 minutes.
Attention!
Après chaque utilisation, avant de remettre le modèle en
marche, laissez-le suf samment le temps de refroidir. Lais-
sez une phase de 10 minutes de refroidissement lorsque
vous utilisez une batterie de rechange pour redémarrer
le modèle de nouveau. En cas de surchauffe, les compo-
sants électroniques peuvent être endommagés ou un risque
d´incendie peut survenir.
12
4 5
3
B A
A B
DE - Achtung.
Trennen Sie immer unmittelbar nach Beenden des Ladevorgangs den Akku
vom Ladegerät. Trennen Sie das Ladegerät immer unmittelbar nach Abste-
cken des Akkus von der Spannungsversorgung. Ein eingesteckt lassen des
Akkus bzw. des Ladegeräts nach Beenden des Ladevorgangs kann zu Be-
schädigungen an Akku, Ladegerät oder der Spannungsversorgung führen
(Brandgefahr).
GB - Danger.
Always disconnect the battery from the charger immediately after charging.
Always disconnect the charger from the power supply immediately after
disconnecting the battery. Inserting the rechargeable battery or charger
after charging will result in damage to the battery, charger or the power
supply ( re hazard).
FR - Attention!
Débranchez toujours après chaque arrêt la batterie du chargeur. Débran-
chez aussi toujours le chargeur immédiatemment après avoir débranché
la batterie de l´alimentation. Laissez brancher la chargeur ou la batterie
peuvent causer des dommages à la batterie, à votzre chargeur ou câble
d´alimentation (risque d´incendie).
4
12
IT - Caricamento attraverso USB (Batteria)
- Sconnettere il collegamento tra la batteria e il modello (per
motivi di sicurezza)
- Collegare il cavo USB al computer (optional caricatore
codice 179948).
- Collegare il cavo USB con il pacco batteria
- Durante la carica, il LED rosso si accende. Quando il LED si
spegne la carica è completa.
La ricarica é completata in 120 min‘ e la durata del volo é
mediamente di 5 - 10 min.
Attenzione!
Lasciate che il modello dopo ogni utilizzo il tempo suf cien-
te per raffreddarsi prima di rimetterlo in funzione. Quando si
utilizza delle batterie per cambio deve essere rispettato una
fase di raffreddamento di 10 minuti tra ogni cambio della
batteria prima di rimetterlo in funzione. Il surriscaldamento
può danneggiare l’elettronica o pericolo d’incendio posso-
no esssere le conseguenze.
ES - Cargamiento a través de USB (Batería)
- Desconecte el conector desde modelo a la batería (por
razones de seguridad, se recomeinda de sacar la batería del
modelo).
- Inserir el conector USB del cable de carga en el buje USB
de su ordenador (optional adaptador de carga, No. 179948)
- Conectar la batería con el conector USB.
- Durante la carga, el LED brilla rojo. Quando el LED se
apaga la carga está completa.
Tempo de carga: 120 min Tempo de vuelo: 5 - 10 min
¡Atención!
Deje que el modelo después de cada uso el tiempo su ci-
ente para enfriarse antes de volver a ponerlo en funciona-
miento. Cuando se utiliza baterías para cambiar se tiene que
respetar una fase de enfriamiento de 10 minutos entre cada
cambio de las baterías antes de ponerlo de nuevo en funcio-
namiento. El sobrecalentamiento puede dañar la electrónica
o peligro de incendio puden ser la consecuencia.
IT - Attenzione!
Dopo ogni carica e importante di: Scollegare sempre subito
la batteria dal caricatore ed il caricatore dalla rete elettrica.
Se dopo la carica si lascia collegato l’uno o l’altro può cau-
sare danni alla batteria, al caricatore o addirittura alla rete
elettrica (pericolo di incendio).
ES - ¡Atención!
Después de cada carga es importante de: Desconectar
siempre la batería del cargador y el cargador de la fuente
de alimentación. Si después de la carga se deja conectado a
uno o otra puede causar daños a la batería, cargador o a la
fuente de alimentación (peligro de incendio).
1 1.1
DE
1. Binden von Sender und Modell
Der Empfänger in Ihrem Modell ist mit einer Einschalt-Sicher-
heitsfunktion versehen. Das garantiert, dass das Modell nur
bindet wenn es ein gültiges Sendersignal erhält.
Achtung!
Erst das Modell und dann den Sender ein-
schalten.
Die korrekte Vorgehensweise ist wie folgt:
• Platzieren Sie das Modell auf einer geraden Ober äche.
• Schieben Sie den Akku ein und verbinden Sie den Akku
mit dem Modell. Schließen Sie das Akkufach und schalten
das Modell ein (Abb.1).
• Nun das Modell nicht mehr bewegen, damit der Gyro sich
einstellen kann. Die LEDs am Modell beginnen zu blinken.
Schalten Sie jetzt den Sender ein(Abb.1.1).
Warten Sie einige Sekunden bis die LED dauerhaft
leuchtet.
GB
1. Binding of transmitter and model
Your RC model is  tted with a Power-On failsafe. This is
designed to ensure that the model’s motor will not start unless
it detects a suitable radio-control signal when the LiPo battery
is connected.
Attention!
Switch the model on  rst then the transmitter.
The correct Start-Up sequence is as follows:
• With the model places on level surface, push the battery
pack in the direction until  xed into position (pic1).
• At this time avoid moving the model so the radio and gyro
system can initialize. The LEDs on the model blinking
(pic1.1). Turn on the transmitter. Wait a few seconds until
the LED permanently lights up.
FR
1. Synchroniser le modèle avec l‘émetteur.
Le récepteur de votre modèle est équipé d‘une fonction de
sécurité. Cela garantit que le modèle se connecte
uniquement si les signaux de l’ émetteur sont valides.
Attention!
Allumez en premier modèle puis seulement votre
l’émetteur.
La procédure à suivre est la suivante:
• Placez l’modèle sur une surface horizontale plane.
• Mettez en place l’accu et branchez-le (image1).
• Ne bougez plus l’modéle a n que le gyroscope puisse se
régler. Les lumières LED à sur le châssis commencent à
clignoter. Allumez le récepteur (image1.1). Attendez
quelques secondes jusqu’à ce que les voyants soient
allumés en permanence.
IT
1. Binding trasmettitore e modello
È importante di non toccare/s orare l’elicottero durante la
fase del binding.
Attenzione!
Accendete prima il modello e poi la trasmittente.
Altrimenti il Gyro non si può inizializzare.
• Il Binding deve avvenire su un tavolo oppure per terra.
• Collegare il pacco batteria (Immagine1). I LED del telaio
cominciano a lampeggiare. Accendere il trasmittente
(Immagine1.1). Attendere qualche secondo  no a quando
il LED si accende.
ES
1. Binding del modelo y la emisora
Si el proceso de combinar ambos se viera afectado por
interferencias, empieze de nuevo.
¡Atención!
Encender primero el modelo, y después la
emisora.
• Ponga el modelo en una super cie plana. Meta la batería
en su sitio (Imagen1).
• Ahora no mueva mas el modelo, para que se pueda
inicializar el giróscopo. Los LEDs comienzan a parpadear.
Encienda la emisora (Imagen1.1). Esperar unos
segundos hasta que el LED se ilumina.
ON
OFF
ON
OFF
5
2 3
2 + 3. Automatische Kalibrierung
Alle Trimmregler auf Neutral stellen.
• Stellen Sie das Modell auf eine waagrechte Ober äche
und bringen Sie vor dem Flug die beiden Steuerknüppel
für ca. 3 Sek. um 45° nach links unten bis die LEDs am
Modell blinken.
• Anschliessend für ca. 3 Sek. Um 45 Grad nach rechts
unten bis die LEDs am Modell blinken. Lassen Sie die
beiden Steuerknüppel los und die LED‘s am Modell
leuchten dauerhaft und zeigen an, dass die automatische
Kalibrierung erfolgreich abgeschlossen ist. Durch diese
Kalibrierung wird auch autom. die Kompassrichtung neu
abgespeichert in die Richtung in die das Modell während
der Kalibrierung zeigt.
GB
2 + 3. Automatic calibration
Set all trim controls to neutral.
• Place the model on level surface and bring both control
sticks 45° to the bottom left for approx. 3 seconds until the
LEDs on the model blinking.
• Bring both control sticks 45° to the bottom right for approx.
3 seconds until the LEDs on the model blinking. Let go the
control sticks back to neutral and the lights on the model
stop blinking and keep shining - this indicates that the
automatic calibration was successful. By this calibration
the compass direction automatically gets set in the
direction in which the model shows during the calibration
process.
FR
2 + 3. Calibrage automatique
Assurez-vous que toutes les commandes de compensation
sont au neutre.
• Marque et modèle sur une surface horizontale et appuyer
les 2 leviers de commande vers le bas à gauche pendant
environ 3 Secondes dans un angle de 45° pendant jusqu’à
ce que les LED autour du modèle commencent par
clignoter.
• Puis vers le bas jusqu‘à ce que les LED clignotent pendant
environ 3 seconde dans un angle de 45 degrés vers la
droite du modèle.. Relâchez les 2 leviers et les LED
s’allument de manière continue, ce qui prouve que
l’auto-synchronisation s’est achevée avec succès. Par
l’auto- synchronisation, la nouvelle direction pour la
boussole est aussi redé nie
IT
2 + 3. Calibrazione automatica
Impostare tutti i trimmer si trovano in folle.
• Posizionare il modello su una piattaforme orizzontale.
Portare le due leve di controllo per 3 secondi a 45° a
sinistra in basso  nche i LED sul modello iniziano a
lampeggiare rapidamente.
• Dopodiche, per ca. 3 secondi a 45° a destra in basso
 nche i LED sul modello iniziano a lampeggiare. Lasciate
le due leve di controllo in posizione neutrale e i LED sul
modello si accende continuamente e mostrano che la
calibrazione automatico è stato completata con successo.
Tramite questa calibrazione viene impostato anche la
funzione bussola, che viene programmata nella direzione
della calibrazione.
ES
2 + 3. Trim automático
Asegure que todas de a podadores de en punto muerto.
• Pone el modelo en una super cie horizontal y llevar las
dos palancas de control durante por 3 segundos a 45°
hacía izquierda abajo hasta que el LED parpadea en el
modelo.
• Luego durante 3 segundos, girar a 45 grados hacia abjao
a la derecha hasta que los LEDs en el modelo parpadean.
Dejar las dos palancas de control y los LEDs en el
modelo van a brillar de forma permanentemente y indican
que el trimming automático se ha completado
correctamente. Con esta calibración automáticamente se
guarda la dirección de la brú jula en nuevo haciá el
modelo está ajustado en el momento de la calibración.
4 6
DE
Altitude Hold Adjustment
Altitude Hold Adjustment ist eine Funktion, die es dem Modell ermöglicht, mittels eines Barometers
(bzw. Höhenmeters) die vorgegebene Flughöhe anhand des gemessenen Luftdruckes zu halten.
Das Barometer misst anhand des sich verändernden Luftdruckes die Höhenunterschiede des Mo-
dells und gleicht diese selbstständig aus.
1. Starten des Modells.
•Möglichkeiten das Modell zu starten:
Möglichkeit 1: Bringen Sie die beiden Steuerknüppel um 45° nach unten/außen (5), die
Rotoren beginnen sich zu drehen.Drücken Sie den Gashebel langsam nach
oben und das Modell wird abheben.
Möglichkeit 2: Wenn Sie die Taste (4) im Stand drücken hebt das Modell automatisch ab
2. Landen des Modells
•Möglichkeiten das Modell zu landen:
Möglichkeit 1: Ziehen Sie den Gashebel zurück, das Modell sinkt und wird landen. Die
Rotoren kommen zum Stillstand.
Möglichkeit 2: Wenn Sie die Taste (4) im Flug drücken reduziert das Modell im Flug
automatisch so weit die Höhe bis es aufsetzt und zum Stillstand kommt.
Während dessen muss das Modell weiterhin gesteuert werden. Der Assistent
übernimmt nur die Höhenkontrolle.
• Notstop:
Wenn Sie während die Motoren laufen beide Steuerknüppel nach unten außen (5)
oder nach unten innen (6) richten stoppen die Motoren ohne Verzögerung. Vermeiden Sie
Flugmanöver die diese Knüppelstellung enthalten da das Modell sonst unweigerlich
abstürzen wird!
GB
Altitude Hold Adjustment
Altitude Hold Adjustment is a function that allows the model to maintain the predetermined altitude
based on the measured air pressure by a barometer (or altimeter). The barometer measures on the
basis of changes in air pressure, the height differences of the model and compensates automatically
and unnoticeable.
1. Start operating method of the aircraft.
•Start the aircraft:
Way 1: Move the two control sticks 45 ° downwards outwards (5), the rotors begin to rotate.
Push upward the throttle lever, the aircraft will take off.
Way 2: If you press the button (4) while the model is standing it will autmatically take off
2. Stop operating method of the aircraft.
•Stop the aircraft:
Way 1: Press down the left throttle stick and the aircraft will landing pack to earth. The
rotors come to a stop.
Way 2: If you press the button (4) when the model  ying, automatically reduced the modell
altitude during  ight until it touches down and will then come to a standstill. You will
have to continue stearing the model. The assistant only takes control of the height.
• Emergency stop
If you press both control sticks down and to the outside (5) or
downwards and inside (6) while the motors are running they will
stop without delay. Avoid maneuvers with the mentioned stick
positions during  ight because the model will otherwise crash!
5
6
DE - Flugübungen
Bevor Sie mit dem Model  iegen informieren Sie sich zuerst über
seine Steuerfunktionen und führen einige Übungen durch.
Platzieren Sie das Model mit der Hinterseite zu Ihnen zeigend
(schwarz) auf einer ebenen Fläche. Üben Sie zuerst den Schwe-
be ug mit dem Gasknüppel zu kontrollieren. Anschließend ver-
suchen Sie die Position des Models mit Hilfe des rechten Steu-
erknüppels zu verändern (vorwärts, rückwärts und seitwärts)
und gegebenenfalls abzufangen. Zuletzt sollten Sie das Drehen
des Models um die eigene Achse mit dem linken Steuerknüppel
üben. Wenn Sie die Grundfunktionen des Models beherrschen
können Sie sich an Ihren ersten kontrollierten Flug machen.
GB - Practice simulation  ight
Before  ying with the model check  rst about its control functions
and perform some exercises. Place the model with the back fa-
cing to you (black) on a  at surface. Practice only to hover with
the throttle control. Then, you try to change the position of the
model using the right stick (forward, backward, sideways) and
possibly correct the  ight. At last, you should practice turning the
model around its own axis with the left stick. If you are into the
basic functions of the model you can perform your  rst controlled
 ight.
FR - Voler dans la pratique
Avant de faire voler le modèle, informez vous de toutes ses fon-
ctions de contrôle et faîtes quelques essais. Placez le modèle
sur une surface platte, placez vous derrière le modèle (noir).
Essayez de le faire planer avec la manette des gaz. Ensuite
essayez de changer la position du modèle à l’aide de la manet-
te droite (marche avant, marche arrière, sur les cotés). Si vous
contrôlez toutes les fonctions de base du modèle vous pouvez
faire les premiers vols.
IT - La pratica
Prima di volare il modello, consigliamo fare conoscenza con tutte
le funzioni di controllo e di effettuare i primi voli di test. Posiziona-
re il modello su una super cie piatta, davanti al pilota. Le eliche
del modello devono essere in posizione posteriore. Per primo,
provare ad alzare il modello in volo, e tenerlo “fermo” in volo.
Poi provare a cambiare la posizione del modello utilizzando la
levetta destra (per farlo andare in avanti/indietro e destra/sinist-
ra). Appena imparato le funzioni di base, procedere ad effettuare
i primi voli.
ES - Volando en la práctica
Antes de volar con el modelo, se recomienda conocer todas la
funciones de control y hacer el primero vuelo de prueba. Posi-
cionar el modelo en una super cie plana, en frente del pilota
(negro). Las palas del modelo deben estar en la posición trasera.
En primo lugar, pruebe a despegar el modelo en vuelo, y tener
 jo en el vuelo. A continuación, intente a cambiar la posición del
modelo usando la palanca derecha (para que vas hacia ade-
lante/atrás y izquierda/derecha). Cuando se ha aprendido las
funciones básico, proceda con los primero vuelos.
FR
Altitude Hold Adjustment
L’Altitude Hold Adjustment est une fonction qui permet au mo-
dèle, par le biais du baromètre de maintenir l´altitude prédéter-
minée sur la pression d´air mesurée. Le baromètre mesure sur
la base d´un changement de pression de l´air et de la différence
des altitudes du modèle et compense ceci
indépendamment et de manière imperceptible.
1. Démarrage du modèle.
•Possibilité de démarrage du modèle:
1ère possibilité: Positionnez les deux manchons à
45 ° vers le bas à l'extérieur (5),
les hélices commencent à tourner.
Poussez le levier d‘accélérateur
lentement vers le haut, le modèle
commence à décoller.
2ème possibilité: Si appuyer cette touche (4),le drone
décolle automatiquement.
2. Arrêt du modèle.
•Atterrissage du modèle:
1ère possibilité: Tirez la manette des gaz, le modèle
est réduit et est terre. Les rotors
viennent à un arrêt.
2ème possibilité: Atterrissage et décollage automa
tique. Si vous appuyez cette touche
(4) en plein vol, l’altitude se réduira
automatiquement jusqu’à ce que le
modèle atterrisse tout seul.
Pendant ce processus, vous pouvez
toutefois contrôler la direction.
• Arrêt d’urgence
Si vous appuyez les deux leviers vers l’intérieur-bas (5)
ou vers l’extérieur-bas (6) pendant que les moteurs
tournent, ces derniers s’arrêtent systématiquement.
Evitez tout manœuvre pouvant amener les leviers dans
cette position a n d’éviter une chute libre du modèle.
IT
Altitude Hold Adjustment
Altitude Hold Adjustment é una funzione che consente il modello
mediante un barometro (o altimetro) di mantenere la quota pre-
determinata in base alla pressione dell’aria misurata. Il barome-
tro missura in base al cambiamento della pressione dell’aria, le
differenze di altezza del modello le compensa automaticamente
e impercettibilmente.
1. Decollare del modello
•Modi per decollare il modello:
Opzione 1: Portare le due leve di controllo a 45°
verso il basso esterno (5), i rotori
iniziano a girare. Per avviare il modello
nuovamente é necessario riavviare il
modello e la radio.
Opzione 2: Se si preme il pulsante (4) in posizione il
modello decolla automaticamente
2. Stoppare del modello:.
•Modi per stoppare il modello:
Opzione 1: Tirare la leva dell'acceleratore posteriore,
il modello viene ridotto ed è terreno. I
rotori si fermano.
Opzione 2: Se si preme il pulsante (4) in volo riduce
automaticamente il modello in volo per
quanto riguarda l‘altezza  no a toccare il
basso e si ferma. Nel frattempo, il
modello deve essere ulteriormente
controllato. L´assistente prende solo il
controllo .
•Emergenza-Stop:
Se durante che i motori camminano, si posizionano le due
leve di controllo verso il basso esterno (5) o verso il
basso interno (6), i motori si fermano immediatamente.
Evitare manovre di volo che contengono queste
posizione di leve perché il modello precipiterà
inevitabilmente
ES
Altitude Hold Adjustment
Altitude Hold Adjustment es una función que permite que el mo-
delo, por medio de un barómetro (o altímetro) de mantener la
cuota predeterminada en base a la presión de aire mesurada. El
barómetro mesura en base al cambio de la presión de aire, las
diferencias de altura del modelo se compensa automáticamente
y de manera imperceptible.
1. Despegar del modelo
•Opciones para despegar el modelo
Opción 1: Llevar las dos palancas de control a 45°
hacia abajo exterior (5), los rotores
empiezan a girar.Presione la palanca de
gas lentamente hacia arriba y el modelo
va a despegar.
Opción 2: Si pulsa el botón (4) en posicion el
modelo despega automáticamente
2. Detener del modelo
•Aterrizar el modelo:
Opción 1: Tire de la palanca del acelerador, el
modelo se reduce y aterrizará. Los
rotores se detienen.
Opción 2: Si pulsa el botón (4) en vuelo el modelo
se reduce en vuelo automáticamente
por lo que la altura hasta que toque hacia
abajo y se detiene. Mientras tanto, el
modelo se tiene que controlar
ulteriormente. El asistente sólo toma el
control de altura.
• Emergencia-Stop:
Si durante que los motores caminan, se posicionan las
dos palancas de control hacia abajo exterior(5) o hacia
abajo interior (6), los motores se detienen
inmediatamente. Evitar maniobras de vuelo que incluyen
esta posicion de palancas porque el modelo va a caer
inevitable.
4 65
7
DE
1. Kombination von Gas, Gieren, Roll und Nick
Nach dem Sie sich mit den verschiedenen Steuermethoden
des Models vertraut gemacht haben versuchen Sie nun die
verschiedenen Steuerungen zu kombinieren.
2. Ändern der Flugperspektive
Nach dem Sie das Fliegen des Models von der Sicht von
hinten auf das Model beherrschen ist es an der Zeit den Flug
aus der seitlich vom Model stehenden Position und von der
vom Model zugewandten Seite aus zu üben. Denken Sie
daran, dass Sie zum Teil invertiert (umgekehrt) steuern
müssen.
GB
1. Combination of gas, rudder, roll and pitch
After you are into the different control methods of the model
now you can try to combine the various controls.
2. Change of  ight perspective
After you master the  ying of the model of the view from the
rear of the model it is time to practice the  ight from the side of
the model and from facing towards to the model. Remember,
you need to invert the controls (vice versa).
FR
1. Combinaison entre le gaz, le trim, le roulement et le nick
Si vous contrôlez toutes les différentes fonctions de contrôle,
vous pouvez combiner plusieurs fonctions entre-elles.
2. Changement de la perspective du vol
Après avoir fait des essais de vol en voyant le modèle de
l’arrière, il est maintenant temps de s’exercer en ayant le
modèle sur le coté. Pensez, qu’il faut commander le modèle à
l’inverse.
IT
1. Combinazione dei comandi (gas, rotazione, roll e nick)
Appena imparato i singoli comandi, provate a combinarle l’uno
con l’altro.
2. Cambiare la perspettiva del volo
Dopo i test di volo, avete imparato di comandare il modello
visto da dietro. Adesso fate volare il modello vista dal lato,
oppure davanti. In questo caso cambia il senso di comando ed
anche il grado di dif coltà.
ES
1. Combinacion de los controles (gas, rotación, roll y nick)
Después de que haya familiarizado con los diferentes
métodos de control del modelo, probar ahora de combinar los
diversos controles
2. Cambio de la prespectiva de vuelo
Después de los vuelos de pruebas, has aprendido a controlar
el modelo de la vista desde atrás. Ahora hacer volar de la
vista desde el lado del modelo o delante. En esta caso cambia
el sentido de mando y tambien el grado de di cultad.
forwardforward
forward
forward
1 2
DE
360° Flip Figur
Um einen Flip auszuführen drücken Sie die Flip-Taste und
lassen Sie sie wieder los. Gleich anschließend wählen Sie mit
dem rechten Steuerknüppel in welche Richtung das Modell den
Flip ausführen soll.
Wenn Sie die Flipfunktion ausfführen, sollten Sie in min. 2 Meter
Höhe  iegen.
GB
360°  ip  gure
To execute a  ip, press the  ip button once. Once the  ip button
is pressed, move the right control stick in the direction the Flip
should be performed.
If you set the  ip function, you  y in 2 meters in height and move
the joystick in the appropriate direction in which the model is to
perform the  ip.
FR
360° Figure Flip
Pour faire un Flip appuyez sur la touche Flip et la lâchez direc-
tement. Ensuite vous choisissez avec le levier de commande
droite dans quelle direction le modèle doit faire le Flip.
Quand vous avez actionner la fonction Flip, vous volez à au
moins 2 m de hauteur. vous pouvez alors bouger le manche de
contrôle dans la direction, dans laquelle le modèle devra faire
le  ip.
IT
360° Effettuare un Flip durante il volo
Per eseguire un ip, premere il tasto Flip e lasciarlo. Subito dopo
scegliere con la leva di controllo destra in quale direzione il mo-
dello deve eseguire il Flip.
Attivando il Flip funzione, è mantenere almeno 2 m di altezza, si
possono effettuare dei Flip durante il volo. Basta azionare la leva.
ES
360° efectuar un Flip durante el vuelo
Para realizar un Flip pulse el botón Flip y déjalo. Inmediatamente
después elija con la palanca de control derecha en cual direcci-
ón el modelo tiene que hacer el Flip.
Activando el Flip función y mantener al modelo 2 m de altura,
se pueden efectuar Flips durante el vuelo. Semplemente activar
la palanca.
8
DE - Anfänger/Fortgeschritten/Pro Modus
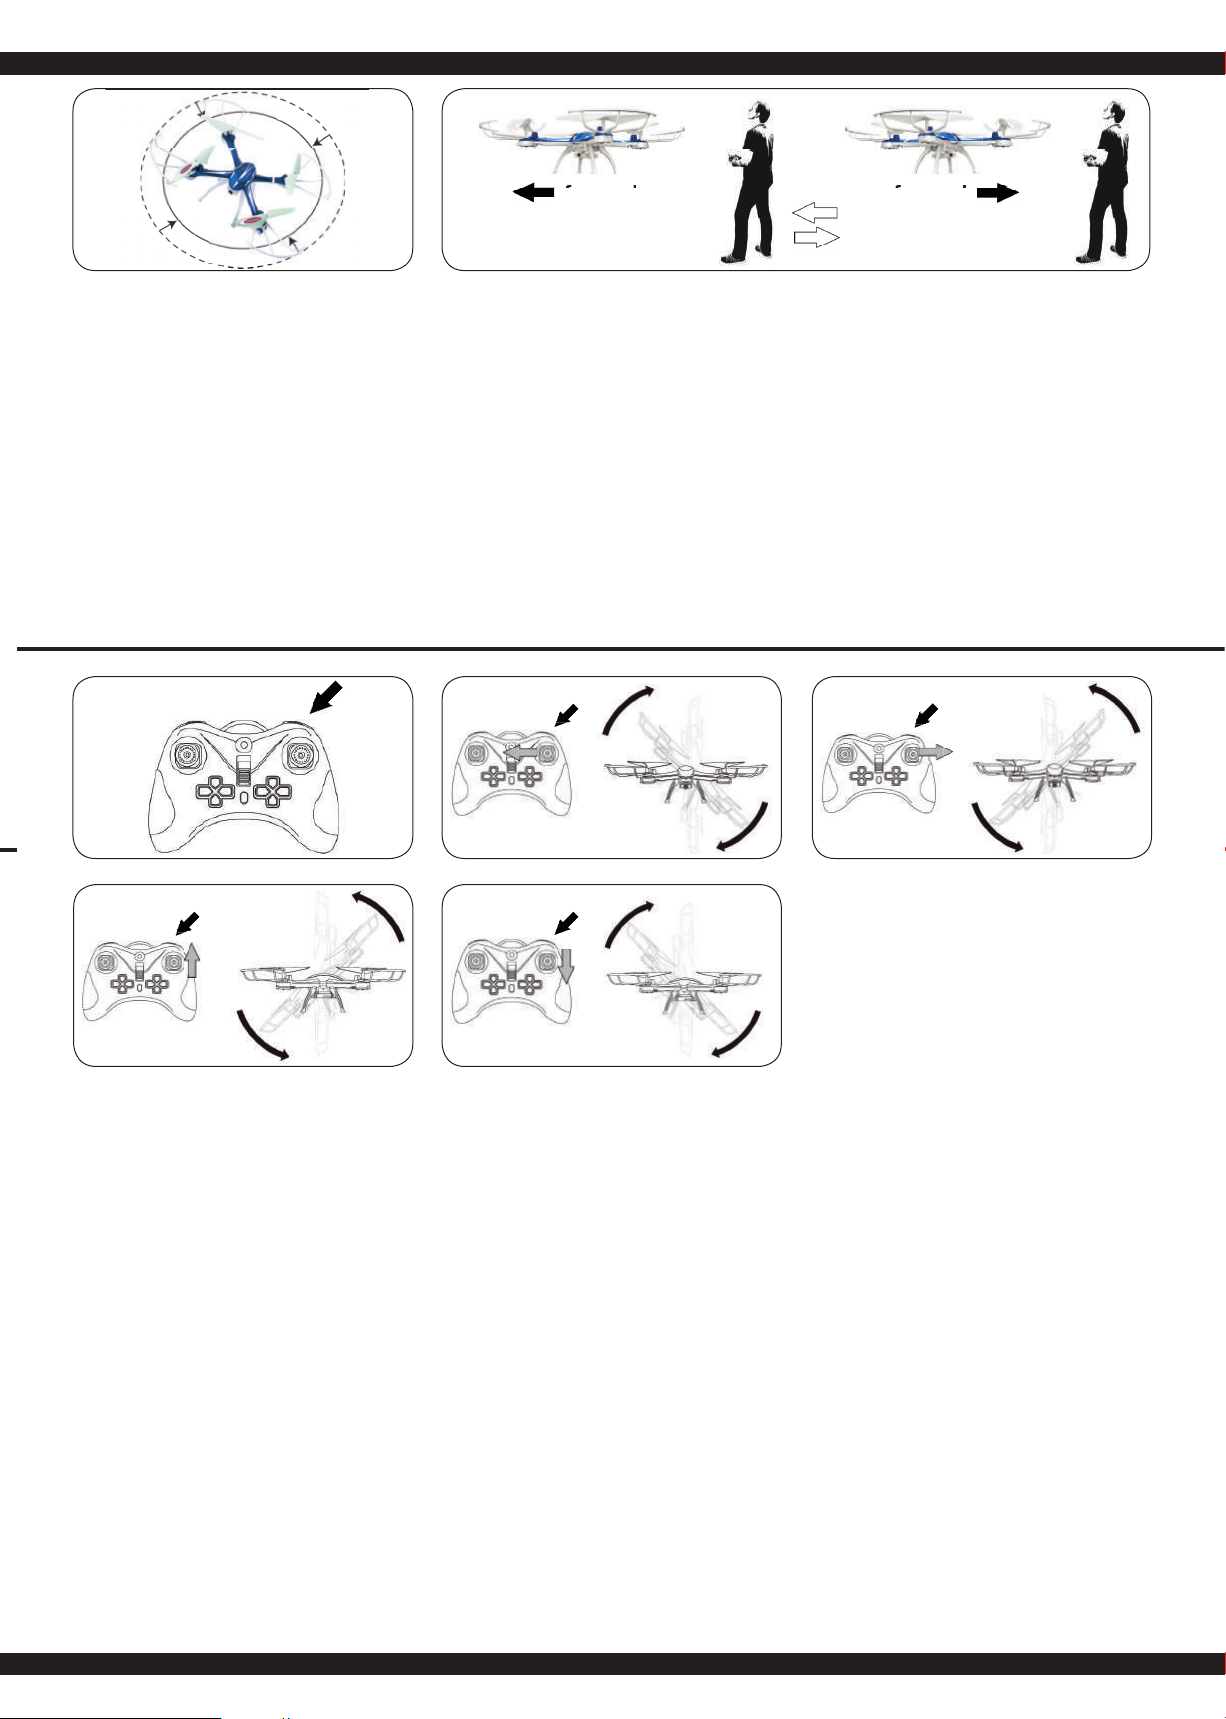
Durch drücken des Gashebels an der Fernsteuerung, können
Sie zwischen 3 Flug-Modi wählen.
A. Einsteiger-Modus (1 x Peep)
Das Modell hat geringe Ausschläge, Steuerbefehle werden
sanft ausgeführt.
B. Fortgeschrittener-Modus (2 x Peep)
Die Ausschläge des Modells sind größer, Steuerbefehle
werden direkter ausgeführt.
C. Pro -Modus (3 x Peep)
Volle Ausschläge am Modell, Steuerbefehle werden agressiv
umgesetzt.
GB - Beginners/advanced/expert mode
By pressing the speed control stick on the transmitter you will be
able to choose from 3  ight modes.
A. Beginner mode (1 x beep)
The model has small de exions, controls are performed
smoothly.
B. Advanced mode (2 x beep)
The de exions are higher, controls are performed directly.
C. Expert mode (3 x beep)
Full de exion on model, controls are performed aggressively.
FR - Mode débutant/avancé/professionnel
En appuyant sur la manette des gaz de la télécommande, vous
pouvez choisir entre trois modes de vol.
A. Mode débutant (1 x beep)
Le modèle a des déviations insigni antes, commandes de
contrôle sont accomplis doucement.
B. Le mode avancé (2 x beep)
Les déviations sont plus grandes, commandes de contrôle
sont accomplis plus direct.
C. Le mode professionnel (3 x beep)
Déviations entières au modèle, commandes de contrôle sont
accomplis agressivement.
IT - Modus principiante/avanzato/expert
Premendo il leva gas sulla radio è possibile scegliere tra 3 mo-
dalità di volo
A. Modus principiante (1 x beep)
Il modello reagisce molto docile e “morbido” ai comandi.
B. Modus avanzato (2 x beep)
La reazione del modello e più preciso.
C. Modus expert (3 x beep)
Reazione molto precisa ai comandi.
ES - Modo Principiante/Avanzado/Experto
Presionando el gas palanqua de la emisora se puede elegir ent-
re 3 modos de vuelo.
A. Modo principiante (1 x beep)
El modelo tiene pequenas erupciones, los comandos de
control vienen efectuado delicado.
B. Modo avanzado (2 x beep)
Los erupciones son más grandes, los comandos de control
vienen efectuado directamente.
C. Modo experto (3 x beep)
Erupciones completos sobre el modelo, comandos de
controls son agresivos.
DE - Achtung!
Sofern Ihr Modell einen Ein/Aus-Schalter besitzt, schalten
Sie das Modell immer unmittelbar nach jedem Einsatz aus.
Besitzt Ihr Modell einen herausnehmbaren Akku bzw. eine
trennbare Steckverbindung zum Akku, sollte unmittelbar
nach jedem Einsatz der Akku vom Modell getrennt werden.
Durch versehentliches eingeschaltet lassen oder Akku
angesteckt lassen kann der Akku tiefenentladen werden.
Durch Tiefenentladung verliert der Akku an Leistung bzw.
kann so stark beschädigt werden, dass ein Laden bzw. Ent-
laden nicht mehr möglich ist bzw. der Akku beim Lade- oder
Entladevorgang selbstentzünden kann (Brandgefahr). Ver-
suchen Sie niemals tiefenentladene Akkus zu Laden bzw.
zu Entladen.
Die Spannung des Akkus sollte niemals unter 3 Volt fallen
um eine Tiefenentladung zu vermeiden. Der vollständig
geladene Akku hat eine Spannung von ca. 4,2 Volt. Nach
dem Gebrauch sollte der intakte Akku umgehend nach einer
Abkühlphase von min. 10 Minuten aber spätestens nach 12h
vollgeladen werden um eine anschließende Tiefenentladung
durch Selbstentladung zu vermeiden. Bei längerem Nichtbe-
nutzen des Akkus bzw. Einlagerung sollte der Akku min. alle
3 Monate auf Spannung (min. 3,9 Volt) bzw. Beschädigung
überprüft und gegebenenfalls aufgeladen bzw. entsorgt
werden.
GB - Danger!
If your model has an on/ off switch, always turn off the
model immediately after each use. If your model has a
removable battery or a disconnectable connector to the
battery, the battery should be disconnected from the model
immediately after each use. The battery can be deep-
discharged by accidentally turning it on or by leaving the
battery plugged in. By deep discharge the battery it loses
power, can be damaged so much that charging or dischar-
ging is no longer possible and the battery can ignite itself
during charging or discharging ( re hazard). Never attempt
to charge or discharge deep-discharge batteries.
The voltage of the battery should never be under 3 volt to
avoid a deep discharge. The fully charged battery has a
voltage of 4,2 volt. After usage, the intact battery has to be
fully charged after a cooling phase of at least 10 min but
not longer than 12 hrs. This is to avoid a deep discharge
caused by a self-discharge. When not using or storing the
battery it has to be checked at least every three months for
voltage (min. 3,9 volt) or damage and if necessary charged
or disposed.
FR - Attention!
Dans la mesure où votre modèle dispose d´un interupteur
marche / arrêt, eteignez votre modèle aprés chaque utilisa-
tion. Si votre modèle dispose d´une batterie amovible et un
connecteur séparable pour la batterie, après chaque utilisa-
tion la batterie doit être déconnectée du modèle immédiate-
ment. La batterie peut-être totalement déchargée si celui-ci
reste allumé lors du chargement et peut être contaminé. Une
décharge profonde peut entrainer une perte de la puissance
de la batterie et peut ainsi endommagé celle-ci, une char-
ge ou décharge est plus possible lorsque la batterie est en
charge ou peut entainer une combustion spontanné ( risque
d´incendie). Ne tentez jamais de décharger profondément
les batteries à charger ou à décharger. La tension de la bat-
terie ne doit jamais être sous 3 Volt pour éviter une décharge
profonde. La batterie complètement chargée a une tension
d‘environ 4,2 Volt. Après utilisation, la batterie intacte doit
immédiatement être complètement chargées après une pha-
se de refroidissement de min. 10 minutes, mais au plus tard
au bout de 12 heures pour éviter une décharge profonde
travers l’auto-décharge. En cas d‘inutilisation de la batterie
ou du stockage, est nécessaire de véri er ou rechargés la
batterie tous les 3 mois, tension (3,9 volts min.). En cas de
dommages disposer correctement.
IT - Attenzione!
Se il suo modello ha un interruttore On/Off e importante
spegnere il modello direttamente dopo ogni utilizzo. Se il
modello ha una batteria rimovibile oppure un connettore
alla batteria, si deve scollegare subito dopo ogni utilizzo dal
modello. Se la batteria rimane accesa oppure rimane colle-
gata essa si può scaricare. Una volta andata in sotto carica
la batteria perde potenza o può essere gravemente dann-
eggiata. In questo caso la batteria non si lascia più caricare
o scaricare ed esiste il pericolo d’in ammazione (pericolo
di incendio). Non provi mai a caricare o scaricare delle bat-
teria sotto carice. La tensione della batteria non deve mai
essere sotto 3 Volt per evitare la scariche profonda. La bat-
teria completamente carica ha una tensione di circa 4,2 Volt.
Dopo l‘uso, la batteria intatta deve essere immediatamente
completamente caricata, dopo una fase di raffreddamento
di min 10 minuti ma al più tardi dopo 12 ore, per prevenire
la scarica profonda attraverso l‘auto-scarica. Se la batteria
non viene usata oppure messa in stoccaggio è necessario
controllare o ricaricata la batteria ogni 3 mesi, tensione (volt
3,9 min.). In caso di danneggiamento della batteria smaltire
correttamente.
ES - ¡Atención!
Si su modelo tiene un interruptor On/Off es importante apa-
gar el modelo directamente después de cada uso. Si el mo-
delo tiene una batería extraible o un conector en la batería,
se debe desconectar inmediatamente después de cada uso
del modelo. Si se deja encendida la batería o conectada, la
batería se puede descargar. Una vez que está descargada la
batería pierde la potencía o se puede dañar grave. En este
caso la batería ya no puede ser cargada o descargada y hay
un peligro de in amación (peligro de incendio). Nunca in-
tentar de cargar o descargar baterías descargadas profun-
damente.
El voltaje de la batería nunca debe estar bajo 3 Voltios para
evitar descargas profundas. La batería completamente car-
gada tiene una tensión de aproximadamente 4,2 Voltios.
Después de su uso, la batería intacta se debe cargar inme-
diatamente completamente, después de una fase de enfria-
miento de al menos 10 minutos pero a más tardar después
de 12 horas, para evitar una descarga profunda a través del
auto-descarga. Si la batería no se utiliza o se pone en el al-
macenamiento es necesario comprobar o recargar la batería
cada 3 meses, tensión (voltios 3,9 min.). En caso de daños a
la batería de disponer correctamente.
9
A
Kompassrichtung A
Flugrichtung
B
A
B
A
FRONT
FRONT
FRONT
FRONT
DE - Flyback- & Kompassfunktion:
Ihr Modell verfügt über eine Flyback- & Kompassfunktion. Das
heißt es ist in der Lage trotz einer Drehung in eine gewünschte
Richtung (der Rumpf zeigt nicht mehr in Flugrichtung) die ur-
sprüngliche Flugrichtung beizubehalten und halbautomatisch zu
Ihnen zurück zu iegen
Vorbereitung:
Zuerst sollten Sie sich Gedanken machen welche Richtung Sie
im Kompass des Models abspeichern wollen. Diese Richtung
wird beim aktivieren des Kompassmodus automatisch zur ab-
gespeicherten Flugrichtung. Möchten Sie also z.B. einen Weg
entlang  iegen und während dessen den Kompassmodus ver-
wenden wählen Sie die Richtung in die der Weg führt als Grund-
richtung für den Kompass. Wenn Sie nun das Modell im Kom-
passmodus um die eigene Achse drehen lassen müssen Sie sich
keine Gedanken um die Flugrichtung an der Fernsteuerung ma-
chen. Wenn Sie den rechten Steuerknüppel nach vorne drücken
wird das Model in Richtung des Weges von ihnen weg iegen.
Wenn Sie den rechten Steuerhebel zu sich herziehen wird sich
das Model den Weg entlang auf Sie zu bewegen.
Einrichtung des Flyback- & Kompassmodus:
Die Richtung in die das Modell beim ersten Start gerichtet ist
wird fest als Flyback bzw. Kompassrichtung abgespeichert.
Die Flyback- & Kompassfunktion kann im Flug durch drücken
der Kompass-/ Flybacktaste (A) aktiviert werden. Durch Blinken
der Led´s und Piepsen am Sender signalisiert das Modell das
es im Flyback- bzw. Kompassmodus ist. Das Modell folgt im
Flyback-Modus unabhängig in welche Richtung der Rumpf des
Models zeigt, der vorher einprogrammierten Kompassrich tung
langsam zurück (Flyback) bis Sie den rechten Steuerknüppel
bewegen. Anschließend be ndet sich das Modell im Kompass-
modus. Während des Flyback- bzw. Kompassmodus müssen
Sie weiterhin mit dem Gashebel die Höhe des Modells kontrollie-
ren.
GB - Compass & Flyback function
Your model has a Compass & Flyback function. This means it
is able to keep the desired  yback direction even if it turns in
another direction during  ight (the front does not face the  ight
direction anymore) and  ies back to you semi-automatic.
First steps:
First of all you should choose the direction that you want to save
in the compass of the model. This direction is used by the com-
pass as the main  ight direction. For example, you  y along a
straight path and would like to use the compass mode; you have
to choose the direction of the path as the main  ight direction.
Now if you are using the compass mode to follow a moving ob-
ject you do not have to waste a thought on the  ying direction of
the model. If you push the steering stick to the front the model
will  y away from you. If you pull the steering stick to the back
the model will  y back to you following the direction of the path
(Compass function).
Setting up the Compass & Flyback mode:
The direction in which the model is facing at the  rst start is sa-
ved as Compass direction. The Compass & Flyback function can
only be activated while the model is in the air and by pressing the
Compass/Flyback button (A) on your remote control. Indicated
by the LEDs and sound from the remote control the model is en-
tering Compass & Flyback mode. The model now automatically
follows the programmed compass direction in Flyback mode re-
gardless in which direction it is facing until you move the right
control stick. After moving the right control stick the model is au-
tomatically in Compass Mode for you to control it on the compass
direction. During use of the Compass & Flyback
function you need to control the altitude with the throttle stick.
FR - Fonction boussole &  yback
Votre modèle a une fonction boussole et  yback. Il peut garder
sa direction de vol initiale malgré une rotation dans une direction
souhaitée (le fuselage ne se trouve plus en direction du vol.) et
de façon semi-automatique revenir vers vous.
Préparation:
D’abord vous devriez ré échir à la direction dans laquelle vous
voulez sauvegarder la boussole du modèle. Cette direction
sera la nouvelle direction de vol automatiquement sauvegardée
quand vous activez la boussole. Si vous voulez voler le long de
cette voie et au même moment prendre le mode boussole, choi-
sissez la direction dans laquelle mène le chemin comme direc-
tion de base pour la boussole. Quand vous tournez le modèle en
mode boussole sur son axe, pour  lmer un objet qui se trouve à
côté de votre modèle, il ne faut pas ré échir sur la direction de
vol à la radiocommande. Si vous pressez le levier de commande
droit an avant, le modèle va s’envoler de vous en direction cette
voie. Quand vous rapprochez le levier de commande à vous, le
modèle va se diriger le long de ce chemin vers vous.
Installation du mode compas et  yback:
La direction dans laquelle le modèle est au départ placé reste
sauvegardée comme la direction compas ou  yback. La fonction
compas et  yback peut être activée pendant le vol. Dirigez le
modèle dans la direction souhaitée et appuyez le bouton com-
pas /  yback (A). Le clignotement des DEL vous signale que le
modèle se trouve en mode compas et  yback. Le modèle suit
alors la direction compas installée en avance, indépendamment
de la direction que montre le fuselage et retournelentement vers
vous jusqu’à ce que vous bougez le levier droit. Après que vous
n’ayez bougé le levier droit, le modèle se retrouve automatique-
ment en mode boussole. En mode boussole ou  yback, vous
devez continuer par contrôler la hauteur du vol par le levier
d’accélération.
12
DE - Trimmen der Fluglage
Lassen Sie das Model ruhig auf einer Stelle schweben und be-
obachten Sie die Veränderungen beim Betätigen der jeweiligen
Trimmregler.
1. Trimmen der Nicklage
2. Trimmen der Roll-Lage
Akkubedingt müssen Sie das Model regelmäßig je nach Ak-
kustand austrimmen um eine stabile Fluglage zu erhalten.
GB - Trimming the model
Let the model hover in one spot and watch the changes in the
respective by pressing the trimm controls.
1. Trimming the pitch
2. Trim the roll position
Depending on the condition of the battery you need to get
the model regularly trimmed to get a stable  ight.
FR - Trimmage du vol
Laissez planer le modèle à une certaine hauteur et observez les
changements quand vous actionnez les régulateurs du trimmage
1. Trim nick
2. Trim du roulement
Il faut régulièrement remettre le modèle dans une position
stable en effectuant un nouveau réglage à cause des accus.
IT - Trim del modello
Fare volare il modello ad una certa altezza e osservare i cambi-
amenti quando si preme i regolatori dei trim.
1. Trim nick
2. Trim roll
Tramite i trim e anche possibile regolare il modello così, che
resta praticamente fermo durante il volo. Queste regolazio-
ne sono da effettuare ogni volta che si collega la batteria,
dato che si tratta di regolazioni dipendenti dalla tensione
della batteria.
ES - Trim del modelo
Flotar tranquilamente el modelo y observar los cambios mientras
pulses el regulador de trim.
1. Trim nick
2. Trim roll
A través del trim es posible regular el modelo para obtener
un vuelo estable durante el vuelo. Esta regulación se tiene
que hacer cada vez que se conecta la batería, ya que esta
regulación depende de la tensión de la batería.
10
A
a
b
c
DE - Installation der Kamera
a. Stecken Sie die Speicherkarte richtig in die Kamera.
b. Stecken Sie den Stecker der Kamera in die Buchse unten
am Modell, bis er ganz einrastet.
c. Hängen Sie die Kamera an das Modell an.
GB - Installation of the Camera
a. Insert the memory card the correct way around into the
camera.
b. Insert the plug of the Camera in the socket below
the model, until it complete snaps.
c. Connect the Camera to the model.
FR - Installation de la caméra.
a. Insérez la carte mémoire correctement dans l´appareil photo.
b. Branchez l´appareil photo dans le connecteur sur la partie
inférieure du modèle, jusqu‘au déclic.
c. Fixer la caméra sur le modèle.
IT - L’installazione della telecamera
a. Inserire la scheda di memoria in modo corretto nella
telecamera.
b. Inserire la spina della telecamera nella presa nella parte
inferiore del modello. Finche si incastra.
c. Montare la telecamera al modello.
ES - La instalación de la cámara
a. Inserte la tarjeta de memoria correctamente en la cámara.
b. Inserte el conector de la cámara en el buje en la
parte inferior del modelo, hasta que se encastre.
c. Monte la cámara en el modelo.
Kompassrichtung A
Flugrichtung
B
A
B
A
FRONT
FRONT
FRONT
FRONT
IT - Funzione Flyback- & Bussola:
Il modello ha una funzione Flyback- & Bussola. Questo signi-
 ca che é in grado nonostante una rotazione in una direzione
desiderata (La fusoliera non è in direzione di volo) mantenere
la direzione originale del volo e semiautomatico volare di nuovo
indietro verso di voi.
Preparazione:
Per primo deve aver una idea in quale direzione desidera memo-
rizzare la bussola del modello. Questa direzione quando attiva
il modo bussola e automaticamente la nuova direzione di volo.
Quindi, se volete per esempio volare lungo il percorso e usare la
modalità bussola scelga la direzione in cui il percorso conduce
come la direzione di base della bussola. Se ora deve far ruota-
re il modello attorno al proprio asse in modalità bussola non ce
bisogno di preoccuparsi per la direzione di volo sulla radio. Se
preme la leva di controllo destro in avanti il modello volerà in
direzione dell percorso via da voi. Se preme la leva di controllo
destro verso di voi il modello volerà in direzione della percorso
verso di voi.
Installazione della Modalità Flyback- & Bussola:
La direzzione in cui il modello é diretto, viene memorizzatoa in
modo permanente come Flyback ossia direzione bussola. La
funzione Flyback- & Bussola puo essere attivato durante il volo
attraverso premendo il pulsante bussola /  yback (A). Dal lam-
peggio del LED e segnale acustico viene segnalato che il mo-
dello é in Flyback ossia modalità bussola. Il modello segue ora
la direzione indipendente, in cui la fusoliera del modello inica di
come era stata programmata la direzione bussola lenta-
mente indietro verso di lei (Flyback)  nche muovera la leva di
controllo destra. Dopo aver spostato la leva dicontrollo destra
il modello si trova automaticamente nella modalitá bussola. Du-
rante la modalità Flyback ossia bussola é necessario continuare
a controllare l’altezza del modello attraverso la leva del gas.
ES - Función Flyback- & Brújula:
Su modelo tiene una función Flyback- & Brújula. Esto signi ca
que no obstante un giro en una dirección deseada (El fuselaje no
está en la dirección de vuelo) mantiene la dirección original de
vuelo y semiautomático vola de nuevo hacia Usted.
Preparación:
Al primero usted debe tener una idea en que dirección desea
almacenar en la brújula del modelo. Esta dirección cuando se
activa el modo de brújula es automáticamente la nueva dirección
del vuelo. Así que si por ejemplo quieres volar a lo largo de un
el camino y utilizar el modo de brújula selecciona la dirección en
la que el camino conduce como la dirección básica de la brújula.
Si ahora hace girar el modelo alrededor de su propio eje en el
modo de brújula no tiene que preocuparse de la dirección de
vuelo en la emisora. Si presiona la palanca de control derecha
hacia adelante el modelo va a volar en la dirección del el camino
lejos de usted. Si tire la planca de control derecha hacia usted
el modelo va a volar en la dirección del el camino hacia usted.
Instalación del modo Flyback- & Brújula:
La direzzione in cui il modello é diretto, viene memorizzatoa in
modo permanente come Flyback ossia direzione bussola. La
funzione Flyback- & Bussola puo essere attivato durante il volo
attraverso premendo il pulsante bussola /  yback (A). Dal lam-
peggio del LED e segnale acustico viene segnalato che il model-
lo é in Flyback- ossia modalità bussola. Il modello segue ora la
direzione indipendente, in cui la fusoliera del modello indica di
come era stata programmata la direzione bussola lentamente
indietro verso di lei (Flyback)  nche muovera la leva di controllo
destra. Dopo aver spostato la leva dicontrollo destra il modello si
trova automaticamente nella modalitá bussola. Durante
la modalità Flyback- ossia bussola é necessario continuare a
controllare l’altezza del modello attraverso la leva del gas.