jbc IN 2100 User manual

IN 2100
I N S T A N T S O L D E R I N G G U N
Index Page
English 1
Español 3
Français 5
Deutsch 7
Italiano 9
Instructions manual


We appreciate the trust you have shown in JBC by purchasing this IN 2100 Ref.
2132058, soldering gun. It has been manufactured with the highest standards of
quality to ensure reliable service.
It is equipped with a long life tip. See the models on the last page.
ENGLISH
APPLICATIONS
Soldering of electronic components for
home repair calls or for use as a source of
quick and powerful heat.
TECHNICAL SPECIFICATIONS
- Power supply: 230 V
- Initial power: 200W
- Maintenance power: 60W
- Fast heating
reaches 250°C: in approx. 45 seconds
- Long-life tip T-20D: Ref.0300509
- Weight: 150 g
OPERATING INSTRUCTIONS
Check that mains voltage is the same as
indicated on the soldering gun handle.
Plug in the soldering gun and press the
trigger without releasing for about 30
seconds. The temperature will keep rising
by its own inertia. Then press the trigger at
intervals of approx. 10 seconds to maintain
temperature.
If the soldering job requires high
temperature or if a great deal of heat
dissipation is foreseen (ground solder),
make an initial contact of approx. 1 minute,
then press the trigger again, this time for as
long as the soldering gun tip remains in
contact with the point to be soldered.
Do NOT keep the trigger pressed for the
whole time that the soldering gun remains
in operation or the tip will overheat and
wear out quickly.
Remember that the soldering flux
evaporates at very high temperatures
before its cleaning action has time to take
effect, thus failing to do the job for which it
is intended.
The coil spring which is supplied with the
unit serves as protection when storing the
hot soldering gun (Fig. 1) and as support
while working (Fig. 2).
Fig. 1
Fig. 2
1
This product should not be thrown in the
garbage.

ENGLISH
JBC reserves the right to after specifications without prior
notice.
CHANGING THE TIP
Use the tip removal device Ref. 0114108.
1Remove the ring to release the tip.
2Remove the tip by pulling the soldering
iron lengthwise without forcing the
element.
Before fitting the new tip, clean the part
of the element which is covered by the
tip, to eliminate any contamination and
facilitate the insertion of the new tip.
3Insert the new tip and make sure that it
has penetrated fully home, otherwise its
thermic performance would be altered
and would not correspond to the
temperature reading.
TIP CARE
- To clean the tips, use the damp sponge
included with the JBC stand.
Only
deionised water (car battery watter)
should be used in order to wet the
sponge. If normal water was to be used,
it is very likely that the tip will become
dirty due to the salts dissolved within the
water.
- Do not file the tips or use abrasive tools
which may damage the tip’s protective
surface coating and avoid knocking them
about.
- If the tip has been a long time without
being tinned, use the metal brush
Ref. 0297705 adaptable to the support,
to remove any dirt and oxide.
2

Agradecemos la confianza depositada en JBC al adquirir nuestro soldador rápido
IN 2100 Ref. 2132058. Ha sido fabricado con las más estrictas normas de calidad,
para prestarle el mejor servicio.
La punta con que va equipado es de larga duración. Ver modelos en la última página.
ESPAÑOL
APLICACIONES
Soldadura de componentes electrónicos
en trabajos de asistencia domiciliaria o
cuando se precise una fuente de calor
rápida y potente.
DATOS TECNICOS
- Alimentación: 230 V
- Potencia inicial: 200 W
- Potencia mantenimiento: 60 W
- Calentamiento
rápido a 250 °C: en aprox. 45 segundos
- Punta larga duración T-20D: Ref. 0300509
- Peso soldador: 150 gr
INSTRUCCIONES DE FUNCIONAMIENTO
Compruebe que el voltaje de la red sea el
indicado en el mango del soldador.
Conecte el soldador y presione el gatillo
de forma continua, durante unos 30
segundos. Por su propia inercia la
temperatura seguirá ascendiendo. A
continuación presione a intervalos aprox.
cada 10 segundos para mantener la
temperatura. Si la soldadura a realizar
requiere una elevada temperatura o tiene
prevista una fuerte disipación (soldaduras
a masa), haga el contacto inicial durante
aprox. 1 minuto, presionando nuevamente
el gatillo, esta vez durante el tiempo que se
mantenga en contacto la punta del
soldador con el punto a soldar.
NO mantener apretado el gatillo durante
todo el tiempo que el soldador deba
permanecer en funcionamiento, producirla
un sobrecalentamiento de la punta,
provocando el rápido deterioro de la misma.
Tenga en cuenta que a temperaturas muy
elevadas, el flux del estaño se evapora
antes de poder efectuar su acción
decapante, anulando la función por la que
ha sido incorporado al estaño.
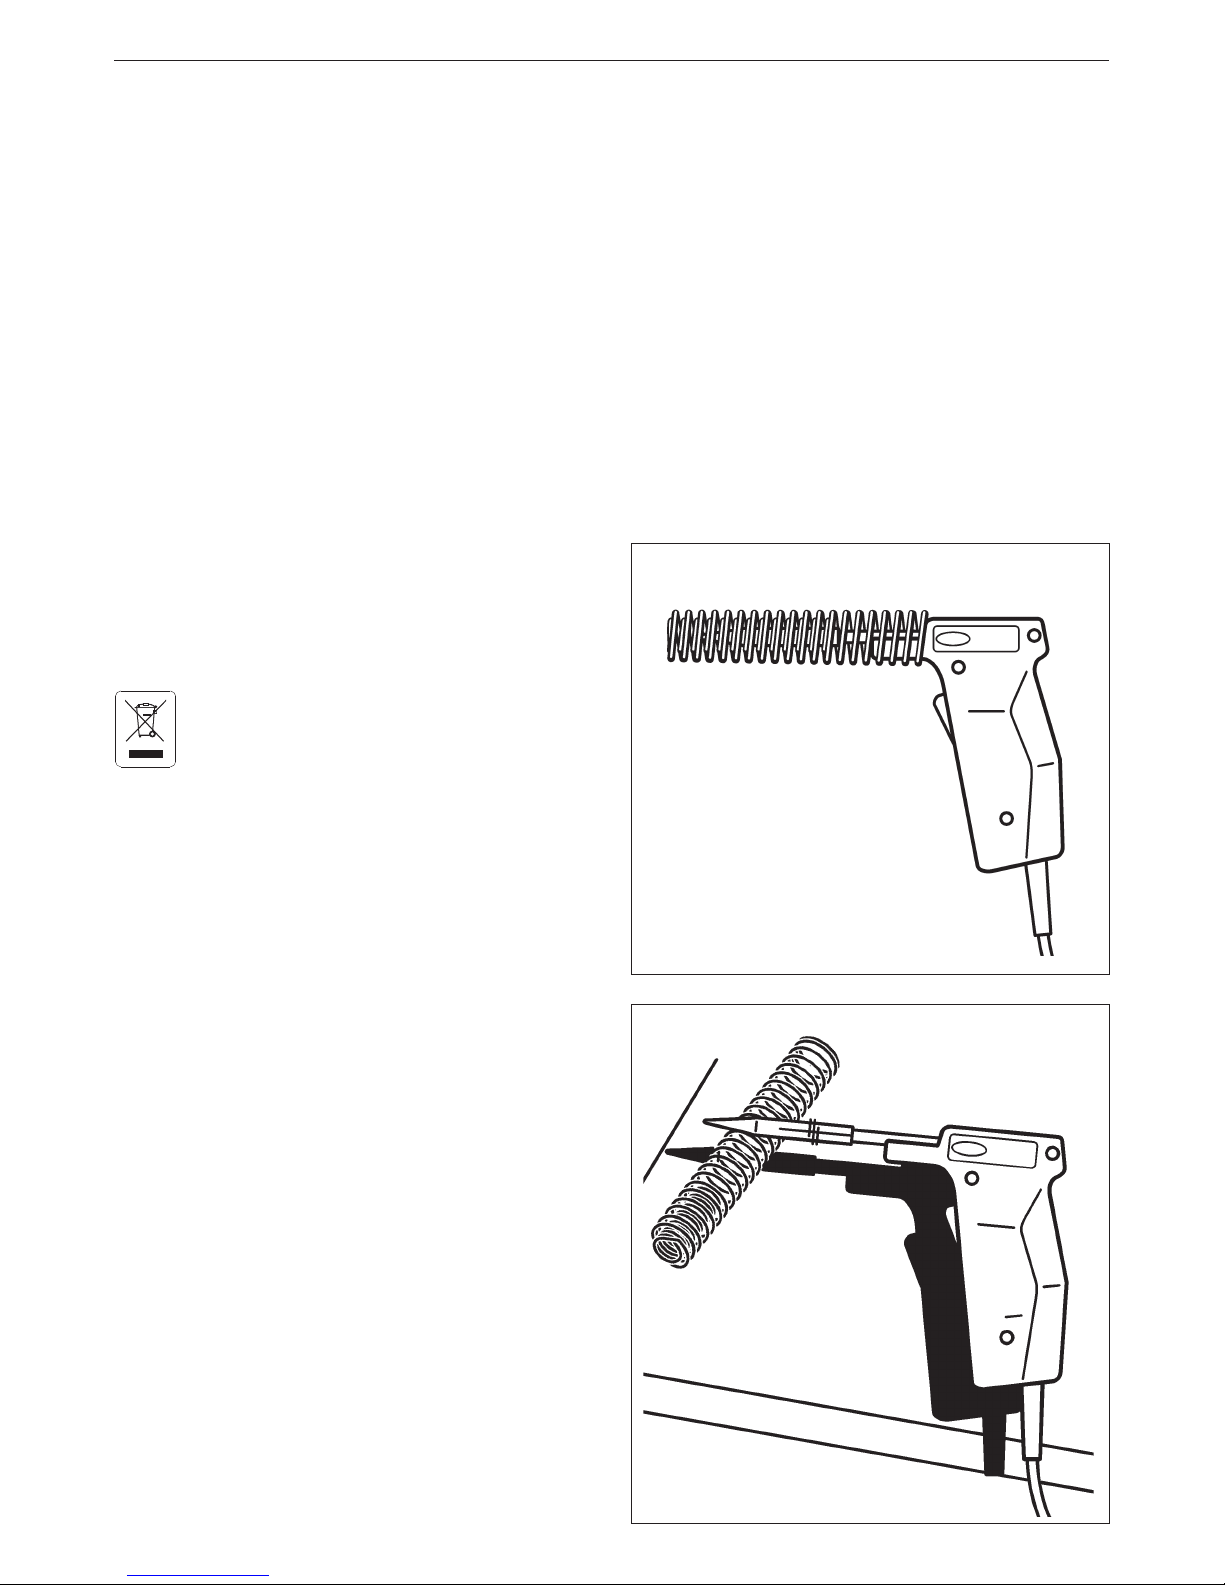
El muelle espiral que se suministra con el
soldador, sirve como protección para
guardar el soldador caliente (Fig. 1) y como
apoyo durante el trabajo (Fig. 2).
Fig. 1
Fig. 2
3
Este producto no debe ser tirado a la
basura.

JBC se reserva el derecho de introducir variaciones
técnicas sin previo aviso.
ESPAÑOL
CAMBIO DE PUNTA
Utilice el extractor de puntas Ref. 0114108.
1Retire la anilla para liberar la punta.
3Introduzca la nueva punta y asegúrese
de que ha penetrado a fondo, de lo
contrario alteraría su rendimiento
térmico y no correspondería la lectura
de temperaturas.
2Extraiga la punta tirando del soldador
en sentido longitudinal y sin forzar la
resistencia.
Antes de colocar la nueva punta, limpie
la parte de la resistencia que queda
cubierta por la punta, para eliminar la
contaminación que pudiera tener y
facilitar así la introducción del
recambio.
CONSERVACION DE LAS PUNTAS
- Para su limpieza utilice la esponja
húmeda que llevan los soportes JBC. Es
necesario utilizar sólo agua desionizada
para humedecer la esponja. Si utiliza
agua normal es muy probable que la
punta se ensucie con las sales disueltas
que hay en el agua.
- No lime ni utilice herramientas abrasivas
que puedan destruir la capa de
protección superficial y evite los golpes.
- Si la punta ha estado mucho tiempo sin
ser estañada, utilice el cepillo metálico
Ref. 0297705 adaptable a los soportes,
para eliminar el óxido y la suciedad.
4

FRANÇAIS
APPLICATIONS
Soudage de composants électroniques pour
travaux à domicile ou opérations demandant
une source de chaleur rapide et puissante.
CARACTÉRISTIQUES TECHNIQUES
- Alimentation: 230 V
- Puissance initiale: 200 W
- Puissance de maintien moyenne: 60 W
- Chauffage rapide
atteint 250°C: en 45 secondes environ
- Panne longue durée: T-20D Ref.0300509
- Poids du fer: 150 g
MODE D’EMPLOI
Vérifier le voltage du secteur: il doit
correspondre à celui qui figure sur la
poignée du fer à souder.
Brancher le fer à souder et appuyer sur la
gâchette en continu pendant 30 secondes.
De par sa propre inertie, la température
continuera à augmenter. Pour maintenir la
température, il suffit ensuite d’appuyer sur
la gâchette toutes les 10 secondes environ.
Si la soudure à effectuer exige une
température élevée ou si une forte
dissipation de chaleur est prévisible
(soudure à la masse), mettre tout d’abord
en contact la panne et le point à souder
pendant environ une minute, puis maintenir
la gâchette apuyée pendant que la panne
est en contact avec le point à souder.
ATTENTION: ne JAMAIS appuyer sur la
gâchette pendant toute la durée de
l’opération de soudure. La panne
surchaufferait et se détériorerait
rapidement.
N’oubliez pas qu’à haute température, le
fondant incorporé à l’étain s’évapore avant
Vous venez d’acquérir un fer à souder instantané IN 2100 Ref. 2132058, JBC vous
remercie de votre confiance. Ce fer a été fabriqué selon les plus strictes normes de
qualité pour que vous bénéficiez du meilleur service.
Il est équipé d’une panne longue durée. Voir modèles page fínale.
d’avoir pu remplir la fonction de décapage
qui est la sienne.
Le ressort en spirale fourni avec le fer à
souder, sert de protection afin de garder
chaud le fer (fig. 1) et d’appui durant le
travail (fig. 2).
Fig. 1
Fig. 2
5
Ce produit ne doit pas être jeté à la
poubelle.

FRANÇAIS
JBC se réserve le droit d’introduire des varations techniques
ou de conception sans préavis.
REMPLACEMENT DE LA PANNE
Utiliser l'extracteur de pannes Réf. 0114108.
1Retirer l’anneau pour libérer la panne.
2Extraire la panne en tirant sur le fer à
souder dans le sens de la longueur et
sans forcer la résistance.
Avant de placer la nouvelle panne,
nettoyez la partie de la résistance qui
reste couverte par la panne, afin
d'éliminer les déchets qu'elle pourrait
avoir et faciliter ainsi l'introduction de
la pièce de rechange.
3Introduire la nouvelle panne et assurez-
vous qu’elle soit enfoncée jusqu’au bout,
sinon son rendement thermique serait
altéré et la lecture des températures ne
correspondrait pas.
CONSERVATION DES PANNES
- Pour le nettoyage, utilisez l’éponge
humide fournie avec les supports JBC. Il
est nécessaire d’utiliser de l’eau
deionisée pour humidifier l’éponge. Si
vous utilisez de l’eau courante, il est très
probable que la panne soit contaminée
par les sels dissous contenus dans l’eau.
- Ne pas limer; ne pas employer d’outils
abrasifs: ils pourraient endommager le
revêtement protecteur de la panne. Éviter
les chocs.
- Si la panne n’a pas été étamée depuis
longtemps, utiliser la brosse métallique
Réf. 0297705 (adaptable à tous les
supports) pour la débarrasser de toute
trace de rouille et de saleté.
6

DEUTSCH
ANWENDUNGSBEREICH
Für das Löten von elektronischen
Bauelementen beim Kundendienst vor Ort
oder bei sonstigen Arbeiten, die eine schnelle
und leistungsfähige Wärmequelle erfordern.
TECHNISCHE DATEN
- Betriebsspannung: 230 V
- Aufheizleistung: 200 W
- Dauerleistung: 60 W
- Schnelles Aufheizen
250° C: in ca. 45 Sekunden
- Long- life-Spitze T-20D: Ref.0300509
- Gewicht des Lötkolbens: 150 g
BEDIENUNGSANWEISUNG
Überprüfen Sie bitte, daß die Netzspannung
mit der auf dem Lötkolbenschaft
angegebenen Spannung übereinstimmt.
Schließen Sie den Lötkolben an und
betätigen Sie etwa 30 Sekunden lang den
Drücker. Aufgrund des Trägheitseffekts wird
die Temperatur noch weiter ansteigen.
Anschließend betätigen Sie den Drücker
etwa alle 10 Sekunden, um die Temperatur
stabil zu halten. Wenn bei den
durchzuführenden Lötarbeiten besonders
hohe Temperaturen benötigt werden oder
mit einer starken Wärmeableitung zu
rechnen ist (Lötarbeiten an Masse), dehnen
Sie das anfängliche Aufheizen auf ca. eine
Minute aus, und betätigen Sie den Drücker
während die Lötkolbenspitze mit der
Lötstelle in Berührung steht.
KEINESFALLS den Drücker durchweg
betätigen, da dies zur Überhitzung der
Spitze und zur vorzeitigen Alterung
derselben führen würde.
Bitte beachten Sie, daß bei sehr hohen
Temperaturen das dem Lötzinn
WirdankenIhnenfürdasVertrauen,daßSieJBCmitdemKaufunseresInstantlötkolbens
IN 2100 Ident-Nr 2132058 entgegengebracht haben. Er entspricht höchsten
Qualitätsanforderungen, so dass Sie optimale Lötergebnisse erwarten dürfen.
Der Kolben ist mit einer Long-Life-Spitze ausgerüstet (Siehe Typenauswahl auf der
letzten Seite).
beigemischte Flußmittel noch vor dem
Beizen verdampft und somit wirkungslos
wird.
Die serienmäßig gelieferte Spirale dient zur
sicheren Aufbewahrung des noch heißen
Lötkolbens (Abb. 1) bzw. als Ablage
während des Lötens (Abb. 2).
Fig. 1
Fig. 2
7
Dieses Produkt darf nicht mit dem
Hausmüll entsorgt werden.

DEUTSCH
Technische und konstruktive Änderungen vorbehalten.
SPITZENWECHSEL
Hierzu Spitzenabzieher Ident-Nr 0114108
verwenden.
1Ring zur Freigabe der Spitze abziehen.
2Die Spitze durch vorsichtiges Ziehen in
Längsrichtung lösen.
Vor Einsatz einer neuen Lötspitze,
den freigewordenen Teil des
Heizkörpers reinigen, um evtl.
anhaftenden Schmutz zu entfernen
und das Einführen der neuen Spitze
zu erleichtern.
3Neue Spitze vollständig aufschieben,
da sonst Temperatuverhältnisse
beeinflußt werden und die ablesbaren
Werte nicht dem tatsächlichen
Zustand entsprechen.
WARTUNG DER SPITZEN
- Benutzen Sie zur Reinigung der Spitzen
den feuchten Schwamm an den JBC-
Ständern. Es ist erforderlich zum
Befeuchten des Schwamms nur
entionisiertes Wasser zu verwenden.
Wenn normales Wasser benutzt wird, ist
es sehr wahrscheinlich, dass die Spitze
durch die im Wasser gelösten Salze
verschmutzt wird.
- Keine Feilen oder sonstige scharfe
Werkzeuge verwenden, damit die
Schutzschicht der Spitze nicht beschädigt
wird. Vermeiden Sie Stöße.
- Wenn die Spitze lange Zeit nicht verzinnt
wurde, benutzen Sie bitte die an den
Ständer anpaßbare Metallbürste 0297705,
um Rost- und sonstige Schmutzreste zu
entfernen.
8

ITALIANO
APPLICAZIONI
Saldatura di componenti elettrici in interventi
di riparazione a domicilio o quando sia
necessaria una fonte di calore rapida e
potente.
DATI TECNICI
- Tensione d’alimentazione: 230 V
- Potenza iniziale: 200 W
- Potenza di mantenimento: 60 W
- Riscaldamento
rapido 250 °C: in circa 45 secondi
- Punte Lunga Durata T-20D: Ref.0300509
- Peso del saldatore: 150 g
ISTRUZIONI PER L’USO
Accertarsi che il voltaggio della rete coincida
con quello riportato sul manico del saldatore.
Collegare il saldatore e premere il pulsante
in modo continuo per circa 30 secondi. La
temperatura continuerà a salire per la sua
stessa inerzia. Premere quindi ad intervalli,
approssimativamente ogni 10 secondi, per
mantenere costante la temperatura. Se la
saldatura da realizzare richiede un’elevata
temperatura o si prevede una forte
dissipazione di calore (saldature a massa),
far durare il contatto iniziale per circa 1
minuto, tenendo quindi premuto il pulsante
per tutto il tempo in cui la punta del saldatore
rimanda in contatto col punto da saldare.
NON tener premuto il pulsante per tutto il
tempo in cui il saldatore debba rimanere
in funzionamento, dato che altrimeni la
punta si surriscalderebbe, deteriorandosi
rapidamente.
Tener presente che a temperature molto
elevate il fondente dello stagno evapora
prima di poter svolgere la sua azione
antiossidante, annullando così la funzione
per cui è stato incorporato allo stagno.
La molla a spirale fornita col saldatore
serve da protezione per riporre il
saldatore ancora caldo (Fig. 1) e da
supporto durante il lavoro (Fig. 2).
La ringraziamo per la fiducia riposta nella JBC con l’acquisto di questo saldatore
istantaneo IN 2100 Rif. 2132058. È stato fabbricato secondo le più rigide norme di
qualità per offrire il servizio migliore.
È dotato di una punta a lunga durata. Vedere i modelli nell’ultima pagina.
Fig. 1
Fig. 2
9
Questo prodotto non deve seguire il
normale percorso di smaltimento dei rifiuti.

ITALIANO
JBC si riserva il diritto d’introdurre variazione tecniche o di
disegno senza preavviso.
CAMBIO DELLA PUNTA
Utilizzare l'estrattore di punte Rif. 0114108.
1Togliere l’anello per liberare la punta.
2Estrarre la punta tirando il saldatore in
senso longitudinale e senza forzare la
resistenza.
Prima di sistemare la nuova punta, si
deve pulire la parte della resistenza che
viene coperta dalla punta, per eliminare
eventuali scorie e facilitare
l'inserimento del ricambio.
3Collocare la nuova punta ed assicurarsi
che sia penetrata fino in fondo, altrimenti
ne verrebbe alterato il rendimento
termico, e la lettura delle temperature
non sarebbe quella giusta.
PULIZIA DELLE PUNTE
- Per la sua pulizia utilizzare la spugna
umida sui supporti JBC. Per inumidire la
spugna è necessario usare solo acqua
distillata. Se si utilizza acqua normale il
calcare può danneggiare la punta.
- Non limare e non utilizzare utensili
abrasivi che possono distruggere la
cappa di protezione superficiale della
punta ed evitare i colpi.
- Se la punta è rimasta molto tempo senza
essere stagnata, utilizzare la spazzola
metallica Rif. 0297705 adattabile ai
supporti, per eliminare le ossidazioni e
la sporcizia.
10


WARRANTY ENGLISH
The JBC 2 years warranty, guarantees
thisequipmentagainstallmanufacturing
defects, covering the replacement of
defectiveparts andall necessary labour.
Warranty does not cover product wear
due to use or mis-use.
In order for the warranty to be valid,
equipment must be returned, postage
paid, to the dealer where it was
purchased enclosing this, fully filled in,
sheet.
GARANTIA ESPAÑOL
JBC garantiza este aparato durante 2
años,contratododefectodefabricación,
cubriendo la reparación con sustitución
de las piezas defectuosas e incluyendo
la mano de obra necesaria.
Quedan excluidas de esta garantía las
averías provocadas por mal uso del
aparato y desgaste por uso.
Es indispensable para acogerse a esta
garantía el envio del aparato al
distribuidor donde se adquirió, a portes
pagados, adjuntando esta hoja
debidamente cumplimentada.
GARANTIE FRANÇAIS
JBC garantit cet appareil 2 ans contre
toutdéfautdefabrication.Celacomprend
la réparation, le remplacement des
pièces défectueuses et la main d'oeuvre
nécessaire.
La garantie ne couvre pas l’usure liée à
l’utilisation et à la mauvaise utilisation du
matériel.
Pour bénéficier de cette garantie il est
indispensable d'envoyer l'appareil chez
le distributeur où il a été acquis, en ports
payés, en joignant cette fiche dûment
remplie.
✂
1Kupferkern
2Eisen
3Nickel
4Chrom
5Verzinnung
1Nucleo di rame
2Ferro
3Nichel
4Cromo
5Stagnatura
How are the JBC long life tips manufactured
All these protection layers avoid that
tin comes into contact with the copper
basis and damages it which gives
such tip a 10 to 20 times longer
working life than the traditional tip,
while keeping its original shape
without deformation by wear.
Cómo se fabrican las puntas de Larga Duración JBC
Todas estas capas de protección evitan
que el estaño entre en contacto con la
base de cobre y produzca su deterioro,
con lo que se consigue una duración de
10 a 20 veces superior a una punta de
cobre convencional, conservando su
forma inicial sin deformación por el
desgaste.
Comment sont fabriquées les pannes Longe Durée JBC
Toutescescouchesdeprotectionévitent
que l'étain n'entre en contact avec la
base de cuivre et ne produise sa
détérioration, ce qui permet d'obtenir
une durée de vie 10 ou 20 fois supérieure
àcelledelapannedecuivretraditionnelle,
tout en conservant sa forme initiale sans
déformation par l'usure.
Wie sind die JBC-Spitzen mit hoher Lebensdauer
Alle diese Schutzschichten vermeiden,
daß das Zinn in Berührung mit der
Kupferbasis kommt, und sie beschädigt;
hierdurch wird eine um 10 bis 20 mal
höhere Lebensdauer erreicht als bei der
konventionellen Kupferspitze, unter
Beibehaltung der ursprüngliche Form
ohne Verformung durch Verscheiß.
Come vengono fabricate le punte Lunga Durata JBC
Tutti questi strati di protezione evitano
che lo stagno sia in contatto con le basi
di rame e la possa danneggiare. Così
si ottiene una durata della punta
superiore di 10 o 20 volte alla durata
della punta convenzionale,
conservando la sua forma iniziale
senza deformazione per l'usura.
1Copper core
2Iron
3Nickel
4Chromium
5Tin plate
1Núcleo de cobre
2Hierro
3Niquel
4Cromo
5Estañado
1Noyau de ciuvre
2Fer
3Nickel
4Chrome
5Étain

0165415-1107
GARANTIE DEUTSCH
Für das vorliegende Gerät übernimmt
JBC eine Garantie von 2 Jahren, für alle
Fabrikationsfehler. Diese Garantie
schliesst die Reparatur bzw. den Ersatz
der defekten Teile sowie die
entsprechenden Arbeitskosten ein.
Ausgeschlossen von dieser
Garantieleistung sind durch
unsachgemässen Gebrauch
hervorgerufene Betriebsstörungen und
normale Gebrauchsabnützungen.
Zur Inanspruchnahme dieser Garantie
muss das Gerät portofrei an den
Vertriebshändler geschickt werden, bei
demesgekauftwurde.FügenSie dieses
vollständig ausgefüllte Blatt bei.
GARANZIA ITALIANO
La JBC garantisce quest'apparato 2
annicontroogni difetto di fabbricazione,
e copre la riparazione e la sostituzione
dei pezzi difettosi, includendo la mano
d'opera necessaria.
Sono escluse da questa garanzia le
avarie provocate da cattivo uso
dell'apparato e logorio da utilizzo.
Per usufruire di questa garanzia, è
indispensabile inviare, in porto franco,
l'apparato al distributore presso il quale
è stato acquistato, unitamente a questo
foglio debitamente compilato.
DATE OF PURCHASE
FECHA DE COMPRA
DATE D'ACHAT
KAUFDATUM
DATA DI ACQUISTO
STAMP OF DEALER
SELLO DEL DISTRIBUIDOR
CACHET DU DISTRIBUTEUR
STEMPEL DES HÄNDLERS
TIMBRO DEL DISTRIBUTORE
SERIAL Nº
✂
MANUFACTURED BY
JBC Industrias, S.A.
Ramón y Cajal, 3 - 08750 MOLINS DE REI
BARCELONA - SPAIN
Tel.: +34 93 325 32 00 - Fax: +34 93 680 49 70
http://www.jbctools.com e-mail:[email protected]
Other manuals for IN 2100
1
Table of contents
Languages:
Other jbc Soldering Gun manuals