EnglishDeutsch
 logo
Brands
  1. Home
  2. •
  3. Brands
  4. •
  5. John Lewis
  6. •
  7. Lighting Equipment
  8. •
  9. John Lewis 70250801 User manual

John Lewis 70250801 User manual

Other John Lewis Lighting Equipment manuals

John Lewis Outdoor Moroccan User manual

John Lewis

John Lewis Outdoor Moroccan User manual

John Lewis Didi User manual

John Lewis

John Lewis Didi User manual

John Lewis Samantha User manual

John Lewis

John Lewis Samantha User manual

John Lewis EMILIA User manual

John Lewis

John Lewis EMILIA User manual

John Lewis ZELLA UPLIGHTER User manual

John Lewis

John Lewis ZELLA UPLIGHTER User manual

John Lewis Lawrence User manual

John Lewis

John Lewis Lawrence User manual

John Lewis BALDWIN User manual

John Lewis

John Lewis BALDWIN User manual

John Lewis Aspen User manual

John Lewis

John Lewis Aspen User manual

John Lewis Freddy Snowman with Glitterball User manual

John Lewis

John Lewis Freddy Snowman with Glitterball User manual

John Lewis LEXI PENDANT User manual

John Lewis

John Lewis LEXI PENDANT User manual

Popular Lighting Equipment manuals by other brands

Brizo 8SP-MU-4 manual

Brizo

Brizo 8SP-MU-4 manual

LUCE&LIGHT BROM 1.0 installation instructions

LUCE&LIGHT

LUCE&LIGHT BROM 1.0 installation instructions

IKEA BJÖRKSPIREA manual

IKEA

IKEA BJÖRKSPIREA manual

Laserworld Evolution Series ES-400RGB manual

Laserworld

Laserworld Evolution Series ES-400RGB manual

EuroLite LED B-40 user manual

EuroLite

EuroLite LED B-40 user manual

Qazqa Suplux SL 3 Black 103062 instruction manual

Qazqa

Qazqa Suplux SL 3 Black 103062 instruction manual

Commercial Electric 54568141 Use and care guide

Commercial Electric

Commercial Electric 54568141 Use and care guide

CREE LIGHTING 304 Series installation instructions

CREE LIGHTING

CREE LIGHTING 304 Series installation instructions

Goobay 49867 user manual

Goobay

Goobay 49867 user manual

ECOMAN ITALIA LED T8 instruction manual

ECOMAN ITALIA

ECOMAN ITALIA LED T8 instruction manual

Alkalite Krypton KT-81 user manual

Alkalite

Alkalite Krypton KT-81 user manual

Clas Ohlson GU10 manual

Clas Ohlson

Clas Ohlson GU10 manual

DTS DELTA 10 F user manual

DTS

DTS DELTA 10 F user manual

ring Solar Steplight manual

ring

ring Solar Steplight manual

One Stop Gardens 57696 Owner's manual & safety instructions

One Stop Gardens

One Stop Gardens 57696 Owner's manual & safety instructions

SIREM Swimeo A2 instructions

SIREM

SIREM Swimeo A2 instructions

Silvair MESH-CEDRP quick start guide

Silvair

Silvair MESH-CEDRP quick start guide

S&P PCRL80 manual

S&P

S&P PCRL80 manual

https://manuals.online logo
https://manuals.online logoBrands
  • About & Mission
  • Contact us
  • Privacy Policy
  • Terms and Conditions

Copyright 2026 Manuals.Online. All Rights Reserved.

CONTEMPORARY PICTURE LIGHT
USER GUIDE
Product Code:
70250801
Please retain these instructions for future reference.
John Lewis Plc
171 Victoria Street
London SW1E 5NN
johnlewis.com
Made in China
21/04/2021
Product
information
• Indoor use only
• Non-dimmable
• Product contains non-replaceable LED tape module
• Clean the tting with a soft dry cloth. Do not use abrasive chemical cleaners as
this will damage the nish
Aftercare and
Troubleshooting
You’ve switched on the light, but it’s not working:
1. Check your power supply is switched on
2. Turn off the light and check that the bulb is inserted correctly
3. Check the bulb is still in working order
If there are technical issues with this product that you can’t solve, please contact your
nearest John Lewis & Partners shop or call Technical Support on 03301 230106.
Specication Product contains LED tape module. Rated input: 220 –240V, 50Hz
Max power: 5.8W
Bulb included
IP rating: 20
Weight: 0.38kg
5-year guarantee At John Lewis & Partners we test every light to high quality standards.
That means we can offer you a 5-year guarantee.
Recycling This symbol indicates that this product should not be treated as normal
household waste and it should be recycled. John Lewis & Partners do not
operate instore take back, but as members of the Distributor Take Back
scheme have funded the development and upgrade of recycling facilities
across the UK. Please take it to your nearest collection facility or for further
details contact your local council or visit www.recycle-more.co.uk.
Getting started Thank you for purchasing this John Lewis & Partners product. For your safety,
and to make sure everything is working properly, please read the instructions
carefully before use.
Warnings This is a Class ll product and must NOT be earthed.
It is recommended that this tting is installed by a qualied electrician.
Install in accordance with the IEE Wiring regulations and the Building Regulations.
To prevent electrocution switch off at mains supply before installing or maintaining this
tting. Ensure other persons cannot restore the electrical supply without your knowledge.
If you are in any doubt, please consult a qualied electrician.
This light tting should be connected to a 5 amp fused circuit.
If replacing an existing tting, make a note of the connections.
This product is suitable for indoor use only.
This product is suitable for installation on surfaces with normal ammability e.g.
wood, plasterboard, masonry. It is not suitable for use on highly ammable surfaces
(e.g. polystyrene, textiles).
The product may get hot, therefore for your safety always switch off the light
and allow to cool for 10 minutes before adjusting the position.
Parts list Description Image Quantity
Light tting x 1
Wall plugs x 2
Screws x 2
Product assembly
Step 1
Refer to assembly diagrams right. Carefully unpack
the carton, making sure all the parts are present
before assembly. Before removing the existing tting,
carefully note the position of each set of wires.
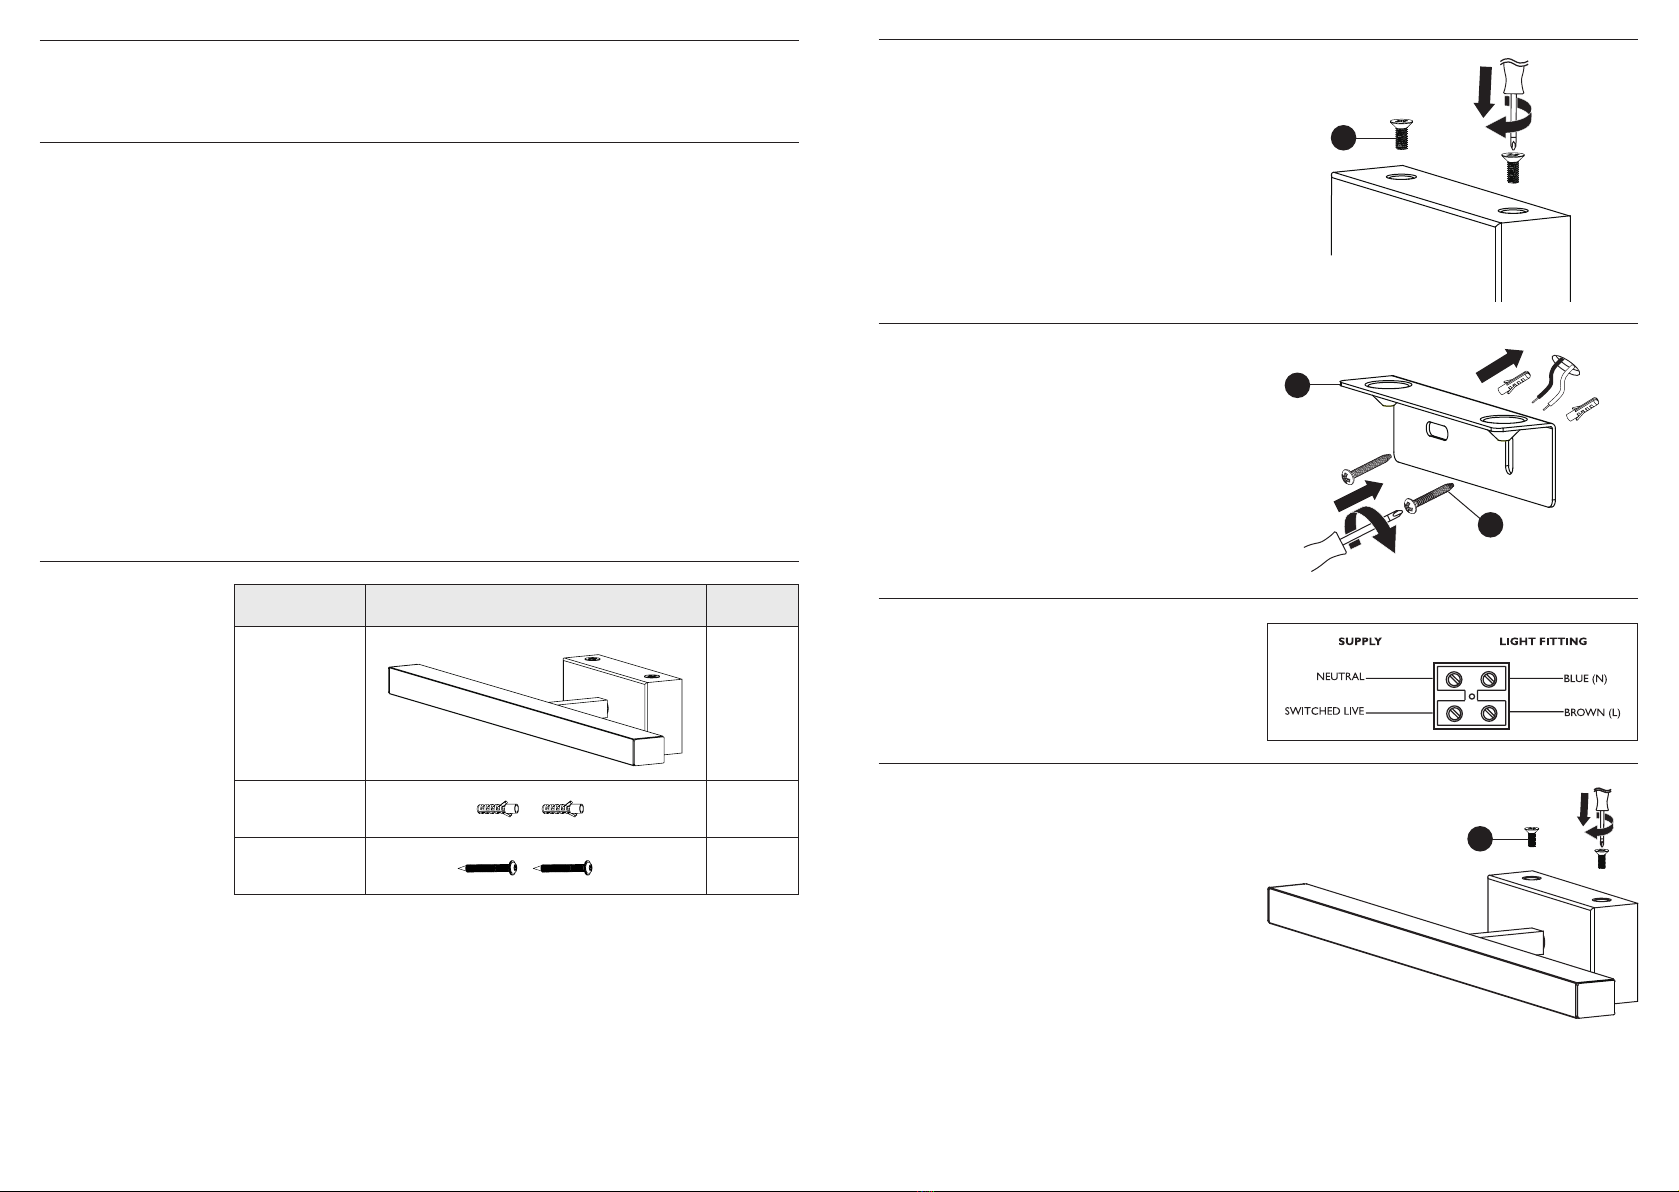
Step 2
Remove the xing bracket (A) from the product by
removing the top screws (B).
Step 4
Connect the product to the household wiring.
Check that: You have correctly identied the house wires.
The connections are tight. No loose strands have been
left out of the connection block. When completed, ensure
that there are no bare or loose strands of wire exposed.
Step 5
Re-attach the product to the xing bracket and tighten
the top screws (B). Take care not to trap any wiring.
Adjust the head to the desired position.
Replace fuse or circuit breaker and switch on.
Your light is now ready for use.
Step 3
Using the screws provided (C) in the xing pack,
secure the bracket (A) to the wall. Take care to avoid
damaging any concealed wiring and pipes.
A
B
C
B