juju Complete 360 User manual

Car eat
User Manual
ENEN ENRO ENBG ENHU ENPL
Complete 360
Group: 0+ / I / II / III (0-36kg)

13.
11.
12.
14.
7.
5.
4.
2.
9.
6.
3.
1.
8.
10.
A.
C.
B.
3
1 2

D.
4
ISO FIX
ISO FIT
ISO FIT
ISO FIT
0-13kg
0 - 18 months
9-18kg
9 months - 4 years
15-25kg
3 - 6 years
22-36kg
6 - 12 years
Page 3

E.
F.
1
Reverse R-gear 23
4
23
1
ISO FIT
456
嗒
Page 4

7
21 3
465
7
G.
Page 5

21 3
H.
I. 13
4
22
J.
2 3
1
ISO FIT
嗒
Page 6

2
1
K. 13
4
2
2
21
5
3
46
L.
Page 7

7 8
21 3
M.
21
4
3
N.
Page 8

21
13
2
4
3
IMPORTANT- DO NOT
USEFORWARD FACING
BEFORETHE CHILS’S
WEIGHTEXCEEDS 9 KG
1 2 3 4 R
21
3
O.
P.
Page 9

Notice
1. This is an ISOFIX CHILD RESTRAINT SYSTEM. It is approved to Regulation No. 44, 04
series of amendments for general use in vehicles fitted with ISOFIX anchorages
systems.
2. It will fit vehicles with positions approved as ISOFIX positions (as detailed in the vehicle
handbook), depending on the category of the child seat and of the fixture.
3. The mass group and the ISOFIX size class for which this device is intended is: group 0+, D
This child restraint is classified for "(Semi-universal)" use and is suitable for fixing into the
seat positions of the following cars:
refer to
vehicle list
Seat positions in other cars may also be suitable to accept this child restraint. If in doubt,
consult either the child restraint manufacturer or the retailer.
- Only suitable for use in the vehicles fitted with 3 point retractor safety-belts, approved to
ECE R16.
- NOT TO USE REARWARD FACING SYSTEMS IN SEATING POSITIONS WHERE THERE IS AN
AIRBAG INSTALLED.
- This child safety seat cannot be used for forward installation until the child reaches 9 kg
(see instructions for use).
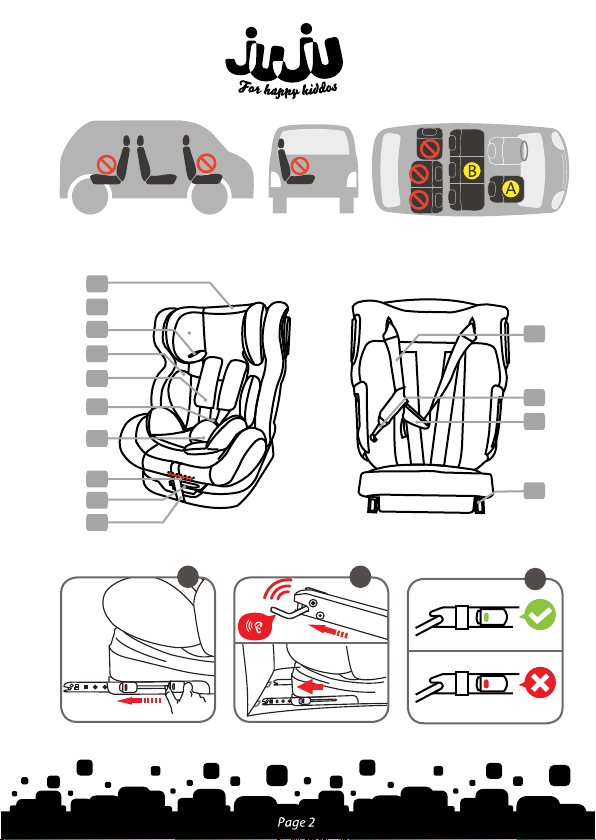
-The rear outside seats are the most safety position of the vehicle for child under 12
years old. This productmust be installed in the forward facing vehicle seat. Do not
install in the side facing or rearward facing vehicle seat. If any doubt about
installation, please check your vehicle user manual, or contact the vehicle supplier.
Some vehicle has no appropriate position to install our production or other safety
seat, see the drawing A:
Page 10

Wrong installation positions
Reverse installation of child safety seats in this position is not recommended. The
installation position must be equipped with car three point mounting belt and must
close
the airbag. Or adjust the car seat position backwards, so that the installation seat
as far away from the installation airbag.
The installation position must be equipped with car three point belt.
Instructions before use
・This product can be installed in the vehicle front and rear seats, but we suggest to
install it in the rear seats.
・After an accident the seat may become unsafe due to damage that is not be
noticeable immediately. It should therfore be replaced.
・We advise you strongly that not to use a second-hand product, because you are not
sure what has happened to it.
・Ensure that all luggage and objects likely to cause injury in the event of an accident
are properly secured.
WARNING!
For the safety of your child, please read
the instruction before installation
Type Group Installation Approval type
0+ ISOFIX attachment + top tether ISOFIX SEMI-UNIVERSAL
Ⅰ/Ⅱ/Ⅲvehicle 3 point belt+ Fix SEMI-UNIVERSAL
Com
plete
360
Page 11

・It is recommended that the car seat should not be used more than 5 years from the
date of production. The properties of the products may deteriorate due to, for example,
ageing of the plastic and this may not be visible.
・The moving parts of the car seat should not be lubricated in any way.
・The baby car seat must not be used without the cover. Please use an original cover,
as the cover contributes to the safety of the seat.
・No alterations may be made to the products as this could affect part or the overall
safety of the seat.
・Before use our product, please read the instruction manual carefully, the product is a
safety product and is only safe when used in accordance with the instruction manual.
・The seat must be secured with a seat belt or ISOFIX and Top Tether, even when isnot
on use. An unsecured seat may injure other passengers in the car in case of an urgent
stop.
・Ensure that the seat is not damaged by the belt between or underneath heavy
luggage, adjustable seats or slamming the car door etc.
・In hot weather the plastic and metal parts of the product will be hot. You should
cover the seat when the car is parked under the sun. In order to prevent damage to the
cover, do not remove the peoduct’s logo.
・Use the seat even in a short journey, as this is when most accidents occur.
・Before the purchase, please check if the car seat is suitable for your car.
・Take a short break in long journey. So that your child has some time for relaxation.
・Set a good example yourselfand always wear your seat belt.
・Tell your child that he/she shouldbe never play with the harness buckle.
・The rigid items and plastic parts of a childrestraint shall be so located and installed
that they are not liable, during everyday use of the vehicle, to become trapped by a
movable seat or in a door of the vehicle.
・Any belts holding the restraint to the vehicle should be tight, and any harnesses
restraining the child should be adjusted to the child's body, also these harnesses should
not be twisted.
・Ensuring that any lap belt is worn low down, so that the pelvis is firmly engaged, shall
be stressed.
・Do not use the car seat when it has been subject to violent stresses in an accident. Do
not make any alterations or additions to the device.
Page 12

・ The chair should be kept away from sunlight, otherwise it may be too hot for
the child's skin.
・ Never leave your child in the child restraint system unattended.
・ Any luggage or other objects liable to cause injuries in the event of a collision shall
be properly secured.
・ The child restraint shall not be used without the cover; the seat cover should not be
replaced with any other than the one recommended by the manufacturer, because the
cover constitutes an integral part of the restraint performance.
・Keep the instruction for future use.
・Do not use any contact points other than those described in the instructions and
marked on the child car seat. The correct fitting of the ISOFIX and Top Tether anchoring
systems or 3-point belt is of vital importance for the safety of your child.
Car seat components
B1. Headrest adjustment handle
B2. Headrest
B3. Group II,III Seat belt guide hook
B4. Baby cushion
B5. Shoulder pad
B6. 5-point type Seat belt system & buckle
B7. Comfort pad
B8. Angle adjustment lever
B9. Rotary locking lever
B10. Five-point ribbon adjustment belt
B11. Top Tether
B12. Fixed hook
B13. Length adjuster of top tether
B14. ISOFIX
Pay attention to the proper preservation of seat parts. If any parts are missing, please
contact your seat supplier. The child safety seat with missing components or damaged
cannot be used.
Page 13

Group 0+ Installation method
Installation of chair's ISOFIX system
Choose the appropriate installation mode
(according to the child's weight to choose the installation mode)
ISOFIX
C1. Press the ISOFIX release button at the bottom of the seat and push the ISOFIX
connector back as hard as possible.
C2. Push the ISOFIX connector into the anchor point of the vehicle, meanwhile
hear two "click" sounds.
C3. When the ISOFIX adjustment button is green, indicating that the seat is
installed in place. If it is red, please follow the above steps to install it again.
C4. Push the seat back until it get close to the vehicle seat. Shake the seat to check
whether the seat is jammed or not, if the seat is swaying, or the ISOFIX connector
is loose, please follow the above steps to install again.
In accordance with the European standard < ECE R44 / 04 >, the safety seat is
divided into four groups.
Please select the installation method of the group corresponding to the
children's instant weight in combination with the children's situation.
See picture D.
Groups I, II, and III must be installed with ISOFIXand vehicle seat
belts. Do not only use vehicle seat belts! Do not use the top tether.
First of all, please check if there are ISOFIX fasteners at the intersection
between the backrest and the seat of the vehicle and if there is a Top Tether
anchorage. Please read your vehicle user's manual carefully, or contact your
vehicle manufacturer.
Some cloth covers of car seats are sensitive (e.g. velvet, leather, etc.) which may
have wear trace after long-term use of child safety seats, so it is recommended
to have a blanket or towel cover the vehicle seat when using your safety seats.
Page 14

E1. Adjust the angle to R-gear, rotate the chair to reverse, and install the ISOFIX
system.
E2. Refer to the picture to find the anchor point on the car, press the release
button on the Top Tether, and stretch the top tether to a sufficient length to hang
the top tether anchorage on the rear vehicle seat.
Note:
The top tether hook anchorage is typically permanently attached to the luggage or to
the vehicle floor.
E3. Hang on the top tether hook, tighten the top tether until the lock is displayed
in green.
E4. And shake the safety chair to check if it is secure.
Group 0+ Reverse installation complete
The 0 + group has 3 installation stress points when using the ISOFIX
and the Top Tether, please do not miss it!
Group 1 Installation method
F1. Rotate the seat to the forward direction and adjust the seat angle to 1st gear
and install the ISOFIX system.
F2. According to the child's weight, judge whether to remove the inner cushion or
not
F3. Pull out the three-point car seat belt to the maximum length.
F4. Insert the shoulder belt under the headrest and under the child's harnesses.
Take the belt from behind the cover and pass it in front.
F5. Fasten the car belt to the buckle until you hear the "click" sound and the
buckle is locked.
F6. Press the chair with one hand and tighten the safety belt with the other hand.
Shake the safety chair to check if it is firm.
F7. Group I Forward installation complete
When your child is less than 15 kg, please install the baby's cushion on the
child's safety chair. The seat cushion is designed to ensure the comfort of a
child with very small weight and to provide the necessary protection of
the child.
Before each use of the safety chair, make sure that the it is firmly installed
and that the car seat belt is not twisted.
Page 15

Harness system for Group 0+/Group I
G1. Press the harness adjustment button and pull on the shoulder straps.
G2. Press the red button on the buckle to open it and put your child in the
safety chair.
G3. Important! Position the ends of the left&right harness belts side by side.
G4. Insert the combined end of the harness belts into the buckle.
G5. The buckle is locked after hearing the "click" sound. Check if they are locked in the
correct position.
G6. Press the harness adjustment button and gently pull on the strap to
tighten the shoulder straps.
G7. Tighten the harness belts. The harness is tightened in the optimal position
when there is a 2 adult fingers distance from the child.
Adjust the tightness of the ve-point seat belt
H1. Press the harness adjuster button
H2.Relax: When holding the button, pull the two shoulder belt outward
(attention: it is not the shoulder pad attachment strap) at the same time
H3. Tighten: Pull out the harness adjustment belt outward.It is better to fit the two
fingers of the adult about the tightness between the shoulders and the baby's
body.
Unlock ISOFIX system and Top Tether strap
I1. Put your knees forward against the safety chair.
I2. At the same time, press the ISOFIX release button, pull the cantilever
backward, and release the ISOFIX system.
I3. Press the Top Tether release button and loosen the strap.
I4. Remove the top tether fixing hook gently.
For the safety of your child, please check that the five-point seat belt system is
securely tightend, that there are no distortions, knots or twisting of the belts.
The buckle of the harness must be securely fastened.
Non-violent disassembly.
Avoid damage to mechanism.
Page 16

Group II, III Installation Method
J1. Rotate the chair forward, adjust the angle of the chair to 1st-gear, and install
the ISOFIX system.
J2. Let the child sit in the chair, pass the seat belt through the three points above,
and fasten it.
J3. Tighten the three-point seat belt to ensure that the seat belt is not distorted.
Adjust the height of headrest
K1. Pull the handle behind the headrest.
K2. Pulling up hard can raise the height of the headrest.
K3. Pull up the handle and keep the headrest lock unlocked. Press the headrest
down firmly to lower the height of the headrest.
K4. The appropriate headrest height is when the shoulder strap of the seat belt passes
over the child's clavicle.
Hidden 5-point seat belt (switch to group II, group III)
L1. Release the 5-point harness buckle
L2. Insert the buckle through the lining and hide it in the space provided under the
cover.
L3. Pull the back liner using the clips on both sides.
L4. Hide the shoulder pads behind the back cover of the chair.
L5. Unlock the piece behind the chair, open the gluing hook on the front shoulder pad
and remove the shoulder pad.
L6. Lift the cloth cover and close the buckle to make sure it is locked.
L7. Place the lock into the buckl storage hole at the bottom of the seat.
L8. Recover the cloth cover, tighten the belt properly to avoid over-tighten-ing,
which will affect the normal use.
Groups II and III cannot be adjusted except for the 1st gear to use other angles!
Please ensure that the pelvis position of the child is restrained well when the
belt is fasten!
Page 17

Rotate/Switch the direction of child car seat
The chair body of the safety seat can be rotated 360° based on the base. Four of
these directions can be fixed.
M1. Reverse: Applicable to group 0+, other groups are not available.
M2. Forward: Applicable to Group I, Group II, Group III; Prohibition of use of Group
0+.
M3. Lateral: It is used for children to sit conveniently. Can only be used when the
vehicle is stopped; Do not use after vehicle start-up.
N1. Pull the rotary locking handle in front of the seat base to unlock the direction
of the chair body.
N2. Rotate the body of the chair and select the direction.
N3. Release the lock handle, when the seat is rotated to the left or right 90 degrees
or forward and reverse, hearing the “click” sound means the gear locked.
N4. Shake/ rotate left and right, and confirm that the rotating mechanism has been
firmly locked.
Chair direction switching complete.
Do not use the safety seat in the unlocked direction; check the seat
direction is locked before driving on the road.
Adjust the chair angle
O1. Find the red angle adjustment lever on the bottom of chair.
O2. Pull the angle adjusting lever up and you can adjust the angle of the seat, then
push it into the gear you want; after hearing the "click" sound, the gear is locked.
O3. Safety chair has forward 4th gear + reverse 1st gear angle adjustment.
Adjust the chair to the blue “reverse” gear when in reverse installation. Only
the correct angle can protect the spine of the newborn baby best .
Remove the chair cover
P1. Unlock the piece behind the chair, open the gluing hook on the front shoulder pad
and remove the shoulder pad.
Page 18

Install the chair cover
Repeat the process in reverse order.
Safety seat advices
In case of accident
Maintainance
- Please check if the seat parts are complete and the seat condition is good in
order to reduce the accident probability.
- Before use, please pull the belt firmly to bring the detection belt buckle loose.
- Do not place the seat in a cold or overheated, humid environment for a long
time.
- Please keep this manual for inspection at any time.
In the event ofafierce collision and accident, please replace the baby seat with a
new one. If any other questions, please contact the manufacturer.
If there is a slight stain on the surface of the chair or the buckle, gently wipe it
with a sponge with a neutral cleaning agent.
The 5 point buckle is an important safety component. Do not soak 5 point belt
buckle in liquid. If there is dirt in the buckle, please contact your dealer.
Seat belt cleaning: You can use warm water diluted neutral detergent solution to
wipe the car seat belts, do not let the liquid in contact with the metal parts of the
belts.
Do not machine wash or machine dry and do not iron the cover or other parts.
Excessive scrubbing will destroy the cloth surface and the sponge layer.
The child seat must not be used without the seat cover.
Note: The Child restraint system (safety chair) cannot be used without the
cover.
P2. Pass the buckle lock bolt through the buckle pad, and then foist the lock into the
cloth cover.
P3. Raise the headrest to the highest position and remove the head cover.
P4. Remove the seat cover from the bottom to the top.
Page 19

Page 20
RO
NOTA:
1. Acesta este un scaun auto cu sistem ISOFIX. Este aprobat conform cerințelor
Standardului European privind dispozitivele pentru Siguranța Copiilor: Regulamentul
nr. 44, seria 04 de modificări pentru utilizare generală în vehiculele dotate cu sisteme
de ancorare ISOFIX.
2. Este potrivit vehiculelor cu poziții aprobate ca poziții ISOFIX (așa cum este detaliat
în manualul vehicului), în funcție de categoria scaunului pentru copii și de sistemul
de fixare.
3. Grupa de marime și clasa ISOFIX pentru care este destinat acest dispozitiv sunt:
grupa 0+, D
Acest scaun auto pentru copii este clasificat pentru utilizare "(semi-universală)" și este
potrivit pentru fixarea în pozițiile scaunelor mașinii astfel:
Consultați lista
vehiculelor
MAȘINA FAȚĂ SPATE
Da
Centru
Da Nu
Pasager
Pozițiile scaunelor în alte mașini pot fi, de asemenea, potrivite pentru a accepta acest
scaun auto pentru copii. Daca nu sunteți sigur, consultați fie producătorul scaunului
auto, fie vânzătorul.
- Scaunul auto este potrivit doar daca autovehiculul are în dotare centuri de siguranță
retractabile în 3 puncte, omologate conform standardului ECE R16.
- NU UTILIZAȚI SCAUNUL AUTO CU SPATELE LA DIRECȚIA DE MERS PE SCAUNELE
AUTOVEHICULULUI PREVAZUTE CU SISTEM DE SIGURANȚA AIRBAG.
- Acest scaun auto pentru copii nu poate fi utilizat cu fața catre direcția de mers până
când copilul nu atinge greutatea de 9 kg (vezi instrucțiunile de utilizare).
- Scaunele din spatele autovehicului sunt cele mai sigure poziții ale vehiculului pentru
copii sub 12 ani. Acest produs trebuie instalat pe scaunule vehiculului orientate spre
față. Nu instalați scaunul auto pentru copii pe scaunele vehiculului orientate lateral
sau spre spate. Dacă aveți îndoieli cu privire la instalare, vă rugăm să verificați
manualul de utilizare al vehiculului sau să contactați furnizorul vehiculului.
Table of contents
Languages:
Other juju Car Seat manuals

juju
juju Fun Racer User manual

juju
juju Safe Rider User manual

juju
juju Pro Rider User manual

juju
juju Total 360 User manual

juju
juju Fun Racer User manual

juju
juju Baby Boo User manual

juju
juju Young Rider User manual

juju
juju Little Rider User manual

juju
juju Navi Safe User manual

juju
juju Gladiator User manual