JUKI LK-1850 Series User manual

•JUKI
HIGH-SPEED
1-NEEDLE
CYLINDER
BED
LOCKSTITCH
BAR
TACKING
INDUSTRIAL
SEWING
MACHINE
LK-1850
INSTRUCTION
MANUAL
CAUTIONS
BEFORE
OPERATION
BE185030B0A
Congratulations on
your
purchase
of
a JUKI
sewing machine.
To get the most
out
of
many functions
of
the
machine
and
operate
it in safe^, it is
necessary
to
use the
unit
correctly, so please read this Instruc
tion Manual carefully before using it.
We
hope
you will enjoy using it for a long time. It is also
necessary to keep this Instruction Manual taking
care
not
to
lose
it.
Rubber
plug'
2.
The
sewing
machine
should
run
in
the
arrowed
direction.
Never
allow
the
machine
to
run
in
the
reverse
direction.
3.
Remove
the
rubber
plug. If
the
felt
placed
inside has
dried,
lubricate
the
machine
referring
to
the
description
given
in
"9.
Lubrication".
m
4. Before starting amachine which has been newly set up or has
not
been used for a long period of time, apply a few drops
of
the
lubricating oil to main shaft components through hole Q , one drop to the racing surface O of
the
shuttle race,
and infiltrate sufficient amount of
the
lubricating oil
to
the machine bed oil felt O .
CAUTIONS
IN
OPERATION
X A 9 a
1. Do
not
place
your
fingers near
the
work
clamp
foot
while
the
machine
is in
operation.
3.
Never
bring
your
fingers or
hair
close
to,
or
place
any
thing
on
the
handwheel,
V-belt,
bobbin
winder
wheel
or
motor
during
operation.
It
may
lead
to
serious
personal
injuries.
Belt
cover
2.
Make
sure
to
turn
off
the
power
switch
before
removing
the
belt
cover.
4. If
your
machine
is
provided
with
a
belt
cover,
finger
guard
and
eye
guard,
never
operate
your
machine
with
any
of
them
removed.
From the library of: Superior Sewing Machine & Supply LLC

1.
NSTALLING
THE
MOTOR
a
2.
INSTALLING
THE
THREAD
STAND
I
1. Attach motor base e to table O using bolt
O,
vibration-proof rubber pad 0 , washer
0,
spring
washer 0 , and nut 0 .
2. Using bolt 0 , washer
(£)
, spring washer 0 , and nut
® , install motor 0 to motor base
0.
Assemble
the
thread
stand,
and
set
it in
the
hole
in
the
table.
Tighten
nut
0 to fix
the
thread
stand.
If
ceiling
wiring
is
made,
pass
the
power
cord
through
spool
rest
rod
9.
3.
REMOVING
THE
BELT
COVER
To remove
the
belt cover, loosen screw 0 and tilt
the
belt
cover
away
from
you
until
it
comes
off
then
lift
it.
★
Install the belt cover by reversing the above
procedure.
4.
RAISING
THE
MACHINE
HEAD
1.
Remove
the
belt
cover.
With
the
machine
head
set
in
its
installing
position on
the
machine table, raise
the
machine head in direction
© while pushing down (in direction) 0 ) bed locker 0 .
2. Releasing
the
bed locker, further raise
the
machine head in direc
tion
©
until
it
locks.
*
To
lower
the
machine
head,
push
up
the
bed
locker
to
release
the
lock.
5.
INSTALLING
THE
MACHINE
HEAD
-2-
1. Install bed mounting base 0 to machine table 0
using bolts 0 , flat washers 0 and O , and nuts
0
(each
3pcs.).
2. Fix
point
0
before
raising
the
machine
head.
Then
fix
two
points
© .
From the library of: Superior Sewing Machine & Supply LLC

6.
ATTACHING
THE
IDLER
PULLEY
7.
MOTOR
PULLEYS
AND
BELTS
Fix idler pulley O
to
mounting
plate O by setscrew
(Caution) Adjust
the
clearance
at
O
to
just
allow
the
Vbelt
to
pass It
through.
1. M-type V
belts
are
used
for
this
model
of
sewing machine.
2. This sewing machine uses two V belts, one for high-speed sewing, and
the
other
for low-speed sewing.
3.
The
table
below
shows
the
relation
between
the
motor
pulleys,
V
belts,
and
sewing
speeds.
Frequency
Sewing
speed
Motor
pulley
part
No.
Engraved
mark
High-speed V
belt
Low-speed
V
belt
50
Hz
2300
s.p.m.
*13531108
50-2300
MTJVM005000
(50")
MTJVM004600
(46")
2000
*13531207
50-2000
MTJVM004900
(49")
1800
13531306
50-1800
MTJVM004800
(48")
60
Hz
2300
*13531405
60-2300
MTJVM004900
(49")
MTJVM004600
(46")
2000
*13531504
60-2000
MTJVM004800
(48")
1800
13531603
60-1800
MTJVM004800
(48")
Note: The
motor
pulleys marked with asterisks are applicable
only
to
cotton
thread.
Please
order
the
motor
pulleys
for
threads
other
than
cotton
thread.
ir Installing
the
motor
pulley
Set
motor
pulley O
onto
motor
shaft O so
that
one of two setscrews e meets the flat part of
the
motor
shaft. Then tighten setscrews O .
-3
-
iD
2.
6.
Attaching
the
belts
Set high-speed V belt O
on
the
large
diameters
of
high-speed pulley ^
and
the
motor
pulley.
Set low-speed V belt 0 on
the
small
diameters
of
low-
speed pulley 0 and
the
motor
pulley
through
pres
sure decreasing pulley O
and
idler pulley 0 .
Move
the
motor
pulley
back
or
forth
to
provide
a 2
to
3mm
clearance
between
high-speed
V belt O and
bobbin
winder wheel 0 .
Loosen setscrew
0,
and
move
the
motor
to
the
right
or
left
to
make
adjustment
so
that
the
high-speed
V
belt
comes
evenly
in
contact
with
the
bobbin
winder
wheel
when
the
bobbin
winder
is
used
(refer
to
"15.
Winding a
bobbin").
Loosen
setscrew
0 ,
and
move
motor
base 0
up
or down by, adjusting
nut
0
to
perform
adjustment
so
that
the
high-speed
V
belt
slacks
about
10mm
when
you
push
the
belt
at
middle o
Loosen
setscrew
0 ,
and
move idler pulley 0 in
the
arrowed
direction
to
perform
adjustment
so
that
the
low-speed
V
belt
slacks
about
10mm
when
you
push
the
belt
at middle 0 .
(At
this
time,
set
the
idler
pulley so
that
it is aligned
with
engraved
marker dot 0 on
the
installing
plate.)
From the library of: Superior Sewing Machine & Supply LLC

8.
ATTACHING
THE
CHAIN
Hook S-shaped hook 0into the hole in the tip of
starting lever O , and
attach
chain O to
the
S-
shaped
hook.
9.
LUBRICATION
Supply
Supply
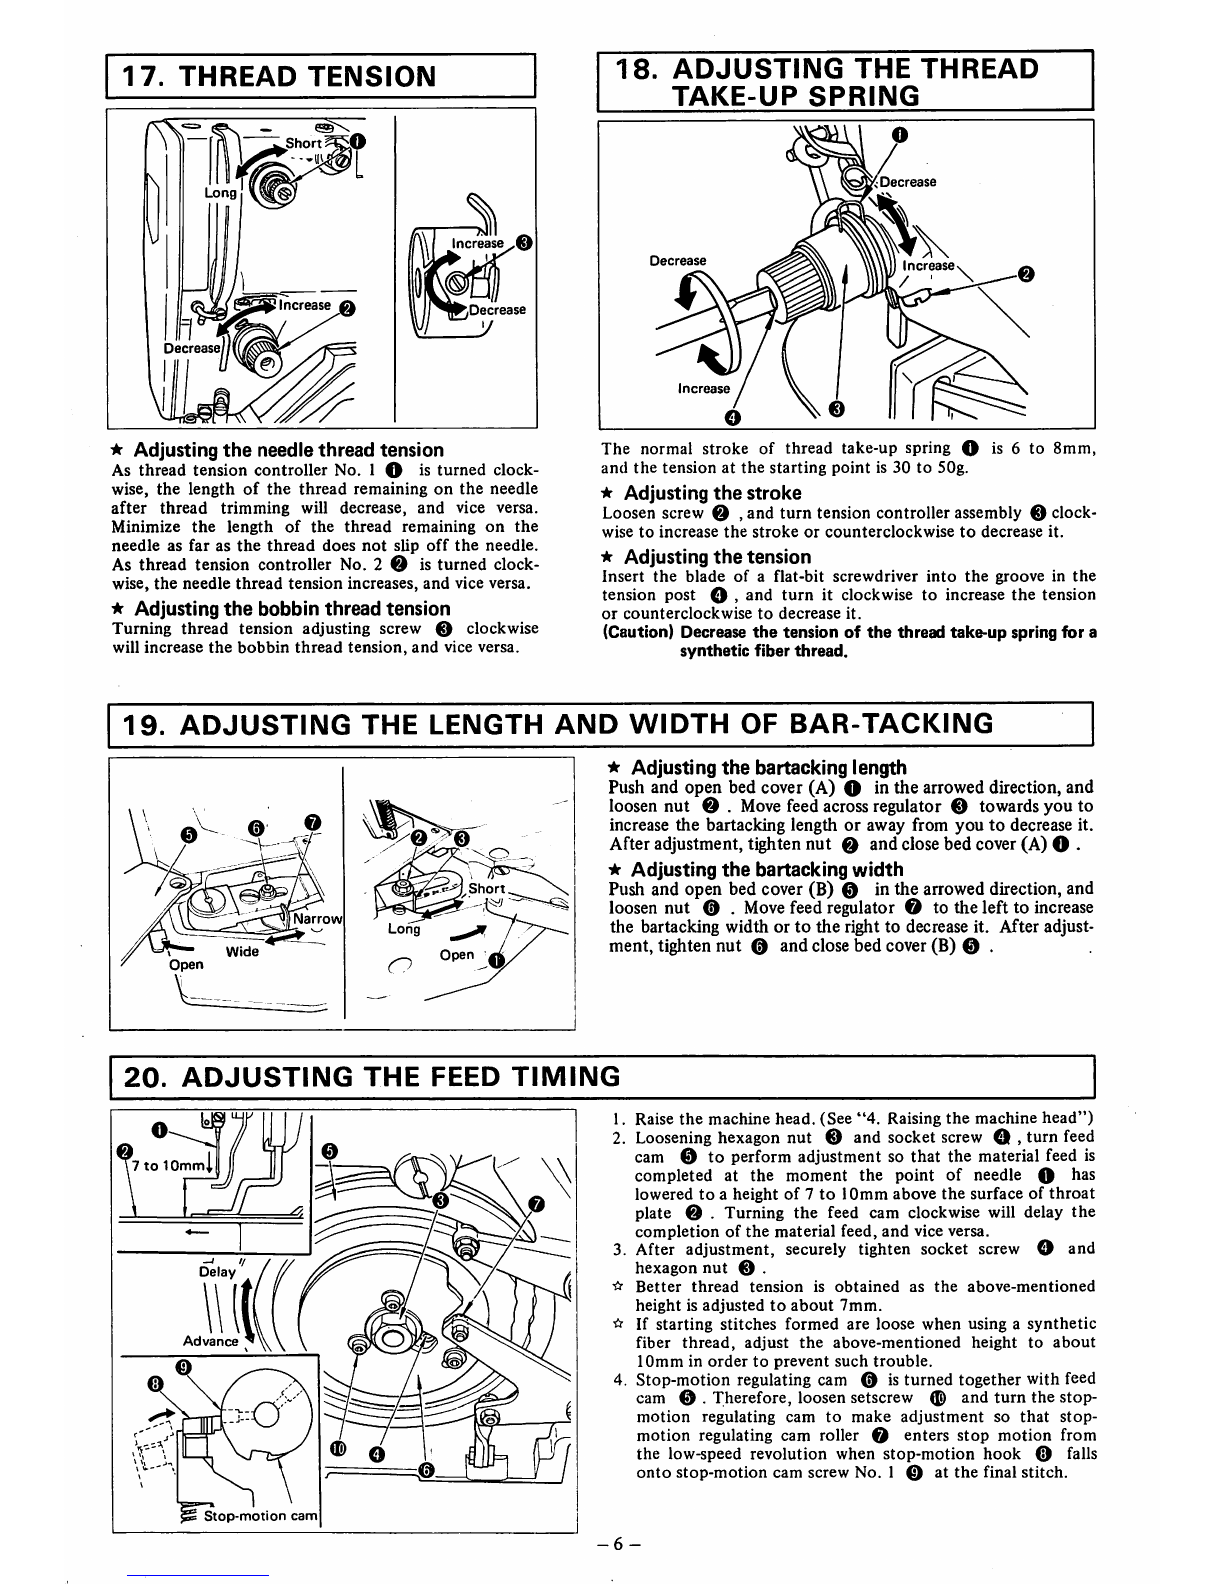
1. Lubricate the machine once a day from lubrication hole O . The
machine can also be lubricated by removingrubber plug O .
2. Use Juki New Defrix Oil No. 2 or spindle oil No. 2 as the lubricating
oil.
* When using
the
thread
guide (optionally available)
Supply silicone oil through silicone oil lubricating hole 0 when using
thread guide
0,
At this time, check
that
the
thread which has passed through thread
guide 0 has
the
silicone oil
on
it.
10.
OPERATING
THE
SEWING
MACHINE
Operate
the
sewing
machine
in
the
following
procedure:
1.
Turn
on
the
power
switch.
2. Depress the starting pedal a little, and the work clamp foot will come down. When you want to make the work clamp foot
go
up,
release
the
pedal.
3. Further depress the pedal, and
the
sewing machine starts bar-tacking. Immediately after the sewing machine starts bar-tacking,
release
the
pedal.
4. When the machine has completed the specified bar-tacking cycle, the work clamp foot will automatically
go*
up, and the
needle
and
bobbin
threads
are
trimmed
before
the
machine
stops.
(Cautions) 1. Be sure to
release
the pedal as soon as the machinestarts bar-tacking, or
else
the
machine will
not
stop
at
the
predetermined point.
2. If you fail to depress the pedal sufficiently, the machine may stop at the
first stitch. In this case, depress
the
pedal gain sufficiently.
3. If
the
machine will not start evenwhen you depress it strong enough, turn
of the power switch, and remove the belt cover. Then turn changeover
pulley
0
(Knurled
part)
in
the
arrowed
direction
of
low-spe^
pulley
0
4. This
sewing
machine may run rather unsmoothly on a cold morning
because it uses grease for the lubrication of several parts. In such a case,
allow
the
machineto idlefor 5 or 6 times before starting
the
work.
^ To
operate
the
sewing maclne manually;
Turn off the power switch, remove the upper end of spring 0 , give low-speed pulley
0 two turns in the arrowed direction and the work clamp foot willcomedown. Then
depress
the
starting pedal, and
the
machine can be run manually.
11.
MATERIALS
AND
NEEDLES
TO
BE
USED
Material
Needle
Needle plate needle hole guide
Class
or
work
Extra
light-weight
material
#11
(DPx5)
D2426282C00
Knit
goods,
tricot
wear
Synthetic
fiber
material
#14
(DPx5, SUPER needle)
B2426280000
(standard)
Men's
suits.
Ladies'
wear
Medium-weight
material
#16(DPx5)
B2426280000
(standard)
Men's
suits.
Ladies'
wear
Heavy-weight
material
#18(DPx5)
B242628O0OO(standard)
Working
wear,
overcoats
-4-
From the library of: Superior Sewing Machine & Supply LLC

12.
ATTACHING
THE
NEEDLE
Loosening setscrew O , insert needle 0 fully into
the
needle
bar
hole
with
the
long
groove
of
the
reedle facing towards you, then tighten setscrew
0.
(Cautions) 1. If
the
bar-tacking stitches as O
shown
above
are
produced,
install
the
needle
so
that
It
slightly
faces
to
the
left.
2.
Use a
SUPER
needle
for
synthetic
fiber
when
sewing
with
synthetic
fiber
thread
or
material.
14.
REMOVING
AND
INSTALLING
THE
BOBBIN
CASE
1. Open cylinder arm cap O .
2.
Raise
and
hold
the
latch
lever
of
bobbin
case
to
take
it
out.
The
bobbin
in
the
bobbin
case
does
not
fall as
far
as
latch
lever 0 is raised
and
held.
3.
To
load
the
bobbin
case
into
the
shuttle,
fit
it
onto
he
shaft
of
the
shuttle
and
snap
in
the
latch
lever
of
te
bobbin
case.
16.
THREADING
THE
BOBBIN
CASE
2.5cm
1.
Hold
bobbin
O in
hand
so
that
it
spins
counter
clockwise and set it in
bobbin
case 0
2. Pass
the
thread
through
slot
0 in
the
bobbin
case.
Pull
the
thread
to
pass it
under
the
tension
spring
out
to thread exit O . At this time, con
firm
that
the
bobbin
spins
in
the
arrowed
direc
tion
when
the
thread
is
pulled.
3. Pass
the
thread
through
hole 0 ,
and
allow
the
thread
to
trail
about
2.5cm
from
the
hole.
13.
THREADING
THE
MACHINE
Thread
the
machine
in
the
order
as
shown
above.
Leave
thread
of
approx.
4cm
on
the
needle.
(Cautions) 1. If
the
machine is equipped with a silicon oil
lubricating
unit,
pass
the
thread
through
thread
guide O of
the
silicon oil lubricating unit. (The
silicon oil lubricating
unit
isoptionally available.)
2.
For
a
thick
thread,
pass
the
thread
through
only
one
of
the
two
holes
in
needle
bar
thread
guide
0.
15.
WINDING
A
BOBBIN
1. Attach bobbin O to bobbin winder spindle 0 .
2.
Thread
the
winder
in
the
order
as
illustrated
and
wind
the
thread
onto
the
bobbin
four
or
five
turns.
3. Push bobbin winder trip latch 0towards the bobbin (in
the
arrowed direction), and
the
winder starts
to
wind
the
bobbin. The
winder will automatically
stop
as
soon
as it has
wound
a
predeter
mined
amount
(80%
of
the
capacity
of
the
bobbin)
of
thread
round
the
bobbin.
4. To
adjust
the
amount
of
thread
wound
round
the
bobbin,
loosen
nut o and screw in adjusting screw 0 to decrease the thread
amount.
6.
If
the
thread
is
not
wound
evenly
round
the
bobbin,
loosen
screw
0 and move bobbin winder base 0 in the arrowed direction to
make
adjustment.
(Caution) Ensure
to
use
the
genuine JUKI
bobbin
case and bobbin.
-5-
From the library of: Superior Sewing Machine & Supply LLC

17.
THREAD
TENSION
Short
\j
Increas^©
ncrease
Decrease
^
Adjusting
the
needle
thread
tension
As
thread
tension controller No. 1 O is
turned
clock
wise,
the
length
of
the
thread
remaining
on
the
needle
after
thread
trimming
will
decrease,
and
vice versa.
Minimize
the
length
of
the
thread
remaining
on
the
needle
as
far
as
the
thread
does
not
slip
off
the
needle.
As
thread
tension
controller
No. 2 0 is
turned
clock
wise,
the
needle
thread
tension
increases,
and
vice
versa.
*
Adjusting
the
bobbin
thread
tension
Turning
thread
tension
adjusting
screw
0
clockwise
will
increase
the
bobbin
thread
tension,
and
vice
versa.
18.
ADJUSTING
THE
THREAD
TAKE-UP
SPRING
Decrease
Decrease
ncrease
Increase
The
normal
stroke
of
thread
take-up
spring O is 6 to
8mm,
and
the
tension
at
the
starting
point
is
30
to
50g.
ir
Adjusting
the
stroke
Loosen screw 0 , and
turn
tension controller assembly 0clock
wise
to
increase
the
stroke
or
counterclockwise
to
decrease
it.
*
Adjusting
the
tension
Insert
the
blade
of
a
flat-bit
screwdriver
into
the
groove
in
the
tension post O , and
turn
it clockwise to increase
the
tension
or
counterclockwise
to
decrease
it.
(Caution) Decrease
the
tension of
the
thread take-up spring for a
synthetic
fiber
thread.
19.
ADJUSTING
THE
LENGTH
AND
WIDTH
OF
BAR-TACKING
!/0:^
Short
Narrow
Open
•
*
Adjusting
the
bartacking
length
Push and open bed cover (A) O in the arrowed direction, and
loosen nut 0 .
Move
feed acrossregulator 0 towardsyou to
increase
the
bartacking length or away from
you
to
decrease it.
After adjustment, tighten nut 0 and closebed cover(A) O .
-k
Adjusting
the
bartacking
width
Push and open bed cover (B) 0 in the arrowed direction, and
loosen nut 0 .
Move
feed regulator 0 to the left to increase
the bartacking width or
to
the right to decrease it. After adjust
ment, tighten nut 0 and close bed cover (B) 0 .
20.
ADJUSTING
THE
FEED
TIMING
Advance
Stop-motion
cam
1. Raise
the
machine
head.
(See
"4.
Raising
the
machine
head")
2. Loosening hexagon nut © and socket screw Q , turn feed
cam 0
to
perform adjustment so
that
the
material feed is
completed
at
the
moment
the
point
of
needle 0 has
lowered
to
aheight
of
7
to
10mm
above
the
surface
of
throat
plate 0 . Turning
the
feed cam clockwise will delay
the
completion
of
the
material
feed,
and
vice versa.
3. After adjustment, securely tighten socket screw O and
hexagon
nut
0 .
Better
thread
tension
is
obtained
as
the
above-mentioned
height
is
adjusted
to
about
7mm.
•ir
If
starting
stitches
formed
are
loose
when
using
a
synthetic
fiber
thread,
adjust
the
above-mentioned
height
to
about
10mm
in
order
to
prevent
such
trouble.
4.
Stop-motion
regulating cam 0 is
turned
together
with
feed
cam 0 . Therefore, loosen setscrew 0 and
turn
the
stop-
motion
regulating
cam
to
make
adjustment
so
that
stop-
motion
regulating cam roller 0enters
stop
motion
from
the
low-speed
revolution
when
stop-motion
hook
0 falls
onto
stop-motion
cam screw No. 1 0 at
the
final
stitch.
-6-
From the library of: Superior Sewing Machine & Supply LLC

21.
NEEDLE-TO-SHUTTLE
RELATION
'0
0.3
~
0.5mm
j-ii
0.05
~
0.1mm
(Adjusting
the
height
of
the
needle
bar)
1.
Turn
the
changeover pulley by
hand
to
bring needle
bar
O to
the
lowest position
of
its
stroke
(see
'To
operate
the
sewing
machine
manually").
2.
Remove
the
rubber
cap,
and
loosen setscrew 0 .
3.
Turn
the
driving
pulley
by
hand
to
make
upper
marker
line Qengraved
on
the
needle
bar
meet
the
bottom
end
of
lower
bushing 0 of the needle bar.
Ti^ten
setscrew 0 .
(Positioning
the
shuttle)
4. Further
turn
the
driving pulley until lower marker line © engraved on needle bar O meets
the
bottom
end
of
lower bushing
©
of
the
needle bar.
5. Loosen shuttle driver setscrew O , and open shuttle race latches 0 to the right and left, respectively while pulling them
towards you to remove shuttle race ring 0 .
(Caution)
At
this time, be careful
not
to
allow
shuttle
7'
to
fall.
6. Perform
adjustment
so
that
no clearance is provided
between
the
needle and
the
front
end of
shuttle
driver 0 when
the
blade point of shuttle 0 is aligned with center 0 of needle 0 . Then tighten shuttle driver setscrew O .
(Caution) At this time, be very careful
not
to
cause
the
shuttle race
to
slip in
the
direction of
rotation.
7. Loosening setscrew © ,
turn
shuttle race adjusting shaft ©clockwise or counterclockwise for adjustment to provide a
0.05 to
0.1mm
clearance between needle 0 and shuttle 0 ,
then
tighten setscrew © .
8.
After
adjustment,
install
shuttle
race ring 0 .
22.
ADJUSTING
THE
THREAD
TENSION
RELEASE
TIMING
4mm
-7-
1. Remove five setscrews O to
take
off
top
cover 0 .
2. Loosen socket screw Q
of
tension arm 0 by L-shaped
wrench 0 , and
turn
the tension arm to make adjustment
so
that
a
4mm
clearance
is
provided
between
the
end
of
connecting rod 0 and
that
of
tension post support plate
0 when the work clamp foot is up (when connecting
rod
0 is
retreated).
3. After adjustment, securely tighten socket screw O •
From the library of: Superior Sewing Machine & Supply LLC

23.
ADJUSTING
THE
THREAD
TRIMMER
0.5mm
Throat
plate
1. Remove starting lever tension spring O , and start the
machine.
(The
work clamp
foot
stays
down
when
the
machine
stops.)
2. Loosen adjusting screw O and adjust the position of
moving knife © in the arrowed direction to align hole
O of the moving knife with the needle hole in needle
hole
guide
0 .
3. Loosen setscrew 0 and
adjust
the
position
of
counter
knife 0 to provide a 0.5mm clearance between needle
hole guide 0 and counter knife e
24.
ADJUSTING
THE LATERAL POSITION OF THE WORK
CLAMP
FOOT
26th
stitch
(for
42-stitch
large
bar-tacking
18th
stitch
(for
28-stitch
large bar-tacking)>
Loosen nut 0 , and move feed across regulator in direction
© to shift lateral center O of work
clamp
foot O to the
right or in direction ® to shift it
to
the
left.
★
For
42-stitch bar-tacking, adjust
the
lateral
center
at
the
26th
stitch.
★
For
28-stitch bar-tacking, adjust
the
lateral
center
at
the
18th
stitch.
(Caution) To correct a slight deviation of
the
lateral feed
center, loosen
the
nut
described in
"19.
Adjusting
the
length and width
of
bar tacking", and push
the
work
clamp
foot
to
the
right or
left
by hand
to
make
adjustment.
25.
ADJUSTING
THE
LIFT OF
THE
WORK
CLAMP
FOOT
Max.
17mm
The
lift of
the
work clamp
foot
can be adjusted up to
17mm.
1. With the machine in stop mode, remove fivesetscrews O
take off top cover 0 .
2.
Apply
L-shaped
wrench
0 to
socket
screw
0 of
clamp
O,
and
loosen
socket
screw.
3. Push down L-shaped wrench 0 to increase the lift of the
work clamp foot, or pull it up to decrease the lift.
4. Securely tighten socket
screw
0 after adjustment.
5. If the right and left work clamp feet are not levelled,loosen
screw 0 and adjust the position of work clamp foot lever
support plate 0 to levelthem.
(Caution) Be careful not
to
cause work clamp
foot
lever support
plate 0 to interferewith feed bracket 0 .
If the work clamp foot lever support plate interferes
with the wiper, readjust the heightof the wiper
using
setscrew
® .
-8-
to
From the library of: Superior Sewing Machine & Supply LLC

26.
ADJUSTING
THE
SAFETY
PLATE
(Work
clamp
foot
"up")
a
0.2
~
0.5mm
(Work
clamp
foot
"down")
ri.5
~
2.5mm
1
0
Loosening two setscrews O , perform adjustment so that a 0.2 to
0.5mm lateral clearance is provided between safety plate O and
lifting lever 0 when the work clamp foot is up at the time of
stop motion, and a 1.5 to 2.5mm longitudinal clearance between
them when the work clamp foot is down.
-9-
1.5
~
2.5mm
2. Check that
the
longitudinal clearance between
safety plate O and lifting lever 0 is 1.5 to
2.5mm during the high-speed bar tacking (the work
clamp
foot
is
down).
From the library of: Superior Sewing Machine & Supply LLC

27.
SPECIFICATIONS
1
—-—
Standard
Subclass
Model
LK-1850
LK-1852-5
LK-1854-10
LK-1852-20
LK-1852-30
LK-185440
Application
Large
size
bar
tacking
•«-
»1
Attaching
band
loops
♦1
4—
♦1
4-
*1
4-
Sewing
speed
(s.p.m.)
1800
•<-
<-
4-
4-
4-
Stitching
pattern
42
1
<itt
f I
tfixiiftxr
28
VA K K h K \
1^ 1 11
WtfMM
RWWVri 21
28 28
42
Number
of
stitches
42
28
21
28
4-
42
Bar
tacking
width
(mm)
1.5
~ 3
•<-
0
4-
4- 4-
Bar
tacking
length
(mm)
I
00
6.5
-
14
(standard
14)
6.5
-
14
(standard
14)
13-
25
(standard
25)
*2
18-35
(standard
25)
Needle
DPx5
#14,
#16
•<-
4—
4-
4-
4-
Work
clamp
foot
lift
(mm)
Max.
17
<-
-4-
4-
4-
4—
Lubricating
oil
Juki
New
Defrix
OU
No.
2-
4-
4-
4-
— . ^
Subclass
Model
LK-1854-6
LK-185
2-3
LK-1854-4
LK-1852-1
LK-1854-11
LK-1852-2
Application
Knit
goods
bar
tacking
*3
Buttonhole
bar
tacking
4-
Small
size
bar
tacking
4-
Sewing speed (s.p.m.)
1800
4-
4-
4-
4-
Stitching
pattern
Iv
A ^ A
A4
28
f.AAA/VA AAf m A A A yi
28
FA A A A A A M m A A A /
28
lAA A
AA\Af
PvVVV|VVV» ^ y Y
kVvVVyV\
V V V
VI
y[YY
VY VVM
Number
of
stitches
21
28
21
28
21
28
Bar
tacking
width
(mm)
1.3-3
(standard
2.5)
<-
1.5
- 3
(standard
2.5)
4-
4-
4-
Bar tacking length
(mm)
4-8
(standard
6.5)
-
4-8
(standard
6)
4-
4-8
(standard
8)
4-
Needle
DPx5
#11
<-
DPx5
#14,
#16
4-
4-
4-
Work
clamp
foot
lift
(mm)
Max.
17
<—
4-
4-
4-
Lubricating
oil
Juki
New
Defrix
Oil
No.
2-
<—
4—
4- 4-
Edge
of
table
I
Motor
^<
74mm
"I
A
Belt
hole
Starting
pedal
shaft \ / ! i
Starting
pedal
lever
J |
(Viewed
from
the
bottom
of
the
table)
*1. The machine head of
the
band-loop attaching machine is
installed sideways. See the figure at left and use the pedal
shaft supplied with the machine for easierpedal operation.
♦2.
For
bar-tacking
of 25to
35mm
length,
use
feed
plate
(part
No.
13547005)
and
work
clamp
foot(part
No.
13547112).
»3. This modelof bar-tacking
machine
is
designed
to
make
the work
clamp
feet automatically
close
from the right and left of
an
eyelet
buttonhole
(closing
width
adjustable
from
0 to
4mm),
thus
preventing
the
button-hole
from
opening
when
bar-
tacking
the
end
of
the
eyelet
buttonhole.
★
By
replacing
the
pedal
pressure
decreasing
unit
(asm)
(part
No.
13523188)
withthe
P-type
pedal
pressure
decreasing
unit
(asm) (part No. 13545959), the work clamp foot lifting operation can be
changed
from the standard one-pedalsystem to
two-pedal
system.
-
10
From the library of: Superior Sewing Machine & Supply LLC

28.
TROUBLES
AND
CORRECTIVE
MEASURES
Trouble
Cause
Corrective
measures
Page
1.
The
needle
thread
slips
off
the
needle
at
the
start
of
bar-
tacking.
0 Stitches are skippedat the start.
0 The needlethread remainingon the
needle
after
thread
trimming
is
too
short.
0 The bobbin thread is too short.
0 Thefeedtimingisbad.
o
Adjust
the
clearance
between
the
needle
and
the
shuttle
to
0.05
to
0.1mm.
o
Correct
the
thread
tension
release
timing
of
the
thread
tension
controller
No.
2.
o
Increase
the
tension
of
the
thread
take-up
spring,
or
decrease
the
tension
of
the
thread
tension
controller
No.
1.
o
Decrease
the
tension
of
the
bobbin
thread,
o
Increase
the
clearance
between
the
needle
hole
guide
and
the
counter
knife,
o
Correct
the
feed
timing.
7
7
6
6
8
•6
2.
Thread
often
breaks
or
synthetic
fiber
thread
splits
finely.
0 The shuttle or the driver has scratches.
0 The needleholeguidehasscratches.
0 The needlestrikes the work clampfoot.
0 Fibrousdust isin the
groove
of the
shuttle
race.
0 The needle thread tension is too high.
0 The tension of the thread take-up spring
is
too
high.
0 Thesynthetic fiberthread meltsdue to
heat
generated
on
the
needle.
o
Take
it
out
and
remove
the
scratches
using
a
fine
whetstone
or
buff.
O
Buff
or
replace
it.
o
Correct
the
position
of
the
work
clamp
foot.
o
Take
out
the
shuttle
and
remove
the
fibrous
dust
from
the
shuttle
race.
o
Reduce
the
needle
thread
tension.
o
Reduce
the
tension.
O
Use
silicone
oil.
8
7
6
6
4
3.
The
needle
often
breaks.
0 The needle is bent.
0 The
needle
hitsthe work
clamp
foot.
0 The feed timingis bad.
0 The
needle
istoo thin for the
material.
0 The driverexcessively bends the needle.
o
Replace
the
bent
needle,
o
Correct
the
position
of
the
work
clamp
foot.
o
Correct
the
feed
timing,
o
Replace
it
with
a
thicker
needle
according
to
the
material,
o
Correctly
position
the
needle
and
the
shuttle.
5
8
6
4
7
4.
Threads
are
not
trimmed.
0 The counter knife is dull.
0 The difference in levelbetween the needle
hole
guide
and
the
counter
knife is
not
enough.
0 The movingknife has been improperly
positioned.
0 Thelaststitch isskipped.
o
Replace
the
counter
knife,
o
Increase
the
bend
of
the
counter
knife.
o
Correct
the
position
of
the
moving
knife.
o
Correct
the
timing
between
the
needle
and
the
shuttle.
8
8
8
7
S.
Stitch
skipping
often
occurs.
0 The motions of the needle and shuttle
are
not
properly
synchronized.
0 The clearance between the needle and
shuttle
is
too
large.
0 The needle is bent.
0 The feed timing is bad.
0 The driverexcessively bends the needle.
o
Correct
the
positions
of
the
needle
and
shuttle.
o
Correct
the
positions
of
the
needle
and
shuttle,
o
Replace
the
bent
needle,
o
Correct
the
feed
timing,
o
Correctly
position
the
driver.
7
7
5
7
6.
The
needle
thread
comes
out
on
the
wrong
side
of
the
material.
0 The needle thread tension is not high
enough.
0 The tension release mechanism failsto
work
properly.
0 The needle thread after thread trimming
is
too
long.
o
Increase
the
needle
thread
tension.
o
Check
whether
or
not
the
tension
disc
No.
2 is
released
during
bar-tacking,
o
Increase
the
tension
of
the
thread
tension
controller
No.
1.
6
7
6
7.
Threads
break
at
time
of
thread
trimming.
0 The movingknife has been improperly
positioned.
o
Correct
the
position
of
the
moving
knife.
8
-11-
From the library of: Superior Sewing Machine & Supply LLC

29.
HOW
TO
SUPPLY
GREASE
TO
THE
REDUCER
•JUKI
JUKI
CORPORATION
HEAD
OFFICE
8-2-1
KOKURYO-CHO.
CHOFU-CITY.
TOKYO
182,
JAPAN
BUSINESS
OFFICE
1-23-3
KABUKI-CHO
SHINJUKU-KU.
TOKYO
160,
JAPAN
PHONE:
03(3205)1188, 1189, 1190
FAX: 03(3203)8260, 03(3205)9131
TELEX:
J22967,
232-2301
rSupply
grease
to the reducer in accordance with-i
the following procedure when the machine has
^been
used
for
more
than
half
year
or
ifit
chatters.
1. Stop the
machine
and
remove
screw O
2.
Uncap
grease
tube O supplied with the ma
chine, screw the tube
into
hole O , and push
the grease out of the tube.
3.
Removing
grease
tube O from Q , push in
the
grease
by screw O •
4. Repeat the step of injecting the grease and
pushing it in by
the
screw twice or so.
5. Tightenscrew O •
(Caution)
if
the
grease will
not
get
into
the
unit
smoothly,
screw in grease
tube
O ,
turn
on
the
motor
switch,
and
move
the
presser
foot
up
and
down
two
or
three
times using lever 0 . By doing this,
you
can
make
the
grease
get
into
the
unit
easily.
To
order
or for further information,
please
contact:
Please do not hesitate to contact our distributors or agents in your
area
for further information when necessary.
*The
description
covered
in
this
instruction
manual
is
subject
to
change
for
improvement
of
the
commodity
without
notice.
1993.
11
Printed
in
Japan
(T)
From the library of: Superior Sewing Machine & Supply LLC
Other manuals for LK-1850 Series
4
Table of contents
Other JUKI Sewing Machine manuals

JUKI
JUKI SC-921 User manual

JUKI
JUKI HZL-35Z User manual

JUKI
JUKI ACF-172-1790 User manual

JUKI
JUKI TL-98P perfection User manual

JUKI
JUKI AMS-215D User manual

JUKI
JUKI LH-3500A series User manual

JUKI
JUKI PLK-J10050R3 User manual

JUKI
JUKI MF-7900 Series Quick start guide

JUKI
JUKI DP-2100 User manual

JUKI
JUKI MF-7923 User manual

JUKI
JUKI DDL-8700-7 User manual

JUKI
JUKI LU-1565N User manual

JUKI
JUKI LS-1340 User manual

JUKI
JUKI HZL-30Z User manual

JUKI
JUKI MO-50e User manual

JUKI
JUKI HZL-80HP-C User manual

JUKI
JUKI DDL-8700L User manual

JUKI
JUKI LZ-2280N Series Quick start guide

JUKI
JUKI SC-20 Quick start guide

JUKI
JUKI AB-1351 User manual