JUPITERBIKE Discovery x5 User manual


1
Structural Diagram.........................................................2
Specications ....................................................................3
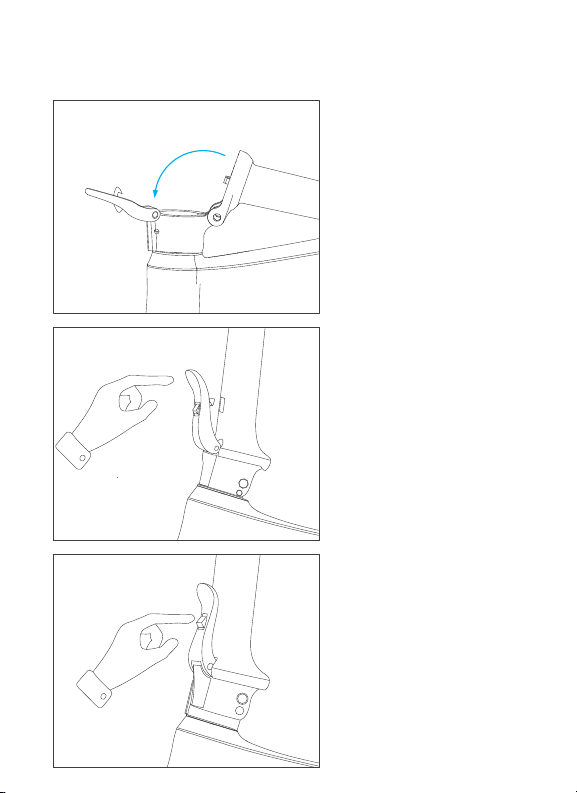
Unfolding The Bike Frame.........................................4
Unfolding the Handle Stem .....................................5
Installing The Handle ...................................................6
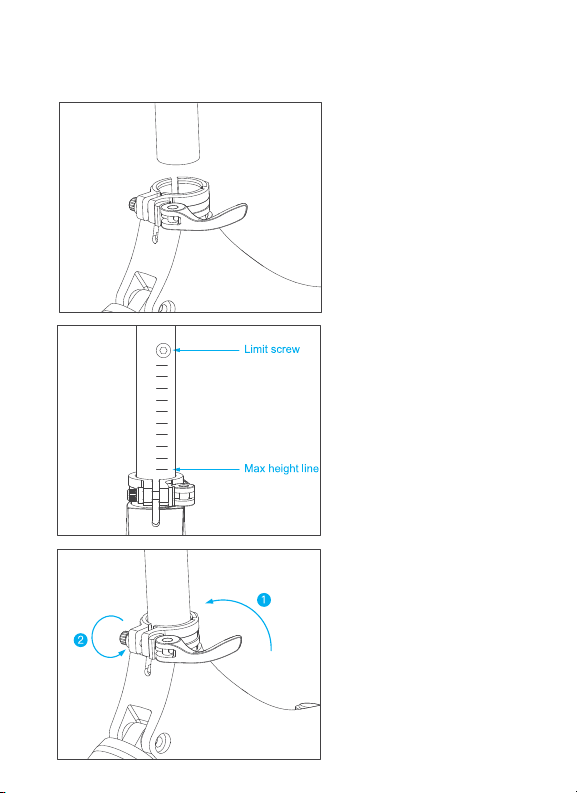
Installing The Seat Post ..............................................7
Unfolding the Pedals....................................................8
Battery and Charger Care..........................................8
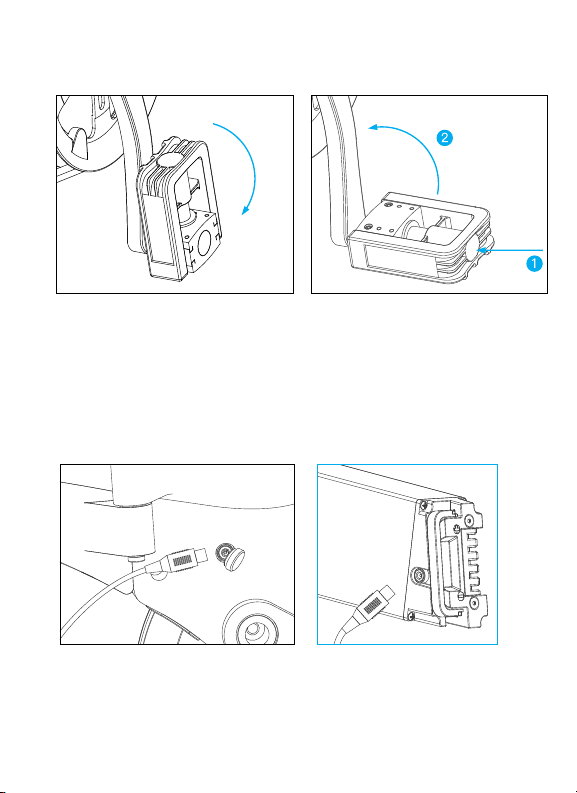
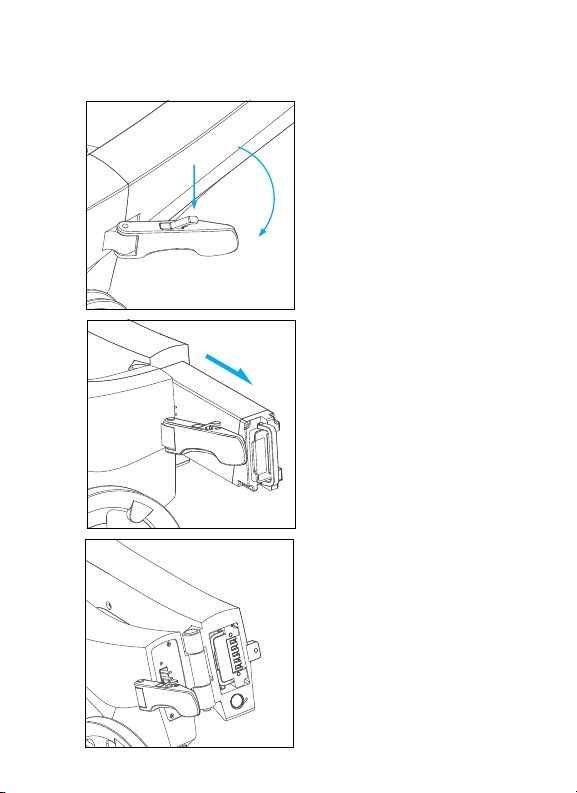
Removing The Battery.................................................9
Turning On Your Bike..................................................10
The LCD Display............................................................10
Precautions When Riding ....................................... 11
Warnings............................................................................ 12
Warranty ............................................................................13
Returns................................................................................13
TABLE OF
CONTENTS

2
Max Range: 34 Miles
Max Speed: 16 MPH
Max Load: 265 lbs
HANDLE
BIKE FRAME
LATCH
SADDLE
SEAT POST
SEAT POST
CLAMP
SHOCK
ABSORBER
MOTOR
PEDAL
CHAINWHEELPROTECTION WHEEL
BRAKE
STEM
LATCH LOCK
STEM LATCH
BIKE FRAME
FRONT FORK
CHAINWHEEL
DISC
BRAKE
STRUCTURAL DIAGRAM
NOTE:
Manual illustrations are for demonstration purposes only. Illustrations may not reflect
exact appearance of actual product. *Specifications subject to change without notice.*

3
PACKING CONTENTS:
E-Bike x 1
Saddle & Seat Tube x 1
User Manual x 1
Charger x 1
Battery Lock Keys x 2
Front & Rear Mudguards
SPECIFICATIONS
MOTOR & BATTERY
Motor Wattage: 36V / 350w
Charging Time: About 3 hours
Waterproof Rating: IP54
Battery Capacity: 36V / 5.2Ah
Battery Type: Lithium Ion
Charging Current 2A max
METER:
Display: LCD Display
Remaining Power: Yes
Speed: Yes
Total Mileage: Yes
Speed Mode: 3 Modes (High, Mid, Low)
COMPOSITION
Suspension: Rear Spring
Shock Absorber
Frame: Magnesium
Unibody Frame
Brake Type: Front & Rear disc
Production dimensions:
Folded: 30.3” x 17” x 25”
Unfolded: 52.75” x 21.6” x 43.3”
Seat Height (from ground) 30” - 36” (adjustable)
Net Weight (with battery) 41 lbs
Wheel Base: 37.4 Inches
Tire Size: 16 inches

4
limit screw
limit screw
limit screw
limit screw
limit screw
limit screw
limit screw
limit screw
UNFOLDING THE BIKE FRAME
1: Unfold the bike frame. 2: Press the latch lock to
release mechanism. Adjust limit
screw if necessary.
3: Proceed when you achieve the
status as pictured.
4: Fasten the latch as pictured.
Jiggle the frame to make sure it
is locked firmly.

5
UNFOLDING THE HANDLE STEM
1: Tilt stem upright to
ensure it connects
seamlessly with the base.
2: Fasten the stem latch
upward to lock it in place.
Jiggle the stem to see
if the folder has firmly
locked in place.
3: To fold the stem, press
the latch lock then
release the stem latch
back down.

6
1: Lift the quick-release lock
from the handlebar holder and
remove the lower screw.
2: Set aside the nut and gasket but
leave screw in place.
3: Place the handle bar inside the
holder, then close the holder
allowing the screw to come
through the bottom hole.
4: Adjust handlebar angle and
position to your preference.
Then reinstall the nut and
gasket to tighten.
INSTALLING THE HANDLE(IF NEEDED)

7
1.Loosen the seat post
clamp and insert saddle
post. Adjust saddle to
the preferred height then
tighten clamp.
2: For safety precautions,
make sure the seat post
clamp is somewhere
between the “Limit Screw”
and the “Max Height Line”.
3: To secure the saddle,
tighten the seat post clamp
as pictured, then press the
seat downward firmly to
ensure it stays in place.
INSTALLING SEAT POST

8
UNFOLDING THE PEDALS
1: Lower pedal into place 2: Fold pedal back up by pressing
inward & upward
CHARGING THE BATTERY
Be sure to charge the battery before your rst ride!
Option 1: Uncover silicon lid and
insert charger to charge from
the bike frame port.
Option 2: Remove battery
and plug charger in directly.

9
REMOVING THE BATTERY
1: Unfold frame by
pressing the latch lock
and pulling the frame
latch away from frame.
2: With bike folded, turn
battery lock, then slide
battery out from frame.
3: Reverse the procedure
to re-install the battery.

10
BATTERY POWER STATUS
CURRENT
SPEED
LED LIGHT
INDICATOR
MOTOR
ISSUE
INDICATOR
CONTROLLER
PROBLEM
INDICATOR
THROTTLE ISSUE INDICATOR
BRAKE
BATTERY POWER
IN PERCENTAGE
MILEAGE/
RIDING TIME
DISPLAY
+ BUTTON
•
• Short press to increase speed mode
- BUTTON
• Short press to decrease speed mode
M BUTTON:
•
• Short press to shift display to:
trip mileage/ totalmileage/ run time
SPEED MODE:
0 = Pure Riding. No power.
1 = Low Speed. Max around 8 MPH
2 = Mid Speed. Max around 11 MPH
3 = High Speed. Max around 15 MPH
1: Once the bike is
charged, hold the
“M” button on the
LCD to power up
your bike.
Congratulations!
You are ready for
your first ride!
Don’t Forget! Practice
common sense &
safety measures when
riding your bike.
THE LCD DISPLAY
TURNING ON YOUR BIKE

11
PRECAUTIONS WHEN RIDING
Do not ride in snowy
or slippery road
conditions.
Always ride with
both hands on the
handlebar.
Never ride down stairs,
escalators orelevators.
• Wear the appropriate protection gear such as helmets, knee pads, and elbow pads on
your rides to help prevent injury.
• Inspect the bike, brakes, & battery before each ride to ensure all is in working order.
• Do not ride on slopes over 15°
• If you must ride in the rain or snow, please ride at lower speeds and keep a safe stopping
distance from objects and vehicles in front of you.
• Children under the age of 12 are not advised to ride the bike.
• Avoid sudden starts and stops.
• Do not lean forwards or backwards while riding, and maintain a safe speed at all times.
• If the battery runs low, keep a low constant speed & charge the battery as soon as possible.
• Do not store your bike in the trunk of a car in hot weather.
• Have a full understanding of local traffic rules and regulations before you ride.
• Be aware of your surroundings at all times, and be sure to always ride in safe conditions.
• Keep a comfortable distance from other riders.
• Use caution when riding in environments with low visibility, if necessary, lower your speed or
stroll your bike.
• Do not ride the bike backwards or do any actions that may endanger yourself and others
while riding.
• Do not lend your bike to others without letting them become familiar to this manual first.
• Do not ride while ill or under the influence of drugs or alcohol.
• Accelerate slowly when riding. Sudden acceleration may throw you out-of-balance and could
cause falls or injury.

12
• For your safety, please read the user
manual carefully. Make sure the owner
and operator understand and accept all
the safety instructions.
• Ride at your own risk and use common
sense.You will be responsible for any loss
or damage caused by improper use.
• The elderly, pregnant women, children,
and those with heart conditions should
not use this product.
• Do not exceed the weight limit of 265
pounds. Only 1 rider at a time.
• Inspect each part of the product prior
to each use to ensure that it has been
correctly maintained and is properly
functioning.Riding with improperly
adjusted brakes is dangerous and may
result in serious injury or death.
• Only operate in safe, suitable locations.
Do not ride on roads with obstacles, such
as litter, small stones, etc. Avoid riding on
steep slopes or in narrow areas.Avoid
riding in the rain or on smooth slippery
surfaces such as ice or snow.Avoid riding
near flammable gas, steam,liquid or dust
that could cause a fire.
• If you have had any head, neck or back
ailments, or prior surgeries to those
areas, Do Not ride this product.
• Do not ride without proper training, at
high speeds, on uneven terrain or on
slopes.
• Be sure all safety labels are in place and
understood prior to riding.
• Do not use near motor vehicles.
• Do not ride after taking prescription
medications or drinking.
• Do not answer your phone, carry items
or engage in any other activities while
riding.
• Always wear appropriate safety gear,
including shoes and a helmet.We
encourage you to use lighting, reflectors
and signal flags.
• Always comply with laws, regulations and
ordinances, including local traffic laws.
• Always give way to pedestrians, and be
alert to your surroundings, both directly in
front of you and in the distance.
• When riding with others, always maintain
a safe distance to avoid the possibility of
a collision.
• Be sure to maintain your balance when
turning, and don’t make sharp turns.
• Applying the brakes too hard, or suddenly,
can cause a wheel to lock which may
cause you to lose control and fall which
may result in injury or death.
• Only ride the product with adequate
daylight for visibility.
• Do not lift the product from the ground
while it is on and the wheels are in
motion. This may result in free spinning
wheels which may cause injury to
yourself or others.
• Do not jump on or off the product or jump
while using it, or perform stunts.
• When not in use, store your bike in a cool,
dry area away from sunlight and water.
• To clean your bike, use a soft damp cloth
to wipe clean, and dry with a dry cloth.
To protect internal wiring and electric
components, do not soak or rinse
your bike with water, and do not clean
your bike with corrosive or flammable
chemical solvents, like alcohol, gasoline,
paraffin or acetone.
• Do not attempt to disassemble,
modify, repair or replace the unit or
any components of the unit without
instruction from Customer Support. This
will void any warranty and can lead to
malfunctions that may cause injury.
CALIFORNIA PROPOSITION 65
WARNING: this product can expose you to a
chemical such as Cadmium that is known
to the State of California to cause cancer
or birth defects or other reproductive
harm. For more information go to: www.
p65warnings.ca.gov/product
TROUBLESHOOTING
For troubleshooting or operational issues,
please contact Jupiter Tech at 813-609-
BIKE (2456) or e-mail sales @jupiterbike.
com
SAFETY WARNINGS

13
JUPITER BIKE DISCOVERY – LIMITED 1 YEAR WARRANTY
The Jupiter Bike Discovery and accessories are manufactured to high quality standards.
The Jupiter Bike Discovery is warranted to the original purchaser for one full year from
the original purchase date against defective materials or workmanship. This warranty
applies to replacement parts only and specifically excludes the tire tread.This warranty
becomes void if the original purchaser transfers the product to another individual.
If the Jupiter Bike Discovery suffers damage due to customer modifications and/
or is used for any application other than for which it was designated, this warranty
is void. This warranty does not include damage due to: (A) neglect, (B) accident, (C)
unreasonable use, (D) improper maintenance or (E) any other causes not attributed to
defects in material or workmanship.Any implied or otherwise explicit guarantees made
through the merchandiser of this product are not covered in this warranty coverage
agreement and are expressly disclaimed.
If you feel your Jupiter Bike Discovery is not operating properly and needs a
replacement part, contact Jupiter Tech at 813-609-BIKE (2453) or email sales@
jupiterbike.com for assistance.
IMPORTANT NOTE:
This machine was designed for certain applications only. Jupiter Tech strongly
recommends that this machine NOT be modified and/or used for any application other
than that for which it was designated. If you have questions relative to its application,
please contact us and we will advise as to its proper use. This warranty gives you
specific legal rights, and you may also have other rights which vary
from state to state.
RETURNS & EXCHANGES:
Please refer to our website JupiterBike.com for all product exchange i
formation & procedures.
Please keep the original packaging.
813-609-BIKE (2453)
www.Jupiterbike.com
JUPITER TECH 5600 Airport Blvd. Suite C TAMPA, FL 33634
WARRANTY:

14

15
Schéma de la structure.............................................. 2
Caractéristiques techniques................................... 3
Déplier le cadre du vélo ............................................ 4
Déplier le guidon............................................................ 5
Installation du guidon .................................................6
Installation de la selle................................................. 7
Déplier la pédale............................................................8
Entretien de la batterie et du chargeur ...........8
Retrait de la batterie ....................................................9
Mise en marche de votre vélo .............................10
L’écran LCD......................................................................10
Précautions à prendre lors de la conduite .. 11
Avertissements..............................................................12
Garantie..............................................................................13
Retours................................................................................13
TABLE DES
MATIÈRES

16
2
SCHÉMA DE LA STRUCTURE
POIGNÉE
FREIN
LOQUET DE
VERROUILL
AGE DE LA
POTENCE
LOQUET DE
POTENCE
FOURCHE
AVANT
CADRE DU VÉLO
FREINA
GE À
DISQUE
ROUE À CHAÎNE ROUE À
CHAÎNE PROTECTION
Distance Max. : 34 Miles
Vitesse Max. : 16 MPH
Charge Max. : 265 lb
REMARQUE :
CADRE DU VÉLO
LOQUET DE
VERROUILLAGE
SELLE
TIGE DE
SELLE
FIXATION
AMORTIS
SEUR
CHAÎNE PROTECTION
MOTEUR
PÉDALE
SCHÉMA DE LA STRUCTURE
REMARQUE :
Les illustrations de ce manuel ne sont données qu’à titre de démonstration. Les il-
lustrations peuvent ne pas refléter l’apparence exacte du produit réel. Sous réserve de
modifications

17
CONTENU
DE L’EMBALLAGE :
E-Bike x 1
Selle et tube de selle x 1
Manuel de l’utilisateur x 1
Chargeur x 1
Clés de verrouillage de la batterie x2
En option : Garde-boue, feu arrière
CARACTÉRISTIQUES
MOTEUR & BATTERIE
Puissance du moteur : 36V / 350w
Temps de charge : Environ 3 heures
Étanchéité à l’eau : IP54
Capacité de la batterie: 36V / 5.2Ah
Type de batterie : Lithium Ion
Courant de charge 2A maxi
MESURES :
Affichage : Écran LCD
Puissance restante : Oui
Vitesse : Oui
Kilométrage total : Oui
Mode vitesse : 3 modes (haut, moyen, bas
COMPOSITION
Suspension : Amortisseur arrière à ressort
Cadre : Cadre monobloc en magnésium
Type de frein : Disque avant et arrière
DIMENSIONS DU PRODUIT :
Plié : 30.3” x 17” x 25” x 25
Déplié : 52.75” x 21.6” x 43.3”
Hauteur du siège (à partir du sol) 30” - 36” (réglable)
Poids net (avec batterie) 41 livres
Empattement : 37.4 pouces
Taille de pneus 16 pouces

18
limit screw
limit screw
limit screw
limit screw
limit screw
limit screw
limit screw
limit screw
DÉPLIER LE CADRE DU VÉLO
1: Dépliez le cadre du vélo. 2: Appuyez sur le loquet de
verrouillage pour déverrouiller le
mécanisme. Régler la vis de butée
si nécessaire.
3: Procédez jusqu’à ce que
vous obteniez le résultat tel
qu’illustré.
4: Fixez le loquet tel qu’illustré.
Secouez le cadre pour vous
assurer qu’il est bien verrouillé.

19
DÉPLIER LA POTENCE
1. Inclinez la tige vers le
haut pour qu’elle se
raccorde parfaitement à
la base.
2. Fixez le loquet de la
potence vers le haut pour
le verrouiller. Secouez la
potence pour voir si le
verrou est bien en place.
3. Pour replier la potence,
appuyez sur le verrou
du loquet, puis relâchez
le loquet de la potence
vers le bas.
Table of contents
Languages:
Other JUPITERBIKE Scooter manuals