manuals.online logo
Brands
  1. Home
  2. •
  3. Brands
  4. •
  5. JYE Tech
  6. •
  7. Test Equipment
  8. •
  9. JYE Tech DSO 068 User manual

JYE Tech DSO 068 User manual

Iron(20W)
1
Solderwire
Multimeter
Screwdriver
AssemblyGuide
Rev.03
DSO068OscilloscopeDIYKit
2
3
4
Flushcutter
5
Tools
Checkpartvalues&quantitiesagainstpartlist
1
Meterandidentifyresistorvaluesbyohmmeter
Understandallpartpolaritiesandorientations
2
3
GetReady
Tweezers
6
Putleadsthroughmountingfrominstallationsideof
PCB.EnsuetheyevenlytouchPCB(picturebelow).
1
SolderattheothersideofPCB.Soldershouldfully
fillandcoversolderingpads.
Avoidbridgeswith
neighberingpads.
Cutunusedleads
flushwithcutter.
2
3
PartList
A. B. C. D. E. F.
BOBBoardInstallation
AssemblytheMainBoard
LED
Neg.P.S.
Conv.
Diode ElectrolyticCap.
Resistor
Reset
USB-UartConv.
Inductor
USBSocket
Volt.Step-upConv.
Main
MCU Transistor
CeramicCap.
CBBCap
Cap.Trimmer
Crystal
LCD
Contrast
Adj.
PowerSwitch
External
P.S.Conn.
Batt.Charger
BackSide SlideSwitch
LCDModule RotaryEncoder
FrontSide
ASSY2 ASSY3
ASSY1
Cutleadsshort
underLCD
A. LayPCBflat.Insertmount-
ingstripswithlongerpins
intoholes.
Labels
B. C. D.
LCDInstallation
Step1
SolderingSkillsandRequirements
Payspecialattentiontopartpolarityatsoldering.Refertophotostotheright.
ForBOBboardsandLCDsolderingrefertophotosatbottomfordetails.
1.
2.Installpartsbytheorderofpartlist.Startfromthebacksideofmainboard.
3.
Performpower-uptestsassuggestedinthepartlist.
4.
Completethestepsin"GetReady"andunderstandsolderingrequirements.
5.
Important!UnusedleadsunderLCDmustbecutflushtoavoidshorttoLCDmodule!
+
-
+
-
+
-
EB
C
JYE116 JYE117 JYE118 JYE119 JYE120
Diode LED Electrolyticcap. Transistor
Identify
Polarity&
Orientation
)Pin1indicatedbyarrow 510K5%1/8W,,
200K ,,1%1/8W
2M ,,1%1/8W
20K ,,
1
%1/8W
300 ,,1%1/8W
180 ,,1%1/8W
120,1%,1/8W
3.3K ,,1%1/8W
470 ,,1%1/8W
10K1,,%1/8W
1K5
,,%1/8W
2
2
1
1
1
3
1
2
3
3
5
R1,R27
R3
R2,R4
R5
R6
R7
R8,R12,R21
R10,R22
R11,R31,R33
R9,R20,R30
R24,R25,R26,R28,R29
300pF,ceramicdisk
3pF,ceramicdisk
1pF,ceramicdisk
120pF,ceramicdisk
0.1uF,ceramicdisk
100uF,16V, φ6X7mm
10uF,16V,4φX5mm
15pF,ceramicdisk 1
12 C9,C10,C11,C12,C14,
C15,C16,C18,C20,C24,
C25,C26
2C2,C23
C1
1
1
3
5
1
2
C17,C27,C28,C29,C30
C19
C21,C22
LED,3mmφ,red D11
2
D2,D3
USBsocket,BtypeMiNi- 1J1
2pins,2.54mm 1J6
100uH,2.5X6mmφ3L1,L4,L5
8550,TO-92(E-B-C) 2Q1,Q2
Tact,6X6X5mm 1SW12
20MHz,φ2X6mm 1Y1
0.1uF/100V,CBB
1N4148DO-35,
C4
C6
C7,C13,C32
JYE119,UART-USBconv.
JYE118,batterycharger
JYE117,On/Offswitch
JYE116,step-upconvertor
JYE120,neg.P.S.convertor
BOB1
()
optional
BOB2
()
optional
BOB3optional
()
BOB4
BOB5
DC005,2.1
φmmcore J21
1
1
1
1
1
Type/Spec QtySeq.
DIP2.54mm5X2,,
SIP,2mm,20X1
SIP,2mm,2X1
2
1
2
J4,J5Donotinstall
()
LCD 128X64graphic,12864-16 1LCD1
SlideswitchSS-23D06,
RotaryEnc.,EC11,10mm 3
1SW1,SW2,SW3
SW4
PCB#:109-06800-00H 1
Catagory
Top(1),bottom(1),stand(1)
switchcaps(3),dialcap(1) 1set
7-keysiliconebuttonpad
2-coreheader/wire,10cm
2.3*8mm,selftapping
BNCBNC-KY,1
2
1
4
2
5
6
4
7
9
8
10
11
12
13
14
15
16
3
28
26
22
23
24
25
33
32
27
29
17
20
30
18
31
21
19
34
39
38
37
35
36
45
42
43
44
40
41
46
47
1
BOBsandJumpers
()
BOB4
()
BOB3
()
BOB2
()
BOB1
()
BOB5
Battery
Conn.
Extention
Ports
Buzzer
A/DConverter
KeepJP1openifBOB2
isinstalled.Otherwise
closeit.
TIP: Resistorvaluesareeasilymis-read.
Metercheckingisstronglysuggested.
BOBBoardsOrientation
48
1
Shieldingwire,8cm
5V,passive,9X5.5mmφ1BP1
49
Note:PleaseinstallbytheordergiveninthePartListbelow.
TIP: C3andR32
arenotrequired.
TIP: DonotinstallJ4ifbatteryistobemountedonbackcover.Insert
thepinsintoprogrammerheadertoperformU4andU5programming.
KeepJP2openifBOB3
isinstalled.Otherwise
closeit.
Identifytheholeswithlabels
onLCD.Theyshouldgo
withthelongstrip.
PutLCDontostripsasshown.
Solderpinsatcornersfirst.Do
therestafterflatnessensured.
TurnLCDandmainboardover.
Completesolderingfollowing
sameproceduresasinC.
Usethesmallacrylic
toolprovided. Applysoldertoone
pin. Applysoldertothe
correspondingpinon
mainPCB.
PutBOBtoplace
andalignpads. MaintainBOBupright
andfixitbymelting
thesolder.
Finishtherestpins.
Designator/Location
MainPCB
Resistor
Diode
Inductor
Crystal
Connector
Switch
Capacitor
Buzzer
Diode
Transistor
Connector
Electro.
Capacitor
Connector
BOB
Board
Performpower-uptest1asdescribedonthereversepage.
Switch
Switch
Pin
Strip
Pinstrip
Enclosure
Switch
Wire
Wire
Connector
Screw
-www.jyetech.com -
JYETechLtd.
Moreatthereversepage
1
10M,5%,1/8W R40
50
Continuefollowingassemblyafterthetest.
Keypad
MCU
Test
Signal
Output
Pin1(squarepad)indicated
byarrow
1
Shortwithsolder JP9
Jumper
Performpower-up
test2asdescribedon
thereversepageafter
allcomponentshave
beeninstalledon
board.
()
PCBVersion:H
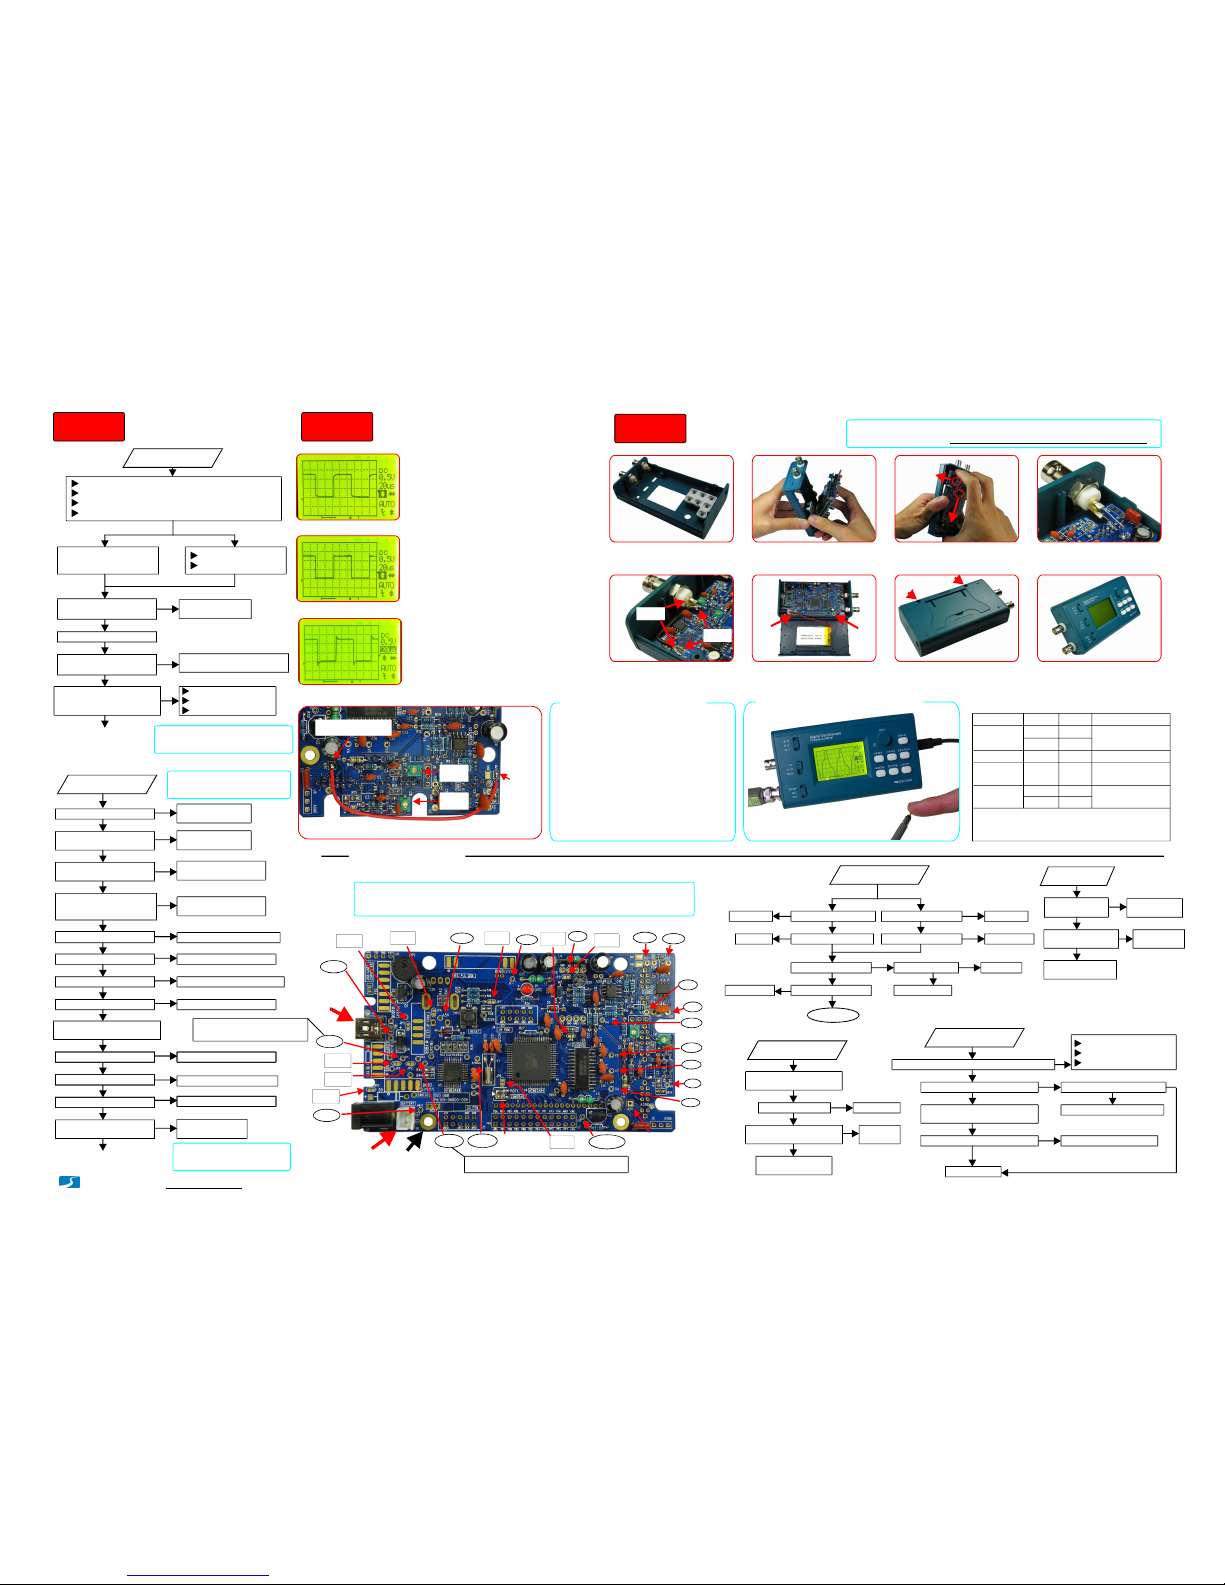
Doublechecktoensurenomissedorcoldsolderorshorts
CloseJP2forthetimebeing(evenBOB3isinstalled)
KeepJP3JP4open、
CloseJP1ifnoBOB2 KeepJP1open
MakesureBOB2in
Powerup.Checkvoltage
at+5Vtestpoint.Isit+5V?
Poweroff.CloseJP4
Powerupandcheck+5V
again.Isitstill+5V?
LCDbacklighton ?
Adjustcontrast.Canyou
seedisplay?
Pressbuttons.Doyousee
reactiononscreen?
Setcursortotimebase.Turn
[ADJ]dial.Doyousee
timebasechange?
Powering-upTest1
Yes
No
USBpowered Batterypowered
MakesureBOB4andBOB5havebeeninstalled
Follow"NoPower"
flowcharttocheck
Checkforsolderingmistakes.
Wrongpolarity,shorts,etc.
Follow"LCDDark"
flowcharttocheck
CheckU5andsoldering
ofbuttonrelatedpins
Follow"Nodisplay"
flowcharttocheck
CheckU5andsoldering
ofrotaryencoderpins
V4
V1
V2
V3
AV-
AV+
V-
+5V
VT
VB
SYSCLK
VA
Contrast
Adj.
JP4
JP3
JP1
JP2
JP6
USB
Connector
(About+5V)
SignalInput
Referencepointfor
voltagemeasurement
*
Allvoltagesaremeasuredwithvoltmeter's(-)poleatreferencepoint(indicated
inphotobelow)and(+)poleatpointsofmeasurement.
1.
2. *
Notes:
VBUS
V+
(Volt.range:2-5V)
Battery
Connector VS+
WithoutBOB3VS+=V+(duetoJP2closed):
WithBOB3VS+dependsonstateofBOB3(OnorOff):
LCDpin18
IsV-normal(-5V)? CheckBOB5andC27
CheckL1,C28,C11,andC12
CheckL5,C16,andC17
SetSW1,SW2,SW3toGND,
10mV,andX1respectively
IsVAnormal(+5V)?
CheckL4,C29,C9,andC10
IsV2measured0V?CheckSW1,SW2,andR1
IsV3measured0V?U1mayhavebeendamaged
isV4measured~1.6V?CheckSW3,R9,R10,R11
AdjustVPOS.Canyousee
tracedisplayed? Follow"NoTrace"
flowcharttocheck
2
1
InstallBatter&
Enclosure
USBpowered Batterypowered
Batteryvoltageok?IsVBUSmeasuredok?
IsV+measuredok?IsV+measuredok ?
IsVS+measuredok?
Is+5Vmeasuredok?
BOB3installed?
Powergood
CheckBOB3
CheckJP2
Checkbatt.
CheckBOB2
CheckUSB
CheckD4
CheckBOB4
IsvoltageatLCD
pin195V? Checkrelated
connections
ShortCandEofQ2.
DoesLCDlightup?
CheckQ2,R30and
connectionwithU5
PossibleLCD
issue
PressSW12.DoesLEDblinkasitshouldbe?
U4andLCDconnectiongood?
LCDdefective
Fixbadconnections
CheckY1,C21,C22
Re-programU4
VoltatU4pin20toolow?
IscontrastchangeablebyPOT1? VEE.atLCDpin18negative?
CheckPOT1andrelatedCheckallconnectionsbetween
U4andLCDforopensorshorts.
VTandVBnormal? U3damaged
ConnectionbetweenU4
pin17andU3pin12good?
U3hasbadsoldering
orhasbeendamaged
Checkout
thecause
Ensureallanalogvoltages
arenormal(seephoto)
PowerUpTests
Troubleshooting
A. B. C. D.
E. F. G. H.
PressSW12.DoyouseeLED
blinkonce(ifbootloader
installed)andthentwice? CheckY1C21C22、、
LEDreversed?
U4pin20voltagelow?
Continuetoinstall
partsonthefront
PoweredbyUSB:V+VBUS-0.7V≈
PoweredbyBatt.:V+VBAT≈
()+5V ()-5V ()+5V
()-5V
()0V
*
()0V
*
()~1.6V
()0.6V
()2.6V
*
()0V
()+5V
()About-5V
(Batteryvoltage)
VBAT
()2.5V
V5
()~1.6V
www.jyetech.com/forum
JP5
AdjustCompensation
Capacitors
Compensationcapacitorscanbe
adjustedusingthebuilt-insignal
generator.Followstepsbelow:
C5
C8
Temporarilyconnecttestsignaloutputto
scopeinputwithapieceofwire
Notenough
通电检查
Good
通电检查
Toomuch
通电检查
1. Connecttestsignaloutputtoscopeinput
(seephotobelow)andsetSW1toDC.
2. Powerup.Settestsignalto10KHzand
5V.Setscopetimebaseto20us.
SetSW&SW3to1V&X2respectively.
Adjusttriggerleveltomakedisplay
stableifnecessary.ChangeC8toobtain
waveformasthemiddleofphotosleft.
3.
Keepsignalfrequenceunchangedand
setamplitudeto1V.SetSW2&SW3to
0.1VandX5respectively.Makedisplay
stable.ChangeC5toobtainwaveform
asthemiddleofphotosleft.
4.
5. Removeconnectionbetweentestsignal
outputandscopeinput.Adjustmentis
done.
JP7 JP8
-www.jyetech.com-
Thisisby-passofchargerBOB2.Ifbattery
isnotused(i.e.noBOB2)keepJP1closed.
Thisisby-passofswitchBOB3.IfBOB3
isnotusedJP2shouldbeclosed.Inordertofocus
onthemaincircuitJP2canbetemporarilyclosed
atpower-uptestevenBOB3isinstalled.Keepit
openafterthetest.
JP2:
Thisisby-passofstep-upconverterBOB4.
UsuallyJP3shouldbekeptopen.
JP3:
Thisistheconnectingpointofpowersupply
totherestcircuits.ForsafetyJP4shouldonlybe
closedafterpowersupplyistestedgood.
JP4:
Step2 Step3 Step4
Yes
Yes
Yes
Yes
Yes
Yes
No
No
No
No
No
No
IsAV-normal(-5V)?
IsAV+normal(+5V)?
Yes
Yes
Yes
Yes
Yes
Yes
Yes
Yes
No
No
No
No
No
No
No
No
NoPower LCDDark
NoDisplay
NoTrace
Yes
No
Yes
Yes
Yes
Yes
Yes
Yes
No
No
No
NoNo
No
No
No
Yes
Yes
Yes
No
Yes
No
Yes
No
Yes
No
Yes
No
Yes
No
Voltageswith""aremeasuredwhenSW1(couple)isplacedatGNDposition.
MajorJumpersExplained
JP1:
InstallBNCconnectors
andplacesiliconepad. Capslideswitches.Insert
boardtoconnectorholes. Holdboardtighttowards
USBendandpushin. ConnectinputsignalBNC
tomainboardasshown.
Connecttestsignalwith
shieldingwireprovided Tighttwoscrewsandattach
batt.tocenterofbackcover Putonbackcover.Tight
thetwoscrewsasshown. Putdialcaponandyou
aredone.
TechSupport:
JYETechLtd.
JP9
Central
conductor
Outter
conductor Tight
Screw
Tight
Screw
Scopeinput
Test
signal
output
Powering-upTest2
Done
Note: JP9mustbeclosed
beforepower-uptest2
TIP:CloseJP7toenable
buzzer.ItbeepsasLEDblinks
Note: KeepJP2open
afterthepower-uptests
QuickWaveformDiaplayTest
Touchprobetipwithafingerto
showintroducedmainlinesignal
Thisjumpershouldalwaysbeclosed.JP9:
PowerSupplyOptions
Source BOB2 JP1 Remarks
USB Yes Open
No Close
Int.Batt. Yes Open
Ext.Batt.
(J2) Yes Open CloseJP5
Ext.5V
(J2) Yes Open
No Close InstallD5(D5
isnotprovided)
Note: Donotsimultaneouslyconnect
externalandinternalbatteries.

Other JYE Tech Test Equipment manuals

JYE Tech 062 Operating instructions

JYE Tech

JYE Tech 062 Operating instructions

JYE Tech 13803K User manual

JYE Tech

JYE Tech 13803K User manual

JYE Tech DSO Shell 150 User manual

JYE Tech

JYE Tech DSO Shell 150 User manual

JYE Tech DSO 068 User manual

JYE Tech

JYE Tech DSO 068 User manual

JYE Tech DSO 138 User manual

JYE Tech

JYE Tech DSO 138 User manual

JYE Tech DSO 138 User manual

JYE Tech

JYE Tech DSO 138 User manual

JYE Tech DSO112A User manual

JYE Tech

JYE Tech DSO112A User manual

JYE Tech DSO112A User manual

JYE Tech

JYE Tech DSO112A User manual

JYE Tech DSO138mini User manual

JYE Tech

JYE Tech DSO138mini User manual

JYE Tech WAVE2 User manual

JYE Tech

JYE Tech WAVE2 User manual

JYE Tech DSO 094 User manual

JYE Tech

JYE Tech DSO 094 User manual

JYE Tech 062 Quick start guide

JYE Tech

JYE Tech 062 Quick start guide

JYE Tech DSO 096 Operating manual

JYE Tech

JYE Tech DSO 096 Operating manual

Popular Test Equipment manuals by other brands

Avtron LPH400 manual

Avtron

Avtron LPH400 manual

Triplett USB-Bug user manual

Triplett

Triplett USB-Bug user manual

birzman BM17-WHTS-CAL-GAUGE instruction manual

birzman

birzman BM17-WHTS-CAL-GAUGE instruction manual

palintest Wagtech Potatest + manual

palintest

palintest Wagtech Potatest + manual

Teledyne T700 Operation manual

Teledyne

Teledyne T700 Operation manual

Viavi MSQ-900 quick start guide

Viavi

Viavi MSQ-900 quick start guide

Keysight 9000 Series Service guide

Keysight

Keysight 9000 Series Service guide

Chroma 19071 quick start guide

Chroma

Chroma 19071 quick start guide

Phenix Technologies HC-5 manual

Phenix Technologies

Phenix Technologies HC-5 manual

Apera Instruments GroStar GS3 Premium user guide

Apera Instruments

Apera Instruments GroStar GS3 Premium user guide

Tenma 72-9400A user manual

Tenma

Tenma 72-9400A user manual

Proceq Equotip 3 operating instructions

Proceq

Proceq Equotip 3 operating instructions

Probewell MT-1/WT3 user guide

Probewell

Probewell MT-1/WT3 user guide

Dräger Alcotest 7000 Instructions for use

Dräger

Dräger Alcotest 7000 Instructions for use

Vello LENS-2020 user manual

Vello

Vello LENS-2020 user manual

MULTI MEASURING INSTRUMENTS MCL-550D instruction manual

MULTI MEASURING INSTRUMENTS

MULTI MEASURING INSTRUMENTS MCL-550D instruction manual

OHD QuantiFit 2 manual

OHD

OHD QuantiFit 2 manual

ARROWELD ARW-TVP instruction manual

ARROWELD

ARROWELD ARW-TVP instruction manual

manuals.online logo
manuals.online logoBrands
  • About & Mission
  • Contact us
  • Privacy Policy
  • Terms and Conditions

Copyright 2025 Manuals.Online. All Rights Reserved.