K&K M9300 User manual
MARDERABWEHRGERÄT
MARTEN-REPELLENT DEVICE | REPOUSSE-MARTRE
M9300
+
-
6x
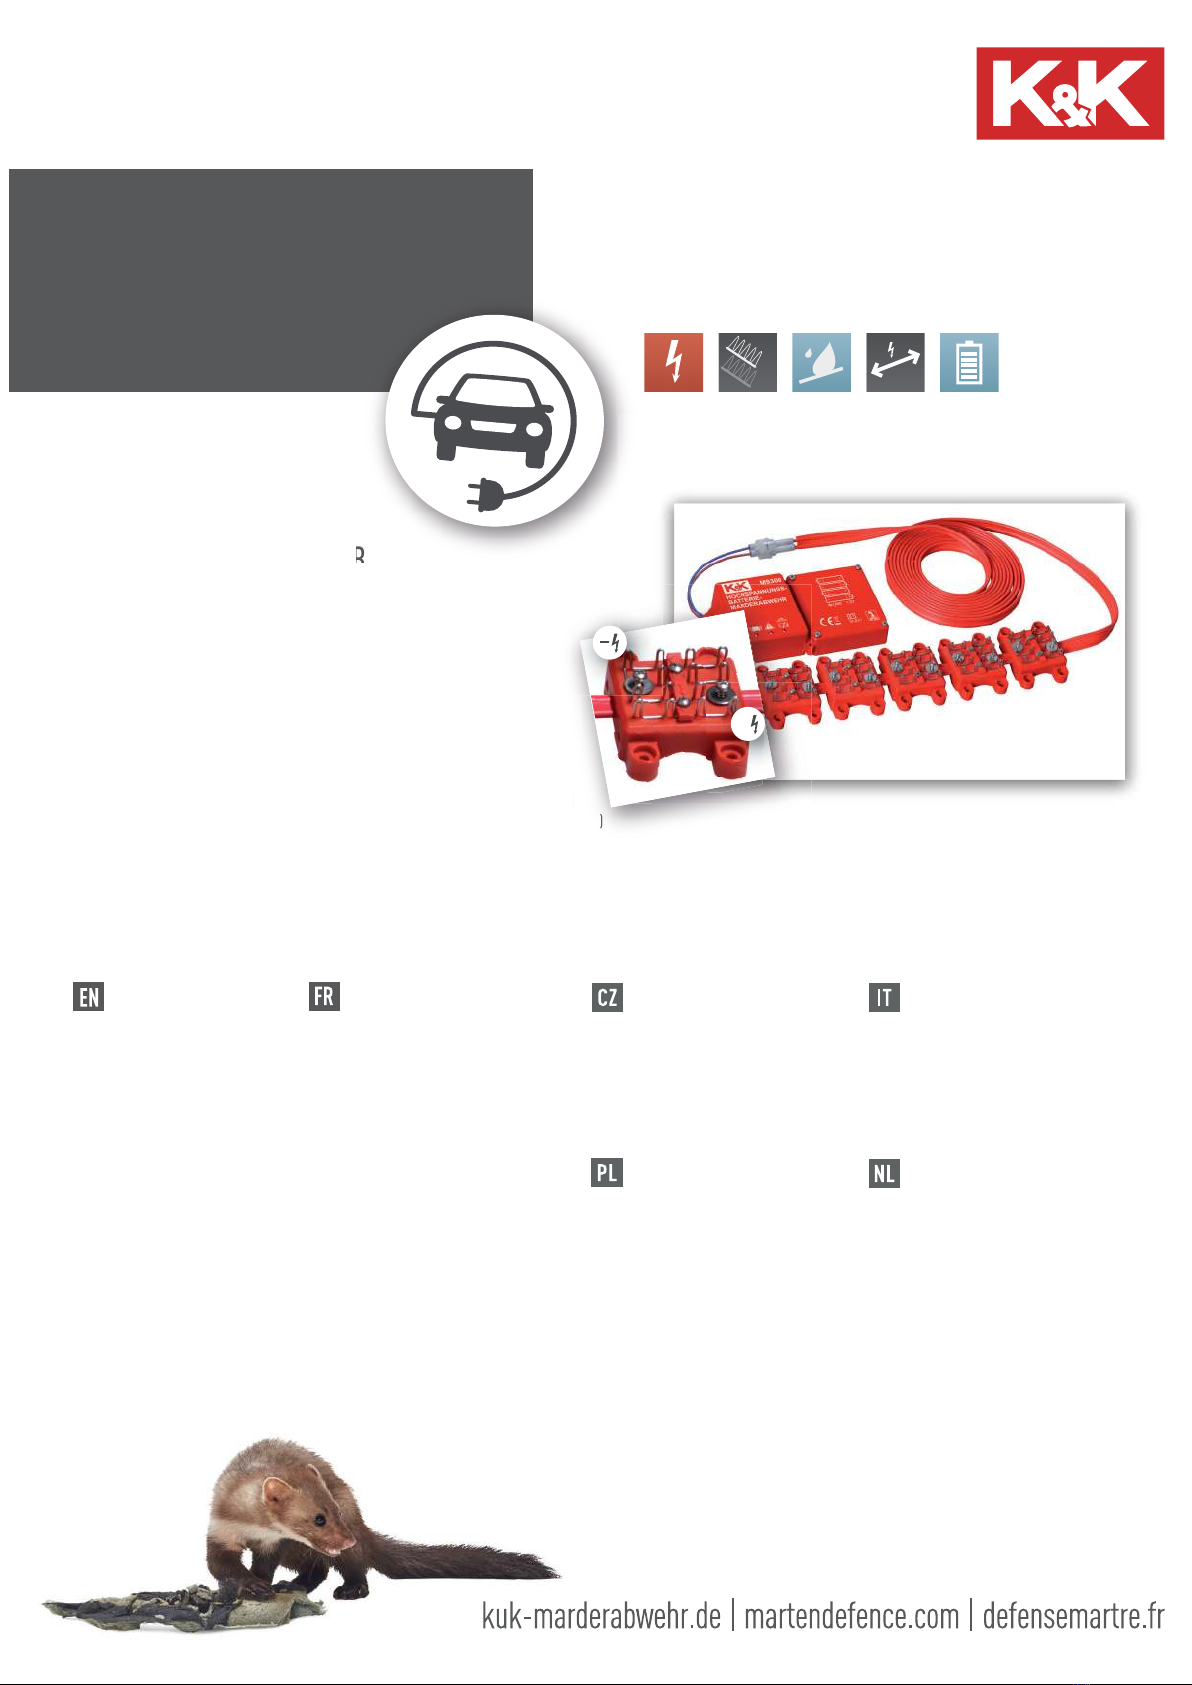
AUTARKER BATTERIEBETRIEB
+/- HOCHSPANNUNGS-BÜRSTEN
WASSERDICHT 2.0
KONTAKTE VERSCHIEBBAR UND ERWEITERBAR
(Detailansicht)
(detailed view) / (Vue détaillée)
B
E
-
E
M
P
F
O
H
L
E
N
·
E
-
R
E
C
O
M
M
E
N
D
E
D
·
E
-
R
E
C
O
M
M
A
N
D
É
c
ht
)
e
détaillée
)
+
2GSX]RYDÿNXQVHY\VRNRQDSćĝRYîPLNRQWDNW\9\VRNRQDSćĝRYiREUDQDQDSiMHQi]EDWHULHMHWDNpLGHiOQtSURGORXKpVWiQtRE\WQpKRDXWRPRELOXDHOHNWULFNpPRWRU\3OXVRYpPtQXVRYpNDUWiÿHKODGtSĕHVL]ROXMtFtVUVW.URPćWODSHNDWODP\MHWDN~ÿLQQiSORFKDPQRKRQiVREQćUR]åtĕHQD8U]ûG]HQLHRGVWUDV]DMûFHNXQ\]ZLHORVW\NRZ\PLV]F]RWNDPLZ\VRNLHJR=DVLODQ\QDEDWHULHRGVWUDV]DF]Z\VRNRQDSLąFLRZ\LGHDOQLHQDGDMHVLąUyZQLHĥGR]DVWRVRZDčZSU]\SDGNXGãXJLFKSRVWRMyZNDPSHUL¬VLOQLNyZHOHNWU\F]Q\FK6]F]RWNLGRGDWQLHXMHPQHSU]HQLNDMûL]ROXMûFûVLHUėý]ZLHU]ąFLD:WHQVSRVyESRZLHU]FKQLDRGG]LDã\ZDQLDSRZLąNV]DVLąSR]DREV]DUFLDãDãDSLS\VND6LVWHPDVFDFFLDPDUWRUHFRQVSD]]ROHDGDOWDWHQVLRQHPXOWLFRQWDWWR,OGLVSRVLWLYRGLGLIHVDDGDOWDWHQVLRQHFRQIXQ]LRQDPHQWRDEDWWHULDqSHUIHWWRDQFKHLQFDVRGLOXQJKLSHULRGLGLVRVWDFDPSHURPRWRULHOHWWULFL/HVSD]]ROH3L0HQRDJLVFRQRVXOPDQWRLVRODQWH,QTXHVWRPRGRROWUHDOOH]DPSHHDOPXVROD]RQDG·D]LRQHVLDPSOLDXOWHULRUPHQWH0DUWHUYHUMDJLQJPHWPXOWLFRQWDFWKRRJVSDQQLQJVERUVWHOV'HKRRJVSDQQLQJVYHUMDJHUPHWEDWWHULMYRHGLQJLVRRNLGHDDOYRRUODQJHSHULRGHQYDQVWLOVWDQGVWDFDUDYDQVHQHOHNWURPRWRUHQ3OXVPLQERUVWHOVGULQJHQGRRUGHLVROHUHQGHYDFKW'HEHUHLNWHRSSHUYODNWHLVGXVQLHWEHSHUNWWRWGHSRWHQHQGHVQXLWHQGDDUGRRUYHOHPDOHQJURWHU
FONCTIONNEMENT AUTONOME À PILES
BROSSES À HAUTE TENSION +/-
ÉTANCHE À L'EAU 2.0
SUPPORTS DE CONTACTS COULISSANTS,
EXTENSIBLES
STANDALONE BATTERY OPERATION
+/- HIGH-VOLTAGE BRUSHES
WATERPROOF 2.0
MOVABLE CONTACTS AND EXPANDABLE
Das HOCHSPANNUNGS-BÜRSTEN Gerät
Die batteriebetriebene Hochspannungsabwehr eignet sich
auch bestens bei langen Standzeiten (Wohnmobil) und
Elektromotoren. Plus/Minus-Bürsten streichen durch das
isolierende Fell. Neben Pfoten und Schnauze wird die
Wirkfläche so um ein Vielfaches erweitert.
K&K Handelsgesellschaft mbH, Germany | D-68723 Oftersheim, Gewerbepark Hardtwald 14 | Tel. +49 (0) 6202-85 932 0
support@kuk-marderabwehr.de support@martendefence.com support@defensemartre.fr
Lieferumfang/scope of delivery/Fournitur:
M9300-KIT
M9300-ST
1 Basisgerät/basic module/module de base
1 Kabelsatz mit Stecker/cable set with connector/
câblage avec connecteur
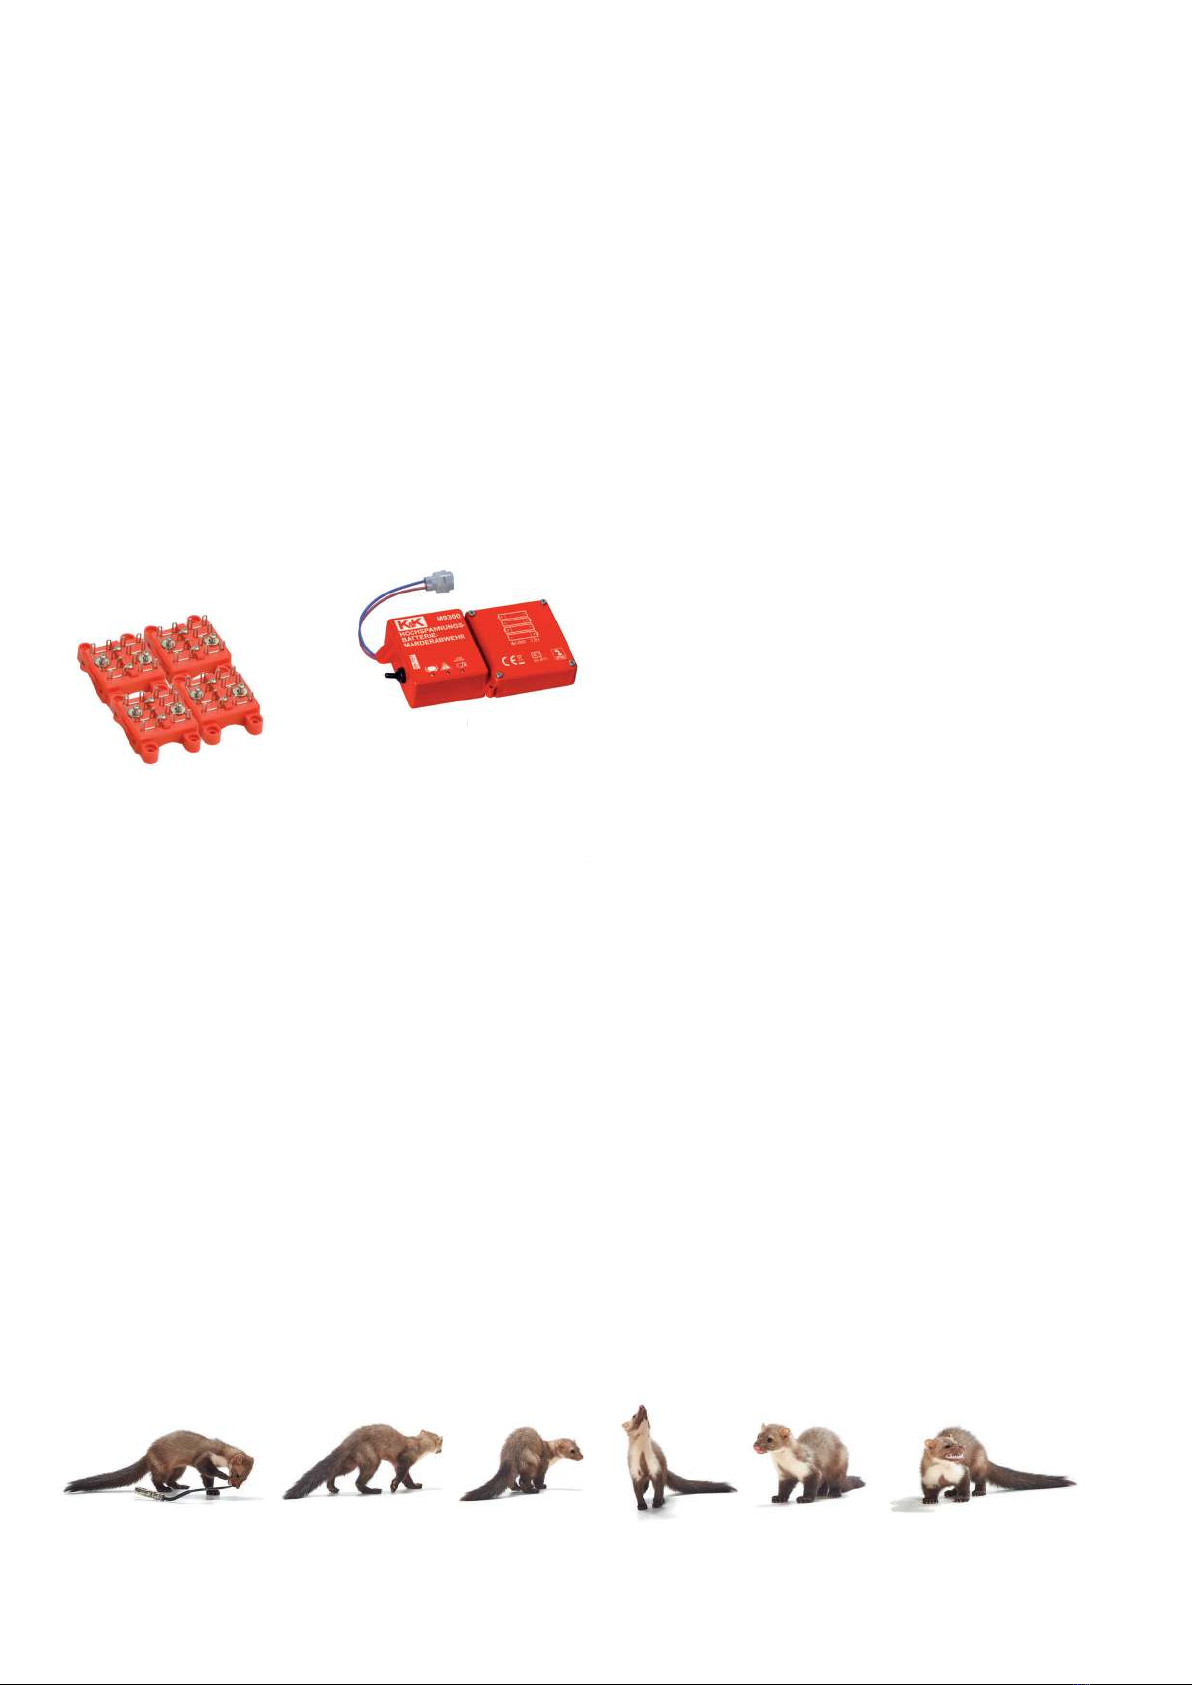
6 Edelstahl-Multikontaktbürsten/stainless steel multi
contact brushes/brosses de contact inox
12 Edelstahl-Schrauben/stainless steel screws/vis inox
6 Plastiksockel/plastic sockets/socles plastic
1 allgemeiner Warnaufkleber/general warning sticker/
autocollant avertissement
1 Montageanleitung/installation manual/notice de montage
16 Kabelbinder/cable ties/Colliers de serrage plastique
erforderliche Batterien/required batteries/piles requises: 4 x AA 1,5 V
Zubehör
- Erweiterungskit mit 4 zusätzlichen Hochspannungskontaktplatten No M9300-KIT
- Ersatzsteuergerät No M9300-ST
- Motorhaubenschalter mit Sofortentladung No 1001
Accessories
- Extension Kit with 4 additional high voltage contact plates No M9300-KIT
- Replacement control unit No M9300-ST
- Bonnet switch for immediate discharge No 1001
Accessoires
- Kit d’extension avec 4 plaques croisées supplémentaires No M9300-KIT
- Appareil de contrôle de remplacement No M9300-ST
- Détecteur d‘ouverture du capot avec déchargement immédiat No 1001
Akcesoria
- Zestaw akcesoriów do rozszerzenia o4styki wysokiego napięcia No M9300-KIT
- Wymienne urządzenie sterujące No M9300-ST
- Wyłącznik pokrywy silnika z natychmiastowym rozładowaniem No 1001
Příslušenství
- Doplňková sada se 4 dalšími kontaktními deskami No M9300-KIT
- Náhradní řídicí jednotka No M9300-ST
- Spínač kapoty motoru s okamžitým vybitím No 1001
Accessoires
- Accesoirreset voor uitbreiding met 4 hoogspanningscontacten No M9300-KIT
- Reservecontroller No M9300-ST
- Motorkapschakelaar met directe ontlading No 1001
Accessori
- Set di accessori per l'espansione no a ulteriori 4 punti di contatto No M9300-KIT
- Centralina sostitutiva No M9300-ST
- Interruttore per cofano motore con scaricamento immediato No 1001
M
9300
-ST
A
k
ces
o
ri
a

G
23
1
DE:
K&K Duftmarkenentferner
EN:
FR:
Destructeur de marques olfactives
PL:
IT:
CZ:
NL:
10
OPTIONAL
Art.-Nr.:
000300
F
9
9
B
2
min. 10 cm
max. 80° C
E
3
B
10
D
min. 10 mm
C
DE EN FR PL CZ NL
1
1x
2
6x
3
High-voltage multi contact
brushes Brosses à haute tension
multicontact
4m
4
5
LED
Vibrationssensor LED
Vibration sensor LED
Détecteur de vibration
6
LED Hochspannung LED high voltage LED haute tension
7Steckverbinder Connector Connecteur
14x 8 Kabelbinder
1x 9
Steuergerät
Multikontakt-
Hochspannungsbürsten
Hochspannungskabel
Sicherheitswarnaufkleber
Mnohovláknové
vysokonapěťové kartáče
Vysokonapěťový kabel
LED
Vibrační čidlo
LED vysoké napětí
přípojka
Stahovací pásky
Bezpečnostní výstražná
nálepka
Odstraňovač pachových stop
LED
Sensore di vibrazione
LED alta tensione
connettore
Spazzole ad alta tensione
multicontatto
Cavi di alta tensione
Fascette serracavo
Adesivi con avvertenze
di sicurezza
Prodotto per rimozione tracce
Wielostykowe szczotki
wysokiego napięcia
Kabel wysokiego napięcia
LED
Czujnik drgań
LED sygnalizująca wysokie napięcie
Złącze wtykowe
Opaski zaciskowe (kablowe)
Naklejka z ostrzeżeniem
Preparat do usuwania zapachów
LED
Vibratiesensor
LED hoogspanning
Multicontact-
hoogspanningsborstels
Hoogspanningskabel
Bonnet switch for immediate
discharge Détecteur d‘ouverture du capot
avec déchargement immédiat
Motorhaubenschalter mit
Sofortentladung Spínač kapoty motoru
s okamžitým vybitím
Interruttore per cofano motore
con scaricamento immediato
wyłącznik pokrywy silnika z
natychmiastowym rozładowaniem Motorkapschakelaar met
directe ontlading
Connector
Kabelbinder
Veiligheidswaarschuwings-
sticker
Geurvlagverwijderaar
Řídicí jednotka
Dispositivo di comando
Jednostka sterująca Besturingsapparaat
Control unit Bloc de commande
High-voltage cable Câble de haute tension
Cable ties Attaches de câble
Warning sticker Autocollant d'avertissement
Scent mark remover
2
1
2
3
456
7
LED Batterie schwach LED Low battery LED Slabá baterieLED Pile faible LED Batteria debole LED Batterij bijna leegLED Słaba bateria
1
A1
A
2
E
2
2
DE: Masse
EN: Earth
FR: Masse
PL: ukostîeni
IT: massa
CZ: Masa
NL: Massa
H
I1-5 min.
1
9
a
a
a
Zubehör No. 1001 Příslušenství 1001Accessori 1001Akcesoria 1001 Accessoires 1001Accessories 1001 Accessoires 1001
Zubehör No. 1001
Příslušenství 1001
Accessori 1001
Akcesoria 1001
Accessoires 1001
Accessories 1001
Accessoires 1001
IT
IT
K
3
J
8
14x

Technische Daten:
• Betriebsspannung: 6 V, 4 AA Batterien
• Batterielaufzeit: bis 18 Monate
• Stromaufnahme durchschnittlich: ca. 0,16 mA
• Hochspannung: > 250 V
• Temperaturbereich: ca. -25°C bis +80°C
• Funktionsanzeige: 3 LEDs für Hochspannung (langsam blinkend),
Vibration (schnell blinkend),
Batterie (langsam blinkend, wenn Batterie schwach)
• Maße Steuergerät: ca. 155 x 88 x 32 mm
• Kabellänge Hochspannungskabel: ca. 4 m
• Multikontakt-Hochspannungsbürsten mit Plus- und Minussträngen
• Auch für Fahrzeuge mit CAN Bus geeignet.
• Automatische Reduzierung der Stromaufnahme bei Kurzschluss oder
Verschmutzung (Blindströme) an den Hochspannungsbürsten.
Kompaktstecker am Steuergerät zum einfachen Abtrennen des Steuergerätes
von der Kabelinstallation. Zulassung durch das Kraftfahrt-Bundesamt
mit dem e1 Zeichen.
MONTAGEANLEITUNG
Wir empfehlen den Einbau durch eine Fachwerkstatt. Um die Kontaktbürsten auch an tieiegenden Eintrittsstellen anbringen zu können ist eine Hebebühne sinnvoll.
SICHERHEITSHINWEISE
• ACHTUNG HOCHSPANNUNG! Die Hochspannung ist für gesunde Menschen zwar ungefährlich, dennoch sollten Sie den Kontakt mit den Kontaktbürsten vermeiden.
Dies gilt besonders für Personen mit Herzleiden oder Herzschrittmacher.
• Die volle Funktionstüchtigkeit des Gerätes kann nur beim Betrieb mit 4 AA (je 1,5 V) Batterien gewährleistet werden (keine Akkus).
• Marderabwehrgerät stets vor übermäßiger Hitze schützen und Verschmutzungen der Kontaktbürsten vermeiden bzw. beseitigen.
• Arbeitsschritte dieser Montageanleitung und deren Sicherheitshinweise unbedingt einhalten.
• Schäden, die durch Nichtbeachten der Montageanleitung verursacht werden, sind von jeglicher Haftung ausgeschlossen.
• Säubern Sie Motorraum und Parkplatz gründlich vor der Montage, um Revierkämpfe zu vermeiden (wir empfehlen für den Motorraum den K&K Duftmarkenentferner, Artikel 000300) (10).
Bestimmungsgemäße Verwendung: Das Gerät dient dem Vertreiben von Mardern und anderen Wildtieren aus dem Motorraum von Kraftfahrzeugen durch Elektroschock. Nachdem der Marder
einen Kurzschluss ausgelöst hat, schaltet die Hochspannungsfunktion kurzzeitig ab, um dem Tier eine Fluchtmöglichkeit zu geben.
FUNKTIONSPRÜFUNG vor Einbau
Alle Geräte werden von uns mehrfach sorgfältig geprüft. Bitte führen Sie darüber hinaus folgende abschließende Prüfung durch:
1) Sicherstellen, dass Kippschalter auf Position 'OFF' steht (A).
2) Eine Kontaktplatte (2) am Ende des Kabels (3) aufziehen, Schrauben in das Hochspannungskabel eindrehen (G) und auf eine isolierende Unterlage legen (Pappe, Holz).
3) Batterien in das Steuergerät einsetzen, 4 x AA (A1).
4) Kippschalter in Position 'ON' bringen (H).
5) Kontaktbürste (Hochspannung) und Steuergerät (Vibration) jetzt nicht mehr berühren.
6) LED (4 + 5 + 6) zeigen durch Blinken die Funktion an, dies kann einige Minuten dauern und zeitversetzt stattnden (I).
7) Hochspannung kann zusätzlich mit digitalem Multimeter am Plusstrang der Kontaktbürste (K) gemessen werden
8) Kompaktstecker (7) ziehen für sofortigen Spannungsabbau oder Kippschalter auf 'OFF' stellen (A) (ACHTUNG! Ca. 3 Minuten Reststrom).
9) Ende Funktionsprüfung
Info: Gewährleistung ausschließlich auf das Gerät, keine Übernahme von Montage und Demontagekosten! Komplettausbau ist selten notwendig, Steuergerät kann getauscht werden!
EINBAU bei getrenntem Kompaktstecker, Kippschalter auf 'OFF'
STEUERGERÄT
Montieren Sie das Steuergerät (1) an einer Stelle, wo es nicht überhitzen kann (z.B. nicht direkt am Auspukrümmer) (B). Beachten Sie bzgl. der Betriebstemperatur auch die Angaben des
Batterieherstellers. LEDs (4 + 5 + 6) sollten gut sichtbar und das Batteriefach gut erreichbar sein.
KONTAKTPLATTEN
Ziehen Sie die Kontaktbürsten (2) auf das Hochspannungskabel (3) auf und verlegen Sie dieses strategisch günstig im Motorraum. Die Positionen der Kontaktbürsten sollten den Gegebenheiten des
Motorraumes angepasst werden (Eintrittsstellen, Laufwege und bissgefährdete Stellen absichern) (E). Das Hochspannungskabel sollte nicht direkt an heißen und drehenden Motorteilen vorbeigeführt
werden (B). Kontaktbürsten sollten mit mindestens 10 mm Abstand zu anderen leitenden Teilen (Kurzschlussgefahr) (C) und schräg montiert werden (Wasserablass) (D). Befestigen Sie die
Kontaktbürsten mit Kabelbindern (F). Durch das Eindrehen der Schrauben wird die Kontaktbürste xiert, das Hochspannungskabel „angezapft“ und der Kontakt hergestellt (G). Das Kabelende sollte an
der letzten Kontaktbürste wegen Kurzschlussgefahr nicht herausstehen.
Bitte bringen Sie den gelben Warnaufkleber ‚Achtung Hochspannung‘ (9) gut sichtbar im Motorraum an (J)!
INBETRIEBNAHME
Stellen Sie den Kippschalter auf Position 'ON' (H). Bei der ersten Inbetriebnahme kann dieser Vorgang einige Minuten dauern (I). In diesem Zustand nicht die Kontaktbürsten oder das Steuergerät
berühren. Der Motorhaubenschalter funktioniert ordnungsgemäß, wenn die Hochspannungs-LED beim Loslassen erlischt. Die LEDs zur Funktionskontrolle können in unterschiedlichen Abständen und
unterschiedlich hell blinken.
BATTERIEN
Die Batterielaufzeit beträgt bis zu 18 Monate. Wenn die Battery Low LED (6) beginnt zu blinken, bleiben noch ca. 3 bis 4 Wochen Zeit, um die Batterien zu erneuern. Verwenden Sie nur AA Batterien mit 1,5 V
Spannung, keine Akkus. Bei der Verwendung von herkömmlichen Akkus mit 1,2 V Spannung wird die nötige Betriebsspannung nicht erreicht. Bei der Verwendung von neuartigen Akkus mit 1,5 V Spannung
funktioniert die Anzeige für den Batteriestatus nicht, da diese Akkus sich schlagartig entladen, nicht langsam wie eine AA Batterie.
Das M9300 ist eine wirkungsvolle und umfassende Abwehrlösung, es kombiniert Ultraschall und Hochspannung, um eine bestmögliche
Abwehrleistung zu erzielen. Trotzdem können wir keine Garantie dafür übernehmen, dass in 100% aller Fälle der Marder vertrieben wird.
WEITERE HINWEISE
Funktioniert das Gerät nicht, könnte das folgende Ursachen haben:
1) Batterien sind nicht richtig eingesetzt oder zu schwach.
2) Die Kontaktbürsten berühren andere leitende Teile (Kurzschluss) (C).
3) Kontakte im Steckverbinder (7) zum Basisgerät haben keine Verbindung (nicht richtig gesteckt, Pin verbogen).
4) Einschalten läuft mit mehreren Sekunden Verzögerung ab. Haben Sie etwas Geduld (I)!
5) Kippschalter steht nicht auf 'ON'.
6) Motorhaubenschalter ist nicht in gedrückter Position.
7) Automatikabschaltung ist durch Vibration aktiv, LED (4) blinkt schnell.
Entsorgung:
Entsorgen Sie Gerät und Batterien gemäß der nationalen Bestimmungen.
Zubehör
- Erweiterungskit mit 4 zusätzlichen Hochspannungsbürsten No M9300-KIT
- Ersatzsteuergerät No M9300-ST
- Motorhaubenschalter mit Sofortentladung No 1001 (a)

INSTALLATION INSTRUCTIONS
We recommend installation by a specialist workshop. A lifting platform is also useful for attaching contact brushes in deep-set entry points.
SAFETY INFORMATION
• WARNING: HIGH-VOLTAGE! High voltage is not harmful to healthy persons. You should, however, avoid contact with the contact brushes.
This applies in particular to people with heart disease or heart pacemakers.
• We can only guarantee the full functioning of the device when it is used with 4 AA (each 1.5 V) batteries (not rechargeable batteries).
• Always protect the marten repellent device against excessive heat and prevent or eliminate dirt on the contact brushes.
• Always comply with the working steps in these installation instructions and the safety information.
• Damage caused by not observing the installation instructions is excluded from any liability.
• Clean the engine compartment and parking space thoroughly before installation in order to avoid turf wars (we recommend the K&K scent mark remover for the engine
compartment, item 000300) (10).
Intended use: The device is used to expel martens and other wild animals from the vehicle engine compartment by means of electric shock. After the marten has triggered a short circuit, the
high-voltage function is switched o for a short time in order to give the animal the opportunity to escape.
FUNCTION TEST prior to installation
All devices are carefully checked by us multiple times. Please also carry out the following nal checks:
1) Ensure that the toggle switch is in the “OFF” position (A).
2) Place the contact plate (2) at the end of the cable (3), insert screws into the high-voltage cable (G) and lay on insulated underlay (cardboard, wood).
3) Place the batteries in the control device, 4 x AA (A1).
4) Switch the toggle switch to the “ON” position (H).
5) Don’t touch the contact brush (high voltage) and control device (vibration) any more.
6) LED (4 + 5 + 6) ashes to indicate it is working. This can take a few minutes and take place at a later time (I).
7) High voltage can also be measured using a digital multimeter on the positive cable of the contact brush (K).
8) Pull multi-pin plug (7) to immediately cut o the current or Set toggle switch to “OFF” (A). (WARNING! After removal, contact brush will carry approx. 3 minutes of residual current)
9) End of function test
Info: Warranty is exclusively for the device. There is no assumption of assembly and disassembly costs! Complete dismantling is rarely required - control unit can be exchanged!
INSTALLATION with the multi-pin plug unplugged, toggle switch set to “OFF”
CONTROL UNIT
Mount the control unit (1) in a place where it cannot overheat (e.g. not directly on the exhaust manifold) (B). Observe the manufacturer’s operating temperature regarding the batteries.
The LEDs (4 + 5 + 6) should be visible and the battery compartment should be easily accessible.
CONTACT PLATES
Raise the contact brushes (2) onto the high-voltage cable (3) and lay this in a strategic location in the engine compartment. Contact brush positions should be adapted to the conditions of the
engine compartment (secure entry points, routes and bite-endangered areas) (E). The high-voltage cable should not be placed anywhere near hot and/or rotating engine parts (B). Contact
brushes should be mounted at a minimum distance of 10mm to other conductive parts (short-circuit hazard) (C) and at an angle (water drainage) (D). Attach the contact plates with cable ties (F).
Tightening the screws xes the contact plate, ‘taps’ the high-voltage cable and makes contact (G). The end of the cable should not protrude from the last contact plate due to a short-circuit
hazard.
Please attach the yellow warning sticker ‘Warning high voltage’ (9) so it can be clearly seen in the engine compartment (J)!
INITIAL OPERATION
Set the toggle switch to the “ON” position (H). This procedure may take a few minutes when operating for the rst time (I). In this state, do not touch the contact brushes or the control device.
The LEDs for function control can ash at various distances and at dierent degrees of brightness.
BATTERIES
The battery life lasts approx. to 18 months. If the Battery Low LED (6) starts to ash, there is still approx. 3 to 4 weeks left to replace the batteries.
Only use AA batteries with 1.5 V voltage, not rechargeable batteries. If standard rechargeable batteries with 1.2 V voltage are used,
the required operating voltage will not be reached. If modern rechargeable batteries with 1.5 V voltage are used, the display for the
battery status will not work, as these batteries discharge abruptly, not slowly like AA batteries.
The M9300 is a highly ecient high-voltage defence solution.
Despite this, we cannot guarantee that the martens will be expelled in 100% of all cases.
MORE INFORMATION
If the device does not work, it could be for the following reasons:
1) The batteries are not properly placed or are too weak.
2) The contact brushes are touching other conductive parts (short circuit) (C).
3) Contacts in the connector (7) to the basic device have no connection (not correctly inserted, pin is bent).
4) There is a delay of several seconds when switching on. Have patience (I)!
5) The toggle switch is not set to “ON”.
6) The bonnet switch is not in the pressed-down position.
7) Automatic shut-o is active via vibration with quick LED (4) ashes.
Disposal: Dispose of the device and batteries in conformance with national regulations.
Accessories
- Extension Kit with 4 additional high voltage contact brushes No M9300-KIT
- Replacement control unit No M9300-ST
- Bonnet switch for immediate discharge No 1001 (a)
Technical data:
• Operating voltage: 6V, 4 AA batteries
• battery life: to 18 months
• Average power consumption: approx. 0,16 mA
• High voltage: > 250V
• Operating temperature range: approx. -25°C to +80°C
• Function display: 3 Flashing LEDs for high voltage (slowly flashing),
vibration (fast flashing),
battery (slowly flashing, if the battery is weak)
• Dimensions control device: approx. 155 x 88 x 32 mm
• high-voltage cable length: approx. 4 m
• Multi-contact high-voltage brushes with plus and minus strands
• Also suitable for vehicles with CAN bus.
Automatic reduction of power consumption in the case of short-circuit or
contamination (reactive currents) at the high-voltage brushes. Compact
plug-and-socket connection at control device for simple disconnection of
the control device from the cable installation. Licensed with the e1
symbol by the German Federal Motor Transport Authority.

INSTRUCTIONS DE MONTAGE
Nous recommandons un montage par un atelier spécialisé. Pour pouvoir installer les brosses de contact également dans des points d'entrée profonds, il est conseillé d'utiliser un élévateur.
CONSIGNES DE SÉCURITÉ
• ATTENTION, HAUTE TENSION! La haute tension n'est certes pas dangereuse pour les personnes en bonne santé, mais il convient tout de même d'éviter le contact avec les brosses de contact.
Cela s'applique notamment aux personnes avec des problèmes cardiaques ou un stimulateur cardiaque.
• Le bon fonctionnement de l'appareil peut seulement être garanti, s'il est utilisé avec 4 piles AA (1,5 V chacune). Ne pas employer de piles rechargeables.
• Protégez toujours l'appareil repousse-martres contre une chaleur trop élevée et évitez ou nettoyez l'encrassement des brosses de contact.
• Les étapes de travail des présentes instructions de montage doivent impérativement être respectées.
• Les dommages entraînés par un non-respect des instructions de montage sont exclus de toute responsabilité.
• Nettoyez soigneusement le compartiment moteur et la place de stationnement avant le montage, pour éviter les combats de défense du territoire
(pour le compartiment moteur, nous recommandons le destructeur de marques olfactives K&K, article 000300) (10).
Utilisation conforme: L'appareil sert à chasser les martres et autres animaux sauvages du compartiment moteur de véhicules automobiles avec des décharges électriques. Une fois que la martre a subi
une décharge électrique, la fonction de haute tension s'arrête brièvement pour laisser une possibilité à l'animal de s'échapper.
VÉRIFICATION DU FONCTIONNEMENT avant l'installation
Tous les appareils sont vériés soigneusement par nos soins plusieurs fois. Veuillez également procéder à la vérication nale suivante:
1) S'assurer que l'interrupteur à bascule est bien en position «OFF» (A).
2) Insérer une plaque de contact (2) à l'extrémité du câble (3), visser le câble de haute tension (G) et le placer sur un support isolant (carton, bois).
3) Insérer les piles dans l'unité de commande, 4 x AA (A1).
4) Mettre l'interrupteur à bascule en position «ON» (H).
5) Ne plus toucher ni les brosses de contact (haute tension), ni l'unité de commande (vibrations).
6) En clignotant, les LED (4 + 5 + 6) indiquent le fonctionnement, cela peut prendre quelques minutes et se produire en diéré (I).
7) La haute tension peut également être mesurée avec un multimètre numérique au brin positif de la brosse de contact (K).
8) Retirer le connecteur compact (7) pour une coupure immédiate de la tension ou Mettre l'interrupteur à bascule sur «OFF» (A) (ATTENTION! Courant résiduel env. 3minutes).
9) Fin de la vérication de fonctionnement
Info: Garantie exclusivement sur l'appareil, pas de prise en charge des coûts de montage et de démontage! Une désinstallation complète est rarement nécessaire, le bloc de commande peut être changé!
INSTALLATION avec le connecteur compact débranché et l'interrupteur à bascule sur «OFF»
BLOC DE COMMANDE
Monter l'unité de commande (1) dans un endroit où elle ne peut pas surchauer (p. ex. pas directement au niveau du collecteur d'échappement) (B). Respecter également les instructions du fabricant
de la batterie / des piles concernant la température de fonctionnement. Les LED (4 + 5 + 6) doivent être bien visibles et le compartiment à piles doit être facilement accessible.
PLAQUES DE CONTACT
Insérez les brosses de contact (2) sur le câble de haute tension (3) et placez-le de manière stratégiquement avantageuse dans le compartiment moteur. Les positions des brosses de contact devraient
être adaptées aux caractéristiques du compartiment moteur (sécuriser les lieux d'entrée, axes de passage et lieux exposés à des risques de morsure) (E). Le câble haute tension ne doit pas être passé
directement sur des pièces de moteur très chaudes et rotatives (B). Les brosse de contact doivent être montées avec un écart d'au moins 10mm par rapport aux autres éléments conducteurs (risque de
court-circuit) (C) et en biais (évacuation de l'eau) (D). Fixez les brosses de contact avec des attaches (F). En vissant les vis, le balai de contact est xé, le câble haute tension est «taraudé» et le contact
est établi (G). L'extrémité de câble de la dernière brosse de contact ne doit pas dépasser à l'extérieur, en raison du risque de court-circuit.
Apposez l'autocollant d'avertissement «Attention haute tension» (9) de manière bien visible dans le compartiment moteur (J)!
MISE EN SERVICE
Mettre l'interrupteur à bascule en position «ON» (H). Lors de la première mise en service, ce processus peut durer plusieurs minutes (I). Ne pas toucher les brosses de contact, ni l'unité de commande,
quand l'appareil est dans ce mode. Les LED de contrôle du fonctionnement peuvent clignoter à diérents intervalles et de façon plus ou moins claire.
PILES
La durée de vie des piles est d'environ à 18 mois. Lorsque la LED battery low (6) commence à clignoter, il reste environ 3 à 4 semaines pour remplacer les piles. Utiliser exclusivement des piles
AA d'une tension de 1,5 V, pas de piles rechargeables. Les piles rechargeables conventionnelles, d'une tension de 1,2 V, ne permettent pas d'atteindre la tension nécessaire à cet appareil. Quant aux
piles rechargeables nouveau modèle, d'une tension de 1,5 V, si on les utilise, l'indicateur d'état des piles ne peut pas remplir son rôle parce
que ces piles se déchargent soudainement et non lentement comme une pile AA.
Le M9300 est une solution ecace et globale, elle combine les ultrasons et la haute tension pour générer la meilleure solution de défense
possible. Nous ne pouvons tout de même pas vous garantir que les martres seront chassées dans 100% des cas.
INDICATIONS SUPPLÉMENTAIRES
Si l'appareil ne fonctionne pas, les causes peuvent être les suivantes:
1) Les piles ne sont pas insérées correctement ou sont trop faibles.
2) Les brosses de contact touchent d'autres éléments conducteurs (court-circuit) (C).
3) Les contacts dans le connecteur (7) à l'appareil de base n'ont pas de connexion (pas correctement raccordé, pin plié).
4) Le démarrage s'eectue en quelques secondes. Soyez patient(I)!
5) L'interrupteur à bascule n'est pas sur «ON».
6) Le contacteur d'ouverture du capot n'est pas enfoncé.
7) L'extinction automatique est active en raison de vibrations, la LED (4) clignote rapidement.
Mise au rebut:
Accessoires
- Kit d’extension avec 4 brosses à haute tension multicontact No M9300-KIT
- Appareil de contrôle de remplacement No M9300-ST
- Détecteur d‘ouverture du capot avec déchargement immédiat No 1001 (a)
Spécicités techniques:
• Tension de fonctionnement: 6 V, 4 piles AA
• autonomie: à 18 mois
• Consommation électrique moyenne: env. 0,16 mA
• Haute tension: > 250V
• Plage de températures: env. -25°C à +80°C
• Affichage de fonctionnement: 3 LED pour la haute tension (clignotement
lent), vibrations (clignotement rapide),
batterie (clignotement lent lorsque la batterie est faible)
• Dimensions unité de commande: env. 155 x 88 x 32 mm
• longueur du câble haute tension: env. 4 m
• Brosses multicontact haute tension à brins positifs et négatifs
• Convient également aux véhicules avec bus CAN.
Réduction automatique de l‘absorption de courant en cas de court-circuit
ou d‘encrassement (courants réactifs) sur les balais à haute tension.
Connexion compacte sur l‘unité principale permettant de la déconnecter
aisément du réseau de câblage. Autorisation de l‘Oce allemand
pour la circulation des véhicules à moteur (homologation e1)
Éliminez l'appareil et les piles conformément aux réglementations nationales en vigueur.

ISTRUZIONI DI MONTAGGIO
Raccomandiamo il montaggio da parte di un’ocina specializzata. Per poter apporre le spazzole di contatto anche in punti di ingresso situati in basso, può essere utile l’impiego di un ponte
sollevatore. In caso di domande di carattere tecnico, siamo disponibili all’indirizzo e-mail [email protected]
AVVERTENZE DI SICUREZZA
• ATTENZIONE, ALTA TENSIONE! Per le persone sane, l’alta tensione non rappresenta un pericolo; evitare in ogni caso il contatto con le spazzole di contatto. Ciò vale in particolare per le persone
con problemi cardiaci o con pacemaker.
• Il pieno funzionamento del dispositivo può essere garantito solo quando si opera con 4 batterie AA, da 1,5 V ciascuna (non ricaricabili).
• Proteggere sempre il dispositivo scaccia-martore dal calore eccessivo e impedire che le spazzole di contatto si sporchino o rimuovere la sporcizia.
• Rispettare tassativamente le fasi operative delle presenti istruzioni di montaggio e le relative avvertenze di sicurezza.
• Si declina qualsivoglia responsabilità per danni dovuti al mancato rispetto delle istruzioni di montaggio.
• Prima del montaggio, pulire accuratamente il vano motore e il parcheggio onde evitare dispute territoriali (per il vano motore consigliamo il prodotto per la rimozione
delle tracce odorose K&K, articolo 000300) (10).
Uso previsto: Il dispositivo serve ad allontanare le martore e altri animali selvatici dal vano motore degli autoveicoli mediante scosse elettriche. Nel momento in cui la martora attiva un
cortocircuito, la funzione di alta tensione si disattiva brevemente, per orire all’animale una possibilità di fuga.
CONTROLLO DEL FUNZIONAMENTO prima del montaggio
Tutti i dispositivi vengono da noi ripetutamente sottoposti ad accurati controlli. Si prega di eseguire in via supplementare il seguente controllo nale:
1) Assicurarsi che l’interruttore a levetta sia in posizione 'OFF' (A).
2) Posizionare una piastra di contatto (2) all’estremità del cavo (3), avvitare le viti nel cavo di alta tensione (G) e disporre su una base isolante (cartone, legno).
3) Inserire le batterie nel dispositivo di comando, 4 x AA (A1).
4) Spostare l’interruttore a levetta in posizione 'ON' (H).
5) Non toccare più la spazzola di contatto (alta tensione) e il dispositivo di comando (vibrazioni).
6) Il LED (4 + 5 + 6) lampeggiante indica il funzionamento; il LED può lampeggiare per qualche minuto e accendersi in ritardo (I).
7) L’alta tensione può essere anche misurata con il multimetro digitale nella parte positiva della spazzola di contatto (K).
8) Staccare il connettore compatto (7) per l’abbassamento immediato della tensione o per Impostare l’interruttore a levetta su 'OFF' (A) (ATTENZIONE! Corrente residua per circa 3 minuti).
9) Fine del controllo del funzionamento
Informazioni: Garanzia esclusivamente sul dispositivo: nessuna assunzione dei costi di montaggio e smontaggio! Smontaggio completo raramente necessario; il dispositivo di comando può essere sostituito!
MONTAGGIO con spina compatta scollegata, commutare l’interruttore a levetta su 'OFF'
DIPOSITIVO DE COMANDO
Montare il dispositivo di comando (1) in un luogo dove non possa surriscaldarsi (ad es. non direttamente sul collettore di scarico) (B). Osservare anche le istruzioni del produttore della batteria per
quanto riguarda la temperatura di esercizio. I LED (4 + 5 + 6) devono essere chiaramente visibili e il vano batteria facilmente accessibile.
PIASTRE DI CONTATTO
Posizionare le spazzole di contatto (2) sul cavo di alta tensione (3) e disporle in modo strategico nel vano motore. Le posizioni delle spazzole di contatto devono essere adeguate alle condizioni del
vano motore (mettere in sicurezza i punti di accesso, i passaggi e i punti a rischio morsi) (E). Il cavo di alta tensione non deve esser fatto passare direttamente in parti del motore calde o rotanti
(B). Le spazzole di contatto devono essere montate ad almeno 10 mm di distanza rispetto alle altre parti conduttrici (pericolo di cortocircuito) (C) e in modo inclinato (scarico acqua) (D). Fissare le
spazzole di contatto con le fascette serracavo (F). Avvitando le viti si ssa la spazzola di contatto, si “controlla” il cavo di alta tensione e si crea il contatto (G). L’estremità del cavo nell’ultima
spazzola di contatto non deve sporgere, altrimenti sussiste il rischio di cortocircuito.
Apporre nel vano motore tutti gli adesivi di avvertenza gialli “Attenzione alta tensione” (9) in modo che siano ben visibili (J)!
MESSA IN FUNZIONE
Posizionare l’interruttore a levetta su 'ON' (K). Alla prima messa in esercizio la procedura potrebbe richiedere alcuni minuti (I). In questa modalità, non toccare le spazzole di contatto né il
dispositivo di comando. I LED per il controllo del funzionamento possono lampeggiare a intervalli diversi e con diversa intensità.
BATTERIE
La durata della batteria è di circa 18 mesi. Quando il LED di batteria scarica (6) inizia a lampeggiare, le batterie vanno sostituite entro 3/4 settimane. Utilizzare solo batterie AA con tensione di 1,5
V, non batterie ricaricabili. Se si utilizzano batterie comuni con tensione di 1,2 V, la tensione di esercizio richiesta non viene raggiunta. Quando si utilizzano batterie nuove con tensione di 1,5 V,
l’indicatore di stato della batteria non funziona perché queste batterie si scaricano improvvisamente,
non lentamente come una batteria AA.
Il M9300 è una soluzione di difesa ecace e completa. Combina ultrasuoni e alta tensione per ottenere risultati ottimali.
Tuttavia non è possibile garantire che le martore vengano allontanate nel 100% dei casi.
ALTRE INDICAZIONI
Se il dispositivo non funziona, le cause possono essere le seguenti:
1) Le batterie non sono inserite correttamente o sono troppo deboli.
2) Le spazzole di contatto toccano altre parti conduttrici (cortocircuito) (C).
3) I contatti nel connettore (7) per il dispositivo di base non presentano un collegamento (non inseriti correttamente, pin piegati).
4) L’accensione si avvia con diversi secondi di ritardo. Pazientare qualche istante (I)!
5) L’interruttore a levetta non è impostato su 'ON'.
6) L’interruttore della cappa non è in posizione premuta.
7) Lo spegnimento automatico è attivo per via delle vibrazioni, il LED (4) lampeggia rapidamente.
Smaltimento:
Smaltire il dispositivo e le batterie secondo le direttive nazionali.
Accessori
- Set di accessori per l'espansione no a ulteriori 4 punti di contatto No M9300-KIT
- Centralina sostitutiva No M9300-ST
- Interruttore per cofano motore con scaricamento immediato No 1001 (a)
Dati tecnici:
• Tensione di esercizio: 6V, 4 batterie AA
• durata della batteria: a 18 mesi circa
• Consumo medio di corrente: circa 0,16 mA
• Alta tensione: > 250V
• Intervallo di temperatura: da -25°C a +80°C circa
• Visualizzazione delle funzioni: 3 LED per alta tensione (a lampeggiamento lento),
vibrazioni (a lampeggiamento rapido),
batteria (a lampeggiamento lento, quando la batteria è scarica)
• Dimensioni dispositivo di comando: ca. 155 x 88 x 32 mm
• Lunghezza cavo di alta tensione: ca. 4 m
• Spazzole multi-contatto ad alta tensione con fili positivi e negativi
• Adatto anche per veicoli con CAN bus.
Riduzione automatica dell‘assorbimento di corrente, in caso di cortocircuito o
disturbo (corrente reattiva) in corrispondenza delle spazzole ad alta tensione.
Connettore compatto da collegare all‘apparecchio di comando per separare in
tutta semplicità il dispositivo stesso dai cavi. Omologato dall‘Ucio Federale
della Motorizzazione e dotato del marchio e1.

INSTRUKCJA MONTAŻU
Zalecamy montaż przez warsztat specjalistyczny. Aby umieścić szczotki stykowe także w głębiej położonych miejscach dostępu, praktyczne będzie użycie podnośnika hydraulicznego.
ZASADY BEZPIECZEŃSTWA
• UWAGA na WYSOKIE NAPIĘCIE! Wysokie napięcie nie jest wprawdzie niebezpieczne dla zdrowego człowieka, jednak należy unikać kontaktu ze szczotkami stykowymi. Dotyczy to
zwłaszcza osób z dolegliwościami sercowymi lub z wszczepionym stymulatorem serca.
• Pełną funkcjonalność urządzenia można zagwarantować tylko w przypadku użytkowania z 4 bateriami AA (każda 1,5 V) (nie z akumulatorami).
• Odstraszacz kun należy zawsze chronić przed nadmiernie wysoką temperaturą i unikać zabrudzenia szczotek stykowych wzgl. je usuwać.
• Należy bezwarunkowo przestrzegać kroków roboczych izasad bezpieczeństwa zawartych w niniejszej Instrukcji montażu.
• Wszelka odpowiedzialność cywilna za szkody spowodowane w wyniku nieprzestrzegania niniejszej Instrukcji obsługi jest wyłączona.
• Przed montażem należy gruntownie oczyścić komorę silnika oraz miejsce parkowania, aby uniknąć walk oterytorium (zalecamy do komory silnika Preparat do usuwania
zapachów K&K, art. 000300) (10).
Stosowanie zgodne z przeznaczeniem: Urządzenie służy do odstraszania iwypędzania kun i innych dzikich zwierząt z komory silnika przez zastosowanie szoku elektrycznego. Po wywołaniu
zwarcia przez kunę, funkcja wysokiego napięcia zostanie na krótko przerwana, aby pozostawić zwierzęciu możliwość ucieczki.
KONTROLA DZIAŁANIA przed montażem
Wszystkie urządzenia przechodzą unas wielokrotne kontrole. Ponadto prosimy o przeprowadzenie następującej kontroli końcowej:
1) Należy się upewnić, że przełącznik znajduje się w pozycji „OFF” (A).
2) Naciągnąć płytkę kontaktową (2) na końcówkę kabla (3). Wkręcić śruby w kabel wysokiego napięcia (G) i ułożyć na izolującej podkładce (karton, drewno).
3) Włożyć baterie do jednostki sterującej, 4 x AA (A1).
4) Ustawić przełącznik przechylmy w pozycji „ON” (H).
5) Teraz już nie należy dotykać szczotek kontaktowych (wysokie napięcie) ani jednostki sterującej (wibracje).
6) Miganie diod LED (4 + 5 + 6) sygnalizuje działanie urządzenia. To może potrwać kilka minut i nastąpić zprzesunięciem w czasie (I).
7) Wysokie napięcie można dodatkowo zmierzyć przy użyciu cyfrowego multimetru na włóknach plus szczotki stykowej (K).
8) Dla potrzeb natychmiastowego obniżenia napięcia wyciągnąć wtyczkę kompaktową (7) lub Ustawić przełącznik przechylny w pozycji „OFF” (A) (UWAGA! Jeszcze prąd przez ok. 3 minuty).
9) Koniec kontroli działania
Informacja: Gwarancja obowiązuje wyłącznie na urządzenie. Nie obejmuje montażu ikosztów demontażu! Kompletne wymontowanie jest rzadko konieczne. Można wymienić jednostkę sterującą!
MONTAŻ przy odłączonej wtyczce kompaktowej, przełącznik w pozycji „OFF”
JEDNOSTKE STERUJACA
Jednostkę sterującą (1) należy zamontować w miejscu, gdzie nie będzie mogła się przegrzewać (np. nie bezpośrednio przy kolektorze wylotowym) (B). Należy również zwrócić uwagę na
informacje producenta baterii dotyczące temperatury roboczej. Diody LED (4 + 5 + 6) powinny być wyraźnie widoczne, a komora baterii powinna być łatwo dostępna.
PLYTKI KONTAKTOWE
Naciągnąć szczotki stykowe (2) na kabel wysokiego napięcia (3) i poprowadzić je wstrategicznie korzystnym miejscu komory silnika. Pozycje szczotek stykowych powinny zostać dostosowanie do
warunków komory silnika (miejsca przedostania się do środka, ścieżki wędrówek i miejsca narażone na ataki gryzoni) (E). Kabla wysokiego napięcia nie należy prowadzić bezpośrednio przy
gorących iobracających się częściach silnika (B). Szczotki stykowe powinny mieć co najmniej 10 mm odstępu od innych części przewodzących prąd (niebezpieczeństwo zwarcia) (C) i należy je
zamontować ukośnie (spust wody) (D). Szczotki stykowe należy przymocować przy użyciu opasek zaciskowych kablowych (F). Szczotka stykowa jest mocowana przez wkręcenie śrub, które
„podłącza ją” do kabla wysokiego napięcia i ustanawia kontakt (G). Końcówka kabla nie powinna wystawać na ostatniej szczotce stykowej zpowodu zagrożenia zwarciem.
Proszę umieścić żółtą naklejkę ostrzegawczą „Uwaga! Wysokie napięcie” (9) wdobrze widocznym miejscu w komorze silnika (J)!
URUCHOMIENIE
Ustawić przełącznik przechylny w pozycji „ON” (H). Podczas pierwszego uruchomienia operacja ta może potrwać kilka minut (I). W tym stanie nie wolno dotykać szczotek stykowych ani jednostki
sterującej. Diody LED do kontroli działania mogą migać w różnych odstępach czasu izróżnym natężeniem światła.
BATERIE Żywotność baterii wynosi ok. do 18 miesięcy. Kiedy dioda LED niskiego poziomu baterii (6) zacznie migać, oznacza to, że do wymiany baterii jest ok. 3 do 4 tygodni. Należy używać tylko baterii AA
o napięciu 1,5 V, nie używać akumulatorów. Podczas korzystania z konwencjonalnych akumulatorów o napięciu 1,2 V wymagane napięcie robocze nie jest osiągane. Podczas korzystania z akumulatorów
1,5 V nowej generacji wskaźnik stanu baterii nie działa, ponieważ akumulatory te rozładowują się nagle, nie tak wolno jak bateria AA.
M9300 jest skutecznym i kompleksowym rozwiązaniem do odstraszania gryzoni. Połączenie ultradźwięków zwysokim napięciem pozwala
uzyskać możliwie najlepsze rezultaty odstraszające. Mimo to nie możemy zagwarantować, że kuna zostanie wygnana w 100% przypadków.
WIĘCEJ WSKAZÓWEK
Jeżeli urządzenie nie działa, może to mieć różne przyczyny:
1) Baterie nie są włożone prawidłowo lub są zbyt słabe.
2) Szczotki stykowe dotykają innych części przewodzących prąd (zwarcie) (C).
3) Styki wzłączu elektronicznym (7) nie mają połączenia zurządzeniem podstawowym (nieprawidłowo wetknięte, zgięty zacisk).
4) Włączenie ma kilka sekund opóźnienia. Prosimy o cierpliwość (I)!
5) Przełącznik przechylny nie jest ustawiony na „ON”.
6) Wyłącznik maski samochodu nie jest w pozycji wciśniętej.
7) Automatyczne wyłączanie jest aktywowane przez wibracje, dioda LED (4) miga szybko.
Usuwanie:
Urządzenie i baterie należy utylizować zgodnie z przepisami krajowymi.
Akcesoria
- Zestaw akcesoriów do rozszerzenia o4styki wysokiego napięcia No M9300-KIT
- Wymienne urządzenie sterujące No M9300-ST
- Wyłącznik pokrywy silnika z natychmiastowym rozładowaniem No 1001 (a)
Dane techniczne:
• Napięcie robocze: 6V, 4 baterie AA
• żywotność baterii: do 18 miesięcy
• Średni pobór mocy: ok. 0,16 mA
• Wysokie napięcie: > 250V
• Zakres temperatur: ok. -25°C do +80°C
• Wskazanie działania: 3 diody LED dla wysokiego napięcia (migające
powoli), wibracji (migające szybko),
baterii (migające powoli, gdy bateria jest słaba)
• Wymiary jednostki sterującej: ok. 155 x 88 x 32 mm
• długość kabla wysokiego napięcia: ok. 4 m
• Szczotki wysokonapięciowe wielokontaktowe z przewodami
fazowymi plus i minus
• Nadaje się również do pojazdów z magistralą CAN.
Automatyczna redukcja poboru prądu, w razie zwarcia lub zabrudzenia
(prądy bierne) w szczotki wysokiego napięcia. Kompaktowe złącze
wtykowe w sterowniku do łatwego odłączenia sterownika od instalacji
kablowej. Aprobata Federalnego Urzędu Pojazdów
Mechanicznych ze znakiem e1.

POKYNY K INSTALACI
Doporučujeme, aby montáž provedl autoservis. Pro umístění kontaktních kartáčů také na hlouběji položených místech vstupu má smysl používat zvedací plošinu.
BEZPEČNOSTNÍ UPOZORNĚNÍ
• POZOR, VYSOKÉ NAPĚTÍ! Ačkoli není toto vysoké napětí pro zdravého člověka nebezpečné, přesto by se lidé měli vyhýbat kontaktu s kontaktními kartáči. Platí to zejména pro osoby s nemocemi
srdce a kardiostimulátorem.
• Plnou funkčnost přístroje lze garantovat pouze při provozu s bateriemi 4 AA (1,5 V) (nepoužívejte nabíjecí baterie).
• Odpuzovač kun vždy chraňte před nadměrným horkem a zamezte znečištění kontaktních kartáčů, resp. jej odstraňte.
• Je nutné bezpodmínečně dodržet pracovní kroky popsané v tomto návodu k montáži a také bezpečnostní upozornění.
• Na škody způsobené nedodržením návodu k montáži se ručení nevztahuje.
• Před montáží důkladně vyčistěte prostor motoru i parkovací plochu, abyste zamezili soubojům o revír (pro prostor motoru doporučujeme odstraňovač pachových
stop K&K, položka 000300) (10).
Použití v souladu s určením: Přístroj slouží k odpuzovaní kun a jiných divokých zvířat z prostoru motoru motorových vozidel formou elektrošoků. Jakmile kuna vyvolá zkrat, vypne se na krátký
čas funkce vysokého napětí, aby mělo zvíře možnost prchnout.
ZKOUŠKA FUNKČNOSTI před zabudováním
Všechny přístroje opakovaně pečlivě prověřujeme. Přesto vás prosíme, abyste provedli ještě závěrečnou kontrolu:
1) Zajistěte, aby byl kolébkový přepínač v poloze 'OFF' (A).
2) Kontaktní desku (2) na konci kabelu (3) natáhněte, do vysokonapěťového kabelu zašroubujte šrouby (G) a položte na izolující podložku (lepenka, dřevo).
3) Baterie vložte do řídicí jednotky, 4x AA (A1).
4) Kolébkový přepínač uveďte do polohy 'ON' (H).
5) Kontaktního kartáče (vysoké napětí) a řídicí jednotky (vibrace) se teď už nedotýkejte.
6) LED (4 + 5 + 6) blikáním indikují funkci, což ovšem může několik minut trvat a nastat až s časovým opožděním (L).
7) Vysoké napětí můžete na plusové větvi kontaktního kartáče (K) dodatečně změřit digitálním multimetrem
8) Za účelem okamžitého odpojení napětí vytáhněte kompaktní zástrčku (7) nebo Kolébkový přepínač uveďte do polohy 'OFF' (A) (POZOR! Ještě zhruba 3 minuty elektrický proud)
9) Konec zkoušky funkčnosti
Info: Záruka se týká pouze přístroje, nepřebíráme náklady na montáž a demontáž! Kompletní vybudování bývá zřídkakdy nezbytné, řídicí přístroj lze vyměnit!
ZABUDOVÁNÍ při odpojené kompaktní zástrčce, kolébkový přepínač na 'OFF'
ŘÍDICÍ PŘÍSTROJ
Řídicí jednotku (1) namontujte na takové místo, kde nemůže dojít k jeho přehřátí (např. ne přímo na koleni výfuku) (B). V souvislosti s provozní teplotou respektujte také údaje výrobce baterií. LED
(4 + 5 + 6) by měly být dobře vidět a přihrádka na baterie by měla být dobře dosažitelná.
KONTAKTNI DESKY
Kontaktní kartáče (2) vytáhněte na vysokonapěťový kabel (3) a kabel v prostoru motoru uložte strategicky výhodně. Pozice kontaktních kartáčů by měly být přizpůsobeny danostem prostoru
motoru (zabezpečte jimi místa vstupu, chodbičky a místa, kde hrozí prokousnutí) (E). Vysokonapěťový kabel byste neměli vést přímo kolem horkých a rotujících částí motoru (B). Kontaktní kartáče
byste měli namontovat ve vzdálenosti nejméně 10 mm od jiných vodivých dílů (nebezpečí zkratu) (C) a šikmě (odtékání vody) (D). Kontaktní kartáče upevněte stahovacími pásky (F). Zakroucení
šroubů způsobí zaxování kontaktního kartáče, napojení vysokonapěťového kabelu a vytvoření kontaktu (G). Konec kabelu by u posledního kontaktního kartáče neměl přečnívat, jinak hrozí
nebezpečí zkratu. Žlutou výstražnou nálepku ‚Pozor, vysoké napětí‘ (9) nalepte v prostoru motoru dobře viditelně (J)!
UVEDENÍ DO PROVOZU
Kolébkový přepínač nastavte do polohy 'ON' (H). V případě prvního uvedení do provozu může tento proces trvat několik minut (I). V tomto stavu se kontaktních kartáčů nebo řídicí jednotky
nedotýkejte. LED-ky pro kontrolu funkcí mohou blikat v různých intervalech a s odlišnou intenzitou jasu.
BATERIE
Životnost baterie je cca až 18 měsíců. Jestliže začne blikat Battery Low LED (6), je ještě čas cca 3 až 4 týdny na výměnu baterií. Používejte pouze baterie AA s napětím 1,5 V, nepoužívejte nabíjecí
baterie. Při použití obvyklých nabíjecích baterií s napětím 1,2 V není dosaženo potřebné provozní napětí. Při použití nových nabíjecích
baterií s napětím 1,5 V nefunguje indikátor stavu baterie, protože se tyto baterie vybijí najednou, ne tak pomalu jako baterie AA.
M9300 představuje účinné a komplexní řešení odpuzování, které kombinuje ultrazvuk a vysoké napětí za účelem dosažení nejlepšího
možného efektu odpuzování. Přesto nemůžeme na 100% zaručit, že kuna bude pokaždé odpuzena.
DALŠÍ UPOZORNĚNÍ
Pokud přístroj nefunguje, může to mít následující příčiny:
1) Baterie nejsou správně vloženy nebo jsou příliš slabé.
2) Kontaktní kartáče se dotýkají jiných vodivých dílů (zkrat) (C).
3) Kontakty v konektoru (7), který zajištuje spojení se základním přístrojem, nemají spojení (nejsou správně zasunuty, kolíky jsou ohnuty).
4) Zapnutí nastane se skluzem několika vteřin. Mějte strpení (I)!
5) Kolébkový přepínač není na 'ON'.
6) Spínač kapoty motoru není ve stlačené poloze.
7) Vibracemi je aktivováno automatické vypnutí, LED (4) bliká rychle.
Likvidace:
Přístroj a baterie zlikvidujte v souladu s národními předpisy.
Příslušenství
- Doplňková sada se 4 dalšími kontaktními deskami No M9300-KIT
- Náhradní řídicí jednotka No M9300-ST
- Spínač kapoty motoru s okamžitým vybitím No 1001 (a)
Technické údaje:
• Provozní napětí: 6V, 4 AA baterie
• životnost baterií: až 18 měsíců
• Příkon průměrně: cca 0,16 mA
• Vysoké napětí: >250V
• Teplotní rozsah: cca -25 °C až +80 °C
• Zobrazení funkce: 3 LED pro vysoké napětí (pomalu blikající),
vibrace (rychle blikající)
baterii (pomalu blikající, když je baterie slabá)
• Rozměry řídicí jednotky: cca 155 x 88 x 32 mm,
• délka vysokonapěťového kabelu: cca 4 m
• Multikontaktní vysokonapěťové kartáče s plusovými a mínusovými provazci
• Vhodné také pro vozidla se sběrnicemi CAN.
• Automatické snížení příkonu při zkratu nebo znečištění (jalových proudech)
na vysokonapěťových kartáčích.
Kompaktní zástrčka na řídicí jednotce k jednoduššímu odpojení řídicí jednotky
od kabeláže.
Schváleno úřadem pro motorová vozidla a opatřeno značkou e1.

MONTAGEHANDLEIDING
Wij adviseren om de inbouw door een vakwerkplaats te laten uitvoeren. Om de contactborstels ook op diepliggende inlaatplekken te kunnen aanbrengen komt een hefbrug van pas.
VEILIGHEIDSAANWIJZINGEN
• LET OP, HOOGSPANNING! Hoogspanning is voor gezonde personen weliswaar ongevaarlijk, maar desondanks moet u het contact met de contactborstels vermijden.
Dat geldt met name voor personen met een hartkwaal of pacemaker.
• De juiste werking van het apparaat is uitsluitend gegarandeerd bij gebruik van 4 AA-batterijen van elk 1,5 V (geen accu's).
• Marterverjager altijd beschermen tegen overmatige hitte en verontreinigingen van de contactborstels voorkomen resp. verwijderen.
• Werkstappen van deze montagehandleiding en de veiligheidsaanwijzingen beslist in acht nemen.
• Wij zijn niet aansprakelijk voor schade die wordt veroorzaakt door het niet in acht nemen van de montagehandleiding.
• Maak de motorruimte en parkeerplek voor montage grondig schoon, om territoriumstrijd te voorkomen
(voor de motorruimte adviseren wij de K&K geurvlagverwijderaar, artikel 000300) (10).
Reglementair gebruik: Het apparaat is bedoeld voor het verjagen van marters en andere wilde dieren uit de motorruimte van personenauto's door elektrische schok. Nadat de marter een
kortsluiting heeft veroorzaakt, wordt de hoogspanningsfunctie tijdelijk uitgeschakeld, om het dier te laten vluchten.
CONTROLE VAN DE WERKING voor het inbouwen
Alle apparaten worden meerdere keren zorgvuldig door ons gecontroleerd. Voer daarnaast de volgende afsluitende controle uit:
1) Controleer of de schakelaar op stand 'OFF' staat (A).
2) Een contactplaat (2) aan het einde van de kabel (3) bevestigen, schroeven in de hoogspanningskabel indraaien (G) en op een isolerende onderlegger plaatsen (karton, hout).
3) Plaats de batterijen in de regelunit, 4 x AA (A1).
4) Zet de schakelaar op de stand 'ON' (H).
5) Raak de contactborstel (hoogspanning) en de regelunit (trillingen) nu niet meer aan.
6) Led (4 + 5 + 6) geeft de werking door knipperen aan, dit kan enkele minuten duren en later plaatsvinden (I).
7) Hoogspanning kan aanvullend met digitale multimeter op de plusstreng van de contactborstel (K) worden gemeten
8) Compacte stekker (7) eruit trekken voor directe spanningsafbouw of Plaats de schakelaar op 'OFF' (A) (LET OP! Nog ca. 3 minuten reststroom).
9) Einde controle van de werking
Info: Garantie uitsluitend op het apparaat, kosten voor montage en demontage worden niet vergoed! Compleet uitbouwen is zelden noodzakelijk, besturingseenheid kan worden vervangen!
INBOUW Stekkers verwijderd, schakelaar op 'OFF'
BESTURINGSAPPARAAT
Monteer de regelunit (1) op een plek, waar deze niet oververhit kan raken (bijv. niet te dicht bij het spruitstuk) (B). Let bij de voorgeschreven bedrijfstemperatuur ook op de voorschriften van de
batterijenproducent. De leds (4 + 5 + 6) moeten goed zichtbaar en het batterijvakje moet goed bereikbaar zijn.
CONTACTPLATEN
Bevestig de contactborstels (2) met de hoogspanningskabel (3) en leg deze strategisch in de motorruimte. De posities van de contactborstels moeten aan de omstandigheden in de motorruimte
worden aangepast (dekkend voor inlaatplekken, loopwegen en beetgevaarlijke plekken) (E). De hoogspanningskabel moet niet direct langs hete en draaiende motordelen worden gelegd (B).
Contactborstels moeten met minimaal 10 mm afstand tot andere geleidende delen (gevaar voor kortsluiting) (C) en schuin worden gemonteerd (afvoer van water) (D). Bevestig de contact-
borstels met kabelbinders (F). Door het indraaien van de schroeven wordt de contactborstel bevestigd, de hoogspanningskabel "afgetapt" en het contact tot stand gebracht (G).Het uiteinde van
de kabel mag op de laatste contactborstel vanwege gevaar voor kortsluiting niet uitsteken.
Breng de gele waarschuwingssticker 'Let op, hoogspanning' (9) goed zichtbaar in de motorruimte aan (J)!
INBEDRIJFNAME
Zet de schakelaar op de stand 'ON' (H). Bij de eerste inbedrijfname kan deze procedure enkele minuten duren (I). In deze stand mogen de contactborstels of de regelunit niet worden aangeraakt.
De leds voor de controle van de werking kunnen met verschillende tussenpozen en helderheid knipperen.
BATTERIJEN
Batterijen gaan ca. tot 18 maanden mee. Wanneer het ledlampje Battery Low (6) begint te knipperen, dient u de batterijen binnen 3 tot 4 weken te vervangen.
Gebruik uitsluitend AA-batterijen met een spanning van 1,5 V en geen accu's. Het gebruik van normale accu's van 1,2 V levert onvoldoende spanning op. Wanneer u nieuwe accu's van 1,5 V
gebruikt, werkt de weergave van de batterijstatus niet, omdat deze accu's in grote stappen ontladen en niet langzaam zoals een AA-batterij.
De M9300 is een eectieve en uitgebreide marterverjager. Deze combineert ultrasoon geluid en hoogspanning om marters zo goed
mogelijk te verjagen. Desondanks kunnen wij niet garanderen dat de marter in 100% van de gevallen wordt verjaagd.
VERDERE AANWIJZINGEN
Als het apparaat niet werkt, kan dat de volgende oorzaken hebben:
1) Batterijen zijn niet op de juiste manier geplaatst of te zwak.
2) De contactborstels raken andere geleidende delen aan (kortsluiting) (C).
3) Contacten in de connector (7) voor het basisapparaat hebben geen verbinding (niet correct ingestoken, pin gebogen).
4) Inschakelen pas na enkele seconden vertraging. U moet eventjes geduld hebben (I).
5) Schakelaar staat niet op 'ON'.
6) Motorkapschakelaar is niet ingedrukt.
7) Automatische uitschakeling is actief door trillingen, led (4) knippert snel.
Verwijdering: Het apparaat mag niet met het huishoudelijk afval worden verwijderd.
Informeer bij uw gemeente over correcte verwijdering.
Accessoires
- Accesoirreset voor uitbreiding met 4 hoogspanningscontacten No M9300-KIT
- Reservecontroller No M9300-ST
- Motorkapschakelaar met directe ontlading No 1001 (a)
Technische gegevens:
• Bedrijfsspanning: 6V, 4 AA-batterijen
• levensduur: tot 19 maanden
• Gemiddeld stroomverbruik: ca. 0,16 mA
• Hoogspanning > 250 V
• Temperatuurbereik: ca. -25°C tot +80°C
• Functie-indicator: 3 controlelampjes voor hoogspanning (langzaam
knipperend), trillingen (snel knipperend),
batterij (langzaam knipperend wanneer de batterij bijna leeg is)
• Afmetingen regelunit: ca. 155 x 88 x 32 mm
• lengte hoogspanningskabel: ca. 4 m
• Hoogspanningsborstels met meerdere contactpunten met plus- en
mindraden
• Ook geschikt voor voertuigen met CAN-bus.
Automatische reductie van de stroomopname bij kortsluiting of vervuiling
(blindstroom) aan de hoogspanningsborstels. Compacte stekkerverbinding aan
regeleenheid voor het eenvoudig loskoppelen van de regeleenheid van de
kabelinstallatie.Toelating door de Duitse federale instantie voor
motorvoertuigen met het e1-teken.
Table of contents
Languages:
Other K&K Pest Control manuals


Popular Pest Control manuals by other brands

P3 International
P3 International P7831 operating instructions

Bartscher
Bartscher IV-65 manual

Pest-Stop
Pest-Stop MoleSTOP ECO instruction manual

Gimenez Ganga
Gimenez Ganga Saxun Pleated Mosquito Screen 27 Lateral And... Assembly manual

network
network TRA029 Instruction booklet

ARDES
ARDES AR6S16A Instructions for use


