Kapture KPT-1442 User manual


1
CONTENTS
1.0 CAUTION ..........................................................................................4
1.1 Battery Warning.........................................................................5
1.2 Product Information ..................................................................6
2.0 INTRODUCTION ...............................................................................6
2.1 Package Contents......................................................................7
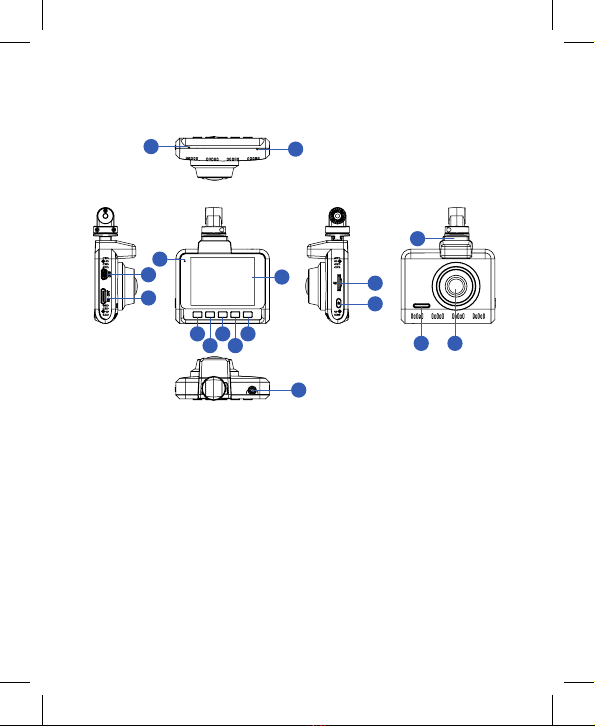
2.2 Product Overview...................................................................... 8
3.0 BUTTON FUNCTIONS AND INDICATORS.....................................9
4.0 GETTING STARTED........................................................................10
4.1 Inserting A Micro SD Card......................................................10
4.2 Removing A Micro SD Card.....................................................11
4.3 Installing The KPT-1442 ............................................................11
4.4 Installing The Rear Camera.................................................... 12
4.4.1 Installation Guide....................................................... 12
4.4.2 Rear Camera Wiring Diagram ................................ 14
4.4.3 Rear Camera Features ............................................. 14
5.0 CONNECTING TO POWER............................................................ 15
6.0 LED INDICATOR ............................................................................. 16
7.0 POWERING THE KPT1442 ONOFF............................................ 16
7.1 Auto Power On/Off ................................................................. 16
7.2 Manual Power On..................................................................... 17
7.3 Manual Power Off.................................................................... 17
7.4 Reset The Car DVR................................................................... 17
8.0 INITIAL SETTINGS.......................................................................... 17
8.1 Formatting The Inserted Micro SD Card ............................ 17
8.2 Setting The Time And Date....................................................18

2
9.0 REAL TIME ROAD ALERTS............................................................ 18
9.1 Speed Camera Alert ................................................................ 19
9.2 Blackspot Alert ......................................................................... 19
9.3 School Zone Alert ..................................................................... 19
9.4 Railway Crossing Alert ............................................................ 19
9.5 Check Speed Alert.................................................................... 19
10.0 INTERFACE .................................................................................... 20
10.1 Video Mode Overview............................................................. 20
10.2 Settings ...................................................................................... 21
11.0 PLAY BACK MENU ........................................................................ 26
12.0 SOFTWARE PLAYBACK ............................................................... 26
13.0 INSTALLING APP ON SMART PHONE.........................................27
14.0 WARRANTY TERMS & CONDITIONS ......................................... 28

3

4
1.0 CAUTION
• Ensure you are using your Car Dash Cam within your
countries’ road laws. Please make sure you are familiar
with your local road legislation before use.
• Avoid leaving your Dash Cam in direct sunlight for extended
periods of time in an unventilated space.
• Please set time and date before you use this device to
record.
• The notiications given by the Car Dash Cam are
suggestions only, please drive to the actual conditions.
• The results of GPS positioning are only for reference. The
Car Dash Cam will lose GPS positioning abilities when
signal is blocked (e.g. driving through tunnels, enclosed car
parks).
• GPS positioning accuracy may vary depending on weather
and surroundings such as dense cities, tunnels, or forests.
GPS satellite signals cannot pass through most solid
materials. Tinted windows may also affect the GPS signal.
• The values displayed in this system, such as speed,
position, and the distance warning, may be affected by the
surrounding environment.
• The system is to be used only for non-commercial use,
within the limits permitted by the relevant laws.
• Avoid using the Car Dash Cam near any devices that emit
radio interference (e.g. Microwave Ovens).
• It is considered normal operation for the Car Dash Cam to
get warm during use.


6
1.2 PRODUCT INFORMATION
For latest manual and product updates please visit our website
at www.kapturecam.com.au or www.kapturecam.co.nz.
2.0 INTRODUCTION
Thank you for purchasing a Kapture Dash Cam. Please read
through instructions before attempting to install or use this
product.
This User guide is designed to assist with the day to day
operation of the KPT-1442.
Before attempting to use or install your Kapture KPT-1442,
please ensure you have read and understood all of the safety
notes below.
• Avoid leaving your KPT-1442 in direct sunlight for extended
periods of time in an unventilated space.
• Do not expose your KPT-1442 to liquids, excessive dusty
conditions or temperatures exceeding 60°C.
• Only use the included cables to power and charge the
KPT-1442.
• Please do not attempt to adjust the KPT-1442 position or
settings whilst you are operating your vehicle.
• Please clean the windshield thoroughly removing all dust
and dirt particles before ixing the adhesive mount.
• Since the mount sticks onto the windshield using a 3M
adhesive, please ensure that the position of the camera is
best located to capture the maximum viewing area.
• We suggest you to power-on the dash camera and test the
playback image on screen irst prior to removing the 3M
tape for installation.

7
• Only remove the 3M tape when you are satisied with the
dash camera placement and image position are delivering
the best possible image and view of the road ahead.
• Ensure you are using your KPT-1442 within your countries’
road laws. Please make sure you are familiar with your local
road legislation before use.
2.1 PACKAGE CONTENTS
Dash Cam
3M Mount
KPT-1442
Dash Cam
Spare 3M
Adhesive
Electrostatic
Film x 2
Car
Charger
User
Guide
1080P FHD
Rear Camera

8
2.2 PRODUCT OVERVIEW
1. Menu/Mode Button
2. Up Button
3. Lock Recording Button
4. Down Button
5. Rec/Ok Button
6. ON/OFF Power Button
7. Micro SD Card slot*
8. HDMI Port
9. Mini USB Power socket
10. Reset
11. Microphone
12. Speaker
13. Lens
14. Slot for Mount
15. Cam/Rear Camera In*
16. LCD Screen
17. Recording Indicator
LED
1 3 5
2 4
17
8
916
15
11
14
6
7
10
12 13

9
3.0 BUTTON FUNCTIONS AND INDICATORS
No. Key Instruction
Menu / Mode
Button
Press to open the Video Mode, Press
again to open General Settings Menu.
Press and hold to switch between
Record, Photo and Playback mode.
Up Button
In the Settings menu use the Up
Button to toggle between the settings.
In Video Mode press and hold to
switch on/off in-built Microphone.
In Video Mode press to Zoom in.
Lock Recording
Button
When DVR is recording, Press Lock
Button to lock the current ile. Locked
ile won't be over recorded during loop
recording. Also turns on/off WIFI.
Down Button
In Settings menu use the down key to
toggle between the settings.
In Video Mode Press to Zoom out.
Rec / OK Button
Press the OK Button to start/stop
video recording in Video mode.
Press the OK Button to take photo in
Camera mode.
Press the OK Button to play/pause
current video on playback mode.
On / Off Power
Button
Press and hold the Power Button to
Power Off the Device. Press once to
switch LCD Screen Off however DVR
will continue recording.


15
Both Front and Rear Camera images will now be displayed on
your Dash Camera's 2.4" Screen, you can switch between by
using the DOWN Key.
Display can switch between:
1. Full Front Camera view
2. Full Rear Camera view
3. Full Front with small window for Rear Camera
When your vehicle is in reverse gear, the display will change to
the Rear Camera view with Reversing Grid Lines to assist the
driver when reversing / parking.
5.0 CONNECTING TO POWER
Only use the included charger to power and charge the Car
DVR.
1. Once the Car DVR is securely installed on your vehicle’s
windscreen, plug the DC Power Plug into your vehicle’s
cigarette lighter.
2. Run the power cable along your vehicle’s console and
windscreen and plug the USB Micro plug into the Car DVR
and the USB A end into the DC Power Plug.


17
7.2 MANUAL POWER ON
Hold the Power button on the lower right hand side of the
camera until the Kapture start up screen appears.
7.3 MANUAL POWER OFF
Press the Power button on the lower right hand side of the
car DVR. After powering down the device please wait for 10
seconds before turning the Car DVR back on.
7.4 RESET THE CAR DVR
If the Car DVR does not function normally, try restarting the
car DVR. To restart the car DVR, using a small pin press and
hold the Reset button on the bottom side of the camera.
8.0 INITIAL SETTINGS
Before using the Car DVR we recommend Formatting the
Inserted Micro SD Card and setting the correct Time and Date.
8.1 FORMATTING THE INSERTED MICRO SD CARD
Formatting the Micro SD card will delete all information on the
inserted Micro SD Card and prepare the card for use with the
Car DVR.
1. Press the Menu Button to enter the Settings/Setup Menu.
2. Use the Up and Down Keys to navigate the Settings Menu
and highlight the Format SD Card setting and press the
OK to select.
3. Press Up and Down Keys to select conirm.
4. Press the OK button to start formatting.
Quick Format (Default), you can switch quick formatting to
change to full formatting in the Setting Menu.

Table of contents
Other Kapture Dashcam manuals

Kapture
Kapture KPT-722 User manual

Kapture
Kapture KPT-500 User manual

Kapture
Kapture KPT-2200 User manual

Kapture
Kapture KPT-590 User manual

Kapture
Kapture KPT-850 User manual

Kapture
Kapture KPT-522 User manual

Kapture
Kapture KPT-942 User manual

Kapture
Kapture KPT-920 User manual

Kapture
Kapture KPT-1240 User manual

Kapture
Kapture KPT-510 User manual