Kenwood KSC-Y32K User manual

B62-2558-00 (K)
RAPID CHARGER
INSTRUCTION MANUAL
CHARGEUR RAPIDE
MODE D’EMPLOI
CARGADOR RÁPIDO
MANUAL DE INSTRUCCIONES
KSC-Y32


1
KSC-Y32 INSTRUCTION MANUAL
RAPID CHARGER
CAUTION
RISK OF ELECTRIC SHOCK
DO NOT OPEN
CAUTION: TO REDUCE THE RISK OF ELECTRIC SHOCK, DO NOT REMOVE COVER
(OR BACK). NO USER-SERVICEABLE PARTS INSIDE. REFER SERVICING TO
QUALIFIED SERVICE PERSONNEL.
THE LIGHTNING FLASH WITH ARROWHEAD SYMBOL, WITHIN AN EQUILATERAL TRIANGLE,
IS INTENDED TO ALERT THE USER TO THE PRESENCE OF UNINSULATED “DANGEROUS
VOLTAGE” WITHIN THE PRODUCT’S ENCLOSURE THAT MAY BE OF SUFFICIENT MAGNITUDE TO
CONSTITUTE A RISK OF ELECTRIC SHOCK TO PERSONS.
THE EXCLAMATION POINT WITHIN AN EQUILATERAL TRIANGLE IS INTENDED TO ALERT
THE USER TO THE PRESENCE OF IMPORTANT OPERATING AND MAINTENANCE (SERVICING)
INSTRUCTIONS IN THE LITERATURE ACCOMPANYING THE APPLIANCE.
One or more of the following statements may be applicable:
FCC WARNING
This equipment generates or uses radio frequency energy. Changes or modifications to this
equipment may cause harmful interference unless the modifications are expressly approved in the
instruction manual. The user could lose the authority to operate this equipment if an unauthorized
change or modification is made.
INFORMATION TO THE DIGITAL DEVICE USER REQUIRED BY THE FCC
This equipment has been tested and found to comply with the limits for a Class B digital device,
pursuant to Part 15 of the FCC Rules. These limits are designed to provide reasonable protection
against harmful interference in a residential installation.
This equipment generates, uses and can generate radio frequency energy and, if not installed and
used in accordance with the instructions, may cause harmful interference to radio communications.
However, there is no guarantee that the interference will not occur in a particular installation. If this
equipment does cause harmful interference to radio or television reception, which can be determined
by turning the equipment offand on, the user is encouraged to try to correct the interference by one or
more of the following measures:
• Reorient or relocate the receiving antenna.
• Increase the separation between the equipment and receiver.
• Connect the equipment to an outlet on a circuit different from that to which the receiver is connected.
• Consult the dealer for technical assistance.
FEATURES
• Capable of charging Li-ion and Ni-MH battery packs when either attached to or removed from the
transceiver.
• Easy to use design allows you to start charging by simply sliding the battery pack into the charging
slot.
• Overcharge protection. Protects against reduced battery pack life caused by excessive charging.
After the rapid charge cycle has finished, the charger automatically switches to trickle charge (Ni-MH).
• A LED colors informs you of the current charging status and battery pack condition.

2
SAFETY PRECAUTIONS
Please read all safety instructions before using this charger. For best results, be aware of all warnings
on the charger, the battery pack, and the product using the battery pack. Follow the provided operating
instructions, and retain them for future reference.
• Do not disassemble the charger. Incorrect re-assembly can cause fire or electric shock.
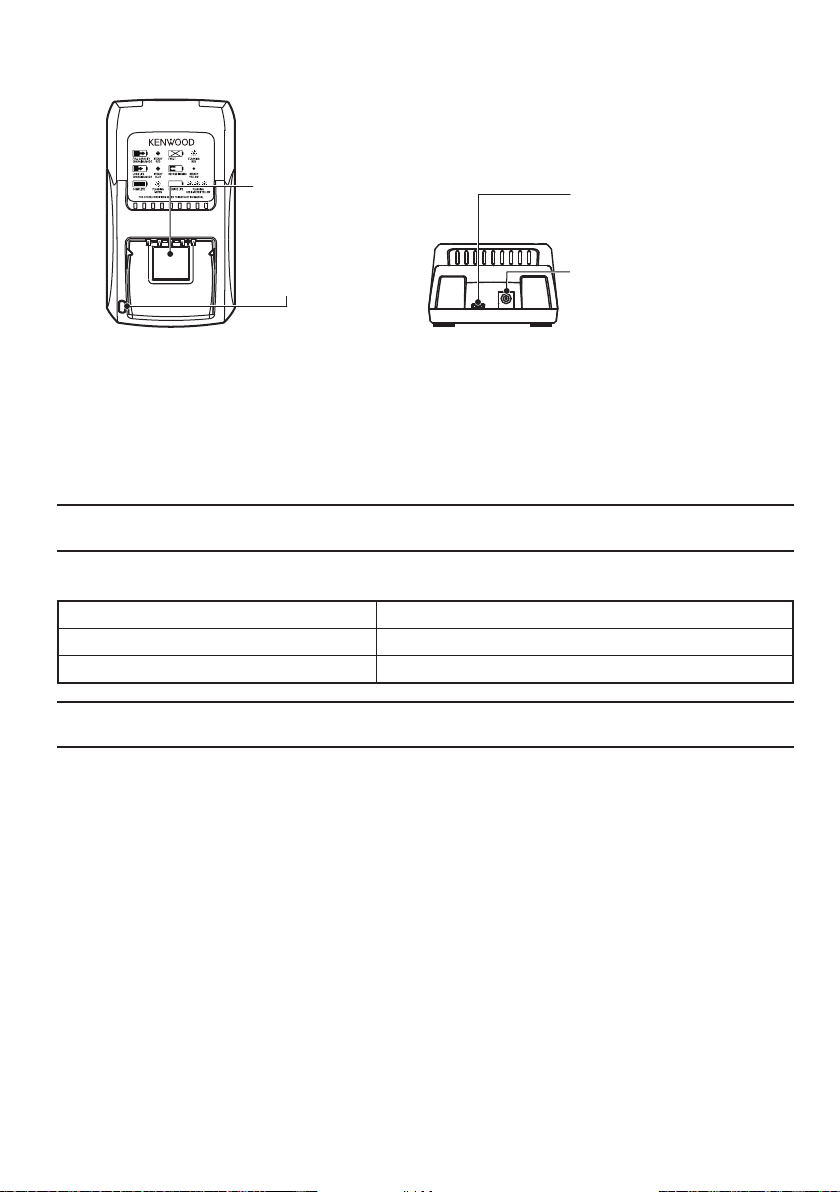
• Do not block any ventilation openings, as this may cause smoke or fire.
• Keep the charger away from inflammable objects.
• Use of attachments/batteries not recommended by nor sold by KENWOOD may cause fire, electric
shock, and/or injury.
• Do not insert or drop metal objects (such as clips, etc.) into the charger as this may cause smoke or fire.
• Do not expose the charger to rain or moisture, to avoid the risk of fire or electric shock.
• If the transceiver and battery pack are wet, do not place them into the charger. Doing so may cause
damage. Before charging, wipe the transceiver and battery pack off with a dry cloth.
• Always remove the AC plug from a AC outlet before attempting to inspect or clean the charger.
Removing the battery packs or changing the controls does not remove the AC voltage from the charger.
• Position the AC cord so it will not be stepped on, tripped over, nor subjected to damage.
• Always remove the AC cord from an AC outlet by pulling on the AC plug rather than the AC cord.
• Do not use the charger if it has a damaged AC cord, or if the charger has been damaged in any way.
Contact your KENWOOD dealer to replace or repair the damaged part.
• Prevent strong impacts, such as caused by dropping, as the charger can be damaged and/or injuries
may occur.
• Do not use the charger in hot or humid environments, in direct sunlight, nor near heaters.
• Do not use solvents such as benzene or paint thinner to clean the charger.
• Do not turn the charger power on when liquids, such as water or juice, have been dropped into the
charger; applying power at this time may cause fire, smoke, or other damage.
• Do not turn the charger power on after the charger has been struck by an item or dropped, as it may
have been damaged during the impact.
• Do not short the charging terminals with metal objects.
• Use only the supplied AC adapter.
APPROXIMATE CHARGING TIME
Li-ion
Battery Pack
Charging Time Ni-MH
Battery Pack
Charging Time
FULL CAPACITY
CHARGING
LONG LIFE
CHARGING FULL CAPACITY
CHARGING
LONG LIFE
CHARGING
KNB-L1 *120 minutes 90 minutes KNB-32N 160 minutes -
KNB-L2 *150 minutes 120 minutes KNB-54N 160 minutes -
KNB-L3 *190 minutes 160 minutes
KNB-33L 120 minutes 90 minutes
KNB-47L 120 minutes 90 minutes
KNB-48L 150 minutes 120 minutes
* Intelligent Battery (battery pack equipped with data terminal)
SUPPLIED EQUIPMENT
Item Parts number Quantity
Charger W08-1341-XX 1
AC adapter W08-1348-XX 1
Instruction manual B62-2558-XX 1

3
ORIENTATION
* By connecting to a PC using a commercially available shielded USB data transfer cable
(USB 2.0 A Male to Micro B) and through installing an optional "KAS-12 BATTERY READER",
the record of the intelligent battery (battery pack equipped with a data terminal) can be monitored
during charging.
The USB driver is included with KAS-12.
You can also download the latest driver from URL. http://www2.jvckenwood.com/usb-com/
(This URL may change without notice.)
ATTENTION:
◆Use a USB cable shorter than 3 m.
SPECIFICATIONS
AC Voltages 100 V - 240 V AC 50/ 60 Hz
Dimensions (W x H x D) (charger only) 160 mm x 90 mm x 58 mm / 6.30 x 3.54 x 2.28 in.
Weight (charger only) Approx. 210 g/ 7.3 oz
ATTENTION:
◆Check the rating label attached to the bottom of the charger for other important specifications.
CHARGING TIPS
• Using the transceiver while charging its battery pack will interfere with correct charging.
• If the operating time of a battery pack decreases although the battery pack is fully and correctly
charged, perform reconditioning if the Intelligent Battery (battery pack is equipped with a data
terminal). If the operating time of the battery pack still decreases, the battery pack life is over.
Replace the battery pack.
• The ambient temperature should be from 5°C to 40°C (41°F to 104°F) while charging is in progress.
When the ambient temperature is in the upper limits (close to 40°C (104°F)), the charging time may
become longer than normal.
• The charging times provided are obtained when a battery pack discharged to 1 V/cell x 6 (Ni-MH) or
3 V/cell x 2 (Li-ion) is charged at normal temperatures. This charging time varies depending on the
degree of discharge and the ambient charging temperature.
• Repeatedly recharging a fully charged battery pack, or almost fully charged pack, shortens its
operating time. To resolve this problem, use the pack until it is completely discharged,
1 V/cell x 6 then recharge the pack to full capacity (Ni-MH).
• The battery life in charge/discharge cycles is approximately 300 to 500. However, overcharging and
excessive discharging shortens the battery pack life.
• When using this equipment near a radio, transceiver or television, you may experience interference
with reception.
AC adapter jack
Plug in the supplied AC adapter
here.
PC (Micro USB) port *
The USB connector allows you
to directly connect to a computer
by using a commercially available
USB cable.
Charging slot
Slide a battery pack or
a transceiver equipped
with a battery pack into
this slot.
LED indicator
Informs you of the
current charger status.

4
CHARGER STATUS TABLE
Indicator Color Meaning
Red
(FULL CAPACITY CHARGING)
A battery pack or a transceiver equipped with a battery pack is in the
charging slot and charging has started.
Flashing red The battery pack or the charger is defective.
Not light The battery pack contacts are not properly mated with those of the
charger.
Flashing green and yellow The temperature of the battery pack has not satisfied the charging start
temperature. In this instance, remove the battery until its temperature
increases, then recharge it.
Flashing green Charging is completed; remove the battery pack or the transceiver from
the charging slot.
Yellow Reconditioning
Blue
(LONG LIFE CHARGING)
The battery pack will not be fully charged to 100 %. The battery pack is
being charged to approximately 80 %.
Flashing purple
If the temperature of the battery pack exceeds the preset temperature
during charging, charging stops and goes into charging standby mode
until the temperature drops within the preset temperature. Charging will
resume automatically if the temperature of the battery pack drops.
After charging starts, the data of the battery pack is read.
Flashing red, green, and
yellow repeatedly The battery pack has deteriorated. Replace the battery pack with a new
one.
CHARGING PROCEDURE
Do not use in explosive atmospheres (gases, dust, fumes, etc.).
ATTENTION:
◆Always switch OFF a transceiver equipped with a battery pack before inserting the transceiver into
the charger.
1 Plug the AC adapter cable into the adapter jack located on the rear of the
charger.
2 Plug the AC plug into an AC outlet.
3 Slide a battery pack or a transceiver equipped with a battery pack into the
charging slot.
• Make sure the metal contacts of the battery pack mate securely with the
charger terminals.
• The indicator lights red or blueto charging starts
(refer to the charger status table).
• When exchanging a battery pack or a tranceiver, slide the following
battery pack or transceiver into the charging slot after removing the
current battery pack or a tranceiver and checking that the indicator of the
charger is off.
4 When charging is completed, the indicator flashing green. Remove the
battery pack or the transceiver from the charging slot.
• When the charger will not be used for a long time, unplug the AC adapter
from the AC outlet.

5
LONG LIFE CHARGING MODE
(For Li-ion
battery
only)
Long Life Charging Mode is a charging mode whereby the battery is charged to approximately 80 % instead
of fully charged to 100 %.
By connecting to a PC using a commercially available shielded USB data transfer cable (USB 2.0 A Male
to Micro B) and through installing an optional "KAS-12 BATTERY READER", you can charge the battery
pack in this mode.
Charging the battery pack in this mode repeatedly can extend the life-span of the battery pack.
The LED indicator lights up in blue when charging the battery pack in this mode.
ATTENTION:
◆The battery pack is not fully charged in this mode so the battery duration from each charging
becomes shorter.
RECONDITIONING
(For Ni-MH
intelligent battery (
battery equipped with data terminal) only)
Automated Battery Reconditioning
When a Ni-MH intelligent battery (battery pack equipped with a data terminal) is used with this
charger, the charger will read the number of discharging and charging cycle of the battery pack. When
the preset number is reached, reconditioning (full discharging and charging) is performed. This allows
you to restore the charging capacity of the battery pack.
If reconditioning is deemed necessary, reconditioning starts automatically. The LED indicator of the
charger lights up in yellow and discharging starts.
Once the discharging is completed, charging starts automatically and the LED indicator lights up in
red.
ATTENTION:
◆Depending on the usage condition of the battery pack, reconditioning may not be performed even
if the preset number of cycle is reached.
◆If the preset number of cycle is reached and charging is done on a charger other than KSC-Y32,
reconditioning will be skipped. Reconditioning will not start until the next preset number is reached.
◆If the effect of the reconditioning is insufficient, reconditioning may start the next time you charge
the battery pack.
◆Full capacity charging may take up for approx 12 hours to complete, depending upon the state of
charge and capacity rating of the battery when it is inserted.
Manual Battery Reconditioning
After charging starts (indicator lights up in red), the record of the battery pack is read (indicator
flashes 3 times in purple). Within the three flashes in purple, repeating the actions of removing the
battery pack from the charger and placing it back to the charger twice within 5 seconds will force
reconditioning to start.
To start and stop manual
battery reconditioning

6
Stopping Reconditioning Manually
After reconditioning is initiated and when discharging is performed (indicator lights up in yellow),
repeating the actions of removing the battery pack from the charger and placing it back to the charger
twice within 5 seconds will force reconditioning to stop. Charging will begin when reconditioning stops.
ATTENTION:
◆Performing reconditioning frequently may shorten the life-span of the battery.
◆If reconditioning is initiated manually, remove the battery pack from the charger and place it back
to the charger to resume charging operation.

1
KSC-Y32 MODE D’EMPLOI
CHARGEUR RAPIDE
CARACTÉRISTIQUES
• Peut charger un bloc-piles Li-ion ou Ni-MH (selon le modèle), qu’il soit relié ou non à l’émetteur-
récepteur.
• Sa conception pratique vous permet de charger un maximum de 6 blocs piles en même temps.
• Protection contre les surcharges. Évite d’écourter la durée de service du bloc-piles à la suite
de charges excessives. Lorsque le cycle de charge rapide est terminé, le chargeur passe
automatiquement au mode de charge lente (Ni-MH).
• Une DEL de couleur, vous informe de l'état de charge actuel et une batterie état.
MATÉRIEL FOURNI
Article Numéro de pièce Quantité
Charger W08-1341-XX 1
AC adapter W08-1348-XX 1
Instruction manual B62-2558-XX 1
ATTENTION
RISQUE DE CHOC ELECTRIQUE
NE PAS OUVRIR
ATTENTION : POUR REDUIRE LES RISQUES DE CHOC ELECTRIQUE, NE PAS DEPOSER LE COUVERCLE
(OU LE PANNEAU ARRIERE). ANCUNE PIECE REPARABLE PAR L’UTILISATEUR NE SE TROUVE A L’INTERIEUR.
CONFIER TOUT TRAVAIL D’ENTRETIEN A UN PERSONNEL DE SERVICE QUALIFIE.
LE SYMBOLE DE L’ECLAIR DANS UN TRIANGLE EQUILATERAL A POUR
BUT D’ATTIRER L’ATTENTION DE L’UTILISATION SUR LA PRESENCE, A
L’INTERIEUR DU COFFRET, D’UNE TENSION DANGEREUSE ET NON ISOLEE
D’UNE PUISSANCE SUFFISANTE POUR CONSTITUER UN RISQUE DE
COMMOTION ELECTRIQUE AUX ETRES HUMAINS.
LE POINT D’EXCLAMATION DANS UN TRIANGLE EQUILATERAL A POUR
BUT D’ATTIRER L’ATTENTION DE L’UTILISATEUR SUR LA PRESENCE, DANS
LA LITTERATURE QUI ACCOMPAGNE CET APPAREIL, D’INFORMATIONS
IMPORTANTES RELATIVE A L’EXPLOITATION ET A L’ENTRETIEN.
MESURES DE SÉCURITÉ
Veuillez lire toutes les instructions de sécurité avant d’utiliser ce chargeur. Pour de meilleurs résultats,
veuillez tenir compte de toutes les mises en garde se trouvant sur le chargeur, sur le bloc-piles et sur
l’appareil qui utilise ce dernier. Suivez la notice d’utilisation fournie et conservez-la pour consultation
ultérieure.
• Ne démontez pas le chargeur. Un remontage incorrect pourrait être la cause d’un incendie ou d’une
électrocution.
• Ne bloquez pas les ouvertures de ventilation, cela pourrait provoquer une émission de fumée ou un
incendie.
• Maintenez le chargeur à distance de tout objet inflammable.
• N’utilisez aucun accessoire ou bloc-piles qui ne soit recommandé ou vendu par KENWOOD, car
cela pourrait causer un incendie, une électrocution et/ou une blessure corporelle.
• N’insérez ou ne faites tomber aucun objet métallique (tels des crochets) dans le chargeur, cela
pourrait provoquer une émission de fumée ou un incendie.

2
• Pour éviter les risques d’incendie ou d’électrocution, n’exposez pas le chargeur à la pluie ni à
l’humidité.
• Si l’émetteur-récepteur et le bloc-piles sont humides, ne les placez pas dans le chargeur. Cela
pourrait provoquer des dommages. Avant la mise en charge, essuyer l’émetteur-récepteur et le
bloc-piles avec un chiffon sec.
• Débranchez toujours la fiche CA de la prise secteur avant d’examiner ou de nettoyer le chargeur. Le
fait d’enlever le bloc-piles ou de changer les commandes ne coupe pas la tension CA du chargeur.
• Placez le câble d’alimentation de manière à éviter qu’il soit écrasé, qu’une personne trébuche
dessus ou qu’il soit endommagé de quelconque façon.
• Pour débrancher le câble d’alimentation de la prise secteur, tirez sur la prise et non sur le câble.
• N’utilisez pas le chargeur s’il est muni d’un câble d’alimentation endommagé, ou si le chargeur a été
endommagé d’une quelconque façon. Contactez votre fournisseur KENWOOD pour remplacer ou
réparer la pièce endommagée.
• Évitez les impacts violents tels que ceux causés par une chute, le chargeur pourrait être
endommagé et/ou des blessures pourraient en résulter.
• N’utilisez pas le chargeur dans un environnement chaud ou humide ni sous les rayons directs du
soleil ni près d’appareils de chauffage.
• N’utilisez pas de solvants tels que le benzène ou un diluant à peinture pour nettoyer le chargeur.
• Ne mettez pas le chargeur sous tension si un liquide, comme de l’eau ou un jus, a été renversé sur
le chargeur, cela pourrait provoquer un incendie, une émission de fumée ou un autre dommage.
• Ne mettez pas le chargeur sous tension s’il a été soumis à un choc ou s’il est tombé, il pourrait avoir
été endommagé lors de l’impact.
• Ne provoquez pas de court-circuit avec des objets en métal.
• Utilisez uniquement le câble d’alimentation fourni.
BLOCS-PILES APPROPRIÉS ET DURÉE DE CHARGE APPROXIMATIVE
Li-ion
Bloc-piles
Durée de Charge Ni-MH
Bloc-piles
Durée de Charge
CHARGE À PLEINE
CAPACITÉ CHARGE DE
LONGUE DURÉE CHARGE À PLEINE
CAPACITÉ CHARGE DE
LONGUE DURÉE
KNB-L1 *120 minutes 90 minutes KNB-32N 170 minutes -
KNB-L2 *150 minutes 120 minutes KNB-54N 170 minutes -
KNB-L3 *190 minutes 160 minutes
KNB-33L 120 minutes 90 minutes
KNB-47L 120 minutes 90minutes
KNB-48L 150 minutes 120 minutes
*Batterie Intelligente (batterie équipée d'un terminal de données)
ORIENTATION
Prise de l'adaptateur
Connectez ici l'adaptateur secteur
fourni.
PC (Micro USB) port *
Le connecteur USB vous permet
de vous connecter directement
à un ordinateur en utilisant un
câble USB disponible dans le
commerce.
Fente du chargeur
Insérez un bloc-piles ou un
émetteur-récepteur muni
d’un bloc-piles dans cette
fente.
DEL à trois couleurs
Indique l’état courant du
chargeur.

3
*
En vous connectant à un PC à l'aide d'un câble de transfert de données USB blindé disponible dans le
commerce (mâle USB 2.0 A jusqu'à micro B), puis par l’installation d’un “LECTEUR BATTERIE KAS-12”
en option, l’enregistrement de la batterie intelligente (batterie équipée d'un terminal de données) peut
être contrôlé pendant la charge.
Le pilote USB est fourni avec le KAS-12.
Vous pouvez également télécharger le pilote le plus récent à partir de l’URL .
http://www2.jvckenwood.com/usb-com/.
(Cette URL est susceptible d’être modifiée sans préavis.)
ATTENTION:
◆Utilisez un câble USB de moins de 3 m.
FICHE TECHNIQUE
Tensions CA 100 V - 240 V CA 50/ 60 Hz
Dimensions (L x H x P) (chargeur seul) 160 mm x 90 mm x 58 mm
Poids (chargeur seul) Environ, 210 g
ATTENTION:
♦Reportez-vous à l’étiquette des caractéristiques nominales située sous le chargeur pour d’autres
spécifications importantes.
CONSEILS CONCERNANT LA CHARGE
• L’utilisation de l’émetteur-récepteur pendant la charge du blocpiles entrave le processus.
• Si le temps d’utilisation d’une batterie diminue même si la batterie est complètement et correctement
chargée, effectuer un reconditionnement si la batterie intelligente (batterie équipée d'un terminal
de données). Si le temps de fonctionnement de la batterie diminue encore, la durée de vie de la
batterie est terminée.
• La charge du bloc-piles doit être effectuée à une température ambiante se situant entre 5°C et 40°C.
Lorsque la température ambiante est très élevée (aux alentours de 40°C), le temps de recharge
peut être plus long que la normale.
• Les durées de charge fournies ont été obtenues lorsqu’un bloc-piles, déchargé jusqu’à 1 V/pile x
6 (Ni-MH) ou jusqu’à 3 V/pile x 2 (Li-ion), est chargé à une température normale. Cette durée de
charge dépend du niveau de décharge et de la température de charge ambiante.
• Recharger de manière répétée un bloc-piles déjà totalement chargé ou presque, réduit sa durée de
vie. Pour résoudre ce problème, utilisez le bloc-piles jusqu’à ce qu’il soit complètement déchargé, à
1V/pile x 6, puis rechargez-le à fond. (Ni-MH)
• La durée de service du bloc-piles est d’environ 300 de 500 cycles de charge/décharge. Cependant
les surcharges et décharges excessives écourtent sa durée de service.
• Lorsque cet appareil est utilisé à proximité d’une radio, d’un émetteur-récepteur ou d’un téléviseur,
des interférences risquent d’altérer la réception.
PROCÉDURE DE CHARGE
Ne pas utiliser dans des atmosphères explosives (gaz, poussière, fumées, etc.).
ATTENTION:
♦Mettez toujours l’émetteur-récepteur équipé d’un bloc-piles hors tension avant d’insérer l’émetteur-
récepteur dans le chargeur.

4
TABLEAU DES ÉTATS DU CHARGEUR
Couleur des témoins Signification
Rouge
(CHARGE À PLEINE CAPACITÉ)
Un bloc piles ou un émetteur-récepteur muni d’un bloc piles est
inséré dans la fente du chargeur et le chargement a commencé.
Clignote en rouge La batterie ou le chargeur est défectueux.
S’allume pas Les contacts du pack de batteries ne sont pas correctement
accouplés avec ceux du chargeur.
Vert ou clignotant jaune La température du bloc-piles ne correspond pas à celle de début de
charge. Dans ce cas, retirez le bloc-piles, attendez que sa
température remonte puis rechargez-le.
Clignote en vert La charge est terminée ; retirez le bloc-piles ou l’émetteur-récepteur
de la fente du chargeur.
Jaune Reconditionnement
Bleu
(CHARGE DE LONGUE DURÉE)
La batterie n’est pas complètement chargée à 100 %. La batterie est
chargée à environ 80 %.
Clignote en pourpre
Si la température de la batterie dépasse la température définie
pendant le chargement, le chargement s’arrête et passe en mode
de veille de chargement jusqu’à ce que la température revienne à la
température prédéfinie. Le chargement reprendra automatiquement
si la température de la batterie diminue.
Après le début de la charge, les données de la batterie sont lues.
Clignote en rouge, vert et
jaune de manière répétée La batterie s'est dégradée. Remplacez la batterie par une nouvelle
batterie.
1 Branchez le câble adaptateur CA à la prise pour adaptateur située à l’arrière
du chargeur.
2 Branchez l’adaptateur CA dans une prise secteur.
3 Insérez un bloc-piles ou un émetteur-récepteur muni d’un bloc-piles dans la
fente du chargeur.
• Assurez-vous que les contacts métalliques du bloc-piles sont bien en
contact avec les bornes du chargeur.
• Le témoin devient rouge ou bleues le chargement commence (référer à
la table d'état du chargeur).
• Lors du remplacement d’un bloc-piles, faites glisser le bloc-piles suivant
ou l’émetteur-récepteur équipé d’un bloc-piles dans la fente du chargeur
après avoir vérifié que le témoin du chargeur est éteint.
4 Lorsque la charge est terminée, le témoin clignote en vert. Retirez le bloc-
piles ou l’émetteur-récepteur de la fente du chargeur.
• Si vous ne prévoyez pas utiliser le chargeur pendant une longue période,
débranchez l’adaptateur CA de la prise secteur.
MODE DE CHARGE DE LONGUE DURÉE
(Pour une
Batterie Li-ion
uniquement)
Le mode de charge longue durée est un mode de charge au cours duquel la batterie est chargée à environ
80 % au lieu d'être complètement chargée à 100 %.
En vous connectant à un PC à l'aide d'un câble de transfert de données USB blindé disponible dans le
commerce (mâle USB 2.0 A jusqu'à micro B), puis par l’installation d’un “
LECTEUR BATTERIE
KAS-12”
en option, vous pouvez charger la batterie dans ce mode.
Charger la batterie dans ce mode de façon répétée peut prolonger la durée de vie de la batterie.
Le témoin DEL s'allume en bleu lorsque vous chargez la batterie dans ce mode.

5
ATTENTION:
◆La batterie n’est pas complètement chargée dans ce mode, la durée de la batterie après chaque
charge est donc plus courte.
RECONDITIONNEMENT
(Pour une batterie intelligente Ni-MH (batterie équipée d'un terminal de données) uniquement)
Reconditionnement de batterie automatique
Lorsqu’une
batterie intelligente Ni-MH (batterie équipée d'un terminal de données) uniquement
est
utilisée avec ce chargeur, le chargeur lit le nombre de cycles de chargement et de déchargement de la
batterie. Lorsque le nombre préréglé est atteint, le reconditionnement (décharge et charge complètes)
est effectué. Cela vous permet de restaurer la capacité de charge de la batterie.
Si le reconditionnement est nécessaire, il démarre automatiquement. Le témoin DEL du chargeur
s’allume en jaune et le déchargement démarre.
Une fois que le déchargement est terminé, la recharge démarre automatiquement et le témoin DEL
s'allume en rouge.
ATTENTION:
◆En fonction des conditions d'utilisation de la batterie, le reconditionnement peut être impossible
même si le nombre prédéfini de cycles est atteint.
◆Si le nombre prédéfini de cycles est atteint et que la mise en charge s'effectue sur un autre
chargeur que le KSC-Y32, le reconditionnement est ignoré. Le reconditionnement ne démarre pas
tant que le prochain nombre préréglé n'est pas atteint.
◆Si l’effet du reconditionnement est insuffisant, le reconditionnement peut démarrer la prochaine
fois que vous chargez la batterie.
◆La charge à pleine capacité peut prendre environ 12 heures, en fonction de l’état de la charge et
de la capacité nominale de la batterie lors de son insertion.
Reconditionnement de batterie manuel
Après que la recharge a démarré (le témoin s’allume en rouge), l’enregistrement de la batterie est
lu (le témoin clignote 3 fois en violet). Pendant les trois clignotements en violet, retirer à nouveau la
batterie du chargeur et la replacer sur le chargeur à deux reprises dans un délai de 5 secondes pour
forcer le démarrage du reconditionnement.
Arrêt manuel du reconditionnement
Une fois que le reconditionnement est initié et que le déchargement est effectué (l'indicateur s’allume
en jaune), retirer à nouveau la batterie du chargeur et la replacer sur le chargeur à deux reprises dans
un délai de 5 secondes pour forcer l'arrêt du reconditionnement. Le chargement s’amorce dès que le
reconditionnement s'arrête.
ATTENTION:
◆Effectuer le reconditionnement fréquemment risque de raccourcir la durée de vie de la batterie.
◆Si le reconditionnement est lancé manuellement, retirer la batterie du chargeur et la replacer sur
le chargeur pour reprendre le chargement.
Pour démarrer et arrêter le
reconditionnement manuel
de la batterie.


1
KSC-Y32 MANUAL DE INSTRUCCIONES
CARGADOR RÁPIDO
CARACTERÍSTICAS
• Puede cargar bloques de baterías de Li-ion y Ni-MH (según el modelo) ya sea que estén o no
conectados al transceptor.
• Su diseño de fácil utilización le permite cargar hasta 6 baterías a la vez.
• Protection contre les surcharges. Évite d’écourter la durée de service du bloc-piles à la suite
de charges excessives. Lorsque le cycle de charge rapide est terminé, le chargeur passe
automatiquement au mode de charge lente (Ni-MH).
• Una LED de colores, le informa del estado de carga actual y condición de la batería.
CONTENIDO SUMINISTRADO
Artículo Número de pieza Cantidad
Cargador W08-1341-XX 1
adaptador de CA W08-1348-XX 1
Manual de instrucciones B62-2558-XX 1
PRECAUCIONES DE SEGURIDAD
Se ruega leer todas las instrucciones de seguridad antes de usar este cargador. Para mejores
resultados, tenga en cuenta todas las advertencias sobre el cargador, el bloque de baterías y el
producto que utiliza el bloque de baterías. Observe todas las instrucciones de funcionamiento, y
guárdelas para futuras consultas.
• No desarme el cargador. Si se rearma incorrectamente, podría ocasionar un incendio o una
descarga eléctrica.
• No obstruya las aberturas de ventilación, ya que puede provocar humo o un incendio.
• Mantenga el cargador alejado de objetos inflamables.
• El uso de accesorios/baterías no recomendados o vendidos por KENWOOD podría producir
incendios, descargas eléctricas y/o lesiones.
PRECAUCIÓN
RIESGO DE DESCARGA ELÉCTRICA
NO ABRA
PRECAUCIÓN: PARA REDUCIR EL RIESGO DE DESCARGA ELECTRICA, NO RETIRE LA TAPA
(O PANEL POSTERIOR).
EN EL INTERIOR DEL APARATO NO HAY PIEZAS QUE PUEDA REPARAR EL USUARIO.
PIDA AL PERSONAL CUALIFICADO QUE HAGA LAS REPARACIONES NECESARIAS.
EL SIMBOLO DEL RAYO, EN EL INTERIOR DE UN TRIANGULO EQUILATERO,
TIENE COMO FIN AVISAR AL USUARIO DE LA PRESENCIA DE UNA TENSION
PELIGROSA SIN AISLAR, EN EL INTERIOR DE LA CAJA DEL APARATO,
QUE PODRIA SER DE SUFICIENTE INTENSIDAD COMO PARA QUE LAS
PERSONAS PODRIAN SUFRIR UNA DESCARGA ELECTRICA.
EL SIGNO DE EXCLAMACION, EN EL INTERIOR DE UN TRIANGULO
EQUILATERO, TIENE COMO FIN AVISAR AL USUARIO DE LA PRESENCIA
DE IMPORTANTES INSTRUCCIONES DE OPERACION Y MANTENIMIENTO
(SERVICIO) EN EL MANUAL SUMINISTRADO CON EL APARATO.

2
• No introduzca o deje caer objetos metálicos (como sujetapapeles, etc.) en el cargador ya que puede
provocar humo o un incendio.
• No exponga el cargador a la lluvia o a la humedad para evitar riesgos de incendio o de descargas eléctricas.
• Si el transceptor y la batería están mojados, no los inserte en el cargador. De hacerlo, podrían
sufrir daños. Antes de cargar, limpie el transceptor y la batería pasándole un paño seco.
• Desenchufe siempre el conector de CA de la toma de corriente mural antes de inspeccionar o de
limpiar el cargador. La extracción de los bloques de batería o el cambio de los mandos no significa
que desaparezca la tensión de CA del cargador.
• No coloque el cable de CA en un lugar donde pueda ser pisado, obstaculizar el paso, o sufrir daños.
• Al desenchufar el cable de CA de la toma de corriente de CA, tire del conector de CA y no del cable.
• No utilice el cargador si el cable de CA está dañado o si el cargador en sí ha sufrido algún daño.
Póngase en contacto con su distribuidor KENWOOD para reemplazar o reparar la parte dañada.
• Para evitar daños o lesiones personales, no deje caer ni dé un golpe fuerte al cargador.
• No utilice el cargador en lugares calurosos o húmedos, a la luz directa del sol, o cerca de
calefactores.
• No use disolventes tales como bencina o diluyentes de pintura para limpiar el cargador.
• No encienda el cargador cuando haya caído líquido, como agua o zumo, dentro del mismo; conectar
la alimentación en estas circunstancias puede provocar un incendio, humo u otros daños.
• No encienda el cargador tras sufrir un golpe o una caída, ya que el impacto podría haberlo dañado.
• No cortocircuite los terminales de carga con objetos metálicos.
• Utilice únicamente el cable de CA suministrado.
BLOQUES DE BATERÍA APLICABLES Y TIEMPOS DE CARGA APROXIMADOS
Li-ion
Bloque de
baterías
Tiempo de carga Ni-MH
Bloque de
baterías
Tiempo de carga
CARGA DE
CAPACIDAD
COMPLETA
CARGA DE LARGA
DURACIÓN
CARGA DE
CAPACIDAD
COMPLETA
CARGA DE LARGA
DURACIÓN
KNB-L1 *120 minutos 90 minutos KNB-32N 170 minutos -
KNB-L2 *150 minutos 120 minutos KNB-54N 170 minutos -
KNB-L3 *190 minutos 160 minutos
KNB-33L 120 minutos 90 minutos
KNB-47L 120 minutos 90 minutos
KNB-48L 150 minutos 120 minutos
*Inteligente Baterías (baterías equipadas con terminal de datos)
ORIENTACIÓN
Jack del adaptador de CA
Enchufe aquí el adaptador de CA
suministrado.
PC (USB micro) puerto *
El conector USB le permite
conectarse directamente a un
ordenador utilizando el cable USB
comercialmente disponible.
Ranura de carga
Introduzca el bloque de
baterías o el transceptor
equipado con el bloque
de bateríasdentro de esta
ranura.
indicador LED
Le informa del estado del
cargador actual.

3
*
Al conectarse a un PC mediante el cable USB blindado de transferencia de datos comercialmente
disponible (USB 2.0 Un macho a micro B) y al instalar un “LECTOR BATERÍAS KAS-12” opcional, se
puede monitorear durante la carga el registro de la
inteligente baterías (baterías equipadas con
terminal de datos)
.
El controlador USB viene incluido con el accesorio KAS-12.
También puede descargar el controlador más reciente desde la URL:
http://www2.jvckenwood.com/usb-com/.
(Esta URL podría cambiar sin previo aviso.)
ATENCIÓN:
◆Utilice un cable USB de más de 3 m.
ESPECIFICACIONES
Tensiones de CA 100 V - 240 V CA 50/ 60 Hz
Dimensiones (An x Al x Pr) (sólo cargador)
160 mm x 90 mm x 58 mm
Peso (sólo cargador) 210 gaprox.
ATENCIÓN:
♦Véanse otras especificaciones importantes en la etiqueta adherida a la parte inferior del cargador.
CONSEJOS SOBRE LA CARGA
• El uso del transceptor mientras se está cargando su bloque de baterías impedirá que se realice
correctamente la carga.
• Si el tiempo de funcionamiento de la batería disminuye pese a estar completamente y
correctamente cargada, lleve a cabo un reacondicionamiento si la inteligente baterías (baterías
equipadas con terminal de datos). Si el tiempo de funcionamiento de la batería sigue disminuyendo,
la batería ha llegado al término de su vida útil.
• La temperatura ambiente debe mantenerse entre 5°C y 40°C mientras se está efectuando la carga.
Cuando la temperatura ambiente alcance los límites superiores (próximos a los 40°C), es posible
que el tiempo de carga se prolongue más de lo habitual.
• Los tiempos de carga proporcionados se obtienen cuando el paquete de baterías se descarga hasta
1 V/la célula x 6 (Ni-MH) o 3 V/la célula x 2 (Li-ion) se carga a temperaturas normales. Este tiempo
de carga varía en función del grado de descarga y de la temperatura ambiente del lugar de la carga.
• La recarga repetida de un bloque de baterías completamente cargado o prácticamente cargado
acortará su tiempo de funcionamiento. Para evitar este contratiempo, utilice el bloque hasta que
esté completamente descargado, 1 V/célula x 6. Luego recárguelo a plena capacidad. (Ni-MH)
• La vida útil de la batería en ciclos de carga/descarga es de aproximadamente 300 a 500. No
obstante, tanto la sobrecarga como una descarga excesiva acortan la vida de servicio del bloque de
baterías.
• Cuando utilice este aparato cerca de un aparato de radio, un transceptor o un televisor, es posible
que se produzcan interferencias en la recepción.
PROCEDIMIENTO DE CARGA
No utilizar en ambientes explosivos (gases, polvo, humos, etc.).
ATENCIÓN:
♦Desconecte siempre el interruptor del transceptor equipado con un bloque de baterías antes de
introducirlo en el cargador.

4
TABLA DE LOS ESTADOS DEL CARGADOR
Color del indicador Significado
Rojo
(CARGA DE CAPACIDAD
COMPLETA)
Hay un bloque de baterías o un transceptor con un bloque de baterías
en la ranura de carga y el proceso de carga ha comenzado.
Parpadeo de color rojo El paquete de baterías o el cargador está defectuoso.
No se iluminará Los contactos de la batería no se acoplan bien con los de la cargador.
Verde y parpadeo de color
naranja
El bloque de baterías no ha alcanzado la temperatura de inicio de
carga. En tal caso, retire la batería hasta que suba la temperatura y
luego recárguela.
Parpadeo de color Verde La carga ha terminado; Retire el bloque de baterías o el transceptor de
la ranura de carga.
Jaune Reacondicionamiento
Bleu
(CHARGE DE LONGUE DURÉE)
La batería no se cargará al 100% (carga completa). La batería se está
cargando aproximadamente a un 80%.
Parpadeo de color púrpura
Si la temperatura de la batería excede la temperatura preestablecida
durante la carga, la carga se detiene y entra en modo de espera de carga
hasta que la temperatura baje a la temperatura preestablecida. La carga
se reanudará automáticamente si la temperatura de la batería desciende.
Una vez comenzada la carga, se leen los datos de la batería.
Parpadeo repetido en color
rojo, verde y amarillo La batería está deteriorada. Sustituya la batería por una nueva.
1 Enchufe el cable del adaptador de CA en el jack del adaptador de la parte
posterior del cargador.
2 Enchufe el adaptador de CA en la toma de CA.
3 Introduzca en la ranura de carga el bloque de baterías o el transceptor
equipado con el bloque de baterías.
• Asegúrese de que los contactos metálicos del bloque de baterías se
acoplen firmemente con los terminales del cargador.
• El indicador se enciende en rojo o azul y comienza la carga (consulte
la tabla de estado del cargador).
• Al cambiar una batería, deslice la batería siguiente o el transceptor
equipado con una batería en la ranura de carga una vez comprobado
que el indicador del cargador está apagado.
4 Al finalizar la carga, el indicador se parpadeo de color verde. Retire el
bloque de baterías o el transceptor de la ranura de carga.
• Cuando no se va a utilizar el cargador por un tiempo prolongado,
desenchufe el adaptador de CA de la toma de CA.
MODO DE CARGA DE LARGA DURACIÓN
(Sólo para baterías Li-ion)
El modo de carga de larga duración es un modo de carga mediante el cual la batería se carga
aproximadamente un 80% en lugar de alcanzar una carga completa, es decir, al 100%.
Al conectarse a un PC mediante el cable
USB blindado de transferencia de datos
comercialmente
disponible (USB 2.0 Un macho a micro B) y al instalar un “LECTOR BATERÍAS KAS-12” opcional, puede
cargar la batería en este modo.
Cargar la batería en este modo repetidamente puede aumentar la vida útil de la batería.
El indicador LED se ilumina en azul cuando se carga la batería en este modo.

5
ATENCIÓN:
◆La batería no se carga por completo en este modo, por tanto la duración de la batería desde
cada carga se vuelve más corta
REACONDICIONAMIENTO
(Sólo para
inteligente baterías Ni-MH (baterías equipadas con terminal de datos)
)
Reacondicionamiento automatizado de la batería
Cuando una inteligente baterías Ni-MH (baterías equipadas con terminal de datos) se utiliza con este
cargador, el cargador leerá el número de ciclo de carga y descarga de la batería. Cuando se alcance el
número preestablecido, se llevará a cabo el reacondicionamiento (descarga y carga completa). Esto le
permite restaurar la capacidad de carga de la batería.
Si el reacondicionamiento se estima necesario, éste se inicia automáticamente. El indicador LED del
cargador se enciende en amarillo y la descarga comienza.
Una vez completa la descarga, la carga comienza automáticamente y el indicador LED se ilumina en rojo.
ATENCIÓN:
◆Dependiendo de las condiciones de uso de la batería, el reacondicionamiento podría no llevarse a
cabo, incluso si se alcanza el número preestablecido de ciclo.
◆Si se alcanza el número preestablecido de ciclo y la carga se realiza en un cargador que no sea
KSC-Y32, se omitirá el reacondicionamiento. El reacondicionamiento no comenzará hasta que se
alcance el siguiente número preestablecido.
◆Si el efecto del reacondicionamiento no fuera suficiente, el reacondicionamiento podría comenzar
de nuevo la próxima vez que cargue la batería.
◆La carga hasta la capacidad máxima puede tardar hasta 12 horas aprox. en completarse,
dependiendo del estado de carga y la capacidad nominal de la batería al introducirla.
Reacondicionamiento manual de la batería
Después del inicio de la carga (el indicador se ilumina en rojo), se lee el registro de la batería (el
indicador parpadea 3 veces en violeta). Si durante los tres parpadeos en violeta se extrae la batería
del cargador y se vuelve a insertar en el cargador y se repiten ambas acciones en ese orden una vez
más, todo dentro de un lapso de 5 segundos, se fuerza el inicio del reacondicionamiento.
Detener el reacondicionamiento manualmente
Tras el inicio del reacondicionamiento y cuando se realiza la descarga (el indicador se ilumina en
amarillo), si se extrae la batería del cargador y se vuelve a insertar en el cargador y se repiten ambas
acciones en ese orden una vez más, todo dentro de un lapso de 5 segundos, se fuerza la detención
del reacondicionamiento. La carga comienza cuando el reacondicionamiento se detiene.
ATENCIÓN:
◆La vida útil de la batería podría reducirse si se lleva a cabo el reacondicionamiento con
frecuencia.
◆Si el reacondicionamiento se inicia manualmente, retire la batería del cargador y reinsértelo en
el cargador para reanudar la operación de carga normal.
Para iniciar y detener
el reacondicionamiento
manual de la batería.

© 2014 JVC KENWOOD Corporation
Table of contents
Languages:
Other Kenwood Batteries Charger manuals

Kenwood
Kenwood KSC-31 User manual

Kenwood
Kenwood KSC-24 User manual

Kenwood
Kenwood KSC-35 User manual

Kenwood
Kenwood ubc-2 User manual

Kenwood
Kenwood KSC-32S User manual

Kenwood
Kenwood KSC-43 User manual

Kenwood
Kenwood KSC-32 User manual

Kenwood
Kenwood KSC-35S User manual

Kenwood
Kenwood KSC-37 User manual

Kenwood
Kenwood KSC-37 User manual

Kenwood
Kenwood KSC-25 User manual

Kenwood
Kenwood KSC-Y32 User manual

Kenwood
Kenwood BC-15 User manual

Kenwood
Kenwood KMB-27 User manual

Kenwood
Kenwood DMC-Q55 User manual

Kenwood
Kenwood KSC-256 User manual

Kenwood
Kenwood KSC-37S User manual

Kenwood
Kenwood KSC-24S User manual

Kenwood
Kenwood KSC-32S User manual

Kenwood
Kenwood KSC-25L User manual