manuals.online logo
Brands
  1. Home
  2. •
  3. Brands
  4. •
  5. Kohler
  6. •
  7. Bathroom Fixture
  8. •
  9. Kohler Mira Store User manual

Kohler Mira Store User manual

Mira Store
Mira Park
Mira Cleanse
Mira Cleanse B
Mira Sense
These instructions must be left with the user
Installation and User Guide
CUSTOMER SERVICE
1204268-W2-D © Kohler Mira Limited, May 2014
Mira is a registered trade mark of Kohler Mira
Limited.
The company reserves the right to alter product
specications without notice.
www.mirashowers.co.uk
Sense Module Installation
Maintenance
Battery Change
1. Use a large at bladed screwdriver or coin to unscrew the battery
lid from the Sense module.
2. Remove the battery from the battery compartment.
3. Fit the battery (in the orientation shown in g 4) into the battery
compartment and retighten the battery lid.
4. Refer to section ‘Sense Module Initialisation‘ to set the clock.
Important! When the battery has reached the end of its serviceable life,
make sure it is disposed of in a safe manner, in accordance with current
local authority recycling, or waste disposal policy.
Spare Parts
1736.845 - Sense Component Pack (Battery, Battery Cap and Sealing
Plug)
Cleaning
Many household cleaners contain abrasives and chemical substances,
and should not be used for cleaning plated or plastic ttings.
These nishes should be cleaned with a mild washing up detergent or
soap solution, and then wiped dry using a soft cloth.
Do not use descalents on this product.
Guarantee
Your product has the benet of our
manufacture's guarantee which starts
from date of purchase.
To activate this guarantee, please
return your completed registration
card, visit our website or free phone
0800 0731248 within 30 days of
purchase (UK only).
Within the guarantee period we
will resolve defects in materials or
workmanship, free of charge, by
replacing parts or product as we may
choose.
This guarantee is in addition to your
statutory rights and is subject to the
following conditions :
The guarantee applies solely to the
original installation under normal use
and to the original purchaser only.
The product must be installed and
maintained in accordance with the
instructions given in this guide.
Replacement under this guarantee
does not extend the original
expiry date. The guarantee on any
replacement parts or product ends at
the original expiry date.
The guarantee does not cover:
Non product faults (such as damage
or performance issues arising from
incorrect installation, improper
use, inappropriate cleaning, lack of
maintenance, build up of limescale,
frost damage, corrosion, system debris
or blocked lters) or where no fault has
been found with the product.
Water or electrical supply, waste and
isolation issues.
Compensation for loss of use of the
product or consequential loss of any
kind.
General wear and tear.
Accidental or wilful damage.
Products purchased ex-showroom
display.
What to do if something goes wrong
If your product does not function
correctly when you rst use it, check
that it is installed and commissioned
in accordance with the instructions in
this manual.
If this does not resolve the issue,
contact us for help and advice.
Helpdesk Service
Our Customer Services Team is
comprehensively trained and can
offer help and advice, spare parts and
accessories.
We will need you to have your model
name or number and date of purchase.
Mira Showers Website
(www.mirashowers.co.uk)
From our website you can download
additional user guides, diagnose faults,
purchase our full range of accessories
and popular spares and refer to our
FAQ's.
Spares and Accessories
We hold the largest stocks of genuine
Mira spares and accessories.
Contact us for a price or visit our
website to purchase items from our
accessory range and popular spares.
To Contact Us
UK
Telephone: 0844 571 5000
Email: Visit www.mirashowers.co.uk/
contactus
Fax: 01242 282595
By Post: Mira Customer Services
Dept, Cromwell Road, Cheltenham,
Gloucestershire GL52 5EP
Eire only
Telephone: 01 531 9337
Email: CustomerServiceEire@
mirashowers.com
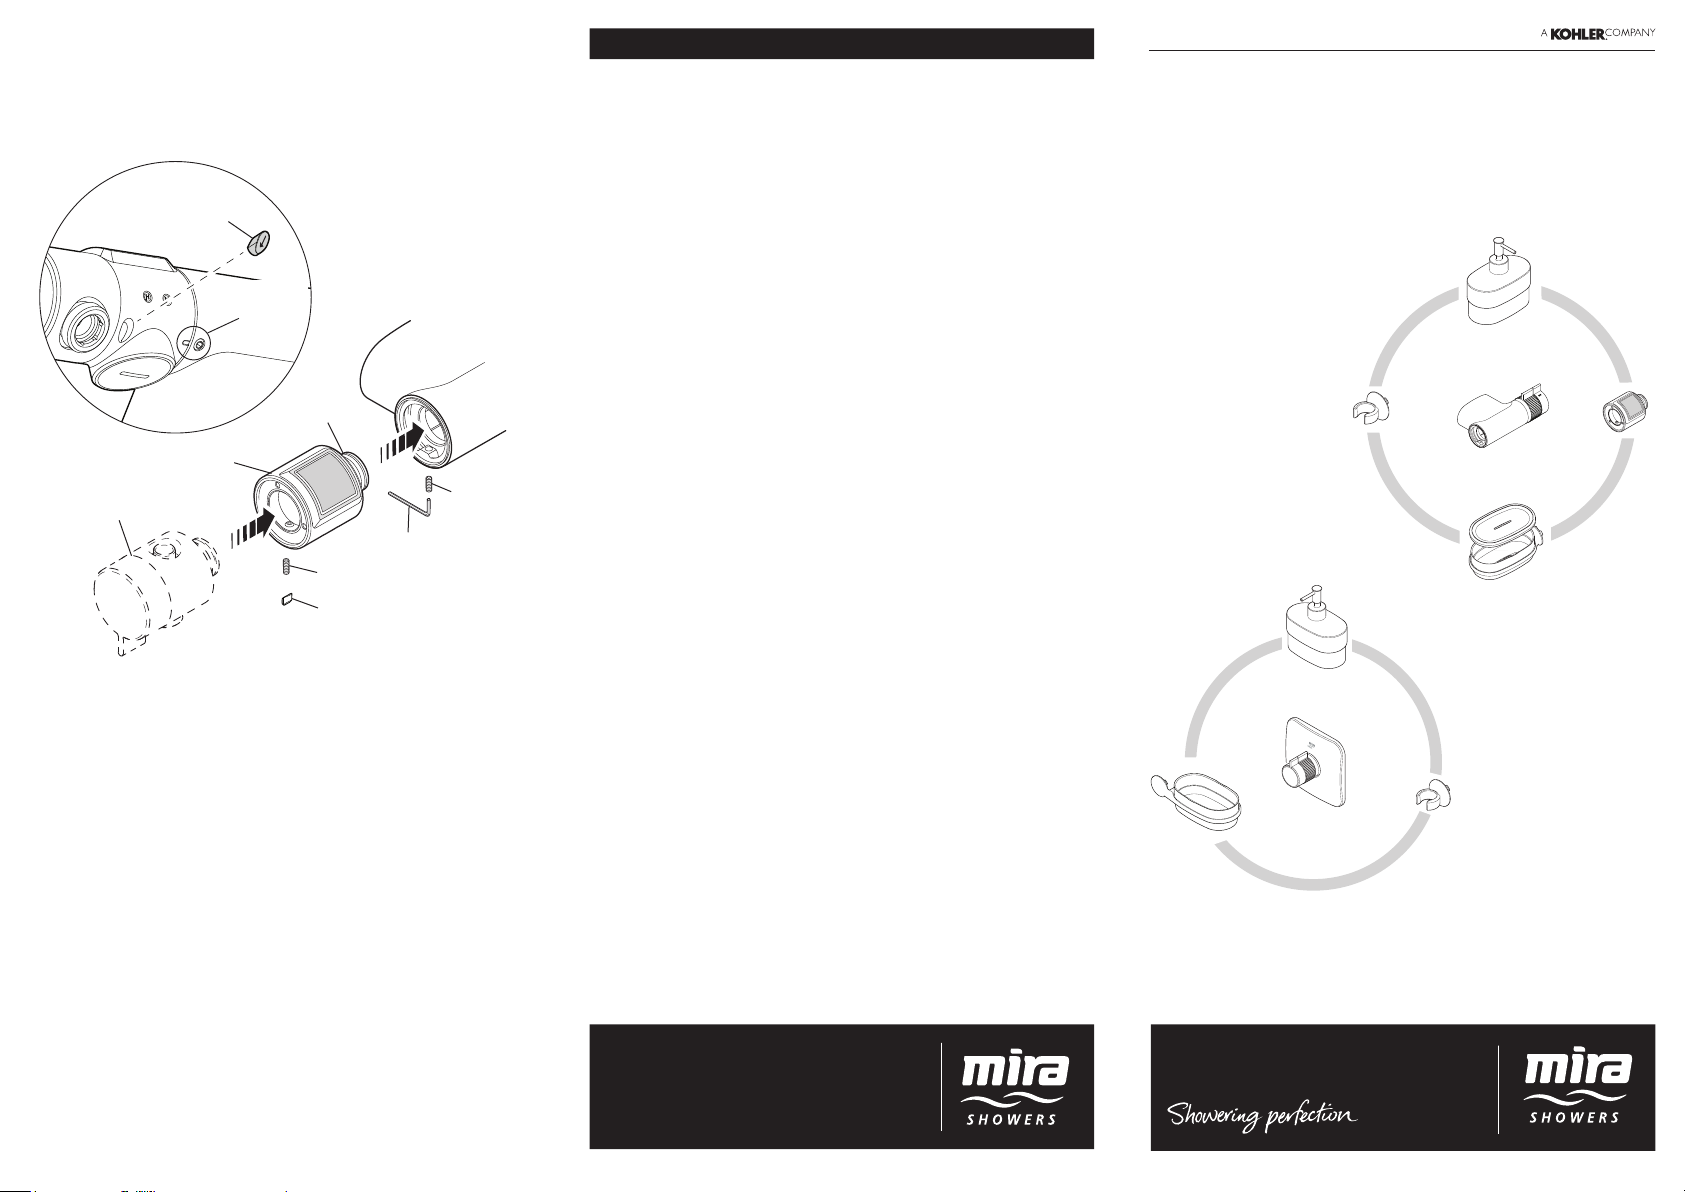
5. Fit the Sealing Plug into the Sense module grubscrew hole. The
arrow on the plug should be visible and pointing to the rear of the
product. See g 6.
Note! The sealing plug MUST be tted correctly to prevent water
ingress into the Sense module, failure to do so may result in
product malfunction and will not be covered by the guarantee.
Mixer
Valve
2.5 mm Hexagonal
Key
Grubscrew
Mixer Valve Outlet
(ERD Shown) Grubscrew
Sealing Plug
Sealing
Plug
Slot aligned
with grubscrew
hole
Sense
Module
Slot aligned
with grubscrew
hole
Sealing Plug
Note! Arrow points
to rear of product
Fig 6
Seal
Installation
1. Install the mixer valve rst - refer to "Installation Procedure" in the
Mira Agile & Mira Pronta Installation and User Guide.
Note! The Sense Module should be tted during the initial installation
of an Agile or Pronta ERD.
2. Unscrew the grubscrew approx 4 turns. Push the module rmly into
the exposed end of the mixer valve, rotating until the slot aligns with
the grubscrew hole (See g 6). Take care not to damage the seal.
3. Push and hold the module in place whilst retightening the grubscrew,
tighten until the grubscrew bites (using 2.5 mm hexagonal key), then
tighten a further 1/2 turn to secure the module to the mixer valve.
4. Fit the Mixer Valve Outlet and Fittings relevant to your shower
installation (EV or ERD), refer to the Fittings Installation Guide and
User guide.
Accessory Ring / Parking Socket
Installation
1. Carefully prise off the Concealing Cap from the mixer valve outlet.
2. Orientate the Accessory Ring or Parking Socket so that the arrow
on the plastic component is pointing upwards. See g 1.
3. Push into the valve/outlet and twist clockwise until the accessory
locks into position with the mixer valve outlet (Agile / Pronta) or water
outlet (Adept). See g 1 and 2.
4. Place the soap dish, pot or soap dispenser into the accessory ring.
5. Use the Parking Socket as an alternative mount for the Showerhead.
Built in Mixer
Accessory Ring
(Mira Adept)
Parking
Socket
Water
Outlet
Concealing
Plate
Parking
Socket
Concealing
Cap
Mixer Valve
Outlet
Accessory Ring
(Mira Agile / Pronta)
Arrow points up
Accessory
Ring
Concealing
Plate
Exposed Mixer
Wall Mount Installation
Special consideration should be given to the xing arrangements when
installing onto a dry lined, stud partition, shower cubicle or laminated
panel wall structures. Installers may wish to obtain alternative proprietary
cavity xings, or choose other options, however these methods of xing
are beyond the scope of this guide.
1. With the hole at the top, place the Wall Plate Mounting Bracket in a
suitable position. See g 3.
2. Mark the holes for the mounting bracket vertically.
3. Drill two holes to suit the wall xings.
4. Screw the mounting bracket to the wall using the screws supplied.
5. Follow steps 2 - 5 as detailed on the previous page.
Battery
Battery Lid
Fig 4
Fig 1
Fig 2 Spare Parts
1736.846 - Accessory Component Pack
Battery
(CR2477)
Synchronisation in
progress symbol
Fig 5
Fig 3 Hole
Slot
Wall Plate
Mounting
Bracket
Accessory
Sense Module
Initialisation
Note! The Sense Module is not suitable for the Mira Agile Single Control.
1. Use a coin to unscrew the battery lid from the Sense module.
2. Fit the battery (in the orientation shown in fig 4) into the
battery compartment and retighten the battery lid. The Sense
module will now enter Auto Update mode for 3 minutes.
During this time, radio signal strength will be indicated on the screen
between 0 (No signal) and 3 (Strong Signal).
The module uses a radio signal to automatically set the time.
Whilst synchronisation is attempted the symbol will be displayed
and signal strength will also be shown, this may take up to 3
minutes.
Notes! Sometimes the low power of the radio signal, geographical
limitations and surrounding site conditions mean this update is
not always successful. Interference from electrical equipment
(mobile phones, wireless broadband routers etc.) and poor
weather conditions can also affect the auto update process, under
these conditions it will be necessary to set the clock manually. If
synchronisation is unsuccessful the clock will ash for 10 seconds
before returning to sleep mode.
The clock defaults to 12:03am.
Manual Setup - Push the button marked ‘H’ until the time is
displayed. Press the button until the correct hour is displayed.
Push the button marked ‘M’ and repeat the process to set the
correct minutes. See g 5.
The module automatically detects whether the shower is in use
and alternately displays the showering temperature and the time.
Notes! Temperature reading is an indication only (accuracy and
responsiveness are reduced below 30°C).
If the shower is not in use the display will switch off and the module
will return to sleep mode.
If the module is in sleep mode pushing either of the buttons will
briey display the time.
The Sense module has a power saving mode, if display turns off
during use simply turn shower off and back on to reset display.
Successful synchronisation will occur with a signal strength
consistantly between 2 and 3.
3. Setting the time:
Auto Update Mode - The Sense module will enter auto update
mode under the following conditions:
When the battery is inserted
When the Sense module clock reaches 3 am daily
Note! If the module attempts to update at 3pm the clock has
been set incorrectly
When both the ‘H’ and ‘M’ buttons are pressed simultaneously.

This manual suits for next models

4

Other Kohler Bathroom Fixture manuals

Kohler K-T10340 Assembly instructions

Kohler

Kohler K-T10340 Assembly instructions

Kohler Loure K-123L36-SANL-CP User manual

Kohler

Kohler Loure K-123L36-SANL-CP User manual

Kohler Stillness K-14450 User manual

Kohler

Kohler Stillness K-14450 User manual

Kohler Triton K-T7019 Assembly instructions

Kohler

Kohler Triton K-T7019 Assembly instructions

Kohler K-99257X-4CD Assembly instructions

Kohler

Kohler K-99257X-4CD Assembly instructions

Kohler ENGLEFIELD MILANO User manual

Kohler

Kohler ENGLEFIELD MILANO User manual

Kohler K-1821 Quick start guide

Kohler

Kohler K-1821 Quick start guide

Kohler K-T7751 Assembly instructions

Kohler

Kohler K-T7751 Assembly instructions

Kohler K4915 Operating manual

Kohler

Kohler K4915 Operating manual

Kohler K-16102 Assembly instructions

Kohler

Kohler K-16102 Assembly instructions

Kohler HARKEN K-78197T User manual

Kohler

Kohler HARKEN K-78197T User manual

Kohler K-24659T-L User manual

Kohler

Kohler K-24659T-L User manual

Kohler K-45205 User manual

Kohler

Kohler K-45205 User manual

Kohler NEW MEMOIRS K-76563T User manual

Kohler

Kohler NEW MEMOIRS K-76563T User manual

Kohler K-8034 User manual

Kohler

Kohler K-8034 User manual

Kohler K-1681 User manual

Kohler

Kohler K-1681 User manual

Kohler K-702101 User manual

Kohler

Kohler K-702101 User manual

Kohler Purist Upgrade K-99170T User manual

Kohler

Kohler Purist Upgrade K-99170T User manual

Kohler K-1643 User manual

Kohler

Kohler K-1643 User manual

Kohler K-701803T-FMSW User manual

Kohler

Kohler K-701803T-FMSW User manual

Kohler K-701805T-FMSW User manual

Kohler

Kohler K-701805T-FMSW User manual

Kohler K-T10426 Assembly instructions

Kohler

Kohler K-T10426 Assembly instructions

Kohler FOREFRONT K-2748T User manual

Kohler

Kohler FOREFRONT K-2748T User manual

Kohler STERLING 5400 Series Operation manual

Kohler

Kohler STERLING 5400 Series Operation manual

Popular Bathroom Fixture manuals by other brands

Porcelanosa noken Giro 100089932 Installation and Maintenance

Porcelanosa

Porcelanosa noken Giro 100089932 Installation and Maintenance

AQUALUX Aqua 4 manual

AQUALUX

AQUALUX Aqua 4 manual

Raritan STCFS Installation and maintenance instructions

Raritan

Raritan STCFS Installation and maintenance instructions

Miomare WC-SITZ Assembly instructions

Miomare

Miomare WC-SITZ Assembly instructions

TESA POWER.KIT BK 43-2 installation guide

TESA

TESA POWER.KIT BK 43-2 installation guide

Akw Onyx 25436L-LS Installation and user manual

Akw

Akw Onyx 25436L-LS Installation and user manual

Bossini ACCIAIO INOX Instructions for installation, operation and maintenance

Bossini

Bossini ACCIAIO INOX Instructions for installation, operation and maintenance

Voda Plumbingware ECLIPSE VECL61S Assembly instructions

Voda Plumbingware

Voda Plumbingware ECLIPSE VECL61S Assembly instructions

Rohl PERRIN & ROWE U.5886X/TO installation instructions

Rohl

Rohl PERRIN & ROWE U.5886X/TO installation instructions

OVE SYDNEY 60 installation manual

OVE

OVE SYDNEY 60 installation manual

Zitta XENIA 32 installation manual

Zitta

Zitta XENIA 32 installation manual

Sanela 37RZ Instructions for use

Sanela

Sanela 37RZ Instructions for use

Artika MONSOON2 Assembly instructions

Artika

Artika MONSOON2 Assembly instructions

Vicenza Designs San Michele TP9001S Instructions for installation

Vicenza Designs

Vicenza Designs San Michele TP9001S Instructions for installation

Sanela SLA 13 Mounting instructions

Sanela

Sanela SLA 13 Mounting instructions

Foremost BRANTLEY BABVT4922 instructions

Foremost

Foremost BRANTLEY BABVT4922 instructions

BELLOSTA Revivre Blue 1200/2/78 Installation instruction

BELLOSTA

BELLOSTA Revivre Blue 1200/2/78 Installation instruction

Helvex RM-15 installation guide

Helvex

Helvex RM-15 installation guide

manuals.online logo
manuals.online logoBrands
  • About & Mission
  • Contact us
  • Privacy Policy
  • Terms and Conditions

Copyright 2025 Manuals.Online. All Rights Reserved.