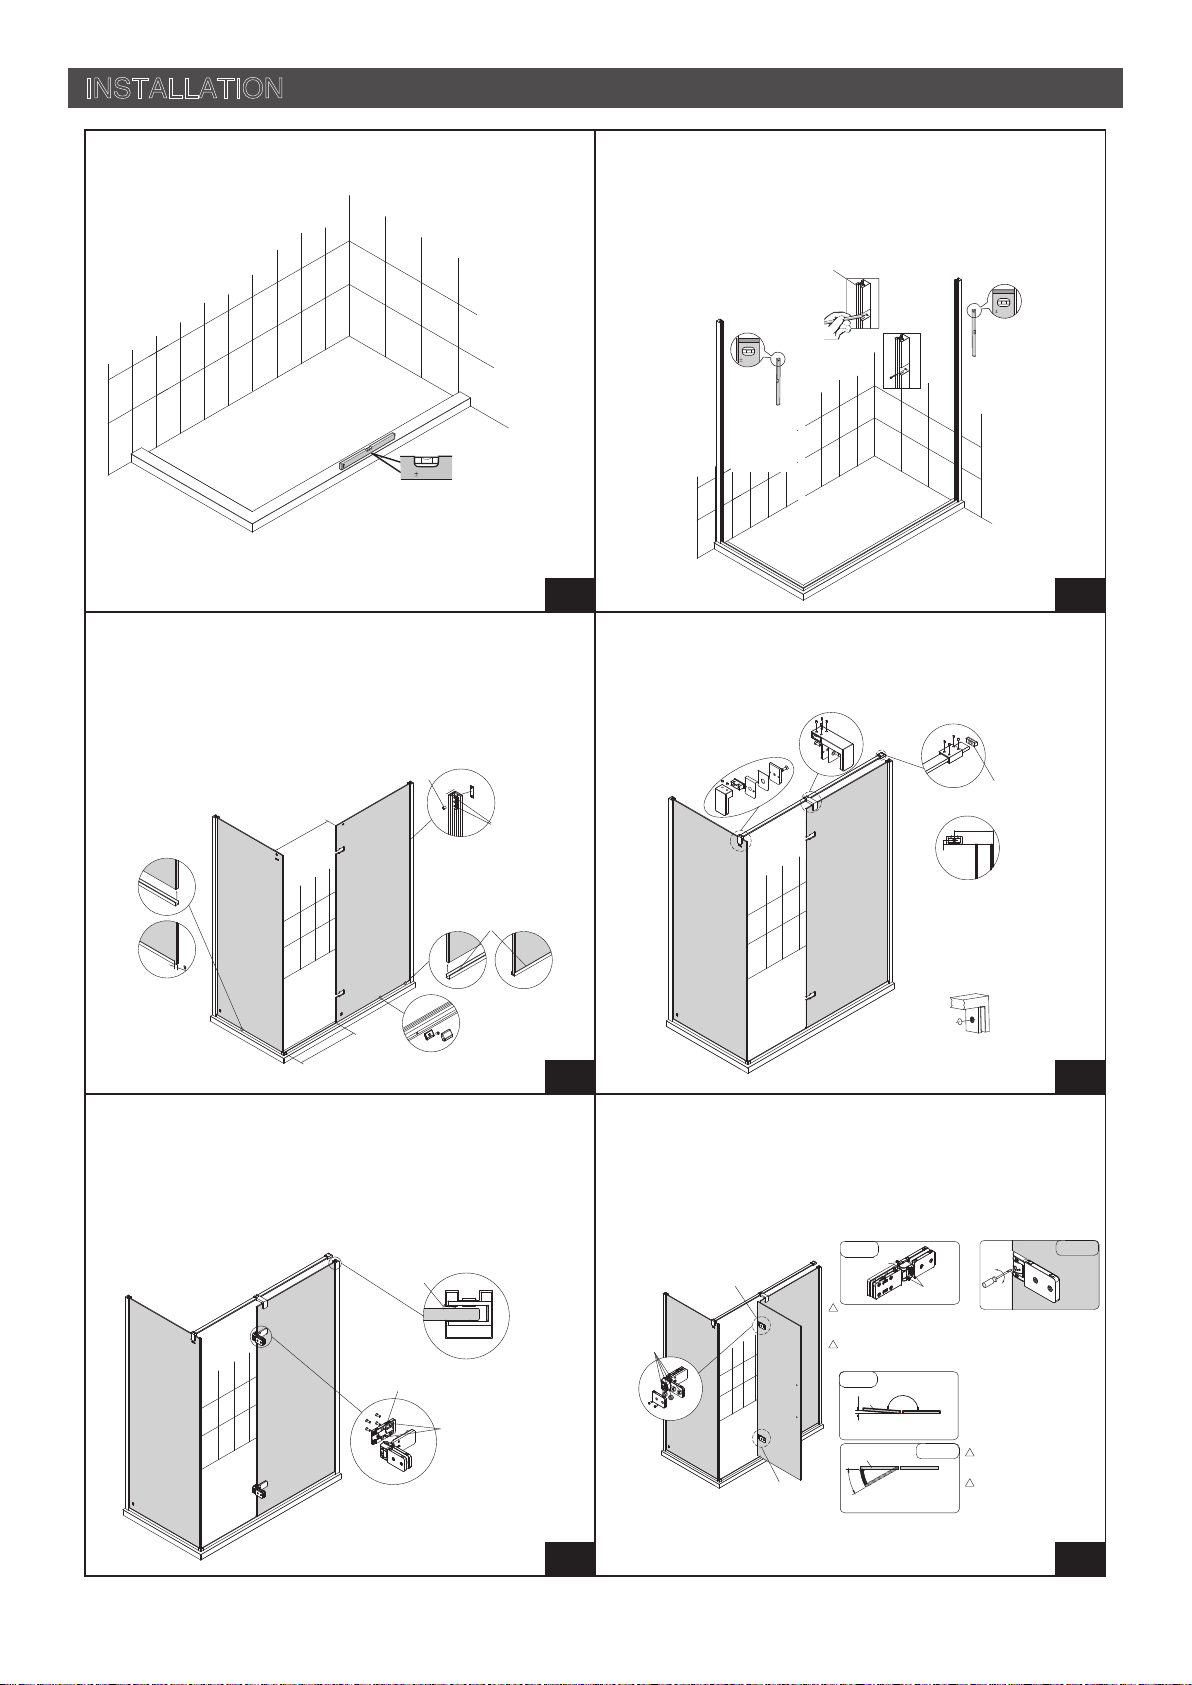
manuals.online logo
Brands
  1. Home
  2. •
  3. Brands
  4. •
  5. Kohler
  6. •
  7. Bathroom Fixture
  8. •
  9. Kohler K-701803T-FMSW User manual

Kohler K-701803T-FMSW User manual

-1-
BEFORE YOU BEGIN 安装之前
© Copyright Kohler China Investment Co., Ltd. 2019
© 版权为科勒(中国)投资有限公司所有 2019
ZHONGSHAN KOHLER SHOWER CO., LTD. NO13-1, XINGYE ROAD, ZHONGSHAN TORCH
DEVELOPMENT ZONE, ZHONGSHAN, GUANGDONG, CHINA POST CODE: 528437
中山科勒卫浴有限公司 广东省中山市中山火炬开发区兴业路 13-1 号邮编:528437
• 说明书中所有的资料是按最新出版的产品资料编写而成。
科勒中国有限公司保留任何时候无须通知即可改变产品特
性、包装或产品可供类型的权利。
• 说明书包括重要的安装、清洁及保养方面的内容,请把这
些资料交给用户阅读,保管。
• 确保在安装淋浴房之前已经完整正确地安装了浴室和完工
墙面材料。淋浴区墙地面应做防水处理,并不得布置有电
器开关、插座。确保地面排水通畅。
• 在进行淋浴房安装之前,请拿出、排列并确认所有的零部
件。请参考第 2 页上所示的分解图。
• 对尺寸与本标准产品不同的定制淋浴房,参照本说明书进
行安装。
• 本产品符合 QB 2584-2007。
• All information is based on the latest product information
available at the time of publication. Kohler China Ltd.
reserves the right to make changes in product
characteristics, packaging, or availability at any time
without notice.
• These instructions contain important care, cleaning, and
warranty information-please leave these instructions for
the consumer.
• Make sure that the bath and the finished wall material are
completely and correctly installed prior to installing your
shower door. Prepare waterproof layer to wall and floor of
the showering area. It is not allowed for any presence of
electric switches and sockets. Make sure the floor drain
runs smoothly.
• Before starting the door installation, lay out and identify all
the parts. Use the exploded view illustrated on page 2 for
reference.
• For the installation method of customized shower with
different dimensions, please refer to this instructions.
• The product complies with QB 2584-2007.
警告:可能有人员伤害或者产品损坏的危险。
钢化玻璃不能进行切割,钻孔或硬物敲击。搬移或安装
过程中,小心确保玻璃边、角部位不受撞击,以防爆裂
伤人。
建议:将本产品安装在科勒淋浴盆或挡水条上(需另行购买)。
如自备挡水条,建议顶面宽度尺寸大于 80mm。
重要事项:淋浴房需要安装在平坦垂直的墙面上。墙面的垂直度
推荐在正负 3mm/m 以内。如果超出此范围,科勒公司将不保证
淋浴房的完美使用。
CAUTION: Risk of injury or product damage.
Tempered glass cannot be cut, drilled or knocked by
hard object. Make sure corner area of the glass
refraining from knocking so as to cause personal injury
due to broken glass.
ATTENTION: Please install this door on Kohler receptors or
curbs(Not included). If the curb is not Kohler-branded, please
note its top width should be more than 80mm.
IMPORTANT: The shower door requires a flat vertical
finished wall. The squareness of the wall is recommended no
more than 3 mm/m. KOHLER Company won't take
responsibility of the installation quality.
24hrs
ROUGHING-IN 尺寸图
Unit: mm
单位:毫米
Do not use the enclosure for at least 24 hours.
安装后 24 小时内请勿使用淋浴房。
COMPONENTS 艺廷
INSTALLATION INSTRUCTIONS
安装说明书
L SHAPE, 1DOOR 2PANELS, 10mm
L型,两固一活,10mm 防爆贴膜+超白,竖墙材款
K-701803T-FMSW
SKU B H
1000-1600
C
250-1100 1850-2200K-701803T
1380417-T01-A
B
C
H
Tools Required/所需工具
5mm Allen Key
5mm 六角扳手
2.5mm Allen Key
2.5mm 六角扳手
Masonry Drill &
6mm Drill Bit
冲击钻以及
6mm 冲击钻头
Pencil
铅笔
Level
水平仪
Measuring Tape
卷尺
Phillips Screwdriver
十字螺丝刀
Hammer
锤子
Knife
刀片
Caulk Gun
硅胶枪
Safety Goggles
护目镜
1380417-T01-A
-2-
Soft Close Hinge, Down
艺廷系列阻尼铰链
Corner Connector, Components
转角连接件
Cover, Briquetting Decorative
下导轨固定件端盖
Briquetting
下导轨固定件
Bubble Seal
泡泡胶条
Wall Jamb-L/R, Insert Glass
夹固玻墙立柱-L/R
Side Panel Glass Clamp Assy
侧固玻拉杆玻璃夹组件
Panel Glass Trolley Body Assy
固玻拉杆夹紧座组件
SS Tube, 10*30, Components
10*30不锈钢扁管
Trolley Wall Body Assy
拉杆上墙座组件
Screw M4X6
半圆头内六角机制螺丝 M4X6
Soft Close Hinge, Up
艺廷系列闭门铰链
Panel Glass, Components
固定玻璃
Waterproof Part
铰链密封防水件
Jamb-L/R, Door Bottom
一固一活下横梁-L/R(通用 L型)
Seal Assy, Moving Glass Bottom, L/RH
回水槽组件(左/右)
Side Jamb, Bottom
L型侧边下横梁
Cover Briquetting Decorative
下导轨固定件端盖
Briquetting
下导轨固定件
Seal, Bottom Door
固玻底下装饰胶条
Components Handle
艺廷拉手
Door Glass, Components
门玻
Magnetic Seal
磁条
Side Panel Glass, L
Shape, Components
侧固定玻璃
Cover, Wall Jamb
墙立柱装饰盖
Wall Jamb-L/R, Insert Glass
夹固玻墙立柱-L/R
End Cover, Solid Glass Wall Jamb
夹固玻墙立柱端盖
X2
X2
X2
X4
X4
X1
X1
X1
X1
X1
X1
X1
Side Panel Glass Clamp Assy 侧固玻拉杆玻璃夹组件
Components Handle 艺廷拉手
Briquetting 下导轨固定件
Cover, Wall Jamb 墙立柱装饰盖
Cover, Briquetting Decorative 下导轨固定件端盖
SS Tube, 10*30, Components 10*30不锈钢扁管
Panel Glass Trolley Body Assy 固玻拉杆夹紧座组件
Trolley Wall Body Assy 拉杆上墙座组件
Soft Close Hinge, Down 艺廷系列阻尼铰链
Soft Close Hinge, Up 艺廷系列闭门铰链
Jamb-L/R, Door Bottom 一固一活下横梁-L/R
Wall Jamb-L/R, Insert Glass 夹固玻墙立柱-L/R
X2 X2
X1X1
Screw M4X6 半圆头内六角机制螺丝 M4X6
End Cover, Solid Glass Wall Jamb 夹固玻墙立柱端盖
Seal Assy, Moving Glass Bottom, L/RH 回水槽组件(左/右)
Screw GB/T 819 M4X10 十字槽沉头不锈钢机制螺丝 M4X10
Screw Key 4mm 内六角扳手 4mm
Pan Screw ST3.5X40 圆头螺丝 ST3.5X40
Screw Key 3mm 内六角扳手 3mm
Screw Key 2.5mm 内六角扳手 2.5mm
Magnetic Seal 磁条
Bubble Seal 泡泡胶条
Insert Seal 单边胶条
Seal, Bottom Door 固玻底下装饰胶条
X2
X4
X10
X4
X1
X1
X1
X1
Insert Seal
单边胶条
1380417-T01-A
-3-
INSTALLATION 安装
STEP
1
STEP
2
STEP
3
STEP
4
STEP
5
STEP
6
1. Place the weather bar. The installation surface in the shower room must be flat.
1.放置挡水条,淋浴房安装面必须打水平。
0mm
IMPORTANT:
Tray MUST be level
along front edge.
重要:
底盘必须水平。
The wall jamb
must be kept
vertical.
上墙材必须垂直。
0mm
0mm
The wall jamb
must be kept
vertical.
上墙材必须垂
直。
Inside
淋浴房内侧
1.Install the bottom frame (20 mm to the edge from the inside). Fix the wall jambs on both
ends and make sure that a minimum gap exists between the jambs and the bottom frame.
IMPORTANT: Make sure that the rubber washer is present on the inter glass jambs.
1.安装底横梁(内偏20mm安装),固定两端上墙型材,请确保上墙型材固定时与底横梁之
间间隙最小。
重要:安装前确保夹固玻型材的焊片胶垫无掉落。
665
665
Installed fastener of the bottom
rail
下导轨固定件安装方式
Protective seal flush with the
glasses
防护胶条与玻璃平齐
Protective seal
防护胶条
Protective seal
防护胶条 Observe from the hole if the rubber washer is
present. Insert the panel glasses into the slot
and then tighten the socket head screws to fix
the glasses.
安装前可从观察孔检查焊片胶垫是否掉落,固
玻插入卡槽后,再拧紧内六角紧定螺钉顶紧固
定玻璃。
Install the panel glass at the
magnetic seal side. Reserve
space for the magnetic seal
when installing the protective
seal
安装磁条侧固玻,防护胶条需预
留磁条安装位置
1.Insert the panel glass into the stainless steel jambs.
2.Adjust the two panel glasses so that they are 665 mm apart (see the figure below).
3.Secure the panel glasses as shown in the figure below.
IMPORTANT: Check that the protective seal has been installed on the bottom of the
glasses and check the installation position and dimension.
1.将固玻插入到不锈钢型材里。
2.按图示要求调节两片玻璃之间的距离为665mm(如下图)。
3.按下图方式将固玻固定好。
重要:在安装固玻前,请确认固玻底下是否安装防护胶条及胶条安装在固玻上的位置
尺寸。
1.Drill the installation holes into the wall according to the dimensions shown in the figure
below.
2.Install the handle.
1.按下图尺寸在墙面钻好安装孔。
2.安装拉杆。
* Note: The decorative cover needs
to be installed after the trolley is
installed.
*注意:拉杆安装完成后,需要扣上
装饰盖
Tighten all set screws
所有紧定螺钉需拧紧
Wall body
上墙座
Position of the installation holes for
the wall body
上墙座钻孔位置示意图
105
10
Adjusting mechanism
调节件
Reduce the distance between the
cover and the glass with the
adjusting mechanism.
可通过调节件减小盖板与玻璃间的
间隙。
Important: The hinge externally marked with "UP/向上" shall be
installed on the top and that marked with "DOWN/向下" on the bottom.
重要:铰链外表面有“UP/向上”标识为上铰链;
铰链外表面有“DOWN/向下”标识为下铰链。
The bottom hinge is used to adjust
the closing speed
下铰链用于关门速度快慢的调节
The top hinge is used only to
adjust the closing angle
上铰链仅用于闭门角度的调节
Be careful of the
orientation of the taper
ring
注意锥形孔圈方向
Taper ring
锥形孔圈
Observation hole
观察孔
Set screws
紧定螺钉 Rubber washer
焊片胶垫
1.Insert the insert seal between the inner side of the panel glasses and the jambs.
2.Loosen the lock screws on the inside of the hinge. Insert the adjusting mechanism into
the opening of the glasses (make sure that the plastic cover and the plastic washers on
both sides of the glasses are present before installation).Lock the hinges onto the panel
glasses.Tighten the upper and the lower adjust screws while keeping the hinge
horizontal. Then tighten the connecting screws on the internal cover.
1.在固定玻璃内侧与型材间卡入单边胶条;
2.松开铰链内侧锁板螺丝,将合页调节件卡入玻璃开口内(安装前需确保调节塑胶套无脱
落,玻璃两侧的塑胶垫片无遗漏。)将合页锁至固定玻璃上。当合页处于水平状态时拧紧
上下两个调节螺丝,最后锁紧内侧盖板的连接螺丝。
Insert Seal
单边胶条
1.Adjust the closing angle with the set screw.
1.通过紧定螺钉调整好关门的角度。
TIPS:
1. The room must be sufficiently supported before the door glass is installed.
2. Four set screws on the top hinge need to be loosened when the door glass is being
removed, otherwise the hinge may rebound and cause the glass to break.
温馨提示:
1.门玻安装前,房体必须要有足够的支撑;
2.拆卸淋浴房门玻时,需松掉上铰链的四颗调节紧定螺钉,防止铰链回弹引起玻璃爆裂。
Top hinge
上铰链
Top hinge
上铰链
Internal set screw
内侧紧定螺钉
External set screw
外侧紧定螺钉
!
!
Safety Tips:
The internal and external set screws must be loosened
when the door glass is to be installed or removed.
Otherwise, the hinge may rebound and cause glass
breakage.
安全提示:
安装或拆卸门玻时,都须松掉内外紧定螺钉,以防止铰
链回弹,导致玻璃破碎。
30
Suggested closing angle <180°
建议闭门角度<180°
α: Starting angle for closing acceleration
α为闭门加速启动角度
α
!
!
Bottom hinge
下铰链
Adjustment Tips:
Loosen the external set screws, and tighten the
internal set screws. Closing angle <180°
Loosen the internal set screws, and tighten the
external set screws. Closing angle >180°
(Suggested offset distance: 30mm)
调节提示:
松外侧紧定螺钉,紧内侧紧定螺钉时,闭门角度<180°;
松内侧紧定螺钉,紧外侧紧定螺钉时,闭门角度>180°。
(闭门偏移距离建议为 30mm)
Inside
房体内侧
Outside
房体外侧
Tips for adjustment of starting angle for closing acceleration:
Loosen the external set screws, and tighten the internal set screws.
Starting angle <α
Loosen the internal set screws, and tighten the external set screws.
Starting angle >α
闭门加速启动角度调节提示:
松外侧紧定螺钉,紧内侧紧定螺钉时,启动角度<α;
松内侧紧定螺钉,紧外侧紧定螺钉时,启动角度>α。
Safety Tips: Positions of set screws for
bottom hinge have been adjusted before
delivery. If no specified closing angle is
needed, no more adjustment is needed.
安全提示:下铰链紧定螺钉位置,出厂时已
调节好,如无特殊关门角度,无须调节。
Door glass
门玻
Door glass
门玻
Inside
房体内侧
Outside
房体外侧
Inside 房体内侧
Outside 房体外侧
Bottom hinge
下铰链
Adjustment Tips:
Closing speed gets lower when
adjusting towards "-";
Closing speed gets higher when
adjusting towards "+";
调节提示:
向"-"调节时,关门速度变慢;
向"+"调节时,关门速度变快。
1380417-T01-A
-4-
INSTALLATION 安装
STEP
7
STEP
8
STEP
9
STEP
10
1.Check that the stopper is properly installed and then install the internal and the external
hinge covers.
1.检查铰链限位件是否已预装好,确认后扣上铰链内外侧盖板;
Install the internal cover while opening the door
outward.
Install the external cover while opening the door
inward.
门往外打开时,装好铰链内侧的盖板;
门往内打开时,装好铰链外侧的盖板。
Door opened inward
门往内打开状态
Stopper
铰链限位件
Check if the stopper is correctly and securely
installed when installing the cover
在安装铰链外盖时, 检查铰链限位件是否安装
好,以确保无脱落
1.Install the magnetic seal and the weather bar.
IMPORTANT: Install the hinge cover before the side weather bar.
1.装好磁条,挡水胶条。
重要:在安装侧挡水胶条前,先扣好铰链盖板。
Cut the bubble seal according to the actual
height of the glass to avoid the installation
positions of the hinges
泡泡胶条需根据实际玻璃高度剪断,用以避开铰
链安装位置
Install the waterproof part before the side
weather bar
防水密封件在安装侧挡水胶条前须装好
Install the bottom weather bar assembly
门底挡水胶条组件安装
1.Install decorative covers on all jambs.
2.Install the handle assembly onto the door glass.
1.将型材装饰盖全部装好;
2.将把手组件安装在门玻上。
1.Apply glass cement both inside and outside as shown in the figure below.
1.按下图所示,在淋浴房里外都打上玻璃胶。
Install the handle onto the door
glass
将把手安装在门玻上
Decorative top cover for the inter glass
扣夹固玻型材装饰盖
Decorative cover for the
inter glass
夹固玻型材装饰盖

Other Kohler Bathroom Fixture manuals

Kohler SKYLINE K-705876T-FM-SHP User manual

Kohler

Kohler SKYLINE K-705876T-FM-SHP User manual

Kohler K-706139 Assembly instructions

Kohler

Kohler K-706139 Assembly instructions

Kohler Sonata K-1641 User manual

Kohler

Kohler Sonata K-1641 User manual

Kohler RAIN DUET 15344T User manual

Kohler

Kohler RAIN DUET 15344T User manual

Kohler K-2293 Assembly instructions

Kohler

Kohler K-2293 Assembly instructions

Kohler K-702300 Assembly instructions

Kohler

Kohler K-702300 Assembly instructions

Kohler Vanity K-2604 Assembly instructions

Kohler

Kohler Vanity K-2604 Assembly instructions

Kohler K-2362 Series Assembly instructions

Kohler

Kohler K-2362 Series Assembly instructions

Kohler Tresham K-2992-8 User manual

Kohler

Kohler Tresham K-2992-8 User manual

Kohler K-19034 User manual

Kohler

Kohler K-19034 User manual

Kohler K-1843-Y2 User manual

Kohler

Kohler K-1843-Y2 User manual

Kohler VINTAGE K-7158 User manual

Kohler

Kohler VINTAGE K-7158 User manual

Kohler K-4108 User manual

Kohler

Kohler K-4108 User manual

Kohler K-2515 Assembly instructions

Kohler

Kohler K-2515 Assembly instructions

Kohler C3-125 Assembly instructions

Kohler

Kohler C3-125 Assembly instructions

Kohler K-116 Assembly instructions

Kohler

Kohler K-116 Assembly instructions

Kohler MATTIA K-36974T User manual

Kohler

Kohler MATTIA K-36974T User manual

Kohler K-16281 User manual

Kohler

Kohler K-16281 User manual

Kohler K-817 User manual

Kohler

Kohler K-817 User manual

Kohler K-102 Assembly instructions

Kohler

Kohler K-102 Assembly instructions

Kohler K-9702 User manual

Kohler

Kohler K-9702 User manual

Kohler 2273W User manual

Kohler

Kohler 2273W User manual

Kohler PATIO 20368T-CP/SC User manual

Kohler

Kohler PATIO 20368T-CP/SC User manual

Kohler C3-500/K-31331T-HC-0 User manual

Kohler

Kohler C3-500/K-31331T-HC-0 User manual

Popular Bathroom Fixture manuals by other brands

Triton ENVI 2181706A manual

Triton

Triton ENVI 2181706A manual

OVE HARBOR 60 installation manual

OVE

OVE HARBOR 60 installation manual

abi CYRUS 100131 quick start guide

abi

abi CYRUS 100131 quick start guide

Axor 35275000 quick start guide

Axor

Axor 35275000 quick start guide

Bossini MANHATTAN L00891 installation instructions

Bossini

Bossini MANHATTAN L00891 installation instructions

Akuaplus MED001 instruction manual

Akuaplus

Akuaplus MED001 instruction manual

Gessi 71442 manual

Gessi

Gessi 71442 manual

Samo B7862 Assembly instruction

Samo

Samo B7862 Assembly instruction

Santec Novo 2831EM10-TM Installation instruction

Santec

Santec Novo 2831EM10-TM Installation instruction

VOXORT PERLA GOLD V401133 Installation instruction

VOXORT

VOXORT PERLA GOLD V401133 Installation instruction

Glacier bay HD873X-2201 Installation and care guide

Glacier bay

Glacier bay HD873X-2201 Installation and care guide

Artweger 9WV.89 Assembly instructions

Artweger

Artweger 9WV.89 Assembly instructions

Glacier bay SIMARD 15606 Use and care guide

Glacier bay

Glacier bay SIMARD 15606 Use and care guide

Hewi System 900Q Installation and operating instructions

Hewi

Hewi System 900Q Installation and operating instructions

Hewi 815 Series Installation and operating instructions

Hewi

Hewi 815 Series Installation and operating instructions

Speakman S-2759 quick start guide

Speakman

Speakman S-2759 quick start guide

Drive Medical RTL12045 installation instructions

Drive Medical

Drive Medical RTL12045 installation instructions

Triton OMNICARE ULTRA manual

Triton

Triton OMNICARE ULTRA manual

manuals.online logo
manuals.online logoBrands
  • About & Mission
  • Contact us
  • Privacy Policy
  • Terms and Conditions

Copyright 2025 Manuals.Online. All Rights Reserved.