Konig HAV-TR900 Series User manual

2014-03-27
HAV-TR900xx
MANUAL (p. 2)
Retro DAB+ Radio
ANLEITUNG (S. 13)
Retro DAB+ Radio
MODE D’EMPLOI (p. 24)
Radio DAB+ rétro
GEBRUIKSAANWIJZING (p. 35)
Retro DAB+radio
MANUALE (p. 46)
Radio DAB+ stile retrò
MANUAL DE USO (p. 57)
DAB + radio de estilo retro
MANUAL (p. 68)
Rádio retro DAB+
HASZNÁLATI ÚTMUTATÓ (o. 80.)
Retró DAB+ rádió
KÄYTTÖOHJE (s. 91)
Retro DAB+ radio
BRUKSANVISNING (s. 102)
Retro DAB+ Radio
NÁVOD K POUŽITÍ (s. 113)
Retro DAB+ rádio
MANUAL DE UTILIZARE (p. 124)
Radio retro DAB+
ΕΓΧΕΙΡΙΔΙΟ XPHΣHΣ(σελ. 135)
Ρετρό ραδιόφωνο DAB+
BRUGERVEJLEDNING (s. 146)
DAB+ Retro Radio
VEILEDNING (s. 157)
Retro-radio med DAB+
ИНСТРУКЦИЯ (168 стр.)
Retro DAB+ Радио
KILAVUZ (s. 180)
Retro DAB+ Radyo
NÁVOD (s. 191)
Retro DAB+ rádio

2
ENGLISH
Retro DAB+ Radio
SAFETY INSTRUCTIONS
WARNING
RISK or ELECTRIC SHOCK
DO NOT OPEN
A triangle with a lightning
symbol draws the user’s
attention to ‘dangerous
voltage’ without insulation in
the cabinet which may be
high enough to entail a risk of
electric shock.
CAUTION: TO REDUCE THE RISK OF
ELECTRIC SHOCK, DO NOT REMOVE
COVER (OR BACK). THERE ARE NO
USER
SERVICEABLE PARTS INSIDE, REFER
SERVICING TO QUALLIFIED SERVICE
PERSONNEL.
A triangle with an exclamation
mark draws the user’s
attention to important
instructions; for use and
maintenance in the
accompanying manual, which
should be studied.
FURTHER INFORMATION
Beware of small pieces and batteries, do not swallow them, It may be hazardous to your
health and lead into suffocation. Please, Make sure to keep small devices and batteries
out of the reach of children.
Important advice regarding hearing protection
Caution:
You care for your hearing, and so do we.
Therefore, use caution while using this appliance.
Our recommendation: Avoid high volumes.
Children should be supervised while using headphones; make sure that the appliance is
not set to high volume.
Caution!
High volumes may cause irreparable damage to children's ears.
NEVER let allow anyone, especially children, to put objects into the holes, slots or
openings on this device. The device must only be opened by a qualified assistant.
Only use the appliance for its intended purpose.
This device may only be used in housings and business premises.
Please keep this instruction manual for further reference.
Instructions on environment protection
Do not dispose of this product in the usual household garbage at the end of its life cycle;
hand it over at a collection point for the recycling of electrical and electronic appliances.
The symbol on the product, the instructions for use or the packing will inform about the
methods for disposal.

3
The materials are recyclable as mentioned in its marking. By recycling, material recycling
or other forms of re-utilisation of old appliances, you are making an important contribution
to protect our environment.
Please inquire at the community administration for the authorised disposal location.
Do not obstruct the ventilation of the device. Make sure, that no curtains, newspapers,
furniture or any other type of objects are blocking the ventilation system of the apparatus.
The ventilation system must be clear of objects at al times! Overheating may lead into
serious damage of the device and reduce its performance and lifespan.
Heat and warmth
Do not expose the appliance to direct sunlight. Make sure that the appliance is not subject
to direct heat sources such as heaters or open fire. Make sure that the ventilation slots of
the appliance are not covered.
Moisture and cleaning
This appliance is not waterproof! Do not immerse player in water. Do not allow player to
come in contact with water. If water gets inside the player it may cause serious damage.
Do not use cleaning agents that contain alcohol, ammoniac, benzene or abrasives as
these could damage the player. For cleaning, use a soft, moistened doth.
Professional recycling
Batteries and packaging should not be disposed of in the trash, Batteries must be handed
over to a collection centre for used batteries. Separating disposable packaging materials
is ecologically friendly.
Location of the controls
Display
Carrying handle
Control panel
Volume/on/off
Tuning dial and pointer
Tuning control
Speake
r
Tone control
AUX in socket
Head
p
hone socket

4
1. Auto button (scan for DAB stations)
2. Menu button
3. Display option button
4. Shift button (for presets 6 to 10)
5. Select button
6. Up button
7. AM select button
8. FM select button
9. DAB select button
10. Preset 1 and 6
11. Preset 2 and 7
12. Preset 3 and 8
13. Preset 4 and 9
14. Preset 5 and 10
15. Down button
16. DAB LCD screen
17. Tone control
18. On/off & volume control
Telescopic aerial
Back cover locking screw
Main power socket
Battery compartment

5
Using your DAB+ radio
Switching on for the first time Adjusting the volume
To increase the volume, turn the volume
control to the right.
To decrease the volume, tum the volume
control to the left.
Tone dial
The tone dial is used to alter the audio output
of the DAB+ digital radio between a high
(treble) and low (bass) frequency range.
Turn the tuning control right to enhance the
high frequency (treble) content of the sound
output.
Turn the tuning control left to enhance the
low frequency (bass) content of the sound
output.
Scanning for DAB stations
To switch on, turn the on/off & volume
control to the right. Press the DAB select
button. When DAB mode is selected for the
first time, the DISPLAY will illuminate and
‘Welcome to DAB’ will be displayed.
The DAB+ digital radio will automatically
begin to scan for stations. The screen shown
below is displayed. A bar graph indicates the
progress of the search.
Progress bar Signal strength symbol
When the scan is complete, the DAB+ digital
radio will select the first available station -
stations are listed in numerical then
alphabetical order.
The station list is retained in memory so the
next time you switch the DAB+ digital radio
on, the station search does not take place.
If there are no stations found, check that
adequate DAB coverage exists in your area.
It is possible to perform a manual scan for
stations, see Manual Tune on page 16.
Changing DAB stations
Press the ►and ◄buttons to scroll up and
down the list of available stations. The
station names will appear on line 3 of the
display.
When the desired station is displayed, press
SELECT. The DAB+ digital radio will tune to
that station.
Due to the nature of DAB radio, additional
stations and services regularly become
available. If you wish to see if there have been
any new DAB stations introduced in your area
you can initiate a search.
Press the AUTO button to activate a local
search for stations.
The DAB+ digital radio will automatically
begin to scan for stations. The screen shown
below is displayed. A bar graph indicates the
progress of the search and the number of
stations found as the scan progresses.
Progress bar Number of
stations found

6
Using your DAB+ Radio
Station display symbols Selecting a preset station
You may see same symbols displayed
alongside the station names. These are
defined as follows:
?Displayed before the station name if the
station is not available or not active.
>> Displayed after the station name indicate
that this is a primary station with secondary
services.
<< Displayed before the station name
indicate that this is a secondary station.
To select presets 1-5, press the relevant
preset button.
To select presets 6-10, hold down the SHIFT
button and then press the relevant preset
button.
If you have not already stored a DAB station in
one of the presets, ‘Empty preset’ will be
displayed. The display will revert to the
previously selected station after a few
seconds.
Storing DAB presets Reset
Note: Each preset button holds two presets.
For example, the 1/6 preset button, on the
DAB+ digital radio, holds preset positions 1
and 6.
You can preset up to 10 DAB stations for
easy access as follows:
1. Tune to the station you wish to preset.
2. Press and hold one of the preset buttons
(e.g. 1/6), located on the top of the DAB+
digital radio. ‘Preset # saved’ will appear on
the second line of the display, where # is the
number of the preset position.
3. To save to preset positions 6-10, hold
down the SHIFT button then press and hold
the desired preset button. If you have
already saved a DAB station in that preset
location, it will be over-written with the new
station.
You can delete all of the preset stations and
return the DAB+ digital radio to its factory
settings as follows:
1. Press and hold the MENU button.
2. The display will show ‘Press SELECT to
confirm reset…’
3. Press the SELECT button. The display will
show ‘Welcome to DAB’ before performing a
new scan for stations.
The DAB+ digital radio will be returned to its
factory condition.
If you do not wish to reset the DAB+ digital
radio, wait a few seconds without pressing
any buttons and the DAB digital radio will
revert to its previous operating condition.

7
Using your DAB+ radio
Changing the DAB display information
It is possible to change the Information that Is displayed on the third line of the display when
listening to a DAB station. Note that this information is not available when listening to conventional
AM/FM stations. There are seven types of information available listed below with examples listed to
the right of the text. To change the information displayed press the display button repeatedly.
Press Display
Dynamic label segment (DLS)
This Is scrolling text information supplied by
the DAB station. It may comprise information
on music titles or details of the programmer
and is provided by the broadcaster.
Program type (PTY)
This is a description of the type of
programmer provided by the DAB station and
is provided by the broadcaster.
Multiplex name
This will show the multiplex that is
broadcasting the programmer you are
listening to.
Time and date
This displays the time and date and is
provided by the broadcaster, so will be
accurate.
Channel and frequency
This displays the channel number and the
transmission frequency.
Signal information
This shows the digital bit-rate and the signal
mode.
Signal error rate
If the transmission signal contains errors the
system can apply correction.
The amount of signal correction can be
displayed as a numerical value between 0
and 99. As the value increases, you will hear
the signal degrade.
To improve reception, try adjusting the
position of the aerial.
Press Display
Press Display
Press Displa
y
Press Displa
y
Press Display
Press Display

8
Using your DAB+ radio
Using the Menu System
The MENU button allows you to change
some of the system options on your DAB+
digital radio. These options are arranged in a
menu structure as shown below.
Pressing the MENU button will enter the
menu control. The options are described
below.
Station order
This function enables you to define how the
stations are arranged when scrolling the
stations list.
1. Press the MENU button to access the
menu control.
2. Press either the ►or ◄buttons until
‘Station order’ is displayed.
3. Press the SELECT button to access
‘Station order’.
4. Use either the ►or ◄to display the
desired option.
There are options available as described
below.
Alphanumeric
This is the default setting. The stations are
arranged in numerical then alphabetical order.
5. Press SELECT to confirm.
Press menu
Press select
Press selec
t
Press select
Press ►
then press
selec
t
Press ►
then press
select
Press
Press
Press
Press
►Then select
Press
select

9
Using your DAB+ radio
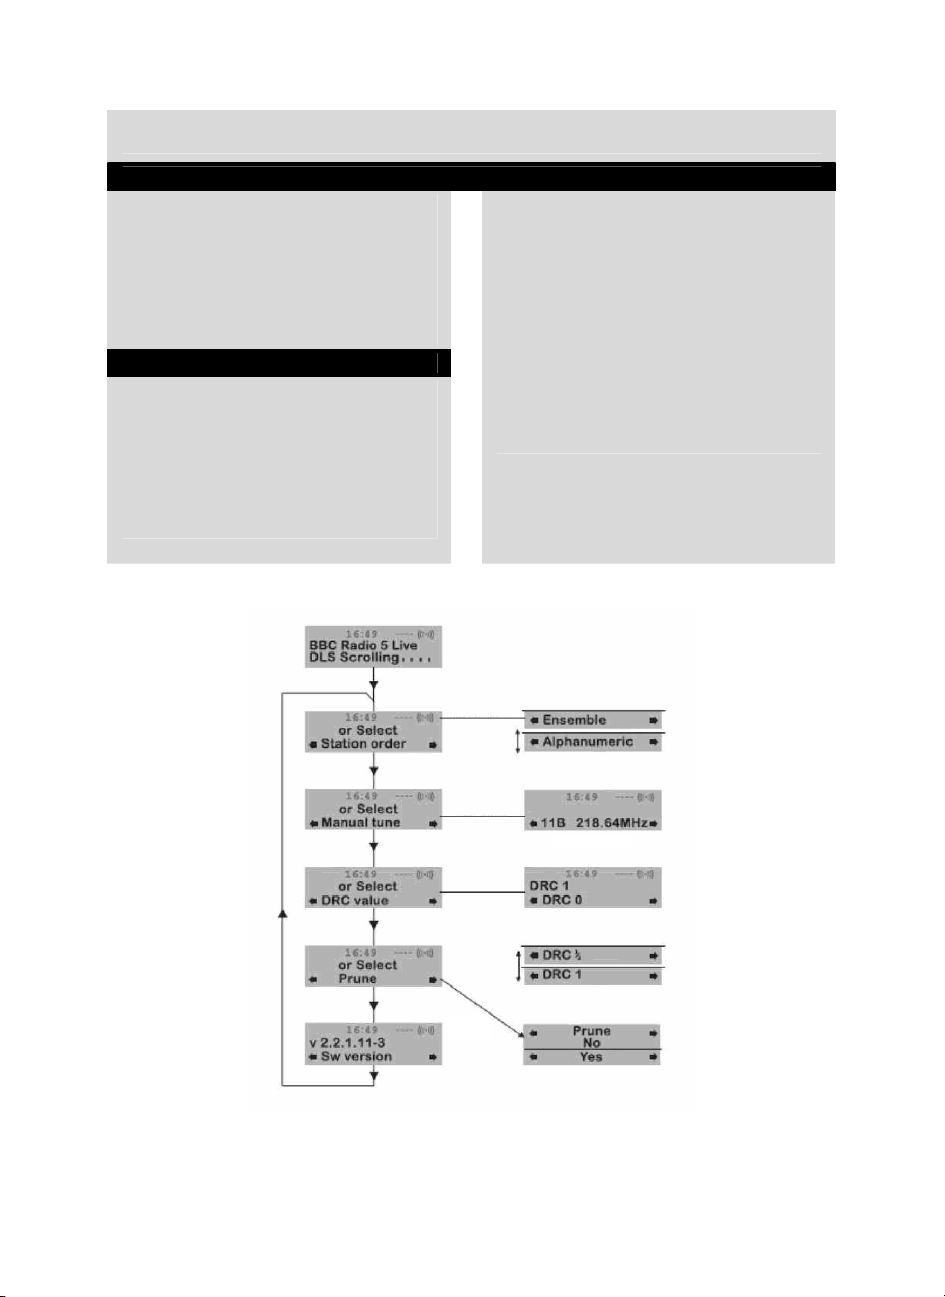
Manual tune Dynamic range control
It is possible to manually tune to a specific
channel/frequency and add this to the station
list.
This function can be used to obtain the
optimum reception for a specific channel/
frequency, taking into account the position of
the aerial.
1. Press the MENU button to access the
menu control.
2. Press either the ►or ◄button until
‘Manual tune’ is displayed.
3. Press the SELECT button to access
‘Manual tune’.
4. Use either the ►or ◄button to select the
desired channel/frequency
5. Press SELECT button.
A rectangle will be displayed on the second
line of the display. The position of this
rectangle indicates the signal strength (the
further towards the right, the greater the
signal strength).
6. Adjust the position of the aerial to obtain
the optimum signal strength.
7. Press the SELECT button to confirm.
Version
This is only provided as an engineer’s
reference in the unlikely event that servicing
should ever be necessary.
Press the MENU button to access the menu
control.
Press either the ►or ◄button until ‘Sw
version’ is displayed.
The version number will appear on line 2.
DRC adds or removes a degree of
compression to compensate for the
differences in the dynamic range between
radio stations. For example, a station
broadcasting popular music may have a high
level of compression applied since the
emphasis is on a constant high listening level,
whereas a station broadcasting classical
music will have little or no compress ion as
the listener requires all of the highs and lows
in the music to define the detail.
There are three levels of compression:
DRC 0: no compression applied.
DRC 1: maximum compression applied
(this is the default).
DRC 1/2: medium compression applied.
The best way to determine which of these
settings suits you best is to experiment with
them on a variety of source material.
1. Press the MENU button to access the
menu control.
2. Press either the ►or ◄button until ‘DRC
value’ is displayed.
3. Press the SELECT button to access ‘DRC
value’. The current DRC level will be
displayed on line 2 of the display.
4. Press the ►button to select between the
three DRC values. The available options
appear on line 3 of the display.
5. When the required DRC value is
displayed, press SELECT to confirm. You
should be able to hear the difference in
compression immediately.
6. Prune station.
No
Yes

10
Using the AM/FM Radio
Switching to AM/FM mode Tone dial
If the DAB+ digital radio is in DAB mode,
press the desired frequency band button
(AM or FM). You may hear background noise
as no station has been tuned in. The display
looks like the image shown below.
Tuning the radio
The tone dial is used to alter the audio output
of the DAB+ digital radio between a high
(treble) and low (bass) frequency range.
Turn the tuning control right to enhance the
high frequency (treble) content of the sound
output.
Turn the tuning control left to enhance the low
frequency (bass) content of the sound output.
Using aux in
The signal from another home entertainment
system can be connected to the digital radio
via 3.5 mm aux in socket on the right hand
side of the digital radio.
You will require a stereo cable with
connectors which match the sockets on your
other audio device.
Adjust the desired volume level by tuning the
volume control of the digital radio.
To tune into a radio broadcast/station turn
the tuning control left or right until the pointer
is aligned with the desired frequency
markings on the tuning dial (see below).
When the pointer is horizontal you have
reached either the start or end of the
frequency range. Do not attempt to force the
dial further in the same direction.
Volume dial
When the DAB+ digital radio is switched on,
either turn the volume dial right to increase
the volume, or left to decrease the volume.

11
Troubleshooting
If you believe that something is wrong with
your DAB+ digital radio, first check the points
listed below.
There Is no sound from my radio
Check that the volume is not set to the
minimum.
Make sure that the radio has been able to
locate DAB/AM/FM stations.
The display shows ‘no services available’
in DAB mode
Make sure that DAB coverage easts in your
area.
Try adjusting the position of the aerial or
location of the radio.
Poor reception
As with any radio service, there will be areas
of weak signal that may cause poor
reception. Follow the instructions for manual
tuning on page 16 and adjust the aerial while
monitoring the signal strength until the
optimum signal is obtained. If reception is
still poor, try re* locating the radio to another
part of the room.
I cannot access secondary services
At the time of publishing this manual, not
many secondary services are available in
the Australia. This will increase as more DAB
stations start broadcasting. If a secondary
service station is available, the secondary
indicator ‘»‘ will be displayed next to the
station name.
The display goes blank, saying
‘SERVICE OFF AIR’
This may occur if a broadcaster changes the
label of a service or removes a label whilst
you are listening to the station. The radio will
try to re-tune to the station. Alternatively,
perform a scan by pressing the AUTO button.
I cannot hear the station I have selected
The station you are listening to is displayed
on line 2. Line 3 shows the selected option,
but you have to press the SELECT button to
tune to the selected station.
I hear distortion on some stations
This is due to a weak signal. Re-positioning
the aerial to gain maximum signal strength.
If the trouble persists, consult your dealer or
contact the Customer Helpline.

12
CLEANING AND MAINTENANCE
Please observe also the safety advices.
Before cleaning, always pull the power plug.
Clean the housing with a soft and moist cloth and a mild detergent.
Never use abrasive detergents or sharp utensils.
Safety precautions:
To reduce risk of electric shock, this product should ONLY be
opened by an authorised technician if service is required.
Disconnect the product from mains and other equipment if a
problem should occur. Do not expose the product to water or
moisture.
Maintenance
Clean the product only with a dry cloth.
Do not use cleaning solvents or abrasives.
Warranty
Any changes and/or modifications to the product will void the warranty. We cannot accept any liability
for damage caused by incorrect use of this product.
Disclaimer
Designs and specifications are subject to change without notice. All logos, brands and product names
are trademarks or registered trademarks of their respective holders and are hereby recognized as
such.
Disposal
This product is designated for separate collection at an appropriate collection point. Do not
dispose of this product with household waste.
For more information, contact the retailer or the local authority responsible for waste
management.
This product has been manufactured and supplied in compliance with all relevant regulations and
directives, valid for all member states of the European Union. It also complies to all applicable
specifications and regulations in the country of sales.
Formal documentation is available upon request. This includes, but is not limited to: Declaration of
Conformity (and product identity), Material Safety Data Sheet, product test report.
Please contact our customer service desk for support:
via website: http://www.nedis.com/en-us/
via telephone: +31 (0)73-5993965 (during office hours)
NEDIS B.V., De Tweeling 28, 5215 MC ’s-Hertogenbosch, THE NETHERLANDS

13
DEUTSCH
Retro DAB+ Radio
SICHERHEITSHINWEISE
WARNUNG
GEFAHR EINES STROMSCHLAGS
NICHT ÖFFNEN
Ein Dreieck mit einem
Blitzsymbol weist den Nutzer
auf eine nicht isolierte,
gefährliche Spannung im
Gehäuse hin, die stark genug
sein könnte, um einen
Stromschlag auszulösen.
VORSICHT: ENTFERNEN SIE NICHT
DIE ABDECKUNG (ODER RÜCKSEITE),
UM DIE GEFAHR EINES
STROMSCHLAGS ZU REDUZIEREN.
ES BEFINDEN SICH KEINE DURCH
DEN NUTZER ZU WARTENDEN TEILE
IM INNEREN. ÜBERLASSEN SIE DIE
PFLEGE DEM FACHPERSONAL.
Ein Dreieck mit einem
Ausrufezeichen weist den
Nutzer in der beiliegenden
Anleitung auf wichtige
Hinweise zur Nutzung und
Instandhaltung hin, die
beachtet werden sollten.
WEITERE INFORMATIONEN
Seien Sie vorsichtig mit Kleinteilen und Batterien. Schlucken Sie diese nicht herunter.
Dies kann Ihre Gesundheit gefährden und zum Ersticken führen. Bitte bewahren Sie
Kleinteile und Batterien außerhalb der Reichweite von Kindern auf.
Wichtige Hinweise zum Gehörschutz
VORSICHT:
Ihnen ist Ihr Gehör wichtig, genauso ist es für uns.
Seien Sie deshalb bei der Verwendung dieses Gerätes vorsichtig.
Unsere Empfehlung: Vermeiden Sie hohe Lautstärken.
Kinder sollten die Kopfhörer nicht ohne Aufsicht verwenden und Sie sollten darauf achten,
dass das Gerät nicht zu laut eingestellt ist.
VORSICHT!
Eine zu hohe Lautstärke kann für Ohren von Kindern zu irreparablen Schäden führen.
Gestatten Sie NIEMANDEM, vor allem nicht Kindern, Objekte in die Löcher, Schlitze oder
Öffnungen des Geräts zu stecken. Das Gerät darf nur durch qualifiziertes Fachpersonal
geöffnet werden.
Verwenden Sie das Gerät nur für den vorgesehenen Zweck.
Das Gerät darf nur in Wohn- und Geschäftsräumen verwendet werden.
Bitte bewahren Sie diese Bedienungsanleitung für spätere Zwecke auf.

14
Hinweise zum Umweltschutz
Entsorgen Sie dieses Produkt am Ende seines Lebenszyklus nicht im normalen
Haushaltsabfall, sondern geben Sie es an einem Recycling-Sammelpunkt für elektrische
und elektronische Geräten ab. Das Symbol auf dem Produkt, der Gebrauchsanleitung
oder der Verpackung weist auf die Methoden zur Entsorgung hin.
Die Materialien sind wiederverwertbar, wie in der Kennzeichnung ersichtlich. Mit der
Wiederverwendung, stofflichen Verwertung oder anderen Formen der Verwertung von
Altgeräten leisten Sie einen wichtigen Beitrag zum Schutz unserer Umwelt.
Bitte erkunden Sie sich bei Ihrer Gemeindeverwaltung nach der zuständigen
Entsorgungsstelle.
Blockieren Sie nicht die Belüftung des Gerätes. Sorgen Sie dafür, dass keine Vorhänge,
Zeitungen, Möbel oder jegliche Art von anderen Objekten die Lüftung der Vorrichtung
blockieren. Die Lüftung muss jederzeit frei von Gegenständen sein! Überhitzung kann zu
schweren Schäden am Gerät führen und verringert dessen Leistung und Lebensdauer.
Hitze und Wärme
Setzen Sie das Gerät keiner direkten Sonneneinstrahlung aus. Sorgen Sie dafür, dass
das Gerät keinen direkten Wärmequellen wie Heizung oder offenem Feuer unterliegt.
Sorgen Sie dafür, dass die Lüftungsschlitze des Gerätes nicht verdeckt sind.
Feuchtigkeit und Reinigung
Dieses Gerät ist nicht wasserdicht! Tauchen Sie das Gerät nicht ins Wasser. Vermeiden
Sie jeglichen Kontakt des Gerätes mit Wasser. Eindringendes Wasser kann im Gerät zu
schweren Schäden führen. Verwenden Sie keine Reinigungsmittel, die Alkohol,
Ammoniak, Benzol oder Scheuermittel enthalten, da diese das Gerät beschädigen
könnten. Verwenden Sie für die Reinigung ein weiches, angefeuchtetes Tuch.
Fachgerechtes Recycling
Batterien und Verpackungen sollten nicht über den Hausmüll entsorgt werden. Die
Batterien müssen bei einer Sammelstelle für Altbatterien abgegeben werden. Die
Trennung von Einwegverpackungen ist umweltfreundlich.
Abbildung der Steuerelemente
Display
Tragegriff
Bedienfeld
Lautstärke/Ein/Aus
Senderauswahl und
Zeiger
Tuning-Regler
Lautspreche
r
Klangregler
AUX-In-Buchse
Ko
p
fhörerbuchse

15
1. Auto-Taste (Suche nach DAB-Sendern)
2. Menütaste
3. Display-Optionstaste
4. Umschalttaste (für Senderplätze 6 bis 10)
5. Auswahltaste
6. Taste: Nach oben
7. AM-Auswahltaste
8. UKW-Auswahltaste
9. DAB-Auswahltaste
10. Voreinstellungen 1 bis 6
11. Voreinstellungen 2 bis 7
12. Voreinstellungen 3 bis 8
13. Voreinstellungen 4 bis 9
14. Voreinstellungen 5 bis 10
15. Taste: Nach unten
16. DAB-LCD-Bildschirm
17. Klangregler
18. Ein/Aus-Schalter und Lautstärkeregler
Teleskopantenne
Feststellschraube für Rückseite
Netzanschluss
Batteriefach

16
Verwendung Ihres DAB+ Radios
Erstmaliges Einschalten Einstellen der Lautstärke
Um die Lautstärke zu erhöhen, drehen Sie
den Lautstärkeregler nach rechts.
Um die Lautstärke zu verringern, drehen Sie
den Lautstärkeregler nach links.
Tonregler
Der Tonregler wird verwendet, um den
Audio-Ausgang des DAB+ Digitalradios
zwischen einem hohen (Höhen) und
niedrigem (Bass) Frequenzbereich zu ändern.
Drehen Sie den Tuning-Regler nach rechts,
um die Hochfrequenzausgabe (Höhen) des
Klangs zu verbessern.
Drehen Sie den Tuning-Regler nach links,
um die Niedrigfrequenzausgabe (Bass)
des Klangs zu verbessern.
Suche nach DAB-Sendern
Drehen Sie zum Einschalten den
Ein/Aus-Schalter nach rechts. Betätigen
Sie die DAB-Auswah -Taste. Bei der ersten
Aktivierung des DAB-Modus wird das
DISPLAY beleuchtet und ‘Welcome to DAB’
angezeigt.
Der DAB+ Digitalradio beginnt automatisch
mit der Sendersuche. Der unten abgebildete
Bildschirm wird angezeigt. Ein Balken zeigt
den Fortschritt der Suche.
Fortschrittsbalken Symbol für
Signalstärke
Wenn der Sendersuchlauf abgeschlossen
ist, wählt das DAB+ Digitalradio den ersten
verfügbaren Sender aus - Sender werden in
numerischer und danach alphabetischer
Reihenfolge aufgeführt.
Die Senderliste wird gespeichert, so dass
die Sendersuche beim nächsten Einschalten
des DAB+ Digitalradios nicht mehr
durchgeführt wird.
Wenn keine Sender gefunden wurden,
vergewissern Sie sich, dass es in Ihrer Region
eine angemessene DAB-Abdeckung gibt.
Sie können auch einen manuellen
Sendersuchlauf durchführen (siehe
manueller Sendersuchlauf, Seite 16).
DAB-Sender ändern
Betätigen Sie die Tasten ►und ◄, um die
Liste der verfügbaren Sender nach oben und
unten zu durchsuchen. Die Sendernamen
erscheinen auf Zeile 3 der Anzeige.
Wenn der gewünschte Sender angezeigt
wird, drücken Sie AUSWAHL. Das DAB+
Digitalradio stimmt den entsprechenden
Sender ab.
Für das DAB-Radio werden regelmäßig
weitere Sender und Dienstleistungen
verfügbar gemacht. Wenn Sie sehen
möchten, ob es irgendwelche neuen
DAB-Sender in Ihrer Region gibt, dann
können Sie einen Suchlauf starten.
Betätigen Sie die AUTO-Taste, um einen
regionalen Sendersuchlauf zu starten.
Der DAB+ Digitalradio beginnt automatisch
mit der Sendersuche. Der unten abgebildete
Bildschirm wird angezeigt. Während des
Suchlaufs zeigt ein Balken den Fortschritt und
die Anzahl der gefundenen Sender.
Fortschrittsbalken Anzahl der
gefundenen Sender

17
Verwendung Ihres DAB+ Radios
Displaysymbole für Sender Auswahl eines gespeicherten Senders
Sie könnten verschiedene Symbole neben
dem Sendernamen sehen. Diese sind wie
folgt definiert:
?Vor dem Sendername angezeigt, wenn
der Sender nicht verfügbar oder nicht aktiv
ist.
>> Hinter dem Sendernamen angezeigt,
wenn es sich um eine Primärstation mit
Sekundärleistungen handelt.
<< Vor dem Sendernamen angezeigt, wenn
es sich um eine Sekundärstation handelt.
Zur Auswahl der Senderplätze 1-5, betätigen
Sie die entsprechende Sendertaste.
Zur Auswahl der Senderplätze 6-10, betätigen
Sie die UMSCHALT-Taste und drücken Sie
die entsprechende Sendertaste.
Wenn Sie bisher noch keinen DAB-Sender
auf einem der Senderplätze gespeichert
haben, erscheint ‘Empty preset’ im Display.
Nach ein paar Sekunden wechselt die
Anzeige wieder auf den zuvor ausgewählten
Sender.
DAB-Senderplätze speichern Zurücksetzen
Hinweis: Jede Sendertaste hat zwei
Senderplätze. Beispielsweise hält die
Sendertaste 1/6 am DAB+ Digitalradio die
Senderplätze 1 und 6 .
Sie können bis zu 10 DAB-Sender zum
Schnellzugriff speichern. Gehen Sie dabei
wie folgt vor:
1. Stellen Sie den Sender ein, den Sie
speichern möchten.
2. Halten Sie eine der Sendertasten (z. B.
1/6) auf der Oberseite des DAB+
Digitalradios gedrückt. ‘Preset # saved’
erscheint in der zweiten Zeile der Anzeige,
wobei # die Nummer des Speicherplatzes
ist.
3. Zur Speicherung auf den Senderplätzen
6-10, halten Sie die Umschalttaste gedrückt
und betätigen Sie die gewünschte
Sendertaste. Wenn Sie für diesen
Senderplatz bereits einen DAB-Sender
gespeichert haben, wird dieser mit dem
neuen Sender überschrieben.
Sie können alle gespeicherten Sender
löschen und das DAB+ Digitalradio auf die
Werkseinstellungen zurückstellen. Gehen Sie
dafür wir folgt vor:
1. Halten Sie die MENÜ-Taste gedrückt.
2. Im Display erscheint ‘Press SELECT to
confirm reset…’
3. Betätigen Sie die AUSWAHL-Taste. Im
Display erscheint ‘Welcome to DAB’, bevor
ein neuer Sendersuchlauf durchgeführt wird.
Das DAB+ Digitalradio wird auf die
Werkseinstellungen zurückgesetzt.
Wenn Sie das DAB+ Digitalradio nicht
zurücksetzen möchten, warten Sie ein paar
Sekunden, ohne eine Taste zu drücken und
das DAB-Digitalradio kehrt in den vorherigen
Betriebszustand zurück.

18
Verwendung Ihres DAB+ Radios
Ändern der DAB-Displayinformationen
Die Informationen, die beim Hören eines DAB-Senders in der dritten Zeile des Displays angezeigt
werden, können geändert werden. Beachten Sie, dass diese Informationen beim Hören von
herkömmlichen AM/UKW-Sendern nicht zur Verfügung stehen. Sieben Arten von Informationen
sind verfügbar und nachfolgend mit Beispielen auf der rechten Seite aufgeführt. Betätigen Sie die
Display-Taste zum Ändern der angezeigten Informationen.
Betätigen Sie Display
Dynamic Label Segment (DLS)
Dabei handelt es sich um durchlaufende
Textinformationen des DAB-Senders. Es
kann Informationen zu den Musiktiteln oder
Einzelheiten zum Programm umfassen und
wird von der Rundfunkanstalt zur Verfügung
gestellt.
Programmtyp (PTY)
Dies ist eine Beschreibung der Programmart
des DAB-Senders und wird von der
Rundfunkanstalt zur Verfügung gestellt.
Multiplex-Name
Dieser zeigt die Multiplex-Anstalt, die das
gerade laufende Programm ausstrahlt.
Zeit und Datum
Dies zeigt die exakte Uhrzeit und das Datum,
welche von der Rundfunkanstalt zur
Verfügung gestellt werden.
Kanal und Frequenz
Dies zeigt die Kanalnummer und die
Sendefrequenz an.
Signalinformationen
Dies zeigt die digitale Bitrate und den
Signal-Modus.
Signalfehlerrate
Wenn das Übertragungssignal Fehler enthält,
kann das System die Korrektur beantragen.
Der Betrag der Signalkorrektur kann als
numerischer Wert zwischen 0 und 99
angezeigt werden. Wenn sich der Wert
erhöht, werden Sie ein schlechteres Signal
hören.
Zur Verbesserung des Empfangs können Sie
versuchen, die Position der Antenne zu
verändern.
Betätigen Sie Display
Betätigen Sie Displa
y
Betätigen Sie Display
Betätigen Sie Displa
y

19
Verwendung Ihres DAB+ Radios
Verwendung des Menüs
Mit der MENÜ-Taste können Sie einige der
Systemoptionen in Ihrem DAB+ Digitalradio
ändern. Diese Optionen sind wie unten
abgebildet in einer Menüstruktur
angeordnet.
Die Menüsteuerung wird über die
MENÜ-Taste aufgerufen. Die Optionen sind
nachstehend beschrieben.
Senderreihenfolge
Mit dieser Funktion können Sie festlegen,
wie die Sender in der Senderliste
angeordnet werden.
1. Drücken Sie die MENÜ-Taste, um die
Menüsteuerung aufzurufen.
2. Drücken Sie die Pfeiltasten ►oder ◄,
bis ‘Station order’ angezeigt wird.
3. Betätigen Sie die Taste AUSWAHL, um in
die ‘Station order’ zu gelangen.
4. Verwenden Sie zur Anzeige der
gewünschten Option die Pfeiltasten ►
oder ◄.
Die unten beschriebenen Optionen stehen zur
Verfügung.
Alphanumerisch
Dies ist die Standardeinstellung. Die Sender
werden dadurch in numerischer und dann
alphabetischer Reihenfolge geordnet.
5. Bestätigen Sie mit AUSWAHL.
Drücken Sie Menü
Drücken Sie
Auswahl
Drücken Sie
Auswahl
Drücken Sie
Auswahl
Drücken Sie
A
uswahl
Drücken Sie ►
und drücken
Sie dann
A
uswahl
Drücken Sie
Drücken Sie
Drücken Sie
Drücken Sie
►und dann Auswahl
Drücken Sie ►
und drücken
Sie dann
A
uswahl

20
Verwendung Ihres DAB+ Radios
Manuelle Sendersuche Dynamische Bereichssteuerung
Es ist möglich, einen bestimmten Kanal bzw.
eine Frequenz manuell einzustellen und
diesen der Senderliste hinzuzufügen.
Diese Funktion kann verwendet werden, um
den optimalen Empfang für einen
bestimmten Kanal bzw. eine Frequenz unter
Berücksichtigung der Position der Antenne
zu erhalten.
1. Drücken Sie die MENÜ-Taste, um die
Menüsteuerung aufzurufen.
2. Drücken Sie entweder die Taste ►oder
◄, bis ‘Manual tune’ im Display angezeigt
wird.
3. Drücken Sie AUSWAHL, um ‘Manual
tune’ aufzurufen.
4. Verwenden Sie entweder die Taste ►
oder ◄, um den gewünschten Kanal bzw.
die Frequenz zu wählen
5. Drücken Sie die AUSWAHL-Taste.
In der zweiten Zeile des Displays wird ein
Rechteck erscheinen. Die Position dieses
Rechteckes zeigt die Signalstärke (je weiter
rechts, desto besser die Signalstärke).
6. Verändern Sie die Position der Antenne,
um eine optimale Signalstärke zu erhalten.
7. Bestätigen Sie mit der AUSWAHL-Taste.
Version
Für den unwahrscheinlichen Fall, dass eine
Wartung nötig sein sollte, dient dies als
Referenz für Fachpersonal.
Drücken Sie die MENÜ-Taste, um die
Menüsteuerung aufzurufen.
Drücken Sie entweder die Taste ►oder ◄
bis ‘Sw version’ erscheint.
Die Versionsnummer wird in Zeile 2
angezeigt.
DRC ergänzt oder entfernt einen
Kompressionsgrad, um die Unterschiede
dynamischer Bereiche zwischen
Radiostationen auszugleichen. Zum Beispiel
kann ein Sender mit beliebter Musik einen
hohen Kompressionsgrad verwenden, da das
Hauptaugenmerk auf einem konstant hohen
Hörpegel liegt, während ein Sender für
klassische Musik wenig oder keine
Kompression haben wird, da der Hörer für ein
fein definiertes Hörerlebnis alle Höhen und
Tiefen der Musik benötigt.
Es gibt drei Kompressionsgrade:
DRC 0: Keine Kompression.
DRC 1: Maximale Kompression (das ist
die Standardeinstellung).
DRC 1/2: Mittlere Kompression.
Die beste Möglichkeit zur Bestimmung der
am besten geeigneten Einstellungen, führt
über das Experimentieren mit einer Vielzahl
von Quellmaterial.
1. Drücken Sie die MENÜ-Taste, um die
Menüsteuerung aufzurufen.
2. Drücken Sie entweder die Taste ►oder
◄, bis ‘DRC value’ angezeigt wird.
3. Drücken Sie AUSWAHL, um ‘DRC value’
aufzurufen. Der aktuelle DRC-Wert erscheint
in Zeile 2 des Displays.
4. Drücken Sie die Taste ►, um zwischen
den drei DRC-Werten auszuwählen. Die
verfügbaren Optionen erscheinen auf Zeile 3
im Display.
5. Wenn der gewünschte DRC-Wert
angezeigt wird, bestätigen Sie mit
AUSWAHL. Sie sollten den Unterschied in
der Kompression sofort hören können.
6. Sender einstellen.
Nein
Ja
Table of contents
Languages:
Other Konig Radio manuals

Konig
Konig HAV-TR200W User manual

Konig
Konig RDDB5000 Series User manual

Konig
Konig HAV-TR110 User manual

Konig
Konig HAV-MR20 User manual

Konig
Konig HAV-SR40 User manual

Konig
Konig HAV-IR10 Instruction manual

Konig
Konig RDFM5010 Series User manual

Konig
Konig HAV-SR42 User manual

Konig
Konig HAV-SR41 User manual

Konig
Konig HAV-IR20 User manual