Kramer PT-12 User manual

Kramer Electronics Ltd.
PT-12 –Contents
i
Contents
Introduction 1
Getting Started 1
Overview 2
Typical Applications 3
Defining PT-12 HDMI Controller 4
Mounting PT-12 5
Connecting PT-12 6
Configuring PT-12 7
Configuring Using DIP-Switches 7
Configuring Automatic Power Controls 8
Defining EDID Lock 8
Modifying EDID with EDID Designer 9
Defining Color Depth and Spacing 9
Defining Audio Pass-Through 9
Setting HDCP Operation 10
Upgrading Firmware 10
Technical Specifications 11
Default EDID 12
Protocol 3000 14
Understanding Protocol 3000 14
Protocol 3000 Commands 15
Result and Error Codes 19

Kramer Electronics Ltd.
PT-12 –Introduction
1
Introduction
Welcome to Kramer Electronics! Since 1981, Kramer Electronics has been providing
a world of unique, creative, and affordable solutions to the vast range of problems that
confront the video, audio, presentation, and broadcasting professional on a daily
basis. In recent years, we have redesigned and upgraded most of our line, making the
best even better!
Getting Started
We recommend that you:
•Unpack the equipment carefully and save the original box and packaging
materials for possible future shipment.
•Review the contents of this user manual.
Go to www.kramerav.com/downloads/PT-12 to check for up-to-date user manuals,
application programs, and to check if firmware upgrades are available (where
appropriate).
Achieving Best Performance
•Use only good quality connection cables (we recommend Kramer high-
performance, high-resolution cables) to avoid interference, deterioration in signal
quality due to poor matching, and elevated noise levels (often associated with
low quality cables).
•Do not secure the cables in tight bundles or roll the slack into tight coils.
•Avoid interference from neighboring electrical appliances that may adversely
influence signal quality.
•Position your Kramer PT-12 away from moisture, excessive sunlight and dust.
Safety Instructions
Caution:
•This equipment is to be used only inside a building. It may only be connected to
other equipment that is installed inside a building.
•For products with relay terminals and GPI\O ports, please refer to the permitted
rating for an external connection, located next to the terminal or in the User
Manual.
•There are no operator serviceable parts inside the unit.
Warning:
•Use only the power cord that is supplied with the unit.
•To ensure continuous risk protection, replace fuses only according to the rating
specified on the product label which located on the bottom of the unit.

Kramer Electronics Ltd.
PT-12 –Introduction
2
Recycling Kramer Products
The Waste Electrical and Electronic Equipment (WEEE) Directive 2002/96/EC aims to
reduce the amount of WEEE sent for disposal to landfill or incineration by requiring it
to be collected and recycled. To comply with the WEEE Directive, Kramer Electronics
has made arrangements with the European Advanced Recycling Network (EARN)
and will cover any costs of treatment, recycling and recovery of waste Kramer
Electronics branded equipment on arrival at the EARN facility. For details of Kramer’s
recycling arrangements in your particular country go to our recycling pages at
www.kramerav.com/support/recycling.
Overview
Congratulations on purchasing your Kramer PT-12 HDMI Controller. PT-12 is a
CEC-enabled TV/display ON/OFF controller and extended EDID processor for
HDMI™signals up to 4K@60Hz (4:2:0) resolution. When PT-12 detects an HDMI
cable plug, it automatically turns ON the connected display, and automatically shuts
OFF the display when signal loss is detected. PT-12 is also a processing tool for
controlling the EDID functions.
Features
•Automates Meeting Rooms –Simplifies meeting beginning and ending by
automatically turning ON a CEC-enabled display when the presentation source is
plugged in and OFF when the source is unplugged. The shutdown delay time is
user-defined.
•High-Performance HDMI Controller –Supports pass-through of signals up to
4K@60Hz (4:2:0) resolution with user control of signal capabilities and functions.
•Selectable HDCP Authorization –Allows the user to control the appearance of an
HDCP or non-HDCP input to the source to permit delivery of protection-free
content, such as personal clips and charts, without HDCP encryption. HDCP
protected content is not passed in non-HDCP mode.
•Video Signal Control –Define color depth attributes and color space capabilities
of pass-through video signal. Lock the EDID configuration to ensure proper video
display.
•Audio Signal Control –User defines whether to allow the full signal to pass
through or to limit the audio to 2 channel LPCM.
•Simple Operation –Includes DIP-switches for defining basic controller functions.
•Cost-Effective Maintenance –Status LED indicators for HDMI ports and power
facilitate easy local maintenance and troubleshooting. Local device management
and firmware upgrade via mini-USB port and DIP-switches, ensure lasting, field-
proven deployment.
•Easy Installation –Compact, fan-less PicoTOOLS® enclosure for device-back
mounting, or side-by-side mounting of 4 units in a 1U rack space with the
recommended Kramer rack adapter.
Kramer Electronics Ltd.
PT-12 –Introduction
3
Typical Applications
PT-12 is ideal for the following typical applications:
•Home theatre or meeting room, automatic TV ON/OFF controller.
•Adapting new device compatibilities with older AV infrastructure.
•Supporting AV troubleshooting.

Kramer Electronics Ltd.
PT-12 –Defining PT-12 HDMI Controller
4
Defining PT-12 HDMI Controller
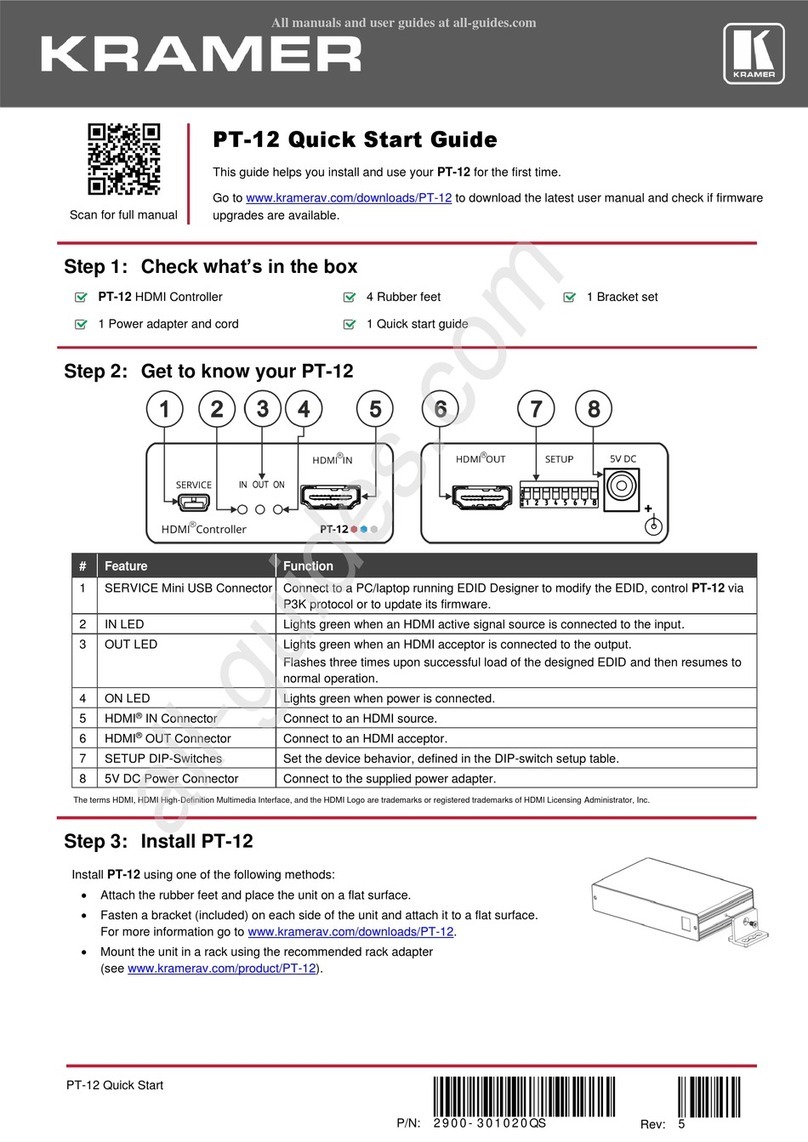
This section defines PT-12.
Figure 1: PT-12 HDMI Controller
#
Feature
Function
SERVICE Mini USB
Connector
Connect to a PC/laptop to modify the EDID using EDID Designer software,
control PT-12 via P3K protocol or to update the firmware.
IN LED
Lights green when an active HDMI source is connected to the input.
OUT LED
Lights green when an HDMI acceptor is connected to the output.
Flashes three times upon successful load of the designed EDID and then
resumes normal operation.
ON LED
Lights green when power is connected.
HDMI®IN Connector
Connect to an HDMI source.
HDMI®OUT Connector
Connect to an HDMI acceptor.
SETUP DIP-Switches
Use to configure device settings (see Configuring Using DIP-Switches
on page 7).
5V DC Power Connector
Connect to the included power adapter.
1
2
3
4
5
6
7
8

Kramer Electronics Ltd.
PT-12 –Mounting PT-12
5
Mounting PT-12
This section provides instructions for mounting PT-12. Before installing, verify that the
environment is within the recommended range:
•Operation temperature –0to 40C (32 to 104F).
•Storage temperature –-40to +70C (-40 to +158F).
•Humidity –10% to 90%, RHL non-condensing.
Caution:
•Mount PT-12 before connecting any cables or power.
Warning:
•Ensure that the environment (e.g., maximum ambient temperature & air flow) is
compatible for the device.
•Avoid uneven mechanical loading.
•Appropriate consideration of equipment nameplate ratings should be used for
avoiding overloading of the circuits.
•Reliable earthing of rack-mounted equipment should be maintained.
•Maximum mounting height for the device using supplied brackets is 2 meters.
To mount PT-12 in a rack:
Mount the unit in a rack using the recommended rack adapter
(see www.kramerav.com/product/PT-12).
To mount PT-12 on a table or shelf:
•Attach the rubber feet and place the unit on a flat surface.
•Fasten a bracket (included) on each side of the unit and
attach it to a flat surface.
For more information go to www.kramerav.com/downloads/PT-12.

Kramer Electronics Ltd.
PT-12 –Connecting PT-12
6
Connecting PT-12
Always switch off the power to each device before connecting it to your PT-12. After
connecting your PT-12, connect its power and then switch on the power to each
device.
Figure 2: Connecting to the PT-12
To connect PT-12 as illustrated in the example in Figure 2:
1. Connect the HDMI source (for example, an AV receiver) to the HDMI IN
Connector on the front panel.
2. Connect the HDMI OUT Connector to a CEC-enabled display.
3. Connect the power adapter to PT-12 and to the mains electricity (not shown in
Figure 2).
5
6

Kramer Electronics Ltd.
PT-12 –Configuring PT-12
7
Configuring PT-12
You can configure PT-12 in the following ways:
•DIP-Switches (see Configuring Using DIP-Switches on page 7).
•EDID Designer Software –to modify the EDID (see Modifying EDID with EDID
Designer on page 9).
•Protocol 3000 API (see Protocol 3000 Commands on page 15).
Configuring Using DIP-Switches
PT-12 enables you to control EDID lock, define signal parameters, configure display
auto power and display auto sleep, and upgrade the device firmware using the DIP-
switches on the back panel.
The following table describes the PT-12 DIP-switches.
By default, all switches are in the OFF (up) position.
All changes in the DIP-switch settings take effect on-the-fly, without the need for a
power cycle.
#
Feature
Description
1
EDID Lock
OFF (up) –Lock the current EDID so that changes on the output do not result
in changes to the EDID.
ON (down) –EDID is passed-through and acquired automatically.
2
Deep Color
OFF (up) –Limit color depth to 8 bits per color.
ON (down) –Pass-through color depth parameters.
3
Audio Pass-through
OFF (up) –Audio transmission is limited to 2-channel LPCM only.
ON (down) –Audio transmission is passed-through.
Audio pass-through setup takes effect only when DIP-switch 1 is OFF (EDID
locked), otherwise, it is ignored.
4
HDCP Operation
OFF (up) –HDCP is disabled, giving the appearance that HDCP is not
supported.
ON (down) –HDCP is enabled, giving the appearance of an HDCP authorized
device to allow unsecured content display by all market-available computer
sources.
5
Display Auto Power
OFF (up) –Display auto power is enabled.
ON (down) –Display auto power is disabled.
6, 7
Display Auto Sleep
Enable/disable auto delay (before 5V output cut-off) of the connected display
when no active input signal is detected.
DIP 6
DIP 7
Delay before Auto Sleep (before 5V output cut-off)
OFF
OFF
Auto Sleep is disabled
ON
OFF
5s
OFF
ON
1m
ON
ON
15m
8
CPU FW Upgrade
OFF (up) –Normal operation mode.
ON (down) –CPU firmware upgrade mode.
When set to ON the device is inactive.

Kramer Electronics Ltd.
PT-12 –Configuring PT-12
8
Configuring Automatic Power Controls
PT-12 enables you to configure the following automatic power controls for your
connected display:
•Configuring Display Auto Sleep on page 8.
•Configuring Display Auto Power on page 8.
Configuring Display Auto Sleep
As long as there is an active source signal, the connected display remains ON. When
the active source becomes incative, a 5V signal is sent to the display to delay it from
going into sleep (standby) mode. PT-12 enables you to enable/disable and set the
delay time before the 5V output cuts off.
To configure the auto sleep delay:
•Set DIP-switch 6 and 7 to the required position (see Configuring Using DIP-
Switches on page 7).
Configuring Display Auto Power
PT-12 features display auto power via CEC communication. This feature turns ON a
display that is in sleep mode when an active signal is detected and turns it OFF (shuts
down) when the active signal becomes inactive. PT-12 enables you to enable/disable
display auto power and to set the delay time before the display is turned OFF.
Enabling/Disabling Display Auto Power
To enable/disable the display auto power feature:
•Set DIP-switch 5 to the required position (see Configuring Using DIP-Switches
on page 7).
Setting Delay Time for Display Auto Power Shutdown
When the display auto sleep delay (see Configuring Display Auto Sleep on page 8) is
set to a shorter time than the display auto power delay, the 5V does not shut OFF
until display auto power turns OFF the display.
To set the delay time before display auto power shutdown:
•Use the AV-SWITCHING-MODE command (see Protocol 3000 Commands
on page 15).
Defining EDID Lock
PT-12 enables you to define whether to enable the EDID values to be passed through
the device and changed automatically to follow the output or to lock the EDID so that
it will not be affected by changes on the output.

Kramer Electronics Ltd.
PT-12 –Configuring PT-12
9
To define EDID lock:
•Set DIP-switch 1 to the required position (see Configuring Using DIP-Switches
on page 7).
Modifying EDID with EDID Designer
To download the software and user manual for EDID Designer, go to:
www.kramerav.com/product/PT-12.
To modify the EDID with Kramer EDID Designer software:
1. Connect your computer to the PT-12 SERVICE Mini USB Connector .
2. Use the Kramer EDID Designer software.
Defining Color Depth and Spacing
PT-12 enables you to define the color depth pass-through and to force RGB color
spacing.
Defining Color Depth Pass-Through
PT-12 enables you to define whether to pass the full color depth parameters through
the device or to limit color depth to 8 bits per color.
To define color depth pass-through:
•Set DIP-switch 2 to the required position (see Configuring Using DIP-Switches
on page 7).
Forcing RGB Color Spacing
To force RGB color spacing:
•Use the CS-CONVERT Protocol 3000 API command (see Protocol 3000
Commands on page 15).
Defining Audio Pass-Through
PT-12 enables you to define whether the full audio transmission is passed through the
device or the audio transmission is limited to 2-channel LPCM only.
To define audio pass-through:
•Set DIP-switch 3 to the required position (see Configuring Using DIP-Switches
on page 7).
1

Kramer Electronics Ltd.
PT-12 –Upgrading Firmware
10
Setting HDCP Operation
PT-12 enables you to enable or disable HDCP. When HDCP is enabled, the PT-12
input appears to be HDCP compliant to the connected source, and vice versa. This
allows the source to transmit a non-HDCP signal, if required.
To set HDCP operation:
•Set DIP-switch 4 to the required position (see Configuring Using DIP-Switches
on page 7).
Upgrading Firmware
Use Kramer K-UPLOAD software to upgrade the firmware via the PT-12 SERVICE
Mini USB Connector when DIP-switch 8 set to ON (down position).
The latest version of K-UPLOAD and installation instructions can be downloaded from
our website at: www.kramerav.com/support/product_downloads.asp.
Before using the micro USB port, install the Kramer USB driver, available at:
www.kramerav.com/support/product_downloads.asp.
1

Kramer Electronics Ltd.
PT-12 –Technical Specifications
11
Technical Specifications
Inputs
1 HDMI
On a female HDMI connector
Outputs
1 HDMI
On a female HDMI connector
Ports
1 USB
On a female mini USB connector
Video
Max Resolution
4K@60Hz (4:2:0)
Max Data Rate
10.2Gbps (3.4Gbps per data channel)
Compliance
HDCP 1.4
User Interface
Controls
8 DIP-switches
Indicator
HDMI In, HDMI Out, Power LEDs
Power
Source
5V DC
Consumption
315mA
Environmental
Conditions
Operating Temperature
0° to +40°C (32° to 104°F)
Storage Temperature
-40° to +70°C (-40° to 158°F)
Humidity
10% to 90%, RHL non-condensing
Regulatory
Compliance
Vibration
ISTA 1A in carton
(International Safe Transit Association)
Safety
CE
Environmental
RoHs, WEEE
Enclosure
Size
PicoTOOLS®
Type
Aluminum
Cooling
Convection ventilation
General
Net Dimensions (W, D, H)
6.22cm x 5.18cm x 2.44cm
(2.45" x 2.04" x 0.96" ) W, D, H
Shipping Dimensions (W, D, H)
15.70cm x 12.00cm x 8.70cm
(6.18" x 4.72" x 3.43" ) W, D, H
Net Weight
0.1kg (0.2lbs) approx.
Shipping Weight
0.6kg (1.3lbs) approx.
Accessories
Included
Power adapter, bracket kit
Specifications are subject to change without notice at www.kramerav.com

Kramer Electronics Ltd.
PT-12 –Default EDID
12
Default EDID
Monitor
Model name............... PT-12
Manufacturer............. KMR
Plug and Play ID......... KMR1200
Serial number............ n/a
Manufacture date......... 2015, ISO week 255
Filter driver............ None
-------------------------
EDID revision............ 1.3
Input signal type........ Digital
Color bit depth.......... Undefined
Display type............. RGB color
Screen size.............. 520 x 320 mm (24.0 in)
Power management......... Standby, Suspend, Active off/sleep
Extension blocs.......... 1 (CEA-EXT)
-------------------------
DDC/CI................... Supported
MCCS revison............. 2.1
Display technology....... TFT
Controller............... STMicro 0x9301
Firmware revision........ 2.1
Firmware flags........... 0x006645CC
Active power on time..... Not supported
Power consumption........ Not supported
Current frequency........ 74.20kHz, 60.20Hz
Color characteristics
Default color space...... Non-sRGB
Display gamma............ 2.20
Red chromaticity......... Rx 0.674 - Ry 0.319
Green chromaticity....... Gx 0.188 - Gy 0.706
Blue chromaticity........ Bx 0.148 - By 0.064
White point (default).... Wx 0.313 - Wy 0.329
Additional descriptors... None
Timing characteristics
Horizontal scan range.... 30-83kHz
Vertical scan range...... 56-76Hz
Video bandwidth.......... 170MHz
CVT standard............. Not supported
GTF standard............. Not supported
Additional descriptors... None
Preferred timing......... Yes
Native/preferred timing.. 1280x720p at 60Hz (16:10)
Modeline............... "1280x720" 74.250 1280 1390 1430 1650 720 725 730 750 +hsync +vsync
Standard timings supported
720 x 400p at 70Hz - IBM VGA
720 x 400p at 88Hz - IBM XGA2
640 x 480p at 60Hz - IBM VGA
640 x 480p at 67Hz - Apple Mac II
640 x 480p at 72Hz - VESA
640 x 480p at 75Hz - VESA
800 x 600p at 56Hz - VESA
800 x 600p at 60Hz - VESA
800 x 600p at 72Hz - VESA
800 x 600p at 75Hz - VESA
832 x 624p at 75Hz - Apple Mac II
1024 x 768i at 87Hz - IBM
1024 x 768p at 60Hz - VESA
1024 x 768p at 70Hz - VESA
1024 x 768p at 75Hz - VESA
1280 x 1024p at 75Hz - VESA
1152 x 870p at 75Hz - Apple Mac II
1280 x 1024p at 75Hz - VESA STD
1280 x 1024p at 85Hz - VESA STD
1600 x 1200p at 60Hz - VESA STD
1024 x 768p at 85Hz - VESA STD
800 x 600p at 85Hz - VESA STD
640 x 480p at 85Hz - VESA STD
1152 x 864p at 70Hz - VESA STD
1280 x 960p at 60Hz - VESA STD
EIA/CEA-861 Information
Revision number.......... 3
IT underscan............. Supported
Basic audio.............. Supported
YCbCr 4:4:4.............. Supported
YCbCr 4:2:2.............. Supported
Native formats........... 1
Detailed timing #1....... 1920x1080p at 60Hz (16:10)
Modeline............... "1920x1080" 148.500 1920 2008 2052 2200 1080 1084 1089 1125 +hsync +vsync
Detailed timing #2....... 1920x1080i at 60Hz (16:10)
Modeline............... "1920x1080" 74.250 1920 2008 2052 2200 1080 1084 1094 1124 interlace +hsync +vsync
Detailed timing #3....... 1280x720p at 60Hz (16:10)
Modeline............... "1280x720" 74.250 1280 1390 1430 1650 720 725 730 750 +hsync +vsync
Detailed timing #4....... 720x480p at 60Hz (16:10)
Modeline............... "720x480" 27.000 720 736 798 858 480 489 495 525 -hsync -vsync
CE audio data (formats supported)
LPCM 2-channel, 16/20/24 bit depths at 32/44/48 kHz
CE video identifiers (VICs) - timing/formats supported
1920 x 1080p at 60Hz - HDTV (16:9, 1:1)
1920 x 1080i at 60Hz - HDTV (16:9, 1:1)
1280 x 720p at 60Hz - HDTV (16:9, 1:1) [Native]
720 x 480p at 60Hz - EDTV (16:9, 32:27)
720 x 480p at 60Hz - EDTV (4:3, 8:9)
720 x 480i at 60Hz - Doublescan (16:9, 32:27)
720 x 576i at 50Hz - Doublescan (16:9, 64:45)
640 x 480p at 60Hz - Default (4:3, 1:1)
NB: NTSC refresh rate = (Hz*1000)/1001
CE vendor specific data (VSDB)
IEEE registration number. 0x000C03
CEC physical address..... 1.0.0.0

Kramer Electronics Ltd.
PT-12 –Default EDID
13
Maximum TMDS clock....... 165MHz
CE speaker allocation data
Channel configuration.... 2.0
Front left/right......... Yes
Front LFE................ No
Front center............. No
Rear left/right.......... No
Rear center.............. No
Front left/right center.. No
Rear left/right center... No
Rear LFE................. No
Report information
Date generated........... 2/16/2016
Software revision........ 2.60.0.972
Data source.............. Real-time 0x0041
Operating system......... 6.1.7601.2.Service Pack 1
Raw data
00,FF,FF,FF,FF,FF,FF,00,2D,B2,00,12,00,00,00,00,FF,19,01,03,80,34,20,78,EA,B3,25,AC,51,30,B4,26,
10,50,54,FF,FF,80,81,8F,81,99,A9,40,61,59,45,59,31,59,71,4A,81,40,01,1D,00,72,51,D0,1E,20,6E,28,
55,00,07,44,21,00,00,1E,00,00,00,FD,00,38,4C,1E,53,11,00,0A,20,20,20,20,20,20,00,00,00,FC,00,50,
54,2D,32,43,20,20,20,20,20,20,20,20,00,00,00,00,00,00,00,00,00,00,00,00,00,00,00,00,00,00,01,CD,
02,03,1B,F1,23,09,07,07,48,10,05,84,03,02,07,16,01,65,03,0C,00,10,00,83,01,00,00,02,3A,80,18,71,
38,2D,40,58,2C,45,00,07,44,21,00,00,1E,01,1D,80,18,71,1C,16,20,58,2C,25,00,07,44,21,00,00,9E,01,
1D,00,72,51,D0,1E,20,6E,28,55,00,07,44,21,00,00,1E,8C,0A,D0,8A,20,E0,2D,10,10,3E,96,00,07,44,21,
00,00,18,00,00,00,00,00,00,00,00,00,00,00,00,00,00,00,00,00,00,00,00,00,00,00,00,00,00,00,00,47

Kramer Electronics Ltd.
PT-12 –Protocol 3000
14
Protocol 3000
Kramer devices can be operated using Kramer Protocol 3000 commands sent via
serial or Ethernet ports.
Understanding Protocol 3000
Protocol 3000 commands are a sequence of ASCII letters, structured according to the
following.
•Command format:
Prefix
Command Name
Constant (Space)
Parameter(s)
Suffix
#
Command
Parameter
<CR>
•Feedback format:
Prefix
Device ID
Constant
Command Name
Parameter(s)
Suffix
~
nn
@
Command
Parameter
<CR><LF>
•Command parameters –Multiple parameters must be separated by a comma
(,). In addition, multiple parameters can be grouped as a single parameter using
brackets ([ and ]).
•Command chain separator character –Multiple commands can be chained in
the same string. Each command is delimited by a pipe character (|).
•Parameters attributes –Parameters may contain multiple attributes. Attributes
are indicated with pointy brackets (<…>) and must be separated by a period (.).
The command framing varies according to how you interface with PT-12. The
following figure displays how the # command is framed using terminal communication
software (such as Hercules):

Kramer Electronics Ltd.
PT-12 –Protocol 3000
15
Protocol 3000 Commands
Function
Description
Syntax
Parameters/Attributes
Example
#
Protocol handshaking.
Validates the
Protocol 3000
connection and gets the
machine number.
Step-in master products
use this command to
identify the availability of
a device.
COMMAND
#<CR>
FEEDBACK
~nn@ok<CR><LF>
#<CR>
AV-SW-
TIMEOUT
Set display auto power
shutdown (via CEC
communication) delay
after active signal stops.
COMMAND
#AV-SW-TIMEOUTswitching_mode,time_out<CR>
FEEDBACK
~nn@AV-SW-TIMEOUTswitching_mode,time_out<CR><LF>
switching_mode –Switching mode
8 –display auto power shutdown
time_out –Delay in seconds
0 - 60000
Set the display auto shutdown
for 60 seconds after the active
signal stops:
#AV-SW-TIMEOUT8,60<CR>
AV-SW-
TIMEOUT?
Get display auto power
shutdown (via CEC
communication) delay
after active signal stops.
COMMAND
#AV-SW-TIMEOUT?switching_mode<CR>
FEEDBACK
~nn@AV-SW-TIMEOUTswitching_mode,time_out<CR><LF>
switching_mode –Switching mode
8 –display auto power shutdown
time_out –Delay in seconds
0 - 60000
Get the display auto shutdown
delay time:
#AV-SW-TIMEOUT?8<CR>
BUILD-DATE?
Get device build date.
COMMAND
#BUILD-DATE?<CR>
FEEDBACK
~nn@BUILD-DATEdate,time<CR><LF>
date –Format: YYYY/MM/DD where
YYYY = Year
MM = Month
DD = Day
time –Format: hh:mm:ss where
hh = hours
mm = minutes
ss = seconds
Get the device build date:
#BUILD-DATE?<CR>
CEC-MODE?
Get the CEC mode
status.
COMMAND
#CEC-MODE?<CR>
FEEDBACK
~nn@CEC-MODEcec_mode<CR><LF>
cec_mode –CEC mode
0 –CEC mode switched off and
automatic TV power function
disabled
1 –CEC mode switched on and
automatic TV power function
enabled
Get the CEC mode status:
#CEC-MODE?<CR>
CPEDID
Copy EDID data from
the output to the input
EEPROM.
Destination bitmap
size depends on device
properties (for 64 inputs
it is a 64-bit word).
Example: bitmap 0x0013
means inputs 1,2 and 5
are loaded with the new
EDID.
In certain products
Safe_mode is an
optional parameter. See
the HELP command for
its availability.
COMMAND
#CPEDIDedid_io,src_id,edid_io,dest_bitmap<CR>
or
#CPEDIDedid_io,src_id,edid_io,dest_bitmap,safe_mode<CR>
FEEDBACK
~nn@CPEDIDedid_io,src_id,edid_io,dest_bitmap<CR><LF>
~nn@CPEDIDedid_io,src_id,edid_io,dest_bitmap,safe_mode<C
R><LF>
edid_io –EDID source type (usually
output)
0–Input
1–Output
2–Default EDID
3–Custom EDID
src_id –Number of chosen source
stage
0–Default EDID source
1–Output 1
edid_io –EDID destination type
(usually input)
0–Input
1–Output
2–Default EDID
3–Custom EDID
dest_bitmap –Bitmap representing
destination IDs. Format: XXXX…X,
where X is hex digit. The binary form of
every hex digit represents
corresponding destinations.
0–indicates that EDID data is not
copied to this destination.
1–indicates that EDID data is copied
to this destination.
safe_mode –Safe mode
0–device accepts the EDID as is
without trying to adjust
1–device tries to adjust the EDID
(default value if no parameter is
sent)
Copy the EDID data from the
Output 1 (EDID source) to the
Input:
#CPEDID1,1,0,0x1<CR>
Copy the EDID data from the
default EDID source to the
Input:
#CPEDID2,0,0,0x1<CR>
CS-CONVERT
Set the “force RGB color
space” convert mode.
COMMAND
#CS-CONVERTout_index,cs_mode<CR>
FEEDBACK
~nn@CS-CONVERTout_index,cs_mode<CR><LF>
out_index –Number that indicates
the specific output:
1
cs_mode –Index in resolution table
0 –Color space pass (default)
1 –Enable “force RGB color space”
convert mode
Enable “force RGB color
space” convert mode for
output 1:
#CS-CONVERT1,1<CR>
CS-CONVERT?
Get the “force RGB color
space” convert mode
status.
COMMAND
#CS-CONVERT?out_index<CR>
FEEDBACK
~nn@CS-CONVERTout_index,cs_mode<CR><LF>
out_index –Number that indicates
the specific output:
1
cs_mode –Index in resolution table
0 –Color space pass (default)
1 –Enable “force RGB color space”
convert mode
Get the “force RGB color
space” convert mode status for
channel 1:
#CS-CONVERT1<CR>
DISPLAY?
Get output HPD status.
COMMAND
#DISPLAY?out_index<CR>
FEEDBACK
~nn@DISPLAYout_index,status<CR><LF>
out_index –Number that indicates
the specific output:
1
status –HPD status according to
signal validation
0–Signal or sink is not valid
1–Signal or sink is valid
2–Sink and EDID is valid
Get the output HPD status of
Output 1:
#DISPLAY?1<CR>

Kramer Electronics Ltd.
PT-12 –Protocol 3000
16
Function
Description
Syntax
Parameters/Attributes
Example
DPSW-STATUS?
Get the DIP-switch
state.
COMMAND
#DPSW-STATUS?dip_id<CR>
FEEDBACK
~nn@DPSW-STATUSdip_id,status<CR><LF>
dip_id –1 to 8 (number of DIP
switches)
status –Up/down
0–Up
1–Down
Get the DIP-switch 2 status:
#DPSW-STATUS?2<CR>
FACTORY
Reset device to factory
default configuration.
This command
deletes all user data
from the device. The
deletion can take some
time.
Your device may require
powering off and
powering on for the
changes to take effect.
COMMAND
#FACTORY<CR>
FEEDBACK
~nn@FACTORYok<CR><LF>
Reset the device to factory
default configuration:
#FACTORY<CR>
GEDID
Get EDID support on
certain input/output.
COMMAND
#GEDIDio_mode,in_index<CR>
FEEDBACK
~nn@GEDIDio_mode,in_index,size<CR><LF>
io_mode –Input/Output
0–Input
1–Output
in_index –Number that indicates the
specific input:
1
size –Size of data to be sent from
device, 0 means no EDID support
Get EDID support information
for input 1:
#GEDID1,1<CR>
HDCP-MOD?
Get HDCP mode.
Set HDCP working
mode on the device
input:
HDCP supported -
HDCP_ON [default].
HDCP not supported -
HDCP OFF.
HDCP support changes
following detected sink -
MIRROR OUTPUT.
COMMAND
#HDCP-MOD?in_index<CR>
FEEDBACK
~nn@HDCP-MODin_index,mode<CR><LF>
in_index –Number that indicates the
specific input:
1-N (N= the total number of inputs)
mode –HDCP mode:
0–HDCP Off
3–HDCP defined according to the
connected output
Get the input HDCP-MODE of
IN 1 HDMI:
#HDCP-MOD?1<CR>
HDCP-STAT?
Get HDCP signal status.
io_mode =1 –get the
HDCP signal status of
the sink device
connected to the
specified output.
io_mode =0 –get the
HDCP signal status of
the source device
connected to the
specified input.
COMMAND
#HDCP-STAT?io_mode,in_index<CR>
FEEDBACK
~nn@HDCP-STATio_mode,in_index,status<CR><LF>
io_mode –Input/Output
0–Input
1–Output
in_index –Number that indicates the
specific input:
1-N (N= the total number of inputs)
status –Signal encryption status -
valid values On/Off
0–HDCP Off
1–HDCP On
Get the output HDCP-STATUS
of IN 1:
#HDCP-STAT?0,1<CR>
HELP
Get command list or
help for specific
command.
COMMAND
#HELP<CR>
#HELPcmd_name<CR>
FEEDBACK
1. Multi-line:
~nn@Devicecmd_name,cmd_name…<CR><LF>
To get help for command use: HELP (COMMAND_NAME)<CR><LF>
~nn@HELPcmd_name:<CR><LF>
description<CR><LF>
USAGE:usage<CR><LF>
cmd_name –Name of a specific
command
Get the command list:
#HELP<CR>
To get help for
AV-SW-TIMEOUT:
HELPav-sw-timeout<CR>

Kramer Electronics Ltd.
PT-12 –Protocol 3000
17
Function
Description
Syntax
Parameters/Attributes
Example
LDEDID
Write EDID data from
external application to
device.
When the unit
receives the LDEDID
command it replies with
READY and enters the
special EDID packet
wait mode. In this mode
the unit can receive only
packets and not regular
protocol commands.
If the unit does not
receive correct packets
for 30 seconds or is
interrupted for more than
30 seconds before
receiving all packets, it
sends timeout error
~nn@LDEDIDerr01<C
R><LF> and returns to
the regular protocol
mode. If the unit
received data that is not
a correct packet, it
sends the corresponding
error and returns to the
regular protocol mode.
COMMAND
Multi-step syntax
FEEDBACK
Step 1:
#LDEDIDedid_io,dest_bitmask,edid_size,safe_mode<CR>
Response 1:
~nn@LDEDIDedid_io,dest_bitmask,edid_size,safe_modeready
<CR><LF>
or
~nn@LDEDIDerrnn<CR><LF>
Step 2: If ready was received, send EDID_DATA
Response 2:
~nn@LDEDIDedid_io,dest_bitmask,edid_size,safe_modeok<CR
><LF>
or
~nn@LDEDIDerrnn<CR><LF>
edid_io –EDID destination type
(usually input)
0–Input
1–Output
2–Default EDID
3–Custom EDID
dest_bitmask –Bitmap representing
destination IDs. Format: 0x********,
where * is ASCII presentation of hex
digit. The binary presentation of this
number is a bit mask for destinations.
Setting ‘1’ means EDID data has to be
copied to this destination
edid_size –EDID data size
safe_mode –Safe mode
0–Device accepts the EDID as is
without trying to adjust
1–Device tries to adjust the EDID
edid_data –Data in protocol packets
Using the Packet Protocol
Send a command: LDRV, LOAD,
IROUT, LDEDID
Receive Ready or ERR###
If Ready:
a. Send a packet,
b. Receive OK on the last packet,
c. Receive OK for the command
Packet structure:
Packet ID (1, 2, 3…) (2 bytes in
length)
Length (data length + 2 for CRC)
–(2 bytes in length)
Data (data length -2 bytes)
CRC –2 bytes
01
02
03
04
05
Packet ID
Length
Data
CRC
5. Response: ~nnnnok<CR><LF>
(Where NNNN is the received
packet ID in ASCII hex digits.)
Write the EDID data from an
external application to the
HDMI In 1 input without
adjustment attempts:
#LDEDID0,0x1,2340,0<CR
>
Write the EDID data from an
external application to HDMI In
1 and PC In inputs with
adjustment attempts:
#LDEDID0,0x5,2340,1<CR
>
MODEL?
Get device model.
This command
identifies equipment
connected to PT-12 and
notifies of identity
changes to the
connected equipment.
The Matrix saves this
data in memory to
answer REMOTE-INFO
requests.
COMMAND
#MODEL?<CR>
FEEDBACK
~nn@MODELmodel_name<CR><LF>
model_name –String of up to 19
printable ASCII chars
Get the device model:
#MODEL?<CR>
NAME
Set machine (DNS)
name.
The machine name
is not the same as the
model name. The
machine name is used
to identify a specific
machine or a network in
use (with DNS feature
on).
COMMAND
#NAMEmachine_name<CR>
FEEDBACK
~nn@NAMEmachine_name<CR><LF>
machine_name –String of up to 15
alpha-numeric chars (can include
hyphen, not at the beginning or end)
Set the DNS name of the
device to room-442:
#NAMEroom-442<CR>
NAME?
Get machine (DNS)
name.
The machine name
is not the same as the
model name. The
machine name is used
to identify a specific
machine or a network in
use (with DNS feature
on).
COMMAND
#NAME?<CR>
FEEDBACK
~nn@NAMEmachine_name<CR><LF>
machine_name –String of up to 15
alpha-numeric chars (can include
hyphen, not at the beginning or end)
Get the DNS name of the
device:
#NAME?<CR>
NAME-RST
Reset machine (DNS)
name to factory default.
Factory default of
machine (DNS) name is
“KRAMER_” + 4 last
digits of device serial
number.
COMMAND
#NAME-RST<CR>
FEEDBACK
~nn@NAME-RSTok<CR><LF>
Reset the machine name (S/N
last digits are 0102):
#NAME-
RSTkramer_0102<CR>
PROT-VER?
Get device protocol
version.
COMMAND
#PROT-VER?<CR>
FEEDBACK
~nn@PROT-VER3000:version<CR><LF>
version –XX.XX where X is a
decimal digit
Get the device protocol
version:
#PROT-VER?<CR>
RESET
Reset device.
To avoid locking the
port due to a USB bug in
Windows, disconnect
USB connections
immediately after
running this command. If
the port was locked,
disconnect and
reconnect the cable to
reopen the port.
COMMAND
#RESET<CR>
FEEDBACK
~nn@RESETok<CR><LF>
Reset the device:
#RESET<CR>

Kramer Electronics Ltd.
PT-12 –Protocol 3000
18
Function
Description
Syntax
Parameters/Attributes
Example
SIGNAL?
Get input signal status.
COMMAND
#SIGNAL?in_index<CR>
FEEDBACK
~nn@SIGNALin_index,status<CR><LF>
in_index –Number that indicates the
specific input:
1-N (N= the total number of inputs)
status –Signal status according to
signal validation:
0–Off
1–On
Get the input signal lock status
of IN 1:
#SIGNAL?1<CR>
SN?
Get device serial
number.
COMMAND
#SN?<CR>
FEEDBACK
~nn@SNserial_num<CR><LF>
serial_num –14 decimal digits,
factory assigned
Get the device serial number:
#SN?<CR>
VERSION?
Get firmware version
number.
COMMAND
#VERSION?<CR>
FEEDBACK
~nn@VERSIONfirmware_version<CR><LF>
firmware_version –XX.XX.XXXX
where the digit groups are:
major.minor.build version
Get the device firmware
version number:
#VERSION?<CR>
Other manuals for PT-12
2
Table of contents
Other Kramer Controllers manuals

Kramer
Kramer RC-7B User manual

Kramer
Kramer RC-7RL User manual

Kramer
Kramer FC-26 User manual

Kramer
Kramer SL-240 User manual

Kramer
Kramer RC-2C User manual

Kramer
Kramer SL-12 User manual

Kramer
Kramer FC-10ETH User manual

Kramer
Kramer RC-13TC User manual

Kramer
Kramer RC-52N User manual

Kramer
Kramer K-NET RC-53D User manual

Kramer
Kramer SL-280 User manual

Kramer
Kramer PT-12 User manual

Kramer
Kramer SL-12 User manual

Kramer
Kramer SL-10 User manual

Kramer
Kramer RC-6IR User manual

Kramer
Kramer RC-63DLN User manual

Kramer
Kramer SL-1N User manual

Kramer
Kramer RC-6 User manual

Kramer
Kramer FC-18 User manual

Kramer
Kramer SL-14RC User manual