Weitere Hinweise / additional advices
1. Die Leuchte nicht fallen lassen, und vor Stößen schützen.
Do not let the lamp drop and avoid impact.
2. Decken Sie die Leuchte nicht ab, hängen und befestigen Sie nichts an dem Produkt.
Do not cover the product, do not hang or fasten anything on the product.
3. Defekte Leuchten nicht mehr benutzen und an den Händler zurückgeben.
Never open the product. In case of failure, please return the lamp to seller.
4. Montagearbeiten und Arbeiten am elektronischen Anschluss darf nur eine zugelassene Elektrofachkraft durchführen.
Mounting or works on the electrical connection may only be carried out by an approved electrician.
5. Nicht direkt in die Augen von Menschen und Tieren leuchten!
Never direct the light of the lamp directly in the eyes of humans or animals!
6. Die Leuchte darf nur von autorisierten Fachkräften repariert werden. Durch unbefugtes Reparieren verliert die Leuchte ihre Garantie und
die Sicherheit kann nicht mehr gewährleistet werden.
The product may only be repaired by specialists. Being repaired without authorization, the product will lose its warranty and safety can no
longer be guaranteed.
7. Sichtbare LED Strahlung nicht direkt mit optischen Instrumenten betrachten.
Never look at visible LED radiation with optical instruments.
8. Das externe flexible Kabel dieser Leuchte kann nicht ersetzt werden. Falls das Kabel beschädigt ist, sollte die Leuchte ersetzt werden.
The external flexible cable or cord of this luminaire cannot be replaced. If the cord is damaged, the luminaire should be replaced.
9. Der Anschluss sollte so gewählt werden, dass eine Verdrahtung mit 3 x 1,0 mm²-Kabel möglich ist.
The terminal used shall be suitable for 3 x 1.0 mm² wiring.
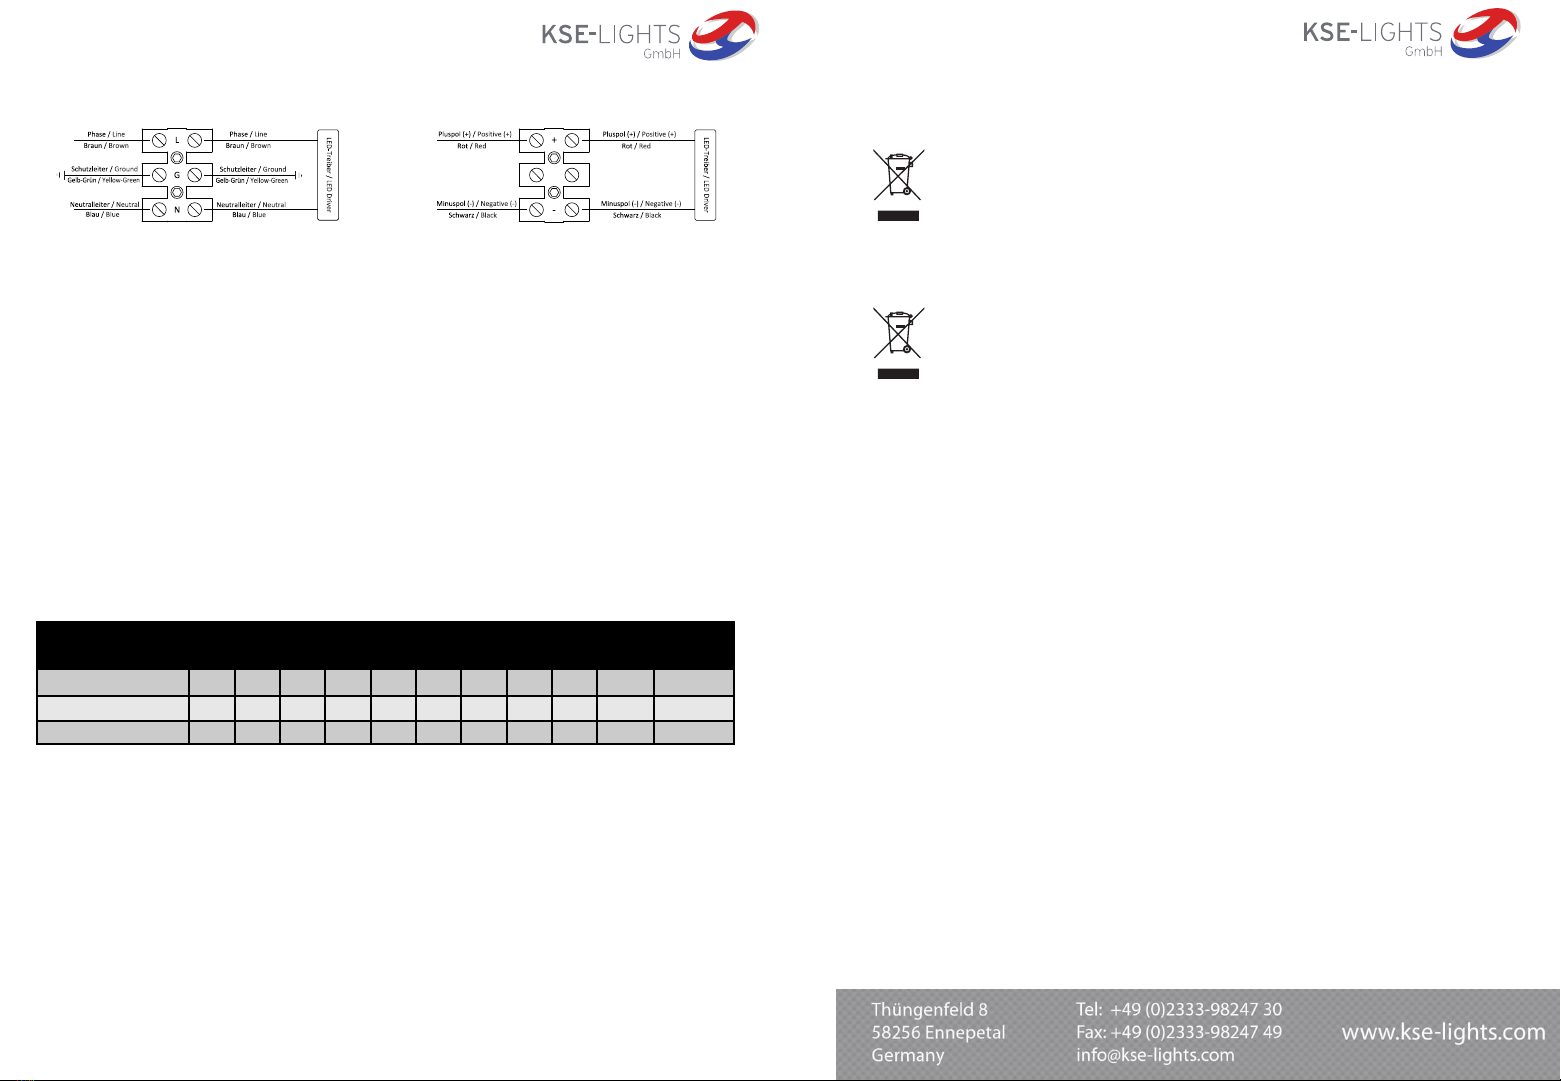
1. Schließen Sie die elektrischen Leitungen wie folgt an / make the following electrical connections:
Verbinden Sie den Schutzleiter (grün-gelb) mit dem Schutzleiter des LED-Treibers (nur für Betrieb mit Wechselspannung).
Connect INPUT GROUND conductor to GROUND conductor of LED driver (only for operation with AC voltage).
Verbinden Sie die Eingangsphase (braun) mit der Phase des LED-Treibers bzw. Pluspol (bei 12/24 V DC).
Connect INPUT VOLTAGE conductor to LINE conductor respectively positive pole (for 12/24 V DC) of LED driver .
Verbinden Sie den Neutralleiter (blau) mit dem Neutralleiter des LED-Treibers bzw. Minuspol (bei 12/24 V DC).
Connect INPUT NEUTRAL conductor to NEUTRAL conductor respectively negative pole (for 12/24 V DC) of LED driver .
Stellen Sie sicher, dass alle Leitungen sicher im Anschlussblock stecken und die Schrauben fest angezogen sind.
Make sure all excess input wires are pushed into pole, screws are tightened.
2. Verwenden Sie ausschließlich Leitungsverbinder, die für Temperaturen bis 90°C ausgelegt sind.
Please insulate all electrical connections with wire nuts suitable for at least 90°C.
3. Falls die Leuchte mit Dimmfunktion ausgerüstet ist, verbinden Sie bitte den positiven Dimmsignalleiter (+) mit DIM+ (Blau) und das
negative Dimmsignal (-) mit DIM- (Weiß) am Schaltnetzteil. Die möglichen Einstellungen entnehmen Sie bitte der unteren Tabelle.
If the fixture come with built-in dimming function, please connect INPUT POSITIVE (+) signal conductor to DIM+(Blue Wire), INPUT
NEGATIVE (-) Signal conductor to DIM- (White Wire) of LED-driver. You can see the possible settings in the chart below.
4. Falls die Leuchte mit DALI-Funktion ausgerüstet ist, verbinden Sie bitte den positiven DALI-Signalleiter (+) mit DALI+ (Rot) und das
negative DALI-Signal (-) mit DALI- (Schwarz) an der Leuchte.
If the fixture come with built-in DALI function, please connect INPUT POSITIVE (+) signal conductor to DALI+(RED Wire), INPUT
NEGATIVE (-) Signal conductor to DALI- (Black Wire) of LED light.
Kundenservice / after sales service
Auf dieses Produkt wird eine Garantie von 7 Jahren gewährt. Die Garantiezeit beginnt mit dem Rechnungsdatum.
Die Garantie bezieht sich auf Materialfehler oder Fehlfunktionen, die nicht durch unsachgemäßen Gebrauch verursacht wurden.
Im Garantiefall den Strahler bitte mit einer Kopie der Kaufrechnung an den Händler zurückgeben. Die Strahler werden entweder
repariert oder ausgetauscht.
Die Leuchte nicht mehr benutzen, wenn Teile defekt sind oder fehlen. Für Folgeschäden, die durch defekte Teile verursacht
werden, kann keine Garantieleistung in Anspruch genommen werden. Bei Zuwiderhandlung erlöschen die Garantie und die
Betriebssicherheit.
Unter den folgenden Umständen werden die Reparaturkosten berechnet:
1. Nach Ablauf der Garantiezeit.
2. Die Serien-/LOT-Nummer fehlt oder nicht mit der Serien-/LOT-Nummer in der Leuchte übereinstimmt.
3. Die Leuchte durch unsachgemäßen Gebrauch beschädigt wurde.
4. Die Leuchte durch Fall bzw. Anstoß beschädigt wurde.
5. Bei Folgeschäden die entstehen, weil der Strahler mit defekten Teilen weiterbenutzt wurde.
The warranty of this product is valid for seven years after purchasing. The time of warranty starts with the date on purchase
invoice. The warranty extends over material defects or dysfunctions that are not caused by improper use. In case of
guarantee please fill out the customer service form full and return this together with lamp and a copy of the purchase
invoice to the local distributor. The lamp will be repaired or a replacement will be issued.
Secondary damage caused by the use of the lamp with broken parts are not covered by the warranty.
In case of misuse, the warranty will be invalidated.
For the following conditions we will repair the product at appropriate charge:
1. Beyond the seven-year warranty.
2. If the serial number is missing or differs from number inside the product.
3. If lamp has been damaged by improper operation.
4. If lamp has been cracked or damaged by impact.
5. Secondary damages caused by the use with broken parts (such as broken housing or switch rubber)
Elektrischer Anschluss / Electrical connection 10. Der Anschluss und das Versorgungskabel sollten IP66-tauglich sein. Als Versorgungsleitung wird 3 x 1,0 mm² H05VV-F empfohlen
The terminal box and supply cord used shall be suitable for IP66 environment. The supply cord shall be 3 x 1.0 mm² H05VV-F.
11. Korrekte Entsorgung des Produktes:
Nur für EU-Länder:
Werfen Sie elektrische Geräte niemals in den Hausmüll. Entsprechend der EU-Anweisung 2012/19/EU bezüglich
alter elektrischer und elektronischer Geräte und ihrer Einbindung in nationale Gesetze, müssen alte elektrische
Geräte von anderem Müll getrennt und umweltfreundlich entsorgt werden, z.B. in einer Sammelstelle.
Wiederverwertung als Alternative zur Entsorgung: Altgeräte enthalten wertvolle recyclingfähige Materialien,
die einer Wiederverwertung zugeführt werden sollten und um der Umwelt bzw. der menschlichen Gesundheit
nicht durch unkontrollierte Müllbeseitigung zu schaden. Bitte entsorgen Sie Altgeräte deshalb über geeignete
Sammelsysteme oder senden Sie das Gerät zur Entsorgung an die Stelle, bei der Sie es gekauft haben. Diese wird dann das Gerät der
stofflichen Verwertung zuführen.
Proper disposal of this product
For EU countries only.
Never place any electric tools in your household refuse. To comply with European Directive 2012/19/EU
concerning old electric and electronic equipment and its implementation in national laws, old electric
tools have to be separated from other waste and disposed of in an environment-friendly fashion, e.g. by taking
to a recycling depot. Recycling alternative to the demand to return electrical devices: As an alternative to
returning the electrical device, the owner is obliged to cooperate in ensuring that the device is properly
recycled if ownership is relinquished. This can also be done by handing over the used device to a returns
center, which will dispose of it in accordance with national commercial and industrial waste management legislation. This does not
apply to the accessories and auxiliary equipment without any electrical components which are included with the used device.
Prozentsatz des Nennstromes
Percentage of rated current 10 % 20 % 30 % 40 % 50 % 60 % 70 % 80 % 90 % 100 % 95 % - 108 %
1-10 V Dimmsignal 1 V 2 V 3 V 4 V 5 V 6 V 7 V 8 V 9 V 10 V Offen / Open
Mit Widerstand / with resistor 10 kΩ20 kΩ30 kΩ40 kΩ50 kΩ60 kΩ70 kΩ80 kΩ90 kΩ100 kΩOffen / Open
10 V PWM Signal 10 % 20 % 30 % 40 % 50 % 60 % 70 % 80 % 90 % 100 % Offen / Open
Dimmwerte/ dimming values
Elektrischer Anschluss / Electrical connection 90-305V AC 50/60 Hz Elektrischer Anschluss / Electrical connection 12/24 V DC


