manuals.online logo
Brands
  1. Home
  2. •
  3. Brands
  4. •
  5. Kurgo
  6. •
  7. Pet Care Product
  8. •
  9. Kurgo BACKSEAT BRIDGE User manual

Kurgo BACKSEAT BRIDGE User manual

Installation:
1. Open the Backseat Bridge and lay it flat across the backseat of the vehicle
with the preferred color facing up. Slide the bridge forward until the edge
with the center console barrier is flush against the back of the front seats.
Place on top of any front seat divider if needed, to ensure any gap between
the platform and front seats is closed.
Note: The space between the back of the front seat and backseat edge
should be 13” or less.
2. Secure seat strap (B) around the back rest of your driver’s seat, as close to
the bottom of the seat as possible, and clip it to the seat strap D-ring (C).
Repeat on your passenger’s side.
Note: Seat strap D-rings (C) are located on both sides of the bridge.
Connect the seat straps to the D-rings located on the underside of the
Backseat Bridge, based on your preferred color choice being right side up.
3. Pull headrest strap (E) around your driver’s side headrest and clip onto the
headrest strap D-ring (F). Repeat this on the passenger side.
4. Adjust all straps for a secure fit.
Additional Tips
• Continuous adjustment of the front seats may damage the bridge
• The center console barrier (D) cannot hold up to sustained pressure. Please
discourage your pup from resting their head, or putting their paws on the
center console barrier (D).
Cleaning instructions:
Our product cleaning instructions will help ensure that your gear has a long,
exciting life. Washing by hand and hang air-drying is the best way to care for
your Kurgo products.
Notice:
Please contact Kurgo directly with any product or warranty inquiries.
Parts List:
ABridge platform
BSeat strap
CSeat strap D-ring
DCenter console barrier
EHeadrest strap
FHeadrest strap D-ring
GCup holder
HBarrier pocket
EN - BACKSEAT BRIDGE |INSTRUCTIONS AND CARE 4-19
kurgo.com/product-instructions
FR - BACKSEAT BRIDGE | INSTRUCTIONS ET ENTRETIEN
Kurgo Products: Salisbury, MA 01952 •877-847-3868 •www.kurgo.com •[email protected] | Kurgo Products-EU: +353 (0) 76 892 0427 •[email protected]
Wraps around
headrest
Wraps
around
seat
Seat strap D-rings (C)
located on both colored sides Seat strap (B)
clips to the
D-ring (C) on
under-side
of platform
13” OR LESS
IMPORTANT:
The space between the back of
the front seat and backseat
edge should be 13” or less.
Installation:
1. Ouvrir le pont pour siège arrière et l’étendre sur le siège arrière, la couleur
choisie vers le haut. Glisser le pont vers l’avant jusqu’à ce que l’extrémité
touche l’arrière des sièges avant. Le placer par-dessus tout séparateur de
sièges pour s’assurer que l’espace entre la plateforme et les sièges avant
soit fermé.
Avis: L'espace entre l'arrière du bord du siège et de banquette arrière avant
doit être de 33 cm ou moins.
2. Fixer la courroie (B) autour du dossier du siège du conducteur, le plus près
possible du bas du siège, et l’attacher à l’anneau en D (C). Répéter
l’opération pour le siège du passager.
Avise: Les anneaux en D des ceintures de siège (C) sont situés des deux
côtés du pont. Il faut les connecter à celles situées sur ce que sera le bas du
pont pour siège arrière en fonction de votre couleur préférée.
3. Tirer la courroie (E) autour de l’appui-tête du siège du conducteur et
l’attacher à l’anneau en D (F). Répéter l’opération du côté opposé.
4. Ajuster solidement toutes les courroies.
Autres conseils
• Continuous adjustment of the front seats may damage the bridge
• The center console barrier (D) cannot hold up to sustained pressure. Please
discourage your pup from resting their head, or putting their paws on the
center console barrier (D).
Instructions de Lavage:
Nos instructions de nettoyage des produits vous assurent que votre
équipement aura une longue durée de vie. Laver à la main et suspendre pour
sécher sont les meilleurs moyens de prendre soin de vos produits Kurgo.
Avis:
Veuillez communiquer toute demande relative aux
produits ou au garantie directement à Kurgo.
Liste des pièces :
APlateforme de pont
BCourroie de siège
CAnneau en D de
courroie de siège
DBarrière inter-sièges
ECourroie d’appui-tête
FAnneau en D de
courroie d’appui-tête
GPorte-gobelet
HPochette de barrière
Autour
de têtière
Autour
du siège
Seat sangle d-anneaux (C)
sur les deux avant et arrière
33 CM OU MOINS.
AVIS:
L'espace entre l'arrière
du bord du siège et de
banquette arrière avant
doit être de 33 cm ou moins.
Courroie de siège (B)
des clips à l'anneau en
D (C) sur les sous-côté
de Backseat Bridge
Anbringung:
1. Die Rücksitz-Brücke öffnen und flach, mit der gewünschten Farbe nach
oben zeigend, über den Rücksitz des Fahrzeuges legen. Die Brücke nach
vorne schieben, bis der Rand mit der Barriere für die Mittelkonsole bündig
an der Rückseite der Vordersitze anliegt. Auf jede Art von Sitztrenner für
Vordersitze legen, um sicherzustellen, dass jegliche Lücke zwischen der
Plattform und den Vordersitzen geschlossen wird.
Anmerkung: Der Abstand zwischen der Rückseite des Vordersitzes und
dem Rand des Rücksitzes sollte höchstens 33 cm betragen.
2. Den Sitzgurt (B) um die Rückenlehne des Fahrersitzes herum, soweit unten
am Sitz, wie möglich, befestigen und am D-Ring für den Sitzgurt (C) einhängen.
Auf der Beifahrerseite wiederholen.
Anmerkung: Die D-Ringe (C) für den Sitzgurt befinden sich auf beiden
Seiten der Brücke. Die Sitzgurte an den D-Ringen, die sich auf der
Unterseite der Rücksitz-Brücke befinden, befestigen, indem die
gewünschte Farbe nach oben zeigt.
3. Den Kopfstützengurt (E) um die Kopfstütze des Fahrersitzes ziehen und im
D-Ring für die Kopfstütze (F) befestigen. Auf der Beifahrerseite wiederholen.
4. Passen Sie alle Gurte an, bis alles sicher anliegt und befestigt ist.
Zusätzliche Tipps
• Ständiges Einstellen der Vordersitze kann die Brücke beschädigen
• Die Barriere für die Mittelkonsole (D) ist ungeeignet für dauerhaften
Druck. Bitte halten Sie Ihren Hund davon ab, den Kopf oder die Pfoten
auf der Barriere für die Mittelkonsole (D) abzulegen.
Reinigungsanleitungen:
Die Reinigungsanleitungen für unsere Produkte helfen dabei, dass sich Ihre
Teile einer langen aufregenden Lebensdauer erfreuen. Waschen von Hand
und Aufhängen zum Trocknen stellt die beste Art und Weise dar, Ihre
Kurgo-Produkte zu pflegen.
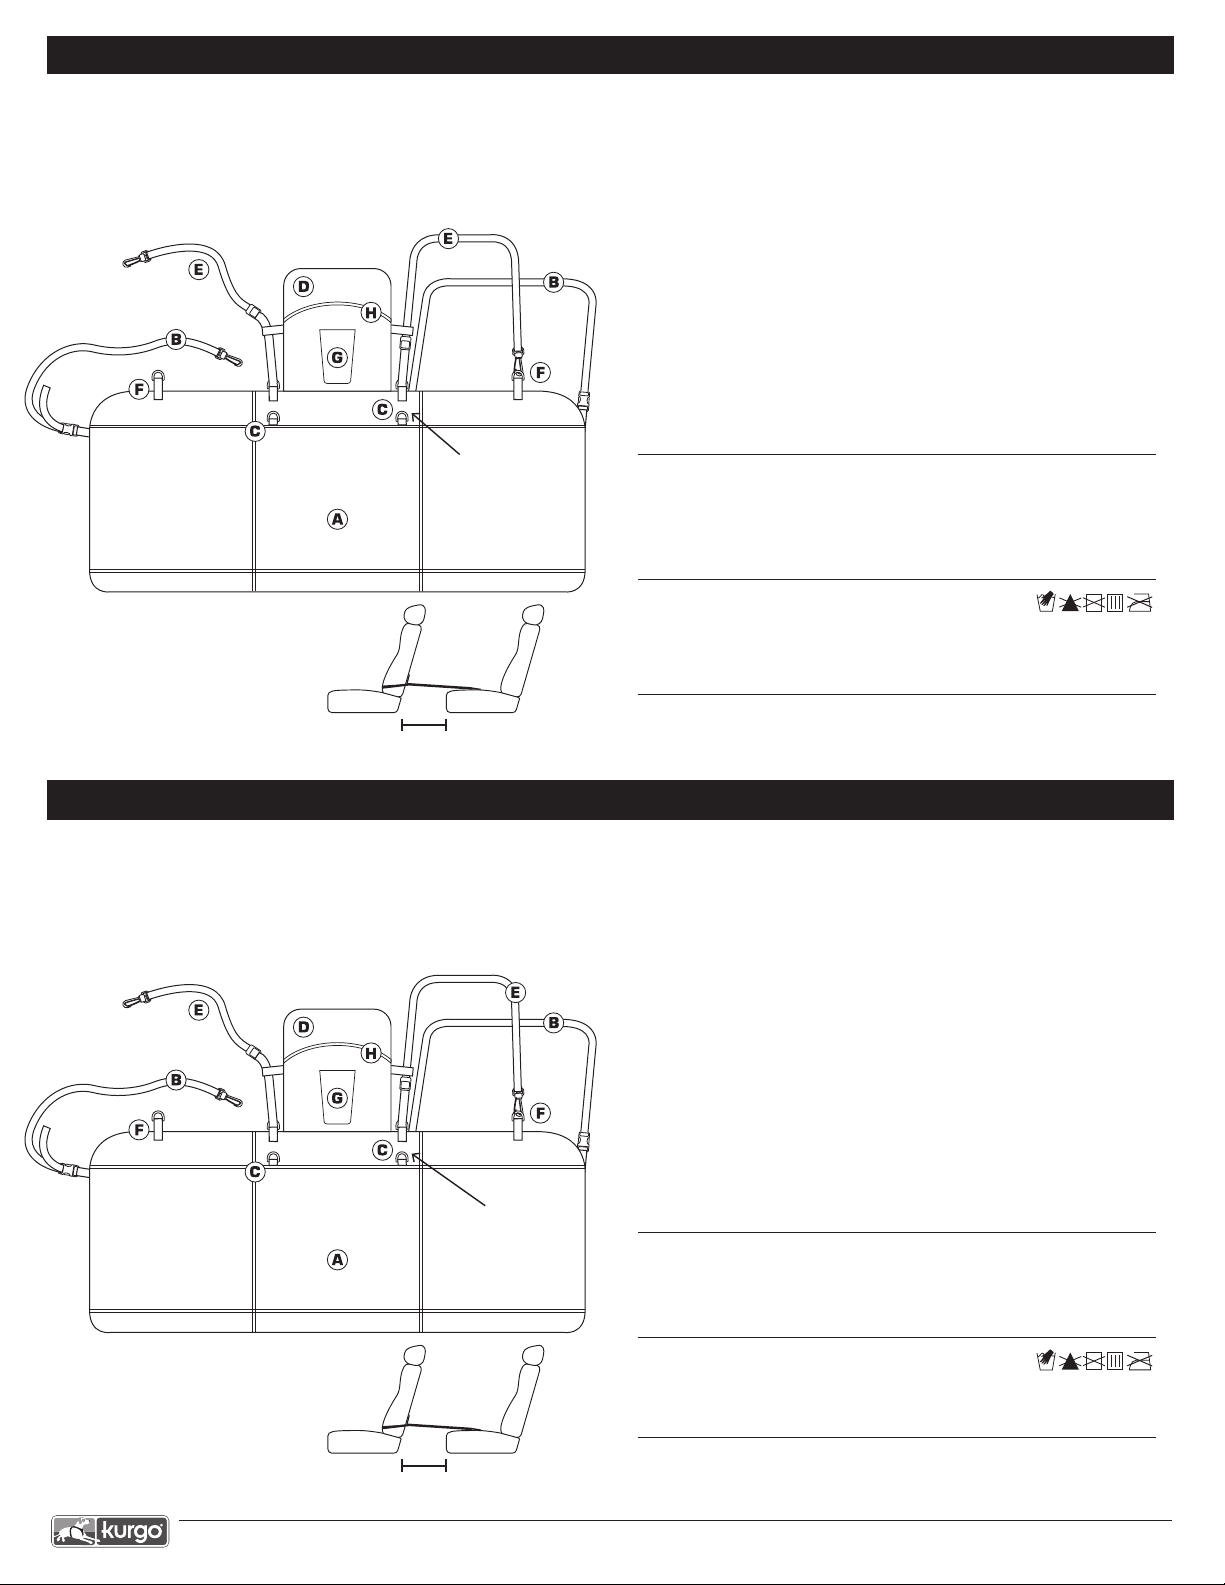
Stückliste:
ABrückenplattform
B Sitzgurt
CD-Ring für Sitzgurt
DBarriere für die
Mittelkonsole
EKopfstützengurt
FD-Ring für Kopfstütze
G Getränkehalter
H Barrierentasche
DE - BACKSEAT BRIDGE K| ANLEITUNGEN UND PFLEGE 4-19
kurgo.com/product-instructions
ES - BACKSEAT BRIDGE | INSTRUCCIONES Y CUIDADO
Kurgo Products: Salisbury, MA 01952 •877-847-3868 •www.kurgo.com •[email protected] | Kurgo Products-EU: +353 (0) 76 892 0427 •[email protected]
Wird um dieKopfstütze
herum geführt (
Wird um den
Sitz herum
geführt
Die D-Ringe (C) für den
Sitzgurt befinden sich auf
beiden farbigen Seiten
Der Sitzgurt (B)
wird in den D-Ring (C)
auf der Unterseite der
Plattform eingehängt
HÖCHSTENS 33 CM BETRAGEN
Anmerkung:
Der Abstand zwischen der
Rückseite des Vordersitzes und
dem Rand des Rücksitzes sollte
höchstens 33 cm betragen.
Instalación:
1. Abra el puente del asiento trasero y colóquelo de manera horizontal sobre
el asiento trasero, con el color de su preferencia hacia arriba. Deslícelo
hacia adelante hasta que el panel/barrera central quede alineado y contra
los asientos delanteros. Póngalo en la parte superior de cualquier parte
divisoria de los asientos delanteros, si es necesario, para que no haya
espacios descubiertos entre la plataforma y los asientos delanteros.
Nota: El espacio entre la parte trasera del asiento delantero y el borde del
asiento trasero debe ser de 13” (33 cm) o menos.
2. Pase la tira del asiento (B) alrededor del respaldo del asiento del conductor,
tratando de que quede lo más cerca posible de la butaca del asiento.
Abróchela al anillo en forma de D de la tira del asiento (C). Haga lo mismo
con el asiento del acompañante.
Nota: Los anillos en forma de D de la tira del asiento están ubicados en
ambos lados del puente. Enganche las tiras del asiento a los anillos en
forma de D que se encuentran en el revés del puente, con el color de
su preferencia hacia arriba.
3. Pase la tira del reposacabezas (E) alrededor del reposacabezas del
conductor y engánchela al anillo en forma de D de la tira para los
reposacabezas (F). Haga lo mismo con el asiento del acompañante.
4. Ajuste todas las tiras.
Consejos adicionales
• Ajustar continuamente los asientos delanteros puede dañar el puente.
•
El panel/barrera central (D) no es resistente a presiones constantes. Evite que
su perro apoye la cabeza o ponga las patas sobre el panel/barrera central (D).
Instrucciones para la limpieza:
Nuestras instrucciones de limpieza del producto le ayudarán a garantizar una
estimulante y larga vida del equipo. La mejor manera de cuidar los productos
Kurgo es lavarlos a mano y secarlos al aire.
Listado de piezas:
APlataforma del puente
BTira del asiento
CAnillo en forma de D
para enganchar las
tiras
DPanel/barrera central
E
Tira del reposacabezas
FAnillo en forma de D
para enganchar los
reposacabezas
GPortavaso
HBolsillo del
panel/barrera
Pasar alrededor
del reposacabezas
Pasar
alrededor
del asiento
Anillos en forma de D, de
la tira del asiento, situados
en ambos lados de color
33 CM O MENOS.
NOTA:
El espacio entre la parte
trasera del asiento delantero y el
borde del asiento trasero debe
ser de 13” (33 cm) o menos.
La tira de asiento (B) se
engancha en el anillo en
forma de D (C) en el
envés de la plataforma
Aviso:
Contacte directamente a Kurgo para consultar sobre algún producto o garantía.
Hinweis:
Bitte wenden Sie sich bezüglich jedweder Produkt- oder
Garantieanfragen direkt an Kurgo.

Other Kurgo Pet Care Product manuals

Kurgo CARGO CAPE User manual

Kurgo

Kurgo CARGO CAPE User manual

Kurgo Long Hauler Joring Pack Belt User manual

Kurgo

Kurgo Long Hauler Joring Pack Belt User manual

Kurgo Tru-Fit Smart Harness ENHANCED STRENGTH v.3 User manual

Kurgo

Kurgo Tru-Fit Smart Harness ENHANCED STRENGTH v.3 User manual

Kurgo Impact Harness User manual

Kurgo

Kurgo Impact Harness User manual

Kurgo JOURNEY HARNESS User manual

Kurgo

Kurgo JOURNEY HARNESS User manual

Kurgo Go-Tech Adventure Harness User manual

Kurgo

Kurgo Go-Tech Adventure Harness User manual

Kurgo JOURNEY BOOSTER SEAT User manual

Kurgo

Kurgo JOURNEY BOOSTER SEAT User manual

Kurgo Journey Air User manual

Kurgo

Kurgo Journey Air User manual

Kurgo Tru-Fit Smart User manual

Kurgo

Kurgo Tru-Fit Smart User manual

Kurgo RSG COUNTY HARNESS User manual

Kurgo

Kurgo RSG COUNTY HARNESS User manual

Kurgo RSG TOWNIE HARNESS User manual

Kurgo

Kurgo RSG TOWNIE HARNESS User manual

Kurgo K9 COURIER User manual

Kurgo

Kurgo K9 COURIER User manual

Kurgo LOFT HAMMOCK User manual

Kurgo

Kurgo LOFT HAMMOCK User manual

Kurgo Long Hauler User manual

Kurgo

Kurgo Long Hauler User manual

Kurgo back seat BARRIER User manual

Kurgo

Kurgo back seat BARRIER User manual

Kurgo Tru-Fit Smart Harness Enhanced strength v.3 User manual

Kurgo

Kurgo Tru-Fit Smart Harness Enhanced strength v.3 User manual

Kurgo JOURNEY BENCH SEAT COVER User manual

Kurgo

Kurgo JOURNEY BENCH SEAT COVER User manual

Kurgo Back Seat Barrier Installation manual

Kurgo

Kurgo Back Seat Barrier Installation manual

Kurgo SKYBOX User manual

Kurgo

Kurgo SKYBOX User manual

Kurgo EXTENDED HAMMOCK User manual

Kurgo

Kurgo EXTENDED HAMMOCK User manual

Kurgo ROVER BOOSTER SEAT User manual

Kurgo

Kurgo ROVER BOOSTER SEAT User manual

Kurgo SKYBOX REAR BOOSTER SEAT User manual

Kurgo

Kurgo SKYBOX REAR BOOSTER SEAT User manual

Kurgo SKYBOX REAR Booster Seat Series User manual

Kurgo

Kurgo SKYBOX REAR Booster Seat Series User manual

Kurgo RSG Active Utility Belt User manual

Kurgo

Kurgo RSG Active Utility Belt User manual

Popular Pet Care Product manuals by other brands

FULL CHEEKS 5318502 Assembly instructions

FULL CHEEKS

FULL CHEEKS 5318502 Assembly instructions

SportDOG SD-1825CAMO Programming manual

SportDOG

SportDOG SD-1825CAMO Programming manual

vet-kem FLEA AND TICK SPOT ON quick start guide

vet-kem

vet-kem FLEA AND TICK SPOT ON quick start guide

LitterMaid LM2680 manual

LitterMaid

LitterMaid LM2680 manual

Leuchtie Plus Easy Charge Instruction

Leuchtie

Leuchtie Plus Easy Charge Instruction

ASTROPET Pisces Lite Series user manual

ASTROPET

ASTROPET Pisces Lite Series user manual

Pettec Pet Fountain Compact manual

Pettec

Pettec Pet Fountain Compact manual

D.E. Systems Border Patrol TC1 owner's manual

D.E. Systems

D.E. Systems Border Patrol TC1 owner's manual

Veterinary Ventures Drinkwell 360 operating instructions

Veterinary Ventures

Veterinary Ventures Drinkwell 360 operating instructions

SportDOG SBC-10 operating guide

SportDOG

SportDOG SBC-10 operating guide

Dogtra YS500 owner's manual

Dogtra

Dogtra YS500 owner's manual

Sunjoy D-BB002PCO owner's manual

Sunjoy

Sunjoy D-BB002PCO owner's manual

Petsafe Drinkwell D2-EU-45 operating guide

Petsafe

Petsafe Drinkwell D2-EU-45 operating guide

Petsafe PIFOO-13672 operating guide

Petsafe

Petsafe PIFOO-13672 operating guide

mimsafe MULTICAGE Double Large Assembly instructions

mimsafe

mimsafe MULTICAGE Double Large Assembly instructions

Current Aquapod Nano-Aquarium 7051 manual

Current

Current Aquapod Nano-Aquarium 7051 manual

Exo Terra REPTI CLEAR F250 instruction manual

Exo Terra

Exo Terra REPTI CLEAR F250 instruction manual

Savic Ruffy 2 Assembly instructions

Savic

Savic Ruffy 2 Assembly instructions

manuals.online logo
manuals.online logoBrands
  • About & Mission
  • Contact us
  • Privacy Policy
  • Terms and Conditions

Copyright 2025 Manuals.Online. All Rights Reserved.