組立てに必要な工具 TOOLS REQUIRED
■カッターナイフ
Sharp Hobby Knife
■+ドライバー(大、中、小)
Phillips Screw Driver (L.M.S)
■ラジオペンチ
Needle Nose Pliers
■キリ
Awl
■ハサミ
Scissors
■ボックスドライバー(8mm)
Box Driver (8mm)
■ニッパー
Wire Cutters
■六角レンチ
Hex Wrench
■十字レンチ
Cross Wrench
■瞬間接着剤
Instant Glue
■エポキシ接着剤
Epoxy Glue
1組立てる前に説明書を良く読んで、おおよその
構造を理解してから組立てに入ってください。
Read through the manual before you begin, so
you will have an overall idea of what to do.
組立て前の注意(1)BEFORE YOU BEGIN (1)
セットの内容をお確かめください。万一不良、不足があ
りましたら、お買い求めの販売店にご相談いただくか、
当社「ユーザー相談室」までご連絡ください。
Check all parts. If you find any defective or missing parts,
contact your local dealer or our Kyosho Distributor.
2
3説明書に使われているマーク
Symbols used throughout the instruction manual, comprise:
■7.2Vニカドバッテリー
7.2V Ni-Cd Battery
禁止事項(してはいけないこと)。
Do not do that!
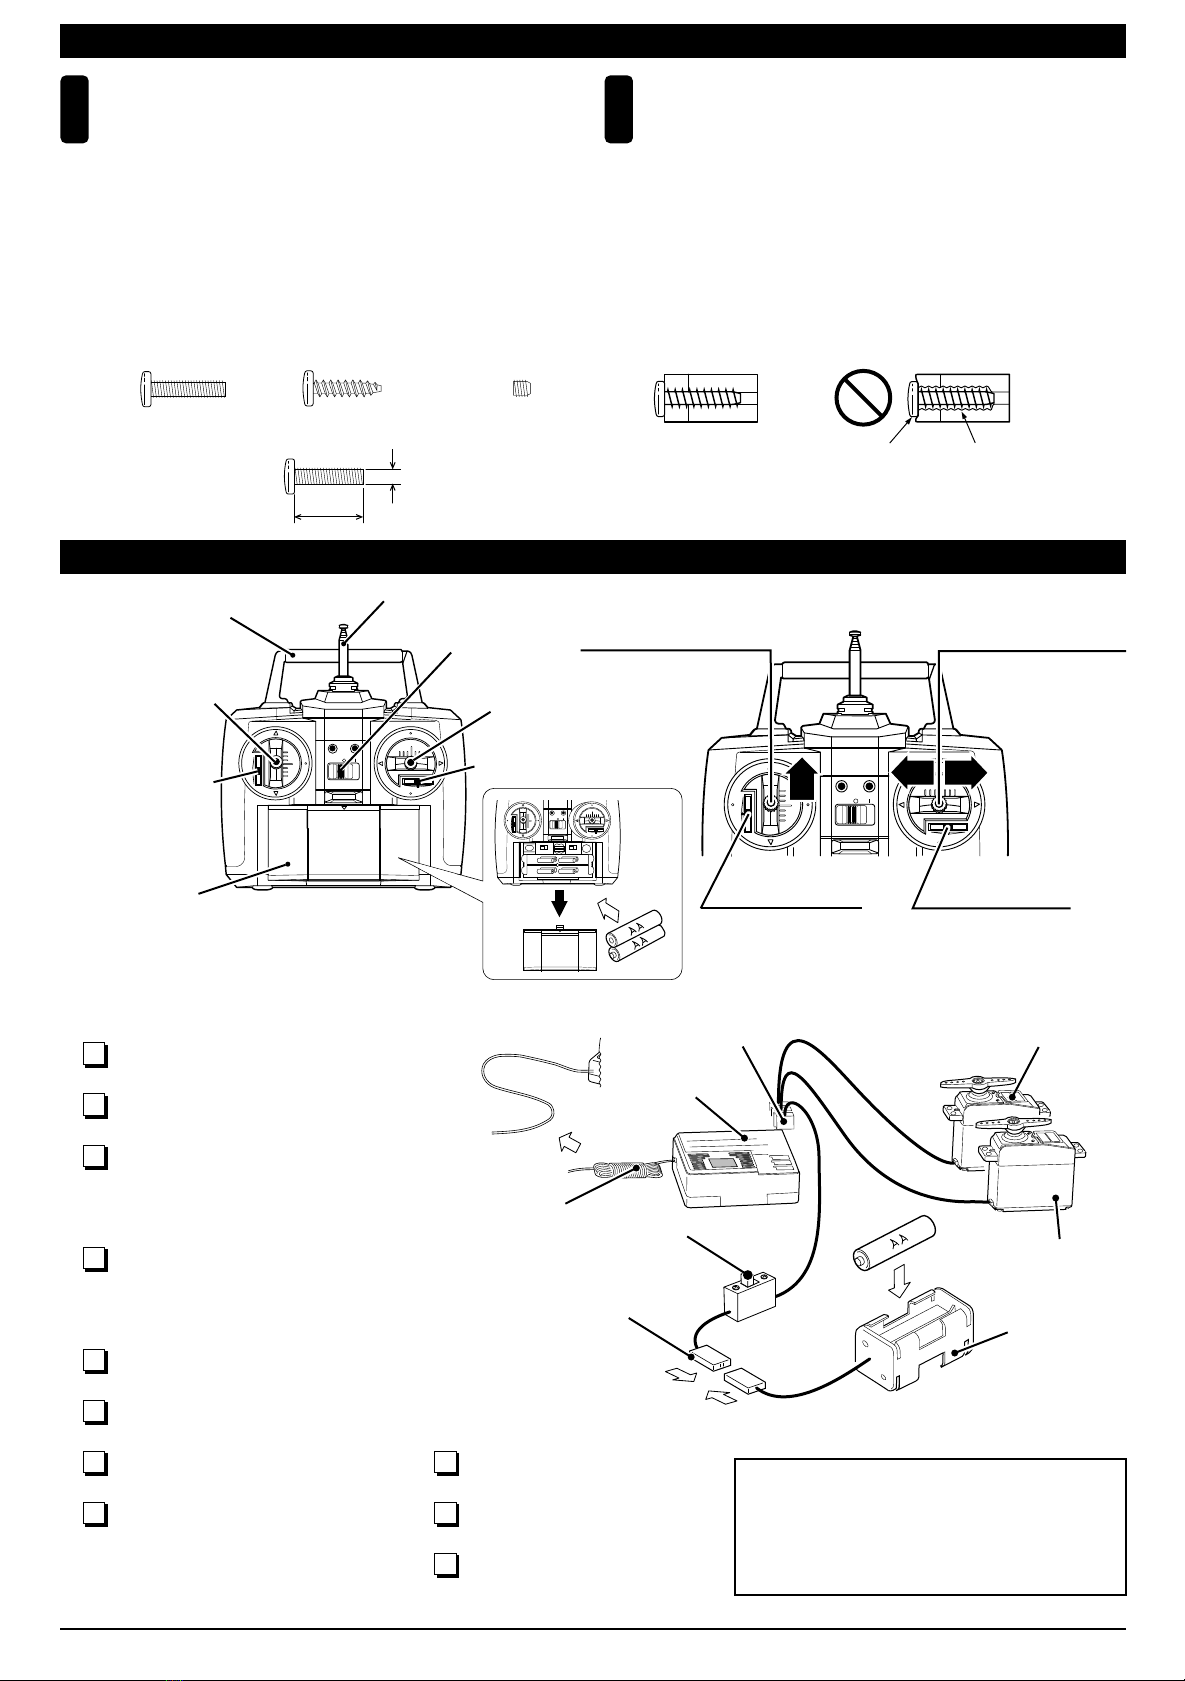
キットの他にそろえる物 REQUIRED FOR OPERATION
■スティックタイプ2チャンネルプロポ
Stick-type 2 channel radio
■単3乾電池(送信機用)…8
AA-size Batteries
(For Transmitter) …8 pcs.
*プロポの取扱い方は、プロポに付属の説明書を参考にしてください。
For proper radio handling, refer to its manual.
AAAA AAAA
2チャンネル 2サーボ無線操縦機(プロポ)と電池ボックス
2 channel & 2 servo radio for R/C models, and battery box.
■電池ボックス
Battery Box
AAAA
(受信機用)…4
AA-size Batteries
(For Receiver) …4 pcs.
●プロポセットに付いている
ときは必要ありません。
If already supplied with the radio,
there is no need to purchase a
battery box separately.
●お手持ちのプロポを使用される場合は、下記の<使用できる
サーボ・サイズ>を確認してください。
If using a radio you are in possession of, check the dimensions
of its servos against the diagram below.
<使用できるサーボサイズ>
< Suitable servo dimensions >
標準以外のプロポを使用する場合
With a standard radio
約20mm
approx. 20mm
約40mm
approx. 40mm
約30mm
approx. 30mm
●このキットでは、フタバ製プロポを ベースに説明しています。
Explanations on the radio are based on the FUTABA radio.
7.2V充電式ニカドバッテリー
KYOSHO CORPORATION MADE IN JAPANNo.71701
R
■充電器
CHARGER
7.5
DELTA PEAK AUTO-CUTOFF
WARNING HOT
WARNING HOT
Ni-Cd BATTERY
FUSE 7.5A
CHARGE
START
エポキシ接着剤で接着する。
Apply epoxy glue.
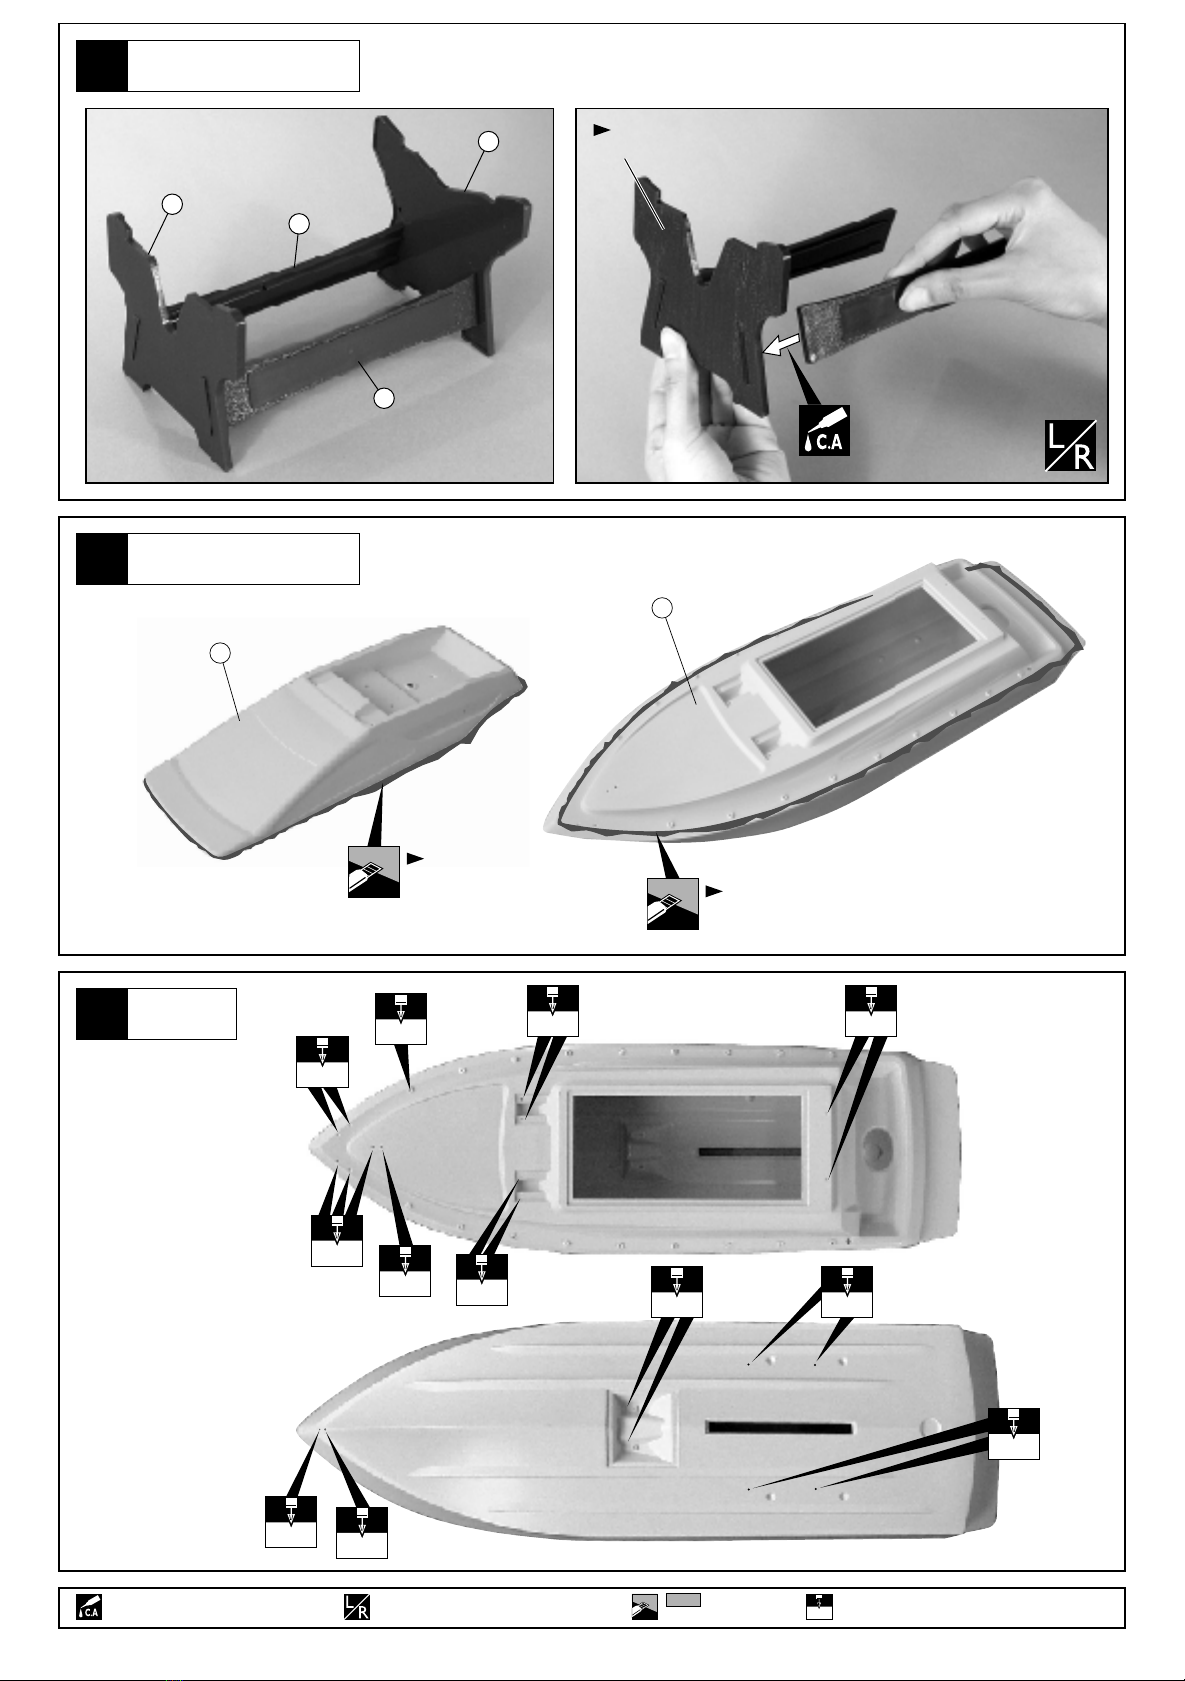
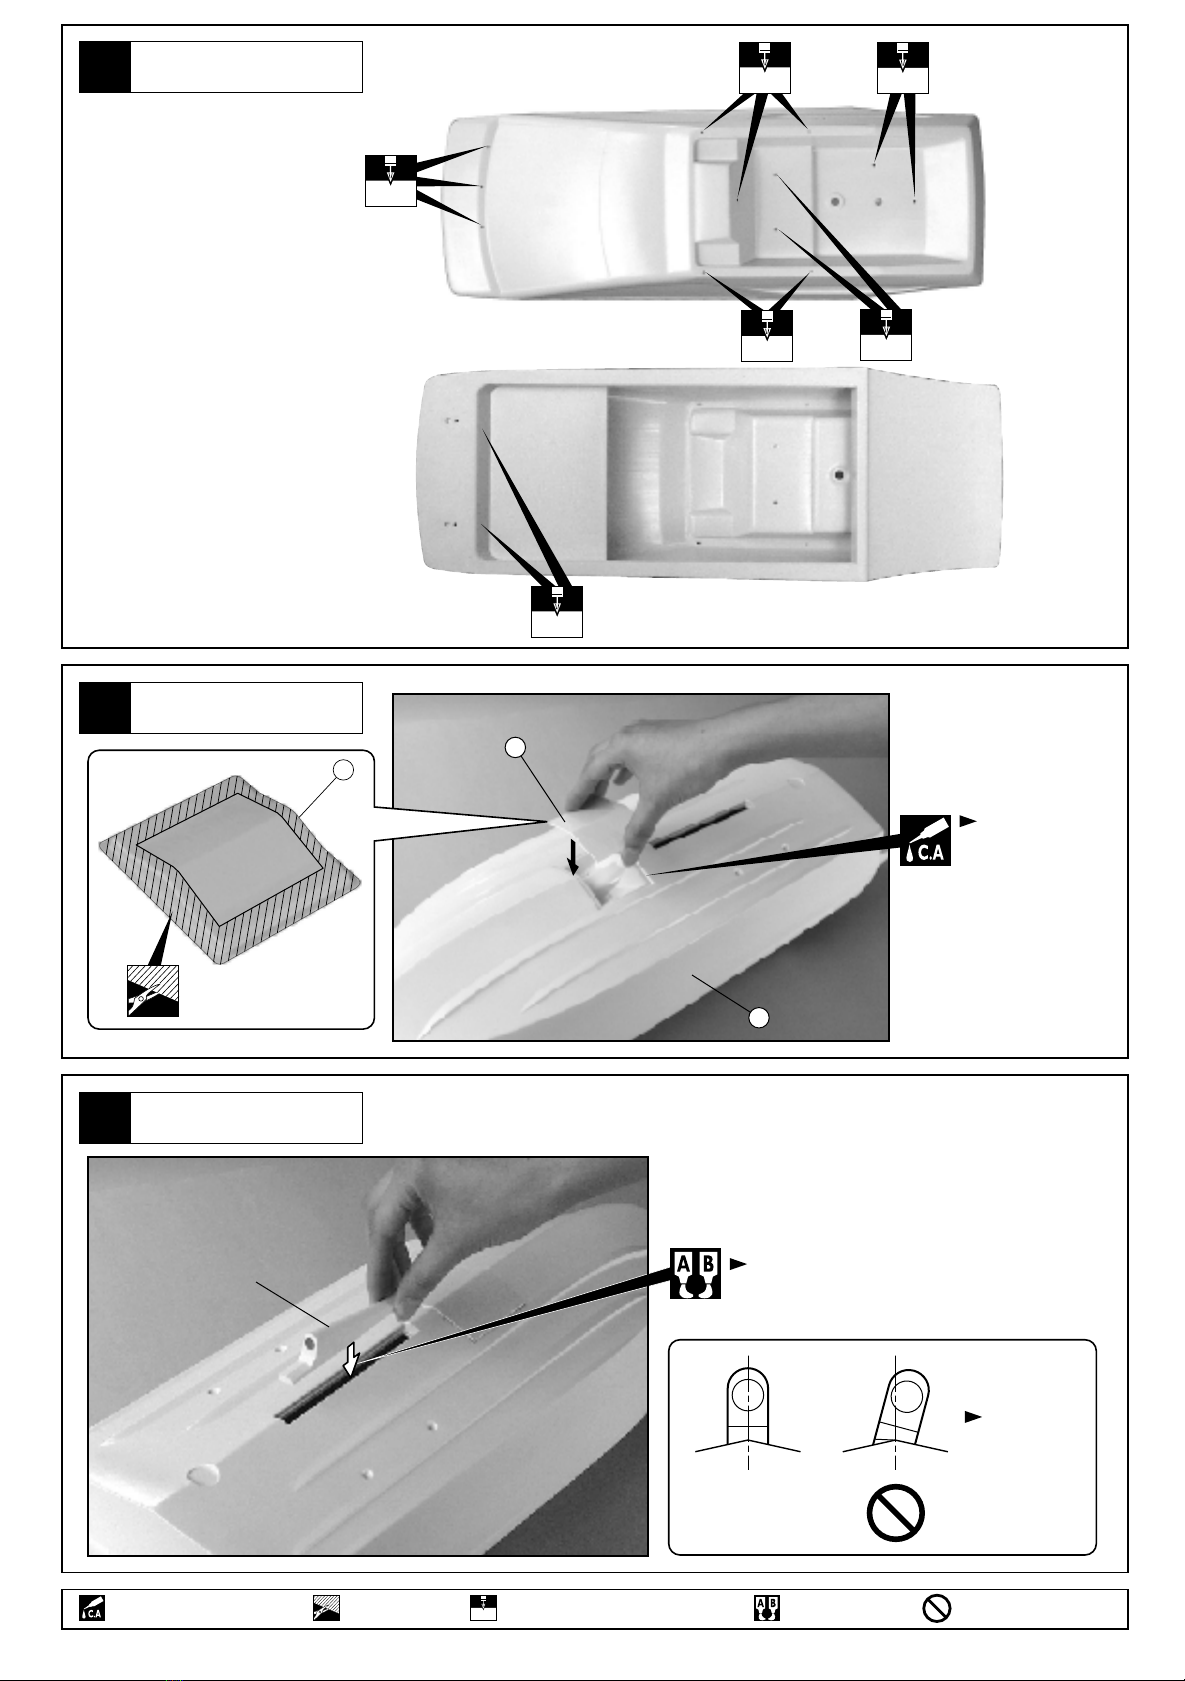
瞬間接着剤で接着する。
Apply instant glue (CA glue, super glue).
グリスを塗る。
Apply grease.
2セット組立てる(例)。
Assemble as many times as specified
(here: twice).
x2
左右同じように組立てる。
Assemble left and right sides the
same way.
別購入品
Must be purchased separately!
仮止め。
Tentatively tighten.
余分をカットする。
Cut off excess.
2mmの穴をあける(例)。
Drill holes with the specified diameter
(here: 2mm).
可動するように組立てる。
Ensure smooth non-binding movement
while assembling.
注意して組立てる所。
Pay close attention here!
番号の順に組立てる。
Assemble in the specified order.
2mm
キットに入っている工具
TOOLS INCLUDED
1.5mm
2mm
●重要な注意事項があ
るマークです。
必ずお読みください。
Do not overlook this
symbol!
Warning!
Epoxy A
Epoxy B
をカットする。
Cut off shaded portion.
2