manuals.online logo
Brands
  1. Home
  2. •
  3. Brands
  4. •
  5. Kyosho
  6. •
  7. Toy
  8. •
  9. Kyosho Calmato TRAINER 40 User manual

Kyosho Calmato TRAINER 40 User manual

INSTRUCTION MANUAL
※製品改良のため、予告なく仕様を変更する場合があります。*SPECIFICATIONS ARE SUBJECT TO BE CHANGED WITHOUT NOTICE. No.11211
●キットの他にそろえる物/組立に必要な工具/組立て前の注意
 REQUIRED FOR OPERATION / TOOLS REQUIRED / BEFORE YOU BEGIN
●セットに入っている物
 KIT CONTENTS
●プロポの準備
RADIO PREPARATION
●本体の組立て
 ASSEMBLY
●パーツリスト
 PARTS LIST
●取扱いの注意
 OPERATING YOUR MODEL SAFELY
2
3
4
4~12
13
13 / 16
目 次 INDEX
THE FINEST RADIO CONTROL MODELS
R
組立/取扱説明書
© 2002 KYOSHO CORPORATION/禁無断転載複製
This radio control model is not a toy!
●First-time builders should seek the advice of experienced modellers
before beginning assembly and if they do not fully understand
any part of the construction.
●Assemble this kit only in places out of childrenÕs reach!
●Take enough safety precautions prior to operating this model.
 You are responsible for this modelÕs assembly and safe operation!
●Always keep this instruction manual ready at hand for quick
 reference, even after completing the assembly.
安全のための注意事項
この無線操縦模型は玩具ではありません!
●この商品は高い性能を発揮するように設計されています。
 組立てに不慣れな方は、模型を良く知っている人にアド
 バイスを受け確実に組立ててください。
●小さい部品があるので、組立て作業は、幼児の手がとど
 かない所で必ず行ってください。
●飛行して楽しむ場所は万一の事故を考えて、安全を確認
 してから責任をもってお楽しみください。
●組立てた後も、説明書がいつでも見られるように大切に
 保管してください。
ARF
ALMOST-READY-TO-FLY
初・中級者向
For Beginner &
Intermediate Flyers
Wingspan: 1600mm (62.9")
RADIO CONTROLLED .40 CLASS ENGINE POWERED AIRCRAFT
KYOSHO トレーナー 40
カルマート
※ご使用前にこの説明書を良くお読みになり十分に理解してください。
Before beginning assembly, please read these instructions thoroughly.
UNDER SAFETY PRECAUTIONS
1
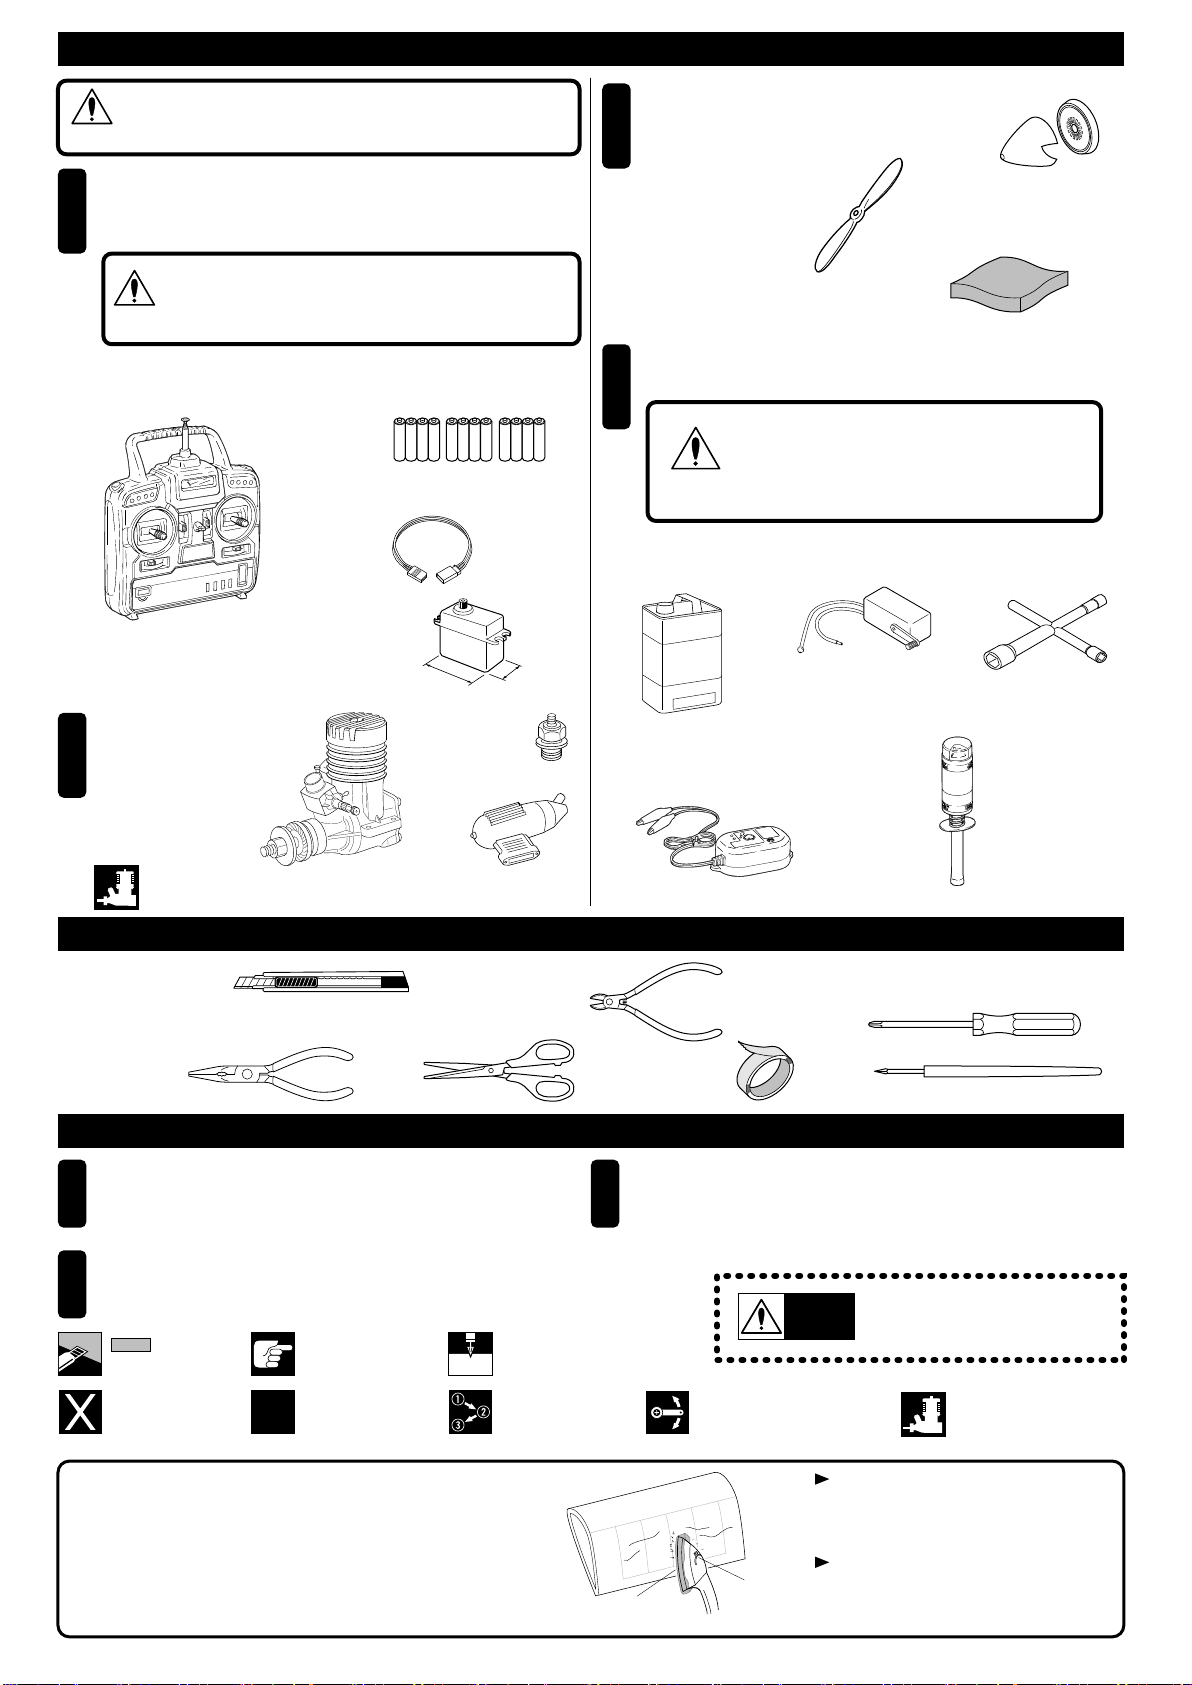
4チャンネル以上の飛行機用無線操縦機(プロポ)セット
(4サーボ)と電池
A 4 Channel radio with 4 standard servos is required.
■飛行機用4チャンネル以上プロポ
A minimum 4 channel transmitter,
configured for aircraft.
■単3乾電池…12本
(送信機・受信機用)
 12 AA-size Batteries
*
プロポの取扱い方は、プロポに付属
 
の説明書を参考にしてください。
Ensure you read and understand the
instructions included with your radio.
■カッターナイフ
Sharp Hobby Knife
■+ドライバー(大、中、小)
Philips Screwdriver ( L, M, S )
■ラジオペンチ
Needle Nose Pliers ■キリ
Awl
■ハサミ
Scissors
AAAA AAAA
AAAA
2
エンジン及びマフラー
■飛行機用エンジン
 Model Aircraft Engine
(エンジン付の場合は、エンジン、マフラー、プラグが付属しています。)
(Engine, Muffler and Glow Plug are included in the W/Engine set).
(エンジン付の場合は付属しています。)
(Propeller included in W/Engine set).
■マフラー
 Muffler
Engine and Muffler
■プラグ
 Glow Plug
■ニッパー
Wire Cutters
3
燃料、始動用具
Required for engine starting:
■プラグレンチ
 Plug Wrench
■
エルロンサーボ用延長コード…1本
 Aileron servo extension lead
4
■グロー燃料
Glow engine fuel only.
MODEL
ENGINE
FUEL
プロペラ 他
*ご使用になるエンジンに合った
 サイズをお買い求めください。
 Purchase a propeller that
 will match your engine.
Propeller
■スポンジシート
 Sponge Sheet
■プロペラ
 Propeller
下記商品のメーカー、サイズ等は、販売店とご相談ください。
CAUTION
: For details concerning the equipment listed below
(size, maker, etc.), check with your hobby shop.
警告
空用(飛行機用)のプロポ(4チャンネル以上)セットを
必ず使用してください。(空用以外使用禁止)
CAUTION
: Only use a minimum 4 channel radio for
airplanes! (No other radio may be used!)
警告
注意
*2サイクル 40
*2-Stroke .40
  ガソリンや灯油は使用禁止
WARNING: Normal gasoline cannot be
used with glow engines.
1組立てる前に説明書を良く読んで、おおよその構造を
理解してから組立てに入ってください。
Read through the manual before you begin, so you will
have an overall idea of what to do.
キットの内容をお確かめください。万一不良、不足があ
りましたら、お買い求めの販売店にご相談いただくか、
当社「ユーザー相談室」までご連絡ください。
Check all parts. If you find any defective or missing parts,
contact your local dealer or our Kyosho Distributor.
2
3説明書に使われているマーク
Symbols used throughout this instruction manual, comprise:
別購入品
Must be purchased
separately!
1.5mmの穴をあける(例)。
Drill holes with the specified
diameter (here: 1.5mm).
をカットする。
Cut off shaded portion.
1.5
mm
注意して組立てる所。
Pay close attention
here!
■スピンナー
 Spinner
低温
low setting
あて布をしたアイロンを低温であて、
必要に応じて温度を上げてゆく。
温度を上げすぎるとフイルムが溶ける
ので注意する
Use an iron covered with a cloth!
Start at low setting. Increase the set--
ting if necessary. If it is too high, you
may damage the film.
あて布
with cover (cloth)
機体に貼ってあるフィルムは、温度や湿度など気候条件
が工場組立の時から変化すると、多少タルミが出ること
があります。飛行には、さしつかえありませんが、アイ
ロンをあてると タルミ がとれます。
The pre-covered film may become wrin-kly due to
variations of temperature. Smooth out as explained right.
2
キットの他にそろえる物(別購入品) REQUIRED FOR OPERATION (Purchase separately!)
組立て前の注意 BEFORE YOU BEGIN
組立に必要な工具 TOOLS REQUIRED (Purchase separately!)
x2
2セット組立てる(例)。
Assemble as many
times as specified.
●
重要な注意事項があるマークです。
 必ずお読みください。
 Read carefully at this symbol!
警告
Warning!
■サーボ
 Servo
16~20mm
38~41mm
■プラグヒーター
 Plug Heater
No.695143
 
スパークブースター
 
Spark Booster
No.695142
 
DC急速充電器
 
DC Quick Charger
番号の順に組立てる。
Assemble in the
specified order.
No. 80701 燃料ポンプ(電動12V)
Fuel Pump (Electric 12V)
No. 80702 燃料ポンプ(手動)
Fuel Pump (Manual)
■燃料ポンプ
Fuel Pump
可動するように組立てる。
Ensure smooth non-binding
movement while assembling.
エンジン付には付属。
Included with "GP" version.
■テープ
  Tape
Linkage Stopper ( 6 pcs) 3 x 3mm
Set Screw ( 6 pcs)
E-ring ( 6 pcs)
Washer ( 6 pcs)
リンケージストッパー (6個)
2mmワッシャー (6個)
Main Wing (R)
主翼(右)
Wing Joiner
カンザシ
Engine Mount
エンジンマウント
Fuel Tank
燃料タンク
Stopper
4mmストッパー
Stopper
4mmストッパー
Tire
タイヤ
Fuselage
胴体
Tire
タイヤ
Tire
タイヤ
Nose Gear Horn
ノーズギヤホーン
Nose Gear
ノーズギヤ
Aileron Rod (95mm)
エルロンロッド (95mm)
Rod Adjuster (4 set)
ロッドアジャスター (4セット)
Throttlr Rod (410mm)
エンコンロッド (410mm)
Nose Gear Rod (410mm)
ノーズギヤロッド (410mm)
Rudder Rod (710mm)
ラダーロッド (710mm)
Elevator Rod (710mm)
エレベーターロッド (710mm)
Shrink Tube
ヒシチューブ
Tire Shaft
タイヤシャフト
Main Gear
メインギヤ
Main Wing (L)
主翼(左)
セットビス (6個)
E1.5 Eリング (6個)
Tail Wing
水平尾翼
Decal
デカール
3
2
3
5 6
7
8
8
9
4
9
9
11
12
13 14
15
16
17
18
19
20
24
22
23
21
10
1
KIT CONTENTS
六角レンチ
Hex Wrench
Screw / Nut
ビス・ナット類
セットに入っているもの
RADIO PREPARATION
ASSEMBLY
1A new Ni-Cd battery must charged before use. Refer to the charger instruction manual for directions.
Set up the radio as explained below.
2
Connect the Ni-Cd battery.
1
Extend the antenna. (Transmitter)
2
3
4
Center the trims.
5
Switch on. (Transmitter)
6
Switch on. (Receiver)
7
Make sure the servos are in command.
8
Switch off. (Receiver)
9
Switch off. (Transmitter)
10
Retract the antenna. (Transmitter)
11
Install AA-size batteries. (Transmitter)
●START
●FINISH
Extend the antenna. (Receiver)
4
1Main Wing
2Main Wing
2
ON
OFF
11
Transmitter
Battery
Receiver
Servo
3
4
79
8
5
10
6
1
Install the grommets to
the servo as shown.
Read carefully at this symbol! Warning!
Cut off shaded portion.
Securely glue together. If it comes off
during flights, you may lose control of
your airplane, resulting in an accident !
Warning!
Align transparent decals leaving no
gap & apply to left & right main wings.
Only cut the film.
Do not cut into the wood.
主翼
主翼
送信機
▲
▲バッテリー
受信機
▲
▼サーボ
キットの組立てに入る前に、ニカドバッテリーを充電器の説明にしたがって充電しておきます。
プロポを下の順序にしたがってセットします。
プロポの準備
本体の組立て
ニカドをつなぐ。
1
アンテナをのばす。(送信機)
2
3
4
トリムレバーを中央にセットする。
5
スイッチを入れる。(送信機)
6
スイッチを入れる。(受信機)
7
スティックを動かしてサーボが動くか確認する。
8
スイッチを切る。(受信機)
9
スイッチを切る。(送信機)
10
アンテナを縮める。(送信機)
11
単3乾電池をセットする。(送信機)
●始める時
●終わる時
アンテナをのばす。(受信機)
サーボにグロメットを
取り付けておく。
重要な注意事項があるマーク
です。必ずお読みください。
をカットする。
確実に取り付ける。
飛行中にはずれると操縦不能になり
事故につながります。
左右の主翼にすき間のないように、
透明のデカールを合わせて貼る。
フイルムのみ。
1
3
2
1
1
2
2
3
3
5
3Aileron Servo
4Aileron Rod
Aileron Rod
Must be purchased
separately!
Cut off shaded portion.
approx. 11~12mm
approx. 2mm
2
19
Linkage Stopper
2
3 x 3mm
Set Screw
2
20
E1.5
E-ring
2
2mm
Washer
2mm
2mm
3mm
3mm
1.5mm
19
19
14
14
14
13
23
23
23
Supplied with the servo.
Aileron Servo
Supplied with the servo.
Assemble as many times
as specified.
x2
x2
Apply heat to shrink the tube.
Beware of the
flame!
Drill holes with the specified
diameter.
1.5
mm
2mm
2mm
1.5
mm
1.5
mm
エルロンサーボ
エルロンロッド
エルロンロッド
別購入品。
をカットする。
約11~12mm
約 2mm
10mm10mm
リンケージストッパー
セットビス
Eリング
ワッシャー
サーボ付属のビス
サーボ付属のビス
サーボ付属のビス
エルロンサーボ
2セット組立てる(例)。
ヒシチューブに熱を加えて収縮させる。
火気に注意。
23
1.5mmの穴をあける(例)。可動するように組立てる。
Ensure smooth non-binding
movement while assembling.
Pay close attention
here!
注意して組立てる所。
6
5Nose Landing Gear
6Engine
Must be purchased
separately!
Pay close attention here!
2
3 x 8mm
Screw
1
4mm
Stopper
8
11
8
12
12
16
3x8mm
3x8mm
3x8mm
3x8mm
3x30mm
3mm
3mm
3mm
3mm
4
3 x 30mm
Cap Screw
4
3mm
Washer
3mm
Nut 4
Relieve this area as
needed to allow needle
valve clearance.
Throttle Rod
For slightly wider engines,
spread slightly wider.
Engine
15
10mm
40mm
Assemble in the
specified order.
4
3
2
5
1
Only cut the film.
To Muffler
To Carburetor
エンジン付には付属。
I
ncluded with "GP" version.
ノーズギヤ
エンジン
別購入品。
注意して組立てる所。
ビス
ストッパー
キャップビス
ワッシャー
ナット
ニードルに合わせて削る。
エンコンロッド
多少幅の広いエンジンの場合は、
少し広げながら取り付ける。
エンジン
番号の順に組立てる。
Cut off shaded portion.
をカットする。
可動するように組立てる。
Ensure smooth non-binding
movement while assembling.
フイルムのみ。
上側のパイプ、マフラーへ
下側のパイプ、キャブレターへ
7
7Main Landing Gear
8Horizontal Tail
9Horizontal Tail
Pay close attention here! Read carefully at this symbol! Warning!
Cut off shaded portion. Drill holes with the
specified diameter.
2.5
mm
2.5
mm
2.5
mm
2
3.2 x 45mm
TP F/H Screw
3
3 x 16mm
Screw
Only cut the film.
Do not cut into the wood.
Only cut the film.
Do not cut into
the wood.
Only cut the film.
Do not cut into
the wood.
3.2x45mm
3x16mm
24
10
A AÕ
B BÕ
A = AÕ
B = BÕ
Securely glue together. If it comes off
during flights, you may lose control of
your airplane, resulting in an accident !
Warning!
メインギヤ
水平尾翼
水平尾翼
注意して組立てる所。 重要な注意事項があるマーク
です。必ずお読みください。
をカットする。 2.5mmの穴をあける(例)。
TPサラビス
ビス
フイルムのみ。
フイルムのみ。
フイルムのみ。
確実に取り付ける。
飛行中にはずれると操縦不能になり
事故につながります。
8
10
Servo
11
Rudder Rod
12
Elevator Rod
Rudder Rod
Must be purchased separately! Read carefully at this symbol! Warning!
Supplied with
the radio.
Supplied with
the radio.
Elevator Control Servo
Throttle Servo
Front
Rear
Rudder Control Servo
Apply heat to shrink the tube.
Apply heat to
shrink the tube.
14
14
14
17
23
14
18
23
Elevator Rod
x3
Assemble as many times as specified.
x3
Use this hole.
Use this hole.
Pay close attention here!
23
10mm
23
10mm
サーボ
ラダーロッド
エレベーターロッド
ラダーロッド
エレベーターロッド
別購入品。 重要な注意事項があるマーク
です。必ずお読みください。
プロポに付属
プロポに付属
エレベーターサーボ
エンコンサーボ
前
後
ラダーサーボ
ヒシチューブに熱を加えて
収縮させる。
23
ヒシチューブ
に熱を加えて収縮
させる。
23
3セット組立てる(例)。
この穴を使う。
この穴を使う。
注意して組立てる所。
Beware of the
flame!
火気に注意。
Beware of the
flame!
火気に注意。
approx. 2mm
約 2mm
approx. 2mm
約 2mm
9
13
Linkage
14
Linkage
Must be purchased separately! Cut off shaded portion. Drill holes with the specified
diameter.
3mm
4
19
Linkage Stopper
4
3 x 3mm
Set Screw
4
20
E1.5
E-ring
4
2mm
Washer
approx. 10mmapprox. 13mm
2mm
2mm
2mm
1.5mm
1.5mm
19
19
19
approx. 13mm
3x3mm
3x3mm
Supplied with
the servo.
Supplied with the servo.
x2
Steering Rod
Rudder Rod
Elevator Rod
Throttle Rod
Assemble as many times
as specified.
x2
可動するように組立てる。
Ensure smooth non-binding
movement while assembling.
2mm
2mm
2mm
リンケージ
リンケージ
別購入品。 をカットする。 3mmの穴をあける(例)。
リンケージストッパー
セットビス
Eリング
ワッシャー
サーボ付属のビス
サーボ付属のビス
サーボ付属のビス
約10mm約13mm
約13mm
ノーズギヤロッド
ラダーロッド
エレベーターロッド
エンコンロッド
2セット組立てる(例)。
10
15
Battery
16
Folding Propeller
Must be purchased separately! Pay close attention here! Read carefully at this symbol! Warning!
Securely glue together. If it comes off during flights, you may
lose control of your airplane, resulting in an accident !
Warning!
Securely tighten the nut holding the propeller for it not come off
when the motor is spinning. If com-ing off, there is a high risk of injury!
Warning!
Receiver
Receiver
Battery
Battery
Foam Pad
Secure foam padding with rubber
bands or tape as required.
Tape.
Switch
Included with
the switch.
Included with the switch.
Propeller
Spinner
Spinner
Muffler
Connect as per radio instruction manual.
Antenna
エンジン付には付属。
Included with "GP" version.
バッテリー
プロペラ
別購入品。 注意して組立てる所。 重要な注意事項があるマーク
です。必ずお読みください。
確実に取り付ける。
飛行中にはずれると操縦不能になり事故につながります。
エンジン回転中にプロペラがはずれないように、確実にナットをしめる。
回転中にはずれるとケガのおそれがあります。
スポンジ
受信機
受信機
バッテリー
バッテリー
ゴムバンド等で止める。
セロテープ等で止める。
スイッチ
スイッチに付属の
プレート
スイッチに付属のビス
プロペラ
スピンナー
スピンナー
マフラー
プロポの説明書を参考に、コネクターを
接続しアンテナを張る。
アンテナを張る。
11
Read carefully at this symbol! Warning!
17
Main Wing
18
Decals
2
4 x 25mm
Cap Screw
4mm
Washer
Securely glue together. If it comes off
during flights, you may lose control of
your airplane, resulting in an accident !
Warning!
4x25mm
4mm
Connect the aileron servo.
2
Apply included decals. For the correct placement of decals, please refer to box top.
Connect as per radio instruction manual.
Cut off this line.
106mm244mm
Pay close attention here!
注意して組立てる所。 重要な注意事項があるマーク
です。必ずお読みください。
主翼
デカール
キャップビス
ワッシャー
確実に取り付ける。
飛行中にはずれると操縦不能
になり事故につながります。
エルロンサーボのコネクターを接続する。
付属のデカールはパッケージ を参考に貼ってください。
プロポの説明書を参考に、
コネクターを接続する。
ここのラインを剥がす。
12
19
Adjustment
20
C of G position
21
Engine Preparation
Must be purchased separately!
Pay close attention here! Read carefully at this symbol! Warning!
Warning! Do not fly before confirming the correct location of the CG.
If the CG is incorrect, you lose control of your airplane which leads to accidents!
In order to obtain the CG specified, reposition
the receiver and other equipment.
CG
85~90mm
Angle
7mm
7mm
9mm
9mm 15mm 15mm
Adjust the travel of each control surface to the values in the diagrams.
Position for
left diagram.
Position for
left diagram.
Position for
left diagram.
Angle
Angle
< >Rudder< >Aileron < >Elevator
Remove pipe attached to carburettor,
and add fuel here.
Fuel comes out of this pipe
when fuel supply is full.
エンジン付には付属。
I
ncluded with "GP" version.
蛇角調整
重心位置
エンジン始動の準備
別購入品。
注意して組立てる所。 重要な注意事項があるマーク
です。必ずお読みください。
重心のチェックをする前に飛行は、おこなわない。
重心位置が正しくないと操縦不能になり事故につながります。
図の位置に重心が来るように、受信機等
を前後に移動し、重心位置を合わせる。
重心位置
蛇角
蛇角 蛇角
< >ラダー< >エルロン < >エレベーター
図の様に各舵が動くように調整する。図の動作量は通常の飛行に適した舵角です。
測定位置
測定位置
測定位置
キャブレターに取付けてあるパイプ
を抜き、ここから燃料を入れます。
燃料がいっぱいまで入ると、
このパイプから出てきます。
Plug
プラグ
13
Read carefully at this symbol! Warning!
●First-time fliers should seek advice for hints in pre-flight adjustments and assembly from experienced fliers. Be
reminded that flying a badly assembled or badly adjusted airplane is very dangerous!
●In the beginning, first-time fliers should always be assisted by an experienced flier and never fly alone!
●This model airplane is designed to be powered by a 2-cycle .40 engine. Installing a more powerful engine than
specified or flying the trainer aggressively may lead to serious damages and accidents!
●As this airplane is intended to be a model for first-time fliers, aerobatic flying cannot be performed!
Warning!
OPTIONAL PARTS
Propeller
Spinner
Nylon Propeller
●750
Spinner (White)
●1000
Spinner (Red)
●1000
Spinner (Yellow)
●1000
Duralumin Spinner
●4000
No.90412-06
No.90420-52
No.90421-52
P.P. Pipe
●300No.90469
Main Wing Taping Tape
●300No.90496
Color Silicone Tube
●400No.1790
Fuel Filter (M)
●1000No.39308
No.90422-52
No.90426-52
品番
No.
パーツ名
Part Names 内容(キーNo.と入数)
Quantity
★発送
手数料
★定価
8
11 12
x 1
8
21
x 2
10
x 1
1500
2000
1600
11211-01
11211-02
11211-03
ノーズギヤセット
Nose Gear Set
メインギヤセット
Main Gear Set
デカール
Decal
22
x 1
★ FOR JAPANESE MARKET ONLY.
200
(一律)
品番
No.
パーツ名
Part Names 内容(キーNo.と入数)
Quantity
★発送
手数料
★定価
9
7
7
x 3 1300
900
11211-04
90431-24C
スポンジタイヤセット
Sponge Tire Set
燃料タンクセット (240cc)
Fuel Tank Set (240cc)
燃料タンク一式
x 1 Set
200
(一律)
SPARE PARTS
重要な注意事項があるマーク
です。必ずお読みください。
オプションパーツ
プロペラ
スピンナー
D12 x P6
ナイロンプロペラ
スピンナー(白)52mm
スピンナー(赤)52mm
スピンナー(黄)52mm
ジュラルミンスピンナー
PPパイプ
主翼止めテープ
カラーシリコンチューブ
燃料フィルター (M)
●無線操縦飛行機が初めてという方は、調整等を経験者のアドバイスを受けながら確実に組立ててください。中途
半端な組上がりの機体を飛ばすのは大変危険です。
●無線操縦飛行機が初めてという方には、単独飛行はできませんので、必ず経験者の指導を受けてください。
●この機体は、2サイクルの40〜46エンジン用に設計されていますのでこれ以上のエンジンを使用し、過激な飛行
をおこなうと破損するだけでなく、大変危険ですので絶対におやめください。
●この機体は、初心者の入門機として作られておりますので、アクロバット及び急降下から急上昇等は絶対にしな
いでください。
スペアパーツ
00
口座番号  (右詰めにご記入ください)
0 0 2 1 0 4 4 7 2 7 1 1 6 8 0
金 額料 金
殊 扱
特 取
千 百 十 万 千 百 十 円
加入者名
※
通  信  欄
払込人住所氏名
(郵便番号      )
※
京 商 株 式 会 社
(電話番号  ‑    ‑   )
各票の※印欄は
払込人において記載してください
裏面の注意事項をお読みください。(郵政省)
受付局日附印
切り取らないで郵便局にお出しください
記載事項を訂正した場合は その箇所に訂正 印を押して ください
払  込  取  扱  票 払込票兼受領証
0 0 2 1 0 4
4 7 2 7 1
1 6 8 0
京商株式会社
千 百 十 万 千 百 十 円
右詰めにご記入ください
口
座
番
号
加入 者名
金 額
払込人住所氏名
特殊取扱
料  金
(消費税込み)
円
受付局日附印
品番    パーツ名   数量
1901   ベアリング    2
発送手数料
消費税
(部品+発送手数料合計金額 x 5%)
合計
1,400
200
80
1,680
※
※
※
※ ※
※
※
※
(1)
(2)
(2)
(3)
(4)
(1)
(例)
243 0034
神奈川県厚木市船子153
京商株式会社
ユーザー相談室
電話046‑229‑4115
*発送手数料、消費税率は平成14年 9月 1日現在のものです。
京商スペアパーツ・オプションパーツの購入方法
これらの購入方法は日本国内に限らせていただきます
郵便振込で
部品を
こわしちゃった
●部品をこわしたり、なくしてしまった場合で
 もスペアパーツやオプションパーツを購入
 し、元どおりに直す事ができます。
●
パーツはお店で直接購入していただくか、お
 店に行けない場合は、インターネットか郵便を
 利用して京商から通信販売で購入できます。
※電話での直接のご注文は取り扱っておりませ
 んので予めご了承ください。 
購入方法による手数料、お届け日数のめやす。
購入方法 発送手数料
お届け予定日数
お店に
行けない場合
インターネットで
お支払い方法により
異なります。
お店に在庫がない場合は
パーツ直送便で
現金書留で
不要
200円
3〜4日
3〜4日
6〜7日
10〜12日
200円
2.お店に行けない場合は
次の3つの方法で京商から通信販売で購入できます。
まずは、お近くのお店か、この商品をお買い求めいただいたお店にご来店ください。ご希望のパーツの在庫が
あれば即購入できます。その際に組立/取扱説明書をお持ちになると購入がスムーズになります。
お店で在庫切れの場合でも京商の『パーツ直送便』※
 
でお店から京商へ申し込めます
お店でご希望のパーツがたまたま品切れだった場合でも、京商の『パーツ直送便』※を利用すればその場で注文でき
ます。『パーツ直送便』は、お店に備え付けのパーツ直送便注文用紙にご希望のパーツの品番や数量等、必要事項
をご記入の上、お店に代金をお支払いいただければ結構です。3〜4日でお客様のご自宅か、お店にお届けします。
発送手数料が不要で早く着くお得なシステムです。
※一部取り扱っていないお店もございます。
パーツ直送便取り扱い店は
このステッカーが目印
3〜4日でお客様の
ご自宅かお店に
お届けします。
お店でパーツ直送便
注文用紙に『品番』
と必要数を記入。
パーツ直送便の
注文用紙といっしょに
代金をお店の人に
支払う!
発送手数料は
不要
お届けまで
3〜4日
発送手数料
200円
発送手数料
200円
お届けまで
10
〜
12日
お届けまで
6〜7日
お届けまで
3〜4日
お店に行けない場合は、京商ホームページ(http://www.kyosho.co.jp/)内のパーツオンラインショップからお申し込みいただくか、郵便局からお申し込みいただくようになります。
1.まずはお店でお求めください。
《現金書留の宛先》
〒243‑0034 神奈川県厚木市船子153
京商株式会社 ユーザー相談室
電話 046‑229‑4115
必要事項を記入した用紙と代金を現金書留
にて京商までご送金ください。代金は次の
とおりとなります。
京商ホームページ(http://www.kyosho.co.jp/)内のインデックス
から
パーツオンラインショップをクリックしてください。
パーツオンラインショップ(インターネット)でお申し込みの
場
合は、右側の3種類(KYOSHO カード、
各社クレジットカード、代引支払い)から
お選びいただけますのでご利用ください。
特典満載 KYOSHOオフィシャルカード
の
お申し込みが、京商ホームページ
(http://www.kyosho.co.jp/)
でもOK !!
(1)メモ用紙に 氏名
・
電話番号
・
郵便番号
・
   
住所(電話番号は登録
・
発送をスムー
  ズにするためのものです。必ずご記入
  ください)と注文するパーツ名
・
品番
・
  
注文数を必ず記入してください。
(2)お間違えのないよう代金といっしょ 
に郵便局よりご送金ください。
2
現金書留で京商へ申し込む 3
郵便振込で京商へ申し込む
氏 名
電話番号
郵便番号
住 所
パーツ名
品 番
数 量
(1)
(2)
郵便局で払込用紙に必要事項をご記入のう
え、代金を郵便振込にて京商までご送金く
ださい。代金は次のとおりとなります。
●代金は、スペアパーツの定価の他に発送手数料(一律200円)と消費税がかかります。
●代金の計算方法は、 代金=(パーツの定価の合計+発送手数料200円)×消費税1.05(1円未満は四捨五入)
《払込用紙の記入例》
(1)口座番号 : 00210‑4‑47271
  加入者名:京商株式会社
(2)あなたの 氏名
・
電話番号
・
郵便
  番号
・
住所 を必ず記入してく
だ  さい。(電話番号は登録
・
発送
を   スムーズにするためのもの
です。  必ずご記入ください)
(3)注文する、品番
・
パーツ名
・
注
 
文数を必ず記入してください。
(4)お間違えのないよう合計金額 
を記入のうえ、ご送金ください。
京商株式会社
〒243‑0034 神奈川県厚木市船子153 ●お問い合わせはユーザー相談室まで 電話 046‑229‑4115 受付時間 : 月〜金曜(祝祭日を除く)10:00〜18:00
※お届け予定日数は夏・冬期休業または交通事情等運送上の理由により。
 遅れる場合がございますのでご了承ください。 
1
インターネットで京商へ申し込む
郵便振込のほうが
現金書留より郵便料金が
安いね。
お店で
"Kyosho Direct-Mail-Parts-Order-System" is available only for Japanese market.
KYOSHOカードで
お支払いの場合    
発送代引手数料 
不要
各社クレジットカードで
お支払いの場合    
発送手数料  
200
円
代引にてお支払いの場合    
発送及び
代引手数料 
1000
円
組立てたり、操作してみて上手くいかない点などございましたら、ご購入いただいた
販売店または、京商ユーザー相談室へお問い合わせください。
京商ユーザー相談室へお問い合わせの際は、お電話いただくか、下記のお問い合わせ
用紙に必要事項をご記入のうえ、
ファックス
または郵便でお送りください。
 平成   年   月  日
年 月 日
約 年
電話でのお問い合わせ:046‑229‑4115
ファックス
でのお問い合わせ:046‑229‑1501
郵便でのお問い合わせ:
〒243‑0034 神奈川県 厚木市 船子153 京商株式会社 ユーザー相談室
お問い合わせご記入欄:
組立/取扱説明書のページ数や部品番号(キーNo.)を用いるなど、なるべく具体的にご記入ください。
組立や、操作上で不明な点のお問い合わせ方法
お問い合わせ用紙
京商へのお問い合わせ先 → 「京商ユーザー相談室」
月曜〜金曜(祝祭日を除く)10:00〜18:00で電話連絡可能な時間帯 :    頃
電話でのお問い合わせは、月曜〜金曜(祝祭日を除く)10:00〜18:00。
ファックスでは、24時間お問い合わせの受付をして居ります。回答は、翌営業日
以降となる場合があります。営業日:月曜〜金曜(祝祭日を除く)
これらのサービスは日本国内に限らせて頂きます
ご購入店
ご使用
プロポ
フリガナ
店名
メーカー名 商品名
ご氏名
ご自宅
住所
平日の昼間に
可能な連絡先
ご自宅の
連絡先
ご購入
年月日
ご使用の
エンジン
受付No.(京商記入欄)
都道府県
( )電話
都道
府県
性別
生年月日 大正 / 昭和 / 平成
男 / 女
電話     (     )
電話     (     )
R/C歴
品番 商品名
ファックス
     (     )
ファックス
     (     )
〒___−____
京商にお問い合わせの際は、「京商ユーザー相談室」にご連絡ください。
お問い合わせの際は、お手元に商品や組立/取扱説明書をご用意のうえ、組立/取扱説明書のページ数, 行程番号, 部品番
号(キーNo.)を用いるなど、なるべく具体的にお知らせください。
お問い合わせ用紙は、フ ァ ッ ク ス または郵便でお送りください。回答方法は、京商で検討のうえ考慮させて頂きます。
郵送の場合は、お問い合わせ用紙のコピーを保管してください。
キリトリ線
The service mentioned below is available only for Japanese market.
No.11211 KYOSHO トレーナー 40 カルマート

Other Kyosho Toy manuals

Kyosho AIRIUM SPITFIRE MK.V VE29 User manual

Kyosho

Kyosho AIRIUM SPITFIRE MK.V VE29 User manual

Kyosho FMR 21V User manual

Kyosho

Kyosho FMR 21V User manual

Kyosho LOCKHEED MARTIN F-16 FIGHTING FALCON User manual

Kyosho

Kyosho LOCKHEED MARTIN F-16 FIGHTING FALCON User manual

Kyosho Sunstorm 600 User manual

Kyosho

Kyosho Sunstorm 600 User manual

Kyosho SPITFIRE Mk.V GP 50 User manual

Kyosho

Kyosho SPITFIRE Mk.V GP 50 User manual

Kyosho P-51D Mustang 40 User manual

Kyosho

Kyosho P-51D Mustang 40 User manual

Kyosho Triumph 4301 User manual

Kyosho

Kyosho Triumph 4301 User manual

Kyosho VE Mad Force kruiser User manual

Kyosho

Kyosho VE Mad Force kruiser User manual

Kyosho autokite xp User manual

Kyosho

Kyosho autokite xp User manual

Kyosho Backyard Flyer Series User manual

Kyosho

Kyosho Backyard Flyer Series User manual

Kyosho Tiger Moth 40 User manual

Kyosho

Kyosho Tiger Moth 40 User manual

Kyosho Airum Curtiss P-40 Warhave VE29 PIP User manual

Kyosho

Kyosho Airum Curtiss P-40 Warhave VE29 PIP User manual

Kyosho EP Caliber M24 User manual

Kyosho

Kyosho EP Caliber M24 User manual

Kyosho Sonic Sports 1300 User manual

Kyosho

Kyosho Sonic Sports 1300 User manual

Kyosho Messerschmitt Bf109E 40 User manual

Kyosho

Kyosho Messerschmitt Bf109E 40 User manual

Kyosho F-16 THUNDERBIRDS User manual

Kyosho

Kyosho F-16 THUNDERBIRDS User manual

Kyosho INFERNO NEO 3.0 User manual

Kyosho

Kyosho INFERNO NEO 3.0 User manual

Kyosho spree sports m36 User manual

Kyosho

Kyosho spree sports m36 User manual

Kyosho Kaliber 90 User manual

Kyosho

Kyosho Kaliber 90 User manual

Kyosho EP Piper J-3 Cub M24 User manual

Kyosho

Kyosho EP Piper J-3 Cub M24 User manual

Kyosho Mitsubishi LANCER Evolution VII WRC Body... User manual

Kyosho

Kyosho Mitsubishi LANCER Evolution VII WRC Body... User manual

Kyosho Macchi M33 50 User manual

Kyosho

Kyosho Macchi M33 50 User manual

Kyosho GP AIR STREAK 500 readyset User manual

Kyosho

Kyosho GP AIR STREAK 500 readyset User manual

Kyosho VIPER User manual

Kyosho

Kyosho VIPER User manual

Popular Toy manuals by other brands

Pichler JOKER C7115 instruction manual

Pichler

Pichler JOKER C7115 instruction manual

Eduard Brassin 648 417 manual

Eduard

Eduard Brassin 648 417 manual

Maxford USA Mentor-G V5 ARF instruction manual

Maxford USA

Maxford USA Mentor-G V5 ARF instruction manual

Eduard Gato class floor plates 1/72 quick start guide

Eduard

Eduard Gato class floor plates 1/72 quick start guide

REVELL Fokker Dr. I Manfred von Richthofen Assembly manual

REVELL

REVELL Fokker Dr. I Manfred von Richthofen Assembly manual

Tower Hobbies TOWA2200 instruction manual

Tower Hobbies

Tower Hobbies TOWA2200 instruction manual

Dynali H3 EASYFLYER SPORT Pilot operating handbook

Dynali

Dynali H3 EASYFLYER SPORT Pilot operating handbook

REVELL Eurofighter TYPHOON Twin seater Assembly manual

REVELL

REVELL Eurofighter TYPHOON Twin seater Assembly manual

Mega Construx Wonder Builders Pokemon Psyduck manual

Mega Construx

Mega Construx Wonder Builders Pokemon Psyduck manual

VTech Baby Learning Fun Party Set user manual

VTech Baby

VTech Baby Learning Fun Party Set user manual

Kato SDP40F quick start guide

Kato

Kato SDP40F quick start guide

Costway UY10060 manual

Costway

Costway UY10060 manual

Fisher-Price GTK08 instructions

Fisher-Price

Fisher-Price GTK08 instructions

Harbor Freight Tools 62578 Owner's manual & safety instructions

Harbor Freight Tools

Harbor Freight Tools 62578 Owner's manual & safety instructions

B Build-a-ma-Jigs Roadster BX1328 quick start guide

B

B Build-a-ma-Jigs Roadster BX1328 quick start guide

LEGO MINDSTORMS Robots Guide

LEGO

LEGO MINDSTORMS Robots Guide

Fisher-Price Y3623 manual

Fisher-Price

Fisher-Price Y3623 manual

BNF UMX Pitts S-1S instruction manual

BNF

BNF UMX Pitts S-1S instruction manual

manuals.online logo
manuals.online logoBrands
  • About & Mission
  • Contact us
  • Privacy Policy
  • Terms and Conditions

Copyright 2025 Manuals.Online. All Rights Reserved.