manuals.online logo
Brands
  1. Home
  2. •
  3. Brands
  4. •
  5. Kyosho
  6. •
  7. Toy
  8. •
  9. Kyosho spree sports 10 gp User manual

Kyosho spree sports 10 gp User manual

R
※製品改良のため、予告なく仕様を変更する場合があります。
目 次
安全のための注意事項
/禁無断転載複製
※ご使用前にこの説明書を良くお読みになり十分に理解してください。
組立/取扱説明書
●組立て前の注意
●キットの他にそろえる物・組立に必要な工具
●キットに入っているもの
●プロポの準備
●本体の組立て
●分解図
●スペアパーツ
●
取扱いの注意
・不要になったニカドバッテリーは、貴重な資源を守るために廃棄しないでリサイクル協力店へお持ちください。
●この商品は高い性能を発揮するように設計されていますので組立 
 てに不慣れな方は、模型を良く知っている人にアドバイスを受け
 確実に組立ててください。
●組立て作業は、幼児の手のとどかない所で必ず行ってください。
●動かして楽しむ場所は万一の事故を考えて、安全を確認してから
 責任をもってお楽しみください。
●組立てた後も説明書がいつでも見られるように大切に保管してく
 ださい。
この無線操縦模型は玩具ではありません!
2
2~3
3
4
5~16
17
18
19
エンジンプレーン
中・上級者向
Before beginning assembly, please read these instructions thoroughly!
WINGSPAN : 1200mm (47.2")
INSTRUCTION MANUAL
INDEX
BEFORE YOU BEGIN
REQUIRED FOR OPERATION・TOOLS REQUIRED
INCLUDED PARTS
RADIO PREPARATION
ASSEMBLY
EXPLODED VIEW
SPARE PARTS
OPERATING YOUR MODEL SAFELY
This radio control model is not a toy!
●First-time builders should seek the advice of experienced modellers
 before beginning assembly and if they do not fully understand
 any part of the construction.
●Assemble this kit only in places out of childrenÕs reach!
●Take care before operating this model.
 You are responsible for this modelÕs assembly and safe operation!
●Always keep this instruction manual ready at hand for quick
 reference, even after completing the assembly.
・The product you have purchased is powered by a rechargeable battery. The battery is recyclable. At the end of its useful life, under
various national / state and local laws, it may be illegal to dispose of this battery into the municipal waste stream. Check with your local
 solid waste officials for details in your area for recycling options or proper disposal. 
UNDER SAFETY PRECAUTIONS
2004 KYOSHO CORPORATION
*SPECIFICATIONS ARE SUBJECT TO BE CHANGED WITHOUT NOTICE. No.11152
GP
VERSION
For Intermediate
and
Advanced Flyers
AAAA
AAAA
Glow Fuel
model engine fuel
組立て前の注意
◆組立てる前に説明書を良く読んで、おおよその構造を理解してから組立てに入ってください。
◆
キットの内容をお確かめください。万一不良、不足がありましたら、お買い求めの販売店にご相談いただくか、当社「ユーザー相談室」までご連絡ください。
●
●
●
●
●
●
無線操縦飛行機が初めてという方は、調整等を経験者のアドバイスを受けながら確実に行ってください。中途半端な組上がり
の機体を飛ばすのは大変危険です。
無線操縦飛行機が初めてという方には、単独飛行はできませんので、必ず経験者の指導を受けてください。
この機体は、2サイクルの.10〜.15エンジン用に設計されていますのでこれ以上のエンジンを使用し、過激な飛行をおこなうと
破損するだけでなく、大変危険ですので絶対におやめください。
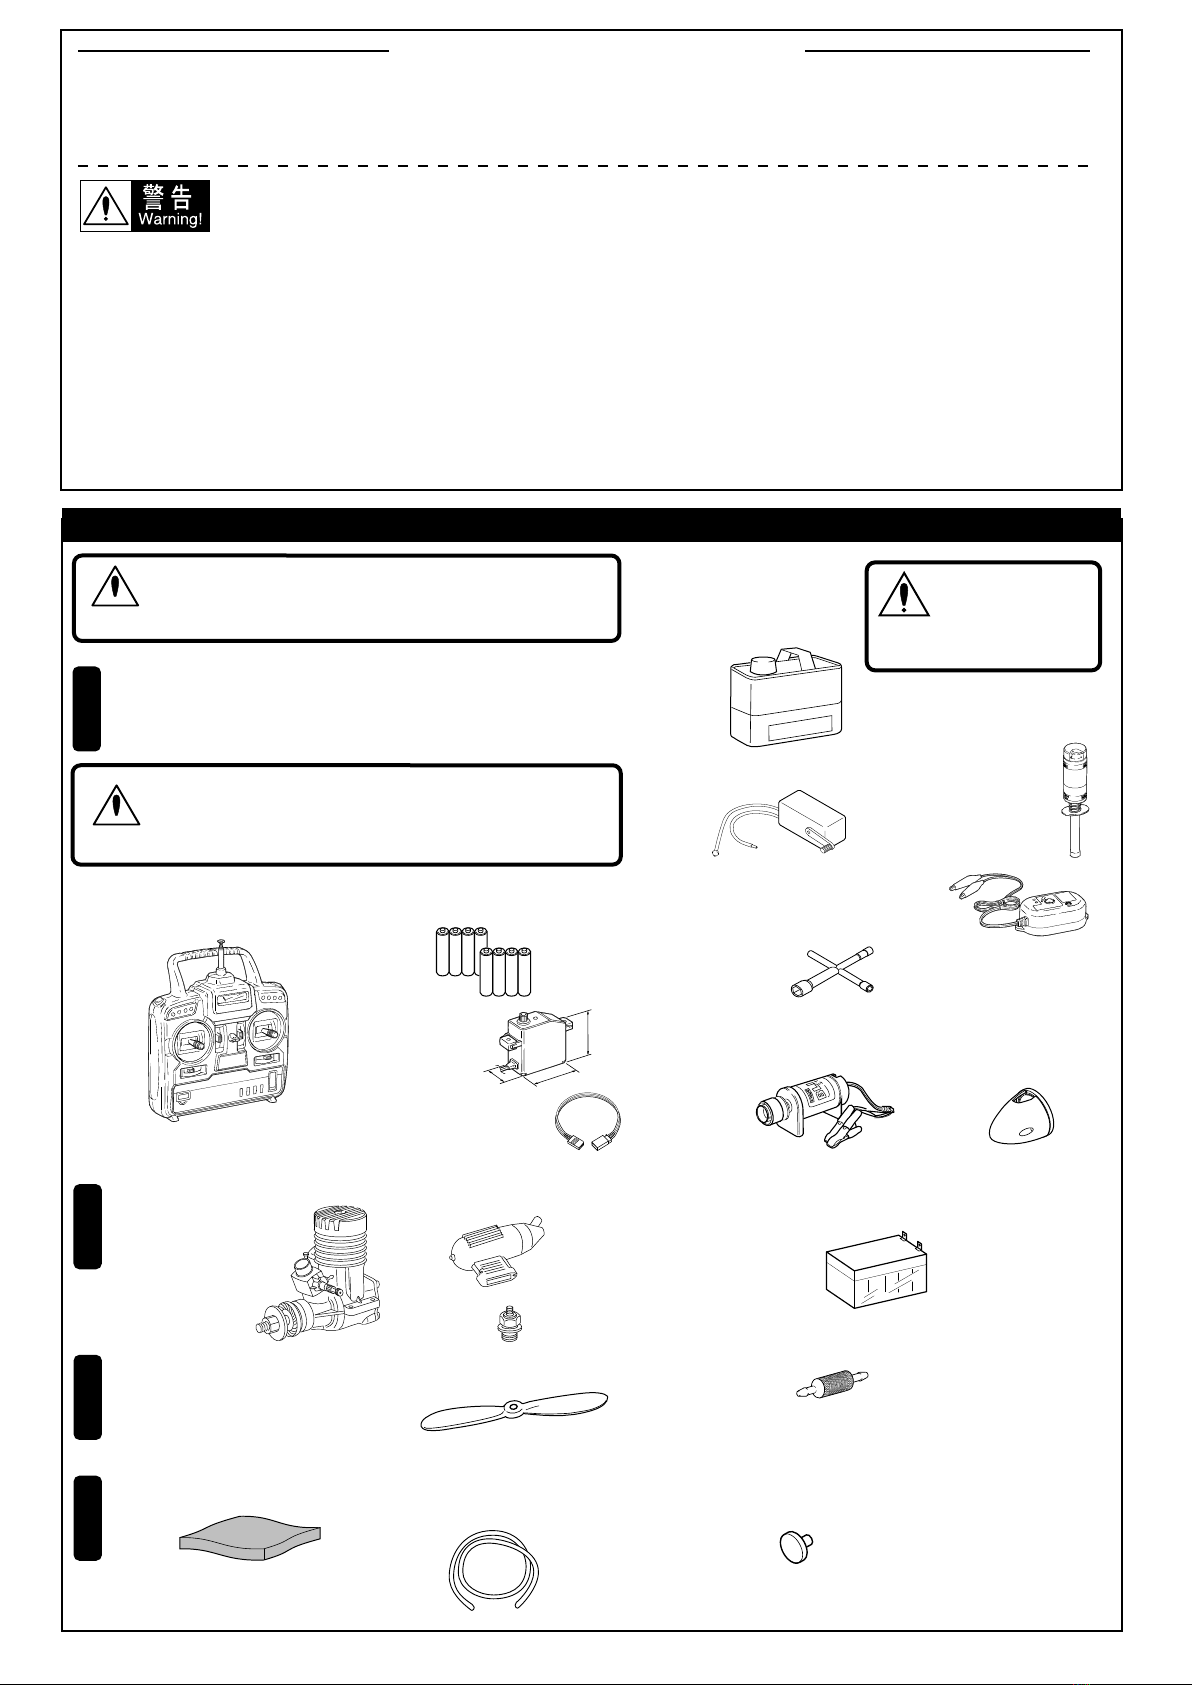
キットの他にそろえる物
4チャンネル以上の飛行機用無線操縦機(プロポ)セット
(マイクロサーボ x4)と乾電池。
注意
警告
■
飛行機用4チャンネル以上のプロポ
■単3乾電池 x 8本(送信機用)
■
マイクロサーボ
■エルロンサーボ用
 延長コード(100mm)
プロポの取扱いは、プロポに付属の説明書を参考にしてください。
スパークブースター
シールドバッテリー
■プラグヒーター/充電器
■
エンジン始動用
 スターター
■スターター用12Vバッテリー
■グロー燃料
エフチャージャーEPポンプ
エフチャージャーHPポンプ
■燃料ポンプ
さらに用意すると良いもの
ガソリンや灯油は
使用禁止
警告
■燃料フィルター
エンジン及びマフラー
■飛行機用エンジン
■マフラー
燃料、始動用具
空用(飛行機用)のプロポセット(4チャンネル以上)を必
ず使用してください。(空用以外使用禁止)
■プラグ
プロペラ及びスピンナーナット
2サイクル .10〜.15
■プロペラ
■シリコンチューブ
■スポンジシート
■スピンナー
■フュールチューブストッパー
■プラグレンチ
*ご使用になるエンジンに合った
 サイズをお買い求めください。
(約300mm)
下記商品のメーカー、サイズ等は、販売店とご相談ください。
●
●
●
●
●
●
●●
 
DC急速充電器
2
 Read through the manual before you begin, so you will have an overall idea of what to do.
BEFORE YOU BEGIN
 Check all parts. If you find any defective or missing parts, contact your local dealer or our Kyosho Distributor.
First-time fliers should seek advice on pre-flight adjustments and assembly from experienced fliers. Remember that
flying a badly assembled or badly adjusted aircraft is very dangerous!
In the beginning, novice fliers should always be assisted by an experienced flier and should never fly alone!
This model aircraft is designed to be powered by 2cycle .10-.15.engine. Installing more powerful engine or flying this model
aggressivelymay lead to serious damage and accidents!
REQUIRED FOR OPERATION
CAUTION
:
For details concerning the equipment listed below
(size, maker, etc.), check with your hobby shop.
2
3
4
5
6
1
A Minimum 4 channel radio for
aircraft
(with 4 micro servos),
and AA-size batteries.
CAUTION
:
Only use a minimum 4 channel transmitter, configured
for aircraft!
(No other radio may be used!)
A minimum 4 channel transmitter,
configured for aircraft.
AA-size Batteries (For Transmitter)
Micro Servo
1 x Extension Lead (Aileron)
For proper radio operation, refer to its manual.
11~13mm 26~28mm
26~30mm
Engine and Muffler
Model Aircraft Engine
2-stroke .10~.15
Muffler
Glow Plug
Propeller
Fuel line
Propeller and Spinner Nut
Purchase a propeller that will match your engine.
Sponge Sheet
(approx.300mm)
Plug Heater / Charger
Glow Fuel
Fuel Pump
WARNING: Gasoline
or kerosene cannot
be used!
Required for engine starting
No. 80702
No. 80701
F-Charger EP pump
F-Charger HP pump
Plug Wrench
Spinner
Sealed Battery
Engine
Starter
12V Battery
Useful Additional Equipment
Fuel Filter
No. 71481
No. 39308
No. 92213 No. 91490
Fuel Tube Stopper
No.695144
 
Spark Booster
No.695142
 
DC Quick Charger
Screw / Nut
ビス・ナット類
Epoxy A
Epoxy B
キットに入っているもの
■ +ドライバー(大、中、小)
■カッターナイフ
■セロハンテープ
■瞬間接着剤(低粘度)
■アイロン
(ハンディタイプ)
用意する工具・その他
■ハサミ
■キリ
■ニッパー
■ドリル
■エポキシ接着剤
使用する工具の取扱いには、十分
注意してください。
注意
組立に必要なもの
胴体
主翼
水平尾翼
エレベーター(左)
エルロン(左) エルロン(右)
エレベーター(右)
ラダー
垂直尾翼
キャノピー
エルロンロッド(2個) エルロンホーン
チップ(2個)
グラスヒンジ
(15個)
燃料タンク120cc エンジンマウント
エルロン
サーボベッド
主翼補強板
エレベーター
ジョイント
カンザシ
デカール
タイヤ(2個)
キャノピー
デカール
ロッドアジャスター
ジョイント(2個)
ロッドアジャスター
(2個)
メインギヤストッパー
(2個)
ホーン(2個)
タイヤストッパー
(4個)
ロッドキーパー(2個)
エンコンロッド エンコンリンケージストッパー
PPパイプ
(左) (右)
主翼
エレベーターロッド
ラダーロッド
カウリング メインギヤ(2個)
3
KIT CONTENTS
Phillips Screwdriver (L.M.S)
Sharp Hobby Knife
REQUIRED
Scissors Cellophane Tape
CA glue , Instant glue
Iron
Awl
Wire Cutters
Drill
Epoxy glue
CAUTION: Handle tools carefully!
REQUIRED FOR OPERATION
Main Landing Gear(2pcs)
Fuselage
Main Wing
Horizontal Tail
Elevator(L)
Aileron(L) Aileron(R)
Elevator(R)
Rudder
Vertical Tail
Canopy
Aileron Rod(2pcs) Horn chip(2pcs)
Hinge(15pcs) Fuel Tank Engine Mount
Aileron Servo Mount Main Wing Support
Elevator Joinner
Wing joint
Decal
Tire(2pcs)
Canopy Decal
Rod Adjuster Joint
(2pcs)
Rod Adjuster
(2pcs) Rod Adjuster(2pcs)
Horn(2pcs)
Tire Stopper
(4pcs)
Rod Keeper
(2pcs)
Throttle Rod Throttle Linkage stopper
PP Pipe
(L) (R)
Main Wing
Elevator Rod
Rudder Rod
Cowling
1.5mm
x2
プロポの準備
説明書に使われているマーク
●重要な注意事項が
 あるマークです。
 
必ずお読みください。
注意して組立てる所。
別購入品
2セット組立てる(例)。
可動するように組立てる。
    をカットする。
瞬間接着剤で接着する。
左右同じように組立てる。
番号の順に組立てる。
余分をカットする。
エポキシ接着剤で接着
する。
キリで穴をあける
(例1.5㎜)
あて布
低温
完成機に張ってあるフィルムは、温度や湿度など気候条件が工
場組立
の時から変化すると、多少タルミが出ることがあります。
飛行には、
さしつかえありませんが、アイロンをあててタルミをとってください。
また、フィルムの重ね目に低粘度瞬間接着剤を流すとはがれにくくな
ります。
あて布をしたアイロンを低温であて、
必要に応じて温度を上げてゆく。
温度を上げすぎるとフイルムが溶ける
ので注意する
送信機
▲バッテリー
受信機
▼サーボ
キットの組立てに入る前に、ニカドバッテリーを充電器の説明にしたがって充電しておきます。
プロポを下の順序にしたがってセットします。
ニカドをつなぐ。
アンテナをのばす。(送信機)
トリムレバーを中央にセットする。
スイッチを入れる。(送信機)
スイッチを入れる。(受信機)
スティックを動かしてサーボが動くか確認する。
スイッチを切る。(受信機)
スイッチを切る。(送信機)
アンテナを縮める。(送信機)
単3乾電池をセットする。(送信機)
●始める時
●終わる時
アンテナをのばす。(受信機)
▲
▲
シリコンシール剤を充てんする。
4
RADIO PREPARATION
Symbols used throughout the instruction manual, comprise:
 Do not overlook
 this symbol!
Cut off shaded portion.
Apply instant glue
(CA glue, super glue).
Assemble left and right
sides the same way.
Assemble in the
specified order.
Cut off excess.
Apply epoxy glue.
Make hole with Awl. (example: 2mm).
Pay close attention here!
Must be purchased separately!
Assemble as many times
as specified.
Ensure smooth non-binding
movement while assembling.
with cover (cloth) low setting
The film covering may loosen slightly from heat and humidity after
leaving the factory where it was assembled. This doesn't affect flight
however; ironing can restore the film tension. Also, applying low
viscosity glue along the seams will prevent lifting.
Use an iron covered with a cloth!
Start at low setting. Increase the set-ting
if necessary. If it is too high, you
may damage the film.
1A new Ni-Cd battery must charge before use. Refer to the charger instruction manual for charging.
Set up the radio as explained below.
2
Connect the Ni-Cd battery.
1
Extend the antenna. (Transmitter)
2
3
4
Center the trims.
5
Switch on. (Transmitter)
6
Switch on. (Receiver)
7
Make sure the servos are in command.
8
Switch off. (Receiver)
9
Switch off. (Transmitter)
10
Retract the antenna. (Transmitter)
11
Install AA-size batteries. (Transmitter)
¥START
¥FINISH
Extend the antenna. (Receiver)
2
ON
OFF
11
Transmitter
Battery
Receiver
Servo
3
4
79
8
5
10
6
1
1
2
3
4
5
6
7
8
9
10
11
Fill in with Silicon Sealant.
1.5mm
Warning!
1.5mm
1.5mm
注意して組立てる所。
別購入品
    をカットする。
瞬間接着剤で接着する。
左右同じように組立てる。 エポキシ接着剤で接着
する。
キリで穴をあける
(例1.5㎜)
主翼
主翼
主翼
平らな台に置き、ねじれない様にピッタリ合わせる。
約62mm
フィルムのみカットする。
サーボのコードを通すための切り込みを入れる。
フィルムのみカットする。
●
重要な注意事項があるマークです。
 
必ずお読みください。
確実に取付ける。
飛行中にはずれると操縦不能に
なり事故につながります。
サーボに付属
サーボに付属
エルロンサーボ
サーボの大きさに合わせてカット。
Ensure smooth non-binding
movement while assembling.
Must be purchased
separately!
Cut off shaded portion.
Apply instant glue
(CA glue, super glue).
Assemble left and right
sides the same way. Apply epoxy glue. Make hole with Awl.
(example: 1.5mm).
Pay close attention here!
Main Wing
Main Wing
Main Wing
1
2
3
Align wings exactly on a flat bench top.
Cut the film only.
Cut for Servo Lead.
Cut the film only.
Approx
62mm
Don't overlook this symbol!
Fix wing securely to fuselage. Loss of wing will
result in no control and crashes.
Included with Servo
Included with Servo
Aileron Servo
Cut to match the Servo.
5
低粘度瞬間接着剤がヒンジにし
みこむ様にして確実に接着する。
Install the hinges completely
before applying instant glue.
可動するように組立てる。
6
2mm
x2
3.1mm
x2
別購入品
キリで穴をあける(例2㎜)
主翼
主翼
主翼
2セット組立てる(例)。
サーボに付属
アジャスター
サーボに付属
フィルムのみカットする。
主翼補強板
フィルムのみカットする。
フィルムのみカットする。
穴をガイドにドリルで主翼補強板を貫通させる。
で取付けた主翼補強板。
の主翼裏面。
エポキシ接着剤で接着
する。     をカットする。
ホーンは主翼に対して平行になるように。
ニュートラル調整
1の場合アジャスターを回して
伸ばす。
2の場合アジャスターを回して
縮める。
Must be purchased separately!
Make hole with Awl.
(example: 2mm).
6
5
4
Assemble as many times
as specified.
Main Wing
Main Wing
Main Wing
Included with Servo
Adjuster
Included with
Servo
Cut the film only.
Main Wing Support
Cut the film only.
Cut the film only.
Main Wing Suppot
Drill holes
The other side.
10mm
10mm
12mm
Apply epoxy glue. Cut off shaded portion.
Place servo horn neutral to adjust.
Adjust to plain.
Adjust to plain.
Horn should be parallel to main wing.
1
2
5
4
1.5mm
1mm
1mm
    をカットする。 左右同じように組立てる。
キリで穴をあける
(例1.5㎜)
燃料タンク
向きを確認してしめ込む。
マフラープレッシャーへ
マフラープレッシャーへ
キャブレターへ
キャブレターへ
燃料給油口
燃料給油口
シリコンチューブ
ビス
完成図を参考に曲げる。
<完成図>
シリコンチューブ
別購入品。
メインギヤ
フィルムのみカット
する。
ストッパー
セットビス
ストッパー
TPビス
Cut off shaded portion. Assemble left and right
sides the same way.
Make hole with Awl.
(example: 1.5mm).
Fuel Tank
8
7
After confirming the posi-tion of the
fuel tank's internal parts(see front
view), insert and tighten the screw.
3x25mm
Muffler Pressure
Muffler Pressure
Silicon Tube
Carburetor
Carburetor
Fuel Supply
Fuel Supply
12mm
3x25mm
5mm
1
3 x 25mm
Screw
Bend as shown here.
< >
Silicone Tube
Reference
Must be purchased
separately!
7Main Gear
Cut the film only.
4
3 x 3mm
Set Screw
4
3mm
Stopper
4
2 x 10mm
TP Screw
2 x 10mm
2 x 10mm
3 x 3mm
Stopper
1.5mm
4.5mm
2.5mm
3.1mm
3.1mm
4.5mm
左右同じように組立てる。
余分をカットする。 エポキシ接着剤で接着
する。
キリで穴をあける
(例1.5㎜)
別購入品
エンジンマウント
ビス
マウントナット
エンジンのクランク
シャフトと機体の横
のシャフトラインを
合わせる。
PPパイプ
横から見た図
エンコンロッド
エンジンマウント
ビス
スプリングワッシャー スプリング
ワッシャー
スプリング
ワッシャー
ワッシャー
ナット
エンジンマウントマーク(黒いライン)と
機体のマークを合わせる。
PPパイプ
エンコンロッド
マークを合わせる。
エンジン
マウント
Assemble left and right
sides the same way.
Cut off excess. Apply epoxy glue.
Make hole with Awl.
(example: 1.5mm).
10
8
Must be purchased separately!
Engine Mount
3mm
3mm
4
4
3 x 16mm
Screw
3mm
Mount Nut
3 x 16mm 3 x 16mm
PP Pipe
Side View
Throttle Rod
Engine Mount
9
4
4
4
4
25mm
77mm
3 x 20mm
Screw
3 x 20mm
3 x 20mm
3mm
3mm
3mm
3mm
3mm
Spring Washer
3mm
Spring Washer
3mm
Spring Washer
3mm
Washer
3mm
Nut
Align the mark on both mounts
with the mark on the fuselage.
Align the crankshaft of
the engine with the side
line.
10mm
PP Pipe
Throttle Rod
Align both marks.
Engine
Mount
A2
A
A2
1.5mm
シリコンシール剤で固定する。
Fix tank with silicon glue.
1mm
左右同じように組立てる。
余分をカットする。 エポキシ接着剤で接着
する。
キリで穴をあける
(例1.5㎜)
別購入品
マフラーへ
給油パイプ
キャブレターへ
カウリング
カウリング
エンジンとマフラーをとりつけ、
形に合わせカットする。
1mmの穴をあける。
いったんカウリングを外して、
下穴に瞬間接着剤をつける。
ビスで固定する。
TPビス
で組立てた燃料タンク。
シリコンシール剤を充てんする。
Assemble left and right
sides the same way.
Cut off excess. Apply epoxy glue.
Make hole with Awl.
(example: 1.5mm).
9
Must be purchased separately!
11
Fuel Tank
To Muffler
To Fuel Tank
To Carburetor
12
3 4
Cut to match your engine.
Drill 1mm hole.
Remove Cowling and apply Epoxy glue.
Fix with screw.
1~2mm
2 x 8mm
4
2 x 8mm
TP Screw
Cowling
12
Cowling
8
Fill in with Silicon Sealant.
別購入品 左右同じように組立てる。
可動するように組立てる。
注意して組立てる所。
胴体
胴体
主翼
ワッシャー
ビス
フィルムのみ。
不要
PPパイプの内径に合わせて、
フィルムをカット。
    をカットする。
Must be purchased separately! Assemble left and right
sides the same way.
Ensure smooth non-binding
movement while assembling.
Pay close attention here!
2
3mm
Washer
2
3 x 20mm
Screw
3 x 20mm
3mm
Cut the film only.
No need.
Cut the film to the inner
rim diameter of the PP pipe.
13
14
15
Fuselage
Fuselage
Main Wing
Cut off shaded portion.
10
1.5mm
B=B' 90°
90°90°
B B'
2mm
注意して組立てる所。
可動するように組立てる。
    をカットする。
瞬間接着剤で接着する。
左右同じように組立てる。 エポキシ接着剤で接着
する。
キリで穴をあける
(例1.5㎜)
尾翼
水平尾翼
垂直尾翼 フィルムのみ(左右)
下のバルサを切らな
いように注意。
フィルムのみ(上下)。下のバルサを切らないように注意。
低粘度瞬間接着剤がヒンジにし
みこむ様にして確実に接着する。
低粘度瞬間接着剤が
ヒンジにしみこむ様
にして確実に接着
する。
Cut off shaded portion.
Apply instant glue
(CA glue, super glue).
Assemble left and right
sides the same way. Apply epoxy glue. Make hole with Awl.
(example: 1.5mm).
Pay close attention here!
Tail
Horizontal Tail
Vertical Tail
Film only (right & left).
Do not cut balsa.
Film only (top & bottom). Do not cut balsa.
Install the hinges completely
before applying instant glue.
Install the hinges
completely before
applying instant
glue.
13
14
15
11
A=A'
90°
A A'
Ensure smooth non-binding
movement while assembling.
1.5mm
2mm
2mm
1.5mm
注意して組立てる所。
キリで穴をあける
(例1.5㎜)
別購入品。
リンケージ
TPビス
エレベーターホーンの取付位置
エレベーター
ラダー
サーボの大きさに
合わせてカットす
る。
ラダーホーンの取付位置
サーボ
ラダーサーボ
で受信機に接続。
エレベーターサーボ
主翼を外す。
スロットル
サーボ
燃料タンク
で取り付けたエンコンロッドとPPパイプ。
Make hole with Awl.
(example: 2mm).
Pay close attention here!
19
12
Must be purchased
separately!
2 x 10mm 2 x 10mm
Linkage
20
4
2 x 10mm
TP Screw
Location of Elevator Hones.
Location of Rudder Hones.
Elevator
Rudder
Throttle
Servo
Fuel Tank
Throttle Rod and PP pipe.
Cut to match your
servos.
24mm
11mm
Rudder Servo
Remove main wing
Connect to receiver.
Elevator Servo
Servo
23
11
1.5mm
11
Warning!
x2
2mm
2mm
x2
    をカットする。 余分をカットする。
キリで穴をあける
(例1.5㎜)
●
重要な注意事項があるマークです。
 
必ずお読みください。
別購入品。
2セット組立てる(例)。
サーボ
リンケージ
エレベーターロッド
ラダーロッド
確実にハンダする。
飛行中にはずれると操縦不能になり
事故につながります。
ハンダ
  のリンケージ調整でニュートラルにしたあと、
長さを合わせてロッドをカットする。
21
約10mm
約12mm
サーボ付属
サーボ付属
サーボ付属
ワッシャー
リンケージガイド
ナット
セットビス
90°
90°
で取り付けた
エンコンロッド。
この穴を使用。
この穴を使用。
Cut off shaded portion. Cut off excess.
Make hole with Awl.
(example: 2mm).
21
Don't overlook this symbol!
13
3 x 3mm
Must be purchased
separately!
Assemble as many times
as specified.
Servo
22
Elevator Rod
Rudder Rod
Place neutral position and cut.
Linkage
Solder
Make sure to solder securely. If not
properly solderd, a faliure in flight
may occur.
approx. 10mm
approx. 12mm
Supplied with
the servo.
Supplied with
the servo.
Supplied with
the servo.
2mm
Washer
Linkage Guide
2mm
Nut
3 x 3mm
Set Screw
1
1
1
1
Throttle Rod
Use this hole.
Use this hole.
1.5mm
2mm
2mm
注意して組立てる所。
    をカットする。
キリで穴をあける
(例1.5㎜)
スイッチ付属のプレート。
スイッチ
●
重要な注意事項があるマークです。
 
必ずお読みください。
別購入品。
受信機
バッテリー
スイッチ付属のビス。
ゴムバンド等で止める。
プロポの説明書を参考に、コネク
ターを接続する。
受信機
受信機
カットします。
バッテリー
バッテリー
受信機のアンテナコードは胴体の外に必ず出す。
(切ったり、伸ばさないで使用すると、操縦不能になり事故につながります。)
アンテナコードは、 の様に胴体の外に出す。
マジックファスナー
スポンジ 確実に取り付ける。飛行中にはずれると
操縦不能になり事故につながります。
キャノピー
銀色のデカールを8㎜幅に
カットして貼る。
エルロン用
延長コード
Cut off shaded portion. Make hole with Awl.
(example: 2mm).
Pay close attention here!
Included with the switch.
Secure foam padding with rubber
bands or tape as required.
Included with the switch.
switch.
23
Don't overlook this symbol!
14
Must be purchased
separately!
Receiver
24
Battery
Receiver
Receiver
Cut.
Battery
Battery
Connect as per radio instruction
manual.
Antenna Lead comes out.
Velcro fastner
Leave Antenna Cord outside. If it is in the fuselage or cut, you may lose control of your airplane.
Foam Pad
Securely glue together. If it comes off
during flights, you may lose control of
your airplane, resulting in an accident !
Canopy
25
8mm
Cut silver decal sheet as
per 6, then apply.
26
Extension cord
for Aileron
1.5mm
ワッシャー
ビス
1mm
1mm
1mm
Warning!
Warning!
キリで穴をあける
(例1.5㎜)
キャノピー
TPビス
アンテナを出し、胴体にテープで止める。
プロペラ
主翼
エンジン回転中に、プロペラが、はず
れないように、確実にビスをしめる。
回転中にはずれるとケガのおそれがあ
ります。
●
重要な注意事項があるマークです。
 
必ずお読みください。
受信機へ。
確実に取付ける。
飛行中にはずれると操縦不能に
なり事故につながります。
別購入品。
Make hole with Awl.
(example: 2mm).
15
Canopy
26
2 x 10mm
     TP Screw
2 x 10mm
2 x 10mm
Drill a hole for Antenna. Use Tape to attach.
3
Propeller
27
Main Wing
28
Securely tighten the screw holding the
propeller so it doesn't come off when
the engine is spinning.
If com-ing off, there is a high risk of injury!
Don't overlook this symbol!
To Receiver.
3mm
Washer
3 x 20mm
Screw
3 x 20mm
3mm
2
2
Fix wing securely to fuselage.
Loss of wing will result in no control
and crashes.
Must be purchased
separately!
Warning!
●
重要な注意事項があるマークです。
 
必ずお読みください。
デカール
重心位置
上図の位置に重心が来るようにバッテリーを前後に
移動して重心位置を合わせる。
測定位置 測定位置
測定位置
重心位置
図の位置にデカールを貼る。
No.デカールは好きな数字に
カットする。
プロポの動作の確認
スティックと各舵の動作があっていない時
は送信機のリバーススイッチで調整する。
<エレベター><ラダー>
<エルロン>
重心のチェックをする前に飛行は、おこなわない。
重心位置が正しくないと操縦不能になり事故につながります。
注意して組立てる所。
29
30
31
Don't overlook this symbol!
16
8mm
Check radio system
If tail fin moving direction is not correct,
shift the reverse switch on transmitter.
<Elevator> <Rudder>
<Aileron>
6mm
6mm
8mm
20mm20mm
C of G position
Position for left diagram. Position for
left diagram.
Position for left diagram.
If necessary, re-position battery to get correct C of G.
6065mm CG
Do not fly before confirming the correct location of the CG.
If the CG is incorrect, you lose control of your airplane which leads to accidents!
Decal
Apply the decal.
Cut the number
as you like.
Pay close attention here!
分解図 EXPLODED VIEW
17
1
2
3
4
5
5
5
5
5
5
5
5
5
5
5
5
5
5
5
6
7
8
9
10
11
12
23
24
25
26
27
28
29
30 31
34
35
36
38
38
38
38
43
39
40
41
42
33
32
スペアパーツ
オプションパーツ
品番 パーツ名 内容
★発送
手数料
★定価
(税込)
210
一律
(税込)
カウリング
尾翼セット
エンジンマウント X(20用)
キャノピー(M36/10共通)
メインギヤセット(M36/10共通)
デカール(M36/10共通)
リンケージセット(M36/10共通)
胴体
主翼セット
品番 パーツ名
★発送
手数料
★定価
(税込)
210
一律
(税込)
エフチャージャーEPポンプ
エフチャージャーHPポンプ
バッテリーチェッカーR(4.8/6V)
ナイロンプロペラ D7xP4
ナイロンプロペラ D7xP5
ナイロンプロペラ D7xP6
ナイロンプロペラ D8xP4
ナイロンプロペラ D8xP5
ナイロンスピンナー 45mm白
ナイロンスピンナー 45mm赤
ナイロンスピンナー 45mm黄
品番 パーツ名
★発送
手数料
★定価
(税込)
210
一律
(税込)
ジェラルミンスピンナー 45mm
燃料タンク100cc標準型
スポンジタイヤ45Φ(2個入)
マジックテープ
フュールチューブストッパー
燃料チューブ(2.4x6x1000mm)
アルミツールボックス
マルチフィールドBOX
品番 パーツ名 内容
★発送
手数料
★定価
(税込)
210
一律
(税込)
パ−ツの価格に消費税が含まれております。また、定価、発送手数料、消
費税は平成 16年 7 月 1 日現在のもので、法規改正、運賃改定、諸事情
などにともない変更になりますのでご了承ください。
18
SPARE PARTS
OPTIONAL PARTS
No. Part Names
Description
11152-01
11152-11
Cowling 11152-13 Tail Wing Set
90882-20 Engine Mount X(for .20 engine)
10142-02 Canopy
23
x 1 2100
4200
840
9450
6930
525
40 41
x 1
10142-03 Main Gear Set
630
10142-04 Decal
10142-06 Linkage Set
11152-12 Fuselage
Main Wing Set
525
525
36
x 2
38
x 4
39
42
x 1
x 1
9
10 11
25 34
x 2
35
12
1 2 3 4
5
8
6 7
x 6
x 2
24
x 1
No. Part Names
80701 Fuel Pump (Electric 12V)
Fuel Pump (Manual)
Battery Checker R (4.8/6V)
Nylon Propeller D7xP4
Nylon Propeller D7xP5
Nylon Propeller D7xP6
Nylon Propeller D8xP4
Nylon Propeller D8xP5
Nylon Spinner 45mm(White)
2310
80702
2100
80901
3675
90407-04
368
90407-05
368
90407-06
368
90408-04
399
90408-05
399
90420-45
945
Nylon Spinner 45mm(Red)
90421-45
945
Nylon Spinner 45mm(Yellow)
90422-45
945
No. Part Names
90426-45 Duralumin Spinner 45mm
Fuel Tank Set (100cc)
Sponge Tire 45Φ(2pcs)
Velcro Fastner
Fuel Tube Stopper
Fuel Tube (2.4x6x1000mm)
3990
90431-10
630
90845-45
683
90945
525
91490
210
92213
735
R/C Field Box
80441
7350
Multi Field Box
80451
5250
No. Part Names
Description
5
29 30
26 27 28
31
x 1
x 9
33
x 2
43
x 2
★: FOR JAPANESE MARKET ONLY.
19
飛 行 後飛  行飛 行 前
Before Flying Flying After Flying
京商の無線操縦模型は、高い性能
を発揮するように設計されており
ますので、飛行場所は万一を考え
て充分に安全であることを確認し
てから楽しんでください。
Before flying your airplane, ensure
the airfield is spacious enough.
Always fly it outdoors in safe areas
with no debris or obstacles!
プロポの取扱方は、プロポの説明
書をご覧ください。
  
For proper radio handling, refer to
its explanations.
スピンナー・プロペラのゆるみを
チェック
Ensure the spinner and propeller
are securely installed.
同じバンド(電波帯)の同時飛行
は出来ません。近くで無線操縦模
型を楽しんでいる人がいたらバン
ドを確認してください。
  
If the airplane begins to operate by
itself, somebody else is on your fre-
quency. Do not attempt to operate
it under such condition for you may
lose of control of it.
送信機のアンテナを
最後までのばす。
Fully extend
the antenna
(transmitter).
送信機のスイッチを入れる。
 
Switch on the transmitter.
スティックを動かして各舵が調整
通り動くかチェック。
Move the sticks on your transmitter
to ensure that all controls move
according to your inputs and the
way you adjusted them.
オプションパーツは京商純正パー
ツ以外使用しないでください。
Only use genuine KYOSHO parts.
機体を風上に向けて、手投げ又は
離陸させる。
Hand-launch your airplane into the
wind to make it take off.
強風や、横風での飛行はしない。
Do not fly your airplane on days
with strong winds or side winds.
機体を風上に向けて、着陸させる。
Always land your airplane into the
wind.
〇×
送信機のスイッチを OFF に。
Switch off the transmitter.
汚れを取り、回転部にはグリスを
付ける。
Proper maintenance extends the
life of your airplane.
安 全 上 の 注 意
Cautions for Safety
プロペラが回転中の機体には絶対に
見物の人を近付けないでください。
Do not allow watching people to get too
close to a rotating propeller.
傷ついたプロペラ、変形したスピ
ンナーは使用しないでください。
Disuse defective propellers as well as
deformed spinners.
主翼が正しく取付けられているか確認。
Ensure the main wing is securely
installed.
〇×
受信機のスイッチを入れる。
Switch on the receiver.
受信機のスイッチを OFF に。
Switch off the receiver.
燃料を入れる。
Fill the fuel tank.
スロットルスティックを動かして、
エンジンキャブレターがスムーズ
に開閉するかチェック。
スロットルをスローにしてから、
スターターをスピンナーに押し当
ててエンジンをかける。
For starting the engine, apply low
throttle and hold the engine starter
against the spinner.
ニードルを調整する。
Adjust the needle.
残った燃料を抜き取り缶にもどす。
Draw out the remaining fuel from the
fuel tank and fill it back into the can.
By moving the throttle control stick,
ensure the carburetor opens and
closes without effort.
スロットルトリムを下げてエンジ
ンをストップさせる。
Bring your airplane to a halt by
lowering the throttle trim.
飛行後のエンジンは、高温になっ
ているのでヤケドに注意。
After each flight, the engine is very
hot. Beware of getting burned!
エンジンの調整は必ず後ろから行
なってください。前、横からは大
変危険ですので絶対に行なわない
でください。
Adjust the engine always from behind,
but never from infront or the sides as
a rotating propeller may badly injure
you!
プロポの電池が弱くなったものは、
新しいものと交換してください。
If the dry batteries in the radio are
flat, replace them with fresh ones.
まわりにいる人の上では飛行させ
ないでください。
Do not fly your airplane above people
standing around.
空の燃料缶は火中に投げ入れない
でください、非常に危険です。
Never throw burning, gleaming or
smouldering things into fuel cans,
even if these happen to be empty.
This will result in serious injury!
ON
OFF
ON
ON
OFF
ON
OFF
OFF
40
R
THE FINEST RADIO CONTROL MODELS
京商株式会社
〒243-0034 神奈川県厚木市船子153
●ユ−ザ−相談室直通電話 046-229-4115
お問い合わせは:月曜〜金曜(祝祭日を除く) 10:00〜18:00
PRINTED IN JAPAN61920407-1
メーカー指定の純正部品を使用して
  安全にR/Cを楽しみましょう。
京商ホームページ
http://www.kyosho.co.jp/

Other Kyosho Toy manuals

Kyosho BMW ORACLE USA-76 User manual

Kyosho

Kyosho BMW ORACLE USA-76 User manual

Kyosho sunstorm1000 User manual

Kyosho

Kyosho sunstorm1000 User manual

Kyosho MINI-Z Racer MR-03N HM MINI COOPER S User manual

Kyosho

Kyosho MINI-Z Racer MR-03N HM MINI COOPER S User manual

Kyosho EP Concept SR-K User manual

Kyosho

Kyosho EP Concept SR-K User manual

Kyosho Backyard Flyer Series User manual

Kyosho

Kyosho Backyard Flyer Series User manual

Kyosho F4U CORSAIR 40 User manual

Kyosho

Kyosho F4U CORSAIR 40 User manual

Kyosho Airum Curtiss P-40 Warhave VE29 PIP User manual

Kyosho

Kyosho Airum Curtiss P-40 Warhave VE29 PIP User manual

Kyosho Messerschmitt Bf109E 40 User manual

Kyosho

Kyosho Messerschmitt Bf109E 40 User manual

Kyosho MINIUM CITABRIA User manual

Kyosho

Kyosho MINIUM CITABRIA User manual

Kyosho Caliber 60 User manual

Kyosho

Kyosho Caliber 60 User manual

Kyosho Caliber 60 User manual

Kyosho

Kyosho Caliber 60 User manual

Kyosho MONSTER TRACKER readyset User manual

Kyosho

Kyosho MONSTER TRACKER readyset User manual

Kyosho Calmato TRAINER 40 User manual

Kyosho

Kyosho Calmato TRAINER 40 User manual

Kyosho MINI-Z MONSTER MM-01 User manual

Kyosho

Kyosho MINI-Z MONSTER MM-01 User manual

Kyosho EP AIR STREAK 500 VE User manual

Kyosho

Kyosho EP AIR STREAK 500 VE User manual

Kyosho Mini-Z Racer MR-02 MM Type User manual

Kyosho

Kyosho Mini-Z Racer MR-02 MM Type User manual

Kyosho MINIUM WARBIRD SPITFIRE MK.I User manual

Kyosho

Kyosho MINIUM WARBIRD SPITFIRE MK.I User manual

Kyosho EP JETSTREAM888 VE User manual

Kyosho

Kyosho EP JETSTREAM888 VE User manual

Kyosho MINIUM EDGE 540 RedBull User manual

Kyosho

Kyosho MINIUM EDGE 540 RedBull User manual

Kyosho Pitts Special S-2C 40 User manual

Kyosho

Kyosho Pitts Special S-2C 40 User manual

Kyosho GP Bluestreak 800 User manual

Kyosho

Kyosho GP Bluestreak 800 User manual

Kyosho Sunstorm 600 User manual

Kyosho

Kyosho Sunstorm 600 User manual

Kyosho Fortune 612 II User manual

Kyosho

Kyosho Fortune 612 II User manual

Kyosho EP concept User manual

Kyosho

Kyosho EP concept User manual

Popular Toy manuals by other brands

LeapFrog 100 English-Chinese Words Book Parents' guide

LeapFrog

LeapFrog 100 English-Chinese Words Book Parents' guide

VTech Baby Lights & Stripes Zebra Parents' guide

VTech Baby

VTech Baby Lights & Stripes Zebra Parents' guide

Turnigy EDGE-540 Assemble manual

Turnigy

Turnigy EDGE-540 Assemble manual

Vinh Quang Dream like instruction manual

Vinh Quang

Vinh Quang Dream like instruction manual

Mattel Barbie R4300 instructions

Mattel

Mattel Barbie R4300 instructions

Radica Games Elvis Slot 71042 instruction manual

Radica Games

Radica Games Elvis Slot 71042 instruction manual

E-FLITE Hurricane 25e TM Assembly manual

E-FLITE

E-FLITE Hurricane 25e TM Assembly manual

PLANEPRINT AERON Assembling manual

PLANEPRINT

PLANEPRINT AERON Assembling manual

VTech Baby Turtle's Busy Day Soft Book Parents' guide

VTech Baby

VTech Baby Turtle's Busy Day Soft Book Parents' guide

E-FLITE Blade mSR BNF quick start guide

E-FLITE

E-FLITE Blade mSR BNF quick start guide

BELL HELICOPTER 430 Maintenance manual

BELL HELICOPTER

BELL HELICOPTER 430 Maintenance manual

Hasbro BEAR FIGHTER instructions

Hasbro

Hasbro BEAR FIGHTER instructions

PIKO BR 110.3 Instructions for use

PIKO

PIKO BR 110.3 Instructions for use

Mega Bloks HALO 97449 manual

Mega Bloks

Mega Bloks HALO 97449 manual

Hasbro TOYBOX Tools Playskool Friends My Little Pony Musical Celebration... manual

Hasbro

Hasbro TOYBOX Tools Playskool Friends My Little Pony Musical Celebration... manual

Fisher-Price BUBBLE MOWER H8910 instruction sheet

Fisher-Price

Fisher-Price BUBBLE MOWER H8910 instruction sheet

Little Tikes 4533 owner's manual

Little Tikes

Little Tikes 4533 owner's manual

Horizon Hobby E-flite BNF UMX HYPER TAXI instruction manual

Horizon Hobby

Horizon Hobby E-flite BNF UMX HYPER TAXI instruction manual

manuals.online logo
manuals.online logoBrands
  • About & Mission
  • Contact us
  • Privacy Policy
  • Terms and Conditions

Copyright 2025 Manuals.Online. All Rights Reserved.