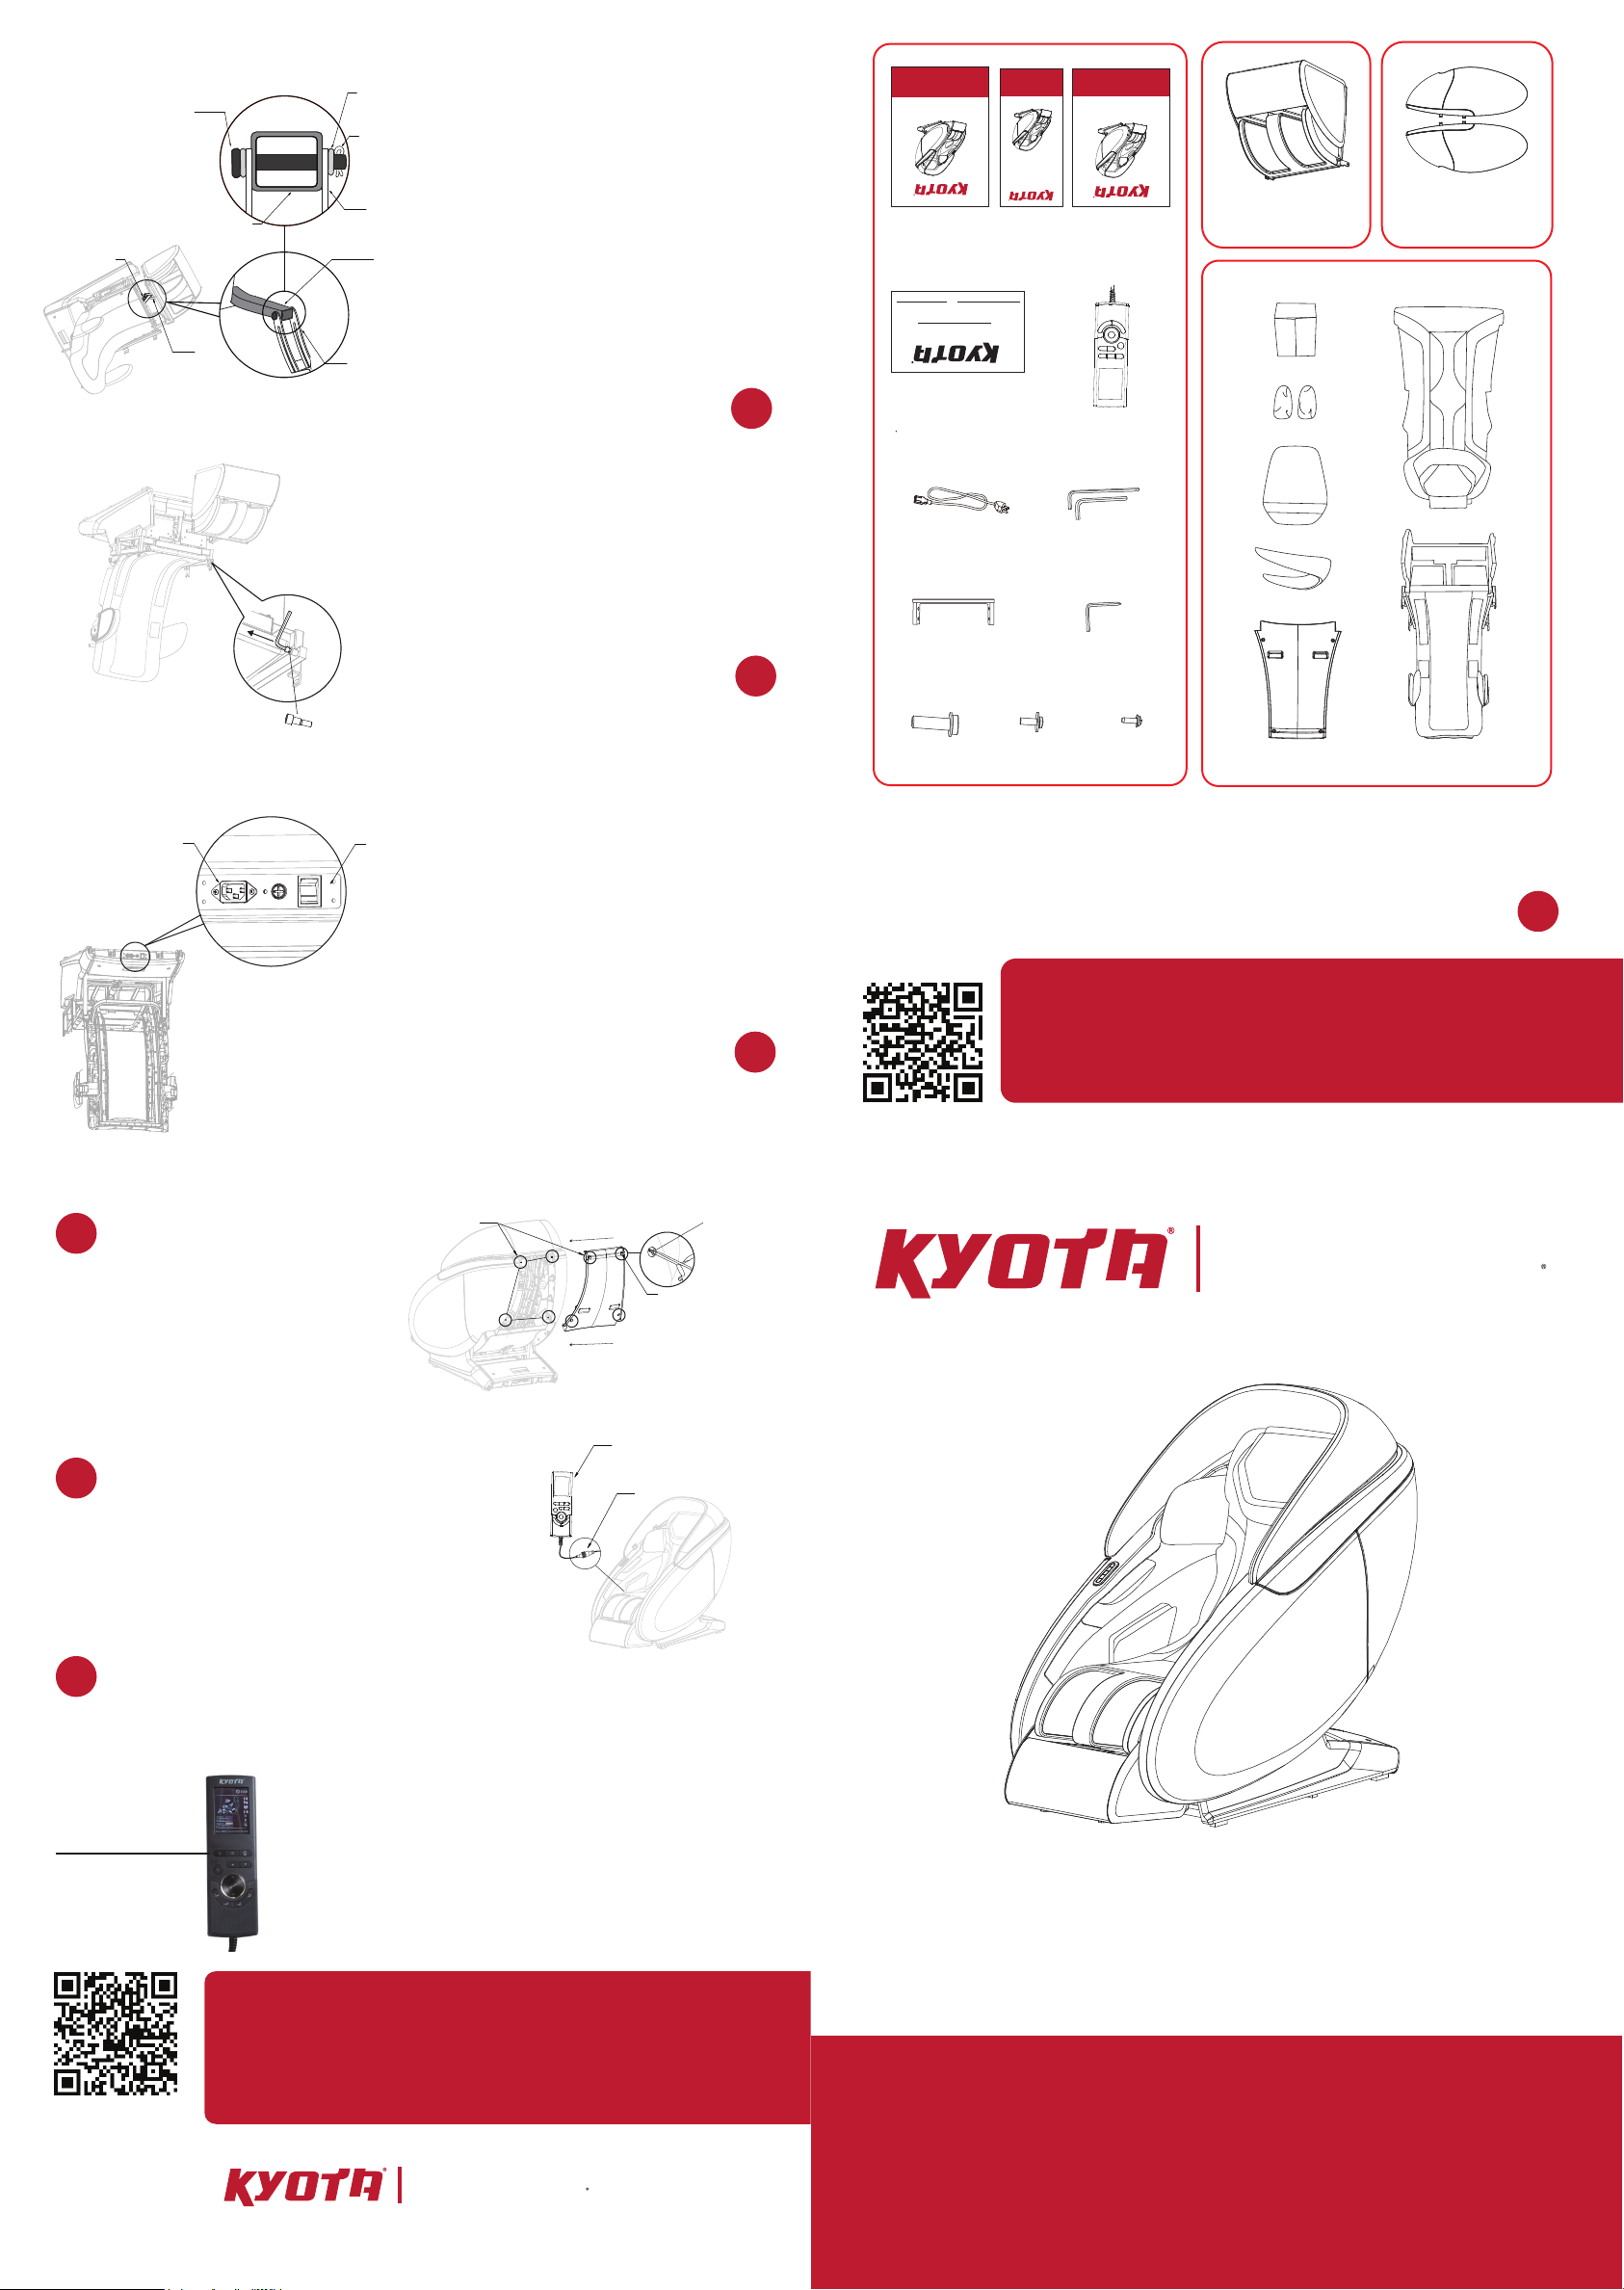
manuals.online logo
Brands
  1. Home
  2. •
  3. Brands
  4. •
  5. KYOTA
  6. •
  7. Massager
  8. •
  9. KYOTA M680 User manual

KYOTA M680 User manual

72 Stard Road, Seabrook, NH 03874 | (800)-242-0761 | www.kyotamassagechairs.com
Version 2.0
M680 Kaizen 3D/4D
Massage Chair
Review chair for smooth operation. If things are not operating
correctly, review all assembly steps. Call Kyota support at
800-242-0761 if you need live US-based support.
You are done; time for a Massage!
Power on the
remote and select
AUTO program to
start a session.
SCAN CODE
Register your product at www.kyotamassagechairs.com/
warranty/registration to ensure it is in our system.
This will simplify the warranty process should you ever need it.
Alternatively, scan the QR code to go directly to the URL above.
SCAN CODE
Before assembling your chair, watch an assembly video at:
www.kyotamassagechairs.com/assembly-tutorials
Alternatively, scan the QR code to go directly to the URL above.
Assembly Guide
The Worlds Most
Advanced Massage Chairs
The Worlds Most
Advanced Massage Chairs
2Step 2:
Plug power cord into power
port located on the back
side of the base of the chair.
Connect the chair power
cord to a grounded 110V
electrical outlet. Flip the
main power switch to on,
this will upright the chair out
of shipping position. Once
the chair is fully upright, flip
the power switch to off and
remove the power cord.
Step 3:
Place the footrest in front of the
chair body. Using the provided
M8 Hex Key, remove the 2 bolts
and their washers from either
side of the front of the chair
body and set them to the side.
3
Step 4:
Locate the chair body base
rod in the footwell of the
chair. Remove the metal clip
from the end of the base rod
pin and then remove the pin.
Place the base rod pin, metal
clip, and washer to the side.
Align the holes on the lifting
rod on the backside of the
footrest to the chair body
base rod and insert the base
rod pin. Place washer on end
of the base rod pin, then
insert the metal clip to secure.
4
1Step 1:
Prior to assembly, carefully unpack all box contents. Carefully check box
contents to the detail below. Make sure all contents are accounted for.
If anything is missing, please contact Kyota Massage Chairs at
800-242-0761.Do not return to the place of purchase.
Accessory Box
Box 1: Chair Body & Accessory Box
M8x35
(10pcs)
M6x20
(5pcs)
M5x20
(5pcs)
M6 Hex Key with
Phillips Head End
M8 Hex Key,
M6 Hex Key
Feet Pads
Back Pad
Hood
Back Cover
Chair Body
Accessory Box
Seat Cushion
Connector
Beam
Power
Cord
Remote
Control
Box 3:
Footrest (1)
Box 2:
Arm Panels (2)
M680 Kaizen 3D/4D
Massage Chair
User Manual
Quick Start
Guide
M680 Kaizen 3D/4D
Massage Chair
Assembly Guide
M680 Kaizen 3D/4D
Massage Chair
Register now to take full advantage of your
four year limited warranty at:
www.kyotamassagechairs.com/Warranty
Full owners manual
available at:
www.kyotamassagechairs.com/Manual
For additional assistance
visit our website at:
www.kyotamassagechairs.com
Or call: 1-800-242-0761
Warranty
Card
Main Power Switch
Power Cord
Port
Footrest
Lifting Rod
Chair Body
Base Rod
Base Rod Pin
Footrest
Lifting Rod
Metal Clip
Chair Body
Base Rod
Washer
Footrest
Lifting Rod
Chair Top View
Chair Body
Base Rod
Step 15:
Position the back cover so that
the ball and socket fasteners
are aligned, then press into
place until you feel a snap to
secure. Insert M5x20 screws
into the four screw holes.
Tighten with the phillips head
end of the M6 hex key.
15
Step 17:
Connect the chair power cord to a grounded 110V electrical outlet and
plug it into the respective port on the back side of the base of the
chair (see step 2). Flip the main power switch to on.
17
Step 16:
Plug the remote control cord into the remote
control port located under the right side of
the seat cushion. Ensure the arrows on the
top of the remote control cord and the
remote control port are aligned before
connecting. Screw on to fasten. Do not force.
16
Ball and Socket
Fasteners x4 M5x20 Screw
Back Cover
Screw Holes
Remote Control
Remote Control
Cord/Port Connection
Footrest Bolt
Step 5:
Connect the footrest
electrical cord and
air hose to the
electrical port and air
hose nozzle located
in the footwell of the
chair body.
5Step 6:
Lift the footrest and align the ends
of the footrest mounting bracket
with the two locations on the chair
body where you removed the bolts
in step 4. Ensure there is a washer
on either side of the mounting
bracket, then re-insert the footrest
bolts you removed one side at a
time, making them finger tight.
Once they are both on, secure by
fastening the bolts with the
provided hex key.
6
Step 7:
Locate both arm panels (found in box 2). There is a left and right arm panel -
indicated by yellow stickers on the inside of the arm panel. Place the
corresponding arm panel next to its respective side of the chair body. Also,
note the two locations of the screw holes on the inside of the arm panel, the
arm panel hook and the arm panel connection bolt (there may be a piece of
tape over the arm panel connection bolt. This tape is there for shipping
purposes and should be removed).
7Step 8:
Start with the right arm panel. With
a partner, lift the arm panel up to
the chair body and connect all
electrical plugs and air hoses (7 in
total). Notice the air hoses are color
coded, connect to corresponding
nozzles by matching the colors.
Also, notice that each electrical cord
has a unique shape and size and
will only fit into its respective chair
body electrical port. When
connecting the electrical cords to
the electrical ports, do so gently to
ensure you are making the correct
connections. Do not force. Once
you are certain you have the correct
connection, push together until you
hear a click sound.
8
Step 9:
Lift the arm panel and
place connection bolt into
the cradle found on the
side of the chair body. At
the same time, ensure the
arm panel hook rests over
the chair body rail. Make
sure all electrical and air
hose connections are out
of the way and not
pinched between the arm
panel and chair body
before continuing.
9Step 10:
Insert the M8 x 35 arm
panel bolts through the
chair body frame and into
the arm panel screw holes
identified in step 8. To
secure the arm panel to the
chair body, fasten the two
arm panel bolts, as well as
the arm panel connection
bolt using the m8 hex key
provided.
10
Step 11:
To attach the Left arm panel,
repeat steps 8-10. The only
difference being that there is an
extra connection port for heat
on the left side. Move the heat
connection port out from
between the arm panel and the
chair body and place it on the
chair body before repeating
step 9 for the left arm panel.
Step 12:
Once the arm panels are
secured, move to the back of the
chair. Locate the connector
beam (found in the accessory
box). Align the holes on each
end of the connector beam to
the screw holes on the top
inside of both arm panels. To
secure, insert the M8x35 bolts
into the screw holes. Fasten with
the provided M8 hex key.
12
11
Note: If you have trouble connecting the air hoses,
you may need to remove the air hose connector
from the arm panel air hose, making sure the spring
inside the air hose does not fall out when you do.
The Worlds Most
Advanced Massage Chairs
Footrest Air Hose Chair Body
Air Nozzle
Footrest
Electrical Cord
Chair Body
Electrical Port
Footrest Bolt
Arm Panel
Screw Holes
Arm Panel Hook Arm Panel Hook
Arm Panel
Connection Bolt Arm Panel
Screw Holes
M8x35 Bolt
M8x35 Bolt
M8x35 Bolt
Air Hoses
Electrical Plug
Electrical Plug
Electrical Plug
Speaker Electrical Plug
Arm
Panel Hook
Arm
Panel
Chair Body Rail
Step 13:
Locate the back cushion (found in
box 1). Remove the protective
covering from the back cushion.
Remove the fabric coverings from
the chair body velcro. Connect the
back cushion to the top of the chair
by attaching the zippers, then drape
the back cushion over the front of
the chair body, making sure the
velcros are aligned. Push down
firmly on velcros to secure.
Connect the back cushion heat cord
to the heat cord port located on the
left-hip side of the chair body. Press
both ends together firmly until you
hear a click.
Step 14:
Locate the Hood (found in Box 1).
Un-zip the two zippers on the
underside of the hood to reveal
the hood mounting ports. Seat
the hood on top of the chair body,
making sure that the chair body
mounting brackets insert into the
hood mounting ports. Using the
smaller M6x20 bolts, fasten the
hood into place on both sides
with the hex key, then close both
zippers on the underside of the
hood.
Orient yourself at the back of the
chair. To secure the hood to the
chair, insert an M8x35 bolt
through the underside of the
connector beam up into the hood
and fasten with the hex key.
14
13
Chair Body
Cradle
Arm Panel
Connection
Bolt
Chair
Body
Velcro
Zipper
Back Cushion
Heat Cord/Port
Connection
Back
Cushion
Heat Cord
Chair Body
Heat Port
M6x20 Bolt
Zipper
Hood
Mounting
Ports
M8x35 Bolt Connector Beam
Back View of Chair
Footrest
Mounting
Bracket
Arm Panel
Screw Holes
Connector Beam
*click*
Chair Body
Mounting
Brackets

Other KYOTA Massager manuals

KYOTA Yugana M780 User manual

KYOTA

KYOTA Yugana M780 User manual

KYOTA Yutaka M898 User manual

KYOTA

KYOTA Yutaka M898 User manual

KYOTA Genki M380 User manual

KYOTA

KYOTA Genki M380 User manual

KYOTA Kofuko E330 User manual

KYOTA

KYOTA Kofuko E330 User manual

KYOTA Genki M380 User manual

KYOTA

KYOTA Genki M380 User manual

KYOTA Kansha M878 4D User manual

KYOTA

KYOTA Kansha M878 4D User manual

KYOTA Kokoro M888 4D User manual

KYOTA

KYOTA Kokoro M888 4D User manual

KYOTA Nokori M980 User manual

KYOTA

KYOTA Nokori M980 User manual

KYOTA Nokori M980 User manual

KYOTA

KYOTA Nokori M980 User manual

KYOTA M868 Yosei 4D User manual

KYOTA

KYOTA M868 Yosei 4D User manual

Popular Massager manuals by other brands

Casada canoo III manual

Casada

Casada canoo III manual

Clatronic FM 2937 Instruction manual & guarantee

Clatronic

Clatronic FM 2937 Instruction manual & guarantee

ReFa CAXA RAY Guide book

ReFa

ReFa CAXA RAY Guide book

Wahl ZB343 instructions

Wahl

Wahl ZB343 instructions

nah-Vital HC-431 instructions

nah-Vital

nah-Vital HC-431 instructions

Interactive Health HT-104 Use & care manual

Interactive Health

Interactive Health HT-104 Use & care manual

High tech health CBV3 user manual

High tech health

High tech health CBV3 user manual

Snailax SL-522VG Use & care manual

Snailax

Snailax SL-522VG Use & care manual

Vivadia H128 instructions

Vivadia

Vivadia H128 instructions

Beurer MG 200 HD-enjoy Instructions for use

Beurer

Beurer MG 200 HD-enjoy Instructions for use

Mebak 3 user manual

Mebak

Mebak 3 user manual

Breo iDream 5 user manual

Breo

Breo iDream 5 user manual

Sharper Image MSG-F110 instruction manual

Sharper Image

Sharper Image MSG-F110 instruction manual

TEBO Elite owner's manual

TEBO

TEBO Elite owner's manual

Ogawa estiloPRIME+ OZ 0978 user manual

Ogawa

Ogawa estiloPRIME+ OZ 0978 user manual

OBH Nordica Shiatsu 6080 instruction manual

OBH Nordica

OBH Nordica Shiatsu 6080 instruction manual

HoMedics ShiatsuMAX CBS-1000-EU instruction manual

HoMedics

HoMedics ShiatsuMAX CBS-1000-EU instruction manual

HoMedics BubbleSpa Elite BMAT-5 Instruction manual and  warranty information

HoMedics

HoMedics BubbleSpa Elite BMAT-5 Instruction manual and warranty information

manuals.online logo
manuals.online logoBrands
  • About & Mission
  • Contact us
  • Privacy Policy
  • Terms and Conditions

Copyright 2025 Manuals.Online. All Rights Reserved.