1.0 General Specifications
Temperature Range Ambient +5C to 150C
Temperature displayresolution 0.1C 4 digit LED
Temperature uniformity +/-0.2C (at 37C in block)
Temperature accuracy +/-0.3C
Control PI Microprocessor controller
Dimensions (W x D x H) / Weight 20 x 26.5 x 8.3 cm 2.2 kg
Electricalrequirements:
D1100 115V 115V, 50/60Hz, 0.8A, Fuse 1.5A
D1100 230V 230V, 50/60Hz, 0.63A, Fuse T630mA
D1200 115V 115V, 50/60Hz, 1.2A, Fuse 2.0A
D1200 230V 230V, 50/60Hz, 1.0A, Fuse T1.0A
2.0 Safety Precautions:
- Do not use this product in an explosive environment
- Do not use in the presence of flammable or combustible material
- Do not heat substances that react violently when heated
- Do not touch block when hot or when unit is heating. Use block lifter.
- Do not touch area around block or block well when unit is hot.
- Do not spill liquids into the well area or into the unit side vent holes
- Connect unit only to a properly grounded outlet
Caution: HOT Surfaces that can burn or cause injury.
Use of this product in any manner not specified by the manufacturer or modifica-
tion of the product may cause injury and/or may void the warranty.
3.0 Installation
Upon unpacking Digital Dry Bath, inspect for damages. Shipping damage is the
responsibility of the carrier. Inspect that the following are present: Users manual,
Line cord, Block Lifter.
Select a location that is dry and not subject to drafts or moving air from heating or
air conditioning vents, or air blown by other equipment. Place the unit on a flat,
preferably non-flammable surface. Allow sufficient room around the unit
for access and cooling. Six inches minimum on all sides is suggested.
Plug the unit into a properly grounded outlet. Using the lifter, insert the
block(s) into the well. The unit is now ready for use.
4.0 Controls
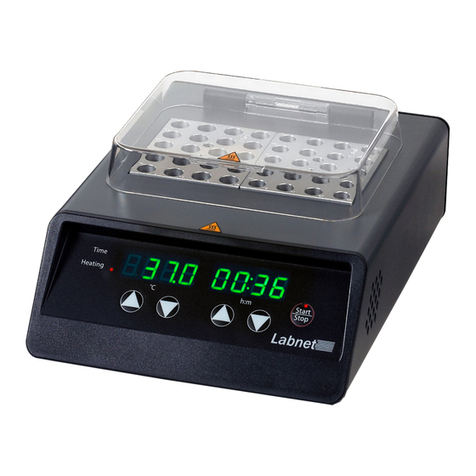
- On / Off rocker switch. Back of unit. Turns primary power on and off
- “Start” LED, red. Illuminates when unit is in heating mode, off in temperature set
mode.
- “Set” LED, green. Illuminates when unit is in temperature set mode and
off when in heating mode.
- “Heating”LED, red. Illuminates when unit is in heating mode and unit is actually
applying heat to the block. This LED is on continuously during heat-up and cycles
on and off when the unit is at the set temperature
- “UP” arrow key. Raises set temperature when unit is in set mode.
- “Down” arrow key. Lowers set temperature when unit is in set mode
- “Start / Stop” key. Switches the unit between set and heating mode.
12
5.0 Operation
Power the unit up with the On / Off switch at the back of the unit. The unit powers
up in set mode. Use the UP arrow and DOWN arrow keys to set the temperature to
the desired operating temperature. Press the “START” key and the unit will begin
heating to the set point.
The unit remembers the last set temperature at power down. However, the
“START” key must be pressed to cause the unit to start heating to that set
temperature.
When first heating up a block, the unit will apply full heat to the block to rapidly
increase the temperature. On this initial heat-up the display will show a temperature
overshoot and then settle back to the set temperature. The actual block temperature
(and sample) however do not overshoot but rise to the set temperature due to the
mass and the natural heat lag time of the block. This control method allows for the
quickest heat up time without temperature overshoot of the sample.
To change temperature set point, press STOP to put the unit back into the tempera-
ture set mode then change the set point with the UP and DOWN arrow keys. Press
the START key to start heating control again.
6.0 Calibration
Calibration allows the unit temperature display to be adjusted or matched to the
temperature of a single sample or to a calibrated thermometer making an indepen-
dent temperature measure of the block.
The Digital Dry Baths are calibrated at the factory at 37C using a standard small-
hole-pattern block. If you are using a block with a high heat loss rate such as a
block with large holes or a platform style block, you may choose to recalibrate the
unit to your specific application. Also, if you are using very loose or odd shaped
vessels, the calibration function can help you match the display temperature to your
actual sample temperature.
To calibrate the unit for a given block or sample, first turn the unit off using the On /
OFF switch. Then place a thermometer of known accuracy* into the block
thermometer hole or a thermocouple or other sensor into your sample. Make sure
there is a good fit between the thermometer and the block or good contact between
any sensor and sample or sensor and block.
To calibrate the block or sample to the display, use the following procedure:
1. Press and hold the START – STOP key then simultaneously power up the unit
with the On / OFF switch.
2. You should hear a “DU-DU-DU.” sound from the dry bath and the display will
have one segment flashing on the left and will show a set temperature.
3. Use the UP and DOWN arrow keys to set the desired temperature at which
you want to calibrate the unit. Then press the START key.
4. Allow time (up to 40 or 50 minutes) for the unit to heat up to your set tempera-
ture and to equilibrate at this temperature. The entire LED display will start
flashing when equilibration is reached.
5. After the entire display has started flashing, read the thermometer (or sensor
meter) and use the UP and DOWN arrow keys to adjust the display to the
thermometer or sensor reading. Then press the START-STOP key.
