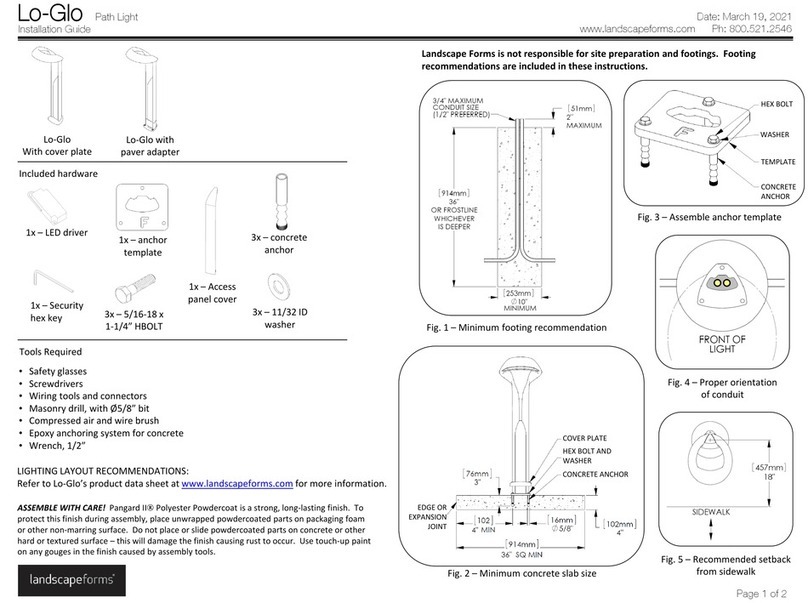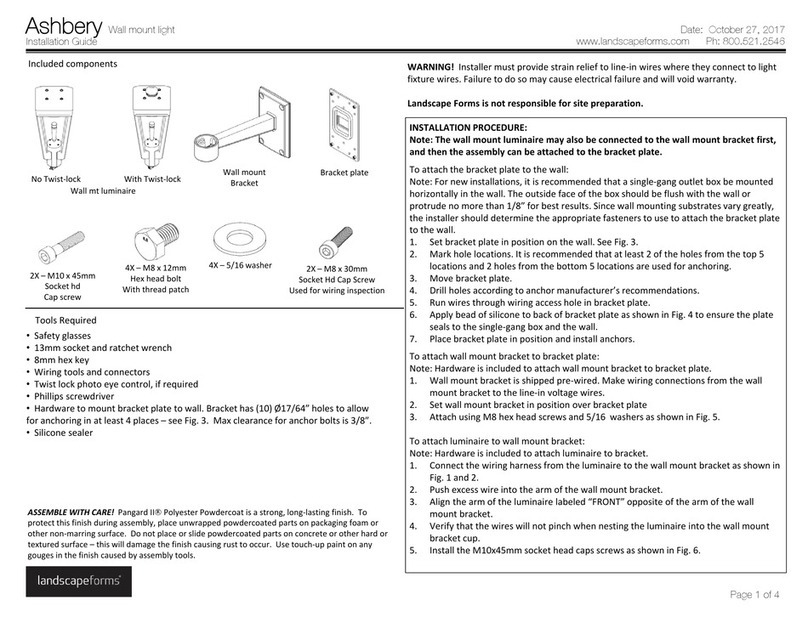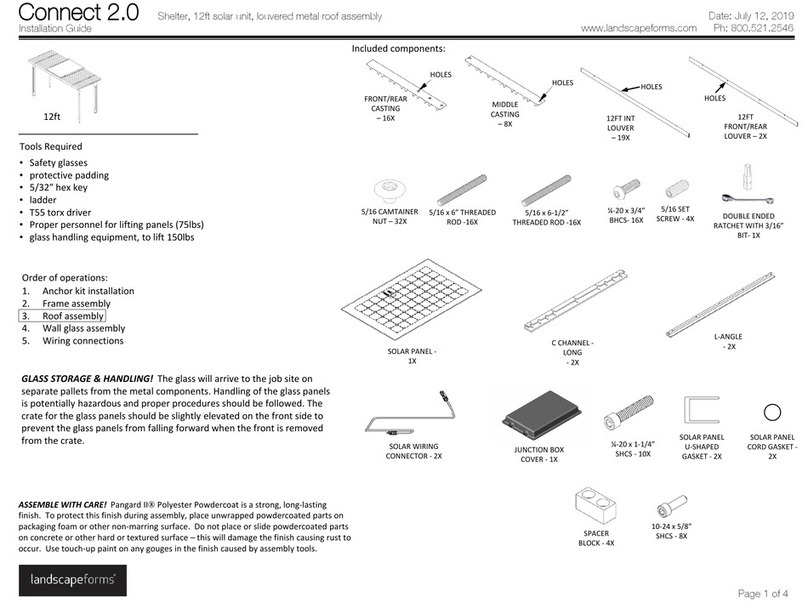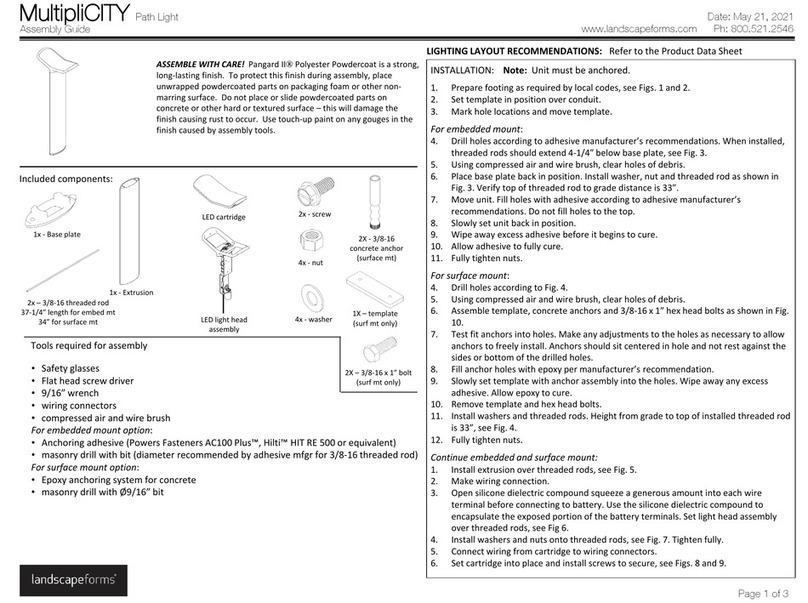
Installation Guide www.landscapeforms.com Ph: 800.521.2546
Page 2 of 6
Connect 2.0 Shelter, wiring guide for 8ft solar powered unit Date: February 14, 2019
INSTALLATION:
Orderofinstallation:Installbatteries.8ftshelterwillhouse8batteriesinthefront
horizontalbeamand8batteriesintherearhorizontalbeam.Theywillconnecttogether
withacentersub‐harness.Installdownlights.Installwayfindinglights.Connectwiring
harnessestodriver.Installfuse.Runtestoflights.
1. Removeaccesscoverinhorizontalbeamnearrearleftpost.EnsureVelcrostripis
installedonrearhorizontalbeam.SecureoneendoflongVelcroharnesstothetop
halfofthestripmountedinthehorizontalbeam.Connect(‐)leadofthebattery
harness,labeled“BACKHARNESS”,tothefirstbattery(‐).Installshortjumper
harnesstothepositivepoleofthebatteryasshowninFig.2.Attachtheotherendof
thejumperharnesstothesecondbattery.Installthesecondbattery.Repeatthis
processforbatteries3and4,withthe4th batteryhookinguptothemainwire
harness(+)connector.Repeatthisprocessfortheremainingbatteries,until8
batteriesareinstalledintherearhorizontalbeam.SeeFig.8forwiringreference.
SlideeachbatteryintoVelcroharnessasitisbeinginstalled.Onceallbatteriesare
installed,twistVelcrostrapandsecureittothebottomofthematingVelcrostripin
thehorizontalbeam,seeFig.4.InstallVelcroclampingplate,seeFig.4.
2. Removeaccesscoverinhorizontalbeamnearfrontrightpost.EnsureVelcrostripis
installedonfronthorizontalbeam.SecureoneendoflongVelcroharnesstothetop
halfofthestripmountedinthehorizontalbeam.Connect(‐)leadofthebattery
harness,labeled“FRONTHARNESS”,tothefirstbattery(‐).Installshortjumper
harnesstothepositivepoleofthebatteryasshowninFig.3.Attachtheotherendof
thejumperharnesstothesecondbattery.Installthesecondbattery.Repeatthis
processforbatteries3and4,withthe4th batteryhookinguptothemainwire
harness(+)connector.Repeatthisprocessfortheremainingbatteries,until8
batteriesareinstalledinthefronthorizontalbeam.SeeFig.8forwiringreference.
SlideeachbatteryintoVelcroharnessasitisbeinginstalled.Onceallbatteriesare
installed,twistVelcrostrapandsecureittothebottomofthematingVelcrostripin
thehorizontalbeam,seeFig.5.
3. Connectcentersub‐harnesstoendoffrontharnessandendofbackharness,routing
throughgrommet,seeFig.6.Runharnesswiringalongbottomofleftrafter,seeFig.
7.Installdownlight(step4)asshowninFig.7tosecureharnessinplace.
4. Firstrafterdownlight:makeconnectionatfronthorizontaltoquickdisconnect.Push
rafterlightconnectionthroughgrommet.Grommetsmayberemovedtopushwires
through,ifnecessary,andthenbereinstalled.SeeFig.7.Usinga3/32”hexkey,
attachdownlighttorafterusing(6)#8‐32x5/16socketbuttonheadcapscrews,
locatedinhardwarepack#62599.Donotovertightenscrews.
5. Installremainingrafterdownlights:makeconnectiontoquickdisconnects.Push
connectionthroughgrommetonfronthorizontalbeam.Attachdownlighttorafter,
seeFig.9.
6. Unusedgrommetsonrearhorizontalbeamcanbesealedwithclearorblack
silicone(suppliedbyothers).
7. Installleftandrightsiderafterskins,withthesharperangleoftheskintowardthe
frontoftherafter.SeeFig.10.Rafterskinshaveabossonthebottomflangethat
hooksintothedownlight,seeFig.10.Hookthebottomoftheskinintopositionand
thenrotatethetopofskinuptotherafterbeam.Usinga3/16”hexkey,install(2)
¼‐20x¾”socketheadcapscrews,locatedinhardwarepack#62599.Tightenuntil
gapbetweenlightandrafterskinisgoneandrafterskindoesnotrattle.Donot
overtightenscrews.
8. Wayfindinglights:Runwiringharnessupthroughfrontverticalpost.Onthefront
leftsideoftheunit,removetheaccesscoveronthefronthorizontalbeam.Make
connectionfromthewiringharnesstothequickdisconnectlocatedinthebeam.
SecureLEDtofrontverticalpost,using(4)8‐32x½”hexheadmachinescrewswith
externaltoothlockwasher,locatedinhardwarepack#62810,seeFig.11.Before
finaltighteningofscrews,ensureonlythelensfromthelightisshowingthrough
thefrontopening.Repeatforoppositeside.Installcoverplates,using(2)¼‐20x½”
socketheadcapscrews,locatedinhardwarepack#62607,seeFig.12.Make
connectiontopre‐installedwiringharnesslabeled“wayfindinglight”.
9. Driverplateassembly:Attachdriverplatetofronthorizontalbeam,inthefront
rightaccesslocation,seeFig.13.
10. MakeconnectionstoPDMaslabeled:Uplight,Wayfinding(x2),Downlight,seeFigs
14and15.MakeconnectionstoMorningstarunit,intheordernotedonthedevice.
Whenallofthewiringconnectionsarecomplete,installthefuse,seeFig.13.
11. FollowtheinstructionsfortheMorningstarunittotestthelights.Replaceaccess
cover.
