Launch EasyDiag User manual

EasyDiag user’s manual
V1.00.000
www.greebid.com

LAUNCH EasyDiag user’s manual
Precautions on operating vehicle’s ECU
zDo not disconnect the vehicle inner consume when the ignition
switch is on, so as to avoid the sensors or the ECU damage.
zDo not place the magnetic object near the ECU in order to
avoid the failure of the circuitry and components.
zDo cut off the power supply of ECU system before welding on
the vehicle.
zPay more attention to the ECU and the sensors when the
operation is next to them.
zGround yourself when you disassemble PROM, otherwise
ECU and sensors willbe damaged by static electricity.
zDo connect ECU harness connector firmly, otherwise
electronic elements, such as IC inside ECU, will be damaged.
Precautions on operation
zThe instrument is a precision electronic instrument. Pay more
attention when in use, donot have it dashed.
zThe equipment power is supplied by 12v battery voltage; do
not use other voltage power.
zTurn off the ignition switch when connect or disconnect the
diagnostic connector.
zPlease put the EasyDiag in its place on the back of the
protective casing in order to avoid lost.
i
www.greebid.com

LAUNCH EasyDiag user’s guide
Contents
1. Overview............................................................................................1
1.1 Product introduction.....................................................................1
1.2 Parameters ..................................................................................1
1.3 Features.......................................................................................2
1.4Accessories..................................................................................2
2. Configuration and Structure............................................................3
3. Connection and Installation ............................................................4
3.2 EasyDiag connection...................................................................4
3.3 Software download and install.....................................................4
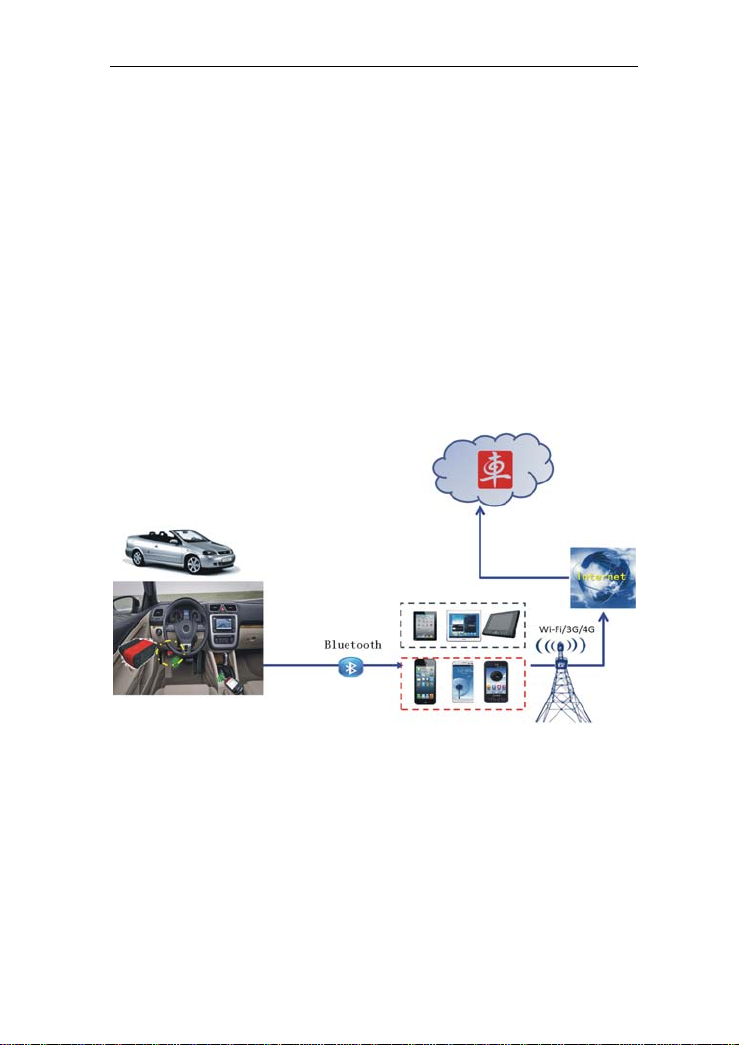
3.4 Bluetooth setting..........................................................................5
4. How to use ........................................................................................5
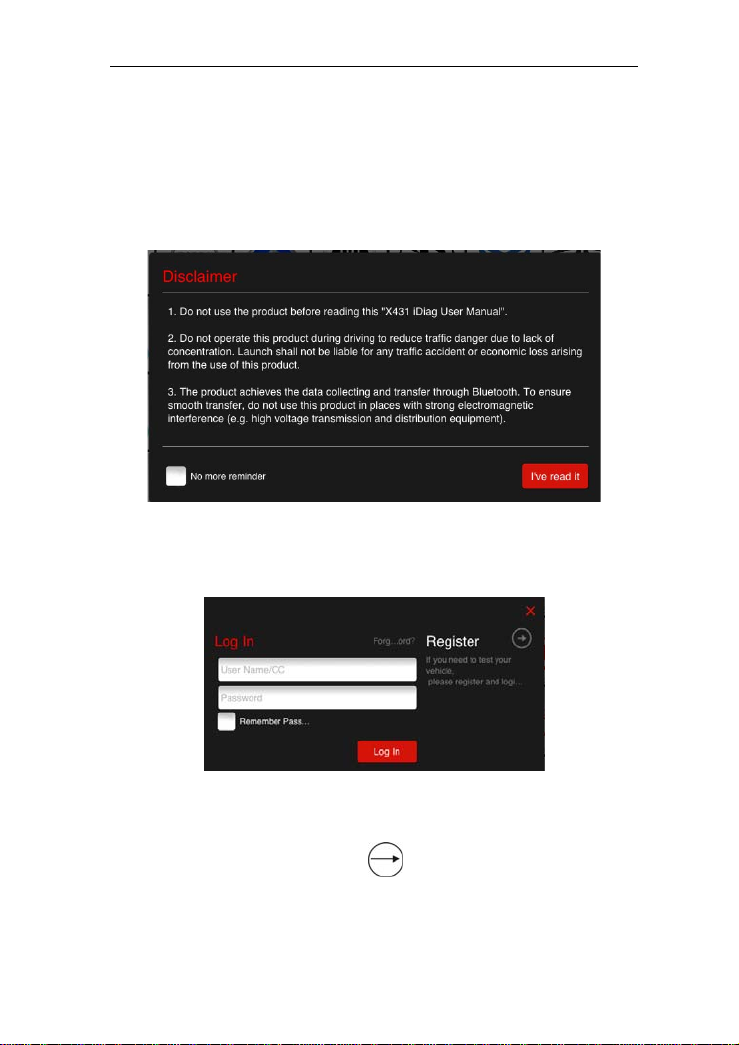
4.1 Initial use......................................................................................6
4.2 EasyDiag registration...................................................................9
4.3Acquire software ........................................................................10
4.5 My space....................................................................................22
4.6 Instant info. ................................................................................23
4.7 Social Circle...............................................................................24
4.9 Management..............................................................................26
4.9.1 EasyDiag Register..............................................................26
4.9.2 Change password ..............................................................26
4.9.3 Type Password Hint............................................................27
4.9.4 Forgot password.................................................................27
4.9.5 Only display available models............................................28
4.10 More.........................................................................................28
4.10.1 Quick Guide......................................................................28
4.10.2 User’s Guide.....................................................................28
4.10.3 Diagsoft Purchase and Download Instruction ..................28
4.10.4About................................................................................28
5. How to Diagnose ............................................................................29
ii
www.greebid.com

LAUNCH EasyDiag user’s guide
1. Overview
1.1 Product introduction
EasyDiag, based on iOS/Android operation system design, research
and development, is an internet vehicle trouble diagnosis tester
customized for mobile intelligent terminals. After being connected
with mobile terminal through Bluetooth, it achieves for x-431 serial
product the full diagnostic functions, which include reading
DTCs(diagnosis trouble code), clearing DTCs, reading data stream,
action test and special functions,and also it can be used as a social
platform tool.
1.2 Parameters
zWorking voltage: 9~15V
zWorking average current: about 35mA
zStatic current: about 25mA
zWorking temperature: -20 to 55℃(-4 to 131°F)
zStorage temperature: -30 to 70℃(-22 to 158°F)
zStorage humidity: <80%
1
www.greebid.com

LAUNCH EasyDiag user’s guide
zWorking humidity: <60%
zNet weight: about 26g
1.3 Features
zMost of the electronic system of vehicle, including Europe,
Asia,America and domestic models, can be detected;
zApplies to iOS and Android system, simple interface, elegant
and easy to operate;
zBluetooth communication;
zOnline download diagnostic software (single vehicle model or
combined software models). Many ways to pay, and many
ways to combine, reduces your one-shot investment. Panel
computer protective casing
zOnline share and communicate diagnostic technology with
core of community concept and service.
1.4 Accessories
EasyDiag
Password envelope
2
www.greebid.com

LAUNCH EasyDiag user’s guide
2. Structure
Fig2.2
①OBD-16 diagnostic
connector To connect vehicle’s OBD2
diagnostic socket
②Power indicator It will light up once EasyDiag is
plugged into OBD2 diagnostic
socket.
③Communication
indicator It will flash when EasyDiag is
communicating with mobile
terminal or EasyDiag is resetting.
④Micro USB port To connect PC for data
transmission or upgrade via USB
cable
3
www.greebid.com

LAUNCH EasyDiag user’s guide
3. Connection and Installation
3.1 EasyDiag connection
Find out the vehicle’s DLC socket, plug EasyDiag into DLC socket
and the EasyDiag power indicator will light up.
Note: vehicle’s DLC socket is generally located under the
dashboard, in the fuse-box or near the shift lever. For the detail
position, please refer to corresponding vehicle’s repair manual.
Fig3.2
Near center of dashboard
3.2 Software download and install
EasyDiag app is free to download
Step 1: Turn on your smart terminals and link networkwell.
Step 2: Software store
iOS:App Store
Please go into app store, input keyword “EasyDiag” in the search
bar, click” EasyDiag” (software client) to install (for details, please
refer to your equipment user’s manual) see Fig3.3.
4
www.greebid.com

LAUNCH EasyDiag user’s guide
Fig3.3
3.3 Bluetooth setting
Enter Bluetooth setting interface to set “ON”, see Fig3.4, Fig3.5, and
select the serial number to pair.
Default name (product SN):
iOS: 96699xxxxxxx
Fig3.4
Note:Bluetooth setting operation should be done before
operating software client.
4. How to use
Click EasyDiag client software icon “ ”
5
www.greebid.com

LAUNCH EasyDiag user’s guide
4.1 Initial use
Note: before operating, you need to log in software first.
When open the software, the screen will pop up disclaimer, see
Fig4.1.
Fig4.1
Click “I’ve read it” to enter login interface, see Fig4.2.
Choose “No more reminder”, the disclaimer will not appear next
time.
Fig4.2
If you have already registered, input user’s name and password to
login
If you have not registered, click” ” to register follow the screen
displays, see Fig4.3.
6
www.greebid.com

LAUNCH EasyDiag user’s guide
Fig4.3
After login, the screenwill display the interfaceas shown in Fig4.4.
Fig4.4
Click “reading” to open quick start guide.
Choose “No more reminder”, the prompt will not appear next time.
The software initial interface, see Fig4.5.
7
www.greebid.com

LAUNCH EasyDiag user’s guide
Fig4.5
:Function selection list,
:Vehicle area selection, including China, Asia, Europe and
America
:User’s name display area
:Search bar
:Theme,for the replacement of the display style.
:SN selection bar
:Car model selection area, the icon means this car’s
diagnostic software has not been downloaded, if you want to
diagnose it, click it to acquirethe software.
: Partial display area
: Full screen display switch button
If you don’t have a EasyDiag, you can click DEMO icon“ ” to
get into the demo function interface, and experience the vehicle
diagnosis function
8
www.greebid.com

LAUNCH EasyDiag user’s guide
If you have already got a EasyDiag, please continue the registration.
4.2 EasyDiag registration
Click “management” to enter the interface asshown in Fig4.6。
Fig4.6
Click “EasyDiag Register”, the screen will display registration
interface, see Fig4.7
Fig4.7
Input product SN and password, then click “Register” to complete
registration.
9
www.greebid.com

LAUNCH EasyDiag user’s guide
Note: the product SN and password are available in the
password envelope. See Fig4.8.
Product SN
Product SN
Product code
Fig4.8
4.3 Acquire software
Before software download, please complete software acquisition
The icon means the diagnostic software has not been
downloaded, if you want to diagnose this car, please click it to
acquire the diagnostic software.
Before purchase, you should select a productSN, see Fig4.9.
10
www.greebid.com

LAUNCH EasyDiag user’s guide
Fig4.9
In the EasyDiag app, click the brand icon software which you want.
Take “HONDA” as an example, click “HONDA” icon, the screen will
display the software message, see Fig4.10.
Fig4.10
11
www.greebid.com

LAUNCH EasyDiag user’s guide
If only this software to be purchased, click “Add to cart”.
If you also want to add other software into the cart, close this page
and select others.
If someone feels the above behavior trouble, because he want to
purchase many kinds of software at the same time, so take soft
package as a whole to purchase may be a choice, in which contains
some common software, but please attention: these software mix
are fixed, can not be selected by free.
Click “soft package” in any software info interface can go into
package selection interface.
Take HONDAas an example, click the space marked in red circle in
Fig4.10,
12
www.greebid.com

LAUNCH EasyDiag user’s guide
Fig4.11
Select the desired package, for example, Click the apace marked in
red circle in Fig4.11, you can see all of the software in this package.
See Fig4.12.
13
www.greebid.com

LAUNCH EasyDiag user’s guide
Fig4.12
When selection has completed, the following operation is payment.
Press “create order”.
Fig4.13
Order list will be created, seeFig4.14
14
www.greebid.com

LAUNCH EasyDiag user’s guide
Fig4.14
After you click the space which marked in red circle in Fig4.14, it
would provide some useful information as in the Fig4.15, such as
diagnosis soft order name, order number, product serial number,
total price, order status, and order time.Please comfire those
information, and take a note about the order number which is the
most important.
Fig4.15
PAYMENT: Right now, it only supports payment on our web site, like
Fig4.16. In the future, we will launch more type of payment. After
click button, the browser will automatic jump into LAUNCH user
center login page.
15
www.greebid.com

LAUNCH EasyDiag user’s guide
Use the Login name and password, which you have registered
before, which is same as EasyDiag app loginaccount.
Fig4.16
WARM TIPS:
zPayment done with RMB can only access Chinese
diagnostic software. Subsequent purchase with this
serial number must be paid in RMB only.
zPayment done with USD can access diagnostic
software of all developed languages. Subsequent
purchase with this serial number must be paid in
USD only.
After login successfully, the web page will include order information.
Please confirm the order information, especially for the order
number. See Fig4.17
16
www.greebid.com
Table of contents
Other Launch Test Equipment manuals

Launch
Launch Creader CR3001 User manual

Launch
Launch BST-460 User manual

Launch
Launch BST-560 User manual

Launch
Launch X-431TOP User manual

Launch
Launch X-431 ADAS PRO User manual

Launch
Launch X431 Scopebox User manual

Launch
Launch Creader 5001 User manual

Launch
Launch KES-200 User manual

Launch
Launch BST-860 User manual

Launch
Launch X-431 PAD III User manual