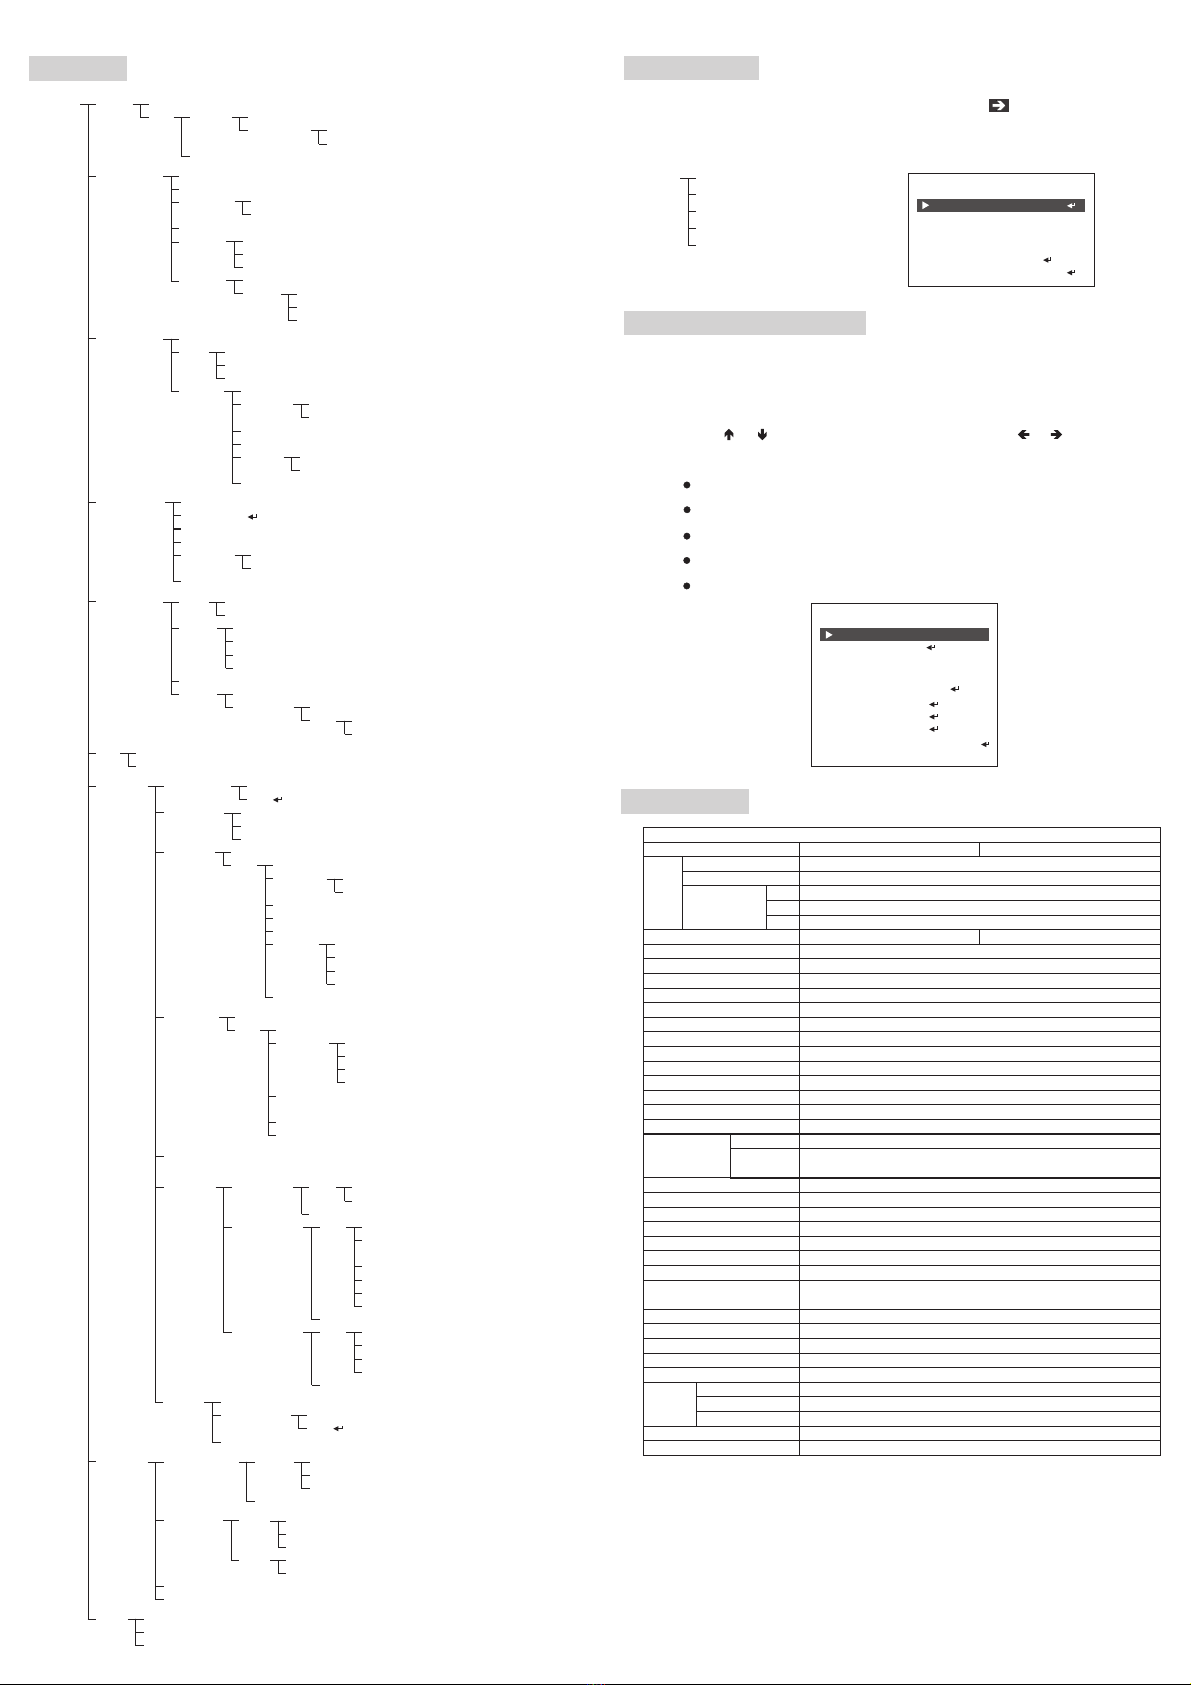
manuals.online logo
Brands
  1. Home
  2. •
  3. Brands
  4. •
  5. Lilin
  6. •
  7. IP Camera
  8. •
  9. Lilin AHD7424AX4.2 User manual

Lilin AHD7424AX4.2 User manual

This manual suits for next models

1

Other Lilin IP Camera manuals

Lilin MR3022 User manual

Lilin

Lilin MR3022 User manual

Lilin IPR712S User manual

Lilin

Lilin IPR712S User manual

Lilin iMEGAPRO IPD2220ES User manual

Lilin

Lilin iMEGAPRO IPD2220ES User manual

Lilin IRS1204 User manual

Lilin

Lilin IRS1204 User manual

Lilin IRS1308 User manual

Lilin

Lilin IRS1308 User manual

Lilin iMEGAPRO IPR722ES User manual

Lilin

Lilin iMEGAPRO IPR722ES User manual

Lilin UHG1182E User manual

Lilin

Lilin UHG1182E User manual

Lilin iMEGALITE series User manual

Lilin

Lilin iMEGALITE series User manual

Lilin PIH - 7000 IP Series User manual

Lilin

Lilin PIH - 7000 IP Series User manual

Lilin IPG012ES User manual

Lilin

Lilin IPG012ES User manual

Lilin AHD7324AX10 User manual

Lilin

Lilin AHD7324AX10 User manual

Lilin IPG1022ELS User manual

Lilin

Lilin IPG1022ELS User manual

Lilin IPC0122P3 User manual

Lilin

Lilin IPC0122P3 User manual

Lilin ipg1022esx User manual

Lilin

Lilin ipg1022esx User manual

Lilin PZD6422CSE-2 User manual

Lilin

Lilin PZD6422CSE-2 User manual

Lilin D/N HD AF IR IP CAMERA User manual

Lilin

Lilin D/N HD AF IR IP CAMERA User manual

Lilin PIH-0364X WN IP User manual

Lilin

Lilin PIH-0364X WN IP User manual

Lilin IPR732ES User manual

Lilin

Lilin IPR732ES User manual

Lilin ZG1232E User manual

Lilin

Lilin ZG1232E User manual

Lilin UFG1122 Guide

Lilin

Lilin UFG1122 Guide

Lilin H.264 User manual

Lilin

Lilin H.264 User manual

Lilin iMEGAPRO IPD2122ES User manual

Lilin

Lilin iMEGAPRO IPD2122ES User manual

Lilin IPS2102E User manual

Lilin

Lilin IPS2102E User manual

Lilin PIH-0364X WN IP User manual

Lilin

Lilin PIH-0364X WN IP User manual

Popular IP Camera manuals by other brands

Challenger Smart Force ASFCAM2 quick start guide

Challenger

Challenger Smart Force ASFCAM2 quick start guide

Foscam FI8903W user manual

Foscam

Foscam FI8903W user manual

BenQ DVY22 user manual

BenQ

BenQ DVY22 user manual

Avigilon H4A-BO1-IR installation guide

Avigilon

Avigilon H4A-BO1-IR installation guide

Digital Watchdog DWCA-C128-64 manual

Digital Watchdog

Digital Watchdog DWCA-C128-64 manual

Ganz ZN8 Series user manual

Ganz

Ganz ZN8 Series user manual

ShareTech AV1 user manual

ShareTech

ShareTech AV1 user manual

HOME8 V33040US quick start guide

HOME8

HOME8 V33040US quick start guide

Ezviz C6C quick start guide

Ezviz

Ezviz C6C quick start guide

Melchioni UCAM 2015 manual

Melchioni

Melchioni UCAM 2015 manual

Zxtech Tropox user manual

Zxtech

Zxtech Tropox user manual

Arecont Vision MegaBall AV3146DN-3310-D-LG installation manual

Arecont Vision

Arecont Vision MegaBall AV3146DN-3310-D-LG installation manual

Mitel 6800i Series Administrator's guide

Mitel

Mitel 6800i Series Administrator's guide

Vitek VTC-IR403-212NP quick start guide

Vitek

Vitek VTC-IR403-212NP quick start guide

THOMSON DSC - 323W user guide

THOMSON

THOMSON DSC - 323W user guide

ACTi TCM-5311 Hardware user manual

ACTi

ACTi TCM-5311 Hardware user manual

Eneo MCB-64A0003M0A Quick installation guide

Eneo

Eneo MCB-64A0003M0A Quick installation guide

deView electronics CBDNI36F instruction manual

deView electronics

deView electronics CBDNI36F instruction manual

manuals.online logo
manuals.online logoBrands
  • About & Mission
  • Contact us
  • Privacy Policy
  • Terms and Conditions

Copyright 2025 Manuals.Online. All Rights Reserved.

F I G . 6
F I G . 4
4. Next, use the provided M5.0x10 screws (silver-2pcs) to secure the camera body to the
bracket with the screwdriver (FIG.6).
Instruction Manual
Part Description & Dimension
AHD IR CAMERA
Unit: mm
Installation
5. Loosen the pan and tilt adjustment screw on the bracket to turn the camera
body to the desired angle and then tighten the screw (FIG.7). 
6. Tighten the screws (FIG.8) after adjusting the focus and zoom of the lens for
optimal video image.
1. Remove the bracket from the box first. Insert the power cable and video cable through the
bracket and then secure the bracket to the wall (FIG.1 & FIG.2).
2. Next, remove the camera body and open the top cover with the included hexagon
screwdriver (FIG.3). 
66-AHD742ACSE-1
SU N SH IE LD
TO P CO VE R
BO TT OM C HA SS IS
BR AC KE T
PA N AD JU ST ME NT SC RE W
TI LT A DJ US TM EN T S CR EW
LE NS
F I G . 1 FIG.2
F I G . 3
3. Insert the power cable and video cable through the bracket rubber and then through
the bottom of camera body (FIG.4). Secure the power cable to the terminal and connect
the video cable to the video output of the camera (FIG.5).
 
 
F I G . 7
F I G . 9 F I G . 1 0
7. Close the top cover and tighten the screws (FIG.9 & FIG.10).
105
109
200
231
160
90
70
80
13
F I G . 5
L N
Note :
When using two-cord
power cable, please
connect them to
"Live" and "Neutral".
Live
Earth
Neutral
F I G . 8
F O C U S
Z O O M
8-1. USER OS D SET TIN G
A. (UP)
B. (LEFT)
C. (RIGHT)
D. (DOWN)
E. SET : Executes se lec ti o ns a n d di s pl ays a s ubm enu f or an
item with th e mark.


: Press to mov e the c urs or up war ds o r t o se l ec t ite ms.
: Press to mov e the c urs or to t he l e ft a n d to s ele ct or
adjust the p ara met ers o f the s el e ct e d it em.
The parame ter s cha nge s eac h ti m e th i s bu tto n is
pressed.
: Press to mov e the c urs or to t he r i gh t a nd s ele ct or
adjust the p ara met ers o f the s el e ct e d it em. The
paramete rs ch ang es ea ch ti me t h is b utt on is p res sed .
: Press to mov e the c urs or do wnw ard s or t o s el e ct
items.
8. Connect to an Up-the-Coax (UTC) digital recorder that supports AHD-Coaxial
protocol. Then use the 8-directional buttons (FIG.11) to adjust settings for the
best images.
.
SET
UP
DOWN
RIGHTLEFT
F I G . 11
Lens
System
Model No.
Pick Up Element
Effective Pixels
Scanning System
Menu Control
Sync. Mode
Infrared Cut Filter
Resolution
Minimum Illumination
S/N Ratio
UTC
Auto Gain Control
White Balance
Shutter
Auto
Manual
Back Light Compensation
D-WDR
Sense-Up
Noise Reduction
Defog
Privacy Masking
Privacy Masking Zone
Video Output
IP Rating
Window
Infrared
LED Beam Spread
Radiant Distance
OSD Language
Power Input Voltage
Focal Length
Iris
Angle of View
H
V
D
NTSC or PAL
1/2.9" CMOS Image Sensor
1,984(H) x 1,105(V)
Progressive Scan
OSD Control
Internal
Auto Selectable, Automatic Switch from Color Mode to Monochrome
1,920(H) x 1,080(V) @ 30/25fps
0.02Lux / F1.4, 0Lux (IR On)
More than 55dB (AGC-Off)
AHD-Coaxial protocol Supported
AUTO (16 Steps)
ATW / AWC / INDOOR / OUTDOOR / MANUAL / AWB
1/60(1/50)S - 1/50,000S
1/30(1/25)S, 1/60(1/50)S, FLK, 1/240S, 1/480S, 1/1,000S, 1/2,000S,
1/5,000S, 1/10,000S, 1/50,000s
OFF / BLC / HSBLC
OFF / ON / AUTO
OFF / AUTO (X2 ~ X30)
2DNR & 3DNR
OFF / AUTO
OFF / ON
4 Zones
AHD1080P / AHD720P / 1280H
IP66
ψ92 Heat Resistant Glass
850nm
30°
70M
ENG / CHN1 / CHN2 / GER / FRA / ITA / SPA / POL / RUS / POR /
NED / TUR / KOR / JPN / HEB / ARB
AC24V 10%±
D/N 1080P AHD VARI-FOCAL IR CAMERA
AHD7424AX4.2
Power Consumption 9W
1500g
Design and specification are subject to change without notice.
Operating Temperature
Dimensions
Weight
-40 C - +50 C° ° ° °(-40 F - 122 F)
Body: 121.5mm(W) x 109mm(H) x 231mm(D), Bracket: 160mm(L)
2.8 - 12mm
91 - 28° °
67.5 - 21.2° °
120.8 - 36° °
F1.4
Peak Wavelength
AC100-240V
AHD7428AX4.2
Specifications
MAIN
MENU
LENS
EXPOSURE SHUTTER AUTO/ 1/30(1/25)/ 1/60(1/50)/ FLK~1/50000/ X2~X30-
OFF
OFF
OFF
BRIGHTNESS (1~100)
SENS-UP
DEFOG
AGC 0 15~( )
AUTO SENS-UP (X2~X30)-
AUTO
ON LEVEL (0~8)-
AUTO
D-WDR
Menu Map
MANUAL
MODE
DC
IRIS SPEED (0~15)
INDOOR
OUTDOOR
POS/SIZE POSITION/ SIZE-
GRADATION (0~2)
DEFAULT
MIN SHU 1/30(1/25)-
MAX SHU 1/60(1/50)~1/50000-
BACKLIGHT
DAY&NIGHT
SPECIAL
NR
WHITE BAL ATW
AWC SET→
INDOOR
OUTDOOR
MANUAL
AWB
OFF
EXT
CAM TITLE
2DNR MIDDLE/ HIGH/ OFF/ LOW-
HSBLC
COLOR
MOTION
BLC
AUTO
D-EFFECT
B/W
3DNR MIDDLE/ HIGH/ OFF/ LOW-
LEVEL MIDDLE/ HIGH/ LOW-
D N (DELAY) 0~60→-
OFF
OFF
ON POSITION/ SIZE-
VIEW TYPE ALL/ OFF/ BLOCK/ OUTLINE-
OFF
SELECT AREA 1/ 2/ 3/ 4-
D N (AGC) 1~255
→-
FREEZE-OFF/ ON
SELECT-AREA 1/ 2/ 3/ 4
BURST-OFF/ ON
AREA POSITION/ SIZE-
N→D (DELAY) 0~60-
ON
ON
OFF
OSD VIEW ON/ OFF-
ALARM OUT. ON/ OFF-
TIME (1~15)
ON
DISPLAY
D N (DELAY) 0~60
→-
MIRROR-OFF/ MIRROR/ V-FLIP/ ROTATE
DISPLAY
IR SMART
N→D (AGC) 1~255-
NEG. IMAGE-OFF/ ON
SENSITIVITY (0~100)
COLOR GREEN/ BLUE/ WHITE/ RED-
TRANS 1.00/ 0.75/ 0.25/ 0.00-
ALARM
DEFAULT
DEFAULT
BLACK MASK ON/ OFF-
N→D (DELAY) 0~60-
LEVEL (0~100)
MODE
DEFAULT
ON POSITION/ SIZE-
OFF
ALL DAY
NIGHT AGC LEVEL (0~255)-
BLUE (0~100)
RED (0~100)
LEVEL (0~15)
AREA POSITION/ SIZE-
PRIVACY
DEFECT
OFF
SELECT AREA 1/ 2/ 3/ 4-
ON
COLOR WHITE/ BLACK/ RED/ BLUE/ YELLOW/
CYAN/ USER
-
GREEN/
TRANS. 1.00/ 0.25/ 0.50/ 0.75-
DEFAULT
DISPLAY COLOR POSITION/ SIZE-
OFF
MOSAIC POSITION/ SIZE-
INV.-POSITION/ SIZE
LIVE DPC
WHITE DPC
BLACK DPC
ON
ON
ON
OFF
OFF
OFF
LANGUAGE ENG/ CHN1/ CHN2/ GER/ FRA/ ITA/ SPA/ POL/ RUS/ POR/
TUR/ KOR/ JPN/ HEB/ ARB
-
NED/
AGC LEVEL (0~255)
POS/ SIZE POSITION/ SIZE-
LEVEL (0~100)
START CLOSE THE IRIS THEN PRESS
ENTER
-
START PRESS ENTER-
DPC VIEW OFF/ ON-
DPC VIEW OFF/ ON-
LEVEL (0~60)
LEVEL (0~100)
AGC (0~14)
SENS-UP (X2~X30)
ADJUST SHARPNESS AUTO LEVEL (0~10)
OFF
START AGC (0~255)
END AGC (0~255)
EXIT
MONITOR
LSC ON/ OFF-
VIDEO. OUT NTSC/ PAL-
LCD
SAVE&END
RESET
CRT
NOT SAVE
GAMMA USER/ 0.45~1.00-
BLUE GAIN (0~100)
BLUE GAIN (0~100)
RED GAIN (0~100)
RED GAIN (0~100)
RS485 CAM ID (0~255)
ID DISPLAY
BAUDRATE 38400/ 2400/ 4800/ 9600/ 19200-
OFF
ON
HIDDEN Menu
HIDDEN MONITOR OUT AHD/ CVBS-
OUTPUT_SIZE 1080P/ 720P-
ADC TEST OFF/ ON-
AE TEST OFF/ ON-
FIRMWARE
HIDDEN
AHD
1080P
OFF
OFF
RET
2. OUTPUT SIZE
3. ADC TEST
4. AE TEST
5. FIRMWARE
6. RETURN
_
1. MONITOR OUT
Setting Menu and Function
To Open and Exi t the M enu s cre en
1. Press "SE T" to s how t he me nu on t he sc ree n. Ch ec k t he c u rr ent s ett ing s
on the menu.
2. P re s s or b utt on to s el e ct the options then us e or b u tt o n to
a mode.
SAVE&END: Save th e set tin gs of t he in te r na l O SD m enu .
: Discard th e set tin gs of t he in te r na l O SD m e nu .
RESET: Rest ore t he ca mer a set tin gs t o f ac t or y d ef aul ts.
RETURN: Re t ur n t o th e pre vio us pa ge.
EXIT: Exit th e mai n men u.


select
NOT SAVE
 
 
MAIN MENU
OFF
ATW
EXIT
SAVE&END
MANUAL
2. EXPOSURE
3. BACKLIGHT
4. WHITE BAL
5. DAY&NIGHT
6. NR
7. SPECIAL
8. ADJUST
9. EXIT
1. LENS
Enter “Mai n Men u”an d ent er “2. E XPO SUR E.”P res s for three ti m es , t he n
press “SET”( i n th e c en t er o f t he 8 - di r ec t io n al b u tt o n) t o e nt e r th e “H ID D EN”
menu. Now yo u c an s wit ch be twe en AHD 1 080 p, AHD 7 20p , and C VBS .