Lincoln industrial Airless Spray System 85415 User manual

Page
Section - C8 - 281
Form 402976
Airless Spray System®
Model 85415
June 2000

Page Number - 2
Airless Spray System®
Form 402976
SAFETY
Read and carefully observe these operating instructions
before unpacking and operating this Airless Spray System.
The Airless Spray System must be operated, maintained and
repaired exclusively by persons familiar with the operating
instructions. Local safety regulations regarding installation,
operation and maintenance must be followed.
Operate this Airless Spray System only after safety
instructions and this service manual are fully understood.
Indicates a potentially hazardous
situation which, if not avoided,
could result in death or serious
injury.
Indicates a potentially hazardous
situation which, if not avoided,
may result in minor or moderate
injury.
Safety Instructions
This equipment generates very high grease pressure.
Extreme caution should be used when operating this
equipment as material leaks from loose or ruptured
components can inject fluid through the skin and into the
body causing serious bodily injury. Stay clear of the spray
nozzle as material discharged from the nozzle tip can also
inject fluid through the skin and into the body causing
serious bodily injury. Adequate protection is recommended
to prevent splashing of material onto the skin or into the
eyes.
Table of Contents
Page
Safety......................................................................................................2
GeneralDescription...................................................................................2
ProductSpecifications..............................................................................3
Operation.............................................................................................3
MaintenanceandRepair...........................................................................5
The measuring valve assembly
is precharged to 2000 PSI. Do
not attempt to disassemble or
remove any components from
measuring valve assembly
unless the discharge procedure,
as printed in this manual, is
strictly followed. Simply
disconnecting the measuring
valve assembly from the
lubricant supply source will not
discharge this assembly.
Failure to heed this warning may
result in serious injury and will
make the spray unit inoperable.
DESCRIPTION
General Description
This Airless Lubrication Spray System consists of three
major components: 1) A pump, used to charge the system
with lubricant, Model 85416, Not included with 85415) A
measuring valve (252815), which the pump charges with
lubricant, and which measures and provides the hydraulic
force necessary to spray the lubricant through the 3) Spray
Head Assembly (252825). The Spray Head is equipped with
an electrically operated Solenoid Valve which controls the
flow of lubricant through the Spray Nozzle. See Service
Manual C8, Page 282 for pump description and
specifications. The spray tip must be ordered separately.
Appropriate Use
This Airless Spray device is exclusively designed to
dispense grease onto a Horizontal Drill Stem to aid in
disassembly of the Drill Sticks after use.
It should only be operated with approved grease
lubricants.
It should only be charged with appropriate pumping
equipment, not to exceed the maximum pressure rating
per Product Specifications.
It should be operated by an appropriate Control System
which will disable the pump when the preset pressure is
reached, as signaled by the Pressure Switch on the
Measuring Valve. The Control System must keep the
Solenoid Valve of the Spray Head closed while the pump
is operating and disable the Pump while the Solenoid
Spray Head is open in order for a measured volume of
lubricant to be discharged. The Control System must also
provide a timing device to control the time which the
Solenoid Valve of the Spray Head is open, dispensing
lubricant. Limit the Spray Valve On time to a time period
where the pressure is optimal to develop a full spray
pattern, turn Off to eliminate dribbling from the Spray
Nozzle as the pressure decays to a point where there is
insufficient pressure to develop a good spray pattern.

Page Number - 3
Airless Spray System®
Form 402976
will be disabled and the stored Accumulator pressure will
force the Measuring Piston to move, forcing the lubricant out
of the Measuring Valve outlet, through a hose or tube into the
Spray Head, through the Solenoid Valve and out the nozzle
onto the work surface. When the Timer times out, the Spray
Solenoid will close and the Pressure Switch, sensing low
pressure, will turn on the Pump to refill the measuring
chamber for another cycle.
Heating the Airless Spray System
To maintain an optimal and predictable spray pattern, the
measuring valve, spray head and interconnecting supply
line should be kept warm. The temperature of the lubricant
should be kept as constant as possible for a consistent
spray pattern. The amount of heat used is dependant upon
the characteristics of the lubricant and the ambient
temperatures to be encountered.
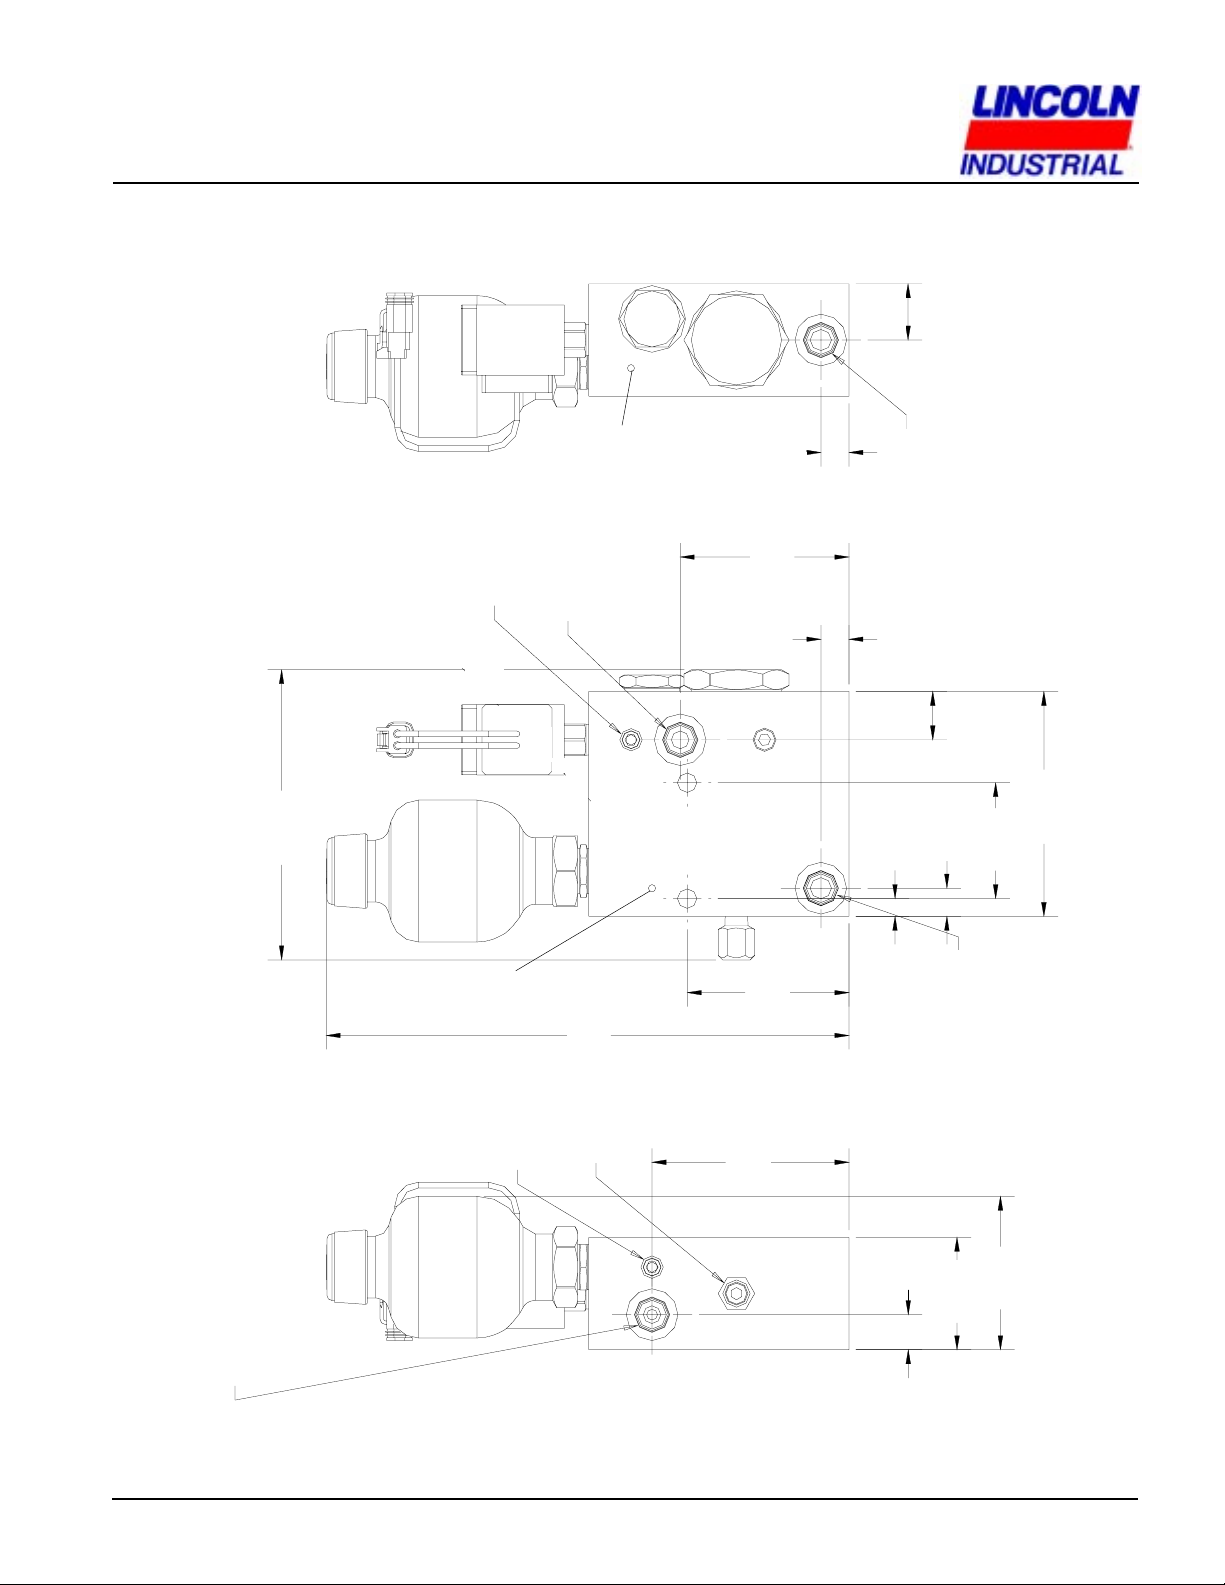
Heating ports are provided in the spray head and measuring
valve to facilitate the application of heat to the system.
These ports may be used to circulate a warming fluid in a
series loop through the spray head and measuring valve. A
heat trace line may also be part of this loop to keep the
interconnecting supply line warm as well.
The heating loop may consist of the return or supply line of a
hydraulic circuit which has enough fluid circulating through it
to keep the components warm. The engine cooling system
may also be used. Temperatures should be as consistent
as possible once the machine has warmed up and is in
operation.
Spray tips should be selected on the basis of the lubricant
temperature once the machine is warmed up and in
operation. Generally, as the lubricant gets hotter, the spray
pattern will get wider and become more atomized, for a
given spray tip. If the lubricant is too cold, the lubricant spray
pattern will be very narrow, become a solid stream, or will
not spray at all.
Lubricants
This system was designed and tested with grease
lubricants. Lubricants with high viscosities, large particles
and with very tacky properties should be avoided. Any
lubricant should be tested in the system before the lubricant
is committed to long term use.
Lubricants with large particulates may cause blockages in
the spray tips and valves used in the spray system. Any
particulates will act as an abrasive and cause premature
wear on these components.
A lubricant change may require a change in spray tips. A
change in lubricant properties will change the spray
characteristics.
The controller may also be used to synchronize timing of
the spray with the movement of a machine part.
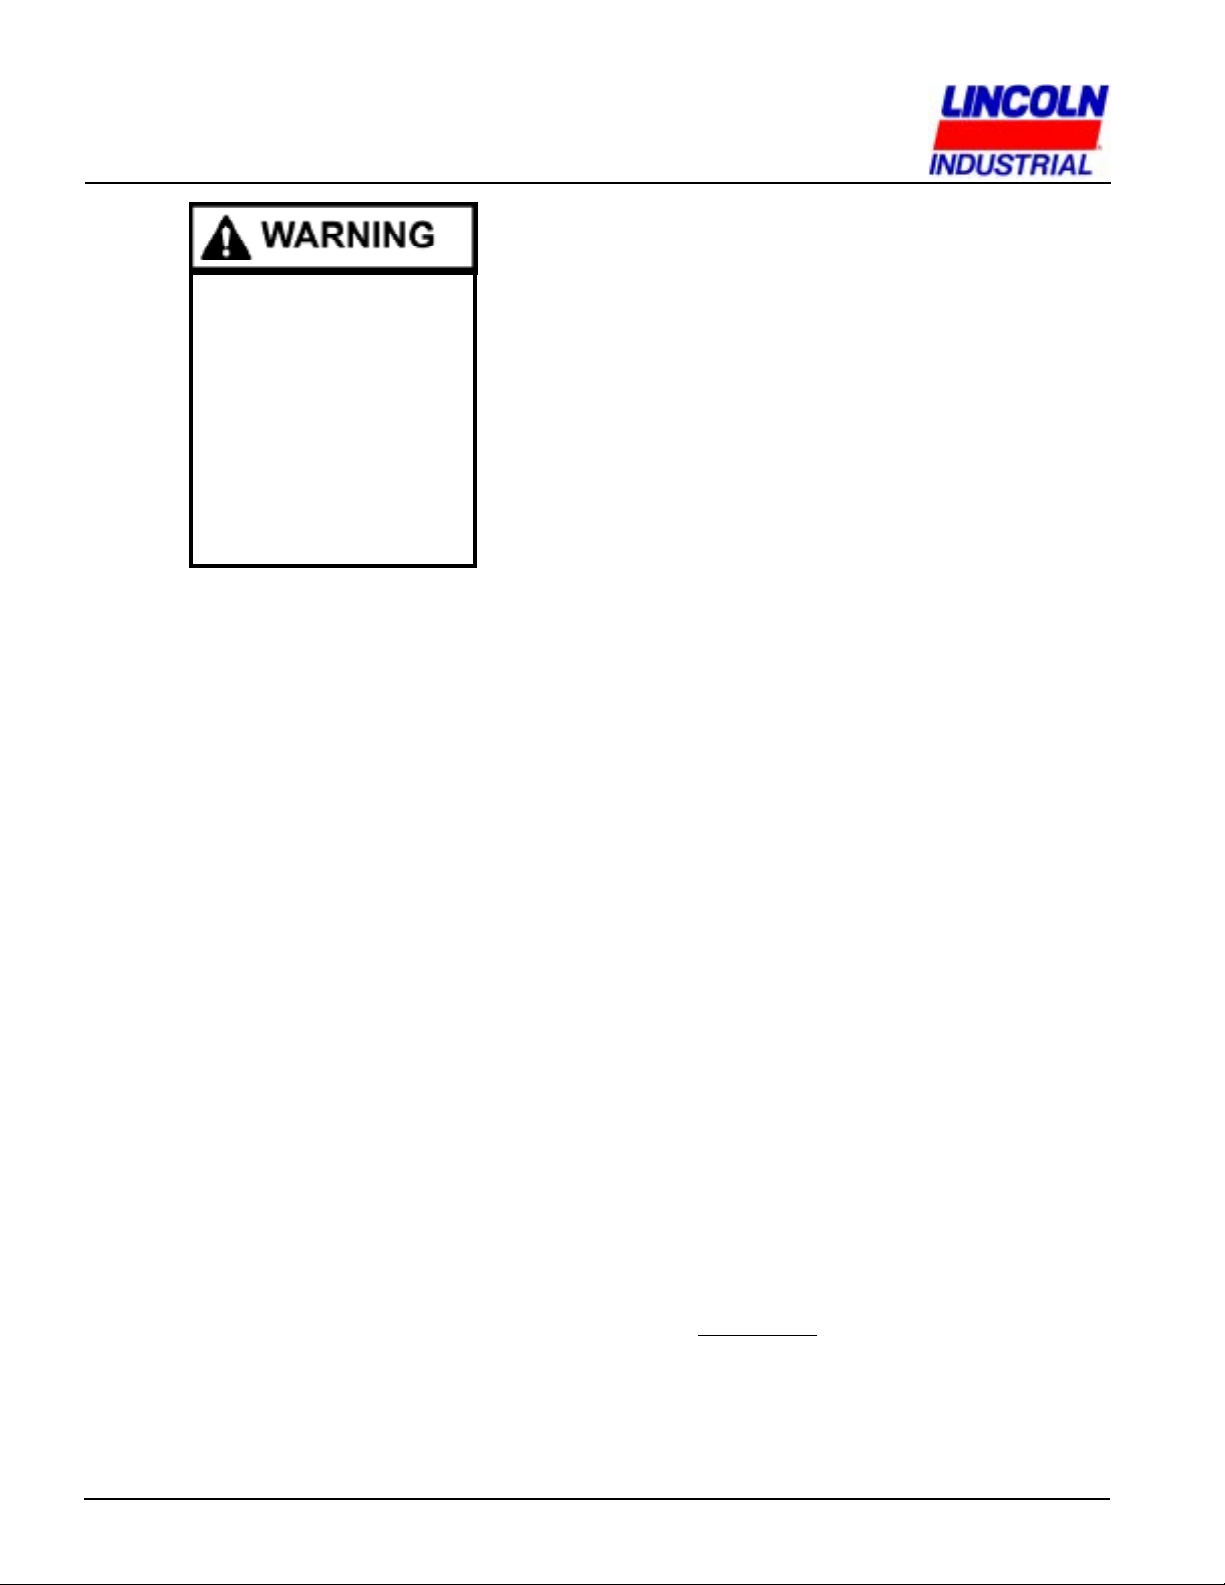
The measuring valve and spray head assemblies are
supplied with ports for conducting heated fluid. These
heat ports may be connected into an existing source of
heat, such as hydraulic return lines or engine coolant
lines to provide heat for predictable spray patterns. A
relatively constant temperature fluid (while in operation)
between 80° F min. and 160° F. max. should be used.
Spray tips should be selected based on the lubricant to
be sprayed and the temperature of the lubricant as it
passes through the spray system.
Product Specifications
Output per Cycle - .500 in³ max. (8.2 cc)
(dependant on spray ON time)
Pressure Switch Preset
Pressure - 4500 psi (310 bar) max.
Output Pressure - 4500 psi (310 bar) max.
Operating Temperature* - -20° to 160° F (-28° C to 71° C)
Operating Voltage - 12 VDC
Initial Current - 1.2 amps
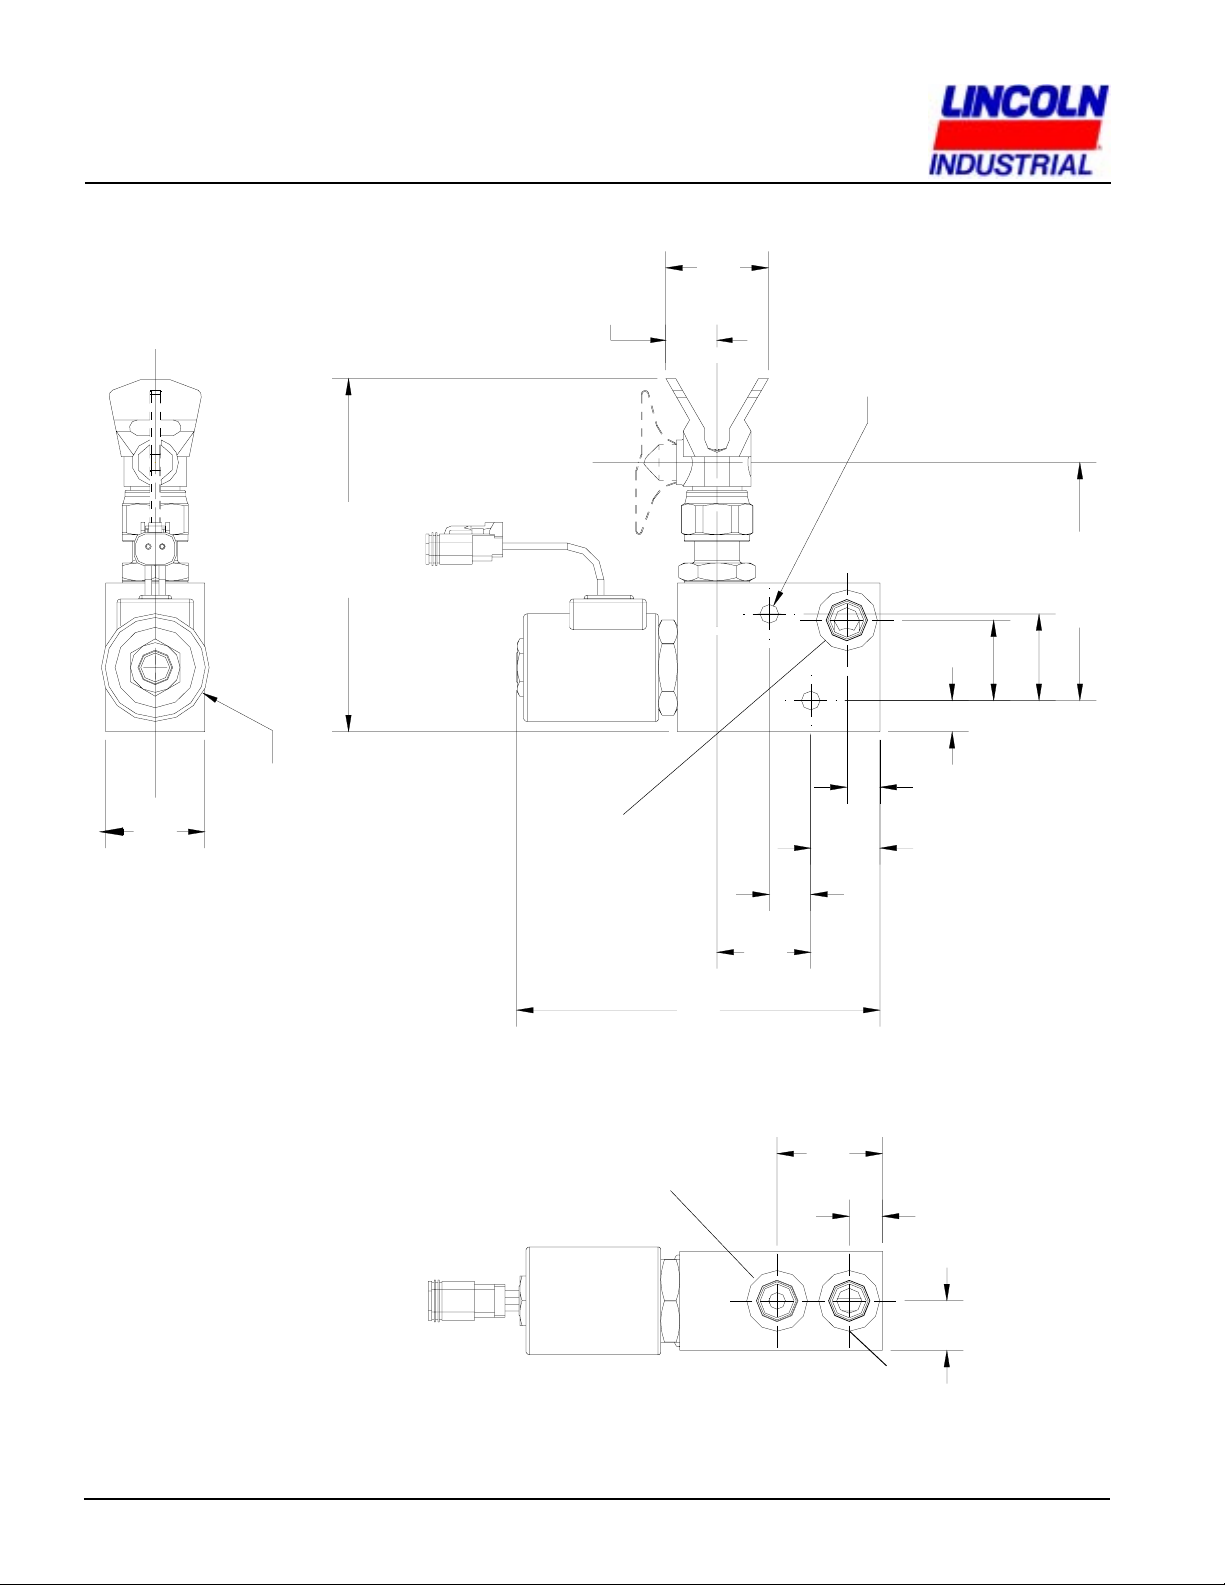
Material Inlet
(measuring valve) - 3/8 SAE J-1926 (9/16 - 18 UNF)
Material Outlet
(spray head) - 1/2 SAE J-1926 (3/4 - 16 UNF)
Interconnecting Ports - 3/8 SAE J-1926 (9/16 - 18 UNF)
Pressure Switch Contacts - 5 Amps @ 125/250 VAC
Initial Hydraulic Charge
(measuring valve) - 2000 PSIG (138 bar)
Initial Pneumatic Charge
(measuring valve) - 1500 PSIG (103.5 bar)
* To achieve consistent spray material temperature, pump to
be maintained at +80° F to 120° F.
Spray tip must be ordered separately and selected based on
lubricant and pattern desired.
OPERATION
When the Pressure Switch, mounted on the Measuring Valve
senses low pressure on the Measuring Valve Chamber, it
signals the control unit to turn on the pump and begin filling
the Measuring Chamber with lubricant. Due to the hydraulic
and gas pre-charge on the Measuring Valve and
Accumulator respectively, initial charging of the lubricant will
begin at 2000 psi. The Pump will continue to charge the
Measuring Chamber, moving the Measuring Piston in its
bore against the precharged hydraulic circuit and
accumulator pressure. The Check Valve will prevent any
lubricant from escaping the Measuring Chamber, and the
Solenoid Valve will prevent lubricant from flowing out of the
Spray Nozzle. When the pressure inside the Measuring
Chamber reaches the pressure switch set point, the Pump
is turned off, the Spray Valve is enabled and a ready light is
turned on, indicating the system is ready to spray. A push
button or other device is used to initiate the spray cycle at
the Control Unit. When the spray cycle is initiated, a timer
will begin to time, the Solenoid Valve will open, the Pump

Page Number - 4
Airless Spray System®
Form 402976
1. Mount the Measuring Valve on an even, stable, solid
surface with (2) 5/16 mounting bolts through the holes
provided.
2. Connect the Material Supply Line from the Spray Head to
the Material Outlet of the Pump (see above).
3. Connect the Material Supply Line from Pump to the
Material Inlet of the Measuring Valve using suitable
adapters (see pump owners manual).
4. For best results, heat should be applied to the
measuring valve. Use the heating ports provided, as
recommended above.
5. Connect the Pressure Switch to the Control Unit, using a
Deutsch Connector. Switch contacts: normally open.
Installing the Pump
Install the pump per the Pump Owners Manual instruction.
The pump should be mounted in a warm environment (70°
to 100° F) for optimal performance. If using Lincoln Pump
Model 85416, the control unit will have to cycle the pump on
and off to supply enough material to fill the spray system
with each cycle. See Pump Owners Manual.
Purge the System of Air
See the Pump Owners Manual for Purging and Priming the
pump with lubricant.
Air may be purged from the Pump Supply Line by operating
the Pump (after it is primed) and opening the Material Dump
Valve on the front face of the Measuring Valve, until grease,
free of air, flows out the Material Dump Valve Discharge Port
on the side of the Measuring Valve. Stop pump and close
the Material Dump Valve by tightening the Set Screw
securely on the ball.
Continue to prime the system by loosening the hose/tube
connection to the Spray Valve at the Spray Valve Material
Inlet. Operate the Pump again until lubricant, free of air,
flows out the fitting. Turn off the Pump and tighten the fitting
securely. Restart the Pump and allow it to build pressure in
the system until the Ready Light turns on. Check for leaks
in all interconnecting hoses/fittings.
Make sure the area around the
Spray Head and work surface
is clear, keep hands or any other
body parts out of the Spray Nozzle
path. Ensure that Spray Head is
securely mounted and cannot
come loose and spray in the
direction of any personnel.
Mounting the Spray Head
The spray head may be mounted in any position. It should
be situated so that the spray head is directed to the work
surface.
Never mount the Spray Head in
a position where the material
spray can be directed at any
person in the area of operation.
Mounting above the work
surface will keep any residual
spray material on the work
surface, after the spray cycle is
completed. Mount the Spray
Head as close to the Measuring
Valve as possible. Long hose
or tubing connections between
Spray Head and measuring valve
will degrade spray patterns
considerably. Use a 1/2 I.D.
hose or larger and keep the
length under 7, between Spray
Head and Measuring Valve.
1. Mount securely to an even, stable and solid surface with
two 1/4 bolts through the two mounting holes provided.
2. For best results, the spray head should be heated.
Heating ports are provided in the spray head body for this
purpose. A possible source of heat would be a hydraulic
return line from a device which is in operation while the
machine is in operation. Engine coolant could also be
used.
3. Connect a 1/2 min. material supply line with suitable
adapters, between spray head and measuring valve. For
best results, this line should be heated and insulated.
The heat supply lines for the spray head may be used as
a heat trace line along the material supply line. Insulate
all lines together for best heat transfer.
4. Install the spray tip into the roto-clean spray head. See
instructions packaged with the tip for installation.
5. Connect the Solenoid Valve to the Control Unit using a
Deutsch connector at the Solenoid Valve. The control
unit must be capable of supplying 12 VDC at 1.2 amps to
the Solenoid Valve.
Mounting the Measuring Valve
The Measuring Valve may be mounted in any position. It
should be located in an area which is warm (70° to 100° F) for
optimum performance. It should be mounted as close to the
Spray Head as possible (see above). It should be placed in
an area where it will not interfere with any moving parts of the
machine.

Page Number - 5
Airless Spray System®
Form 402976
Dirt or debris in spray nozzle
can cause spray pattern to
discharge in an unpredictable
pattern, even outside of the
projected spray area. Keep clear
of Spray Head and keep distance
between anyone and spray when
operating.
Make several trial spray shots by initiating a spray cycle.
Adjust the Spray Nozzle as necessary to obtain the desired
spray pattern.
Disable and lockout the Spray
System while any adjustments
are made. Discharge the Spray
System using the Material Dump
Valve to relieve any pressure on
the Spray System. When using
the Material Dump Valve, keep
fingers, hands and other body
parts away from the Material
Dump Valve Discharge Port.
Keep any personnel out of the
line of fire of the Dump Valve
Discharge Port. Lubricant will
travel out the hole at a high
velocity and could be injected
into the skin or eyes. Open the
Material Dump Valve very slowly
with an Allen Wrench and close
after adjustments/repairs are
complete.
Adjust the Control Unit Timer for spray time to suit the
system requirements.
MAINTENANCE AND REPAIR
Clearing a clogged spray tip
This unit is supplied with a roto-clean spray head which
allows the operator to clear a clogged spray tip without tools
or disassembly. To clear a clogged tip:
1. Turn off electrical power to the spray system
2. Rotate the roto-clean spray tip handle so that arrow on
handle points away from spray head outlet.
3. Reapply power to the spray system.
4. Place a container under spray head outlet to catch
lubricant.
5. Initiate a spray sequence. This will force lubricant
backwards through the spray tip flushing dirt and
debris out of the tip.
6. Rotate the roto-clean spray tip handle so that arrow
points in direction of spray head outlet. Resume normal
operation.
Frequent tip clogging may indicate that dirt or other foreign
matter has entered the spray system necessitating the
flushing or disassembly and cleaning of the entire system.
Spray Tip Replacement
As the spray system is in normal use, the spray tips will
wear causing degraded spray patterns. Tip wear will
depend on the lubricant in use. Lubricants with high
particulate content will wear the tips more rapidly than
lubricants with lower particulate content.
1. Turn off electrical power to spray system.
2. Grasp Roto-Clean spray tip handle and pull out of spray
head.
3. Insert new Roto-Clean Spray tip and point arrow on
handle in direction of spray head outlet.
4. Reapply power to system and resume normal operation.
Under some conditions, the spray tip seals may need to be
replaced. This requires the removal of the Roto-Clean spray
head. When removing the spray head, turn electrical power
to the spray system and discharge the spray system by
opening the material dump valve on the measuring valve,
bleeding all pressure off the system. Follow the instructions
packaged with the Roto-Clean tip for seal and tip
replacement.
System Discharge
Any maintenance or repair of the airless spray system, other
than simple clog clearing or tip replacement, requires that
pressure is discharged from the system. This discharge is
done in two steps.
1. Discharging lubricant pressure from the system. (For
maintenance or repair of the spray valve and
interconnecting hose.)
Open the material dump valve on the face of the
measuring valve to bleed all the pressure from the
spray valve and interconnecting hose/line. Lubricant
will be expelled from the dump valve port. Keep
fingers, hands, eyes, etc. away from direction of
discharge path. Leave the dump valve open until all
maintenance is completed. Close the valve and
tighten when work is finished.
2. Discharge hydraulic pressure from measuring valve. For
any maintenance or repair or measuring valve which
requires removal of any component or disassembly of
the measuring valve. Follow the above procedure before
starting to discharge the hydraulic circuit.
Table of contents
Other Lincoln industrial Lubrication System manuals
Popular Lubrication System manuals by other brands

SKF
SKF UFD20 Series Assembly instructions

Groeneveld
Groeneveld Multiline AC Series installation manual

MATO
MATO eHybrid-Greaser 230V operating instructions

Timken
Timken M-Power 300 installation instructions

MEMOLUB
MEMOLUB HPS instructions

IMI
IMI norgren Micro-Fog L68C Installation & maintenance instructions